
Our thoughts rarely go from Point A to Point B in a straight line. More likely, they flit about like a firefly caught in a jar. This is where a tool like a Mind Map comes in use.
A mind map is simply a diagram that helps to connect related ideas or concepts around a central thought. It is a great idea-capturing device to bring some order to the chaos that’s our brain. A paper and pen is the easiest tool to get started on your first mind map. But today, we will take a shot at making a mind map with Microsoft Word.
Why Mind Maps Work
By putting down ideas or thoughts on a mind map, the brain is encouraged to think from every perspective. A mind map also encourages brainstorming. Your brain will start to think about the relationships between ideas rather than look at them as a hierarchical list.
The bottom line about mind mapping is that it’s all about “visuals”—associate words with each other and add imagery to help your brain make sense of large chunks of data.
How to Make a Mind Map in Microsoft Word
There are specialized apps for creating mind maps. But if you don’t have any mind mapping software, then Microsoft Word can also be used to draw a quick mind map. But first…
Simple Rules for Effective Mind Maps
- Think of the central idea and write it down in the middle.
- Think of related ideas and place them radially around the central idea. Connect all ideas with meaningful relationships. Use lines, colored lines, shapes, pictures, etc. to graphically describe ideas and relationships.
- Leave lots of space between ideas because new filler ideas and relationships will come in as the mind map grows.
- Go with the flow.
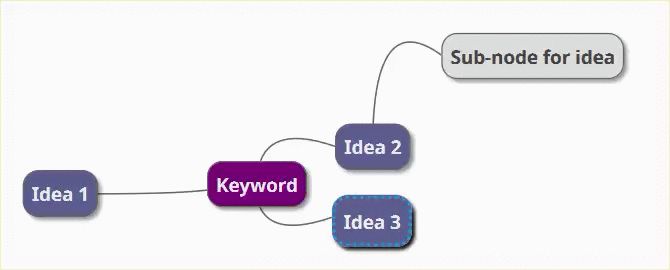
Get Familiar With the Illustrations Group in Word
We have seen how easy it is to create flowcharts in Word with the help of basic shapes and connectors. Extend it with icons, pictures, SmartArt, charts, or even videos. And the finished mind map in Word can become a professional document in its own right.
Step 1: Switch to Landscape Mode
The landscape mode gives the most horizontal area to work with. In a New Word Document, select Layout > Orientation > Landscape. If you want to finally print it, select the right Size in the Page Setup group.
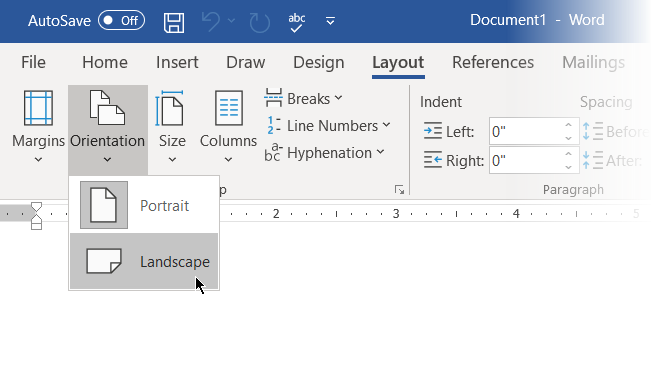
Step 2: Combine Available Shapes in Word
Most of the tools we can use lie in the Illustrations group on the Insert tab. Click on Shapes which has all basic building blocks for a mind map.
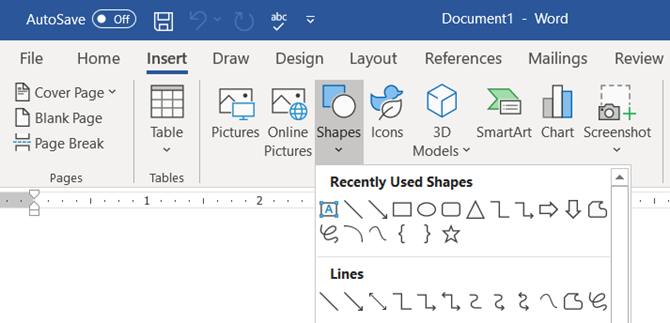
You can use simple shapes like ovals or rounded rectangles to represent the central ideas. Then, label all shapes with a Text Box.
Stretch out and connect the shapes with lines and arrows to represent relationships.
Like all other elements, you can copy and paste shapes, thus helping to put down the main ideas rapidly as nodes and sub-nodes.
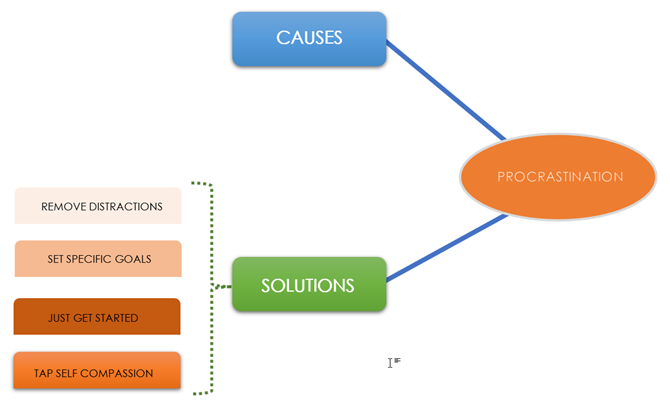
Step 3: Start Mapping With Shapes and Text Boxes
All elements can be elaborated using the full range of the Shape Styles. Drawing the first shape brings up the contextual Shape Format tab. The best thing is that a mouse-over on any tool gives us a live preview of how the diagram is turning out.

Step 4: Format Your Shapes
To change the properties of the shape, right-click on the selected shape and select Format Shape from the context menu.
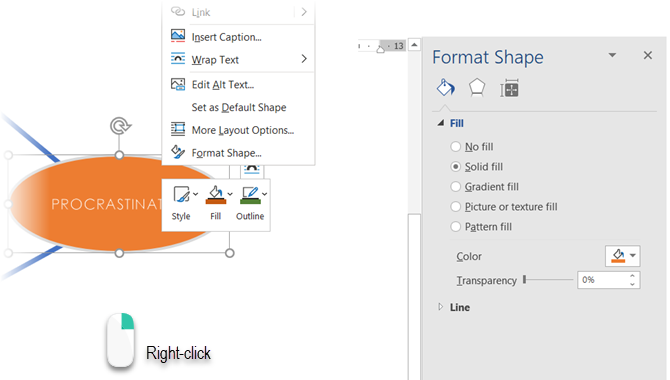
Any options for Lines connects all the nodes and sub-nodes. Lines are also Shapes and their look or angles of rotation can be similarly changed from Format Shape or from the Ribbon (double click on the shape to bring up the Format tab).
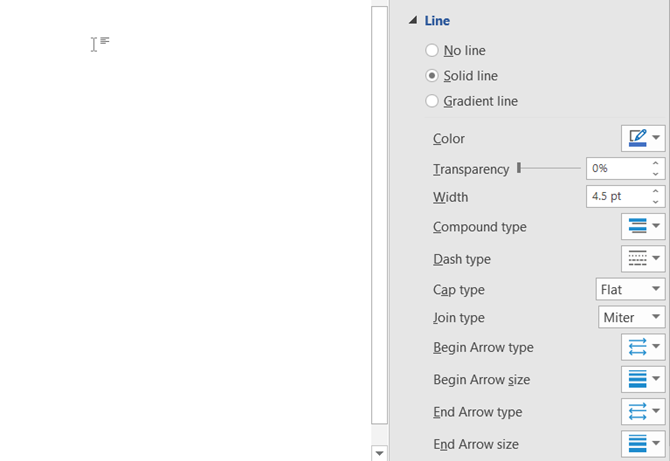
Step 5: Label Shapes and Lines
You can label shapes and lines with text to define the relationships. However, in earlier versions, Microsoft Word limits text orientation to vertical or horizontal. In Word 2016 and 2019, go to Insert > Text > Text Box and insert a Simple Text Box, which you can subsequently rotate to your preferred angle.
Mind maps can be illustrated with images sourced from your desktop or online. Instead of pictures, you can also tap into Icons to represent processes and workflows.
Go to Ribbon > Insert > Illustrations Group > Icons.
![]()
While inserting images or icons, use the corner handles to define the size of the image. You can also adjust the transparency and colorize the icons to match them with the color theme of your mind map.
![]()
Step 6: Add Notes and Links to Your Word Mind Map
Creating a mind map in Word can be extended by adding hyperlinks to external sources. But what if you want to add more detailed notes to the mind map?
A workaround to add notes or attachments within the Microsoft Word file is not there, though you can use OneNote to make Linked Notes.
The OneNote Linked Notes feature allows you to dock OneNote on one side of the open Word document and take notes. Whatever notes you take in OneNote gets “linked” to the particular Word document.
To start taking Linked Notes in Word, go to Ribbon > Review > Linked Notes.
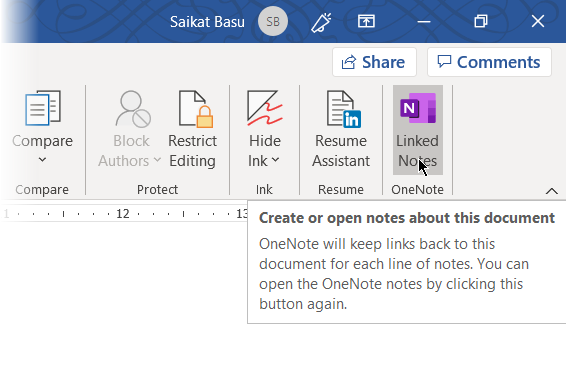
OneNote will open next to your mind map and ask you to pick a Notebook, Section, and Page for your new note with the Select Location dialog box. Choose a new page or an existing page to begin.
Start your notes in the OneNote window on the right. OneNote embeds a thumbnail image of the page, a text excerpt, and a link to the document the note is linked to. You can click on the thumbnail to open the associated mind map anytime.
To stop your note-taking session, go to the upper-right corner of the docked OneNote window. Click the chain link icon, and then choose Stop Taking Linked Notes.
Microsoft Word as a Mind Mapping Tool
Microsoft Word (and even Microsoft PowerPoint) is useful as a rapid tool for building a mind map. It’s more flexible than pen and paper because you can easily update it by adding or rearranging the topics.
You can copy it to the other Office programs and if need be, even print it out. Presenting it with PowerPoint or email sharing are added options.
But make no mistake—Microsoft Word is not a dedicated tool for mindmaps.
Mind mapping tools like FreeMind have greater flexibility. Just to cite one feature, it’s not possible to collapse and open the branch nodes in Microsoft Word. But, the crux of the matter is that Microsoft Word can make mind maps and we have shown you how to make one.
Want another tip to boost your thinking? Try these Microsoft Word templates to start brainstorming.
Read the full article: How to Build a Mind Map in Microsoft Word
Read Full Article
No comments:
Post a Comment