The April 2018 Update for Windows 10 is finally here, and that means a bunch of new features and improvements to play around with.
If you don’t have the update yet, see our post on manually downloading the April 2018 update. Notable changes include improvements to Windows Hello and more control over what data gets sent to Microsoft. But my favorite new feature? The Timeline. Here’s everything you need to know about it and how to start using it.
What Is Windows 10 Timeline?
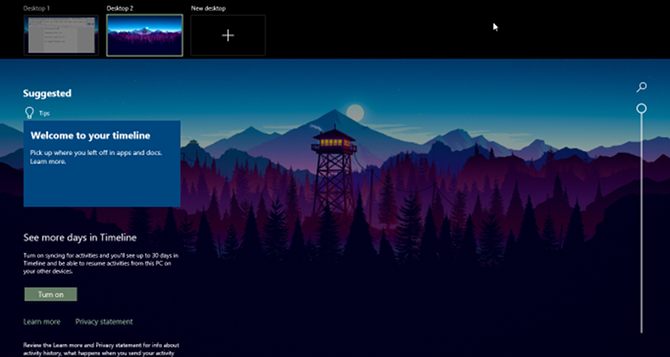
Timeline is an enhancement to the Task View feature. Task View brings up an overview of all open and running applications, similar to how Task Switcher works. But whereas Task Switcher is activated using Alt + Tab, Task View is activated using Win + Tab.
Learn more in our overview of Task View in Windows 10.
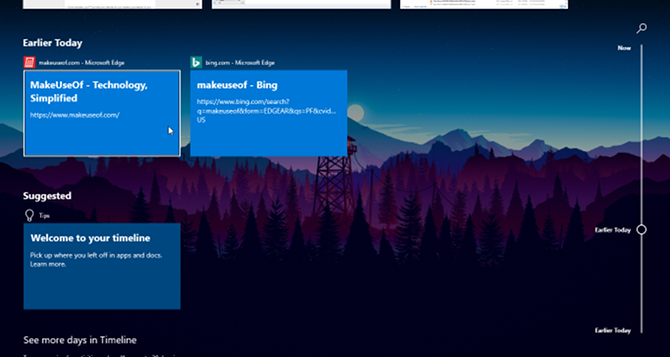
So how does Timeline factor into this? Well, with the April 2018 Update, Task View doesn’t just show currently running applications. You can now scroll down and see a “timeline” of previous apps you’ve run, documents you’ve opened, and web pages you’ve visited. It’s like a browser history, but for all of Windows 10.

Windows will also try to be smart about it, analyzing how those apps, documents, and web pages were used together. If it thinks a certain group of apps, documents, and web pages were related, it’ll group them into Activities.
Everything in Timeline is, as you’d expect, listed chronically. The most recent Activities are at the top, and as you scroll down, you start heading further and further into the past. It’s also organized into two levels: the default view shows Activities by day, but you can zoom in on a day by clicking See all activities to view Activities by the hour.
By default, Timeline will store Activities in its history for up to several days, but you can extend that to 30 days if you sync Timeline to the cloud. It’s unclear how long individual apps and documents are kept, but I suspect they’re stored indefinitely. It’s also unclear how much drive space Timeline uses, but so far it seems negligible.
Why Windows 10 Timeline Is Useful
Or in other words, how can you benefit from Timeline?
Astute readers might notice that this sounds a lot like the Recently Used Apps feature in Windows 10 (and in previous versions of Windows), but a lot smarter and more organized. The ability to swap from one Activity to another is one with a lot of promise, especially if you tend to flip between multiple projects from day to day.
As previously mentioned, Timeline also has a syncing option that lets you sync your history to your Microsoft Account, allowing you to view and access your documents from any Windows 10 device as long as you log in using your Microsoft Account. It’s a clean way to “move” your workspace (e.g. from desktop to laptop).
Timeline supports searching through Activities, apps, and documents. Timeline also works particularly well with Microsoft Office and OneDrive, which shouldn’t be a surprise. Not only is the integration tight and in real-time, but Timeline can pull in data for Office and OneDrive documents from even before the feature was enabled.
The Downsides of Windows 10 Timeline

As of right now, Activities only work with Microsoft Office and Edge. I don’t see any data from Chrome, Postbox, or any other app in Timeline.
That’s a huge drawback, to be honest, but Microsoft has left the possibility open for third-party developers to be integrated into Timeline once they create “high-quality activity cards” for their apps. So even though Timeline feels a bit primitive right now, it will likely be a lot more useful within a year or so.
Privacy is another concern. If your computer has multiple users, the Activities for other users can show up in your Timeline, and vice versa. You can disable this in the settings, but if someone else has the right permissions, they can turn it back on. Not to mention the privacy risks of syncing the data with Microsoft’s cloud.
How to Set Up and Use Windows 10 Timeline
When you first get the April 2018 Update, Timeline should be enabled by default. Just open Task View using the Win + Tab keyboard shortcut (see our guide to Windows keyboard shortcuts) and scroll down. Then click “Welcome to your timeline” for a quick walkthrough of its features.

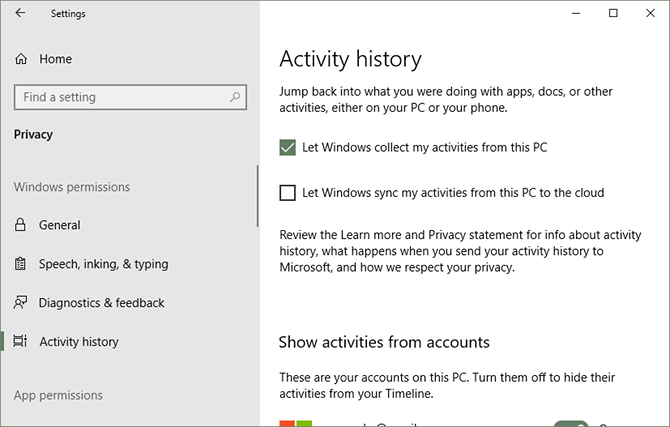
To tweak the settings, open the Settings app by opening the Start Menu and clicking the gear icon labeled Settings. In the Settings app, navigate to Privacy > Activity History. Pay attention to:
- “Let Windows collect my activities from this PC” controls whether or not the Timeline feature is enabled or disabled.
- “Let Windows sync my activities from this PC to the cloud” controls whether or not your Activities are accessible from other devices.
- Scroll down to Show activities from accounts to toggle which accounts’ Activities show up in your Timeline.
To see what Activity data is being tracked by Microsoft, visit the Activity History privacy page and explore and delete individual items. Or go back to the Settings app and click Clear to wipe all of it at once.
Other Windows 10 Features Worth Using
Timeline isn’t the only interesting feature to be added in recent months. Not long ago, Microsoft added a bunch of new features in the Fall Creators Update, including OneDrive On-Demand, the People app, and several improvements to Edge.
Moreover, there are lots of long-standing Windows 10 features you may have overlooked, such as Virtual Desktops, Storage Sense, File History backups, and Dynamic Lock (which automatically locks your PC when you step away). Windows 10 has come a long way. Don’t neglect its best aspects!
Read Full Article
No comments:
Post a Comment