11 June 2019

UK carriers warn over ongoing Huawei 5G uncertainty: Report


UK mobile network operators have drafted a letter urging the government for greater clarity on Chinese tech giant Huawei’s involvement in domestic 5G infrastructure, according to a report by the BBC.

Huawei remains under a cloud of security suspicion attached to its relationship with the Chinese state, which in 2017 passed legislation that gives authorities more direct control over the operations of internet-based companies — leading to fears it could repurpose network kit supplied by Huawei as a conduit for foreign spying.

Back in April, press reports emerged suggesting the UK government was intending to give Huawei a limited role in 5G infrastructure — for ‘non-core’ parts of the network — despite multiple cabinet ministers apparently raising concerns about any role for the Chinese tech giant. The UK government did not officially confirmed the leaks.

In the draft letter UK operators warn the government that the country risks losing its position as a world leader in mobile connectivity as a result of ongoing uncertainty attached to Huawei and 5G, per the BBC’s report.

The broadcaster says it has reviewed the letter which is intended to be sent to cabinet secretary, Mark Sedwill, as soon as this week.

It also reports that operators have asked for an urgent meeting between industry leaders and the government to discuss their concerns — saying they can can’t invest in 5G infrastructure while uncertainty over the use of Chinese tech persists.

The BBC’s report does not name which operators have put their names to the draft letter.

We reached out to the major UK mobile network operators for comment.

A spokesperson for BT, which owns the mobile brand EE — and was the first to go live with a consumer 5G service in the UK last month — told us: “We are in regular contact with UK government around this topic, and continue to discuss the impact of possible regulation on UK telecoms networks.”

A Vodafone spokesperson added: “We do not comment on draft documents. We would ask for any decision regarding the future use of Huawei equipment in the UK not to be rushed but based on all the facts.”

At the time of writing Orange, O2 and 3 had not yet responded to requests for comment.

A report in March by a UK oversight body set up to evaluate Huawei’s security was damning — describing “serious and systematic defects” in its software engineering and cyber security competence, although it resisted calls for an outright ban.

Reached for comment on the draft letter, a spokesperson for the Department for Digital, Culture, Media and Sport told us it has not yet received it — but sent the following statement:

The security and resilience of the UK’s telecoms networks is of paramount importance. We have robust procedures in place to manage risks to national security and are committed to the highest possible security standards.

The Telecoms Supply Chain Review will be announced in due course. We have been clear throughout the process that all network operators will need to comply with the Government’s decision.

The spokesperson added that the government has undertaken extensive consultation with industry as part of its review of the 5G supply chain, in addition to regular engagement, and emphasized that it is for network operators to confirm the details of any steps they have taken in upgrading their networks.

Carriers are aware they must comply with the government’s final decision, the spokesperson added.

At the pan-Europe level, the European Commission has urged member states to step up individual and collective attention on network security to mitigate potential risks as they roll out 5G networks.

The Commission remains very unlikely to try to impose 5G supplier bans itself. Its interventions so far call for EU member states to pay close attention to network security, and help each other by sharing more information, with the Commission also warning of the risk of fragmentation to its flagship “digital single market” project if national governments impose individual bans on Chinese kit vendors.


Read Full Article

Card readers at electric vehicle charging stations will weaken security, researchers say


Electric vehicle charging stations could become one of the next big targets for fraudsters — thanks to proposals in several state that researchers say would weaken their security.

Most electric vehicle (EV) charging stations rely solely on a credit card linked to an app or through contactless payments with RFID-enabled credit cards or through a driver’s smartphone. Contactless payments are one of the most secure ways to pay, cutting out the credit card entirely and reducing the chance that a card will be cloned or have its data skimmed. For charging stations — often in the middle of nowhere and unmonitored — relying on contactless payments can reduce device tampering and credit card fraud.

But several states are proposing EV charging stations install magnetic stripe credit card readers, which the researchers are prone to abuse by fraudsters.

Arizona, California, Nevada, Vermont, and several states across New England are said to be considering installing credit card readers at publicly funded EV charging stations.

“While these proposals may be well-intentioned, they could expose drivers to new security risks while providing cyber criminals with easy access to attractive targets,” wrote security researchers April Wright and Jayson Street, in a paper out Monday by the Digital Citizens Alliance, a nonprofit consumer group.

Instead, they say EV charging stations and other point-of-sale machines should continue to rely on contactless payment methods and lawmakers “should engage with the security community to better understand fraud risks associated with credit card readers.”

“These proposals would effectively reverse the industry’s careful considerations regarding EV charger payment options,” said the researchers.

Much of the issues fall on the continued reliance of magnetic stripe cards, which remains one of the most common payment methods in the U.S.

Where other nations, including the U.K. and most of Europe, have adopted chip-and-PIN as the primary way of paying for goods and services, the U.S. still relies on the insecure magnetic stripe. Hackers can easily skim the data off the credit card and repurpose a stolen magnetic stripe to commit fraud. Although chip-and-PIN is more secure than the magnetic stripe, card fraud remains a risk until chip-and-PIN becomes the primary method for making payments. Even with chip-enabled cards, fraudsters can still steal payment card numbers and card verification codes by using hidden pinhole cameras.

Credit card skimming is said to be a $2 billion industry.

Using mobile contactless payments, like Apple Pay or Google Pay, would largely render the risk from card skimming almost entirely moot, they say.

Until more secure options are used, the introduction of magnetic stripe readers at EV chargers “would represent an unnecessary risk” to drivers.


Read Full Article

RapidAPI nabs $25M led by Microsoft as its API marketplace cracks 10K APIs and 1M users


APIs — the lightweight programming interfaces used by developers to integrate other applications with theirs, or to help their apps integrate with others — have become an essential building block of our software-powered world, with a majority of organizations building and working with them and, by some estimates, upwards of 50,000 of them in circulation today.

Those numbers and popularity, however, can lead to a lot of fragmentation and disorganization in terms of discoverability. Now, one of the startups that’s building a marketplace to help fix these problems has raised funding to capitalise on the opportunity.

RapidAPI, which developers use to search for, pay and connect to public APIs, has closed a Series B round of $25 million.

CEO and co-founder Iddo Gino said in an interview that the startup plans to use the funding to continue both expanding the size of its marketplace and the kinds of tools that it provides to developers to engage with it.

Up first will be a new product aimed at developer groups, appropriately titled RapidAPI for Teams, which will help them not only manage their use of public APIs but also organise and use their own internal APIs and microservices. (The product will be free for up to five developers and charged at $10 per user per month thereafter for unlimited calls, Gino said.)

The funding comes at a time of decent growth for the startup. The company now counts 10,000 APIs in its marketplace, which it estimates covers 33% of all publicly available APIs globally (leaving lots of room still to grow); with developers using RapidAPI now standing at 1 million, who now collectively make 500 billion API calls each month from a wide variety of companies big and small, including Microsoft, SendGrid, Nexmo, Telesign, Google, Skyscanner  and Crunchbase (TC’s cousin).

Customers, meanwhile, include some of API providers along with other enterprises, including Cisco, Hyatt, SAP, Delta, and Reddit.

In addition to that we have 20,000 more APIs that are either stale (not used, mostly private) or are used by just one user in private mode so we don’t consider them in our count.

The stats RapidAPI is putting out today are all up on numbers it revealed to me last year, when I wrote about the startup’s Series A. (Then, it had 8,000 APIs, 500,000 developers and 400 billion calls.)

It now also has some 50 employees spread out between San Francisco, Tel Aviv and Ukraine.

The Series B — which brings the total raised by RapidAPI to around $38 million — is being led by M12, the VC arm of Microsoft, with DNS Capital and previous investors Andreessen Horowitz and Green Bay Capital also participating.

Microsoft’s involvement is strategic and notable: the company has long been building itself as the go-to platform for all things developer, a strategy that goes back years but more recently has extended to its big investment in its Azure cloud platform, as well as its acquisition of code repository GitHub, among many other moves. You can easily see how well something like RapidAPI could complement those existing tools.

“Responding to the torrid growth of the API economy, RapidAPI is changing the way businesses scale with APIs and microservices,” said Mony Hassid, General Manager and Managing Director at M12, in a statement. “We are excited about the potential for RapidAPI to enhance developers’ productivity, streamline duplicative work, and assist to combine API contracts.” Hassid also has now joined RapidAPIs board of directors.

From what we understand, Microsoft wasn’t the only strategic company that was eyeing an investment in RapidAPI in this round. But Iddo Gino, the company’s young founder, said in an interview that the terms of this deal were very clear and the company is very free to pursue partnerships with others, including Microsoft competitors.

Competitors are top of mind for RapidAPI in another regard, too. As you would imagine, the popularity of API usage — which extends not just to software but a number of hardware devices and IoT devices that the software powers — has led to a number of companies that are all going after the same business.

Companies like Zapier and IFTTT (also backed by Andreessen) provide directories of apps that can be connected together; and ProgrammableWeb also has offered a longstanding API directory, although Gino argues that it incorporates less of the tools that RapidAPI offers. He noted that he sees Manifold, which is a much larger cloud services marketplace, a more direct competitor.

The proliferation of tools for developers, and more specifically those aimed at helping developers work with APIs, will inevitably lead to more consolidation, with bigger fish swallowing up some of the minnows, or the minnows coming together for a stronger proposition to the market. RapidAPI has already been a beneficiary of that trend: it acquired Mashape in 2017, leading to a nice bump in its user numbers. And there could be more of that to come.

While RapidAPI has focused up to now on public APIs, the turn with teams to private APIs will open the door to a whole new set of services and use cases that speak to another kind of growth for the company. Citing a survey by Ping Identity, RapidAPI notes that 25% of companies typically use more than 1,000 internal APIs or microservices, while another 35% have 400–1,000 internal APIs. API days are here again, it seems.


Read Full Article

Shazam for Android now recognizes music played through headphones


Shazam, the Apple-owned app that helps users identify songs playing around them, can now recognize songs you’re listening to through your headphones when using an Android phone or tablet.

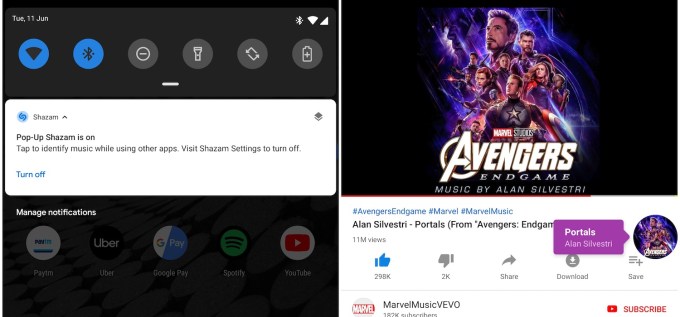
Acquired by Apple for $400 million last year, the company introduced a feature called ‘Pop-Up Shazam’ to its Android app this week that, when enabled, works with any other Android app to track and identify songs playing externally or internally on the phone.

It’s a feature that many users have requested for years. Prior to this, when a user would chance upon a music track in say a YouTube video, they only had two inconvenient ways to shazam the song. They could either unplug the earphones from the phone and let the audio play through the built-in speakers, or draw an earpiece close to the mic of the phone.

The new feature enables Shazam to track the audio signal beaming off of other apps, thereby not completely relying on just output from the surrounding and a phone’s speaker. The app is tapping the audio signal by using a persistent notification that floats around and could be dragged — like the ones from Facebook Messenger — and can be activated by a single tap.

In our test, the feature worked as advertised through both wired and wireless earphones (amusingly, Apple’s AirPods) and on Instagram, TikTok, and YouTube apps. iPhone users hoping to use a similar feature will likely have to patiently wait as persistent notification isn’t something that Apple’s mobile operating system currently supports. Apple could potentially find an alternative workaround in the future.

Google has taken a shot at audio recognition in recent years, too, after it introduced a ‘Now Playing’ feature in its Pixel 3 series smartphone last year. If enabled, the phone actively looks for songs playing in the surrounding, identifies them and keeps a log.


Read Full Article

Type 100 Words Per Minute With a Typesy Lifetime Subscription, Now $19.99


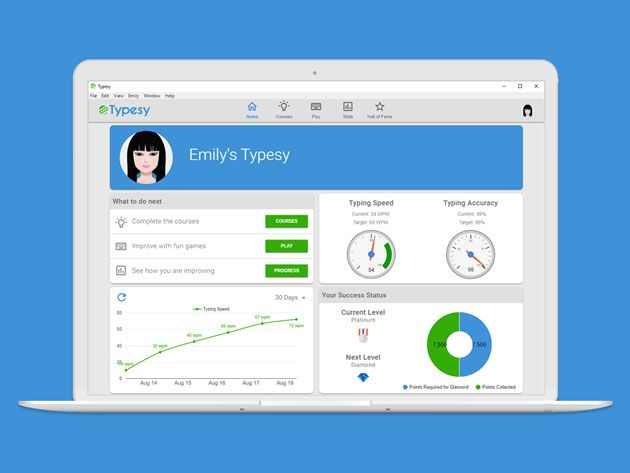
If you work a desk job, chances are that you have to write a lot every day. Most people can write about 50 words per minute, but professional typists are much faster. Typesy Typing Trainer helps you join this elite group, with a program based around fun games and typing tutorials. By following the course, you can push your typing speed up to 100 words per minute. Right now, you can get a lifetime subscription for just $19.99 at MakeUseOf Deals.

Productivity Hack

You may not realize it, but pretty much everything you do with your computer is based around typing. Creating a spreadsheet? You will need to fill out the cells. Checking something with Google? You have to type out a search term. Of course, every email and report also requires typing.

Typesy teaches you how to type faster, meaning you can complete these tasks in half the time. You learn through simple exercises, fun games and concise video tutorials, created by typing experts. You only need to practice for a few minutes each day, and Typesy provides a personalized learning experience.

The software is available to download on Windows, Mac, Linux, and Chrome, with cloud syncing between platforms. Once you finish the course, you can even claim an advanced typing certificate — a nice addition to any résumé.

Lifetime Learning for $19.99

Order now for $19.99 to get lifetime access to this highly-rated program, worth $290.

Read the full article: Type 100 Words Per Minute With a Typesy Lifetime Subscription, Now $19.99


Read Full Article

5 Free Video Conference Apps for Office Meetings and Friendly Calls

How to Open Apps When Plugging in Headphones on Android

Make Linux Look Like macOS With These Easy Tweaks


linux-like-macos

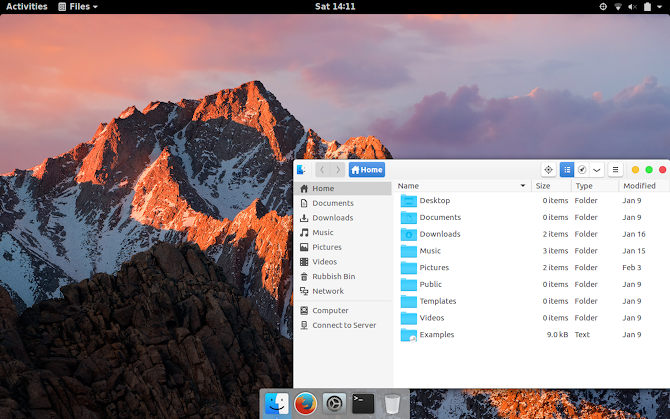
If you like Linux but enjoy the Mac aesthetic, you’re in luck! You’re about to learn the simple steps required to make your Linux desktop behave and look like Apple’s macOS.

Redesigning Linux to resemble macOS is straightforward. After all, Macintosh desktops have two defining features: the application dock and the menu bar. This guide will try and imitate them on Linux, along with other things.

How to Make Linux Look Like macOS

Making Linux resemble the macOS desktop is reasonably straightforward. However, it does depend on which desktop environment you’re using. In this guide we look at skinning Linux to look like a Mac using five desktop environments:

  • GNOME
  • Xfce
  • KDE Plasma
  • Linux Mint’s Cinnamon desktop
  • Unity

Before you get started, however, you need three things to make Linux look like macOS: a theme, the right icons, and a dock.

Basic Theming

Before anything else, if you want your desktop to look like a Mac’s, you’ll need to install the right themes. A Linux theme called macOS Sierra does exactly that. To download it, open a terminal and enter:

mkdir $HOME/.themes

You may already have a /.themes/ folder (you’ll know if the terminal puts out an error). If that’s the case, just skip this command. Next:

cd $HOME/.themes

wget https://github.com/B00merang-Project/macOS-Sierra/archive/master.zip

If you don’t have wget, just copy the link into your browser and download it manually. Make sure to place it in the /.themes/ folder!

Finally:

unzip master.zip

Later, you’ll be able to select the theme from your distro’s appearance tweaker.

Icon Themes

The Gnome Yosemite icon theme closely matches the macOS appearance. Like application themes, the way to adjust them varies between desktops. The terminal commands below just focus on installing it:

sudo add-apt-repository ppa:numix/ppa && sudo apt-get update

sudo apt install numix-icon-theme-circle

(Note that if you’re using a recent Debian-based distro, you may need to install software-properties-common to enable the add-apt-repository command.)

This theme is based on the Numix Circle icon theme, which is installed first. It doesn’t work quite as intended out of the box, so you’ll need this fix:

sudo sh -c "curl https://raw.githubusercontent.com/Foggalong/hardcode-fixer/master/fix.sh | bash"

curl https://raw.githubusercontent.com/ActusOS/GnomeYosemiteIcons/master/download_from_github.sh | sh

The second command downloads a script that automatically installs and sets Gnome Yosemite as your icon theme. If the commands don’t work, make sure you’ve installed cURL first:

sudo apt install curl

New to cURL? Here are some useful things you can do with cURL.

The Plank Dock

Apart from Unity, the other guides will assume you have Plank. It’s a taskbar that integrates well with the Linux macOS theme. To install it, enter this command:

sudo apt install plank

After this, launch the dock by entering the ALT + F2 shortcut, and entering plank --preferences.

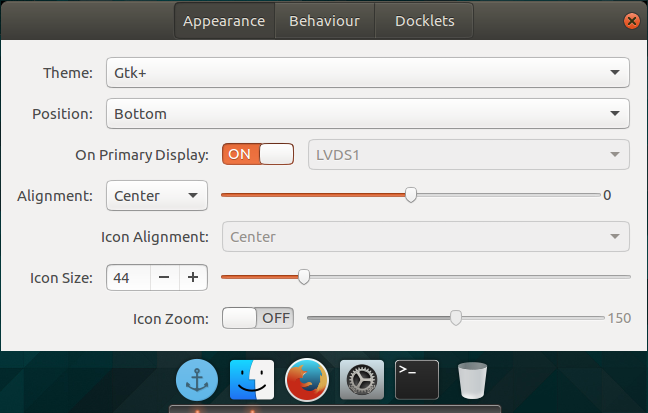
Regardless of your desktop, this should start up Plank, along with its configuration window. In the Appearance section, change the Theme to Gtk+. This will make the dock look like the one in macOS once you make some adjustments later.

Configure the Plank dock

It looks good, but you may want to hide that anchor icon. This means tweaking a hidden setting:

gsettings set net.launchpad.plank.dock.settings:/net/launchpad/plank/docks/dock1/ show-dock-item false

Now you’ve made Linux look like macOS, you’ll need to make some further tweaks to finish things off.

Tweak GNOME to Make Ubuntu Look Like a Mac

Ubuntu uses the GNOME desktop environment, and only requires a few tweaks to give it a macOS look.

The Dock

If you followed the instructions at the beginning of the article, you should now have a dock. However, to keep using it on reboot, you’ll need to add it to your startup applications. The easiest way to do this is through the GNOME Tweak Tool. Install it with this command:

sudo apt install gnome-tweak-tool

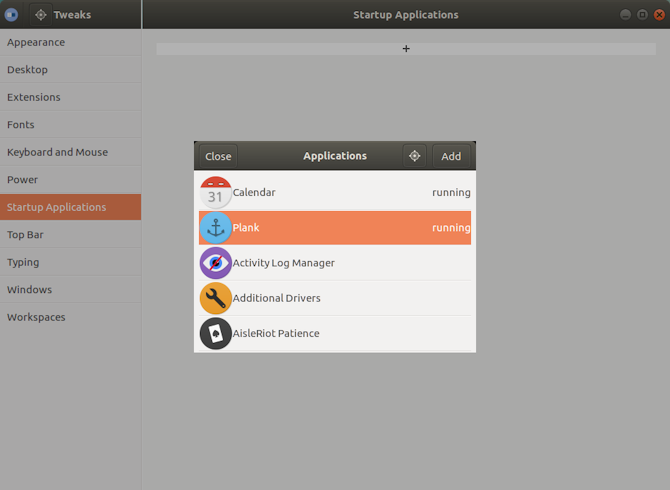
Open the program by typing in gnome-tweak-tool to the terminal. Alternately, you can just search for the program in your activities menu. Navigate to the Startup Applications entry. From there, just add Plank. If it’s already running, you won’t have to search for it—it’ll be right at the top.

Select Plank dock in the GNOME desktop

Changing the Theme

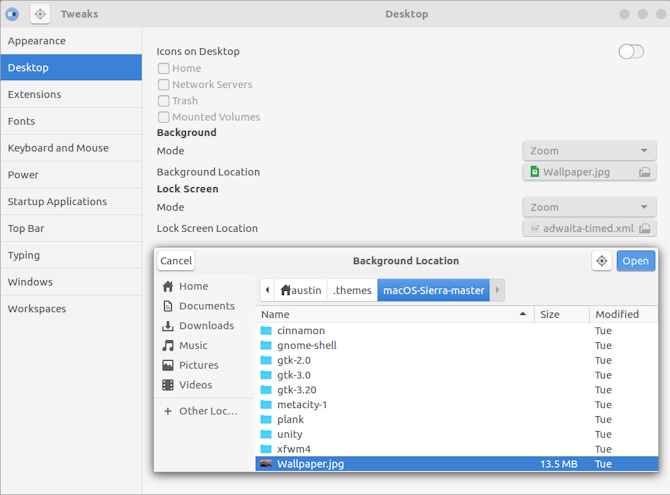
Inside the GNOME Tweak Tool, go to the Appearance section. Change the GTK+ theme to MacOS-Sierra-master. Both your application windows and the Plank dock should change in appearance. As a final touch, change your wallpaper by heading to the Desktop section in the Tweak Tool. In there, click on the Background Location button.

You’ll be presented with a way of choosing a new wallpaper. A Mac-like one is located with your theme (named Wallpaper.jpg), so navigate to it at ~/.themes/macOS-Sierra-master. You might have to show hidden files to see this folder. If that’s the case, right click in the file selection window, and click the Show Hidden Files entry.

Make GNOME look like macOS

Skin Xfce to Look Like macOS

If you’re using the Xfce desktop environment, you can get a fresh macOS look in just a few minutes. Thanks to the Yosemite GTK3 theme, your Linux box will resemble a Mac with minimum effort.

As you may know, Xfce already somewhat resembles macOS thanks to the inclusion of a dock.

Get started by downloading the Yosemite theme from GitHub.

Download: Yosemite theme for Xfce

Next, unzip the file into the /.themes/ directory in your Home folder. Follow this by opening Settings > Appearance and selecting OS-X-Yosemite.

Select a macOS theme for Xfce

The new macOS theme for Linux will be instantly applied; click OK to accept.

Make KDE Plasma Look Like macOS

With the release of Plasma 5.9, it’s possible to make KDE’s signature desktop very much like a Mac.

KDE’s offering prides itself on its power and flexibility. As such, it can match macOS in appearance a little more than GNOME can. However, it’ll take a bit more work.

Plasma’s Menu Bar

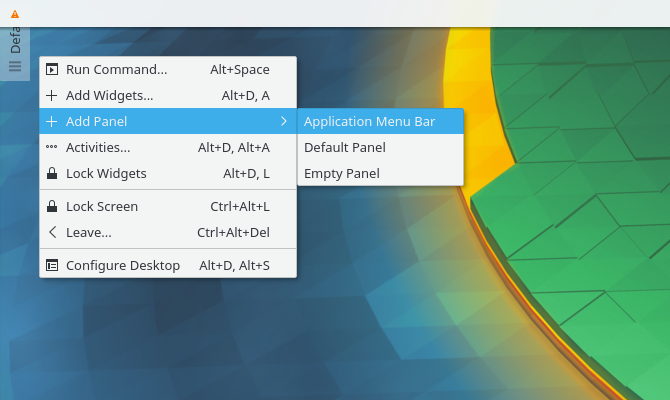
As of Plasma 5.9, you can now have a global menu just like macOS. To start off, right-click on your desktop, and select Add Panel > Application Menu Bar. You’ll get a blank panel at the top of your screen. Click on the hazard sign inside it. This will open a settings window that will let you change how application menu bars are displayed.

Set a macOS-style menu bar in Plasma

Go to Fine Tuning > Menubar style > Application Menu widget. Once you’ve applied this setting, the hazard sign should go away, and application menus should show up on top. For some reason, while the menu bar was visible in Firefox, it wasn’t functional. Your mileage may vary!

Tweak Plasma widgets to create a macOS look

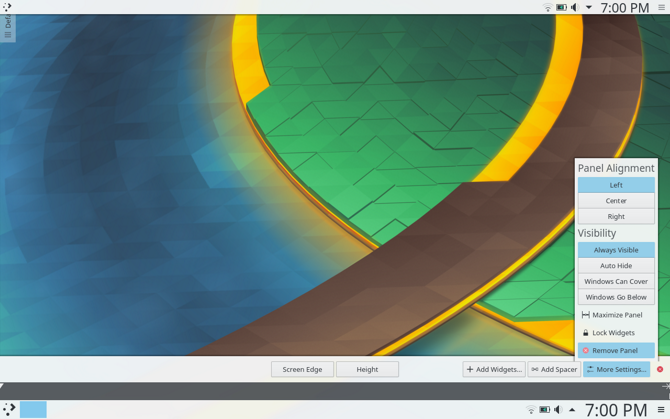
Once you’re done with this, fill the panel with some suitable widgets, by right-clicking on it, and selecting the Add Widgets option. I suggest using similar widgets to the bottom panel. After all this, remove the bottom panel by clicking on the hamburger menu and selecting More Settings > Remove Panel.

Configure the Plasma panel

Starting Plank Automatically

In your System Settings, go to Workspace > Startup and Shutdown > Autostart > Add Program. You should be able to find Plank located under Utilities. This stops you from manually starting the dock every time you log in to your desktop.

Adjusting Appearance

Interestingly, Plasma puts its icon themes in a different location. Because of this, you’ll need to move your macOS icon theme folder elsewhere. Use these terminal commands to do this:

cd $HOME/.icons

cp -r GnomeYosemiteIcons-master/ ../.local/share/icons

Now, when you open your system settings, and go to Appearance > Icons and select the Yosemite Icons icon theme.

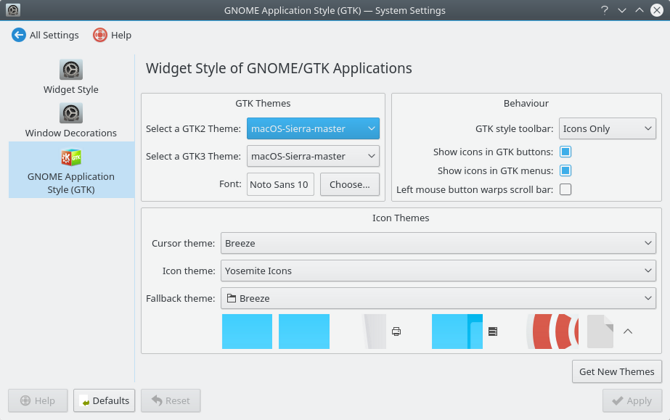
Having done this, return to the settings menu, and go to Appearance > Application Style > GNOME Application Style. Under the GTK Themes section, select macOS-Sierra-master. Then, change your icon theme to Yosemite Icons.

Make Plasma look like macOS

Then, go to Window Decorations, and select the Get New Decorations option. Search for a theme called Breezemite and install it. Set it as your decoration theme.

Finally, to hide the toolbox in the corner of your desktop, click on it and select Configure Desktop. In the Tweaks menu that will pop up, disable the Show the desktop toolbox option.

How to Make Linux Mint Cinnamon Look Like a Mac

Without any modifications, the Cinnamon desktop looks more like Windows than macOS. Fortunately, this it is very easy to change the Cinnamon desktop.

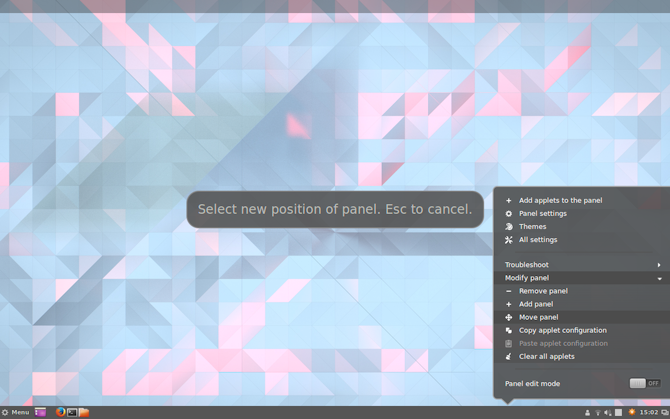
Move the bottom panel to the top by right-clicking on it, then going to Modify panel > Move panel. This should leave you with something a bit more Mac-like. Afterwards, remove the desktop icons in the panel by right-clicking on them, and selecting the Remove option.

You may also remove the window list applet (if you prefer it to a global menu) by right-clicking on it, selecting Configure the window list, then clicking the Remove button.

Configure Linux Mint Cinnamon to look like macOS

Automatically Starting Plank

If you followed the steps at the beginning of the article, Plank should be active on your desktop. However, it won’t show up on a reboot. To fix this, open the Startup Applications menu in the settings manager. From there, look for Plank in your list of applications (they’re sorted alphabetically).

Now if you restart your desktop session, you won’t have to manually start the dock up.

Themeing Cinnamon

The Cinnamon desktop needs a bit more tweaking than other desktops. Open System Settings > Appearance > Themes. You’ll be presented with a few theme options. Change everything but the Icons and Mouse Pointer entries to macOS-Sierra-master. Then, change the Icons entry to use GnomeYosemiteIcons-master.

For some final touches, you can change your wallpaper to something more Mac-like. Open the Backgrounds setting, then add the ~/.themes/macOS-Sierra-master folder as a new background directory. You may have to show hidden folders to see it.

Old Ubuntu System? Make Unity Look Like macOS

The Unity desktop is found on older versions of Ubuntu. Since it takes some cues from macOS, it’s also easy to change.

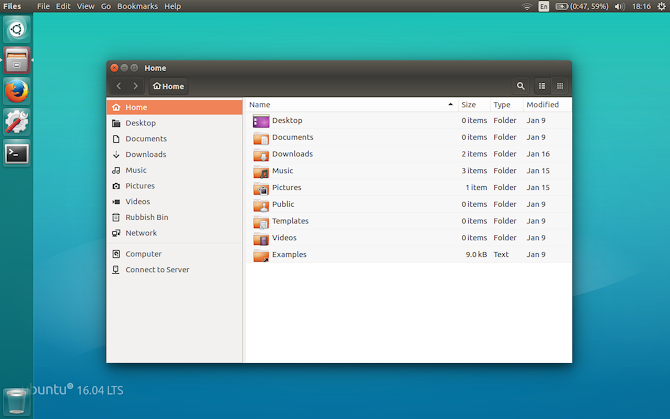
Tweak Unity to resemble macOS

As you can see, Unity already has a dock and a menu bar by default. All you need to do is make some visual adjustments. This is easily achieved using the Unity Tweak Tool, which allows you to change some hidden desktop options. Install it with this terminal command:

sudo apt install unity-tweak-tool

Having installed it, open the tool by searching for it in the Unity menu. Then go to Launcher > Appearance > Position. You’ll see that the application dock has two changeable positions: one on the left (by default), and one on the bottom (like macOS). You’ll want to select the Bottom position.

Unity Tweak tool

Final Touches

In the Unity Tweak Tool, return to the Overview menu. From there, find Appearance > Theme and select Macos-sierra-master. Your applications should now have a very Mac-like feel to them.

The theme also comes with a nice wallpaper. To get to it, first hit Ctrl + L in the file manager. This allows you to enter a location:

/home/USER/.themes/macOS-Sierra-master/

Find the image named Wallpaper.jpg, right-click, and select the Set as Wallpaper option.

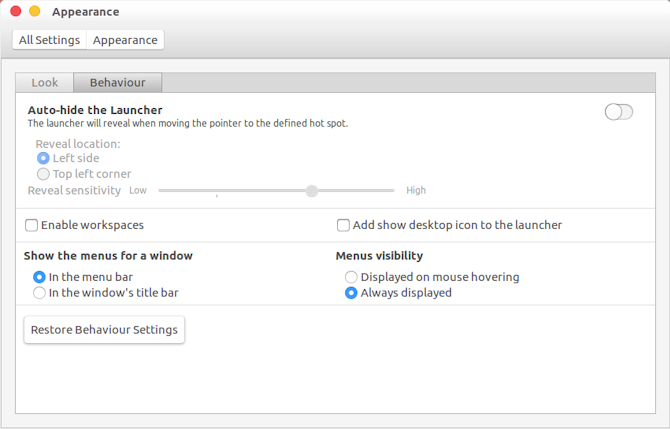
By default, Unity’s menu-bar only shows options when you hover your mouse over it. To make it behave like macOS, open System Settings, then go to Personal > Appearance > Behaviour > Menu visibility. Select the always displayed option underneath it.

Configure Unity to look like macOS

What’s the Best Way to Make Linux Look Like macOS?

As you can see, regardless of the desktop, you can get a close approximation of the macOS desktop.

GNOME

Here, everything looks good, although the menu bar is a little different.

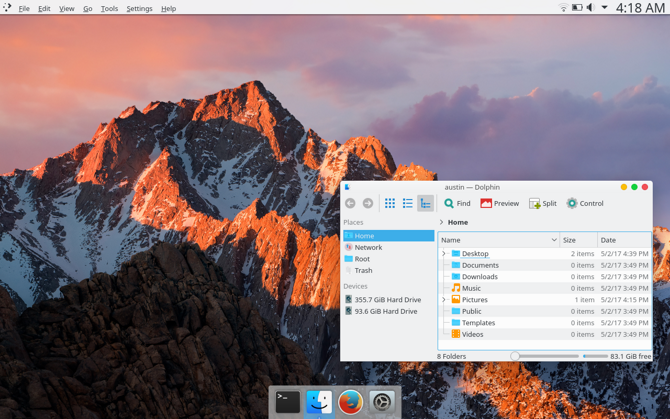
Set a macOS-like theme for GNOME

Xfce

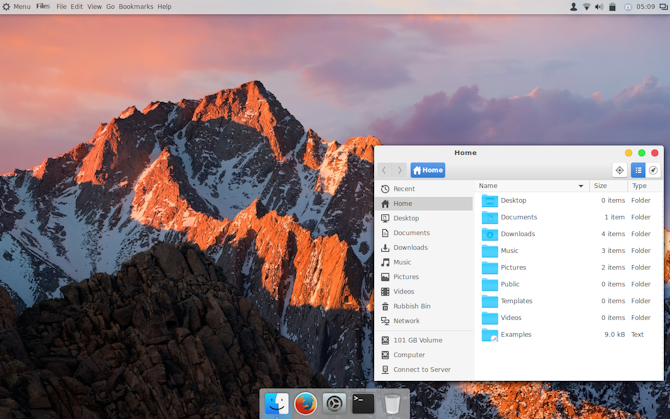
Making Xfce look like macOS is arguably the easiest option of the lot. The result isn’t as perfect as the others, but it will save you some time. You might consider adding a macOS-themed icon pack to improve the result.

Yosemite theme for Xfce desktops

Plasma

The icon theme in Plasma doesn’t fit quite as well, but it makes a good Mac-like experience, nonetheless.

Make KDE Plasma look like macOS

Cinnamon

Arguably, it’s the Cinnamon desktop that comes closest to the macOS feel.

Give Linux Mint a macOS overhaul

Unity

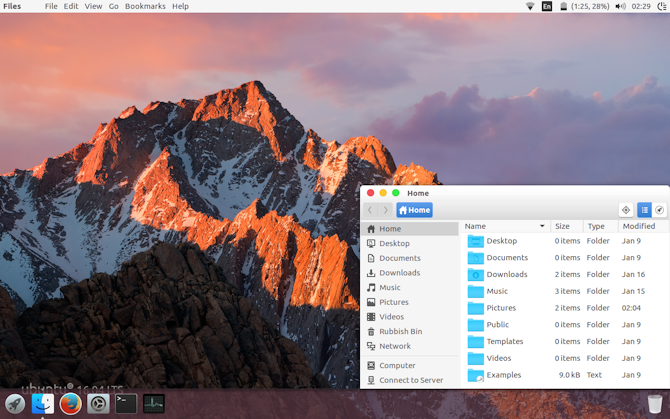
The color and alignment of the dock gives away the fact it’s not really macOS, unfortunately. Using Plank wasn’t much of an option—it would make launching programs too difficult.

Make Ubuntu look like macOS

Reskin Your Linux Desktop as macOS Today

Linux is extremely flexible—if you don’t like what you see, then you have the power to change it. Whether you make your own tweaks, or install themes, icons packs, and other add-ons is up to you.

If you want the easiest option for making Linux look like a Mac, however, we suggest using the Xfce desktop.

But it means you can choose from a great selection of desktop environments and distributions. Some Linux distros are even designed to look like macOS. If you don’t fancy spending time configuring a new look for Linux, here’s why elementaryOS might be the answer.

Read the full article: Make Linux Look Like macOS With These Easy Tweaks


Read Full Article

How to Make Money on YouTube: 6 Monetization Strategies Used by Pros


make-money-youtube

While anyone can enjoy uploading videos to YouTube for fun, the time might come when you want to actually earn an income from your content. If you’re thinking about spending serious time on your channel, you’ve probably wondered how to make money on YouTube.

The truth is that very few people will earn millions of dollars on YouTube. However, as a YouTuber, you have several options for monetizing your content. Let’s take a look at how to make money on YouTube by listing the most popular methods.

1. Advertising

Like most free services, YouTube is powered by advertising (unless you pay for YouTube Premium). Before you watch most videos, and sometimes in the middle of longer ones, you’ll have to watch a short ad. Some of the money from this goes to the channel, and the rest goes to YouTube itself.

YouTube has certain guidelines for when your channel is eligible for monetization (meaning ads show on your videos). At the time of writing, YouTube requires a channel to have 4,000 watch hours in the prior 12 months, plus 1,000 subscribers, for monetization. See the YouTube Partner Program overview page for more details.

This means you won’t be able to make money from ads until you start building a fanbase. When eligible, you’ll want to visit your Creator Studio, then click the Channel tab on the left. Under Status and Features, select Enable under Monetization to get started.

From there, you’ll need to link your AdSense account, choose what types of ads you’d like on your videos, and go through a review.

Unfortunately, there’s no simple formula for how much you can make through ads. It depends on how many people watch the full ad, how many viewers use an ad-blocker, and other factors. In addition, YouTube has experienced a lot of problems in the past few years with advertisers pulling their ads from the platform. This has led to the site demonetizing videos for a variety of reasons.

Overall, this means that when you’re starting out, ad revenue is not guaranteed. To deal with YouTube’s monetization issues, many creators are looking at other methods to make money on YouTube.

2. Product Placements

Product placement is an age-old advertising technique that’s common in TV shows and movies, and works for making money off YouTube as well. It essentially boils down to using specific brands in order to promote them. For example, a movie from Sony Pictures may include someone playing a PlayStation on a Sony TV.

On your YouTube channel, you may be able to strike a product placement deal with a company that’s relevant to the kind of content you produce. Of course, you’ll likely need to build a following before a brand will want to advertise with you.

The product placement doesn’t have to be the entire focus of your video—just part of it. Mentioning or using a brand in your video in a natural way is all that’s required. The Rhett and Link video embedded above is an example of product placement done well, as the music video stands on its own aside from the Buick promotion.

This is a solid advertising tactic because people can’t skip it. Additionally, viewers often feel a connection with their favorite content creators. This lends more authenticity to your recommendations, but you have to take care that this doesn’t backfire.

If you don’t make it clear that you’ve been paid for the promotion, or don’t actually like the product you’re reviewing, it could negatively affect your viewers’ opinion of you. Thankfully, YouTube includes a checkbox that lets people know a video contains sponsored content.

3. Sponsored Videos

Sponsored videos are similar to product placement, but with a few key differences. While product placement involves integrating a brand into an existing video, a sponsored video is entirely based around a brand.

If you run a gaming channel (one of the most popular types of YouTube channels) for instance, a developer might approach you to make a video about its game. Since you likely wouldn’t have played this game otherwise, you’ll let your viewers know that the developer paid you to make the video.

Sponsorships come in less drastic forms, too. Many YouTubers include a short sponsor message at the start of their videos. This is essentially a quick advertisement for a brand that’s separate from YouTube ads. Sometimes, these include a discount code for viewers to save a bit of money if they sign up for the service.

Like product placement, sponsored videos are a good alternative for making money, but you should be careful with them. If you don’t come across as genuine, your audience might find these videos in poor taste. Thus, you should try to avoid advertising sponsored content you’ve never actually used or don’t endorse.

4. Affiliate Links

You’ve probably heard of affiliate links, as many websites use affiliates to make money. Basically, affiliate links allow you to create a unique URL to a website. When anyone follows that link and buys a product, you get a small percentage of the sale.

These are pretty easy to set up, and don’t require sponsorship deals from brands. If you talk about a certain product in your video, you can include an affiliate link to its Amazon page in the description. Or you could add an affiliate link for services like Audible, where you’ll make some money if someone decides to sign up.

Affiliate links are a good passive source of income. After all, if someone is going to buy a product anyway, it doesn’t make any difference to them if they buy it through your affiliate link. Like the other methods, it’s a good idea to clearly disclose when you include affiliate links to your audience.

5. Fan Funding/Subscriptions

Many have turned to fan funding as an alternative way to make money. This involves joining a service like Patreon or SubscribeStar that lets fans donate some money each month to support their favorite channels.

Most creators who use a service like this offer tiers of rewards in exchange for their fans’ support. You might list their names at the end of each video, host a video chat with them every month, or provide behind-the-scenes clips. It’s a great way to connect the biggest fans with their favorite channels, and provides a fairly steady form of revenue not reliant on ads.

YouTube now offers its own way to do this through the Channel Membership feature. Once your channel meets certain guidelines, you can allow viewers to sponsor you monthly through YouTube in exchange for a few perks. It’s up to you if you’d rather do this on or off YouTube.

If you livestream on your channel, you can also use the Super Chat feature. This allows viewers to donate money in exchange for highlighting their message for a time during a stream.

6. Selling Merchandise

Another monetization option is creating merchandise to sell to your fans. Websites like TeePublic let you create custom designs for T-shirts, wall art, mugs, and more. Many creators offer designs featuring popular catchphrases, jokes, or art from their videos.

Once you’ve created some cool designs, let viewers know about them in a few videos. Include a link to your merchandise page in video descriptions, and anyone who’s interested can support you and get some cool swag at the same time.

Now You Know How to Make Money on YouTube

While you have many monetization options available to you, remember that making money from YouTube is not easy. You’ll have to produce quality content for some time in order to build the viewership required for ads, sponsorships, and more.

If you’re just starting out, focus on making awesome videos and do what you can to make YouTube a better place. And hopefully, over time, your audience will come. You can then look deeper into these monetization options once your channel becomes more popular.

Read the full article: How to Make Money on YouTube: 6 Monetization Strategies Used by Pros


Read Full Article
The 12 Best GoPro HERO Accessories of 2019

Changes to Facebook Graph Search leaves online investigators in a lurch


When Facebook Graph Search launched six years ago, it was meant to help users discover content across public posts on the platform. Since then, the feature stayed relatively low-profile for many users (its last major announcement was in 2014 when a mobile version was rolled out), but became a valuable tool for many online investigators who used it to collect evidence of human rights abuses, war crimes and human trafficking. Last week, however, many of them discovered that Graph Search features had suddenly been turned off, reports Vice.

Graph Search let users search in plain language (i.e. sentences written the way people talk, not just keywords), but more importantly, it also let them filter search results by very specific criteria. For example, users could find who had liked a page or photo, when someone had visited a city or if they had been in the same place at the same time with another person. Despite the obvious potential for privacy issues, Graph Search was also an important resource for organizations like Bellingcat, an investigative journalism website that used it to document Saudi-led airstrikes in Yemen for its Yemen Project.

Other investigators also used Graph Search to build tools like StalkScan, but the removal of Graph Search means they have had to suspend their services or offer them in a very limited capacity. For example, StalkScan’s website now has a notice that says:

“As of June 6th, you can scan only your own profile with this tool. After two years and 28M+ StalkScan sessions, Facebook decided to make the Graph Search less transparent. As usual, they did this without any communication or dialogue with activists and journalists that used it for legitimate purposes.The creepy graph search itself still exists, but is now less accessible and more difficult to use. Make sure to check yourself with this tool, since your data is still out there!”

Facebook may be trying to take a more cautious stance because it is still dealing with the fall out from several major security lapses, including the Cambridge Analytica data scandal, as well as the revelation earlier this year that it had stored hundreds of millions of passwords in plain text.

In a statement to Vice, a Facebook spokesperson said “The vast majority of people on Facebook search using keywords, a factor which led us to pause some aspects of graph search and focus more on improving keyword search. We are working closely with researchers to make sure they have the tools they need to use our platform.” But one of Vice’s sources, a current employee at Facebook, said within the company there is “lots of internal and external struggle between giving access to info so people can find friends or research things (like Bellingcat), and protecting it.”

TechCrunch has contacted Facebook for more information.


Read Full Article

Moving deeper into enterprise cloud, Intel picks up Barefoot Networks


When it launched out of stealth just three years ago, Barefoot Networks was hailed as a company that would transform the way a generation of computing giants like Facebook, Alphabet, Amazon and Microsoft would function while making chip manufacturers like Intel and networking companies like Cisco take notice

Now, Intel has not only taken notice, it’s acquired Barefoot Networks for an undisclosed amount.

It’s a sign of just how important cloud computing has become, and an opportunity for Intel to stake more of a claim in the networking space after losing ground to the GPU manufacturers whose chipsets have been in demand since the rise of gaming, graphics, and artificial intelligence made them ascendant.

Essentially, Barefoot Networks chips allow its customers to program whatever functionality they need on to the networking chips that Barefoot sells them. 

Previously, companies could customize network architecture down to everything BUT the chipset. The lack of programmable chips meant that network architectures couldn’t be quite as responsive as a company like Facebook, Microsoft, or Google would want, because they were always working around chipsets that had been designed for specific functions.

Based in Santa Clara, Calif., Barefoot Networks was launched from stealth in late 2016 by Dr. Craig Barratt, a former Stanford University professor whose work was critical to the development of the networking architectures that allowed Alphabet, Facebook and others to operate at the massive scale they now have.

As these companies demanded more customized hardware ranging from chipsets to enable their various machine learning algorithms to manage and monitor content (and win Go games), to the servers and routers that they’ve put up in their own internal networks Barratt realized they’d need chipsets that they could modify.

With the acquisition, Intel adds a core knowledge set around p4-programmable high speed data paths, switch silicon development, P4 compilers, drivers oftware, network telemetry and computational networking.

It also provides another bulwark against rival chip manufacturer, Broadcom.

No word from some of Barefoot Networks investors on the result for them in this acquisition. The company raised $155.4 million from investors including Tencent Holdings, DHVC, Alibaba Group, Dell Technologies Capital, Hewlett Packard Enterprise, and Lightspeed Ventures.


Read Full Article
Keep Your Mac in Top Shape With CleanMyMac X


keep-mac-top-shape

A Mac’s combination of top-notch software and hardware means your laptop or desktop should provide years of service. But over time, whether you use your Mac for work or play, the computer accumulates digital trash.

Unneeded files take up precious storage spaced, which is especially an issue with the smaller SSDs found in most MacBooks. Apple still sells models with a paltry 128GB of local storage.

In addition, overall system speed and performance can take a hit for a number of different reasons over time. And there’s always the threat of malware.

If you want to keep your Mac in top shape with just a few clicks, there’s a great utility to take a look at: CleanMyMac X.

What Is CleanMyMac X?

CleanMyMac X is a utility suite that can clean up, optimize, and manage your Mac in four major categories. It finds and deletes unneeded files, detects and deletes malware, optimizes and speeds up your system, and manages apps.

Developer MacPaw’s suite has been around for a decade. And the latest version, CleanMyMac X, is a powerful way to tidy up your system. Let’s see what it offers.

Start With the Smart Scan

CleanMyMac X Smart Scan

Easily the best feature of CleanMyMac X is Smart Scan. Instead of spending time looking through the app to accomplish all the different tasks, you can just open CleanMyMac X and hit Scan. The app will take care of the rest.

The scan combines three of the major parts of the app—Cleanup, Protection, and Speed—and will look at every portion of your Mac. If you’re using the Smart Scan for the first time, simply minimize CleanMyMac X and let the app do its work while you move onto other tasks.

When complete, you’ll see a notification and can open up the app to review the scan results. You’ll see the results grouped into the three major areas; click on each to see the details.

If there’s something in the results you don’t agree with, don’t worry. You have complete control over what files to delete for extra space, threats to remove, or the suggested steps to make your Mac run faster.

Spring Cleaning on Your Mac

CleanMyMac X Cleanup

Deleting unneeded files is a great way to bring new life to a Mac. After my first time using Smart Scan on my MacBook Pro, CleanMyMac X found 23GB of files that could safely be deleted. That makes a big difference, especially when you just have 256GB of built-in storage.

Some of the most typical types of files found by CleanMyMac X are:

  • Cache and log files from the macOS system and apps.
  • Language files from macOS and unused app localizations.
  • If you use Xcode, junk from build information and the project index.
  • Multiple versions of documents from Sketch, Pages, Keynote, and Numbers.

The app also scans for unnecessary data from both your Photo Library and iTunes, which you can delete without worry.

Anyone who receives large attachments from time to time will be happy to hear that app also scans for those documents. You can select any files that you don’t need or use.

CleanMyMac X Offers Much More

CleanMyMac X Malware Removal

CleanMyMac X is for much more than just freeing up space on your Mac. The app also does a great job helping to wipe personal information from your machine, which is welcome as privacy has becomes more difficult on the internet.

The app can perform an extensive scan for any type of malicious software. That ranges from viruses to other problems like spyware, adware, and items that can compromise your privacy and personal information. After the scan, you can delete anything it found with just a click.

In the Privacy section, the app will find items like chat history, browsing history, cookies, downloads, and recent item lists that you can delete to make your machine even more private.

Another way CleanMyMac X improves your Mac is in the Speed section. It examines the system and gives you control of exactly what runs. You’re bound to find something not needed that will help free up valuable resources like RAM.

CleanMyMac X also offers a number of different maintenance scripts that can help make your Mac run faster.

Take Advantage of Space Lens

CleanMyMac X Space Lens

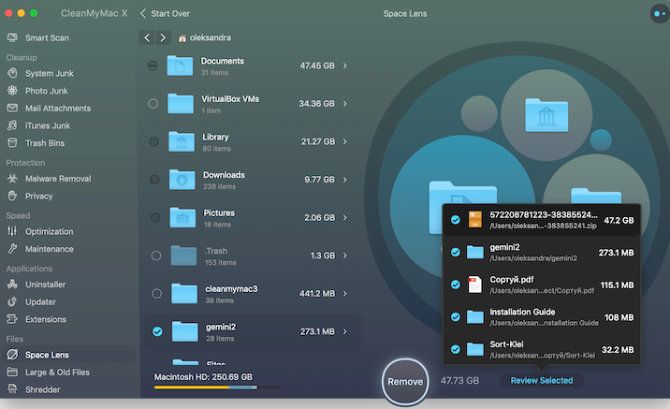
One of the newest additions to the CleanMyMac X is Space Lens. It’s a great way to help you visualize the storage on your Mac and manually examine and delete files you no longer need.

To start, select the hard drive you’d like to scan (this feature also works on external drives). After the scan completes, you’ll see a unique map of the drive’s storage represented as bubbles of different sizes. The larger a file or folder is, the bigger its bubble.

This makes is much easier to find large files that you might not need. After looking through Space Lens, you can take one last look at all the files you’ve selected before permanently deleting the data.

Always Accessible in the Menu Bar

CleanMyMac X Menu Bar

Even when the app isn’t running, you can quickly access various CleanMyMac X features through the Menu Bar.

Just click the icon to open up an at-a-glance status update. It’s a great place to go when your Mac is running a bit slower than normal. With just a click, you can delete the Trash or free up RAM.

When you’re not connected to a power source, it will also show apps that are heavily consuming battery power. You can quit any of those with just a click. The dashboard even displays the CPU temperature and load, along with upload and download network traffic. For more info, try running a quick test to see the speed of the current internet speed.

If you sign into a Dropbox account, the menu will also show the amount of free storage left.

Get Started With CleanMyMac X

CleanMyMac X Subscription

You can download CleanMyMac X from MacPaw now. The company offers two different ways to purchase.

A one-year subscription license for one Mac is $34.95. Meanwhile, a two-Mac license is $54.95. You can subscribe five Macs for $79.95.

If you prefer, you can instead make a one-time purchase of $89.95 for a single Mac. A two-Mac license is $134.95 while five Macs can use the app forever for $199.95. All purchases come with a 30-day money-back guarantee.

If you’d like to see how the app works, give the free trial a shot first.

CleanMyMac X: An Indispensable Mac Utility

While it’s not something you’ll need to use every day, CleanMyMac X is a great utility for any Mac owner. Along with freeing up space on your hard drive, the utility will help run your Mac run faster, no matter its age. And that’s music to any Mac owner’s ears.

Read the full article: Keep Your Mac in Top Shape With CleanMyMac X


Read Full Article
Video Scheduler Internal Error: 8 Fixes for This Windows 10 Stop Code


video-scheduler-internal-error

The Blue Screen of Death is so infamous it has its own acronym: BSOD. These aren’t as common on Windows 10 as they were on older versions of Windows. That said, they’re still every bit the headache they have always been when they do occur.

This is especially true when the BSOD is accompanied by the cryptic Windows 10 stop code “VIDEO SCHEDULER INTERNAL ERROR.” This can be tough to track down, but we’ve compiled a list of potential fixes to make your life easier.

1. Run an Anti-Virus Scan

Windows Defender Antivirus scan

It’s not very likely that you’ve got a virus causing the Video Scheduler Internal error, but it can’t hurt to check. This is simple, doesn’t take that long to do, and is something you should do occasionally anyway.

Even if you never think about anti-virus programs, you have one installed. Windows Defender comes with Windows 10 by default and is easy to use. You can also use third-party anti-virus or anti-malware scans, but we’ll focus on Windows Defender.

Open the Start Menu or tap the Windows key, then type Windows Defender and hit enter. Click on the Virus & threat protection icon, then click on Scan options. Check the Full scan option to fully scan your computer for threats.

2. Check Your System Drive

Running Command Prompt as Administrator

With the threat of malware out of the way, it’s time to check your hard drive or SSD for corruption.

Tap the Windows key and type cmd, but don’t hit Enter. Instead, right-click on the Command Prompt icon and select Run as administrator. Windows will pop up a prompt asking if you want to let the app make changes. Click Yes.

Now type the following to attempt to perform a disk check:

chkdsk /f /r

You’ll see an error message telling you that the scan can’t be performed until the system restarts. Press Y to confirm. Now restart Windows to perform a hard disk check.

This is just one of the ways the chkdsk utility can be handy. We’ve got a list of handy things you can do with chkdsk.

3. Scan and Repair the Registry

Running sfc to fix video scheduler internal error

Errors in the registry can cause all sorts of windows 10 stop codes, including the Video Scheduler Internal Error. There are plenty of ways to repair the registry, but Microsoft’s System File Checker is built-in. We’ll need an elevated command prompt, just as we did for running chkdsk.

Hit the Windows key and type cmd, then right-click on the icon and choose Run as administrator. Now type the following:

sfc /scannow

Press Enter to start the scan. This will take a while. Once the scan is complete, restart your computer to repair any corrupted files.

4. Update Your Video Drivers

Updating video driver in Windows 10

Video drivers are often the culprit for the Video Scheduler Internal Error Windows stop code. Windows 10 makes updating your drivers fairly easy, so this is among the first things you should try if the above fixes haven’t worked.

Right-click or click on hold on the Start button, then choose Device Manager from the menu. Here, file and expand the Display adapters category and right-click on the menu that appears. Select Update driver and follow the prompts to complete the process.

Once the process is complete, restart your computer.

5. Re-install Your Video Drivers

Uninstalling video driver before reinstallation

If updating your video drivers didn’t help, re-installing them may help. Like the previous step, we’ll take care of this using the Windows Device Manager.

Right-click or, if you prefer, click and hold the Start button and select Display Manager. Expand the Display adapters category, right-click on your video card, and select Uninstall Driver. Now restart your computer.

Now either download a new driver from your video card manufacturer’s website or the Windows Download Center. Run the installer and follow the prompts to install.

6. Install Available Windows Updates

Updating Windows to fix Running chkdsk to fix video scheduler internal error

Keeping your system up to date is vital for a number of reasons, including security. It can also help resolve BSOD problems like the Video Scheduler Internal Error. Windows 10 will usually automatically update, but it can’t hurt to check for the latest updates.

Open the Settings app by pressing the Windows Key + I key combination. From the available options, select Update & Security. On the right side of the screen, select Check for Updates.

If any updates are available, Windows will begin downloading them. Once the updates have been downloaded to your system, restart your computer to begin the install process.

7. Remove Recent Hardware/Software Additions

If you’ve recently installed hardware or software, it’s possible this is what’s causing your problem. Especially if the Video Scheduler Internal Error began right after installing something new, try removing it. Both new hardware and the system drivers installed by it can cause trouble, as can standalone software.

For software, the built-in Windows System Restore tool can be handy, especially if you manually created a restore point before you added the new hardware or software. For future reference, we’ve gathered some handy tips for using System Restore.

8. Other Possible Fixes

There are a few other issues that can cause the Video Scheduler Internal Error Windows 10 stop code. Heavy graphics cards can begin to bend in the slot after a while, which can cause the error. If this is happening, try turning your PC on its side and see if the error goes away.

Overclocking your graphics card can also lead to the error. If you see the error after overclocking your PC, try changing the frequency and see if this helps.

If you have a standalone graphics card, you can try installing it in another computer to see if it works. Conversely, if you have another graphics card, try that in your computer and see if the error goes away.

What About Other BSOD Problems?

It may be one of the trickier ones, but the Video Scheduler Internal Error isn’t the only BSOD you’ll run into. Fortunately, we’ve encountered quite a few of them. If you ever run into the “memory management” stop code, we’ve got a guide to help you sort that out.

More critical errors like Machine Check Exceptions (MCE) can be even tougher to figure out. If you run into one of these, we can show you how to fix it.

Read the full article: Video Scheduler Internal Error: 8 Fixes for This Windows 10 Stop Code


Read Full Article

How to Automate Your Android Phone for Better Battery Life

The 7 Best Sports Trackers When You Can’t Wear Your Apple Watch

Is iTunes Not Recognizing Your iPhone? Here’s the Fix!


itunes-not-recognizing

Even in our increasingly wireless world, iPhone owners still have to plug in to their computers every now and then. Whether it’s for backups, quick music or video transfers, or other reasons, sometimes there’s no way around it. First, you need to dig out a Lightning cable, then you have to remember how to connect to iTunes.

But this time, there’s something wrong. Whether it’s iTunes not recognizing iPhone connections at all or you’re getting a cryptic “0xE” error, you just can’t get iTunes to work. While this can be a tough problem to solve, the fix is often surprisingly easy. We’re here to help.

1. iPhone Won’t Connect to iTunes? Start Here

There are a few extremely simple factors to check before you move on to any other solutions. First, make sure that your iOS device is unlocked and on the Home screen. If it wasn’t in the first place, unplug it, then plug it back in. Also, make sure the cable is fully inserted into both your iPhone and computer.

Another simple fix is to restart your iPhone. This is a basic step, but works for a number of issues.

2. Review Trust Issues

Occasionally, when you plug your iPhone into a computer, you’ll see a prompt on the home screen asking if you trust the computer. If you don’t select Trust, you’ll have trouble with your iPhone not showing up in iTunes.

If you accidentally selected Don’t Trust in the past, don’t worry—there’s a way to fix that. On your iPhone, open Settings, then go to General > Reset > Reset Location & Privacy.

Now you’ll see the prompt when you plug your phone back into your computer. This time, make sure to tap Trust.

3. Check Your Lightning Cable

MFi-Certified Apple Lightning to USB cable

Another common problem that can lead to your iPhone not connecting to iTunes is a bad cable. First, have a look at both ends of your cable. If it seems wrinkled or frayed on either end, this is a bad sign.

However, a cable can also have connection issues even without any visual evidence. Perhaps one of the inside prongs is bent, or it came in contact with water and was ruined.

Even if your cable is in perfect shape, it can cause trouble if it isn’t MFi-Certified. This basically means that Apple has approved the cable for use with its hardware. If you have spare Lightning cables, try using a different cable to see if it solves your problem. Try buying a replacement Lightning cable if you need a new one.

4. Inspect Your Ports

Lightning port on an iPhone

Cables aren’t the only part of the physical connection that can lead to iTunes not detecting iPhone connections. Your Lightning port can get dust and debris in it, causing incomplete connections. Follow our guide to cleaning the Lightning port to remove any gunk stuck in it.

If you see lint or anything else in your Lightning port, you may need to remove it. The SIM card ejector tool that comes with most phones is the perfect size to do this. Be careful not to damage the port.

The USB port on your computer can lead to trouble as well. If your iPhone won’t connect to iTunes and you’re using a USB hub, try plugging directly into your computer instead. If you’re already plugging in directly, try using a different port if one is available.

5. Update iTunes

Updating software on macOS

At this point, you’ve ruled out most of the basic issues, but there’s one left. If you’re getting errors reading “iTunes could not connect to the iPhone,” try updating iTunes.

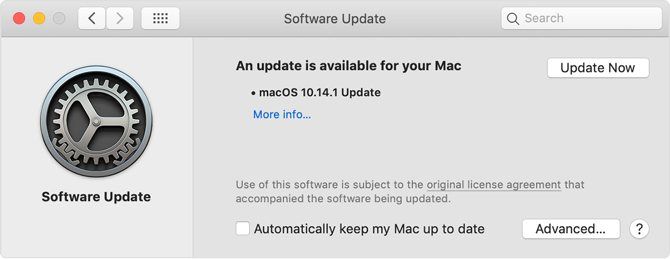
On a Mac, click the Apple icon in the upper-left portion of the screen, then select System Preferences. On this screen, select Software Update. This will check for macOS system updates, which include updates to core system apps like iTunes and Safari.

On Windows, there are two different ways to update iTunes. Which you should use depends on how you installed the app: from Apple’s website, or via the Microsoft Store.

For the version downloaded via the Apple website, select Help in the menu bar at the top of the app, then click Check for Updates. Follow the prompts to update iTunes through Apple Software Update.

If you’re using the Microsoft Store version, it should check for updates automatically. You can run a manual check by opening the Microsoft Store app. Click the three-dot menu button in the top-right and choose Downloads and updates. Then at the top-right, choose Get updates.

6. Mac Users: Check Your System Report

macOS System Report showing connected iPhone

If you’ve already gone through all the relevant steps above on your Ma,c and your iPhone still won’t connect to iTunes, it’s time to pull out the big guns.

Hold down the Option key and click the Apple logo in the top-left portion of the screen. Here, select System Information or System Report. Once the window appears, select USB from the list on the left.

If you see your phone displayed, but iTunes won’t connect to the iPhone, you likely have a software issue. Try updating macOS or uninstalling third-party security software like antivirus and anti-malware apps.

On the other hand, if your iPhone isn’t displayed in the USB section of the menu, it may be a hardware issue. Try connecting your phone to another computer or retry the above tips about checking cables and ports.

7. Windows Users: Reinstall the Apple Mobile Device USB Driver

If you’re running Windows and none of the above steps have worked for you, there’s a likely culprit. The Apple Mobile Device USB driver can cause problems, so reinstalling it may fix your problem. This is often the cause when your iPhone won’t connect to your computer at all, not just iTunes.

No matter which way you downloaded iTunes, start by disconnecting your iPhone from your computer if you haven’t already. Unlock your phone and make sure it’s on the Home screen.

Now reconnect your iPhone. If either version of iTunes opens, close it.

If You Downloaded iTunes From Apple

Open a File Explorer window. At the top of window, enter the following into the address bar and press Enter:

%ProgramFiles%\Common Files\Apple\Mobile Device Support\Drivers

In the panel that opens, right-click on either usbaapl64.inf or usbaapl.inf(only one will be present) and select Install.

Manually reinstalling the Apple Mobile Device USB Driver on Windows

While you may see other similarly named files here, you should only install the file ending in the .inf extension. If you can’t see file extensions, expand the View tab at the top and check the box labeled File name extensions.

Once installation is complete, disconnect your iPhone and restart your computer. Now reconnect your iPhone and launch iTunes.

If You Downloaded iTunes via the Microsoft Store

Reinstalling the Apple Mobile Device USB driver is easier if you installed iTunes via the Microsoft Store. To do so, first right-click the Start button, then select Device Manager.

Scroll down until you spot the Portable Devices section. Expand this section and look for your iPhone. Right-click on the icon and select Update driver. In the window that pops up, select Search automatically for updated driver software.

Updating the Apple Mobile Device USB Driver automatically on Windows

After the installer runs, try opening iTunes and hopefully, it will recognize your iPhone. If you still have issues with iTunes not recognizing iPhone connections, you might try completely uninstalling and reinstalling the app.

iTunes Still Doesn’t Recognize Your iPhone?

In the vast majority of cases, one of the above tips should sort out your problem. That said, your iPhone not showing up in iTunes can have many causes. When you’ve run out of fixes to try, it’s probably time to contact Apple support.

This isn’t the only iPhone issue that can crop up. Learn how to fix other common problems with our iPhone troubleshooting tips.

Read the full article: Is iTunes Not Recognizing Your iPhone? Here’s the Fix!


Read Full Article