27 November 2018

LG’s Phone With 16 Lenses Could Be the Future of Smartphone Photography


Remember the first time you got a cell phone with a camera? The idea of having a digital camera in your pocket at all times was incredibly exciting. Phone cameras have come a long way since then, with some devices featuring lenses that rival dedicated cameras.

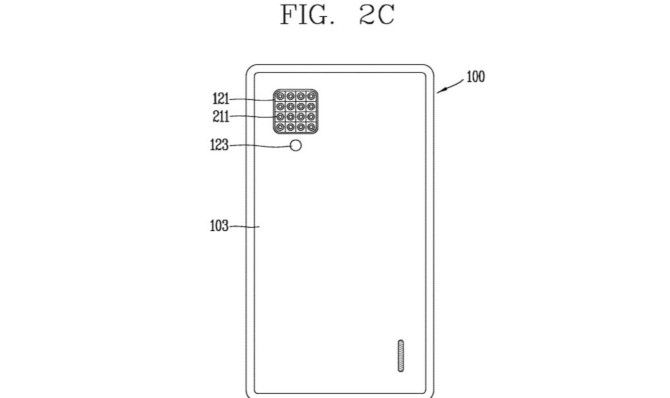
LG has just received a new patent that takes the idea of smartphone photography to an insane new level. The patent is for a smartphone that features a staggering 16 camera lenses. Right now, it’s common to see smartphones with multiple lenses—the LG V40 ThinQ has five—but we’ve definitely never seen one with this many.

The news was first reported by LetsGoDigital (from the USPTO).

Why 16 Lenses on a Phone?

Why on Earth would anyone want a camera with 16 lenses? Basically, it opens up a slew of new options for photos and videos that can’t be accomplished with just one or two lenses. For example, you’d be able to create 3D videos, move a subject to a different angle in a photo, or even remove parts of a photo after you’ve taken it.

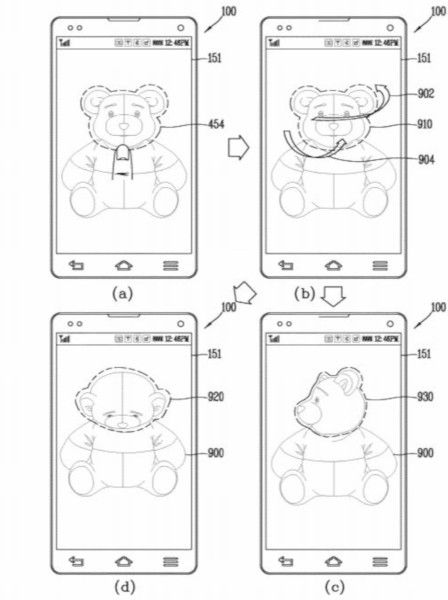
LG showed an example where you could select one photo from a series, or even create a single shot from multiple angles, which wouldn’t be possible without a full suite of lenses.

It only gets crazier from there, though. LG demonstrated using AI to scan the face in a photo, recognize them, and replace their head with a more flattering shot.

But what if you want to use your insane 16-lens camera to take a selfie? According to the patent, LG will attach a mirror to the back of the phone, which is the ultimate low-tech way to take a selfie. Interesting that it’s combined with such a future-tech camera.

When Can You Buy One?

As this device is just in the patents stage, there’s no guarantee that LG will ever even release a phone with all these lenses attached. Essentially, the patent just means that it has the technology available to make the phone a reality and that no other company can copy this idea without paying LG. It doesn’t mean that the company is planning to release the device anytime in the near future.

So, to put it simply, you can’t purchase one of these yet, but it’s most definitely fun to imagine all the cool things you could do with a 16-lens smartphone.

While you wait, make sure to check out our list of the best smartphones at IFA 2018 for a look at what’s coming soon..

Image Credit: Ryhor/DepositPhotos

Read the full article: LG’s Phone With 16 Lenses Could Be the Future of Smartphone Photography


Read Full Article

That night, a forest flew: DroneSeed is planting trees from the air


Wildfires are consuming our forests and grasslands faster than we can replace them. It’s a vicious cycle of destruction and inadequate restoration rooted, so to speak, in decades of neglect of the institutions and technologies needed to keep these environments healthy.

DroneSeed is a Seattle-based startup that aims to combat this growing problem with a modern toolkit that scales: drones, artificial intelligence, and biological engineering. And it’s even more complicated than it sounds.

Trees in decline

A bit of background first. The problem of disappearing forests is a complex one, but it boils down to a few major factors: climate change, outdated methods, and shrinking budgets (and as you can imagine, all three are related).

Forest fires are a natural occurrence, of course. And they’re necessary, as you’ve likely read, to sort of clear the deck for new growth to take hold. But climate change, monoculture growth, population increases, lack of control burns, and other factors have led to these events taking place not just more often, but more extensively and to more permanent effect.

On average, the U.S. is losing 7 million acres a year. That’s not easy to replace to begin with — and as budgets for the likes of national and state forest upkeep have shrunk continually over the last half century, there have been fewer and fewer resources with which to combat this trend.

The most effective and common reforestation technique for a recently burned woodland is human planters carrying sacks of seedlings and manually selecting and placing them across miles of landscapes. This back-breaking work is rarely done by anyone for more than a year or two, so labor is scarce and turnover is intense.

Even if the labor was available on tap, the trees might not be. Seedlings take time to grow in nurseries and a major wildfire might necessitate the purchase and planting of millions of new trees. It’s impossible for nurseries to anticipate this demand, and the risk associated with growing such numbers on speculation is more than many can afford. One missed guess could put the whole operation underwater.

Meanwhile if nothing gets planted, invasive weeds move in with a vengeance, claiming huge areas that were once old growth forests. Lacking the labor and tree inventory to stem this possibility, forest keepers resort to a stopgap measure: use helicopters to drench the area in herbicides to kill weeds, then saturate it with fast-growing cheatgrass or the like. (The alternative to spraying is, again, the manual approach: machetes.)

At least then, in a year, instead of a weedy wasteland, you have a grassy monoculture — not a forest, but it’ll do until the forest gets here.

One final complication: helicopter spraying is a horrendously dangerous profession. These pilots are flying at sub-100-foot elevations, performing high-speed maneuvers so that their sprays reach the very edge of burn zones but they don’t crash head-on into the trees. This is an extremely dangerous occupation: 80 to 100 crashes occur every year in the U.S. alone.

In short, there are more and worse fires and we have fewer resources — and dated ones at that — with which to restore forests after them.

These are facts anyone in forest ecology and logging are familiar with, but perhaps not as well known among technologists. We do tend to stay in areas with cell coverage. But it turns out that a boost from the cloistered knowledge workers of the tech world — specifically those in the Emerald City — may be exactly what the industry and ecosystem require.

Simple idea, complex solution

So what’s the solution to all this? Automation, right?

Automation, especially via robotics, is proverbially suited for jobs that are “dull, dirty, and dangerous.” Restoring a forest is dirty and dangerous to be sure. But dull isn’t quite right. It turns out that the process requires far more intelligence than anyone was willing, it seems, to apply to the problem — with the exception of those planters. That’s changing.

Earlier this year, DroneSeed was awarded the first multi-craft, over-55-pounds unmanned aerial vehicle license ever issued by the FAA. Its custom UAV platforms, equipped with multispectral camera arrays, high-end lidar, 6-gallon tanks of herbicide, and proprietary seed dispersal mechanisms have been hired by several major forest management companies, with government entities eyeing the service as well.

These drones scout a burned area, mapping it down to as high as centimeter accuracy, including objects and plant species, fumigate it efficiently and autonomously, identify where trees would grow best, then deploy painstakingly designed seed-nutrient packages to those locations. It’s cheaper than people, less wasteful and dangerous than helicopters, and smart enough to scale to national forests currently at risk of permanent damage.

I met with the company’s team at their headquarters near Ballard, where complete and half-finished drones sat on top of their cases and the air was thick with capsaicin (we’ll get to that).

The idea for the company began when founder and CEO Grant Canary burned through a few sustainable startup ideas after his last company was acquired, and was told, in his despondency, that he might have to just go plant trees. Canary took his friend’s suggestion literally.

“I started looking into how it’s done today,” he told me. “It’s incredibly outdated. Even at the most sophisticated companies in the world, planters are superheroes that use bags and a shovel to plant trees. They’re being paid to move material over mountainous terrain and be a simple AI and determine where to plant trees where they will grow — microsites. We are now able to do both these functions with drones. This allows those same workers to address much larger areas faster without the caloric wear and tear.”

It may not surprise you to hear that investors are not especially hot on forest restoration (I joked that it was a “growth industry” but really because of the reasons above it’s in dire straits).

But investors are interested in automation, machine learning, drones, and especially government contracts. So the pitch took that form. With the money Droneseed secured, it has built its modestly sized but highly accomplished team and produced the prototype drones with which is has captured several significant contracts before even announcing that it exists.

“We definitely don’t fit the mold or metrics most startups are judged on. The nice thing about not fitting the mold is people double take and then get curious,” Canary said. “Once they see we can actually execute and have been with 3 of the 5 largest timber companies in the US for years, they get excited and really start advocating hard for us.”

The company went through Techstars, and Social Capital helped them get on their feet, with Spero Ventures joining up after the company got some groundwork done.

If things go as Droneseed hopes, these drones could be deployed all over the world by trained teams, allowing spraying and planting efforts in nurseries and natural forests to take place exponentially faster and more efficiently than they are today. It’s genuine change-the-world-from-your-garage stuff, which is why this article is so long.

Hunter (weed) killers

The job at hand isn’t simple or even straightforward. Every landscape differs from every other, not just in the shape and size of the area to be treated but the ecology, native species, soil type and acidity, type of fire or logging that cleared it, and so on. So the first and most important task is to gather information.

For this Droneseed has a special craft equipped with a sophisticated imaging stack. This first pass is done using waypoints set on satellite imagery.

The information collected at this point is really far more detailed than what’s actually needed. The lidar, for instance, collects spatial information at a resolution much beyond what’s needed to understand the shape of the terrain and major obstacles. It produces a 3D map of the vegetation as well as the terrain, allowing the system to identify stumps, roots, bushes, new trees, erosion, and other important features.

This works hand in hand with the multispectral camera, which collects imagery not just in the visible bands — useful for identifying things — but also in those outside the human range, which allows for in-depth analysis of the soil and plant life.

The resulting map of the area is not just useful for drone navigation, but for the surgical strikes that are necessary to make this kind of drone-based operation worth doing in the first place. No doubt there are researchers who would love to have this data as well.
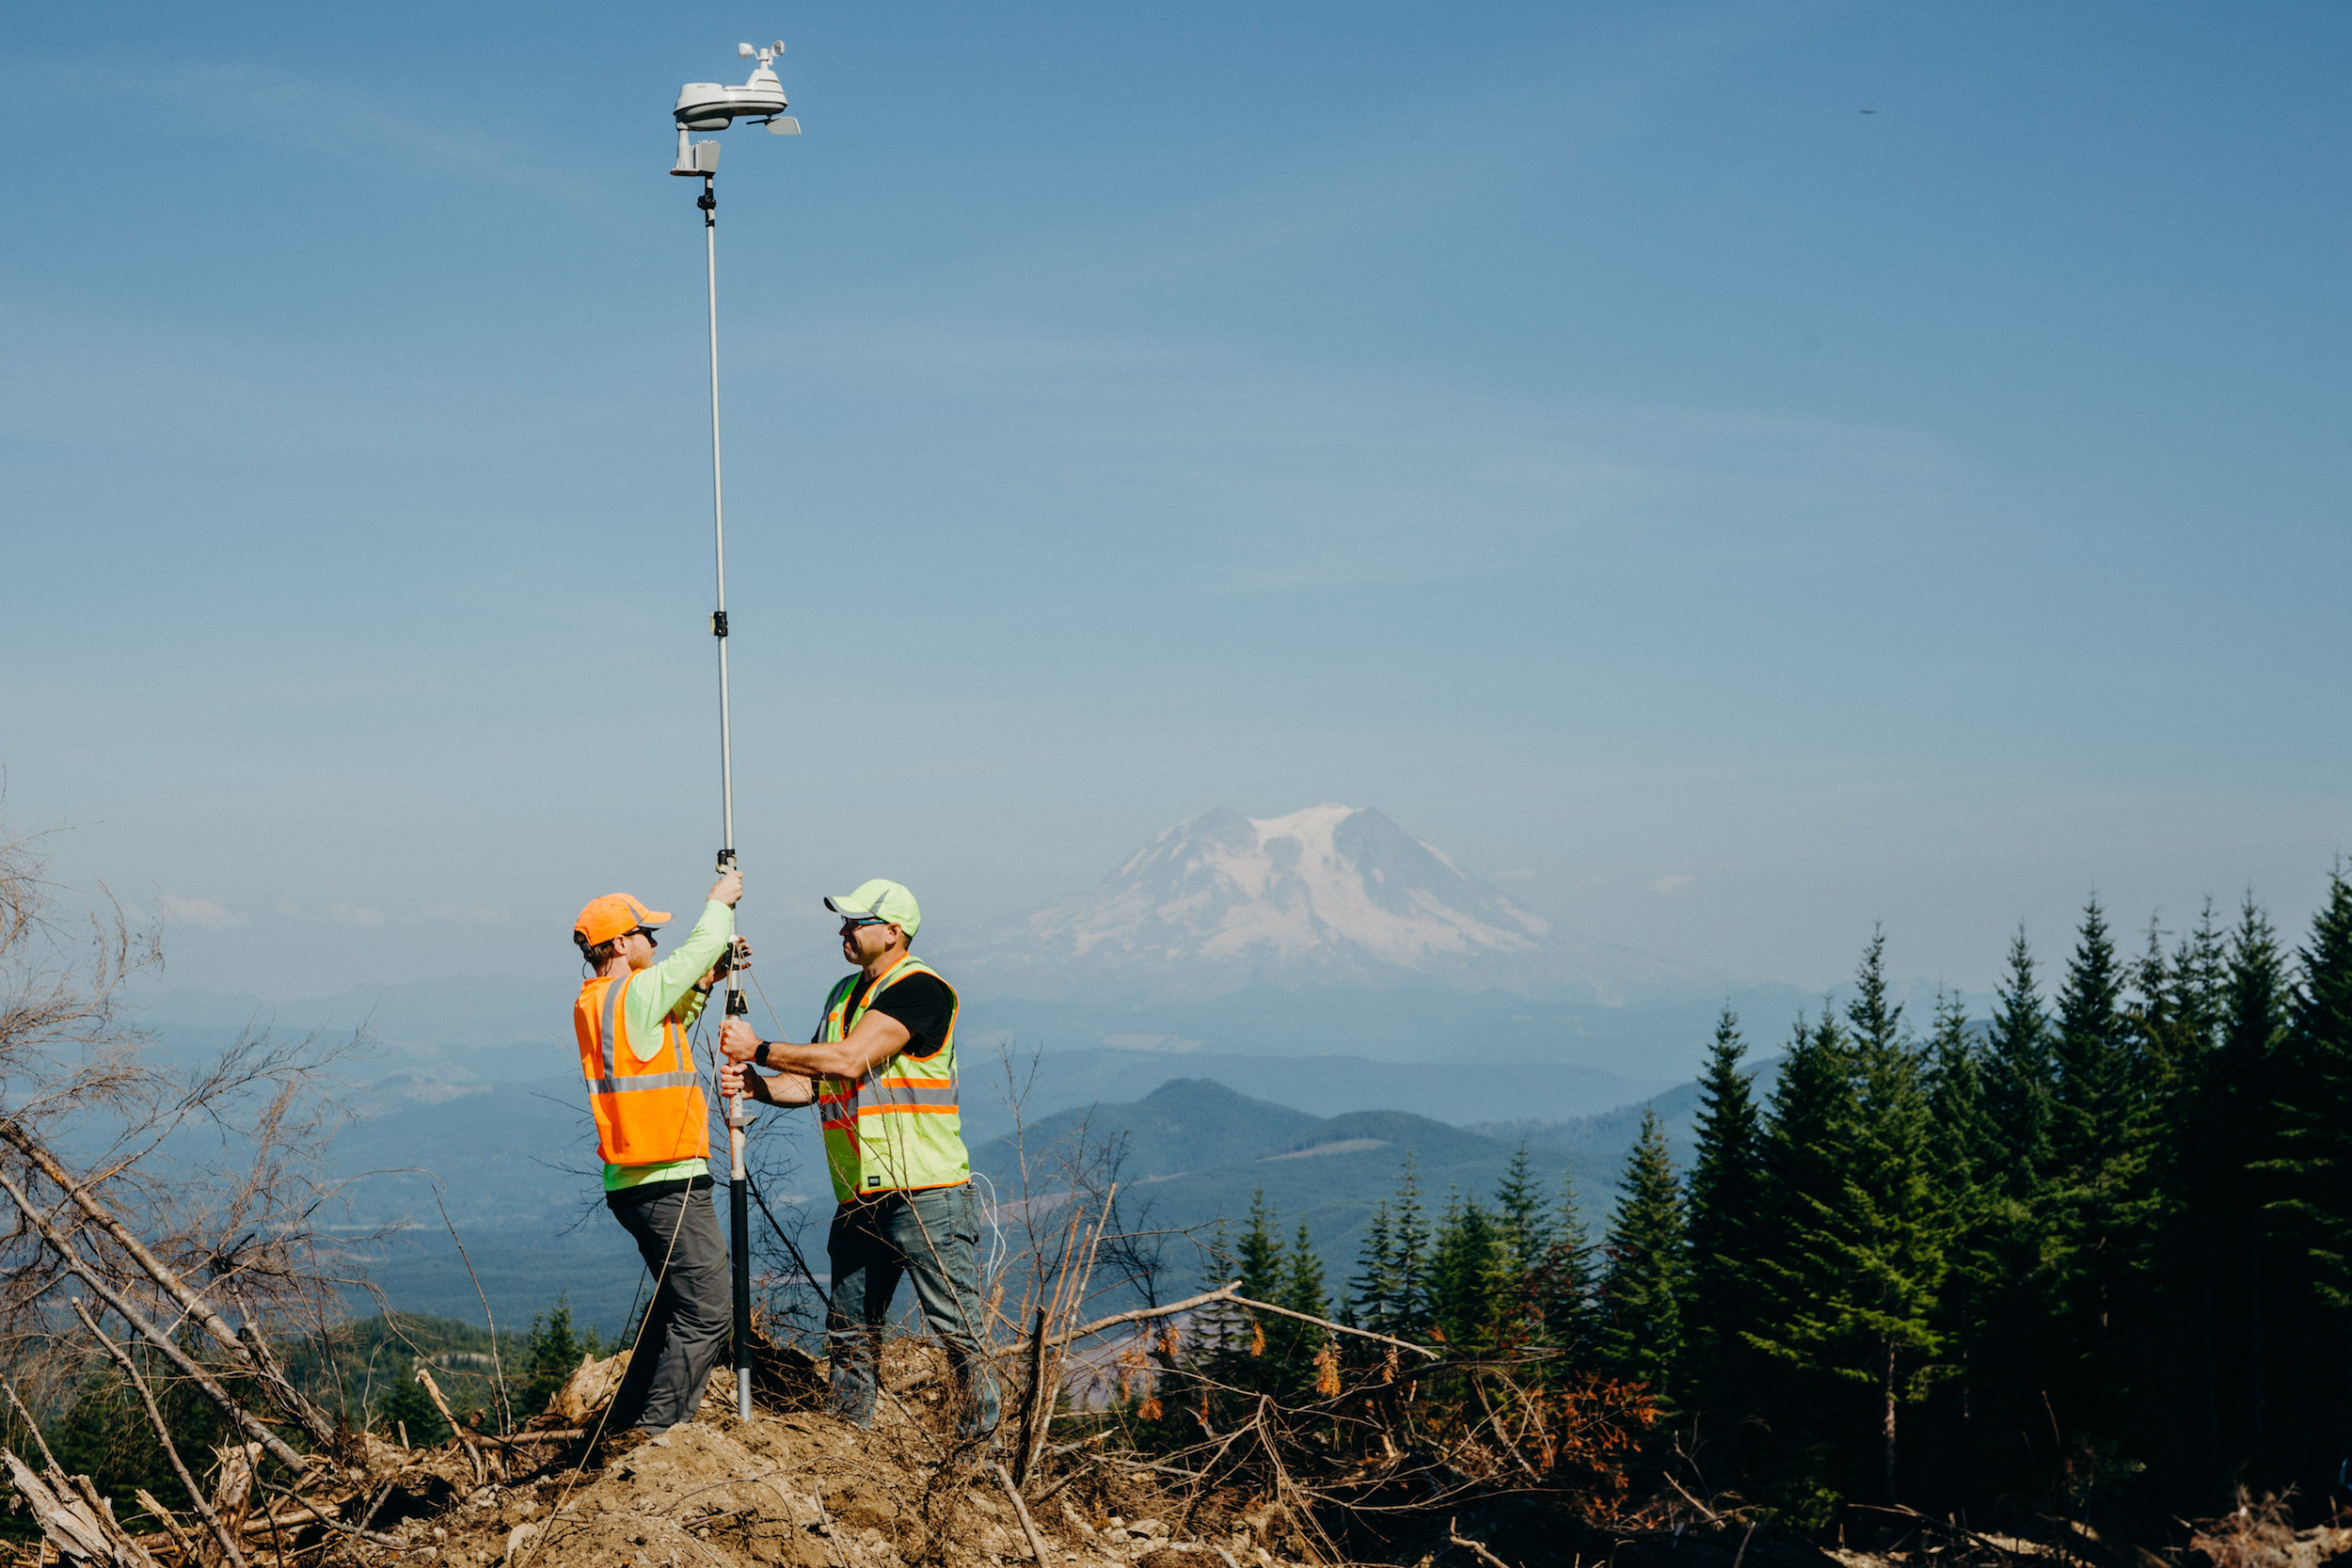
Now, spraying and planting are very different tasks. The first tends to be done indiscriminately using helicopters, and the second by laborers who burn out after a couple years — as mentioned above, it’s incredibly difficult work. The challenge in the first case is to improve efficiency and efficacy, while in the second case is to automate something that requires considerable intelligence.

Spraying is in many ways simpler. Identifying invasive plants isn’t easy, exactly, but it can be done with imagery like that the drones are collecting. Having identified patches of a plant to be eliminated, the drones can calculate a path and expend only as much herbicide is necessary to kill them, instead of dumping hundreds of gallons indiscriminately on the entire area. It’s cheaper and more environmentally friendly. Naturally, the opposite approach could be used for distributing fertilizer or some other agent.

I’m making it sound easy again. This isn’t a plug and play situation — you can’t buy a DJI drone and hit the “weedkiller” option in its control software. A big part of this operation was the creation not only of the drones themselves, but the infrastructure with which to deploy them.

Conservation convoy
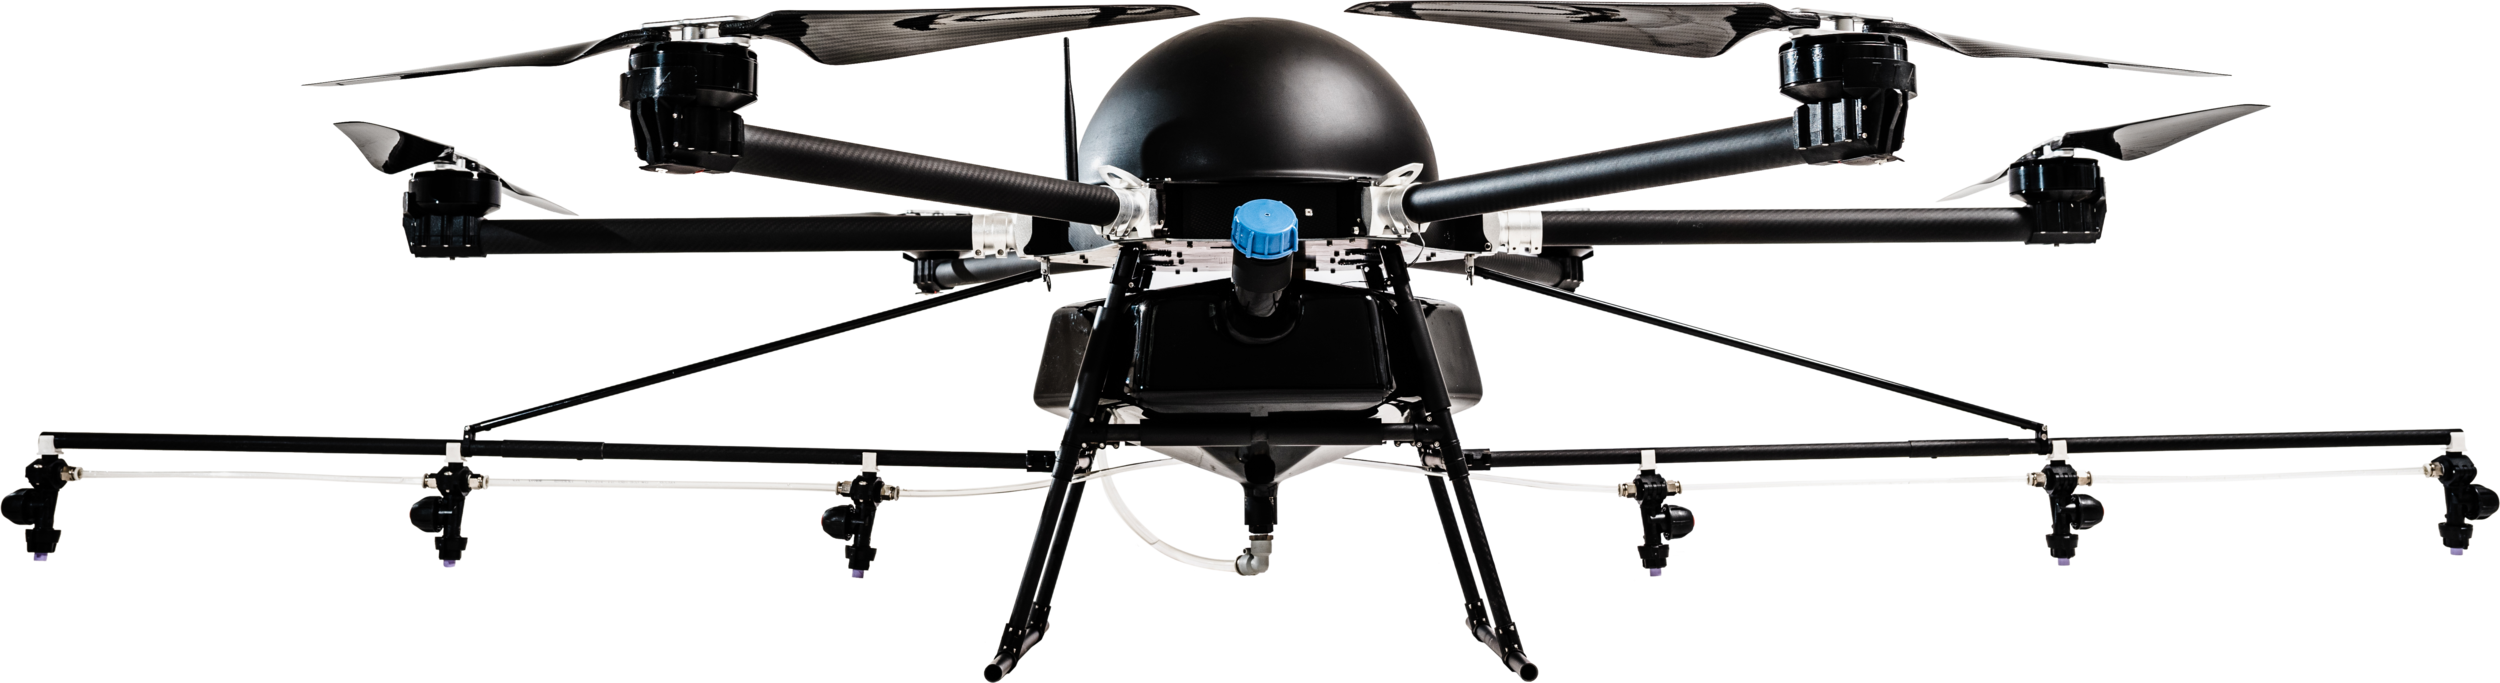
The drones themselves are unique, but not alarmingly so. They’re heavy-duty craft, capable of lifting well over the 57 pounds of payload they carry (the FAA limits them to 115 pounds).

“We buy and gut aircraft, then retrofit them,” Canary explained simply. Their head of hardware, would probably like to think there’s a bit more to it than that, but really the problem they’re solving isn’t “make a drone” but “make drones plant trees.” To that end, Canary explained, “the most unique engineering challenge was building a planting module for the drone that functions with the software.” We’ll get to that later.

DroneSeed deploys drones in swarms, which means as many as five drones in the air at once — which in turn means they need two trucks and trailers with their boxes, power supplies, ground stations, and so on. The company’s VP of operations comes from a military background where managing multiple aircraft onsite was part of the job, and she’s brought her rigorous command of multi-aircraft environments to the company.

The drones take off and fly autonomously, but always under direct observation by the crew. If anything goes wrong, they’re there to take over, though of course there are plenty of autonomous behaviors for what to do in case of, say, a lost positioning signal or bird strike.

They fly in patterns calculated ahead of time to be the most efficient, spraying at problem areas when they’re over them, and returning to the ground stations to have power supplies swapped out before returning to the pattern. It’s key to get this process down pat, since efficiency is a major selling point. If a helicopter does it in a day, why shouldn’t a drone swarm? It would be sad if they had to truck the craft back to a hangar and recharge them every hour or two. It also increases logistics costs like gas and lodging if it takes more time and driving.

This means the team involves several people as well as several drones. Qualified pilots and observers are needed, as well as people familiar with the hardware and software that can maintain and troubleshoot on site — usually with no cell signal or other support. Like many other forms of automation, this one brings its own new job opportunities to the table.

AI plays Mother Nature

The actual planting process is deceptively complex.

The idea of loading up a drone with seeds and setting it free on a blasted landscape is easy enough to picture. Hell, it’s been done. There are efforts going back decades to essentially load seeds or seedlings into guns and fire them out into the landscape at speeds high enough to bury them in the dirt: in theory this combines the benefits of manual planting with the scale of carpeting the place with seeds.

But whether it was slapdash placement or the shock of being fired out of a seed gun, this approach never seemed to work.

Forestry researchers have shown the effectiveness of finding the right “microsite” for a seed or seedling; in fact, it’s why manual planting works as well as it does. Trained humans find perfect spots to put seedlings: in the lee of a log; near but not too near the edge of a stream; on the flattest part of a slope, and so on. If you really want a forest to grow, you need optimal placement, perfect conditions, and preventative surgical strikes with pesticides.

Although it’s difficult it’s also the kind of thing that a machine learning model can become good at. Sorting through messy, complex imagery and finding local minima and maxima is a specialty of today’s ML systems, and the aerial imagery from the drones is rich in relevant data.

The company’s CTO led the creation of an ML model that determines the best locations to put trees at a site — though this task can be highly variable depending on the needs of the forest. A logging company might want a tree every couple feet even if that means putting them in sub-optimal conditions — but a few inches to the left or right may make all the difference. On the other hand, national forests may want more sparse deployments or specific species in certain locations to curb erosion or establish sustainable firebreaks.

Once the data has been crunched, the map is loaded into the drones’ hive mind and the convoy goes to the location, where the craft are loaded up with seeds instead of herbicides.

But not just any old seeds! You see, that’s one more wrinkle. If you just throw a sagebrush seed on the ground, even if it’s in the best spot in the world, it could easily be snatched up by an animal, roll or wash down to a nearby crevasse, or simply fail to find the right nutrients in time despite the planter’s best efforts.

That’s why DroneSeed’s Head of Planting and his team have been working on a proprietary seed packet that they were unbelievably reticent to detail.

From what I could gather, they’ve put a ton of work into packaging the seeds into nutrient-packed little pucks held together with a biodegradable fiber. The outside is dusted with capsaicin, the chemical that makes spicy food spicy (and also what makes bear spray do what it does). If they hadn’t told me, I might have guessed, since the workshop area was hazy with it, leading us all to cough tear up a little. If I were a marmot, I’d learn to avoid these things real fast.

The pucks, or “seed vessels,” can and must be customized for the location and purpose — you have to match the content and acidity of the soil, things like that. DroneSeed will have to make millions of these things, but it doesn’t plan to be the manufacturer.

Finally these pucks are loaded in a special puck-dispenser which, closely coordinating with the drone, spits one out at the exact moment and speed needed to put it within a few centimeters of the microsite.

All these factors should improve the survival rate of seedlings substantially. That means that the company’s methods will not only be more efficient, but more effective. Reforestation is a numbers game played at scale, and even slight improvements — and DroneSeed is promising more than that — are measured in square miles and millions of tons of biomass.

Proof of life

DroneSeed has already signed several big contracts for spraying, and planting is next. Unfortunately the timing on their side meant they missed this year’s planting season, though by doing a few small sites and showing off the results, they’ll be in pole position for next year.

After demonstrating the effectiveness of the planting technique, the company expects to expand its business substantially. That’s the scaling part — again, not easy, but easier than hiring another couple thousand planters every year.
Ideally the hardware can be assigned to local teams that do the on-site work, producing loci of activity around major forests from which jobs can be deployed at large or small scales. A set of 5 or 6 drones does the work of a helicopter, roughly speaking, so depending on the volume requested by a company or forestry organization you may need dozens on demand.

That’s all yet to be explored, but DroneSeed is confident that the industry will see the writing on the wall when it comes to the old methods, and identify them as a solution that fits the future.

If it sounds like I’m cheerleading for this company, that’s because I am. It’s not often in the world of tech startups that you find a group of people not just attempting to solve a serious problem — it’s common enough to find companies hitting this or that issue — but who have spent the time, gathered the expertise, and really done the dirty, boots-on-the-ground work that needs to happen so it goes from great idea to real company.

That’s what I felt was the case with DroneSeed, and here’s hoping their work pays off — for their sake, sure, but mainly for ours.


Read Full Article

26 November 2018

AppleCare Warranty: What Are Your Options and Is It Worth It?


When you buy an Apple product, you’ll likely see an offer to purchase AppleCare+ along with it. Apple’s official warranty can provide peace of mind, but is it worth the additional cost on an already expensive device?

Let’s take a closer look. We’ll examine what AppleCare+ covers, how much it costs for your device, and whether AppleCare+ is worth it.

What Is AppleCare?

AppleCare Home

AppleCare is Apple’s first-party warranty plan for its devices. Most Apple products come with a one-year warranty and three months of phone support if you need help—this is called AppleCare.

Adding AppleCare+, Apple’s extended warranty, increases these periods so your devices are covered for longer. You can purchase it to protect your Mac, iPad, iPhone, Apple Watch, Apple TV, HomePod, or iPod Touch.

Normally, we advise against buying extended warranties for electronics. They’re usually just a way for the seller to make more money, as most devices won’t need repairs during their lifetime.

However, AppleCare is a special case due to Apple’s tight control on its products. Since the company designs the hardware, OS, and lots of apps for its devices, having a warranty from that company is an attractive idea. Notably, AppleCare+ also covers accidental damage, as we’ll discuss shortly.

Apple lets you transfer AppleCare+ coverage. If you sell or give away your device, the rest of the warranty goes with it. This can make selling your Mac easier as extra coverage sweetens the deal—check out Apple’s AppleCare transfer page for information.

How Do I Get AppleCare+?

When you buy an Apple product from the website or in an Apple Store, you’ll have the opportunity to add an AppleCare+ plan. If you decide you want to buy AppleCare+ later, you can do so within 60 days of your purchase.

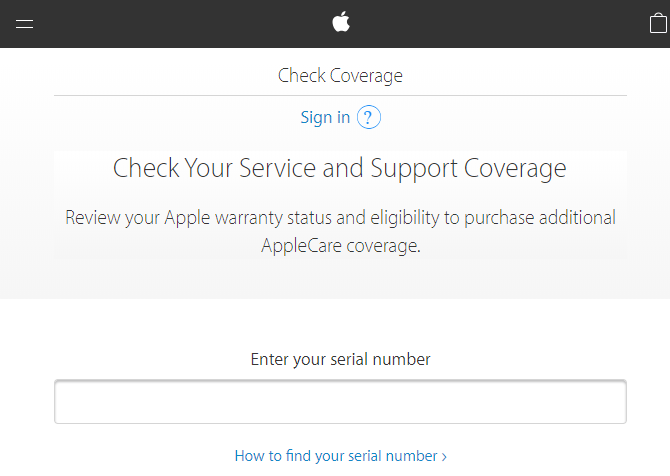
To do so, head to Apple’s warranty status page and enter your device’s serial number to start the process. This requires you to run a remote diagnostic so Apple can confirm your device is in good shape.

Apple Check Warranty Coverage

If you don’t want to purchase AppleCare+ online, you can do so in an Apple Store instead. A technician will inspect your device, plus you’ll need to provide proof of purchase.

Not sure if you have AppleCare+ already? Sign into Apple’s My Support page and you can check the status on all your devices.

What Does AppleCare+ Cover?

As mentioned, AppleCare+ essentially acts as an extension of your complimentary warranty. However, what AppleCare+ covers depends on your device. And when you need service, you have a few options.

If you have a MacBook, iPhone, or other portable device, you can mail your Mac to Apple using a prepaid shipping box. For desktop Macs, Apple will send a technician to you. Or if you prefer, you can bring your device into an Apple Store.

Your purchase also includes 24/7 support via online chat or phone call.

AppleCare+ for Mac

macbook-vs-imac

AppleCare+ for Mac extends your warranty coverage for two additional years (a total of three years). It also covers up to two accidental damage coverages. If you take your Mac in for accidental damage, Apple charges you $99 to fix the screen or $299 for anything else.

Items covered under warranty include the battery, power adapter, RAM, and similar. If you’ve got a Mac problem, we’ve covered the best free tools to fix common macOS issues.

AppleCare+ for iPhone

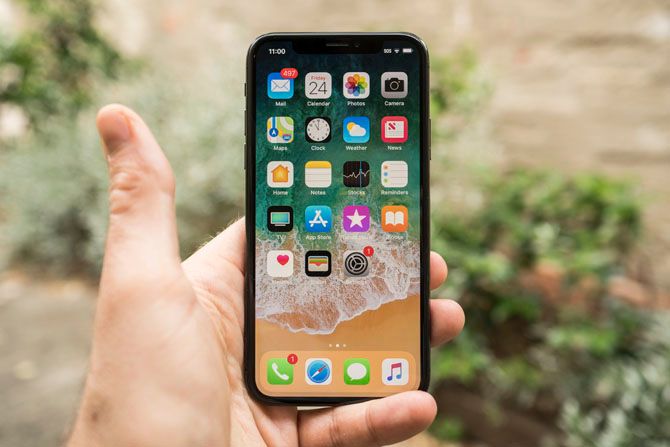
iPhone X

Apple offers two AppleCare+ plans for your iPhone.

The first is AppleCare+, which gives an additional year of warranty coverage (two years total) and covers up to two accidental damage fixes. These will cost you $29 to fix the screen or $99 for anything else.

For complete coverage, Apple also offers the AppleCare+ with Theft and Loss plan. This includes everything in the standard plan, plus coverage if your iPhone is lost or stolen. As long as you have Find My iPhone enabled at the time of incident, you can get a replacement device.

Apple charges a deductible for this replacement, which depends on your device:

  • iPhone 8, 7, and 6S: $199
  • iPhone XR, 8 Plus, 7 Plus, and 6S Plus: $229
  • iPhone XS, XS Max, and X: $269

AppleCare+ for iPad

Purchasing AppleCare+ for your iPad grants you an additional year of warranty coverage (two years total). This also includes Apple Pencil coverage, if you bought one with your iPad.

In addition, this warranty covers the iPad’s battery and all included cables.

Like the coverage for Mac, you get two accidental damage incidents as well. Apple charges $49 to fix an iPad issue, or $29 for an Apple Pencil problem.

AppleCare+ for Apple Watch

MilaneseLoop_670

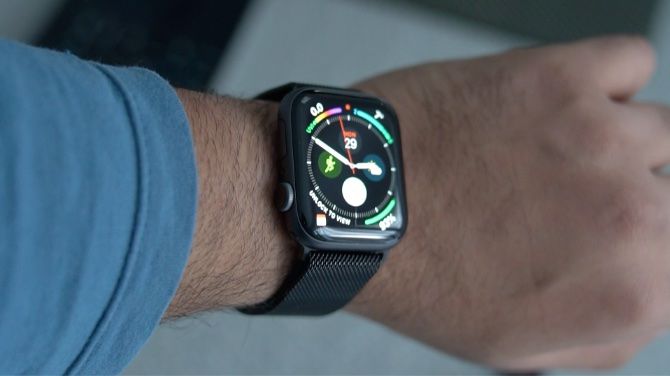
AppleCare+ for the Apple Watch and Apple Watch Nike+ adds another year of warranty coverage (for two total). The Apple Watch Hermès comes with a two-year warranty, so AppleCare+ extends this to three years total. Coverage includes the device, battery, and charging cable.

Like the other plans, your Apple Watch coverage includes two incidents of accidental damage. Apple charges a fee of $69 ($79 for the Apple Watch Hermès) for these.

AppleCare Protection Plan for Apple TV

Apple calls the Apple TV coverage plan “AppleCare Protection Plan” instead of AppleCare+. But it still includes the same additional year of warranty coverage (two years total). This includes the Apple TV unit and remote.

Unlike the other plans, this does not include coverage for accidental damage (likely the reason for the name difference).

AppleCare+ for HomePod

Apple HomePod

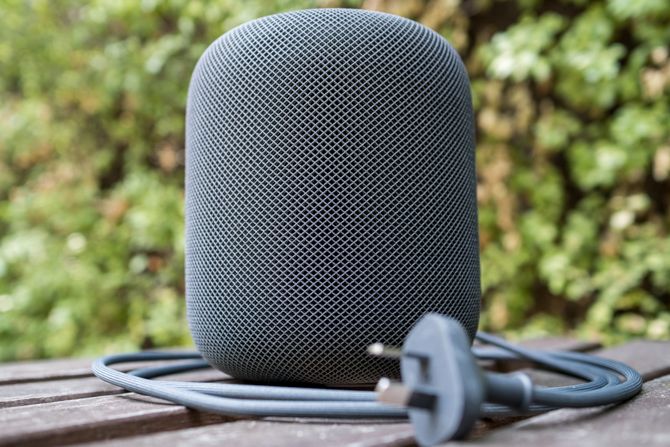
You know what to expect by now: the AppleCare+ plan for your HomePod adds another year of warranty coverage for two total. You get two accidents covered for a fee of $39 each time.

Don’t have a HomePod? Check out cool HomePod features that will make you want one.

AppleCare+ for iPod Touch

AppleCare+ will extend your iPod Touch’s warranty to two years total. Coverage includes the device, battery, and included earbuds and charging cable. If you accidentally damage it, you can pay Apple $29 for a repair, up to two times.

How Much Is AppleCare+?

The cost of an AppleCare+ plan depends on what device you’re protecting. Below is a list of current rates:

  • MacBook or MacBook Air: $249
  • 13″ MacBook Pro: $269
  • 15″ MacBook Pro: $379
  • Mac mini: $99
  • iMac/iMac Pro: $169
  • Mac Pro: $249
  • iPhone XS or XS Max: $199 | $299 with theft and loss
  • iPhone XR, 8 Plus, or 7 Plus: $149 | $249 with theft and loss
  • iPhone 8 or 7: $129 | $199 with theft and loss
  • iPhone SE: $99
  • iPad Pro: $129
  • iPad or iPad Mini: $70
  • Apple Watch Series 4: $79
  • Apple Watch Hermès: $99
  • Apple Watch Series 3: $49
  • Apple TV: $29
  • HomePod: $39
  • iPod Touch: $59

Is AppleCare+ Worth It?

If AppleCare+ was only a warranty, it would be pretty easy to recommend against it.

The chance of a defect affecting your device after the complimentary warranty isn’t that high, especially with Apple products that are known for their high quality. And the support service for questions isn’t that important due to the wealth of information available online.

However, AppleCare+ also includes fixes for accidental damage. Depending on how careful you are with your devices (and whether you can fix your iPhone on your own), this may work out in your favor.

Comparing Repair Prices

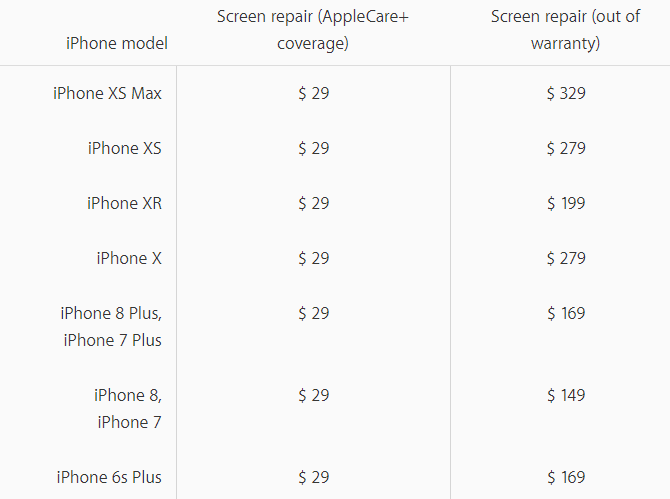
Taking a look at Apple’s iPhone repair page provides a good idea of what you’ll pay for out-of-warranty fixes compared to AppleCare+ coverage.

An iPhone screen repair, for instance, costs $29 with AppleCare+ no matter what device you have. But without coverage, you’ll pay anywhere from $149 for an iPhone 7 to $279 for an iPhone XS.

iPhone Screen Repair Cost

“Other repairs,” which include anything aside from the battery and screen, are more costly. They’re $99 regardless of device with AppleCare+, but can cost anywhere from $319 for an iPhone 7 up to a whopping $549 for an iPhone XS. Cracking the glass backs on the newest iPhone models falls under this.

AppleCare’s Value

Whether you should get AppleCare depends on how accident-prone you are, and what device you’re protecting.

Say you buy a new iPhone every two years and expect to crack the screen once per phone. AppleCare+ coverage for an iPhone XS costs $199 upfront, plus $29 for the repair. Without this, you’d pay $279 out of pocket for the repair.

Thus, if you crack your newer iPhone screen even once during its life, AppleCare+ provides a good value. However, since the newest iPhones are all-screen, their screen repair prices are accordingly higher.

The price to fix an iPhone 8’s screen out of warranty is $149. Compared to the $129 price of AppleCare+ for an iPhone 8, plus the $29 repair charge, it’s cheaper to pay for the repair out of pocket. Don’t forget that the newest iPhone models are also water-resistant, which helps protect from a common form of damage.

Consider what device you’re buying and whether you expect to accidentally damage it. It may be more cost-effective to simply set aside a bit of money each month for repairs. Then, if you don’t damage your device, you’ll have that money for something else.

If you can afford to replace something, it isn’t really worth insuring.

There Are Other AppleCare Alternatives, Too

AppleCare+ isn’t the only way to protect your device. If you tend to drop it often, get a protective case that will keep it safe from damage. This costs a fraction of a warranty’s price and you can choose from hundreds of cases.

Whatever you choose, know your typical usage and calculate the costs first. If you’ve never dropped an iPhone or had a Mac hardware defect in the past, it’s not worth the high cost to cover something that, in all likelihood, won’t happen.

If you can’t live without the peace of mind a warranty brings, consider another smartphone warranty plan like SquareTrade. Its phone warranty costs $9/month and covers accidental damage and defects, plus it offers several options when you need repairs.

Read the full article: AppleCare Warranty: What Are Your Options and Is It Worth It?


Read Full Article

How to Write a Company Profile and the Templates You Need

Create and Manage a Custom Digital Library for Your Business or Organization with BookFusion

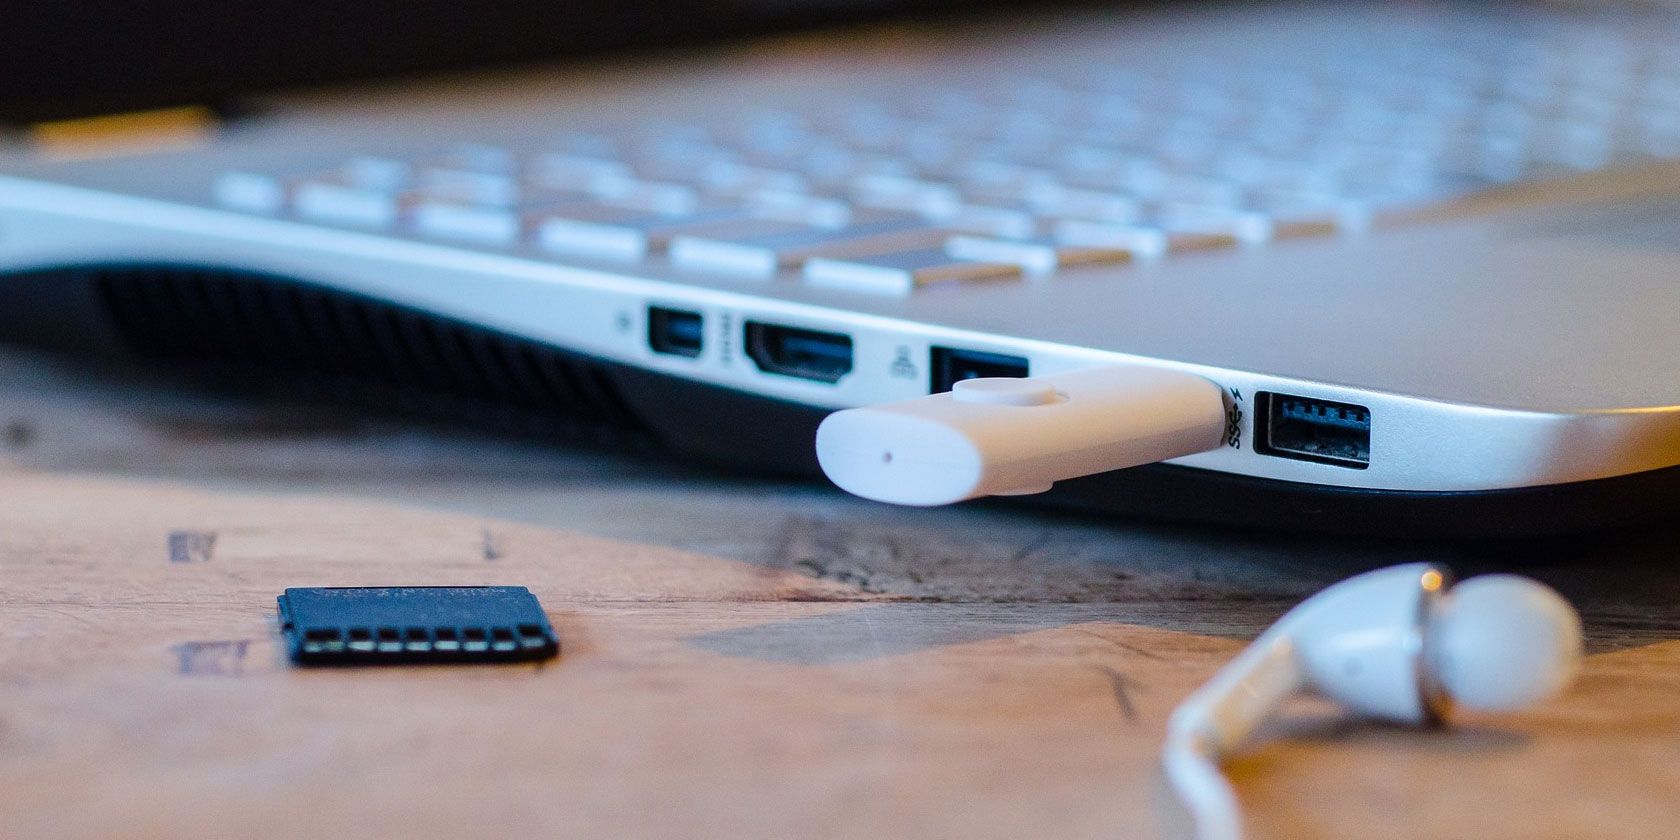
How to Connect Any Phone or Tablet to Your TV Using USB

What Happens When You Deactivate a Facebook Account?


deactivate-facebook

Facebook has endured several scandals in recent years, and they invariably concern the privacy and security of its users. This led to the #DeleteFacebook campaign, and you might have been tempted to delete Facebook as a result.

However, there is another option. Rather than deleting Facebook, you can just deactivate your account. But what does it mean to deactivate your Facebook account? In this article we’ll give you the facts about deactivating Facebook…

Deleting vs. Deactivating a Facebook Account

Should you deactivate or delete Facebook?

First, we need to clarify that there’s a difference between deleting and deactivating your Facebook account. They’re not interchangeable.

Essentially, deactivation is for people who aren’t completely certain they want to leave Facebook forever. If you just want to take a sabbatical from social media, deactivation is a good option, although it’s not the only one. You could merely ignore Facebook for a while without deactivating it, but that depends on how tempted you’ll be to return.

Deleting Facebook, meanwhile, is more permanent. It’s a decision not to be taken lightly; indeed, there are plenty of reasons not to delete Facebook. If you delete your account you can’t come back and expect any of your data to still be intact. There is a way to start again, but we’ll return to that later in the article.

Can People Search for Me If I Deactivate Facebook?

They can search for you, sure—you just won’t show up!

Your timeline will disappear, alongside your list of “likes”. That should happen immediately, though you’ll need to jump through a few hoops to get to that stage. Everything will be invisible.

Similarly, if you delete Facebook, your account will vanish. But full deletion won’t happen for a few days because the social network gives you some leeway. If you log back in shortly after deactivating your account, it will be automatically reactivated.

Otherwise, it takes 90 days for information on a deleted account to be removed from Facebook’s servers. Some details will still exist, but any personal identifiers will disappear. You’ll become a statistic.

Do My Comments Disappear If I Deactivate Facebook?

How to see all the private data held by Facebook

Your posts on your own timeline won’t be publicly visible, and your friends won’t be able to see them either. Your whole profile will have gone. But that doesn’t mean comments you’ve made to others will disappear too.

Facebook is obsessed with memories. It likes to make you nostalgic, and remind you of just how long you’ve used social media. It’s a way of building brand loyalty.

That’s why your comments won’t vanish. Your name will appear as plain text, as the link to your account will be broken. Your profile image will be replaced by a default icon too.

And of course, if you choose to reactivate, all those posts will revert back to normal.

What happens if you delete Facebook permanently? Facebook says your data will be erased within 3 months, but can’t guarantee that flotsam and jetsam—the comments, reactions, and posts—will be cleared.

How to Tell If Someone Deactivated Facebook

If you’re concerned that someone has been unusually quiet on Facebook, there are three options to consider. The first is that they’re simply busy. Try messaging them to check they’re OK.

Look through your list of friends. If they’re still listed, they’re probably just preoccupied. If they’re not, the second possibility is that they’ve blocked you. But before you investigate that, question whether they’ve got rid of their whole account.

So how do you know if someone has blocked you on Facebook or deactivated their account?

Go to a mutual friend’s profile and check whether the person in question is listed there. If their name is searchable, the profile still exists. Sadly, it’s very likely you’ve been blocked. Check on Messenger though; there could be a technical issue. You can’t send a message if you’ve been blocked, and their profile picture will be replaced on any comments they’ve previously posted on your timeline.

Can I Still Use Messenger Without Facebook?

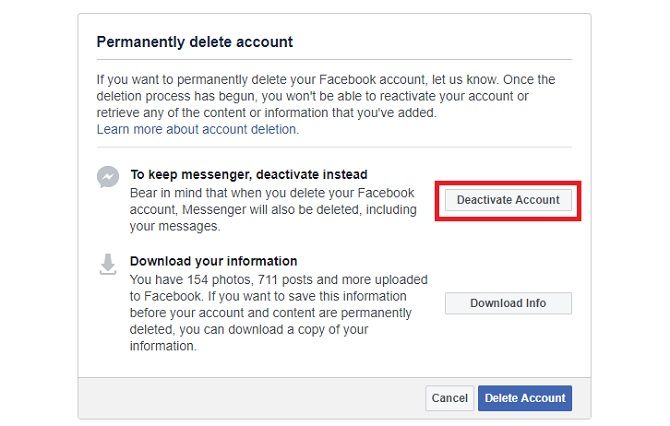
Facebook advises you deactivate your account if you carry on using Messenger

You might be worried that, by deactivating Facebook, you won’t be able to use the separate (but nonetheless connected) Messenger app. After all, they’re both owned by the same company and mine the same list of contacts. It seems Messenger cannot exist without its parent. That certainly used to be the case.

But fear not. It doesn’t actually matter if you don’t have a Facebook account: you can still use Messenger.

When you deactivate your account, Facebook will ask if you want to deactivate Messenger too. Say no, and your information on the app will be saved. Obviously, if you’d prefer to go without the instant messaging service, you can deactivate Messenger separately.

In some cases, you’ll need to reinstall Messenger after deactivation. If you delete Facebook, you’ll certainly have to sign into the app again, albeit using a slightly different method. To do this, you simply click Not On Facebook?, and add your name and phone number. Allow it access to your address book so you can keep in touch with your contacts.

Can People See My Messages If I Deactivate Facebook?

Yes, you can still use Messenger, so it follows that your messages will appear after deactivating your account. In fact, when you press “Send”, as long as you have internet access, the message will go straight to the recipient’s inbox.

However, if you delete Facebook, your previous messages will read “Facebook User”. They won’t be able to respond. Incidentally, this is the same thing that happens if you block someone.

Can You Reactivate a Facebook Account?

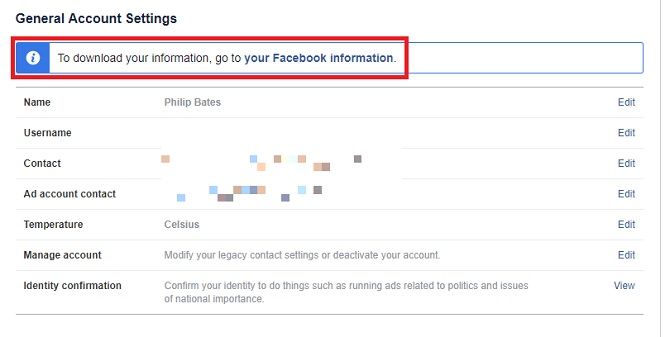
Facebook general account settings let you download all personal information

By and large, the answer is yes. But…!

If you’ve deactivated your Facebook account, all you need to do is log back in sometime. You can change your password if considerable time has lapsed and you’ve forgotten it. Your profile still exists, as does your personal information. Previous messages and comments typically reappear too.

Actually, Facebook makes it very easy to reactivate. That’s especially true if you’ve given the social network your phone number. Some users have reported getting texts from Facebook, tempting them back. Clicking on the accompanying link—even accidentally—will reactivate your profile.

Note: Don’t forget how dangerous it is to click on SMS links.

However, if you delete Facebook, you’ll need to have taken steps to prepare for your reactivation before having deleted it. The social network lets you download a copy of all the data Facebook has stored about you. That means you can get your account back up and running, although the process is a bit trickier than if you’ve merely deactivated it.

What Happens to Tagged Photos After Deactivation?

Because Facebook has saved your data for your potential return, tags in pictures will still exist. However, those tags will convert to plain text. No one can link those images to a profile (to reiterate, your profile isn’t visible to anyone). This is also true of any other posts you’ve tagged in.

If you reactivate your account, the tags will reappear as if nothing’s happened.

This is pretty much the same after deletion; tags will revert to plain text. If you open a new account, those original tags won’t link automatically with your name again. Just think of the number of people with the same name as you.

Let’s say you have deleted your profile, then regretted it, and decided to return. You’ll need to ask your contacts to remove previous tags and update them to your new profile.

sending a message to facebook via smartphone app

Worried about an embarrassing photo? Don’t want people identifying you even after deactivation or deletion? Don’t forget you can manually remove tags anyway—but do so before taking further steps with your account.

Should You Deactivate or Delete Facebook?

If you’re reading this because you’re not sure whether to delete or deactivate Facebook, choose the former. Why? Because you’re clearly unsure about the decision. Therefore it’s better to go for the non-nuclear option which will allow you to return one day.

Read the full article: What Happens When You Deactivate a Facebook Account?


Read Full Article

8 Adobe Photoshop Workflow Tips to Improve Your Image Editing


photoshop-workflow

Working in Photoshop can be time-consuming, but there are a few tips and tricks you can use to speed up your workflow. This will ensure that you spend your time being creative, rather than wasting time doing things the long winded way.

1. Clone Photoshop Layer Styles

You’ve spent a ton of time perfecting your design using Photoshop’s layers and styles. Instead of painstakingly applying the same styles to a new layer or design, you can “copy and paste” the styles.

To access Layer Styles, right-click the layer and select Blending Options. You can add outlines to your Photoshop designs, along with drop shadows, bevels, and strokes.

To quickly copy one layer style to another, right-click the layer with the styles applied and click Copy Layer Style.

Click on the layer where you want to apply the styles. Right-click the layer and select Paste Layer Style.

Copy-Layer-Style-Photoshop

You can also drag and drop the layer style in the layers panel, but this will remove it from the original layer.

Drag-Photoshop-Layer-Style

2. Batch Resize Images

You can easily resize a large batch of photos in Photoshop using a script. (Don’t worry, it’s not as intimidating as it sounds.)

Go to File > Scripts > Image Processor, and you’ll find a few options available. You can run the script on images that you currently have open in Photoshop or better yet, you can apply the settings to an entire folder of images.

You can also select the location on your computer to save the resized images, the file type (jpeg, PSD, or TIFF), and the quality.

Once you’ve selected your file type, you can now select your image size by checking Resize to Fit. You can select a specific width or height, depending on your needs.

Once you’ve made your selections, click Run.

Photoshop-Scripts-Batch-Resize-Images

3. Quickly Select a Photoshop Layer

If you’re working with a ton of layers, it can be tedious scrolling to find the exact one you’re looking for.

There are a few faster ways to get straight to the layer(s) you want to adjust without touching the layers panel.

  1. Select the Move tool from the Tools menu or use the keyboard shortcut V
  2. In the menu at the top of the screen, make sure Auto-Select is checked and that Layer is selected from the drop-down menu.
  3. Click on the item in your canvas that you want to select and it should now be the selected, active layer in the Layers panel.

Auto-Select-Layers-Photoshop

You can also use this feature to quickly select Groups by choosing Groups from the Auto-Select drop-down menu.

There’s another option. With the Move tool selected, press the Ctrl/Cmd button on your keyboard and then click the layer you want to select.

If you have a crowded canvas, you can get more specific with the following:

  1. With any tool selected, use the Ctrl+Cmd+Right click combination to bring up a menu panel. (Make sure that you’re clicking in the area where the item you want to select is on the canvas.)
  2. Click on the name of the layer you want to select.

Select-Layers-Photoshop

If you want to select all of the layers at the same time use the keyboard shortcut Command+Option+A on a Mac or Ctrl+Alt+A on Windows or go to Select > All Layers.

4. Zoom In and Out Simultaneously

If you’re working on an image, it can be helpful to see a closeup at the same time as the entire image. This means you can make small edits in a detailed view, and see how they affect the overall image at the same time.

To view a zoomed and 1:1 version of the image simultaneously, do the following:

  1. Go to Window > Arrange > New Window for [FileName.PSD]. This will open a second version of your image in a second tab.
  2. Go to Window > Arrange > 2-up Vertical to display both canvases side by side.
  3. With one of the canvases selected, zoom in. (You can easily zoom in and out using the keyboard shortcut Cmd/Ctrl+ and Cmd/Ctrl-.)

Dual-View-Zoom

5. Automate Using Actions and Scripts

There are plenty of ways to automate your work in Photoshop using a combination of actions and scripts.

Photoshop Actions cut your editing time by allowing you to apply the same editing techniques to your photos or images with the click of a button.

You can download Photoshop Actions or you create your own Actions for your personalized editing style. You can use also Actions for repetitive tasks like adding watermarks to your images or creating diptychs and triptychs.

And as we’ve mentioned, you can use Photoshop Scripts to automate repetitive tasks like batch resizing images.

In addition to Actions and Scripts, you can also use Photoshop filters for quick work. For example, filters make it easy to quickly add realistic trees to your Photoshop designs.

6. Create Custom Photoshop Shortcuts

You can create custom shortcuts and workspaces that suit your workflow.

Let’s say you want to set a keyboard shortcut for toggling the 2-Up vertical view used in the fourth tip in this article:

  1. Go to Edit > Keyboard Shortcuts or use keyboard shortcut Option+Shift+Cmd/Ctrl+K.
  2. In the panel that opens up, you can set or change existing keyboard shortcuts for Application Menus, Panel Menus, and Tools.
  3. In the drop-down menu for Shortcuts For select Application Menus.
  4. Scroll down to Window and click the arrow to expand the selection and see all the items you’d find under the Window menu.
  5. Scroll down to the menu item you want (in this case 2-Up Vertical) and click to select.
  6. Enter the keyboard shortcut you want to use. If the keyboard shortcut is already in use for another feature, Photoshop will let you know.
  7. Click OK.

Custom-Keyboard-Shortcuts-Photoshop

To create a custom workspace, open up all the panels you use frequently, and then go to Windows > Workspace > New Workspace to create a customized interface.

7. Hide All Photoshop Layers Except One

While we’ve shown you a few easy ways to get right to the layer you want to work with, Photoshop also offers the option to hide all layers except one. To do this, you’ll need the Layers panel open:

  1. If you don’t see the Layers panel to go to Windows > Layers to open it.
  2. Hold down the Alt/Option key and click the visibility (eye) icon next to the layer you want to keep open.
  3. All other layers will be toggled off with the exception of the one you clicked.

Toggle-One-Layer-On-Photoshop

This method will also toggle off your background.

8. Organize Your Photoshop Layers

Keeping your layers organized can be a little time consuming, but in the long run, it can save you time.

Properly naming your layers makes it easier to navigate the Layers panel and to select your layers using the tips on how to quickly select a layer.

To rename a layer, open the Layers panel and find the layer you want to rename and double-click the text of the name. You can then type in the new name.

You can also name your layers as you create them by using the menu item Layer > New > Layer or use the keyboard shortcut Shift+Cmd/Ctrl+N. You can then type in the name of the layer before you create it.

New-Layer-Name

To add your layers to groups, open the Layers panel:

  1. To select multiple layers, hold down the Ctrl/Cmd key and click the layers you want to select.
  2. Use the keyboard shortcut Ctrl/Cmd+G or right-click the layers and click Group from Layers.

When it comes to organizing your layers, you can use whatever approach suits your workflow best, but here are some tips if you need a hint on how to get started with keeping your layers in check:

  • Group your layers by type. If you’re creating a button, for example, group all the items that make up that button: shapes, text etc. in one folder.
  • Position your layers in the panel similarly to how they appear on your canvas. Place the items at the top of your design at the top of your Layers panel.

To quickly navigate between layers, you can use the following keyboard shortcuts:

  • Select layer beneath selected layer: Alt/Opt+[
  • Select layer above selected layer: Alt/Opt+]
  • Move layer down one position: Cmd/Ctrl+[
  • Move layer up one position: Cmd/Ctrl+]

Keep Speeding Up Your Photoshop Workflow

The more you use Photoshop, the more you’ll learn about speeding up your workflow. As it becomes clearer to you which features you use most often, you can search for more tips and tricks to speed up your workflow.

If you’re still getting the hang of Photoshop, these tips will come in handy, but first be sure to take a look at everything you need to know to learn the basics of Photoshop.

Read the full article: 8 Adobe Photoshop Workflow Tips to Improve Your Image Editing


Read Full Article

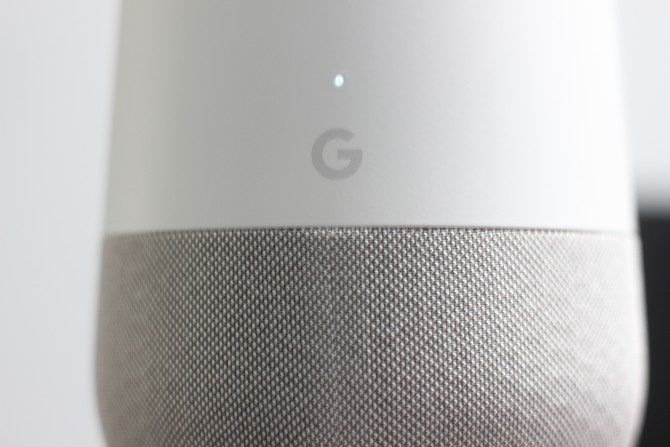
5 Essential Tips to Secure Your Google Home Device


google-home-security

Although Amazon Alexa is leading the way among home-based digital assistants, Google Home is quickly catching up, packed with powerful features.

To set up and use your Google Home device with full functionality, you need to use your Google account credentials. This means that Google Home collects a significant amount of data and personal information.

If this worries you, it’s time to think about your relationship with Google, and how to secure your Google Home.

5 Ways to Secure Your Google Home Device

How do you secure a Google Home device?
In my opinion, Google is one of the more trustworthy companies when it comes to the collection and processing of personal data. In fact, having all this data in one place within Google Home is arguably preferable to having it scattered among various third parties.

  1. Enable voice match
  2. Limit external devices
  3. Use two-factor authentication
  4. Mute Google Home
  5. Discard old voice recordings

As with any IoT device, however, there are a few accepted best practices for securing Google Home devices. Before reading on, ensure your Wi-Fi network is backed-up by a secure password and WPA2 encryption. For bonus points, set up your Google Home and other smart devices on their own network.

When you have secured your home network, you can take these steps to protect your Google Home device.

1. Enable the Voice Match Feature

Unlike Amazon Alexa, Google Home has a feature known as ‘Voice Match’ that learns your voice over time.

This means that you can not only tailor Google Home to answer your questions in a personalized way, but you can also stop third-parties and unauthorized strangers from using Google Home’s voice functionality to access sensitive information.

Using Voice Match, Google Home will provide personalized results only if it recognizes an authorized voice. You can enable Voice Match by navigating to your Google Home app and setting it up.

You will have to train Google Home by talking to it, but this doesn’t take too long. When Voice Match is enabled, only authorized voices will be able to activate the device.

2. Don’t Go Crazy With External Devices

It can be tempting to hook up all your external devices with Google Home. However, the more additional devices and services you use—for example, banking—the more vulnerable you and your personal information become.

If you are using more devices and services then more data is being sent back and forth to third-party companies and service providers, and not all these entities are guaranteed to protect your data to the same extent as Google; when data is sent between Google Home and Google, it is encrypted.

Google Home provides plenty of opportunities to link external devices and services. Companies are understandably keen to get you to do this, however, you should resist the temptation if you are concerned about security.

Whilst linking your financial information to Google Home may be convenient, is it worth the risk?

3. Use Two-Factor Authentication

Two-factor authentication is an additional layer of security that can act as a barrier between thieves and your data. Remember, your Google Home is connected to your Google account, teeming with potentially valuable data. Consider your search history, email, Google Drive, music, and more.

If a hacker manages to steal your Google password, all this (including voice recordings from Google Home) is fair game.

Setting up two-factor authentication on the other hand completely secures your account. It makes it virtually impossible for a malicious third-party to access your account. The only way this would be possible is if somebody knew your password and had your phone.

Regardless of whether you use Google Home, use of two-factor authentication is always recommended.

4. Not Using Google Home? Mute It

Just like Amazon Alexa, Google Home can be unintentionally triggered and record conversations. Many people leave Google Home unmuted whilst it is not being used, however, they shouldn’t.

Phrases that sound nothing like the two wake words can still activate your device, so if you are concerned that unintentional waking of Google Home could record sensitive information then it’s a good idea to mute the device when it is not in use. Unintentional wakes will happen, that’s a virtual certainty.

Google Home devices have either an on/off toggle switch or mute button at the back of the device. When the microphone is muted, the notification light will turn orange. Until you re-enable the microphone, you will not be able to use voice commands.

5. Regularly Prune Old Voice Recordings

Many people don’t realize that Google stores all the interactions you and other people have with Google Home on the Google servers until you delete them.

Whilst most things that you use Google Home for is unlikely to be anything groundbreaking or valuable—who really cares about the fact that you asked Google for the time?—if you have ever used it for anything related to your finances or health, for example, you should delete these.

Regularly go through your Google Home’s old voice recordings in your Google account under “My Activity” to listen and delete them. You can also do this through the google Home app or by visiting myactivity.google.com—there’s no need to go rummaging through your Google account’s settings!

It’s Easy to Use Smart Devices Securely

Although home-based smart assistants have attracted negative press, they are perfectly safe when used properly. It is good practice to be securing your home network and any smart devices you use on them regardless. This simply comes with the territory when using modern smart products and benefiting from the IoT.

The bottom-line is that you don’t need to be a cybersecurity expert to use devices such as Google Home safely. By taking care of some very basic security-related housekeeping that, in the grand scheme of things, doesn’t take much time or effort, you can use smart devices without compromising your personal information.

Google Home isn’t the only risk from connected smart devices in your home. Various Internet of Things vulnerabilities can cause problems with smart home hardware.

Read the full article: 5 Essential Tips to Secure Your Google Home Device


Read Full Article

5 Ways to Fix a Malfunctioning USB Device or Port on Linux


fix-linux-usb

You’ve hooked up a USB flash drive, or a keyboard or mouse to your Linux PC. But nothing is happening.

What’s going on? Why won’t your Linux computer detect the device? Is it a Linux thing, or has your USB device stopped working?

USB Not Working in Ubuntu?

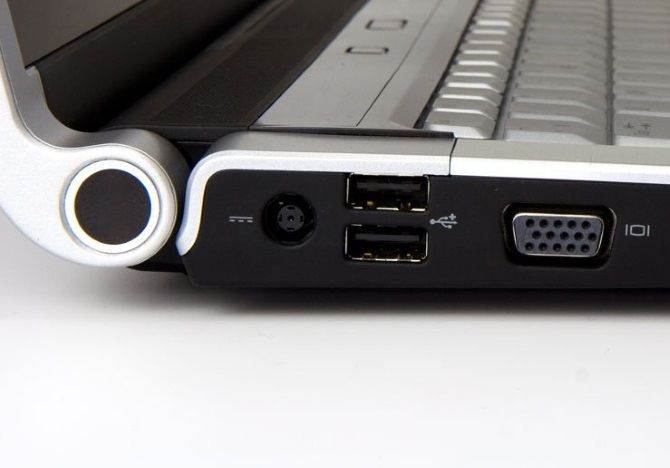
USB ports on a laptop

Disk drives, card readers, phones, media players, and media peripherals… they’re all useful, but if there’s a problem with your system’s USB port or drivers, they’re not going to work. This can be particularly frustrating if you use a Bluetooth keyboard (here’s why you shouldn’t) or mouse (with a USB dongle) as it means digging out wired USB alternatives.

However, it might not be the port that doesn’t work. Perhaps the USB device you’re using has developed a fault and cannot be detected.

Dealing with USB issues can be tricky, but it’s not impossible to diagnose a fault and make the necessary fixes.

There are five steps to follow to fix USB issues in Linux:

  1. Confirm the USB port is detected
  2. Make any necessary repairs to the port
  3. Fix or repair USB devices
  4. Reboot your Linux operating system
  5. Confirm the presence of device drivers

Let’s look at each of these in turn and learn how to deal with dodgy USB devices in Linux.

1. Is Your Device Detected by Linux?

The first thing to check upon inserting your USB device in your Linux computer is whether it is being detected. USB device detection is usually not as verbal or audible as it is in Windows or macOS, which means that often you need to check that the device has been picked up by the operating system.

Fortunately, this is simple.

Use the lsusb command in Linux

First, disconnect the USB device you’re querying. Then, open a terminal window and input the “list USB” command:

lsusb

Make a note of the results, then connect the USB device, and run lsusb again.

This time, you should see an extra device listed, with a Bus ID, Device ID, USB ID, and a description. If you can’t work out what the extra device is (you may have an internal USB device, perhaps Ethernet), try a different command.

dmesg | grep -i USB

The dmesg command will list the connected USB devices on your system. It will also include non-USB hardware, and unfortunately offers an overwhelming amount of information. To counter this, you can try

dmesg | less

Finally, you could just rely on the more user-friendly

usb-devices

This is like a cross between the dmesg and lsusb commands, listing connected USB hardware with enough information to identify them.

So, is the USB you’ve connected listed here? If not, then perhaps the port is damaged or there is a problem with the device. Equally, the device may not be compatible with Linux.

2. How to Check Your USB Port

If the USB device isn’t showing, it could be due to an issue with the USB port.

The best way to check this quickly is to simply use a different USB port on the same computer. If the USB hardware is now detected, then you know you have a problem with the other USB port.

If another USB port is not available, you’ll need to try the USB device on another PC or laptop. This may not be ideal, however, as you may only have a Windows or macOS computer as an alternative. As some USB devices cannot be used on Linux it will be difficult to ascertain whether it is the USB device, or the USB port that is causing you problems.

For the best results, where possible stick to Linux-compatible hardware when troubleshooting USB devices. No time to install Linux on another PC? Consider confirming the state of your USB hardware with a low-cost Raspberry Pi Zero instead.

3. Fixing Broken USB Hardware

If your USB hardware is defective, you have two choices: fix or return.

A fix will typically involve checking the USB port, as well as the device that is currently not working. Fixes will almost always center around the USB cable, and the port on your computer. USB cables can usually be replaced, however, while ports can be repaired.

A physical check of USB equipment is a good idea. Cables should be sturdy, without any splits; the plugs should be solid, with the metal section firmly attached.

USB ports, meanwhile, should be checked with your PC switched off, and disconnected from the mains supply. Check the ports are firmly seated; wobbly USB ports are an indication of hardware that is wearing out.

If the USB port is coming loose, you may be able to solder it back into place. Of course, you should already know how to solder; never attempt DIY jobs without prior experience.

Also, check for dust and dirt in your USB ports, especially those around the back of your PC where dust regularly collects. Dust is the enemy of PCs, so it is worth keeping your system in a dust free environment to encourage performance. As dust can work its way into your PC via USB slots, take the time to keep these ports clean. Use a can of compressed air to disperse dust and dirt.

Can you return your USB device? If it’s new, then probably. The problem is, unless it is explicitly labeled as running under Linux, then, the retailer is unlikely to accept a return. You may need to be a little selective with the facts you share with them…

4. Restarting Linux to Fix a USB Port

In some cases—such as if you’re using a laptop—power issues might be affecting its ability to detect USB devices. The autosuspend setting is designed to reduce power usage on Linux laptops, but it can prove counterproductive.

So, what can you do?

First, check whether autosuspend is causing the problem. You can do this by rebooting your computer; if the USB device works, then that USB port is receiving power.

The next step is to ensure this doesn’t happen again. The following command line tricks are for Ubuntu 18.10, so check for the correct procedure on your preferred Linux distribution.

Open a terminal window and input:

cat /sys/module/usbcore/parameters/autosuspend

This should return a value of 2, which means autosuspend is enabled. You can fix this by editing the grub file. Enter:

sudo nano /etc/default/grub

Fix USB power issues in Linux

Here, look for

GRUB_CMDLINE_LINUX_DEFAULT="quiet splash"

Change this to

GRUB_CMDLINE_LINUX_DEFAULT="quiet splash usbcore.autosuspend=-1"

Press Ctrl + X to save the file, and exit. Next, update grub:

sudo update-grub

When that completes, restart Ubuntu.

After rebooting, log into your account and enter the cat command again:

cat /sys/module/usbcore/parameters/autosuspend

This time, the value returned should be -1. You’ve disabled autosuspend, so USB devices connected to your laptop should not fail due to power issues.

5. Checking USB Device Drivers on Linux

Once upon a time, USB devices didn’t often work in Linux. Only devices produced by OEMs with an interest in Linux (perhaps they used it for development) would offer a Linux driver.

These days, things are very different, with most manufacturers offering a Linux driver. In most cases, this will already be available in your Linux operating system, via the kernel.  You shouldn’t need to install any USB drivers.

If a driver is unavailable, you’ll probably be able to find it by contacting the USB device manufacturer.

Troubleshooting USB Issues on Linux: Fixed!

With built-in drivers and wide support for many types of USB device, it should be easy to diagnose issues with your computer’s USB hardware.

While broken hardware may need repairing or swapping, software fixes are also available.

If you’ve recently swapped from Windows, running into USB issues on Linux can be a problem. Fortunately, these problems are usually easily solved, helping to make switching to Linux easy!

Read the full article: 5 Ways to Fix a Malfunctioning USB Device or Port on Linux


Read Full Article

9 Useful Apps to Download Before Your Next International Trip

The Best Cyber Monday Deals From Amazon

Banuba raises $7M to supercharge any app or device with the ability to really see you


Walking into the office of Viktor Prokopenya – which overlooks a central London park – you would perhaps be forgiven for missing the significance of this unassuming location, just south of Victoria Station in London. While giant firms battle globally to make Augmented Reality a ‘real industry’, this jovial businessman form Belrarus is poised to launch a revolutionary new technology for just this space. This is the kind of technology some of the biggest companies in the world are snapping up right now, and yet, scuttling off to make me a coffee in the kitchen is someone who could be sitting on just such a company.

Regardless of whether it’s immediate future is obvious or not, AR has a future if the amount of investment pouring into the space is anything to go by.

In 2016 AR and VR attracted $2.3 billion worth of investments (a 300% jump from 2015) and is expected to reach $108 billion by 2021 – 25% of which will be aimed at the AR sector. But, according to numerous forecasts, AR will overtake VR in 5-10 years.

Apple is clearly making headway in its AR developments, having recently acquired AR lens company Akonia Holographics and in releasing iOS 12 this month, it enables developers to fully utilize ARKit 2, no doubt prompting the release of a new wave of camera-centric apps. This year Sequoia Capital China, SoftBank invested $50M in AR camera app Snow. Samsung recently introduced its version of the AR cloud and a partnership with Wacom that turns Samsung’s S-Pen into an augmented reality magic wand.

The IBM/Unity partnership allows developers to integrate Watson cloud services such as visual recognition, speech to text, and more into their Unity applications.

So there is no question that AR is becoming increasingly important, given the sheer amount of funding and M&A activity.

Joining the field is Prokopenya’s “Banuba” project. For although you can download a Snapchat-like app called ‘Banuba’ from the App Store right now, underlying this is a suite of tools of which Prokopenya is the founding investor, and who is working closely to realize a very big vision with the founding team of AI/AR experts behind it.

The key to Banuba’s pitch is the idea that its technology could equip not only apps but even hardware devices with “vision”. This is a perfect marriage of both AI and AR. What if, for instance, Amazon’s Alexa couldn’t just hear you? What if it could see you and interpret your facial expressions or perhaps even your mood? That’s the tantalizing strategy at the heart of this growing company.

Better known for its consumer apps, which have been effectively testing their concepts in the consumer field for the last year, Banuba is about to move heavily into the world of developer tools with the release of its new Banuba 3.0 mobile SDK. (Available to download now in the App Store for iOS devices and Google Play Store for Android). It’s also now secured a further $7m in funding from Larnabel Ventures, the fund of Russian entrepreneur Said Gutseriev, and Prokopenya’s VP Capital.

This move will take its total funding to $12m. In the world of AR, this is like a Romulan warbird de-cloaking in a scene from Star Trek.

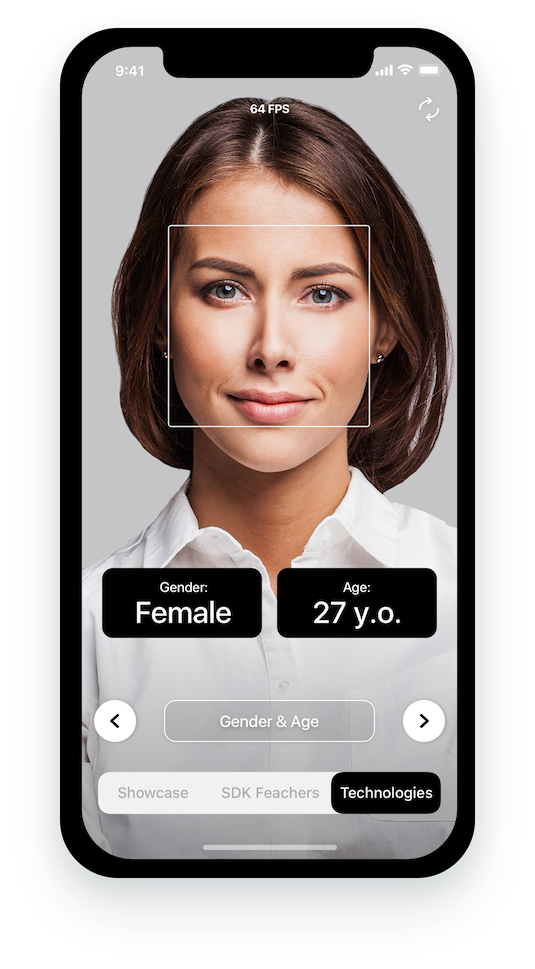
Banuba hopes that its SDK will enable brands and apps to utilise 3D Face AR inside their own apps, meaning users can benefit from cutting-edge face motion tracking, facial analysis, skin smoothing and tone adjustment. Banuba’s SDK also enables app developers to utilise background subtraction, which is similar to ‘green screen’ technology regularly used in movies and TV shows, enabling end-users to create a range of AR scenarios. Thus, like magic, you can remove that unsightly office surrounding and place yourself on a beach in the Bahamas…

Because Banuba’s technology equips devices with ‘vision’, meaning they can ‘see’ human faces in 3D and extract meaningful subject analysis based on neural networks, including age, gender, it can do things that other apps just cannot do. It can even monitor your heart rate via spectral analysis of the time-varying color tones in your face.

It has already been incorporated into an app called Facemetrix, which can track a child’s eyes to ascertain whether they are reading something on a phone or tablet or not. Thanks to this technology, it is possible to not just to “track” a person’s gaze, but also to control a smartphone’s function with a gaze. To that end, the SDF can detect micro-movements of the eye with subpixel accuracy in real-time, and also detects certain points of the eye. The idea behind this is to “Gamify education”, rewarding a child with games and entertainment apps if the Facemetrix app has duly checked that they really did read the e-book they told their parents they’d read.

If that makes you think of a parallel with a certain Black Mirror episode where a young girl is prevented from seeing certain things via a brain implant, then you wouldn’t be a million miles away. At least this is a more benign version…

Banuba’s SDK also includes ‘Avatar AR’, empowering developers to get creative with digital communication by giving users the ability to interact with – and create personalized – avatars using any iOS or Android device.

Prokopenya says: “We are in the midst of a critical transformation between our existing smartphones and future of AR devices, such as advanced glasses and lenses. Camera-centric apps have never been more important because of this.” He says that while developers using ARKit and ARCore are able to build experiences primarily for top-of-the-range smartphones, Banuba’s SDK can work on even low-range smartphones.

The SDK will also feature Avatar AR, which allows users to interact with fun avatars or create personalised ones for all iOS and Android devices. Why should users of Apple’s iPhone X be the only people to enjoy Animoji?

Banbua is also likely to take advantage of the news that Facebook recently announced it was testing AR ads in its newsfeed, following trials for businesses to show off products within Messenger.

Banuna’s technology won’t simply be for fun apps however. Inside 2 years, the company has filed 25 patent applications with the the US patent office and of six of those were processed in record time compared with the average. Its R&D center, staffed by 50 people and based in Minsk, is focused on developing a portfolio of technologies.

Interestingly, Belarus has become famous for AI and facial recognition technologies.

For instance, cast your mind back to early 2016, when Facebook bought Masquerade, a Minsk-based developer of a video filter app, MSQRD, which at one point was one of the most popular apps in the App Store. And in 2017, another Belarusian company, AIMatter, was acquired by Google, only months after raising $2M. It too took an SDK approach, releasing a platform for real-time photo and video editing on mobile, dubbed Fabby. This was built upon a neural network-based AI platform. But Prokopenya has much bolder plans for Banuba.

In early 2017, he and Banuba launched a “technology-for-equity” program to enroll app developers and publishers across the world. This signed up Inventain, another startup from Belarus, to develop AR-based mobile games.

Prokopenya says the technologies associated with AR will be “leveraged by virtually every kind of app. Any app can recognize its user through the camera: male or female, age, ethnicity, level of stress, etc.” He says the app could then respond to the user in any number of ways. Literally, your apps could be watching you.

So for instance, a fitness app could see how much weight you’d lost just by using the Banuba SDF to look at your face. Games apps could personalize the game based on what it knows about your face, such as reading your facial cues.

Back in his London office, overlooking a small park, Prokopenya waxes lyrical about the “incredible concentration of diversity, energy and opportunity” of London. “Living in London is fantastic,” he says. “The only thing I am upset about, however, is the uncertainty surrounding Brexit and what it might mean for business in the UK in the future.”

London may be great (and will always be), but sitting on his desk though is a laptop with direct links back to Minsk, a place where the facial recognition technologies of the future are only now just emerging.


Read Full Article
Heist


Heist

Black Friday drove half a million new users to the top shopping apps


More U.S. consumers were shopping on mobile devices on Black Friday this year, with $2.1 billion in sales coming from smartphones. This trend was also reflected across the U.S. App Store. According to new data from Sensor Tower out this morning, the top 10 shopping apps on the App Store added half a million first-time users on Black Friday. That’s up 16.3 percent from the same day in 2017, the firm found.
Overall, new shopping app installs grew 9 percent over last year to reach approximately 1.8 million. To be clear, this number is new downloads, not re-downloads from someone who previously had the app installed on their device, but deleted it at some point. (Of course, those consumers may have already been customers on the web.)

Not surprisingly, Amazon’s app was the most installed, as it has been in years past. But Walmart’s app gained steam as it saw more significant year-over-year growth, the report said.

This year, Amazon added around 115,000 new app users, up 11.7 percent from 2017. Walmart, however, added 95,000 first-time users, up 39.7 percent over last year. Target’s app, which was the third most installed this year, grew 3.3 percent from 2017 with around 62,000 new users.

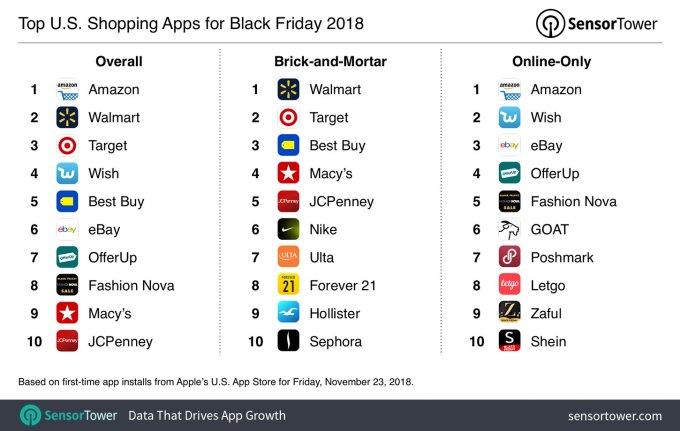
The rest of the top 10 was rounded out by Wish, Best Buy, eBay, Offer Up, Fashion Nova, Macy’s and JCPenney. This includes both brick-and-mortar and online retailers.

In terms of online-only retailers, the list looked a little different. Amazon was still in the lead, but was then followed by Wish, eBay, Offer Up, Fashion Nova, GOAT, Poshmark, Letgo, Zaful, and Shein.

Walmart, meanwhile, was the most-downloaded app out of all the brick-and-mortar retailers, followed by Target, Best Buy, Macy’s, JCPenney, Nike, Ulta, Forever 21, Hollister, and Sephora.

Overall, new downloads from the brick-and-mortar apps were up 24.7 percent over last year’s Black Friday, while the online-only apps grew around 20 percent.

Of these, Best Buy also had a good year in terms of new installs, the firm said. Around 34.5 percent new users installed its app for the first time, with about 39,000 new downloads in 2018 compared to 29,000 in 2017.

Sensor Tower wasn’t the only App Store intelligence firm predicting a boost in mobile shopping for this year’s Black Friday. App Annie had also forecast the sales holiday in 2018 would break new records.

In the two-week period including Thanksgiving, Black Friday and Cyber Monday, App Annie was predicting a 25 percent increase in time spent in shopping apps on Android devices – nearly double from the four years prior.

However, the Google Play numbers aren’t in yet because there’s a 3-plus day delay on Google Play between downloads and chart ranking changes. That means we won’t have accurate Android app store’s numbers until later in the week.


Read Full Article