02 November 2018

The Most Awesome Online Teachers for Learning Web Development


For the past few months, I have been on a learning spree looking to enhance my existing coding skills and also learn new programming languages and frameworks. In this process, I have watched a countless number of video tutorials and online courses that pertain to programming and, specifically, web development.

In my quest to become a better developer, I’ve come across several awesome “teachers” who aren’t just excellent programmers but awesome educators and have the art of explaining complex and difficult concepts.

Learn Modern Web Programming with the Best Online Teachers

This is an attempt to highlight the best instructors on the Internet for JavaScript, React, Redux, Node.js, Firebase (database and storage), Docker, Google Golang, Typescript, Flutter (for mobile app development), Dart, Git, Webpack and Parcel bundler.

I’ve taken courses by every single instructor mentioned here (PDF) and recommend them highly.

Awesome Web Teachers
Language / Platform Teacher / Course
React.js Andrew Mead, Maximilian Schwarzmüller, Stephen Grider, Ryan FlorenceScott Tolinski, Elijah Manor, Brian Holt, Dave CeddiaKirupa Chinnathambi
Advanced JavaScript / ES6 / ES2017 Anthony Alicea, Wes Bos, Mark Zamoyta, Tyler McGinnis,  Mosh HamedaniKent C. DoddsKyle SimpsonKyle Robinson YoungBrandon Morelli, Cody Seibert
Redux Dan AbramovShaun PellingBucky RobertsCory House
Dart & Flutter Mary Xia & Matt SullivanStephen Grider, Maximilian Schwarzmüller, Filip & Emily Fortuna
Docker / Kubernetes Jake Wright, Stephen Grider, James Lee
Webpack / Parcel web bundler Andrew MeadLawrence Whiteside, Sean LarkinPetr TichyBrad TraversyMax Schwarzmüller
Node.js Maximilian SchwarzmüllerStephen GriderAndrew MeadAzat MardanAnthony AliceaSamer Buna
Git & Github Trevor MillerAlex Garret-SmithTom Preson-Werner, Daniel Shiffman
Go Language Todd McLeod, Stephen Grider, Derek Banas, Jon Calhoun, Harrison Kinsley
TypeScript Todd MottoJohn LidquistBasarat Ali SyedMarius Schulz
Firebase / Firestore David East, Doug Stevenson, Shaun Pelling, Todd Kerpelman, Steve Kinney
Google Chrome Dev Tools Paul Irish, Surma, Umar Hansa, Jon Kuperman
GraphQL Andrew Mead, Stephen Grider

Also see: Learn How to Code Online

The post The Most Awesome Online Teachers for Learning Web Development appeared first on Digital Inspiration.


Challengers


Challengers

Flickr Limits Free Users to 1,000 Photos


In April 2018, SmugMug acquired Flickr from Oath for an undisclosed sum of money. Now, six months on, SmugMug is making changes to Flickr in order to make a return on its investment. Which is good news for Pro users, and bad news for free users. Naturally.

Flickr Puts a Price on Ambition

The new owners of Flickr describe the photo-sharing site as “a place to connect, to discover, and to evolve as photographers and lovers of photography.” And claim that “this newly-independent community can shape the future of photography itself.”

Unfortunately, such heady ambitions come at a price. That price being the $5.99/month or $49.99/year it costs to use Flickr Pro. Because while Flickr Pro members are getting new features to use, free members are being shunted to the sidelines.

Flickr Makes Changes to Pro and Free

Flickr Pro members will now enjoy unlimited storage at full resolution, ad-free browsing, advanced statistics, premier customer support, and partner discounts. Furthermore, increased exposure, a 5K resolution option, and 10 minute videos are arriving in 2019.

In contrast, free users will now be limited to storing just 1,000 photos. Which is a huge drop from the 1TB previously offered. This will apply from day one for all new users signing up for an account, but is also being applied to existing users.

If you’re a free user who already has over 1,000 photos stored on Flickr you have until January 8, 2019 to delete some content. And on February 5, 2019, Flickr will actively start deleting your photos (starting with the oldest) until you fall in line.

There Are Alternatives to Flickr…

For the new owners of Flickr, shifting focus (and resources) to Pro users makes sense. That is, after all, where the money is, and they want people to pay to use the service. However, Flickr is making it clear that free users are second class citizens, and that sucks.

If you need to remove content from Flickr in order to get under the new limit, here’s how to download your Flickr photos at their original resolutions. And if this makes you want to ditch Flickr altogether there’s always Amazon Photos or Google Photos.

Read the full article: Flickr Limits Free Users to 1,000 Photos


Read Full Article

Reef-rejuvenating LarvalBot spreads coral babies by the millions


The continuing die-off of the world’s coral reefs is a depressing reminder of the reality of climate change, but it’s also something we can actively push back on. Conservationists have a new tool to do so with LarvalBot, an underwater robot platform that may greatly accelerate efforts to re-seed old corals with healthy new polyps.

The robot has a history going back to 2015, when a prototype known as COTSbot was introduced, capable of autonomously finding and destroying the destructive crown of thorns starfish (hence the name). It has since been upgraded and revised by the team at the Queensland University of Technology, and in its hunter-killer form is known as the RangerBot.

But the same systems that let it safely navigate and monitor corals for invasive fauna also make it capable of helping these vanishing ecosystems more directly.

Great Barrier Reef coral spawn yearly in a mass event that sees the waters off north Queensland filled with eggs and sperm. Researchers at Southern Cross University have been studying how to reap this harvest and sow a new generation of corals. They collect the eggs and sperm and sequester them in floating enclosures, where they are given a week or so to develop into viable coral babies (not my term, but I like it). These coral babies are then transplanted carefully to endangered reefs.

LarvalBot comes into play in that last step.

“We aim to have two or three robots ready for the November spawn. One will carry about 200,000 larvae and the other about 1.2 million,” explained QUT’s Matthew Dunbabin in a news release. “During operation, the robots will follow preselected paths at constant altitude across the reef and a person monitoring will trigger the release of the larvae to maximise the efficiency of the dispersal.”

It’s something a diver would normally have to do, so the robot acts as a force multiplier — one that doesn’t require food or oxygen, as well. A few of these could do the work of dozens of rangers or volunteers.

“The surviving corals will start to grow and bud and form new colonies which will grow large enough after about three years to become sexually reproductive and complete the life cycle,” said Southern Cross’s Peter Harrison, who has been developing the larval restoration technique.

It’s not a quick fix by any means, but this artificial spreading of corals could vastly improve the chances of a given reef or area surviving the next few years and eventually becoming self-sufficient again.


Read Full Article

GoPro shares are tanking after disastrous Q3


GoPro stock is currently down 15% in after-hours trading and is falling after reporting its third quarter earnings. The company saw revenues dive 13%.3 percent.

Overall GoPro reported a net loss of $27.1 million, or 19 cents per share, in the quarter that ended on Sept. 30. Is compared with a profit of $14.7 million, or 10 cents per share, from the previous year. Likewise, GoPro saw revenue fell to $285.9 million from $329.8 million.

Developing…


Read Full Article

Instagram’s next cash cow: instant Promote ads for Stories


Instagram hopes dollars from long-tail of small businesses and social media stars can help it pull its weight in the Facebook family. A new ad type called “Promote” for Stories allows Instagram business pages to show their ephemeral slideshows to more users without doing much work. Admins can choose to auto-target users similar to their followers, people in a certain location, or use all of Instagram’s targeting parameters to inject their Story into the Stories queue of more users as an ad that can also link to business’ Instagram profile or website.

Facebook confirms to TechCrunch that Promote for Stories works similarly to Facebook’s Boost option that lets them pay to instantly show their feed posts to more users. “I can confirm that we are testing this feature globally. We don’t have an immediate timeline for 100% rollout, but will keep you posted” an Instagram spokesperson told me. Screenshots of Promote were first shared by social consultant Matt Navarra.

Instagram tests new Promote Stories ads. Image Credit: Matt Navarra

Instagram already has 2 million active advertisers, compared to Facebook’s 6 million. But designing and targeting ads, especially full-screen video Stories ads can be daunting to small businesses and public figures. Promote offers an easy way to turn their existing Stories into ads.

The feature could unlock more spend at crucial time when Facebook’s revenue growth is in massive decline. It dropped from 59 percent year-over-years revenue growth in Q3 2016 to 49 percent in Q3 2017 to 33 percent in Q3 2018 as it hits saturation in lucrative developed countries and runs out of News Feed space. Facebook warned Wall Street about revenue deceleration as sharing shifts from feeds to Stories and advertisers have to adapt, but turning local merchants and influencers into paying customers could smooth that transition.

Instagram Analytics Launches In Beta

In other Instagram business news, today it launched Instagram Analytics in beta as part of Facebook Analytics. The tool goes beyond Instagram’s existing Insights tool that just counted different types of engagement with an account and its content, such as new followers, website clicks, post impressions, and Story exits. With Instagram Analytics, business accounts can track life time value and retention rates for people who do or don’t interact with their content, and create audience segments to see if people who commented on a particular post generate more value for them. They can also analyze how their Instagram audeince overlaps with people who visit their site, download their app, or Like their Facebook Page.

The more Instagram analytics businesses have access to, the better they’ll be able to prove that their investment in the platform is paying off. Being able to see exactly how followers move through a conversion funnel will result in higher confidence in campaigns and translate into more ad and content spend.

IGTV Hopes For Virality With Stories Previews

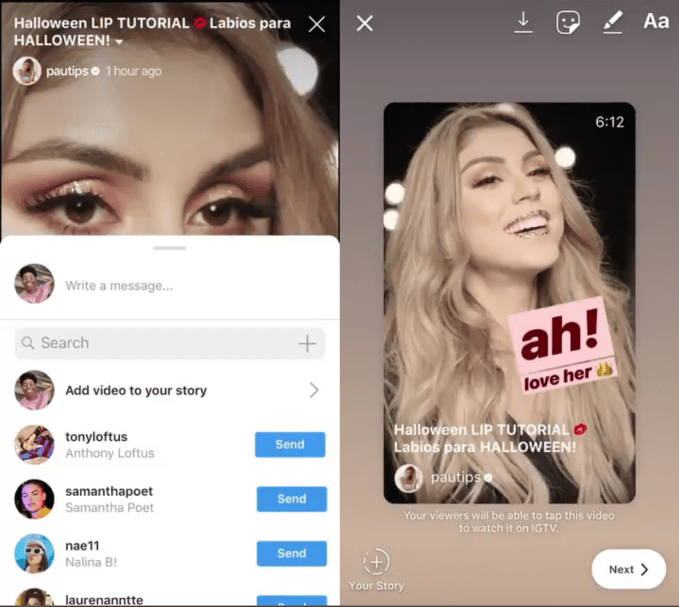
And there’s one final piece of Instagram news for the day. IGTV hasn’t quite blown up like Instagram Stories since launching in June, but a combination could bring some much needed attention to the app’s longer form video hub. Instagram today launched the ability to share preview image of an IGTV video to your Instagram Story. Friends can tap through to actually watch the full video on IGTV.

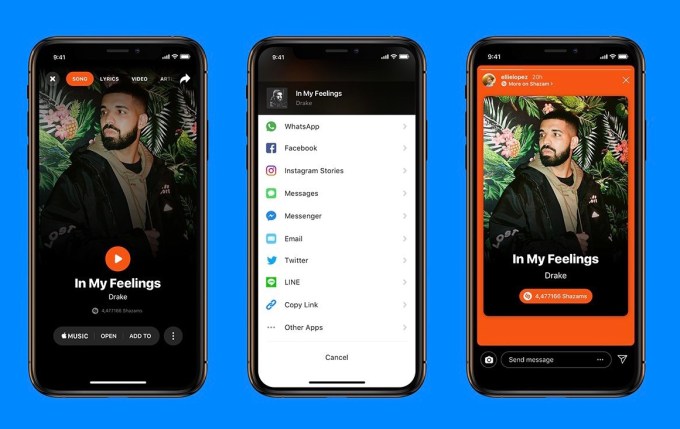
The IGTV previews don’t actually play, they’re just a static sticker. Shazam launched its own Instagram Stories integration today works similarly to the IGTV previews as well as SoundCloud and Pandora’s partnerships. Shazam lets you share a preview image of a song to your Instagram Story, but to actually hear any music you have to click through to Shazam. That makes these integrations inferior to Instagram’s own native music sharing feature that actually lets you add a soundtrack to your Stories that friends can hear as they watch.

Shazam now can share song preview images to Instagram Stories, but you have to tap through to hear anything

IGTV has also recently added a History tab that shows what you’ve recently watched. This could be helpful for getting back to your favorite clips or jumping to a new episode of a show you’re hooked on.

Facebook CEO Mark Zuckerberg said on Tuesday’s earnings call that “People really want to watch a lot of video”, and the company plans to invest more in premium Facebook Watch content. But so far, it’s niether publicly announced any deals to pay for IGTV content, nor has opened any direct monetization options to creators. With viewership taking time to grow, there just aren’t enough incentives for creators to invest to producing polished, longer-form vertical video when there’s nowhere else to put it but IGTV. Virality through these previews could convince them there’s big fan base growth opportunities available if they stick with IGTV.

Combined, these updates show that the departure of Instagram’s co-founders hasn’t slowed down the company’s innovation. Former Facebook News Feed VP Adam Mosseri kept up a brisk pace of product launches, and now with Instagram he seems determined to keep users, creators, and businesses glued to what’s quickly becoming the social giant’s premier property.


Read Full Article

Instagram’s next cash cow: instant Promote ads for Stories


Instagram hopes dollars from long-tail of small businesses and social media stars can help it pull its weight in the Facebook family. A new ad type called “Promote” for Stories allows Instagram business pages to show their ephemeral slideshows to more users without doing much work. Admins can choose to auto-target users similar to their followers, people in a certain location, or use all of Instagram’s targeting parameters to inject their Story into the Stories queue of more users as an ad that can also link to business’ Instagram profile or website.

Facebook confirms to TechCrunch that Promote for Stories works similarly to Facebook’s Boost option that lets them pay to instantly show their feed posts to more users. “I can confirm that we are testing this feature globally. We don’t have an immediate timeline for 100% rollout, but will keep you posted” an Instagram spokesperson told me. Screenshots of Promote were first shared by social consultant Matt Navarra.

Instagram tests new Promote Stories ads. Image Credit: Matt Navarra

Instagram already has 2 million active advertisers, compared to Facebook’s 6 million. But designing and targeting ads, especially full-screen video Stories ads can be daunting to small businesses and public figures. Promote offers an easy way to turn their existing Stories into ads.

The feature could unlock more spend at crucial time when Facebook’s revenue growth is in massive decline. It dropped from 59 percent year-over-years revenue growth in Q3 2016 to 49 percent in Q3 2017 to 33 percent in Q3 2018 as it hits saturation in lucrative developed countries and runs out of News Feed space. Facebook warned Wall Street about revenue deceleration as sharing shifts from feeds to Stories and advertisers have to adapt, but turning local merchants and influencers into paying customers could smooth that transition.

Instagram Analytics Launches In Beta

In other Instagram business news, today it launched Instagram Analytics in beta as part of Facebook Analytics. The tool goes beyond Instagram’s existing Insights tool that just counted different types of engagement with an account and its content, such as new followers, website clicks, post impressions, and Story exits. With Instagram Analytics, business accounts can track life time value and retention rates for people who do or don’t interact with their content, and create audience segments to see if people who commented on a particular post generate more value for them. They can also analyze how their Instagram audeince overlaps with people who visit their site, download their app, or Like their Facebook Page.

The more Instagram analytics businesses have access to, the better they’ll be able to prove that their investment in the platform is paying off. Being able to see exactly how followers move through a conversion funnel will result in higher confidence in campaigns and translate into more ad and content spend.

IGTV Hopes For Virality With Stories Previews

And there’s one final piece of Instagram news for the day. IGTV hasn’t quite blown up like Instagram Stories since launching in June, but a combination could bring some much needed attention to the app’s longer form video hub. Instagram today launched the ability to share preview image of an IGTV video to your Instagram Story. Friends can tap through to actually watch the full video on IGTV.

The IGTV previews don’t actually play, they’re just a static sticker. Shazam launched its own Instagram Stories integration today works similarly to the IGTV previews as well as SoundCloud and Pandora’s partnerships. Shazam lets you share a preview image of a song to your Instagram Story, but to actually hear any music you have to click through to Shazam. That makes these integrations inferior to Instagram’s own native music sharing feature that actually lets you add a soundtrack to your Stories that friends can hear as they watch.

Shazam now can share song preview images to Instagram Stories, but you have to tap through to hear anything

IGTV has also recently added a History tab that shows what you’ve recently watched. This could be helpful for getting back to your favorite clips or jumping to a new episode of a show you’re hooked on.

Facebook CEO Mark Zuckerberg said on Tuesday’s earnings call that “People really want to watch a lot of video”, and the company plans to invest more in premium Facebook Watch content. But so far, it’s niether publicly announced any deals to pay for IGTV content, nor has opened any direct monetization options to creators. With viewership taking time to grow, there just aren’t enough incentives for creators to invest to producing polished, longer-form vertical video when there’s nowhere else to put it but IGTV. Virality through these previews could convince them there’s big fan base growth opportunities available if they stick with IGTV.

Combined, these updates show that the departure of Instagram’s co-founders hasn’t slowed down the company’s innovation. Former Facebook News Feed VP Adam Mosseri kept up a brisk pace of product launches, and now with Instagram he seems determined to keep users, creators, and businesses glued to what’s quickly becoming the social giant’s premier property.


Read Full Article

Google walkout organizer: ‘I hope I still have a career in Silicon Valley after this’


Shouting “women’s rights are worker’s rights” and a number of other #TimesUp and #MeToo chants, upwards of 1,000 Google employees gathered in San Francisco’s Harry Bridges Plaza Thursday to protest the company’s handling of sexual harassment and misconduct cases.

Staffers from all of Google’s San Francisco offices were in attendance. An organizer, who declined to be named, told TechCrunch there were 1,500 Google employees across the globe that participated in the 48-hour effort to arrange a worldwide walkout. The effort was a major success. More than 3,000 Googlers and supporters of the movement attended the New York City walkout alone. As many as 1,000 Googlers and others came out for the San Francisco walkout, which the organizers said, was double the number they expected.

Cathay Bi, a Google employee in San Francisco and one of the walkout organizers, told a group of journalists at the rally that she was conflicted with participating in the walkout and ultimately decided not to go public with her own story of sexual harassment.

“I experienced sexual harassment at Google and I didn’t feel safe talking about it,” said Bi, pictured above. “That feeling of not being safe is why I’m out here today. I’d love it if everyone felt safe talking about it.”

[gallery ids="1740837,1740838,1740839,1740841,1740840,1740843,1740845"]

“There were many times over the course of the last 24 hours that I emailed the group and said ‘I’m not doing this because I’m scared’ but that fear is something everyone else feels,” she said. “I said to myself last night, I hope I still have a career in Silicon Valley after this.”

Other organizers declined to go on the record.

There were protests around the globe today, including in London, Dublin, Montreal, Singapore, New York City, San Francisco and Cambridge, following a New York Times investigation that revealed Google had given Android co-creator Andy Rubin a $90 million exit package despite multiple relationships with other Google staffers and credible accusations of sexual misconduct made against him. That story, coupled with tech’s well-established issue of harassment and discrimination toward women and underrepresented minorities, was a catalyst for today’s rallies.

At the rally, Googlers read off their list of demands, which includes an end to forced arbitration in cases of harassment and discrimination, a commitment to end pay and opportunity inequity and a clear, inclusive process for reporting sexual misconduct safely and anonymously.

They’re also requesting that the search giant promote chief diversity officer Danielle Brown to a role in which she reports directly to chief executive officer Sundar Pichai, as well as the addition of an employee representative to the company’s board of directors.

Here’s the statement from Pichai Google provided to TechCrunch this morning: “Earlier this week, we let Googlers know that we are aware of the activities planned for today and that employees will have the support they need if they wish to participate. Employees have raised constructive ideas for how we can improve our policies and our processes going forward. We are taking in all their feedback so we can turn these ideas into action.”

Now, employees around the Globe will await Google’s highly-anticipated course of “action.”

“These types of changes don’t happen overnight,” Bi said. “If we expected them overnight we would have the wrong expectations of how these movements take place.”


Read Full Article

Campaign tool supplied to UK’s governing party by Trump-Pence app dev quietly taken out of service


An app that the UK’s governing party launched last year — for Conservative Party activists to gamify, ‘socialize’ and co-ordinate their campaigning activity — has been quietly pulled from app stores.

Its vanishing was flagged to us earlier today, by Twitter user Sarah Parks, who noticed that, when loaded, the Campaigner app now displays a message informing users the supplier is “no longer supporting clients based in Europe”.

“So we’re taking this opportunity to refresh our campaigning app,” it adds. “We will be back with a new and improved app early next year – well in time for the local elections.”

(Bad luck, then, should there end up being another very snap, Brexit-induced UK General Election in the meanwhile, as some have suggested may yet come to pass. But I digress… )

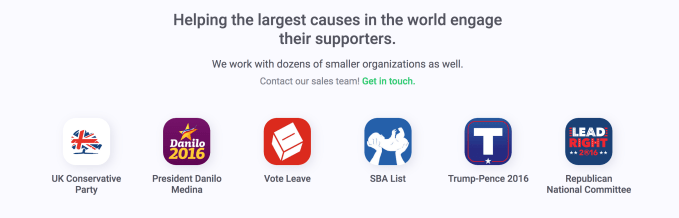
The supplier of the Conservative Campaigner app is — or was — a US-based add developer called uCampaign, which had also built branded apps for Trump-Pence 2016; the Republican National Committee; and the UK’s Vote Leave Brexit campaign, to name a few of the political campaigns it has counted as customers.

Here’s a few more: The (pro-gun) National Rife Association and the (anti-abortion) SBA List.

We know the name of the Conservative Campaigner app’s supplier because this summer we raised privacy concerns about the app — on account of its use of uCampaign’s boilerplate privacy policy, if you clicked to read the app’s privacy policy earlier this year.

The wording of uCampaign’s privacy policy suggested the Conservative Campaigner app could be harvesting users’ mobile phone contacts — if they chose to sync their contacts book with it.

The privacy policy for the app was subsequently changed to point to the Conservative Party’s own privacy policy — with the change of privacy policy taking place just before a tough new EU-wide data protection framework, GDPR, came into force on May 25 this year.

Prior to May 23, the privacy policy of the Conservatives’ digital campaigning app suggests it was harvesting contacts data from users — and potentially sharing non-users’ personal information with entities of uCampaign’s choosing (given, for example, the company’s privacy policy gave itself the right to “share your Personal Information with other organizations, groups, causes, campaigns, political organizations, and our clients that we believe have similar viewpoints, principles or objectives as us”).

This sort of consentless scraping of large amounts of networked personal data — by sucking up information on users’ friend groups and other personal connections — has of course had a massive spotlight thrown on it this year, as a result of the Facebook Cambridge Analytica data misuse scandal in which the personal data of tens of millions of Facebook users was extracted from the social network via a quiz app that used a (now defunct) Facebook friends API to grab data on non-users who would not have even had the chance to agree to the app’s terms.

Safe to say, this modus operandi wasn’t cool then — and it’s certainly not cool now.

Politicians all over the globe have been shaken awake by the Cambridge Analytica scandal, and are now raising all sorts of concerns about how data and digital tools are being used (and or misused and abused).

The EU parliament recently called for an independent audit of Facebook, for example.

In the UK, a committee that’s been probing the impact of social media-accelerated disinformation on democratic processes published a report this summer calling for a levy on social media to defend democracy. Its lengthy preliminary report also suggested urgent amendments to domestic electoral law to reflect the use of digital technologies for political campaigning.

Though the UK’s Conservative minority government — and the party behind the now on-pause Conservative Campaigner app — apparently disagrees on the need for speed, declining in its response last week to accept most of the committee’s laundry list of recommended changes.

The DCMS committee’s inquiry into political campaigns’ use (and misuse) of personal data continues — now at a transnational level.

An ethical pause?

Shortly after we published our privacy concerns about the Conservative Campaigner app, the UK’s data protection watchdog issued its own a lengthy report detailing extensive concerns about how UK political parties were misusing personal data — and calling for an ethical pause on the use of microtargeting for election campaigning purposes.

Which does rather beg the question whether the Conservative Campaigner app going AWOL now, until a reboot under a new supplier (presumably) next year, might not represent just such an ‘ethical pause’.

The app is, after all, only just over a year old.

We asked the Conservative Party a number of questions about the Campaigner app via email — after a press office spokeswoman declined to discuss the matter on the telephone.

Five hours later it emailed the following brief statement, attributed to a Conservative spokesperson:

We work with a number of different suppliers and all Conservative party campaigning is compliant with the relevant data protection legislation including GDPR.

The spokesperson did not engage with the substance of the vast majority of our concerns — such as those relating to the app’s handling of people’s data and the legal bases for any transfers of UK voter data to the US.

Instead the spokesperson reiterated the in-app notification which claims “the supplier” is no longer supporting clients based in Europe.

They also said the party is currently reviewing its campaigning tools, without providing any further detail.

We’ve included our full list of questions at the bottom of this post.

We’ve also reached out to the ICO to ask if it had any concerns related to how the Conservative Campaigner app was handling people’s data.

Similarly, the former deputy director & head of digital strategy for the Conservative party, Anthony Hind, declined to engage with the same data protection concerns when we raised them with him directly, back in July.

According to his LinkedIn profile he’s since moved on from the Conservatives to head up social media for the Confederation of British Industry.

For this report we also reached out to uCampaign’s founder and CEO, Thomas Peters, to ask for confirmation on the company’s situation vis-a-vis European clients.

At the time of writing Peters had not responded to our emails. We’ll update this story with any uCampaign response.

The company’s website still includes the UK Conservative Party listed as a client — though the language used on the webpage does not make it explicit whether or not the party is a current client…

Another graphic on the same page plots the UK flag on a world map depicting what uCampaign dubs its “global platform”, where it’s marked along with several other European flags — including Ireland, France, Germany and Malta, suggesting uCampaign has — or had — multiple European clients.

Here’s the full list of questions we put to the Conservatives about their campaigner app. To our eye it has answered just one of them:

Can you confirm — on the record — the reasons for the app being pulled?

Does the Conservative Party intend to continue working with uCampaign for the new campaign app that will relaunch next year? Or does the party have a new supplier?

If the latter, where is the new supplier based? In the UK or in the US?

Did the Conservative Party have any concerns at all related to using uCampaigner as a supplier? (Given, for example, concerns flagged about its data privacy practices by one of the DCMS committee’s recent reports — following an inquiry investigating digital campaigning.)

If the Conservative Party was aware of data privacy concerns pertaining to uCampaign’s practices can you confirm when the party became aware of such concerns?

Was the party aware that the privacy policy it used for the app prior to May 23, 2018 was uCampaign’s own privacy policy?

This privacy policy stated that the app could harvest data from users’ mobile phone contacts and share that data with unknown third parties of the developer’s choosing — including other political campaigns. Is the Conservative Party comfortable with having its supporters’ data shared with other political campaigns?

What due diligence did the Conservative Party carry out before it selected uCampaign as its app supplier?

After signing up the supplier, did the Conservative Party carry out a privacy impact assessment related to how the app operates?

Please confirm all the data points that the app was collecting from users, and what each of those data points was being used for

Where was app user data being processed? In the US, where uCampaign is based, or in the UK where potential voters live?

If the US, what was the legal basis for any transfer of data from UK users to the US?

Is the Conservative Party confident its use of the campaigner app did not breach UK data protection law?

Earlier this year the former Cabinet Minister Dominic Grieve suggested that the bosses of tech giants involved in the Cambridge Analytica data misuse scandal should be jailed for their part in abusing online data for political and financial gain. Does the Conservative Party support Grieve’s position on online data abuse?

Has anyone been sacked or sanctioned for their part in procuring uCampaign as the app supplier — and/or overseeing the operation of the Conservative Campaigner app itself?

Will the Conservative Party commit to notifying all individuals whose data was shared with uCampaign without their explicit consent?

Can the Conservative Party confirm how many individuals had their personal data shared with uCampaign?

Has the Information Commissioner’s Office raised any concerns with the Conservative Party about the Campaigner app?

Has the Conservative Party itself reported any concerns about the app/uCampaign to the ICO?


Read Full Article

Walmart adds an AR scanner to its iOS app for product comparisons


Walmart is giving augmented reality a shot. The retailer today announced the launch of a new AR scanning tool in its iPhone application which will help customers with product comparisons. However, unlike a typical barcode scanner meant only to compare prices on one item at a time, Walmart’s AR scanner can be panned about across store shelves, offering details on pricing and customer ratings beneath the products it sees.

The technology was first developed by a team at an internal Walmart hackathon using Apple’s ARKit technology. At the time, their idea was to create a scanning experience that worked faster and felt faster when used by customers. They also wanted to build a scanner that offered more than just price comparisons.

“Walmart store shoppers love using our mobile app barcode scanner as a price checker. Our team sees the potential of this product as so much more, though,” explains Tim Sears, Senior Engineering Manager at Walmart Labs, in a post announcing the feature’s launch. “When a customer launches the scanner, they get a direct connection between the digital and the physical world that their screen and camera lens creates for them,” he says.

The team won the hackathon, then went on to further redesign the experience to become the one that’s live today in Walmart’s application.

To use the scanner, you launch the feature in the Walmart app then point it at the products on the shelf you want to compare. As you move the phone between one item and the other, the product tile at the bottom of the screen will update with information, including the product name, price, and the star rating across however many reviews it has received on Walmart.com. A link to related products is also available.

The AR scanner was designed to anchor dots to what you’ve scanned, but uses smaller dots instead of anchoring the entire content to the product itself to overcome the problems that could occur when multiple items are scanned together in a close space.

Despite the supposed advantages of AR scanning over a simpler barcode scan, it still remains to be seen to what extent consumers will adopt the feature now that it’s live.

Walmart isn’t the only retailer to give AR a go. Others have used it in various ways, including Amazon, Target, Wayfair, and many more. But in several cases, AR’s adoption by retailers have been focused on visualizing products in your home, or – in the case of Target’s AR ‘studio,’ makeup on your face.

Walmart’s AR scanner goes after a more practical use.

The AR Scanner is in the latest version of the Walmart iOS app (18.20 and higher), and works on iPhones that run at least iOS 11.3. This latter requirement is due to its use of ARKit 1.5, but will limit the audience largely to those with newer iPhones.


Read Full Article

01 November 2018

How to Find a Song Title Just by Humming the Lyrics


Have you ever found yourself in one of those tip of the tongue moments when you’ve fallen in love with a new song but you can’t remember the title or the lyrics?

There are a number of solutions for this scenario when you need to find a song by partial lyrics. Even if you don’t know the title of the song or any of the lyrics, you can use these solutions to find the song by humming!

Voice Recognition Technology

There are a number of cutting edge computer technologies these days that enter into the realm of artificial intelligence. Two of those include image recognition and voice recognition.

There are a number of online apps that let you sing, hum or whistle a tune and it can accurately guess the title of the song. Images of science fiction movies, where starship crew members seek the help of the ship’s AI computer system come to mind. Well, it’s no longer science fiction—these exciting online apps will help you find a song by humming!

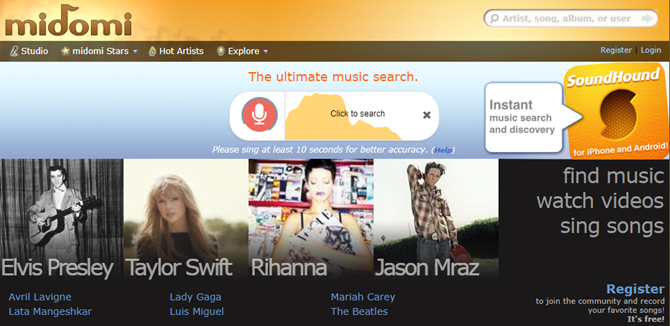
1. Midomi

Midomi itself isn’t exactly a very special or unique website. Just like every other website where you can search for and purchase music online, Midomi lets you research music, bands, and more.

You can watch music videos, listen to music clips or even join the Midomi community to record your own music. However, what makes Midomi so useful is the little box at the top of the first page that reads, “Click and Sing or Hum.”

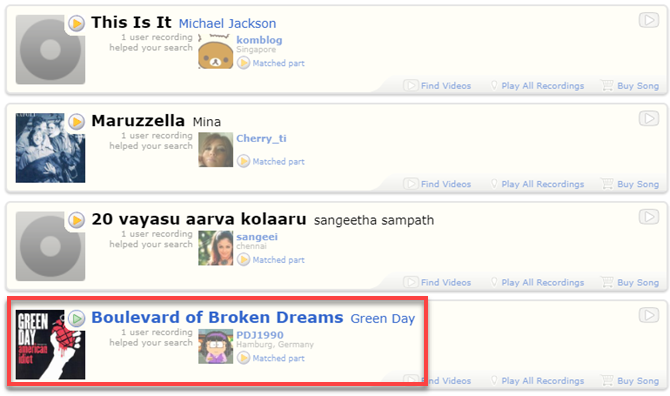
Does it really work?  We tested the accuracy of this online application by humming Boulevard Of Broken Dreams, by Green Day. After clicking the text box, the recording began.

midomi find song by humming

This test included just humming 16 seconds or so of part of the song, no words whatsoever (and a terrible rendition). When done, click on the red microphone to start the search for results. This is what came up for us.

midomi found song by humming

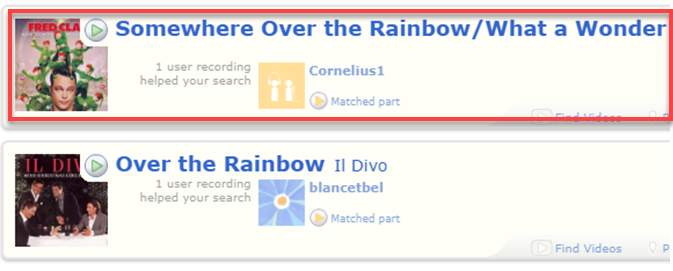
One of the “guesses” was a perfect match. Pretty impressive. To test that this wasn’t just a lucky guess, we tried it again with a more difficult tune that wasn’t so modern—the first 15 seconds of “Over the Rainbow”, sung by Judy Garland in the “Wizard of Oz”.

After 15 seconds of forcing the recorder to suffer through a horrible rendition of the song, the app processed the recording and then provided the following results.

midomi found music by humming

If anything is convincing, this is it. You only need to know the general tune of a song, no title and no lyrics required. This amazing little Midomi web app will remind you of the title after just a few seconds of humming, whistling, or singing.

2. Musipedia

If you are a musician, then you probably know most of the notes for a song, rather than just humming the tune. If that describes you, then Musipedia may be the perfect song-finder service for you.

The website offers the ability to import music through your microphone (even singing or humming if you wish).

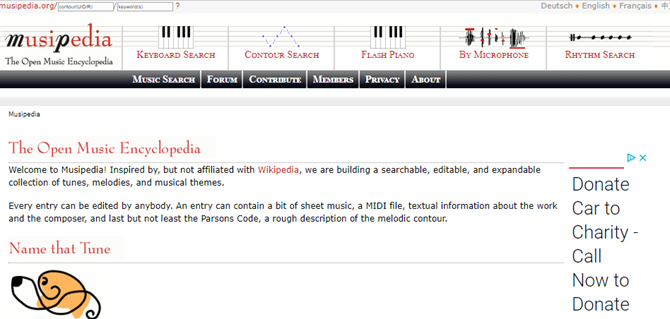
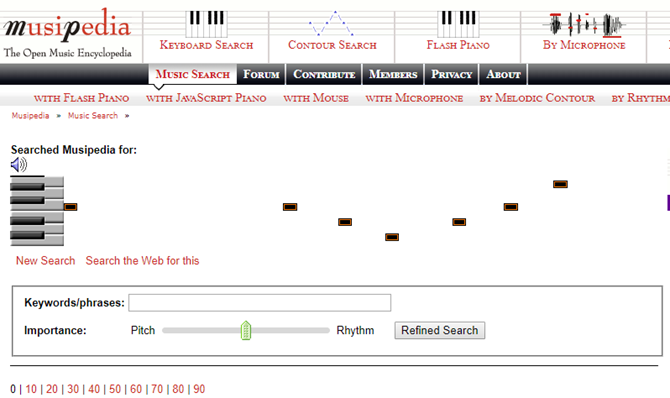
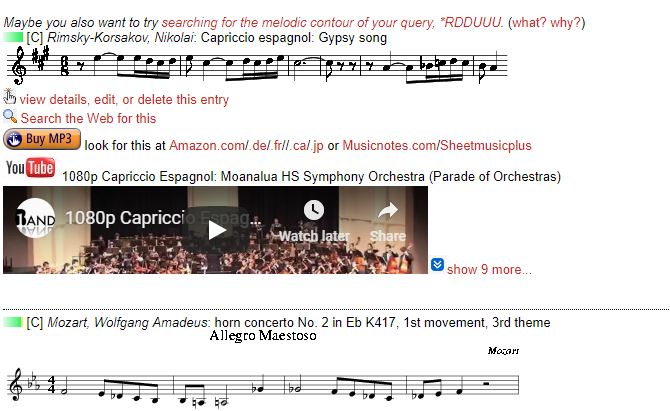
Also, the site gives you the ability to play the tune with several note-related searches. These include a keyboard search (strictly notes), a contour search (the general note pattern of the song), using a flash piano, or a rhythm search which you can use to hunt for a song by rhythm alone.

musipedia song finder by sound

When you use any of these search features, the Musipedia engine will convert it into a general “note-contour” line, and algorithmically run through its library of music looking for a match.

musipedia song finder by sound

When it finds matches, you’ll see a listing of all of the songs in the results.

Each result includes the portion of the musical pattern that matched the tune you played. The listing also includes an embedded play button so you can hear it, a YouTube link to the video, and even a button you can use to buy the song or album on Amazon.

musipedia song finder by sound

The “with microphone” feature requires Flash, so you’ll need to enable flash in your browser for this site, and it can be a little flaky at times. So this web app is best used if you know how to play the notes on a piano.

The website itself isn’t exactly a work of art by web development standards, but aesthetics aside it does do the job well!

3. AudioTag

The next site that allows you to find a song title just by humming is AudioTag.info. This is another very basic site, but it offers a pretty handy service.

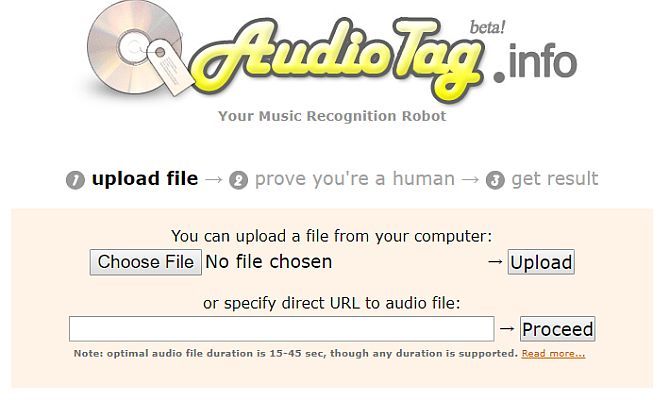
Yes, the audio recognition feature is fully automated, so you don’t have to wait for someone to figure out your song title. However, the method of uploading the music is a little bit different than other sites listed in this article. You have to record and upload your own audio file.

You can hum, sing, or play the tune on your guitar. So long as you have something similar to the original song recorded, it should work.

We tested the feature by playing a song from Spotify and recording it through a microphone. Use the Choose File button on the page to select your file and upload it to the site. (You can also link to an online audio file if you have the URL).

When you’re ready just click Proceed.

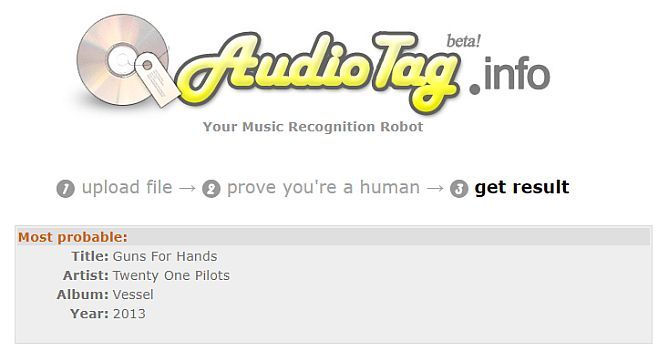
In our case, the site came back in less than 60 seconds with the exact song title, the artist, the album, and the year of release.

Not too surprising considering we recorded the exact song. But why not give it a try by humming or singing that tune stuck in your head. See if the site can name that tune!

4. AHA Music Extension

Another solution to identify a song by humming or singing is to install the AHA Music Identifier Chrome Extension.

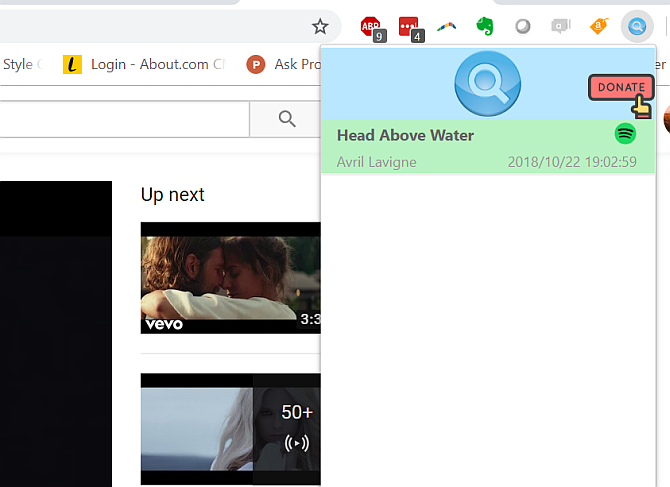
The way it works is very simple. If you’re watching a video, movie, TV show, or anything else that’s playing music, just click on the AHA Music icon in your browser.

aha music identifier

The app will listen to the song and then identify it for you. You can click on the Spotify icon to open the song on the Spotify website.

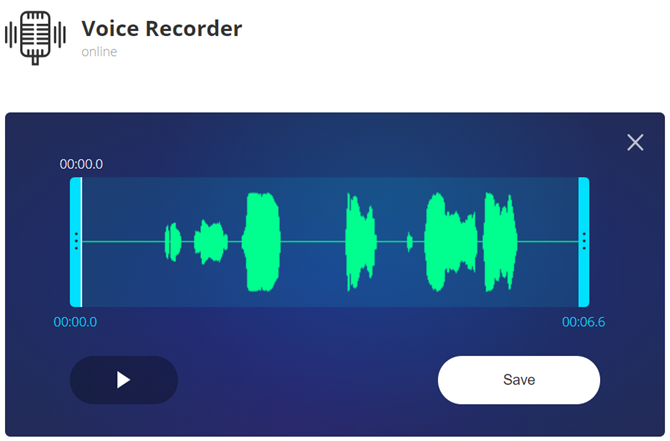
Using this extension to find a song by lyrics or humming is a two-step process. First, you can use a site like Online Voice Recorder to record your humming or singing.

online voice recorder

Then, when you play it back you can trigger the AHA Music extensions and it’ll identify the song for you.

What’s nice about this solution is that it’s handy to identify songs you hear while watching something on Netflix or Amazon. Quickly identify that song and discover new music more often.

What Is That Song? Hum It and Find Out

There is nothing quite as frustrating as walking around all day with a tune stuck in your head. Well, the next time this happens, you know from where you can get an answer just by humming or singing the song!

If you love everything about music, then you’ll want to review our brilliant gift ideas for music lovers. Or if you want to give your family and friends some ideas for you, share the link with them!

Read the full article: How to Find a Song Title Just by Humming the Lyrics


Read Full Article

PCIe vs. SATA SSDs: Which Type of Data Drive Is Best for You?

5 Mac Outliners to Help You Organize Your Projects and Ideas


mac-outliners

Outlining is a smart way to take ideas from the scrambled mess that is your brain and arrange them and purpose. And yes, there’s an app for that.

While you can use note-taking apps like Evernote and Simplenote as outliners, you might want to give dedicated outliner apps a shot instead. Right on cue, here are our top five picks for macOS-based outlining software.

1. OutlineEdit

sample-outline-in-outline-edit-on-mac

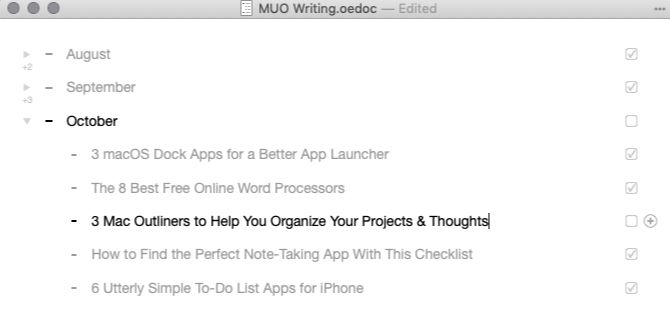
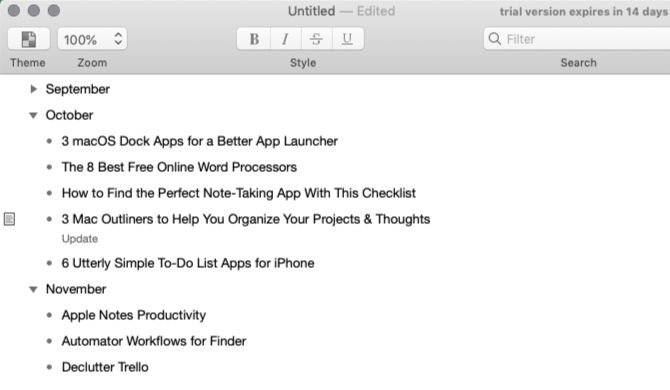
OutlineEdit allows your ideas and words to take center stage. You can create, structure, and rearrange your outlines, plus search through them with ease. You also have options to turn items into checklists, add notes to items, and display statistics like word count and time elapsed.

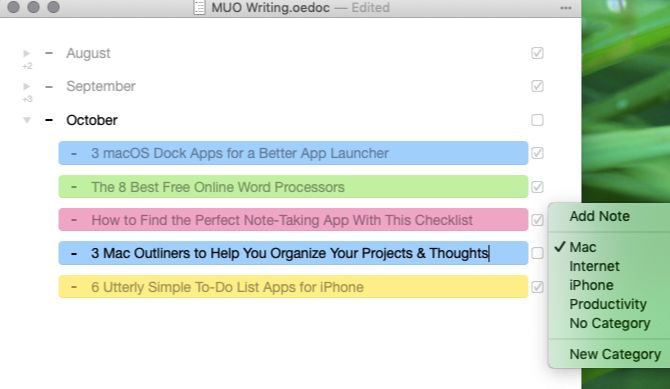
If you want to color code items for quick visual identification, create and assign categories for them. Categories come with colorful markers; you can customize the color for each category or pick from one of the preset color schemes.

sample-outline-with-categories-highlighted-in-outline-edit-on-mac

To keep the OutlineEdit window handy, you have few options to customize window behavior. You can dock the app window, keep it floating over other apps, or even make it appear translucent.

If you like your Mac apps lean and uncluttered, you’ll love OutlineEdit.

Download: OutlineEdit (Free)

2. Outlinely

sample-outline-in-outlinely-on-mac

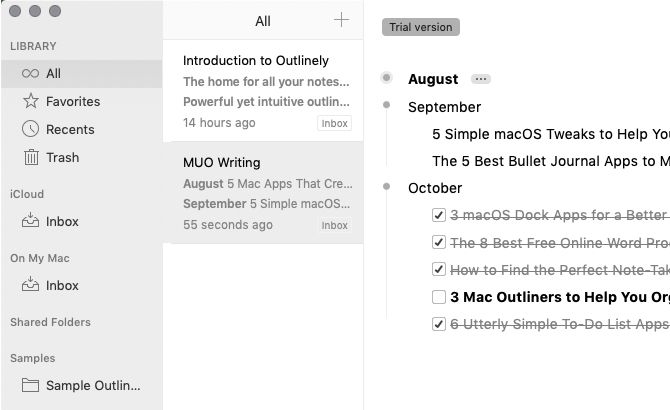
Outlinely is a self-contained app. This means all your outlining takes place within the app window, and you don’t need Finder to access or save your outlines. The app’s three-pane layout is reminiscent of the one you’ll find in the popular writing app Ulysses.

Apart from creating outlines in Outlinely, you can customize how you work with them. Outlinely gives you themes, folders, versioning, word counts, and Markdown highlighting. You also have the much-in-demand Focus mode that fades out all text except the current line.

Outlinely sets you up with a folder full of sample outlines to begin with. These walk you through a few highlights of the app and some Markdown syntax you should get familiar with.

Of course, you can jump right in and start creating outlines. But we recommend that you go through the sample ones first to get a better idea of what’s possible with Outlinely.

Download: Outlinely ($40, free trial available)

3. TaskPaper

sample-outline-in-taskpaper-on-mac

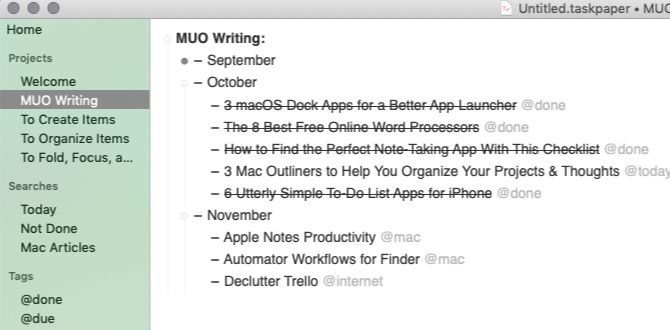
TaskPaper, from the developers of the much-loved distraction-free writing app Writeroom, is as simple and beautiful as it gets. Your projects, tags, and custom searches line the sidebar, while your outline contents go in the right-hand pane.

Adding tasks, filtering by tags, and folding/unfolding items are all intuitive tasks that you’ll have no trouble with. In any case, each new document comes with a Welcome project to give you an overview of TaskPaper actions. Once you’ve got the hang of the app, you can prevent this sample project from showing up via the app settings.

Do you have a Setapp subscription? TaskPaper is available as part of the service!

Download: TaskPaper ($25, free trial available)

4. Cloud Outliner

sample-outline-in-cloud-outliner-on-mac

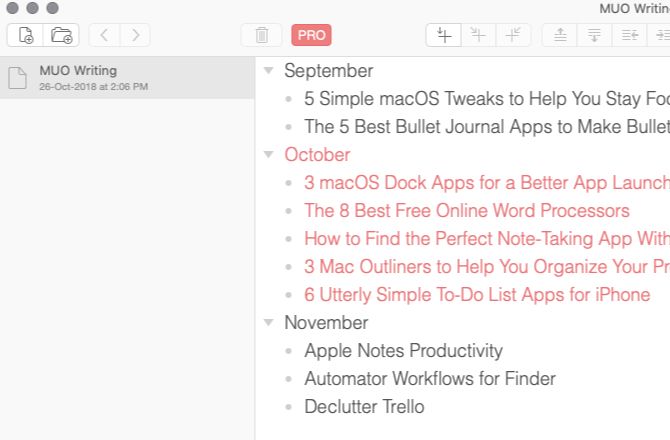
Cloud Outliner looks simple enough on the surface, but is quite flexible. You start off with a blank two-pane view and build up outlines and folders as you need them.

The toolbar buttons make it easy to create, structure, indent, and delete outlines. Thanks to the font customization options, you can highlight items in various colors for visual clarity.

It might take you a while to get used to the keyboard shortcuts in Cloud Outliner. If you’d rather use customized shortcuts, you’re in luck—the app allows for those.

The free version of CloudOutliner is robust, but if you want advanced options, you’ll need to get Cloud Outliner Pro. It brings features like PDF export and Evernote sync, and also gives you an ad-free experience. The Pro version is also available on Setapp.

Keep in mind that you’ll find the free version of Cloud Outliner only in the Mac App Store.

Download: Cloud Outliner (Free) | Cloud Outliner Pro ($10)

5. OmniOutliner

sample-outline-in-omnioutliner-on-mac

The Omni Outliner starter edition, Essentials, has all the basic ingredients you need in an outliner app. Its interface is easy enough to navigate and interact with.

You can begin outlining with one of the ready-made themes-cum-templates that OmniOutliner provides. Of course, you can just as easily create outlines from scratch.

Apart from the usual checklist and notes features of outlining software, you get a typewriter mode and a distraction-free mode.

If you’re on the lookout for an advanced outliner app, OmniOutliner Essentials will probably fall short of your expectations. That’s where Omni Outliner Pro comes in. The professional edition of OmniOutliner brings smart columns, scripting, custom themes and shortcuts, audio recording, and saved searches, among other advanced features. It will cost you $60.

Download: OmniOutliner ($10, free trial available)

More Ways to Organize Your Projects and Ideas

If you want to get your thoughts in order, dumping them into an outliner app is a good place to start. You can use outliners for taking notes, capturing ideas, or planning a trip. Pretty much any activity that needs an organized, hierarchical approach will benefit from the use of an outliner.

That’s because outlining puts your ideas in a digestible format and gives you a roadmap of sorts to start taking action.

Read the full article: 5 Mac Outliners to Help You Organize Your Projects and Ideas


Read Full Article

What Is the “LoJax” UEFI Rootkit Developed by Russian Hackers?


lojax-rootkit

A rootkit is a particularly nasty type of malware. A “regular” malware infection loads when you enter the operating system. It is still a bad situation, but a decent antivirus should remove the malware and clean up your system.

Conversely, a rootkit installs to your system firmware and allows for the installation of a malicious payload each time you reboot your system.

Security researchers have spotted a new rootkit variant in the wild, named LoJax. What sets this rootkit apart from others? Well, it can infect modern UEFI-based systems, rather than older BIOS-based systems. And that is a problem.

The LoJax UEFI Rootkit

ESET Research published a research paper that details LoJax, a newly discovered rootkit (what is a rootkit?) that successfully re-purposes a commercial software of the same name. (Although the research team christened the malware “LoJax,” the genuine software is named “LoJack.”)

Adding to the threat, LoJax can survive a complete Windows re-installation and even replacement of the hard drive.

The malware survives by attacking the UEFI firmware boot system. Other rootkits might hide in drivers or boot sectors, depending on their coding and the intent of the attacker. LoJax hooks into the system firmware and re-infects the system before the OS even loads.

As yet, the only known method to completely remove the LoJax malware is flashing new firmware over the suspect system. A firmware flash isn’t something most users have experience with. While easier than in the past, there is still a significant that flashing a firmware will go wrong, potentially bricking the machine in question.

How Does the LoJax Rootkit Work?

LoJax uses a repackaged version of Absolute Software’s LoJack anti-theft software. The original tool is meant to be persistent throughout a system wipe or hard drive replacement so the licensee can track a stolen device. The reasons for the tool burrowing so deep into the computer are fairly legitimate, and LoJack is still a popular anti-theft product for these exact qualities.

Given that, in the US, 97 percent of stolen laptops are never recovered, it’s understandable users want extra protection for such an expensive investment.

LoJax uses a kernel driver, RwDrv.sys, to access the BIOS/UEFI settings. The kernel driver is bundled with RWEverything, a legitimate tool used to read and analyze low-level computer settings (bits you normally do not have access to). There were three other tools in the LoJax rootkit infection process:

  • The first tool dumps information about the low-level system settings (copied from RWEverything) to a text file. Bypassing system protection against malicious firmware updates requires knowledge of the system.
  • The second tool “saves an image of the system firmware to a file by reading the contents of the SPI flash memory.” The SPI flash memory hosts the UEFI/BIOS.
  • A third tool adds the malicious module to the firmware image then writes it back to the SPI flash memory.

If LoJax realizes that the SPI flash memory is protected, it exploits a known vulnerability (CVE-2014-8273) to access it, then continues and writes the rootkit to memory.

Where Did LoJax Come From?

The ESET Research team believe that LoJax is the work of the infamous Fancy Bear/Sednit/Strontium/APT28 Russian hacking group. The hacking group is responsible for several major attacks in recent years.

LoJax uses the same command and control servers as SedUploader—another Sednit backdoor malware. LoJax also has links and traces of other Sednit malware, including XAgent (another backdoor tool), and XTunnel (a secure network proxy tool).

Additionally, the ESET research found that the malware operators “used different components of the LoJax malware to target a few government organizations in the Balkans as well as Central and Eastern Europe.”

LoJax Isn’t the First UEFI Rootkit

The news of LoJax certainly caused the security world to sit up and take note. However, it isn’t the first UEFI rootkit. The Hacking Team (a malicious group, just in case you were wondering) was using a UEFI/BIOS rootkit back in 2015 to keep a remote-control system agent installed on target systems.

The major difference between The Hacking Team UEFI rootkit and LoJax is the method of delivery. At the time, security researchers thought that The Hacking Team required physical access to a system to install the firmware-level infection. Of course, if someone has direct access to your computer, they can do what they want. Still, the UEFI rootkit is especially nasty.

Is Your System at Risk From LoJax?

Modern UEFI-based systems have several distinct advantages over their older BIOS-based counterparts.

For one, they’re newer. New hardware isn’t the be all and end all, but it does make many computing tasks easier.

Secondly, UEFI-firmware has a few additional security features, too. Particularly of note is Secure Boot, which only allows programs with a signed digital signature to run.

If this is turned off and you encounter a rootkit, you’re going to have a bad time. Secure Boot is a particularly useful tool in the current age of ransomware, too. Check out the following video of Secure Boot dealing with the extremely dangerous NotPetya ransomware:

NotPetya would have encrypted everything on the target system had Secure Boot been turned off.

LoJax is a different kind of beast altogether. Contrary to earlier reports, even Secure Boot cannot stop LoJax. Keeping your UEFI firmware up to date is extremely important. There are some specialized anti-rootkit tools, too, but it is unclear if they can protect against LoJax.

However, like many threats with this level of capability, your computer is a prime target. Advanced malware predominantly focuses on high-level targets. Furthermore, LoJax has the indications of nation-state threat actor involvement; another strong chance LoJax won’t affect you in the short term. That said, malware has a way of filtering out into the world. If cybercriminals spot the successful use of LoJax, it might become more commonplace in regular malware attacks.

As ever, keeping your system up to date is one of the best ways to protect your system. A Malwarebytes Premium subscription is a great help, too.

Read the full article: What Is the “LoJax” UEFI Rootkit Developed by Russian Hackers?


Read Full Article

How to Record or Stream Your Computer Screen Using OBS Studio


record-stream-obs

If you’re looking to record your screen or stream online, OBS Studio (formerly Open Broadcaster Software) is a great option. This tool makes it simple to capture screencasts, record your gameplay, stream to Twitch, and much more.

But if you’ve never used it before, OBS Studio might seem a little daunting at first. In this article, we’ll walk you through how to set up OBS Studio, what you need to start recording and streaming, and tips for getting the best results.

Download OBS Studio

To get started, you’ll want to download OBS Studio for Windows, macOS, or Linux. We’ll use the Windows version for this tutorial, but it’s similar on all platforms.

OBS Studio is truly free, so you don’t have to pay for any features. It’s also open source software, meaning anyone can take a look at the code and improve it.
01-Download-OBS-Studio

Step through the standard installer. Once it completes, OBS Studio will offer to walk you through an auto-configuration wizard. You can do this if you like; we’ll review related settings below.

The OBS Studio Interface

The main OBS Studio interface allows you to set up everything you need to start streaming or recording. At the bottom of the screen, you’ll see several control elements.
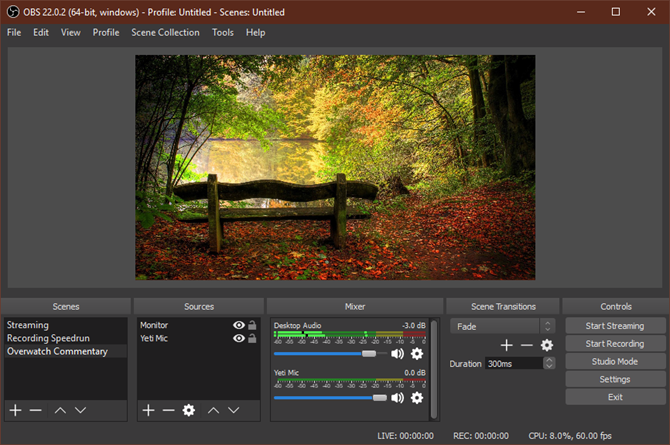
02-OBS-Main-Window

Scenes

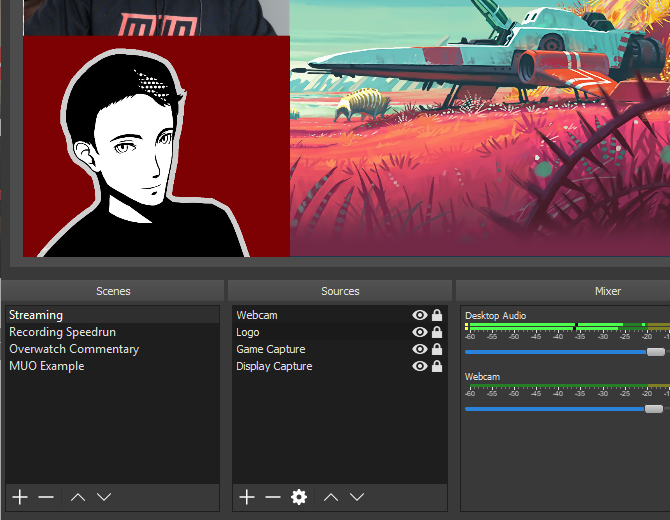
A Scene in OBS Studio allows you to collect and arrange certain Source elements in a specific way. You can have multiple scenes and switch between them at will.

This will make a bit more sense as we move on. For now, you can click the Plus button to create a new scene. Call it Default or something similar (you can change it later).

After you’ve added some elements, you can click on them in the preview to adjust as you wish. Click the Eye icon to hide an element, or the Lock to prevent accidental movement.
03-OBS-Scenes

Sources

Sources are the video and audio inputs that you feed into OBS Studio. Click the Plus button to add a new one, and you’ll see several categories. Some of the most important ones include:

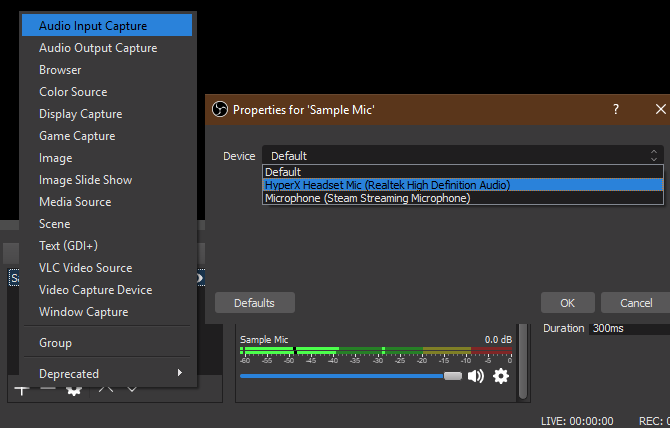
  • Audio Input Capture: Record sound from a microphone or similar. (See the best budget microphones if you need one.)
  • Audio Output Capture: Capture the sound coming out of your computer, so your recording/stream includes game or desktop audio.
  • Display Capture: Allows you to capture an entire monitor, no matter what’s showing on it.
  • Game Capture: Choose a specific game to record.
  • Image: Display a static image.
  • Video Capture Device: Records footage from a webcam or similar. (We’ve listed the best budget webcams if you don’t have one already.)
  • Window Capture: Record a specific program window. Like Game Capture, but works for any program.

Once you select an option, you can choose Create new or Add Existing. Since you just started, you’ll need to add a new item that you can reuse later. After you click OK, OBS Studio displays options depending on the source you chose.

As an example, click Audio Input Capture. Let’s say you’re going to use a headset microphone to record audio. Enter a descriptive name for the source (like Headset Mic) and click OK. On the resulting screen, pick your headset mic from the Device dropdown and click OK.
04-OBS-Add-Audio-Source

Now you have that input registered with OBS Studio and can easily add it again in the future. You’ll need to repeat this step to add your webcam, screen capture, and similar.

Mixer

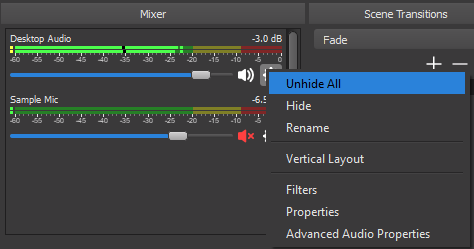
Once you’ve added all your sources, the Mixer tab lets you adjust the volume balance between them. The bars move in real-time to reflect levels. Drag the slider to adjust the mix, or click the speaker icon to mute a source.
05-OBS-Mixer-Section

Play around with these ahead of time, as different sources can have vastly different volume levels. You wouldn’t want to complete a recording only to find out that the game audio overpowers your mic.

Scene Transitions

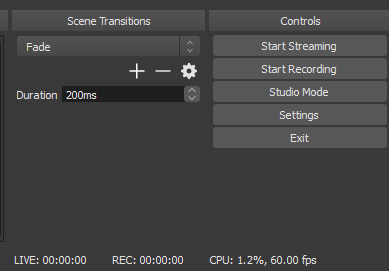
This simple section allows you to choose what happens when you swap between scenes. Choose between Fade and Cut in the dropdown, or hit Plus to pick another option. You can choose how long the transition lasts using the Duration box.

Controls
06-OBS-Transitions-and-Controls

Here, the Start Streaming and Start Recording buttons will let you start capturing with OBS Studio. You can see the current FPS and CPU usage below.

It also lets you enable Studio Mode for making changes to scenes on the fly, plus access to the many Settings of OBS Studio.

Tweaking OBS Studio Settings

Before your first recording or stream, you should tweak a few options. Click Settings in the Controls section of the interface to access them.

OBS Studio offers other options than what we explore here, but you shouldn’t need to worry about those until you’re more experienced with it.

Video Settings

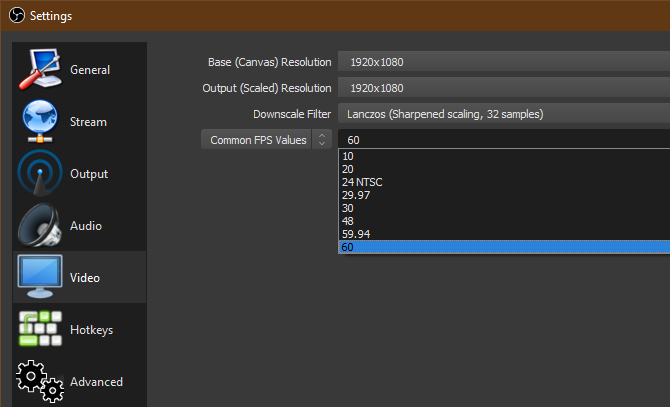
First, head to the Video tab. Here, check the Base (Canvas) Resolution and Output (Scaled) Resolution) options.
07-OBS-Video-Settings

The first should match your screen resolution, while the second lets you choose the resolution of the final video. Leave Output the same as the above for a full-quality recording, or lower it to something like 1280×720 for a lower file size. Leave the Downscale Filter as Lanczos if you’re downscaling.

Lastly here, you’ll need to choose the FPS (frames per second) of the recording. For a smooth picture, choose 60. But if you desire a smaller file size or are recording something simple, 30 is suitable.

It’s also a good idea to open the Advanced tab and set Process Priority to High in order to give OBS Studio the most resources to create the best recording.

Recording Settings

Switch to the Output tab to access options to screen recording.

At the top, you can set the Output Mode to Simple or Advanced. If you want a quick and solid preset, pick Simple and set the following under Recording:

  • Recording Quality to Indistinguishable Quality
  • Recording format to FLV, or MKV if you prefer
  • Encoder to Hardware (AMD) or Hardware (Nvidia) if you have a powerful graphics card, or Software (x264) if not (see below for more details).
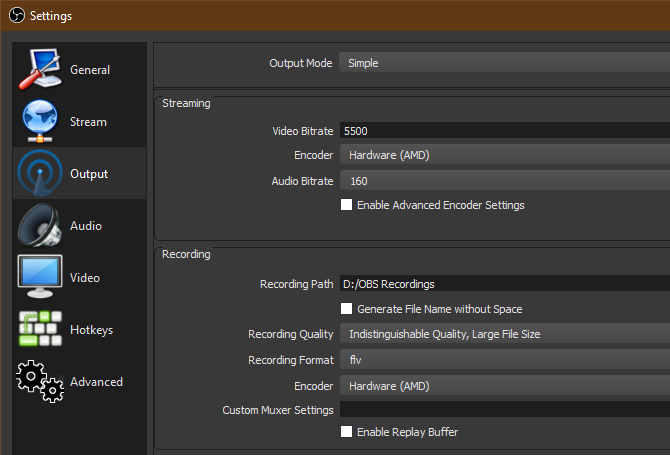
08-OBS-Simple-Recording-Settings

Of course, Advanced gives you more options. Choose Advanced and swap to the Recording tab below to see them.

Choose where you’d like your completed video to save using the Recording Path field.

Under Recoding Format, you can choose the video filetype to save in. The default is FLV, which is a fine default. While MP4 is a popular format, using it is risky because you’ll lose the whole file if OBS Studio can’t finalize it. Thus, a Blue Screen or power outage would destroy an MP4 recording but merely cut off an FLV.

Below this, you’ll need to choose an Encoder. The default is x264, which uses your CPU. If you have a powerful dedicated graphics card (not integrated graphics), you can change this to H264 (for AMD cards) or NVENC (for Nvidia cards). Doing so will likely provide better results when recording, as it won’t put as much strain on your CPU.
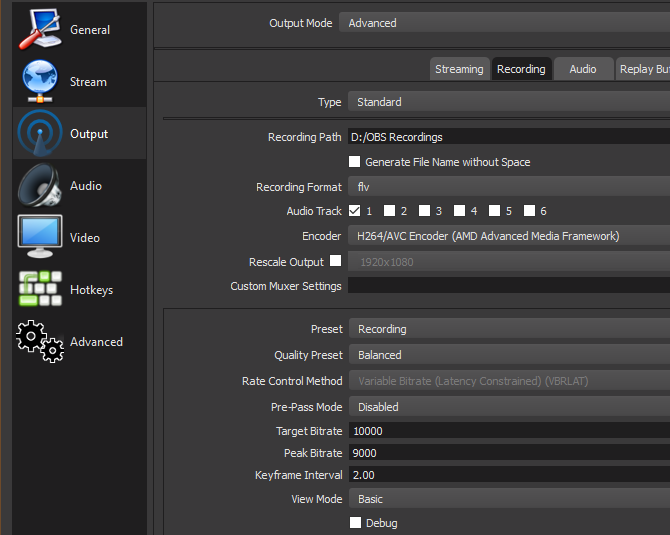
09-OBS-Advanced-Recording-Options

Feel free to try both and see which is best for you.

Bitrate

Perhaps the most important part of your recording options is the Bitrate field. Essentially, a higher bitrate results in better-quality videos with larger file sizes. Setting bitrate too low will result in pixelated video, while setting it too high will generate a massive file.

If you’re using x264, choose CBR (constant bitrate) and enter a value for bitrate below. 50,000 is a good starting point for 1080p recordings at 60FPS. The CPU Usage Preset lets you tweak how much of the CPU the software uses to encode video. The default is veryfast, but you can up this to superfast if you get a High CPU Usage Warning while recording or streaming.
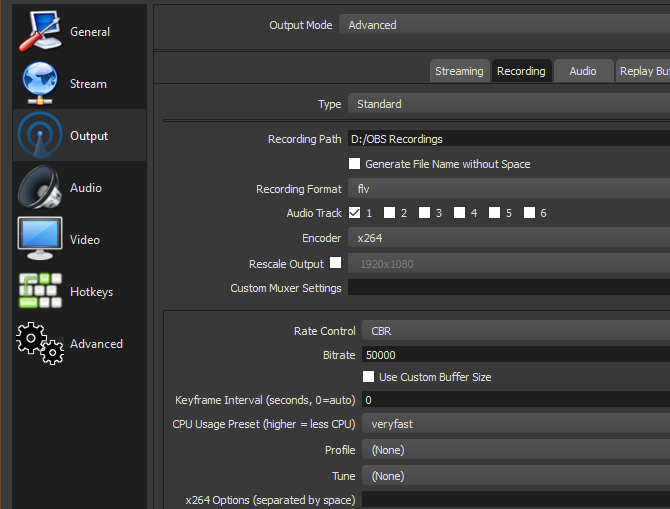
10-OBS-Advanced-Recording-x264

Those using a graphics card encoder can choose a Preset, or set the bitrate values below similarly to above.

Try different values here with a few test recordings to find the best balance of video quality and file size for your purposes. Record around a minute of typical footage and you can use that to estimate how large of a file you’ll end up with.

Streaming Settings

You’ll find Streaming on the Output tab as well. In Simple mode, you’ll simply need to specify a bitrate, choose between software or hardware encoding, and set the Audio bitrate.

Twitch recommends some streaming bitrates depending on quality. 1080p at 60FPS should use a bitrate of at least 4,500, while 720p at 30fps can use something around 2,500. For the audio bitrate, 160 is a good baseline. You can increase this to 192 for better quality, or 320 if you need top-notch audio.

In the Advanced mode, you’ll find very similar options on the Streaming tab as discussed above. You may wish to lower the bitrate (as well as downscaling the resolution and lowering the FPS) slightly for streaming, as a stable stream that everyone can enjoy is better than streaming in maximum quality that few can enjoy.
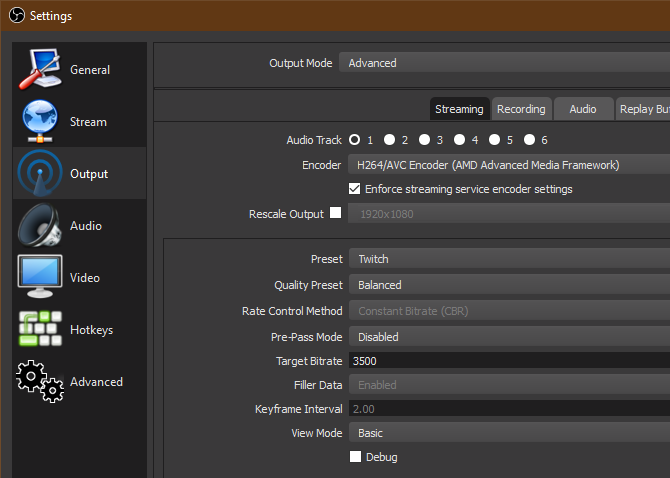
11-OBS-Streaming-Settings

The tips for fixing poor FPS in games apply too. Check out Twitch’s broadcast requirements page for more info.

How to Record Your Screen With OBS Studio

To begin screen recording, all you have to do is click Start Recording on the main OBS Studio page. The software will immediately start recording based on the current Scene. You can swap Scenes at any time, so make sure you’ve set them up beforehand.

When you click Stop Recording, OBS Studio will save your file to the directory you specified in Settings. As mentioned earlier, we recommend performing a short test recording first to make sure everything looks and sounds acceptable.

How to Stream Using OBS Studio

To stream with OBS Studio, you’ll first need to authorize OBS Studio with your streaming account. Do this by opening Settings and switching to the Stream tab. Under Service, choose your preferred service. You’ll find Twitch, YouTube Gaming, Mixer, and more.
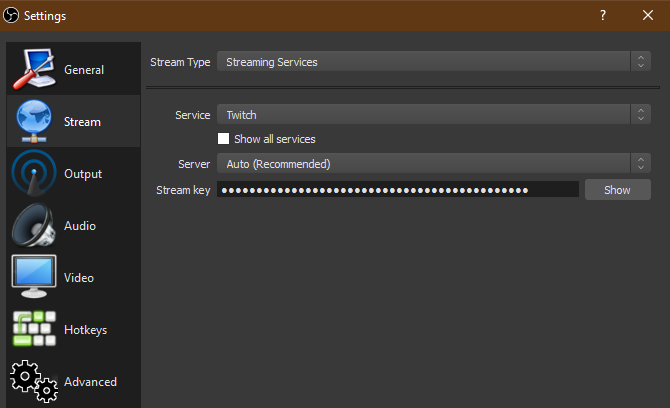
12-OBS-Streaming-Key

Next, you’ll need to generate a streaming key for the service. To do this for Twitch, head to the Stream Key page in Twitch’s Settings (Settings > Channel) while logged in. Click Copy and paste this into the Stream key field in OBS Studio.

For YouTube Gaming, open the Live Streaming > Stream now tab in YouTube’s Creator Studio. At the bottom of the page in the Encoder Setup section, reveal and copy your Stream name/key.

Warning: Never give this stream key to anyone or show it on a stream! Anyone with access to this can stream to your account. If you accidentally share it, click Reset to generate a new one.

You’re All Set With OBS Studio

Now you have a basic understanding of how to use OBS Studio. You can customize it a lot more to suit your own personal needs, but this article is designed to prepare you to record gameplay locally or run your first stream.
Now you can focus on building an audience for your streams.

Read the full article: How to Record or Stream Your Computer Screen Using OBS Studio


Read Full Article