26 May 2020

nano vs. Vim: The Best Terminal Text Editors, Compared


linux-terminal-shutdown

You may be surprised to learn that many aspects of your Linux desktop are not hidden behind complex code. Numerous programs and system settings are tucked away in text files.

You can open these with your default text editor such as Gedit or Kate, but the terminal is often faster, especially when you need administrator permissions.

For terminal-based text editing, two of the top choices are GNU nano and Vim. Which is better? I’m not going to wade into that question, but there are core differences that set these two text editors apart.

A Brief History of GNU nano and Vim

The GNU nano (more commonly referred to as “nano”) project was created in 1999 in order to emulate and improve upon the Pico text editor. Developers claimed GNU nano to be 2/3 to 1/8 the size of the Pico binary, which made it very lean and usable on even the weakest systems.

Vim, originally developed in 1991, is based on the original Vi text editor that was developed in 1976. Like GNU nano, Vim began as an effort to improve an earlier project.

GNU nano

Nano Linux terminal text editor

GNU nano has a reputation for being relatively user-friendly. If you’ve never used nano before, there’s a good chance you can fumble your way through without help.

To get started, you can open or create a file by typing:

nano /home/user/HelloWorld.txt

This will show you a recognizable user interface. The title of your text file appears at the top and the text contained within the file appears in the middle. The actions you can perform line the bottom. You complete these actions by pressing Ctrl plus the indicated key.

For example, you exit and save a file using Ctrl + X. Admittedly, I was very concerned about how to save my file the first time I used nano, as the text editor only lists this command as “Exit”. But when you try to edit, Nano asks if you want to save.

As the bottom of the screen shows, nano contains much of the functionality you would expect from a graphical application. You can cut and paste, find and replace words, and much more.

GNU nano’s features include:

  • Autoconf support
  • Goto-line# command w/o flag
  • Case sensitive search function
  • Interactive search and replace
  • Slang and ncurses support
  • Autoindent ability
  • Displayed tab width option
  • Regular expression search and replace
  • Toggles for cmdline flags via meta keys
  • Tab completion when reading/writing files
  • Soft text wrapping (text doesn’t wrap as in full-fledged document editors, with continuations indicated with $)

Overall, nano is a great option for newcomers to terminal text editing. You can get to try your hand at opening files from the command line and navigating using primarily a keyboard without having to throw out much of what you know about text editors.

On a DEB-based system such as Debian or Ubuntu, you can install GNU nano using:

sudo apt install nano

On Fedora, a RPM-based system, you can install using:

sudo dnf install nano

Since nano is a command-line program you likely won’t find it in GNOME Software or alternative Linux app stores. But you can install it using traditional package managers, such as Synaptic.

Vim

Vim Linux terminal text editor

Vim, by contrast, isn’t quite so welcoming to newcomers. When you open a text file you see just the contents of the file and no indication of how to use Vim itself.

Getting started is straightforward though. You open a file using the following command:

vim /home/user/HelloWorld.txt

At this point, you’re left having to read the documentation, search online, or mash buttons and hope for the best. If you do opt for the last option, there are some safeguards in place. You can’t do any real editing without pressing I to enter “Insert” mode. After you’ve made your edits, you then press Esc to exit the mode (at least you could probably guess that).

To perform other functions, when not in Insert mode, press the : (colon) key. Then type the key or keys that correspond with what you want to do and press Enter.

For example, to save the changes you’ve made to your text file, type :w and hit Enter. This will “write” changes to your file. See, the w is intuitive when you think in terms of read and write rather than open and save.

When you’re done, you can then type :q and hit Enter to quit the program. Again, rather intuitive.

Once you learn the behavior, there’s a certain beauty to Vim’s minimal aesthetic. You don’t have clutter floating inside your terminal window. All you see on screen is the text inside your text file. If you’re comfortable with typing (and you very well may be, considering you’re in the command line), Vim’s interface can feel rather natural.

There’s another reason to make the effort. Vim has the advantage of being more powerful than GNU nano. Not only does Vim contain more features from the get-go, you can also customize the program with plugins and scripts.

Vim’s features include:

  • Automatic commands
  • Completion commands
  • Digraph input
  • Higher memory limits than vanilla vi
  • Split screen
  • Session recovery
  • Tab expansion
  • Tag system
  • Syntax coloring

After you’ve taken the time to add in your desired plugins, Vim becomes a capable alternative to full-featured graphical text editors such as Sublime Text or Visual Studio Code. If you’re not into coding, that doesn’t mean it’s time to give Vim a pass. With a markdown plugin available, Vim is also a capable option for writers.

Is Vim harder to grasp than nano? For sure. But with the ability to add features from other text editors, you can really make Vim your own.

On Debian or Ubuntu, you can install Vim using:

sudo apt install vim

On Fedora, use:

sudo dnf install vim

GNU nano vs. Vim: Which Do You Prefer?

If you can live with with a steeper learning curve, then you may find yourself falling in love with Vim. It’s simple and rather attractive in its own way.

But if you want an option that’s straightforward and gets the job done, there’s little reason not to pick GNU nano. It doesn’t have the mystery that Vim has. You don’t have to read a manual to use the program, which in general is a hallmark of good design.

At the end of the day, both are equally capable of editing the same text files. And when you find yourself falling in love with either program, here are ways to integrate plain text files into how you use your computer.

Read the full article: nano vs. Vim: The Best Terminal Text Editors, Compared


5 Free Homeschooling Websites to Teach and Educate Children at Home


Homeschooling Websites

With the internet, education comes to your home as you can teach kids through online classes. Where do you start? Try these best free websites and apps for homeschooling children.

If homeschooling is a permanent plan for you, you’ll likely want to spend on premium apps and websites that offer robust packages. But if you are temporarily homeschooling or trying it out for the first time, the internet makes it easy to do it for free.

1. TED-Ed@Home (Web): TED-Ed’s Free Homeschooling Newsletter and Activities

TedEd@Home issues a daily newsletter for easier homeschooling, and hosts a daily new speaker on Instagram

The makers of TED Talks launched a new program to encourage learning for students without going to school. The TED-Ed@Home initiative is a daily newsletter with free lessons, activities, and challenges to support students of all age groups, and parents and teachers too.

The newsletter includes new lessons daily for elementary, middle school, high school, and university. A single click will take you to TED-Ed’s archive of educational videos appropriate for that age group. The lessons cover the arts, literature, language, math, science, technology, and more.

You can also browse all TED-Ed lessons, which you can filter by subject, student level, content type, date uploaded, and popularity.

Also, check out the new TED Challenges on the @TEDEducation Instagram page. Every weekday, a new TED speaker will take over the account for a brief educational talk, and a family-oriented challenge that students can do at home.

Remember, TED isn’t the only platform of its type. You should check out the best TED Talks alternatives and see if their lessons are better suited for your children.

2. Things to Do Indoors (Web): Free Resources From Roald Dahl’s Official Website

Roald Dahl's Things to Do Indoors has a variety of free learning resources for children

The books of Roald Dahl are ever-popular among children. The official website now has a mini-page called Things to Do Indoors, which collects free resources to entertain and educate kids at home.

It’s a mix of fun activities and educational pieces. For example, teachers can browse the “Lickswishy Lesson Plans” to find interactive ways to teach language skills. Or take drawing classes to learn how to draw some of Dahl’s famous characters like Matilda.

There are quizzes, puzzles, arts and crafts, and much more for children to browse directly, as well as adults to teach their kids.

Dahl’s website tries to be as inclusive as possible. The video storytelling section, for example, tells some of his classics in sign language. Also, download the giant activity pack from the Create and Learn page, which has quizzes, activity sheets, dress-up ideas, and more.

3. Techie Home School Mom (Web): Beginner Homeschooling Advice and Curriculum Directory

Techie Home School Mom has an easy to browse directory of home learning courses and curriculum

Beth decided to homeschool her kids, and share all the tips and tricks she learns along the way. Despite the name of her blog, you don’t need to be adept at technology to use it. Beth’s articles are accessible for any level of tech expertise.

The first thing to check out at Techie HomeSchool Mom (THSM) is the online homeschool curriculum directory. Beth has scoured the best free online homeschooling courses to make them easy for you to browse.

Filter by subject, grade, or type, and you’ll find a brief description of each course, the class format, grade levels, and categories it applies to.

Throughout the website, Beth shares to-the-point articles about what you’ll need to successfully homeschool children. It’s a lot of thoughtful things that you wouldn’t have considered, like the equipment you’ll need, or specific homeschooling advice for children struggling with certain subjects.

4. Scholastic Learn at Home (Web): Free 4-Week Homeschool Courses

Scholastic teaches children at home through free four-week courses

Educational books giant Scholastic released some of its library to make four-week-long educational courses. You need to sign up to use it as a teacher, parent, or student, and then it’s completely free, no strings attached.

First, choose a grade group: PreK and Kindergarten, Grades 1 and 2, Grades 3 to 5, or Grades 6 to 9. Each course has four weeks divided into a normal 5-day week. Every day has four activities or educational elements.

Scholastic draws upon its vast repository of educational materials to mix up the lessons for well-rounded learning.

Generally, the kids will have to read an article or watch a video, and then have a follow-up activity like writing an essay based on what they learned. By finishing the daily activities, kids earn a “daily reading quest” for enjoyable comprehension.

Scholastic has also made BookFlix free till the end of the school year. BookFlix is its interactive story-telling app that teaches children to learn to read. Check out the Resources for Families section to learn how to use BookFlix free, and get other free downloadables.

5. GoNoodle Good Energy at Home (Web): Free PE and Exercise Games for Kids

GoNoodle's Good Energy at Home has free weekly physical education and exercise activities for kids

Homeschooling needs to be well-rounded like the system a real school would provide. Your child needs physical activity, and GoNoodle’s Good Energy at Home is the answer. Get free movement, yoga, and mindfulness videos for kids in a variety of activities.

The website has new activities every week, where kids learn different exercises with a bit of fun to them. For example, an NFL player taught children some coordination and agility training exercises. Dance instructors teach kids to shake a leg while getting some cardio. And there are other printables, videos, and activities to find something new each day of the week. Plus, you can always go back through the archives for more.

GoNoodle also works on Apple TV, Amazon Fire TV devices, and Roku, for a big-screen activity experience. Several parents reviewing the app say it’s a great compromise. Kids are happy to get a little extra “screen time”, and parents are happy that the child is active and moving. Plus, it also recommends a few off-screen activities to give those eyes some rest.

Download Free Homeschool Printables

Scholastic doesn’t do what GoNoodle does, and GoNoodle has none of the activities from Roald Dahl’s free site. Ideally, you should mix and match the above recommendations to create your own schedule. And you’ll need to print that out for the child to stick to it.

Much like at the school, homeschooling often requires good old paper and pen. But the good news is that you don’t need to draw up those charts, report cards, and schedules. We’ve got your back with a collection of the best free homeschool printables and templates you can download.

Read the full article: 5 Free Homeschooling Websites to Teach and Educate Children at Home


Confidence Interval


Confidence Interval

How to Use Family Sharing to Monitor Your Child’s iPhone


monitor-child-iphone

You might not realize it, but there are lots of parental control options on an iPhone or iPad. They make it easy to keep your children safe and monitor how they use their devices. Most of these controls link with Family Sharing, which means you can use your own iPhone or iPad to edit restrictions or allow purchases for your child.

Here’s a complete guide to setting up and monitoring parental controls on your child’s iPhone or iPad using Family Sharing from your own device.

Create a Family Sharing Group

Before you set up any parental controls, it’s best to create a Family Sharing group with you and your children in it. Family Sharing lets you share iTunes and App Store purchases, iCloud storage, and Apple Music or TV channel subscriptions.

But you can also use Family Sharing to approve or deny your children’s purchases, monitor their screen time, restrict adult content, or track their location. What’s particularly great about Family Sharing is that you can do all of this remotely from your own iPhone, iPad, or Mac.

To create a Family Sharing group:

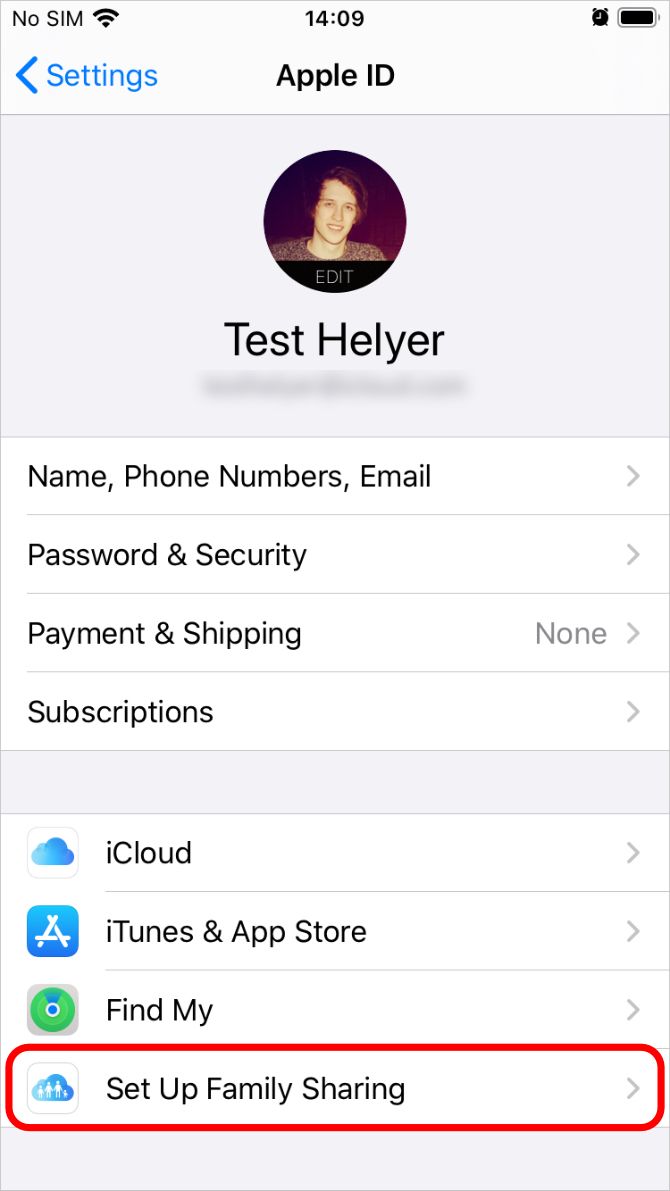
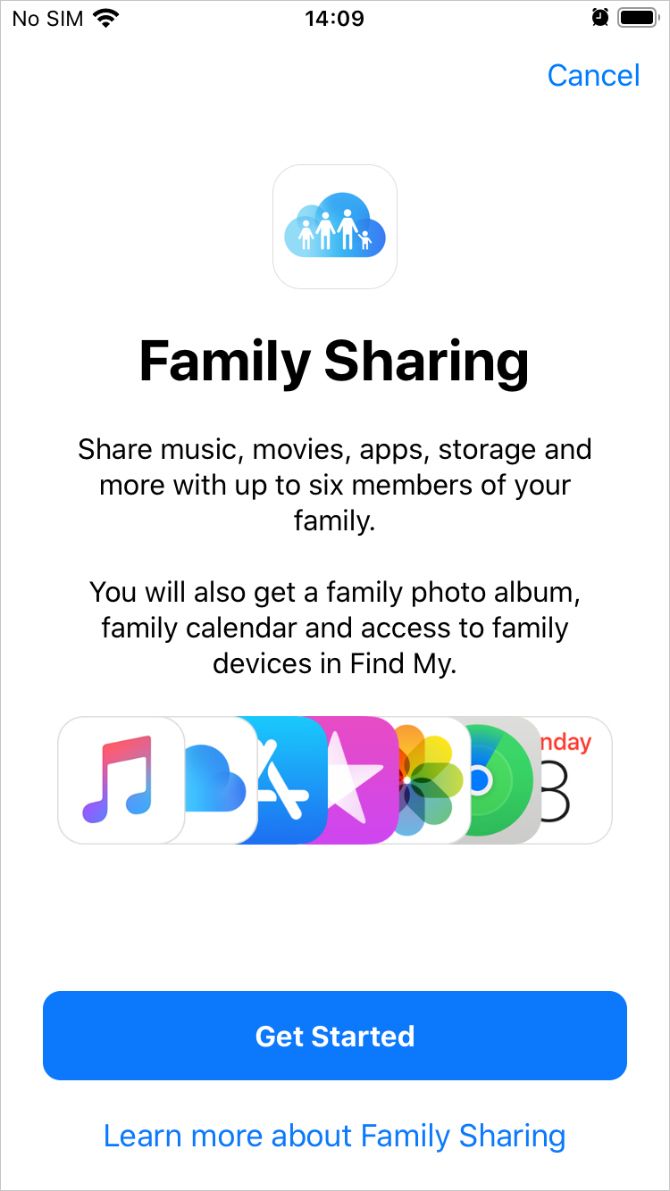
  1. Open the Settings app on your iPhone or iPad and tap [Your Name] at the top of the screen. Choose to Set Up Family Sharing if you haven’t already.
  2. Follow the onscreen prompts to add a payment method, invite family members, and enable Family Sharing features.
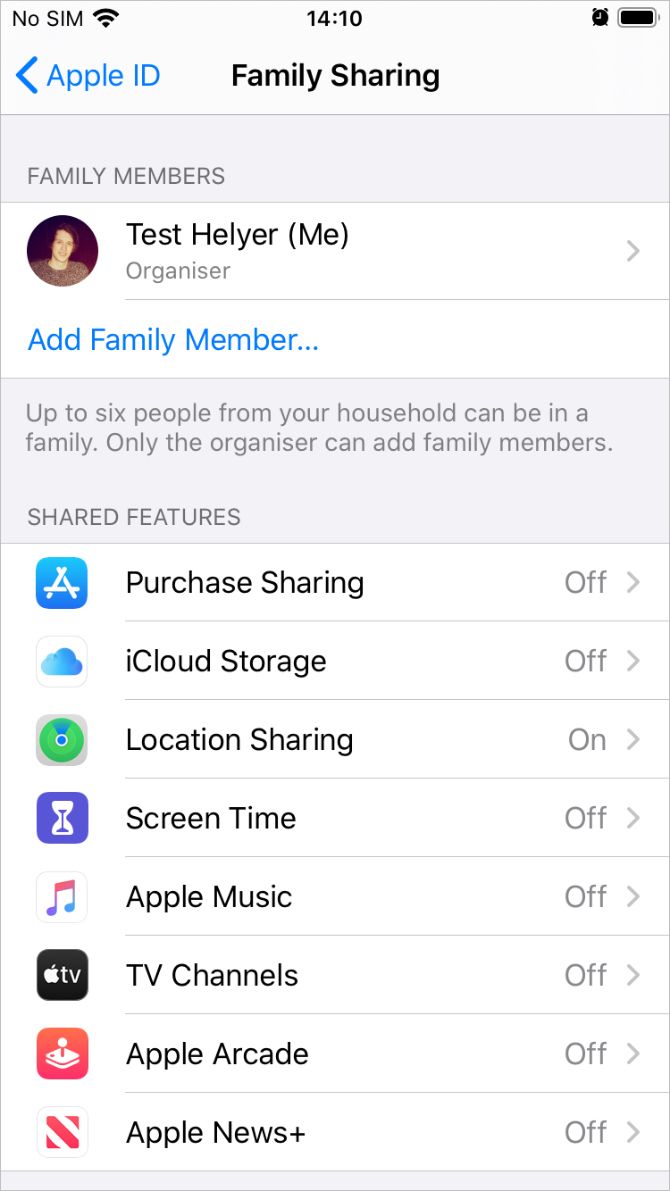
  3. After creating the group, tap Add Family Member to invite more people to your Family Sharing group, up to a total of six people.
  4. Alternatively, ask the Family Organizer of an existing Family Sharing group to add you to their group.

Creating a Child Account

Family members can only join your Family Sharing group if they have an Apple ID. If your child is under 13 years old, you will need to create a Child account for them to use, since Apple doesn’t let them make their own.

A Child account must be linked to a Family Sharing group until the child reaches 13 years old, at which point they can choose to leave the group.

To create a Child account for Family Sharing:

  1. Open the Settings app on your iPhone or iPad and go to [Your Name] > Family Sharing.
  2. Tap Add Family Member and choose to Create a Child Account. Then follow the onscreen prompts to create an Apple ID for your child.
  3. After creating the account, use the email address and password you created to sign in to that account on your child’s iPhone or iPad.

Create a Child Account for Family Sharing on iPhone

Assigning Parents or Guardians

If there are multiple adults (over 18 years old) in your Family Sharing group, you may want to assign some of them to act as Parents/Guardians for any children in the group.

A Parent/Guardian can monitor Screen Time, adjust Content & Privacy Restrictions, and approve or deny App Store and iTunes purchases for your child’s device.

To make someone a Parent/Guardian in your Family Sharing group:

  1. Open the Settings app on your iPhone or iPad and go to [Your Name] > Family Sharing.
  2. Tap an adult family member’s name and turn on the Parent/Guardian option.

Parent:Guardian toggle in Family Sharing settings

Approve Downloads With Ask to Buy

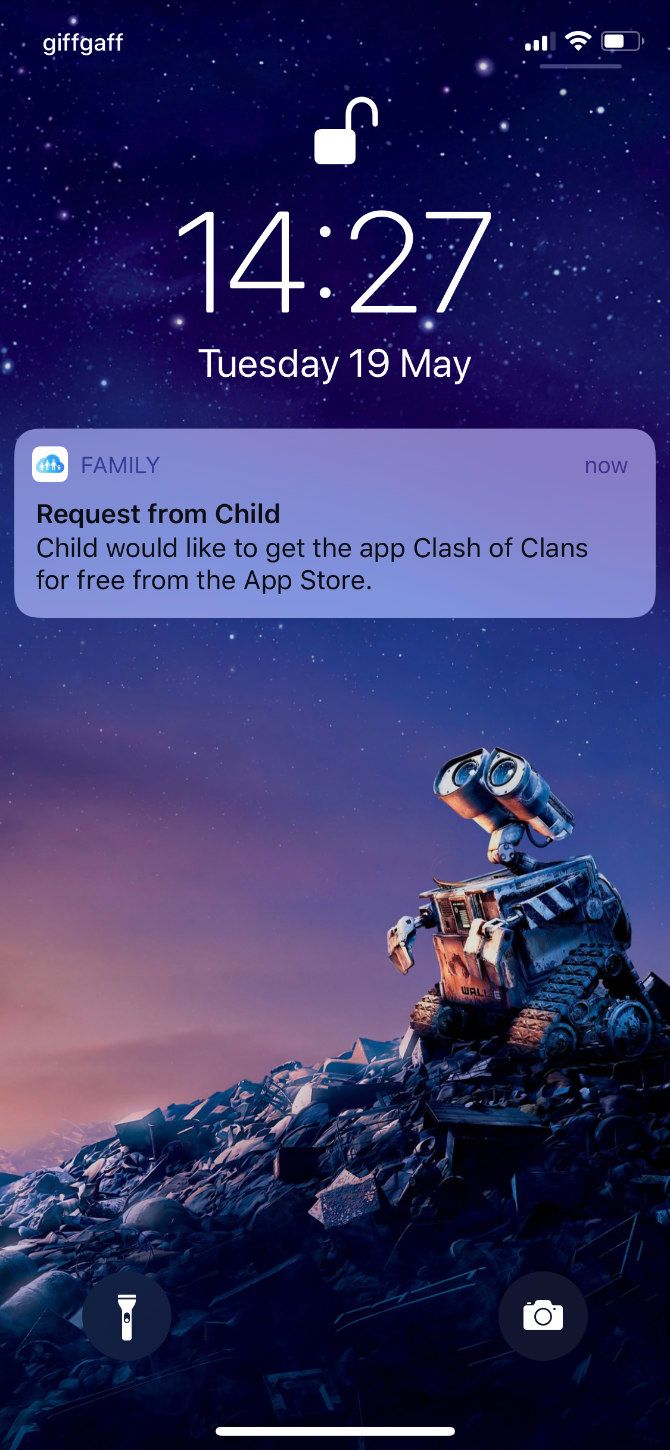
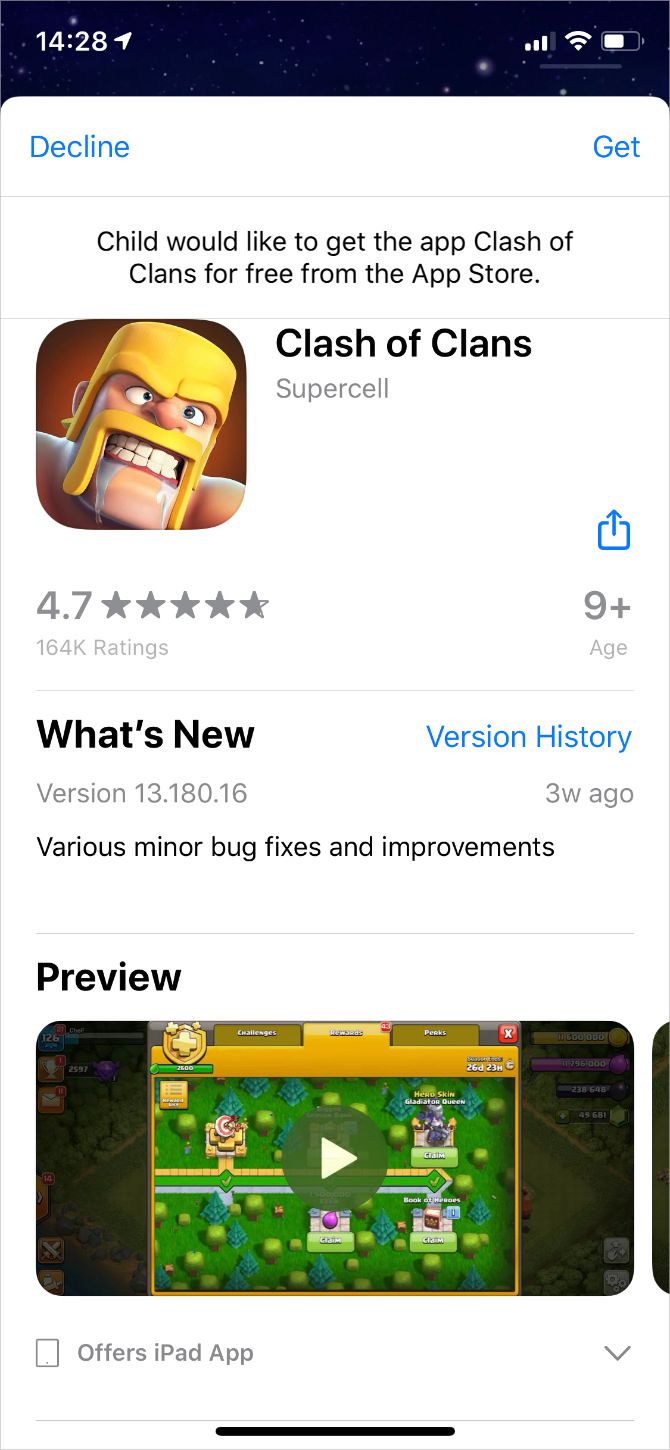
Ask to Buy sends a notification to all your Apple devices whenever your child tries to download content from iTunes or the App Store. You can then tap Get or Decline in this notification to choose whether to let them download the media or not.

This is a good way to avoid unexpected iTunes bills—since any purchases they do make come off the Family Organizer’s payment method. It’s also an easy way to avoid letting your children download apps, songs, movies, TV shows, or books you don’t want them to have, since they need to request permission first.

Ask to Buy applies to free downloads as well as paid purchases. So your child always needs your permission before grabbing a new app.

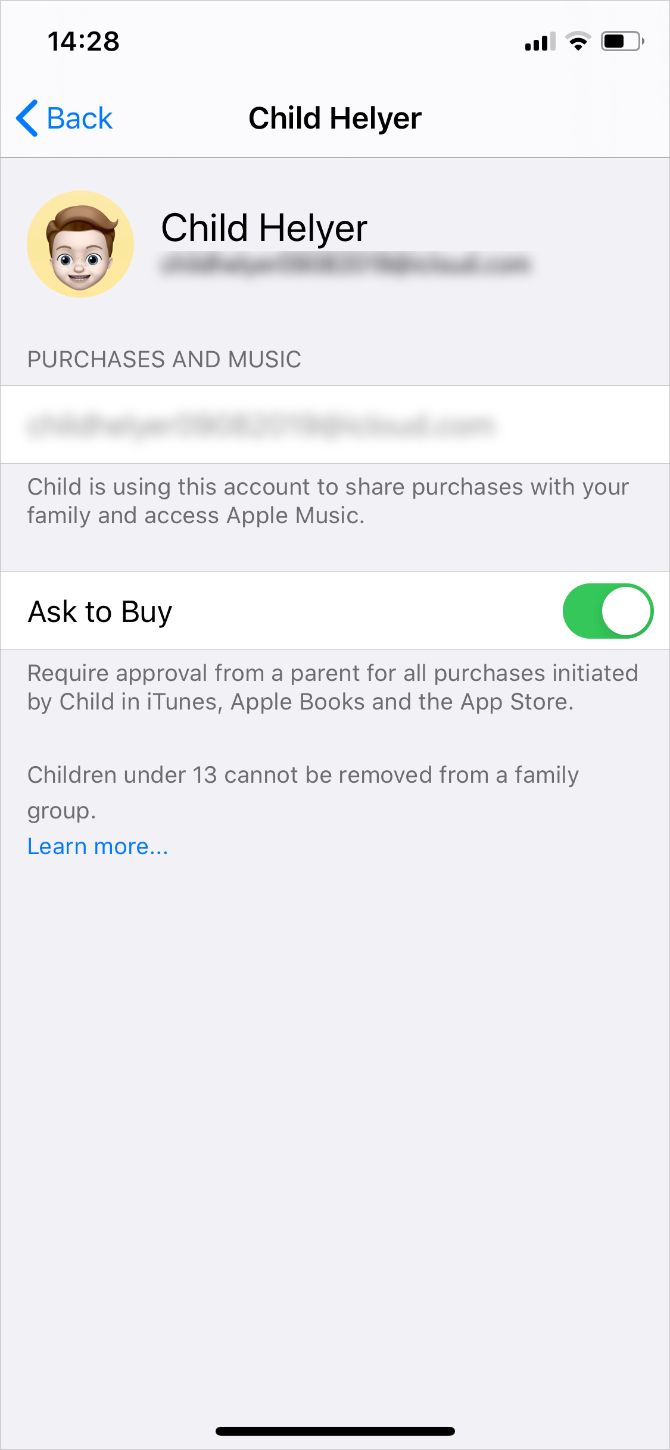
Apple enables Ask to Buy automatically when you create a Child account. But you can also turn it on or off for anyone under 18 in your Family Sharing settings:

  1. Open the Settings app and go to [Your Name] > Family Sharing.
  2. Tap a family member’s name and toggle the Ask to Buy option.
  3. When you receive a request notification, tap it to view the app or media your child wants to download.

Add Gift Card Balance to Your Child’s Account

When you approve purchases for your child, Apple takes payment from the Family Organizer’s primary payment method. If you don’t want this to be the case, you should buy an iTunes or App Store gift card and add that balance to your child’s account.

Any future purchases you approve will come off your child’s Apple ID balance. When it’s all used up, payment reverts to the Family Organizer’s payment method again.

Monitor Your Child’s Screen Time

Screen Time collects a range of data to show how much someone has used their Apple device, along with which apps they spend their time on. With Family Sharing, you can remotely monitor your children’s Screen Time and impose limits to keep them from spending too long on their iPhone or iPad.

To enable Screen Time for your child’s device:

  1. Open Settings on your iPhone or iPad and go to [Your Name] > Family Sharing.
  2. Tap Screen Time, then tap your child’s name and choose to Turn On Screen Time.

When you turn on Screen Time for your child, it prompts you to set Downtime, App Limits, and a Screen Time passcode straight away. You can edit these settings at any time using the Screen Time passcode you create; keep this passcode secret from your child so they can’t edit the settings themselves.

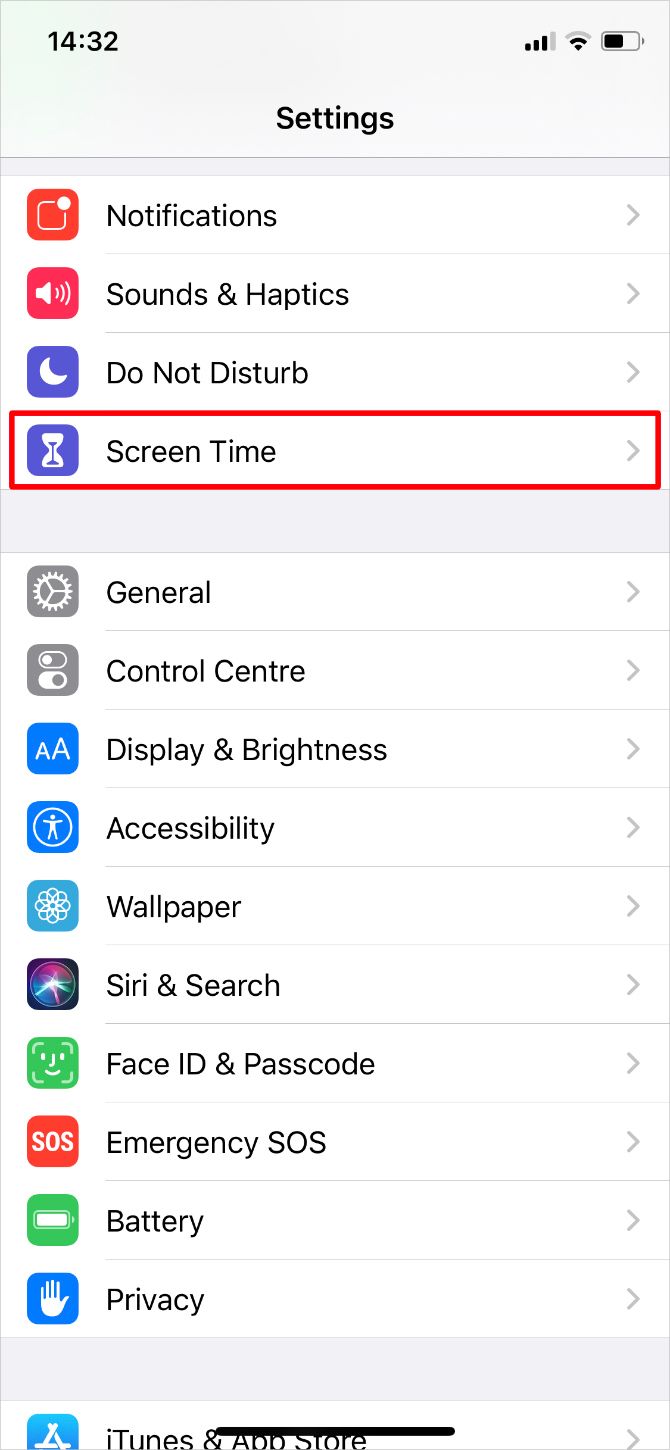
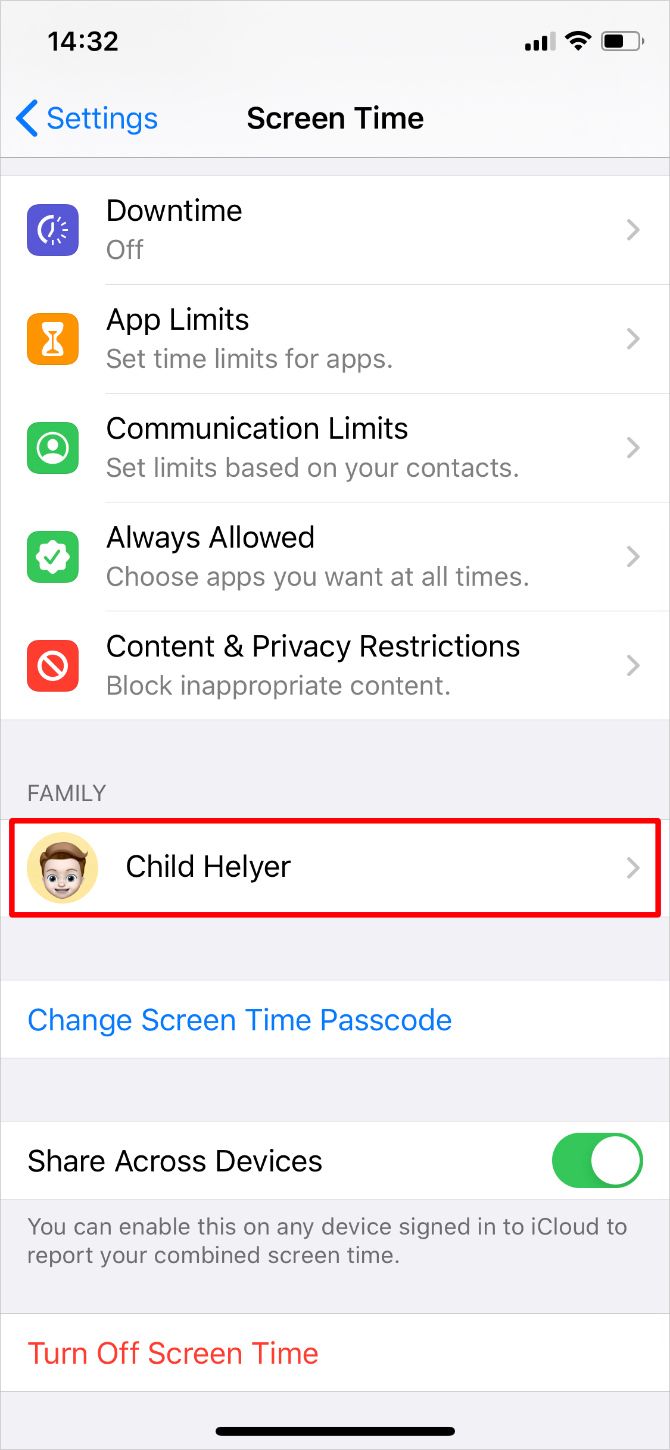
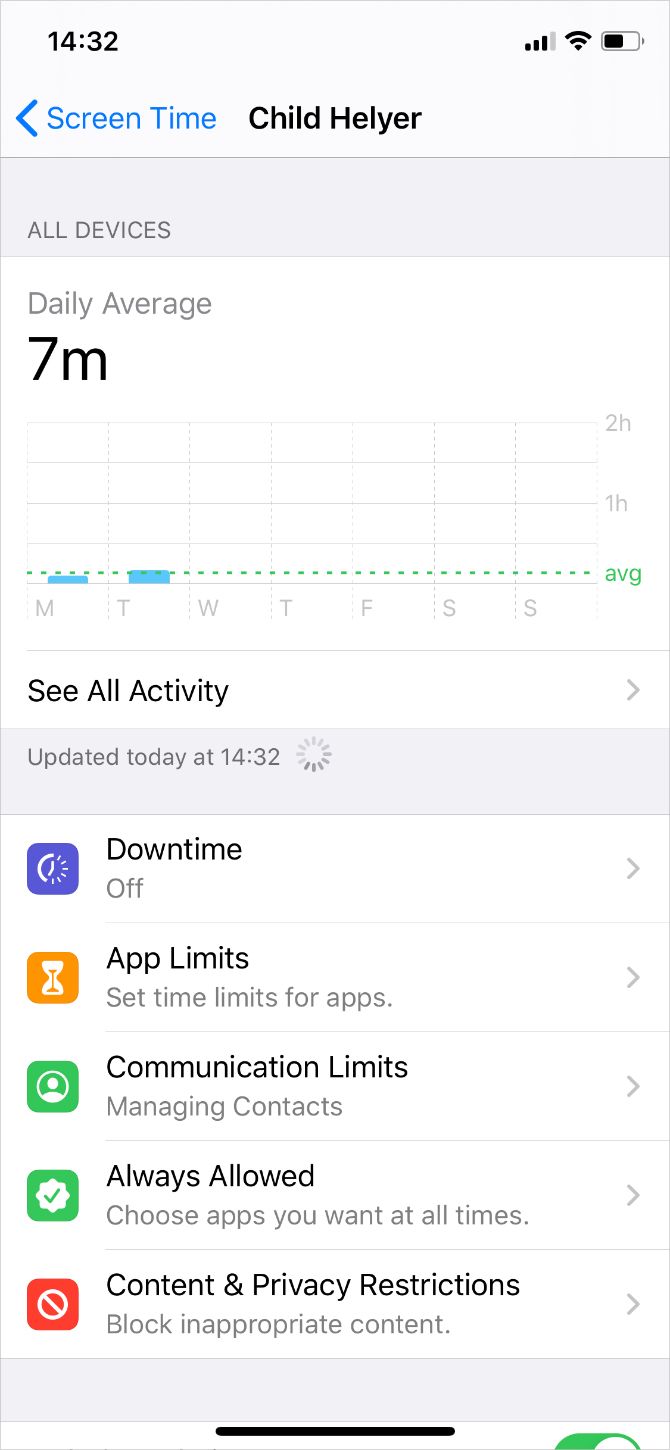
To view your child’s Screen Time usage or edit their settings, open the Settings and go to Screen Time. Then tap your child’s name beneath the Family heading.

You should see a usage report at the top of the screen. Tap See All Activity for a breakdown of how long your child spent on each app or each category of apps. If you enable Include Website Data, you can also see how long they spent on particular websites in Safari.

Take a look at our breakdown of all Screen Time features to see how you can limit your child’s device usage. Your child can also send requests to you for more time when they reach their limits, which you can approve or deny from your own device.

Enable Content & Privacy Restrictions

The best parental controls on an iPhone or iPad are in the Content & Privacy Restrictions, which you can find within the Screen Time settings. Thanks to Family Sharing, you can edit the restrictions on your child’s device remotely.

  1. Go to Settings > Screen Time on your iPhone or iPad.
  2. Beneath the Family section, tap your child’s name to view their Screen Time settings.
  3. Then go to Content & Privacy Restrictions and turn them on using the toggle at the top of the screen.

Most of the Content & Privacy Restrictions are fairly self-explanatory, but we’ve detailed each of the sections below for full clarity.

iTunes & App Store Purchases

Choose whether you want to allow your child to install or delete apps on their device, and if you want to allow them to make in-app purchases. If Ask to Buy is turned on, your child still needs your permission before they can install or purchase anything.

If you allow your child to install apps without using Ask to Buy, you should make sure iTunes and App Store purchases Always Require an Apple ID password. Otherwise, your child can download media themselves for a short period after you enter the password.

iTunes & App Store purchases snippet

Allowed Apps

With this setting, you can choose to make iPhone or iPad apps disappear from your child’s device entirely. To do so, turn off the button next to the app you don’t want to allow. This is a great way to avoid all temptation and protect your child from potentially harmful apps.

Allowed apps snippet in Content & Privacy Restrictions

Content Restrictions

Regardless of your child’s actual age, you can choose the age ratings and content restrictions for iTunes, the App Store, web content, Siri, and Game Center. It might take a while to work through each of these options, but you can configure them however you feel comfortable.

Content Restrictions snippet

Privacy

This option can be misleading. Choosing to allow Share My Location lets your child make changes to their location settings. If you choose not to allow Share My Location, then your child can’t make changes to their location settings.

Keep in mind that choosing not to allow Share My Location doesn’t turn off Location Sharing on your child’s device. It only stops your child from being able to change those settings on their own.

Privacy Share My Location option in Content & Privacy Restrictions

Allow Changes

The Allow Changes section lets you lock particular settings on your child’s device, such as the passcode, accounts, and mobile data settings. You might want to set these options to Don’t Allow to keep your child from logging out of their Child account and creating an adult’s account to use instead.

Allow Changes settings in Content & Privacy Restrictions

Track Your Child’s Location

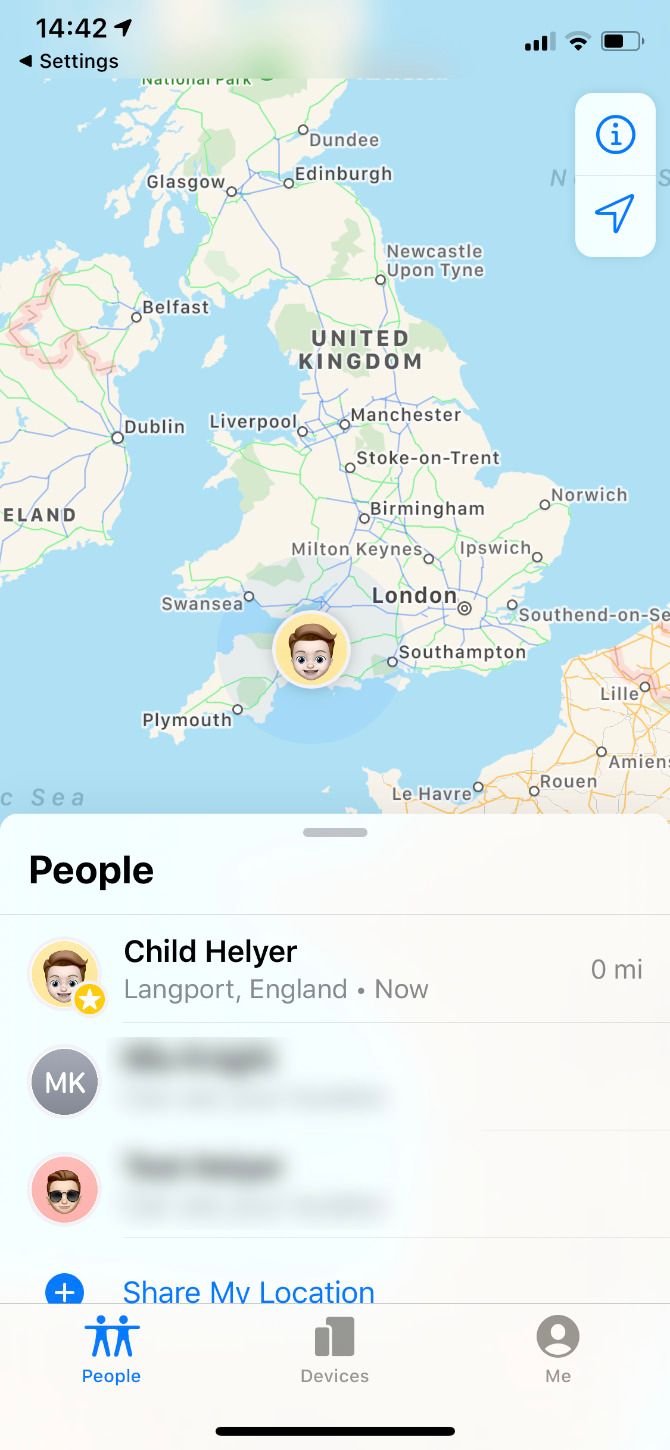
Keep tabs on your children’s whereabouts with the Location Sharing option in Family Sharing. If your child’s device is set up to share its location with you, then you can always find out where they are using the Find My app.

This time, it’s easiest to set up Location Sharing directly on your child’s device:

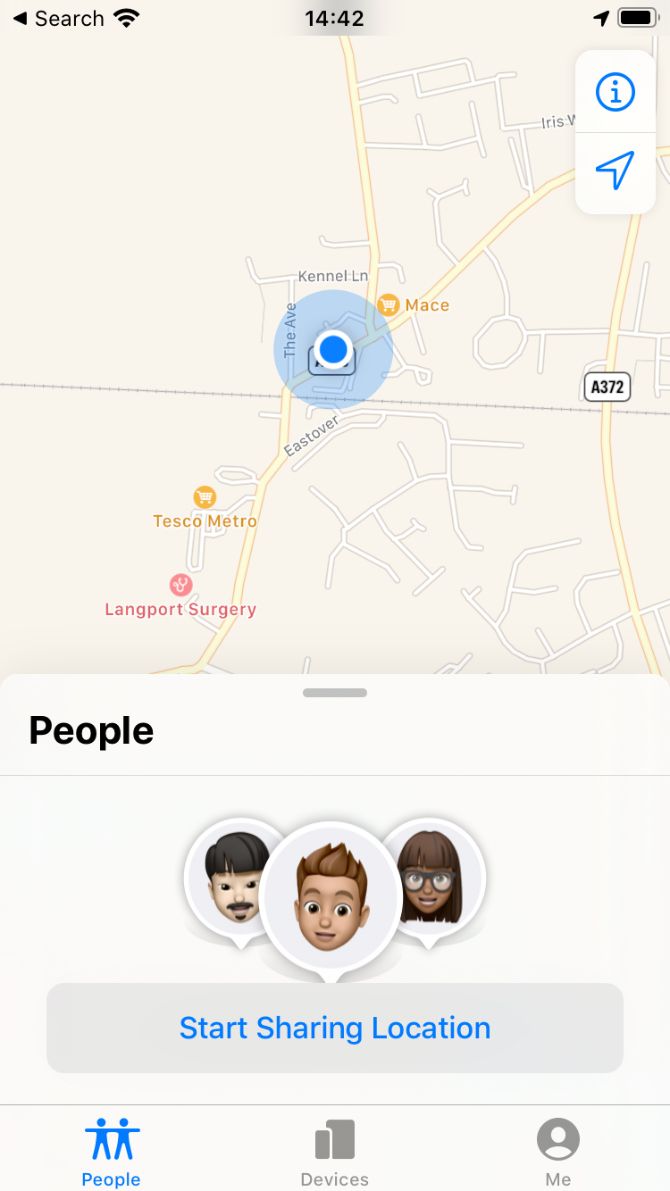
  1. Open the Find My app on your child’s iPhone or iPad and go to the People tab.
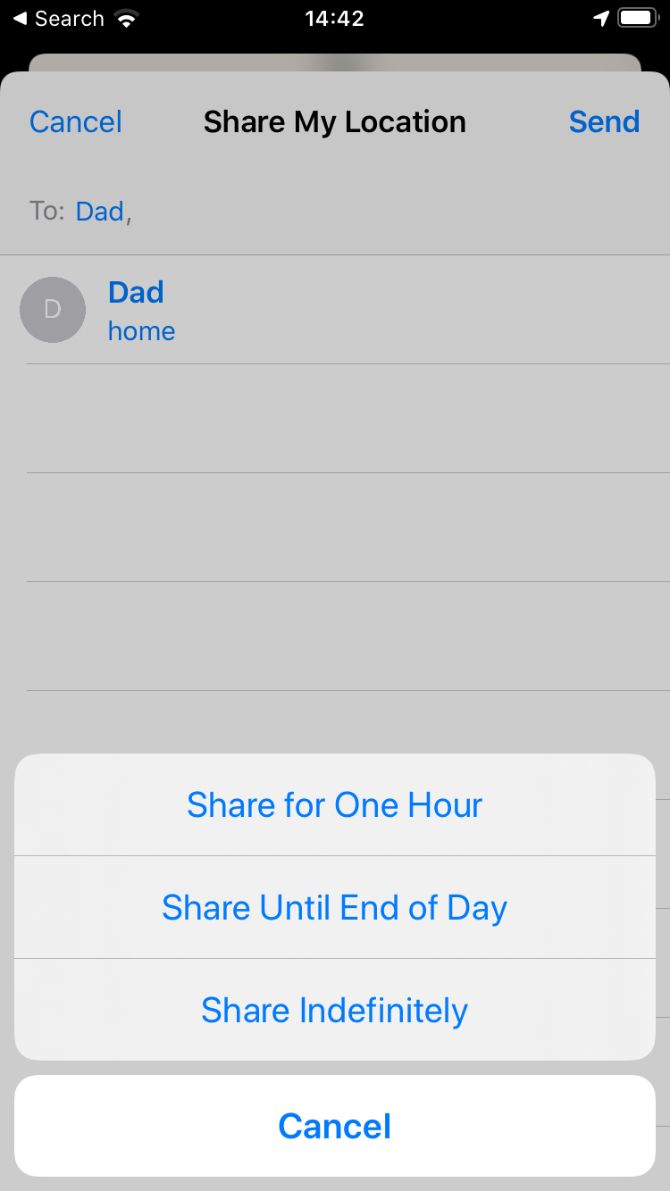
  2. Tap Share My Location and enter your Apple ID account to send an invitation to yourself. Choose to Share Indefinitely.
  3. You should now be able to see your child’s location in the Find My app on your own device. You can choose to share your location with them if you wish to.

To keep your child from hiding their location in the future, return to the Content & Privacy Restrictions above and choose Don’t Allow for the Share My Location option. This stops your child from editing the Location Sharing settings on their device.

Set Up Parental Controls on All Your Children’s Devices

Apple makes it particularly easy to edit your child’s parental controls using Family Sharing from your own device. But every company offers its own way of managing these settings, and they aren’t always easy to find.

Take a look at our complete guide to parental controls to find out how to enforce necessary restrictions across all your children’s devices.

Read the full article: How to Use Family Sharing to Monitor Your Child’s iPhone


Read Full Article

How to Create and Boot From a Linux USB Drive on Mac


Linux has long been synonymous with bootable flash drives, whether it’s to fix some sort of problem with your primary operating system, or for trying various distros.

There are a few ways to create an Ubuntu (or other Linux) bootable USB drive for Mac. You can go the freeware route for an easy option, or put a little bit of time into creating the drive yourself using Terminal. Let’s look at both methods.

First: Prepare Your USB Drive

When you’re looking to create a bootable Linux USB drive on a Mac, the first step is to make sure you’ve got the right USB drive for the job, and that it’s formatted correctly to avoid any problems.

Some Linux variants may require larger volumes, so pay attention to the requirements when downloading. Generally speaking, anything above 4GB will do the job. Others don’t have any strict requirements, but formatting to FAT beforehand is a good idea regardless.

Warning: Everything on your drive will be erased when you do this!

  1. Insert your USB drive into your Mac and launch Disk Utility (under Applications > Utilities, or search for it using Spotlight with Cmd + Space).
  2. Select your USB device in the menu on the left, then click Erase.
  3. Give it a name and choose MS-DOS (FAT) under Format and GUID Partition Map under Scheme.
  4. Hit Erase to apply the changes. If it fails, try again—sometimes the system doesn’t unmount the volume in time and the process will be unable to complete.

Mac Disk Utility format

If you have persistent problems, try another USB drive. Now download a Linux distro to install on your USB stick, and you’re ready to get started.

Make a Bootable Linux USB Drive With Etcher

balenaEtcher is a free open source tool for burning disc images onto USB and SD drives. It makes creating bootable devices completely foolproof:

  1. Grab your desired Linux image, then download Etcher and install it.
  2. Insert your USB stick, then launch Etcher.
  3. Click Select image and find the Linux image you downloaded—Etcher supports IMG, ISO, and ZIP, among others.
  4. Ensure the correct USB device is selected—hit Change to see a list of connected devices.
  5. Finalize the process by clicking Flash and wait for the process to complete.

etcher bootable linux usb drive

You’ll likely see an error message warning that your USB drive isn’t compatible with your Mac. That’s normal—simply eject and go. Your bootable Linux USB drive is now ready; you can now skip to the Booting Your USB Drive section below.

Create a Live USB Using the Terminal

If for some reason you don’t want to use Etcher (maybe you’re on an incompatible version of macOS), you can accomplish this task using the command line. It’s possible using Terminal, your Mac’s built-in command line interface.

While this method requires a little more thought and patience, it’s actually pretty straightforward. You might even learn something new, plus you’ll feel smart afterwards. Assuming you’ve formatted your drive per the earlier instructions, here’s how it works:

1. Convert Your ISO

Launch Terminal and take note of where your Linux disc image is stored in Finder. Convert your image (usually an ISO) to an IMG file using the hdiutil convert command:

hdiutil convert [/path/to/downloaded.iso] -format UDRW -o [/path/to/newimage]

Replace [/path/to/downloaded.iso] with the location of your own ISO (you can drag and drop directly into the Terminal window if you want) and [/path/to/newimage] to wherever you want the new image file to be created.

convert iso to dmg

Note: Modern versions of macOS will automatically create a .DMG file. If your version doesn’t do this, try appending IMG to the end of your new image file name, such as [/path/to/newimage.img]

2. Write the Image to USB

Next, you’ll need to identify your drive’s mounted location so you can tell the Mac which drive to use. With Terminal open, use the following command to list all connected drives:

diskutil list

set up external drive

You’ll likely be able to identify the drive by its name, format, and size using a process of elimination. Take a note of the listing under the IDENTIFIER column, then unmount the drive using the following command:

diskutil unmountDisk /dev/[diskX]

You’ll need to replace [diskX] with the corresponding number, like disk3—if successful, Terminal will report that the disk was unmounted. If you’re having trouble unmounting a drive, you can launch Disk Utility, right-click on a drive, then choose Unmount (don’t eject the drive, though).

unmount drive mac

The final step is to write the image to your USB stick, using the dd command:

sudo dd if=[/path/to/newimage.dmg] of=/dev/[diskN] bs=1m

Replace [/path/to/newimage.dmg] with the path to the file created in the first step (again, drag and drop works best), and [diskN] with the location identified earlier. You’ll need to authorize with your administrator password immediately afterwards, since you used the sudo command.

install linux on usb drive mac

You’re now done, and your drive is ready for booting.

Booting Your USB Drive

Assuming all went well, you’ll now have a USB drive that will let you boot into Linux. Plug it into the Mac you want to use it on, then shut down the computer.

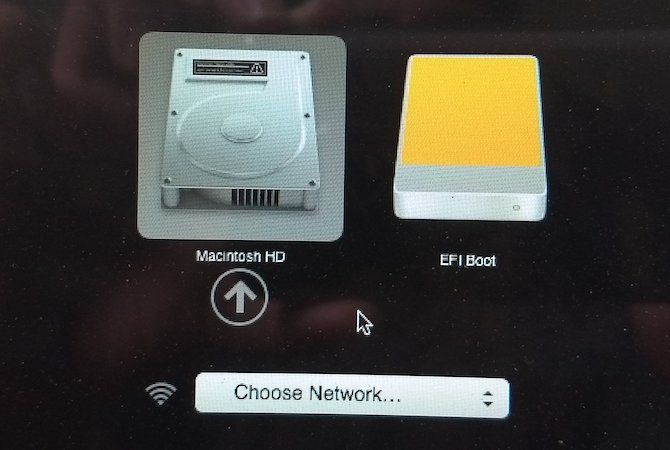
In order to access your Mac’s boot menu, you’ll need to hold the Option (Alt) key while it boots. The best way to do this is to shut down, hold the Option key, start your Mac, and wait. If you did it correctly, you’ll see a few options including your built-in hard drive and the USB device created earlier, titled EFI Boot.

Mac choose boot disk

To boot into Linux, select the USB device and click the arrow (or double-click it). Depending on what you’re using, you may get another menu which acts as a bootloader for your particular flavor of Linux.

Linux boot menu

If you have problems, or your USB drive won’t show up, try running the process again, using an alternative method above, running off a different USB stick or port, or consulting your respective distro’s help documentation.

The Best Way to Try Linux on Your Mac

Assuming all went well, you now have Linux running on your Mac and you can test it out or install it outright if you’re tired of macOS. You still have an Apple recovery partition which is accessible by holding Cmd + R while your machine boots. This can help you reinstall macOS (or apply other fixes) if you decide to go back.

Ubuntu running on a MacBook Air

There are other tools that claim to help you do this, but not all of them work, and some cost money. Unetbootin is still a popular choice for Linux and Windows users, but is not as good as Etcher on a Mac (and has some issues on newer versions of macOS).

There’s also our old favorite Mac Linux USB Loader, which is open source and actively maintained. It’ll cost you $5 for a pre-compiled binary, assuming you don’t want to download Xcode and compile it yourself. This low entry fee helps keep the project maintained, but it’s hard to justify paying for something when there are perfectly good free alternatives.

For more, check out how to install macOS from a USB flash drive. And if you’d prefer to install Linux on your internal drive, our guide on how to dual-boot Linux on your Mac is your essential next read.

Read the full article: How to Create and Boot From a Linux USB Drive on Mac


25 May 2020

Weekly Trading Calls 26-May-2020 Free

Weekly Trading Calls 26-May-2020 Free

Please click on the following link to view full post.

https://marketctl.blogspot.com/2020/05/weekly-trading-calls-26-may-2020-free.html

Via https://marketctl.blogspot.com/

Jabra’s Elite Active 75t earbuds offer great value and sound for both workouts and workdays


Technology improvements over the past few years mean that most fully wireless earbuds are a lot better than they used to be. That has led to something of a narrowing of the field among competitors in this arena, but some of the players still stand out – and Jabra have definitely delivered a standout performer with its newest Elite Active 75t fully wireless earbuds.

Basics

Jabra’s Elite Active 75t is a successor to its very popular 65t line, with added moisture resistance designed specifically for exercise use, as indicated by the ‘Active’ in the name. At $199.99, these are definitely premium-priced – but they’re a lot more affordable than many of the other offerings in the category, especially with their IP57-water and sweat resistance rating.

The Elite Active 75t also feature an esteemed 7.5 hours of battery life on a single charge, and their compact charging case carries backup power that adds up to a total of 28 hours potential run time across a single charge for both. The case charges via USB-C and also offers a fast-charge capability that provides 60 minutes of use from just 15 minutes of charging.

While they don’t offer active noise cancellation, they do have passive noise blocking, and an adjustable passthrough mode so that you can tune how much of the sound of the world around you you want to let in – a great safety feature for running or other activities.

They use Bluetooth 5.0 for low power consumption and extended connection range, have an auto-pause and resume feature for when you take out one earbud, and include a 4-mic array to optimize audio quality during calls.

Design

Jabra has accomplished a lot on the design front with the Elite Active 75t. Their predecessor was already among the most compact and low-profile in-ear wireless buds on the market, and the Elite Active 75t is even smaller. These are extremely lightweight and comfortable, too, and their design ensures that they stay put even during running or other active pursuits. In my testing, they didn’t even require adjustment once during a 30-minute outdoor run.

Their comfort makes them a great choice for both active use and for all-day wear at the desk – and the 7.5 hours of battery life doesn’t seem to be a boast, either, based on my use, which is also good for workday wear.

Another key design feature that Jabra included on the Elite Active 75t is that both earbuds feature a large, physical button for controls. This is much better and easier to use than the touch-based controls found on a lot of other headsets, and makes learning the various on-device control features a lot easier.

Finally in terms of design, the charging case for the Elite Active 75t is also among the most svelte on the market. It’s about the size of two stacked matchboxes, and easily slides into any available pockets. Like the earbuds themselves, the case features a very slightly rubberized outer texture, which is great for grip but, as you can see from the photos, is also a dust magnet. That doesn’t really matter unless you happen to be tasked with photographing them, however.

One final note on the case design – magnetic snaps in the earbud pockets mean you can be sure that your headset buds are seated correctly for charging when you put them back, which is a great bit of user experience thoughtfulness.

Performance

It’s easy to see why the Jabra Elite Active 75t is already a favorite among users – they provide a rich, pleasant sound profile that’s also easily tuned through the Jabra Sound+ mobile app. Especially for a pair of earbuds designed specifically for active use, these provide sound quality that goes above and beyond.

Their battery life appears to line up with manufacturer estimates, which also makes them class-leading in terms of single charge battery life. That’s a big advantage when using these for longer outdoor activities, or, as mentioned, when relying on them for all-day desk work. Their built-in mic is also clear and easy to understand for people on the other side of voice and video calls, and the built-in voice isolation seems to work very well according to my testing.

In my experience, their fit is also fantastic. Jabra really seems to have figured out how to build a bud that stays in place, regardless of how much you’re moving around or sweating. It’s really refreshing to find a pair of fully wireless buds that you never have to even think about readjusting them during a workout.

Bottom Line

Jabra has done an excellent job setting their offering apart from an increasingly crowded fully wireless earbud market, and the Elite Active 75t is another distinctive success. Size, comfort and battery life all help put this above its peers, and it also boasts great sound quality as well as excellent call quality. You can get better sounding fully wireless earbuds, but not without spending quite a bit more money and sacrificing some of those other advantages.


Read Full Article

Weekly Trading Calls 26-May-2020

Weekly Trading Calls 26-May-2020

Please click on the following link to view full post.

https://intradayguruji.blogspot.com/2020/05/weekly-trading-calls-26-may-2020.html

Via http://intradayguruji.blogspot.com

24 May 2020

Intraday Trading Calls for 26-May-2020

Intraday Trading Calls for 26-May-2020

Please click on the following link to view full post.

https://intradayguruji.blogspot.com/2020/05/intraday-trading-calls-for-26-may-2020.html

Via http://intradayguruji.blogspot.com

This Week in Apps: Facebook takes on Shopify, Tinder considers its future, contact-tracing tech goes live


Welcome back to This Week in Apps, the Extra Crunch series that recaps the latest OS news, the applications they support and the money that flows through it all.

The app industry is as hot as ever, with a record 204 billion downloads and $120 billion in consumer spending in 2019. People are now spending three hours and 40 minutes per day using apps, rivaling TV. Apps aren’t just a way to pass idle hours — they’re a big business. In 2019, mobile-first companies had a combined $544 billion valuation, 6.5x higher than those without a mobile focus.

In this Extra Crunch series, we help you keep up with the latest news from the world of apps, delivered on a weekly basis.

This week we’re continuing to look at how the coronavirus outbreak is impacting the world of mobile applications. Notably, we saw the launch of the Apple/Google exposure-notification API with the latest version of iOS out this week. The pandemic is also inspiring other new apps and features, including upcoming additions to Apple’s Schoolwork, which focus on distance learning, as well as Facebook’s new Shops feature designed to help small business shift their operations online in the wake of physical retail closures.

Tinder, meanwhile, seems to be toying with the idea of pivoting to a global friend finder and online hangout in the wake of social distancing, with its test of a feature that allows users to match with others worldwide — meaning, with no intention of in-person dating.

Headlines

COVID-19 apps in the news

  • Fitbit app: The fitness tracker app launched a COVID-19 early detection study aimed at determining whether wearables can help detect COVID-19 or the flu. The study will ask volunteers questions about their health, including whether they had COVID-19, then pair that with activity data to see if there are any clues that could be used to build an early warning algorithm of sorts.
  • U.K. contact-tracing app: The app won’t be ready in mid-May as promised, as the government mulls the use of the Apple/Google API. In testing, the existing app drains the phone battery too quickly. In addition, researchers have recently identified seven security flaws in the app, which is currently being trialed on the Isle of Wight.

Apple launches iOS/iPadOS 13.5 with Face ID tweak and contact-tracing API

Apple this week released the latest version of iOS/iPadOS with two new features related to the pandemic. The first is an update to Face ID which will now be able to tell when the user is wearing a mask. In those cases, Face ID will instead switch to the Passcode field so you can type in your code to unlock your phone, or authenticate with apps like the App Store, Apple Books, Apple Pay, iTunes and others.

The other new feature is the launch of the exposure-notification API jointly developed by Apple and Google. The API allows for the development of apps from public health organizations and governments that can help determine if someone has been exposed by COVID-19. The apps that support the API have yet to launch, but some 22 countries have requested API access.


Read Full Article

This Week in Apps: Facebook takes on Shopify, Tinder considers its future, contact-tracing tech goes live


Welcome back to This Week in Apps, the Extra Crunch series that recaps the latest OS news, the applications they support and the money that flows through it all.

The app industry is as hot as ever, with a record 204 billion downloads and $120 billion in consumer spending in 2019. People are now spending three hours and 40 minutes per day using apps, rivaling TV. Apps aren’t just a way to pass idle hours — they’re a big business. In 2019, mobile-first companies had a combined $544 billion valuation, 6.5x higher than those without a mobile focus.

In this Extra Crunch series, we help you keep up with the latest news from the world of apps, delivered on a weekly basis.

This week we’re continuing to look at how the coronavirus outbreak is impacting the world of mobile applications. Notably, we saw the launch of the Apple/Google exposure-notification API with the latest version of iOS out this week. The pandemic is also inspiring other new apps and features, including upcoming additions to Apple’s Schoolwork, which focus on distance learning, as well as Facebook’s new Shops feature designed to help small business shift their operations online in the wake of physical retail closures.

Tinder, meanwhile, seems to be toying with the idea of pivoting to a global friend finder and online hangout in the wake of social distancing, with its test of a feature that allows users to match with others worldwide — meaning, with no intention of in-person dating.

Headlines

COVID-19 apps in the news

  • Fitbit app: The fitness tracker app launched a COVID-19 early detection study aimed at determining whether wearables can help detect COVID-19 or the flu. The study will ask volunteers questions about their health, including whether they had COVID-19, then pair that with activity data to see if there are any clues that could be used to build an early warning algorithm of sorts.
  • U.K. contact-tracing app: The app won’t be ready in mid-May as promised, as the government mulls the use of the Apple/Google API. In testing, the existing app drains the phone battery too quickly. In addition, researchers have recently identified seven security flaws in the app, which is currently being trialed on the Isle of Wight.

Apple launches iOS/iPadOS 13.5 with Face ID tweak and contact-tracing API

Apple this week released the latest version of iOS/iPadOS with two new features related to the pandemic. The first is an update to Face ID which will now be able to tell when the user is wearing a mask. In those cases, Face ID will instead switch to the Passcode field so you can type in your code to unlock your phone, or authenticate with apps like the App Store, Apple Books, Apple Pay, iTunes and others.

The other new feature is the launch of the exposure-notification API jointly developed by Apple and Google. The API allows for the development of apps from public health organizations and governments that can help determine if someone has been exposed by COVID-19. The apps that support the API have yet to launch, but some 22 countries have requested API access.


Read Full Article