08 May 2020

The Sonos Arc Soundbar Brings Theater-Quality Audio to Your Home


For years, people have set up their homes to replicate the theater experience. That’s often been through immersive televisions, curved screens, smart lighting, or high-quality soundbars.

Sonos, the famed audio manufacturer, has announced its latest smart soundbar, the Sonos Arc, that promises to bring cinema-quality audio to your home. Here’s everything you need to know about the Sonos Arc.

What Is the Sonos Arc?

The Sonos Arc is the latest product in the company’s smart home audio lineup. Like many soundbars on the market, the Arc is an unassuming long, thin speaker designed to fit comfortably underneath your TV. However, Sonos’ devices come equipped with the company’s technology, and that’s their key difference to other equipment.

All Sonos devices connect to your Wi-Fi network and can then interact with each other. This means you could own one of their speakers, place it in your bedroom, and synchronize playback with your other Sonos products by putting them into a Group. This interaction isn’t done on the device, though. Your primary contact with the speaker is through the Sonos controller app, which is available for mobile and desktop.

The app allows you to change audio sources, install firmware updates, schedule alarms, and change the EQ of each speaker individually. If you already own a Sonos product, you’ll be familiar with the controller. However, with the launch of the Arc, the company is also debuting a new Sonos app, which will allow you to customize the experience further.

Sonos Arc Features

Sonos Arc soundbar with Sonos Sub

One of the most notable features of the Arc is the inclusion of Dolby Atmos technology. This surround sound experience is found in many theaters around the world and has been making appearances in home cinema setups since 2017. However, this marks the first time Dobly Atmos can be found in any Sonos product.

The improved audio quality is further bolstered by the new Sonos app, which makes it possible to tweak settings like Speech Enhancement to emphasize voices, and Night Sound to reduce the volume of loud sound effects. Using Sonos’ TruePlay tuning, the Arc creates an acoustic profile of your room and automatically changes settings for the most immersive experience.

The Arc soundbar is undoubtedly aimed at home theater experiences. However, you can continue to use the speaker even once the TV is shut off. Using the Sonos app, you can listen to music, podcasts, audiobooks, and radio using the services integrated with Sonos’ platform. This includes popular apps like Spotify, YouTube Music, Tidal, Pocket Casts, and Audible.

Sonos’ most recent speakers also include support for voice assistants, and the same is true of the Arc. You can interact with Google Assistant and Alexa, and control the soundbar with the Sonos app, your TV remote, and Apple AirPlay 2.

Where Can You Buy the Sonos Arc?

The Sonos Arc will be available from June 10th, 2020, with an expected retail price of $799. You can pre-order the Sonos Arc from the Sonos website, too.

The company also announced the upgraded Sonos Sub, allowing you to add extra bass to your Sonos setup. The Sub, along with a new edition of the Sonos Five speaker, can also be pre-ordered through the Sonos website.

While there’s a lot to like about the Arc, it isn’t the only soundbar available to you. If you’re interested in upgrading your home audio setup, consider one of the best soundbars for audiophiles on a budget.

Read the full article: The Sonos Arc Soundbar Brings Theater-Quality Audio to Your Home


Read Full Article

The 8 Best Google Teamwork Tools for Online Collaboration


google-drive-tools

Google has one of the most enviable company cultures of any business in the world. But what makes Google a truly great place to work is its spirit of collaboration and drive for teamwork. That same culture is reflected in its roster of cloud tools built for team productivity.

Let’s look at several of those Google collaboration tools.

1. Gmail

Gmail is a user-friendly email provider that offers 15 GB of storage space per account. What you might not know is it also allows for collaboration through a delegation option. Delegates can read and send email on your behalf while accessing the account.

To set this up, follow these simple steps:

  1. Click the Settings button (gear icon) and choose
  2. Select the Accounts and Import tab at the top.
  3. Scroll down to Grant access to your account.
  4. Make your selections for the Mark as read and Sender information
  5. Click Add another account, enter the Gmail address for the person you are delegating to, and click Next Step.
  6. Confirm the email address and click Send email to grant access.

You’ll be directed back to your Gmail settings where you’ll see the person’s email address in that section. It will display as Pending until they accept the invitation and will then change to reflect that.

Gmail Grant AccessT o Delegate

Your delegate has seven days to accept your invitation. Once they do, they will see your account listed beneath theirs with the word Delegated. They simply click that to manage your inbox.

Google Switch Account Delegated

Download: Gmail for Android | iOS (Free)

2. Google Calendar

Google Calendar is a great way to visually organize your busy life. The tool also supports sharing. Make some or all of your calendars public, so people can see when you’re free.

Want to share a calendar with just one person? It’s easy!

  1. Click the options button (three dots) to the right of the relevant calendar in the main list and select Settings and Sharing.
  2. On the next page, scroll down to the Share with specific people
  3. Click Add people and then enter the person’s email address.
  4. Choose the Permissions dropdown box and pick the privilege you want to allow. You can also change this afterward in the same section of the settings.
  5. Click Send.

Google Calendar ShareWith Specific People

You can also share your using a link. On the same calendar Settings page, scroll down to Integrate calendar.

You’ll see different URL options for your calendar as a public URL, public URL in iCal format, and secret URL in iCal format.

Google Calendar Integrate Links

Copy the generated URL and send it to colleagues, friends, or other people you know. Be aware, anyone who gets the link can access the calendar.

The sharing capability of Google Calendar is fantastic for planning meetings, study sessions, or other collaborative activities.

Download: Google Calendar for Android | iOS (Free)

3. Google Sheets

Google Sheets is a spreadsheet app you can use with others simultaneously. Advantages like conditional formatting and built-in spreadsheet formulas save time for you and collaborators. You can even see other people make edits in real time.

To share your spreadsheet, follow these steps:

  1. Click the Share button on the upper right.
  2. Add the email addresses of the people you want to access the spreadsheet.
  3. Click the pencil icon and specify whether people can view the sheet, edit it, or comment on it.
  4. Alternatively, you can use the Get a shareable link option and send the link manually. Choose the viewing and editing permissions when doing so and you can group message or email the link to your team.
  5. Click Done when you finish.

Google Sheets Share Options

Want to send a notification to a collaborator in the sheet? Just right-click the cell in your sheet and pick Comment. Then type a plus sign followed by the collaborator to send a notification to their email address.

Google Sheets Comment Mention

Download: Google Sheets for Android | iOS (Free)

4. Google Docs

Google Docs works perfectly for putting your head together with teammates. Use it while writing to-do lists, brainstorming for projects, or anything else that’s better with input from others.

Share a document with people via the same process you use for Google Sheets (above). You can also use the shareable link option in the corner of the sharing box.

Another option you have when sharing Google Docs or Google Sheets are some advanced settings.

  1. Click the Share button on the top right.
  2. In the popup window, click Advanced.
  3. Here you’ll see the link to share, those who have access, and an option to invite more people.
  4. Under Owner settings, you can check the boxes for those additional options. So you can prevent editors from changing access or adding others and disable options for commenters and viewers to download, print, or copy it.

Google Docs Advanced Sharing Options

While looking at the document, pay attention to the colorful, flag-like icons with people’s names. They tell you who’s responsible for making changes.

Download: Google Docs for Android | iOS (Free)

5. Google Slides

Getting ready for a group presentation? Avoid endless phone calls and emails about how to proceed, and collaborate with Google Slides instead. Select an appealing template to save design time and make your words pop with hundreds of font possibilities.

Like Google Docs and Sheets, this collaboration facilitator allows in-the-moment editing by any authorized individual. Simply follow the now-familiar process for granting privileges with the Share button on the upper right of the window.

google slides presentation

Download: Google Slides for Android | iOS (Free)

6. Google Keep

Think of Google Keep as a beautifully basic project management tool. You can depend on it as a place for notes, drawings, lists, pictures, and audio clips.

  1. Start sharing by clicking the Collaborator icon at the bottom of the note.
  2. Enter the person’s name or type in their email address.
  3. Click Save.

Google Keep Note Collaborator Button

When you open Google Keep, you’ll see the last person who edited the note along with when.

Download: Google Keep for Android | iOS | Chrome (Free)

7. Google Hangouts (Chat)

Google Hangouts, to be renamed Google Chat, is a messaging app. Use it to talk to one person at a time through text or up to 150 individuals.

You can also launch a video chat with as many as 10 people. Start a new conversation by clicking the plus sign. Then, add people by name, email address, or phone number. Finally, choose whether you want a message-based conversation, phone call, or video call.

Google Hangouts Main

Let more people join by clicking the person icon and clicking the Invite People icon on the top. Then, follow the same process you initially did when creating the chat.

Download: Google Hangouts for Android | iOS (Free)

8. Google Meet

Google Meet is very similar to Google Hangouts as both offer a video call service. However, Google Meet is intended for professionals and is a paid service, although currently free due to the COVID-19 pandemic. Google Hangouts, on the other hand, is more for consumers.

It can accommodate up to 250 participants per call for G Suite users (see below) and 100 with a personal Google account. Plus, you can check out the live streaming and recording features.

Google Meet Meeting Ready

Starting or joining a meeting with Google Meet is simple. Just head to the website, hit Start a meeting or Enter meeting code, and you’re on your way.

Download: Google Meet for Android | iOS (Free)

Bonus: G Suite

If you’re collaborating for business reasons, checking out for G Suite may be a good idea. G Suite is Google’s packaged solution for organizations of all types. It offers all the tools above, plus several others. Essentially, it lets you access every tool from one location.

The G Suite version of Google Drive has a central administration panel with data loss prevention features. It also boasts a machine-learning-powered search feature that helps people find files faster.

After finishing a two-week free trial, you’ll pay a monthly amount per user based on tier level.

Purchase G Suite: $6 to $25 per month per user based on chosen package after a two-week free trial.

Take Advantage of Google Collaboration Tools

Getting acquainted with these tools is simple. That’s because the process for carrying out certain tasks (such as sharing documents) is identical across apps. And, most even allow you to keep working alone or with others, even without an internet connection.

With so many professional tools available (for free!), there’s no excuse not to be an awesome team. For more, take a look at these additional online collaboration tools.

Read the full article: The 8 Best Google Teamwork Tools for Online Collaboration


Read Full Article

How to Clean Your Dirty iPhone: A Step-by-Step Guide


clean-dirty-iphone

When your iPhone goes everywhere with you, it’s likely to pick up some dirt along the way. There’s only so much wiping the screen with your sleeve will achieve. Your phone is potentially a health hazard and needs cleaning.

However, you need to take care when cleaning your iPhone. You can’t just use anything you find in the cupboard, else you risk damaging it. Let’s walk through the steps of how to clean your dirty iPhone.

Cleaning Your iPhone? Do This First

Before you rush headfirst into the steps below, take a few moments to plan how to clean your iPhone. Make sure you have the following ready to use:

  • A table or desk
  • Small towel
  • A bowl of warm soapy water
  • Bowl of cool tap water
  • Isopropyl alcohol
  • Lint-free cloth (usually included with glasses)
  • SIM slot key, paper clip, or similar
  • Soft toothbrush
  • Toothpick
  • Cotton swap
  • Handheld vacuum cleaner
  • Plenty of time

On that last point: it’s important to set enough time aside to clean your phone. You’ll need to prepare the device, grab the cleaning tools you’ll need, and be patient. Don’t rush through this.

Follow the steps below to clean your iPhone.

1. Clean Your iPhone Case

Clean your iPhone case

You can clean the case separately, since it’s far more resistant to damage than your iPhone is. It’s also relatively cheap to replace the case if something happens to it.

With the case removed, clean per the manufacturer’s cleaning instructions, if there are any. If not, use warm soapy water to dislodge dirt and grime from the case. Pay attention to the various openings including charging ports, mute toggle, volume rockers, and camera lens opening.

Put your iPhone case to one side to dry. Then turn your attention to the phone itself.

2. Clean the iPhone Screen

Clean your iPhone's screen

Take extra care with the screen, which is the most delicate part of your device. Apple applies an oleophobic coating to your iPhone screen, which helps repel finger grease and oil. This also applies to the back of devices from the iPhone 8 series onwards.

In order to preserve the oleophobic coating, you should only use water to clean your iPhone screen.

Do not use abrasive cleaners, glass cleaner, surface sprays, rubbing alcohol, or anything that promises to cut through grease. These substances will damage the coating on your screen.

Instead grab a soft, lint-free cloth and moisten it with the tap water. You should have a lint-free cloth already, but if not, you can buy them for a low price online. They’re the same ones you use to clean glasses, camera lenses, and other coated scratch-prone surfaces.

Lint-Free Cloths Lint-Free Cloths Buy Now On Amazon $8.49

While cleaning, wipe in the same direction so that you push the grease and dirt off the screen. This may take several wipes and a few more dips in the tap water. You can add a glass screen protector with fresh oleophobic coating if the situation is really bad.

3. How to Clean the iPhone Charging Port

Learn how to clean the iPhone charging port

If your iPhone isn’t charging as well as it was, the charging port might be to blame. Pocket lint, fluff, bits of paper, and other debris can prevent the pins inside from connecting with your charger.

Apple advises against using compressed air for cleaning any part of your iPhone, and the charging port is no exception. One of the first parts of your device an Apple Genius will check is the charging port, so take the time to clean it.

One of the best tools for cleaning the iPhone’s charging port is the SIM slot key bundled with your device. If you can’t find it, a safety pin or similar thin object with a good point is a smart alternative. Put the pin in the hole and scrape out what you can. Wipe off what you find and repeat till it’s clean.

Apple does this with a surprising amount of force at the Genius bar, but we advise against going too hard. Shine a light in the port to check for residual grime.

4. Clean the Lightning Cable Contacts

Improve connections with a clean Lightning cable

Another reason your iPhone might not charge properly is the state of your Lightning cable. In particular, the contacts can press against the gunk that makes its way into the charging port. This results in grime build-up on the cable contacts that can prevent proper charging.

Unplug your Lightning cable at both ends before attempting to clean it. Wipe the contacts clean with a damp cloth until you can see them gleaming—they should be gold. Be sure to let the connector dry before using it again. This is also a good time to examine the cable for further signs of damage or wear.

5. How to Clean the iPhone Speaker and Microphone Holes

Clean your iPhone's microphone

The speaker and microphone are at the bottom of your iPhone, on either side of the charging port. This is one of the most difficult areas to clean, and the most likely area to become filled with dirt.

Do not use compressed air, since the pressure could damage your iPhone or compromise the water resistance. Instead, take a fine, super-soft toothbrush and lightly scrub the area to loosen stuck-on dirt. Take care not to apply too much force.

Some users online recommend using fine-point toothpicks when a toothbrush is not enough. If you do that, be careful you don’t push too hard and cause damage. Cleaning this area may improve audio quality and make your voice clearer in calls.

For further help with audio, learn how to fix your iPhone’s speaker when it doesn’t work.

6. Clean the Mute Toggle Switch

Get gunk out of the mute switch

Every iPhone has a mute toggle switch along the left edge of your device. Certain cases can really worsen the build-up of gunk, making the switch hard to clean. Eventually it can become hard to toggle the switch.

And if you never touch this switch (if your iPhone is always on vibrate mode, for instance), it’s likely full of dirt.

Take a fine toothpick and scrape the grime out. Flip the switch a few times so you can clean both sides.

If this isn’t enough, a fine-point cotton swab with a dab of isopropyl alcohol should do the trick. It’s very important not to get any alcohol on the screen or other sensitive parts of your iPhone. This chemical can remove protective coatings, impacting the user experience.

A sticky mute toggle can cause problems with your iPhone’s volume control, so it’s worth checking during this process.

7. Clean the Home Button

If you have an older iPhone, another important area to keep clean is the Home button. In fact, it’s so important to keep this clean that you might consider carrying a soft, lint-free cloth with you.

You should clean the button often, perhaps weekly. Since the button handles Touch ID with its built-in fingerprint reader, clean it as regularly as you would your screen. Even a thin layer of grease can prevent your fingerprint from registering.

8. Clean Your iPhone’s Sensor Array

On newer iPhone models with Face ID (iPhone X and later), the cutout at the top of the screen is full of sensors. Their performance is negated when there’s a layer of grease on the screen.

So if you find Face ID is failing to unlock your iPhone, cleaning the sensor array will help. Wipe it with the same cloth you’ve been using elsewhere.

9. Remove Grease from the iPhone’s Camera Lens

Keep your iPhone camera clean

Like the Home button and sensor array, both the front and rear cameras are susceptible to grease buildup.

Learn to recognize the signs of a dirty lens cover in the viewfinder of your chosen camera app. Look for:

  • Light streaks
  • Blown-out highlights
  • A foggy image
  • Difficulty focusing

Cleaning will deal with each of these problems. Simply wipe the glass covering the lens regularly with a soft, damp, lint-free cloth.

A Final Note on iPhone Water Resistance

If you have an iPhone 7 or later, your phone is certified water resistant. The iPhone 7, 8, X, and XR carry the IP67 rating, meaning they can survive being under water for 30 minutes at a depth of around 3.3 feet. Meanwhile, the iPhone XS and later boast IP68 resistance, so they can survive at least double that depth for the same amount of time.

Apple achieves this rating with a rubber seal that protects the internals from moisture and dust. Over time this rubber seal can diminish, particularly if your iPhone sustains physical damage. A cracked screen, dent in the chassis, or accidental pocket-bending (from sitting) can damage the seal.

While this might make you want to clean your iPhone with water, you should not expose it to anything other than cold tap water. Forget pressurized water, salt water, or any other liquids. And if you do drop your iPhone in the sea or pool, rinse it off with tap water immediately.

Despite the water resistance rating, don’t consider iPhones waterproof. Never clean your iPhone simply by running it under a tap. Hot water is also a bad idea, since heat can kill iPhones (as can sudden temperature changes). Frequent exposure to running water may also accelerate the rate at which the oleophobic coating wears away.

Congratulations: Your iPhone Is Now Clean

Following these steps to clean your iPhone will result in a device that looks and performs better. It should be almost as good as new—certainly the best you’ve seen your iPhone since unboxing it.

Remember to keep your iPhone clean by following these steps every couple of months. And don’t forget to carry a lint-free cloth for keeping the device free of grease.

Once you’ve physically cleaned your iPhone, you should also clean up the software side to free up some iOS storage space.

Read the full article: How to Clean Your Dirty iPhone: A Step-by-Step Guide


Read Full Article

The 5 Best Free Mac VPN Clients (And 2 Bonus Alternatives)


best-mac-vpn

Virtual private networks (VPNs) are more popular than ever. They’re an important weapon in the ongoing fight against cyber-snooping and can even unlock some geo-blocked apps and websites.

Different VPN providers specialize in different areas; it can be difficult to choose the right supplier for your needs. But once you’ve selected your provider, you still have decisions to make. Specifically, how do you know which VPN client to use? Should you use your VPN provider’s proprietary app, or a flexible solution that can connect to several different services?

If you’re not sure where to turn, keep reading for the best free Mac VPN clients you can use right now, plus a few other options you might not have considered.

1. TunnelBlick

tunnelblick vpn mac

Let’s start with some open source VPN software for Mac. TunnelBlick is a free VPN client that works on macOS and iOS with any VPN provider that offers OpenVPN support. There is no Windows or Linux version.

Because the app is open source, you can be confident it’s not secretly tracking your internet usage in other ways and thus negating the benefit of using a VPN. It’s thus more transparent than proprietary apps.

Interestingly, TunnelBlick logs all your session data by default. This is not out of the ordinary—all OpenVPN clients do the same. If you want to turn off session data logging, all you need to do is add verb 0 to the app’s config file. Remember, this is not linked to whether the VPN provider itself is logging your data.

Finally, the app has a vibrant support community. If you encounter difficulties, head to its Google Group discussion forum, and someone will quickly step in to assist.

Download: TunnelBlick (Free)

2. OpenVPN

openvpn login

The OpenVPN project began back in 2002 and is probably the most well-known of all free Mac VPN clients. In addition to the Mac version, the app is also available on iOS, Windows, and Android.

The app supports lots of different VPN configurations, including remote access, site-to-site VPNs, and enterprise-scale deployments.

OpenVPN isn’t as easy to use as proprietary apps—or even some other OpenVPN clients—but it’s established a name for itself thanks to its feature-rich menus and unflinching reliability.

The main criticism of OpenVPN is its VPN configurations limit. By default, you cannot have more than 50 saved. It’s possible to recompile the app to remove the limit, but that’s a complicated process beyond the scope of this list. It’s also important to be aware that the OpenVPN app only supports the OpenVPN protocol.

Download: OpenVPN (Free)

3. SoftEther VPN

softether report

SoftEther VPN is one of the leading multi-protocol VPN apps. It runs on Mac, Windows, and Linux. The open source offering is entirely free, regardless of whether you use it in a personal or commercial environment.

The app supports almost all VPN protocols, meaning not only is it one of the best OpenVPN clients on Mac, but you can also hook it up to L2TP/IPsec, MS-SSTP, L2TPv3, EtherIP, and most impressively, VPN-over-HTTPS connections.

If you use the developer’s own SoftEther VPN protocol, you can expect faster surfing speeds than OpenVPN. In testing, the SoftEther server was 103 percent faster than Microsoft’s Windows implementation of L2TP/IPsec, and up to 117 percent faster than OpenVPN.

Additional features include support for packet filtering, dynamic DNS, and UDP hole punching.

Download: SoftEther VPN (Free)

4. WireGuard

WireGuard is a fast VPN tunnel that can outperform OpenVPN and IPSec. Connections via WireGuard rely on the exchange of public keys. As such, the VPN can roam between IPs and removes the need for managing connections and daemons.

The technology uses cutting-edge cryptography to keep you safe and deploys a tiny codebase in order to reduce the potential attack surface.

The VPN client app for Mac lets you connect to a VPN (assuming your provider supports WireGuard), import new tunnels from archives, and create new tunnels.

WireGuard is also available for Windows, Linux, Android, and iOS.

Download: WireGuard (Free)

5. OpenConnect GUI

OpenConnect GUI

OpenConnect GUI is a free Mac VPN client. It uses TLS and DTLS to establish sessions and is compatible with the Cisco AnyConnect SSL VPN protocol. For those who don’t know, OpenConnect was originally developed as an open source replacement for Cisco’s proprietary product, and it quickly grew in popularity.

However, OpenConnect is its raw form requires command line knowledge. This VPN client removes the need for that by providing a clean and easy-to-understand interface that beginners will quickly be able to wrap their heads around.

OpenConnect GUI is also available on Windows.

Download: OpenConnect GUI (Free)

Bonus: Shimo

shimo log

Unfortunately, the selection of free VPN clients for Mac is fairly thin. Thus, we’ve included two paid options in case the above didn’t fit your needs.

Shimo supports OpenVPN, IPSec, PPTP, SSL, AnyConnect, and SSH connections (note that it does not support PPTP/L2TP on macOS Catalina, however). It allows for concurrent connections, automated connections, and 2FA. And there’s even a dark mode!

Security-wise, you can enjoy AES-256 encryption, SHA-2 hash functions, and secure key exchange using the D-H method. Connections that need certificates or one-time passcode tokens are also supported through the Extended Authentication (XAUTH) toolset.

The app costs a one-time fee of €49 (about $53 at the time of writing), but you can try before you buy.

Download: Shimo ($53, free trial available)

Bonus: Viscosity

Viscosity vpn mac

Like the free solutions we discussed, Viscosity is open source. It’s available for $14 and is cross-platform—you can run it on Windows as well as macOS.

Viscosity definitely has the best design here. Its user interface is more polished than the free alternatives, and it’s incredibly easy to use and navigate. If you’re new to the world of third-party VPN clients and aren’t familiar with VPN terminology, the app represents money well spent.

From a technical standpoint, the app gives you a complete traffic breakdown of your connections, integrates with Keychain to keep your details safe, and works with macOS’s advanced DNS system.

You can use a 30-day free trial before you commit to the single purchase.

Download: Viscosity ($14, free trial available)

Which Mac VPN Client Do You Prefer?

Each VPN client has different advantages and disadvantages. Which one you choose will depend on the protocols your VPN provider offers and your familiarity with setting up and using VPNs on third-party apps.

To learn more about VPNs, check our guide on how to set up a VPN on your Mac.

Read the full article: The 5 Best Free Mac VPN Clients (And 2 Bonus Alternatives)


Read Full Article

07 May 2020

Locatee raises $4M Series A for its workplace analytics platform


Locatee, a Swiss startup that uses existing sensors and IT infrastructures to provide employers and commercial real estate owners with detailed data about how their spaces are utilized, today announced that it has raised a $4 million Series A funding round led by San Francisco-based FYRFLY Venture Partners and Zurich-based Tomahawk VC.

“We started the company based on the experience we had with the big banks,” Locatee CEO and co-founder Thomas Kessler told me. “As users, we were introduced to this new world of working. You can work from any place. You can work from Starbucks. You can work from any area. And in the office, I did not have my own desk anymore. I could choose between meeting rooms, focus areas and so on. But that also has some challenges for managing the space.”

Corporate real estate managers often don’t understand how their buildings are utilized these days because they simply don’t have the tools to gather this data. As a result, they overprovision their office spaces and large chunks of it remain empty — which organizations then unnecessarily pay for.

What makes Locatee stand out from similar players in this space is that it integrates with existing motion sensors inside a building and other data sources, like Wi-Fi networks. For Swiss Re’s Munich office, for example, Locatee was able to work with NetCloud and integrate with the existing Cisco network infrastructure. Thanks to the data it gathered, Swiss Re was able to reduce its local office space by 10%, which Locatee says allowed the company to save about €290,000 per year.

On top of the core data analytics, Locatee also offers a number of other tools, ranging from smart signage for meeting rooms and workstations, for example, to desk finders for workers who now (or at least once they return to their offices) are often not working from a single, pre-assigned cubicle every day but who roam around a building and work from a different spot every day.

As Keller stressed, Locatee approached its first customers by trying to understand their use cases, not by trying to sell them technology. One of Locatee’s first customers was Biogen, but today, it also calls Swiss Re, Johnson & Johnson and Zurich (the financial services company, not the city) among its users.

Locatee’s data is anonymized and Kessler argues that employees don’t tend to worry about being tracked. “[Employees] have a benefit,” he said. “They have an app, for instance, where they can see available meeting rooms and desks. And they can see where colleagues are — on an opt-in basis. So it’s more like a ‘share your location’ feature like in iOS Messenger or in WhatsApp.”

With that kind of momentum, Kessler told me, finding investors was relatively easy — though it surely helped that the company closed this raise before the coronavirus pandemic hit Europe.

“Locatee’s vision to transform how space is used will ultimately elevate the quality of life for employees and can also contribute significantly to sustainable development goals,” said Philipp Stauffer, co-founder and managing director at FYRFLY Venture Partners. “Office space is only one component and increasingly all ‘work points’ matter for productivity optimization. A quantitative approach to space optimization and productivity holds both significant top- and bottom-line potential for large global organizations. Furthermore, aggregated data can help predict larger market trends, which is exciting to us.”

The company says it wants to use the new funding to become the “Google Analytics of office buildings.” And while its technology could also be used in other environments, Kessler says he wants to focus on office space for now. “There is still a lot of wasted real estate that needs to be optimized,” he said.


Read Full Article

Intraday Trading Calls for 8-May-2020

Intraday Trading Calls for 8-May-2020

Please click on the following link to view full post.

https://intradayguruji.blogspot.com/2020/05/intraday-trading-calls-for-8-may-2020.html

Via http://intradayguruji.blogspot.com

The Best Free Video Editors for Windows


video-editing

Video is a common part of everyday life. People take videos on smartphones, upload them via YouTube, and share them on Facebook. You’d think, then, that free video editors would be common.

Free video editors have become serious rivals to the alternative, paid programs in both capacity and scope of editing. However, the selection remains somewhat limited.

We present the absolute best free video editors available for Windows.

Keep in mind: The following software is only as effective as your know-how, and none of the free video editors for Windows 10 are instantly intuitive.

1. Lightworks

If you’re looking for a powerful video editor, give Lightworks a look. Lightworks has been around since 1989 and has been used to edit many professional movies you’ve probably watched and enjoyed, like Pulp Fiction and Braveheart.

As you might expect, this professional-grade editor comes with a professional-grade learning curve. Lightworks is a nonlinear editor, which means it is not based on a simple A-to-B video timeline. That makes advanced edits easier, but thoroughly confuses newbies.

Add tons of effects and multi-cam editing, and you’ve got one heck of a nut to crack. If you manage it, though, you can create videos of higher quality than most other free editors.

Along with providing users with all the basics you could desire from free video editing software, Lightworks also provides a few extras like basic effects, titles, transitions, and color correction. Whether you’re a bare bones amateur or a bit more experienced, Lightworks will definitely meet your video editing needs.

The free version, unfortunately, comes with a few caveats, the most problematic being a lack of 1080p output. Free users can only output at 720p, which could be a major turn-off. If that doesn’t bother you, though, Lightworks is a solid choice.

The free version of Lightworks will allow you access for seven days, at which time you’ll have to register officially through the Lightworks website to use. You can do all this early on by registering today.

Download: Lightworks for Windows 10 (Free)

2. HitFilm Express

HitFilm is a doozy. Touting on its main page that it’s the “most powerful free editing and VFX software to date,” HitFilm doesn’t disappoint.

For one, the software has plenty of beautiful examples for you to choose from directly on their web page. Check out the linked film above. It is one of the prime examples.

Aside from a fantastic interface for laying out your clips and workflow, it also provides countless free video tutorials and visual effect possibilities by default.

Its UI is also largely reminiscent of more mainstream, paid video editing software. In that, you aren’t limited to what you can do and create within the window. The same applies feature-wise: color correction, clip cutting, VFX, and mask tracking are all within grasp with HitFilm Express.

You’ll have to sign-up for an account, and then the download link is sent to your inbox.

Download: HitFilm Express for Windows 10 (Free)

3. DaVinci Resolve

DaVinci Resolve is as close to a free, professional video editor for Windows 10 as is possible. Keep in mind that this means it takes about as much practice, time, and dedication to learn as it would any other professional video editor. However, once you can find your way around the software, you’ll never need another video editor.

There’s hardly a thing DaVinci Resolve isn’t able to do for you. But one thing it does fantastically is color grading. In fact, it’s renounced for being a standalone color correction software along with doing, well, everything else.

It also allows SD, HD, and Ultra HD output, meaning you can start, edit, and create pseudo-studio productions—polished and finalized—all in one software. While the Studio versions will, of course, cater to actual professional production settings, the alternative free version will provide more than enough functionality to keep any beginner satisfied.

Similar to HitFilm Express, you must register with the website to download the software. For more information on Windows 10 video editors, see our comparison of DaVinci Resolve and HitFilm Express.

Download: DaVinci Resolve for Windows 10 (Free)

4. Shotcut

Comparatively speaking, Shotcut is designed for the amateur video editor or someone who needs to tie together or edit short clips to create a sensible final product. It’s as easy as dragging and dropping clips and editing them by cutting and adding transitions.

If you don’t require a large, professional-grade video editor for Windows 10, but still want to put together short clips with transitions, this program is exactly for you. Better yet, its slim data size allows users of all PC specs to use the software. You don’t need a souped-up PC in order to use Shotcut. Sometimes, that can make all the difference.

Plenty of bells and whistles are great, but for specific purposes, they can border on clutter. With Shotcut, everything you need is laid out in front of you. If you require a simple free video editor for Windows 10, look no further.

Download: Shotcut for Windows 10 (Free)

5. Avidemux

Avidemux is a free and open-source video editor for Windows 10, as well as macOS and Linux.

This program is a half-step between serious video editing software, like Lightworks, and a basic video editor like the infamous Windows Movie Maker. It supports nonlinear editing, you can add subtitles, and the software’s file format lets users save all the settings associated with a project, which you can then re-applied to another project.

Scripting is available through the GUI or directly through a command line. Virtually all major video and audio formats are supported for input and output, though WMV and QuickTime are absent.

The developer’s website includes a link to a wiki and forums that will help you become familiar with the software. Although the software hasn’t received an update for over eight months at the time of writing, Avidemux is still under active development.

Download: Avidemux for Windows 10 (Free)

6. VSDC Free Video Editor

This appropriately titled editor is another solid choice for people who want a semi-professional option without having to pay a professional price tag. A nonlinear editor, VSDC allows for advanced editing techniques. The software also supports a broad range of video and audio effects like color correction, blur reduction, and volume correction.

Though still confusing for the novice, the basic interface of VSDC is a bit easier to grasp than that of Lightworks, thanks to a front-end that mimics the Microsoft ribbon interface and has a more conventional workflow.

One nice extra that may elevate VSDC above the free version of Lightworks is video output support for 1080p at 30 FPS, which is much better than its competitor’s 720p limitation. The installer is also a rather compact 37MB, making it a handy video editing app to keep on a USB stick.

Download: VSDC Free Video Editor for Windows 10 (Free)

7. OpenShot

OpenShot is a remarkable story. An open-source, free video editing tool for Windows 10 that began life as a Kickstarter campaign, OpenShot is now a popular and capable tool. It is also a handy free video editing tool that bridges the gap between the advanced video editing options and those more basic selections.

The UI is easy to navigate, using a familiar style for anyone with any video editing experience. Even if you have zero experience, the drag and drop timelines, editable properties, filters, transitions, and other effects are all only a click away.

But don’t let the simplicity of OpenShot fool you. It is a capable cross-platform video editing tool that supports a wide range of formats, rendering techniques, and more.

Download: OpenShot for Windows 10 (Free)

8. Blender

Blender is, I admit, a different breed of video editor. It’s for 3D, rather than 2D, editing. Despite that being the case, not mentioning Blender would be a serious error because of just how much 3D video editing functionality is packed into this free software.

It’s a complete education in a single program. From the first time you enter Blender, you must get to grips with its notorious and somewhat complex UI. Blender isn’t your typical video editing software: aside from the possibility of creating a mixed reality short film like the one above, you can create, edit, animate, and light 3D animations.

Learning your way through Blender can take a lot of time. After all, you’re not starting with a few clips you can trim and edit. Blender gives little by way of instruction when you first open the program and you have to learn as you go.

That includes the official Blender Youtube channel, mind you, which not only has tutorials for users but hours upon hours of talks and presentations as well. That’s on top of their official animations, which give you something to strive for if 3D animation is your forthcoming forte.

I know, I cheated a little adding a 3D animation software to the list. There’s no doubt, however, that Blender ranks head and shoulder above the competition for its 3D video editing capabilities.

And did you know you could also use Blender to create models for 3D printing?

Download: Blender for Windows 10 (Free)

Which Is the Best Free Video Editing Software for Windows 10?

Figuring out the absolute best free video editor for Windows 10 is tricky. So much of what makes a tool “the best” lies in the ability and goal of the user.

I extensively use Shotcut to make quick, basic edits to videos—but probably don’t use even half of what the software can do. In that, choosing a free video editing tool that suits your project is important. If you’re clipping together family videos as a memento, you probably don’t need a comprehensive feature film editing suite.

If you need to upgrade your computer for this, check out the best laptops for video editing. You should make sure you have a good camcorder for hobbyist use too. And don’t miss out on these free apps to split and merge video files in a crunch!

Read the full article: The Best Free Video Editors for Windows


How face surveillance threatens your privacy and freedom | Kade Crockford

How face surveillance threatens your privacy and freedom | Kade Crockford

Privacy isn't dead, but face surveillance technology might kill it, says civil rights advocate Kade Crockford. In an eye-opening talk, Kade outlines the startling reasons why this invasive technology -- powered by often-flawed facial recognition databases that track people without their knowledge -- poses unprecedented threats to your fundamental rights. Learn what can be done to ban government use before it's too late.

Click the above link to download the TED talk.

Google launches ‘Read Along,’ a free app that helps young children practice reading


Google today is launching a new app, Read Along, that aims to help elementary school students practice their reading skills and stay educationally engaged amid school closures due to coronavirus. The new Android app is based on Google’s existing application, Bolo, which launched in India last year with a catalog of read-along stories in both English and Hindi. The updated and rebranded version is now globally available with support for 9 languages. 

Like Bolo, Read Along also leverages Google’s speech recognition and text-to-speech to help kids learn to read.

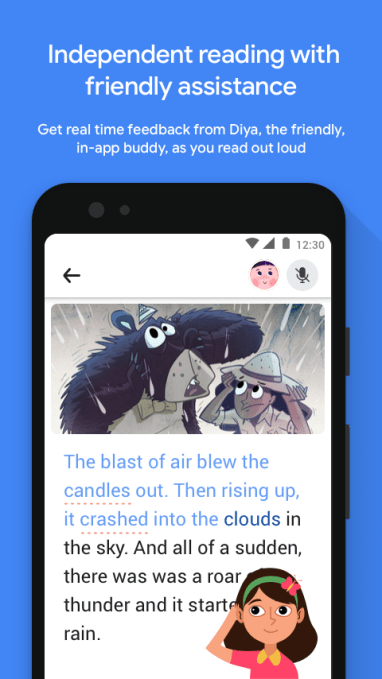
The app includes a built-in reading assistant named Diya. As kids read aloud, Diya detects if the child is struggling with a passage and can jump in with positive reinforcement or help. At any time, the child can ask Diya to help them read a sentence or pronounce a word they don’t know.

As children progress in the app, they’re presented with mini word games and earn in-app prizes as they improve their skills.

Google says the app was built with children’t privacy in mind and is able to work without either Wi-Fi or data. The voice data is analyzed in real-time on the device, and is not synced, stored or analyzed on Google’s servers. The company also stresses that it’s not using a voice sample from the kids to make the product better.

The app doesn’t include advertising or in-app purchases, either. Parents can opt to connect to the internet if they want to download additional stories, but there isn’t a charge.

At launch, Read Along offers around 500 stories and the catalog is continually expanded with new books.

Since its debut as Bolo in March 2019, Google says feedback from parents was encouraging, prompting it to bring the app to new markets. While in India, “Bolo” is broadly understood to mean “speak,” Google rebranded the app to Read Along to resonate with parents and children around the world. The app has also been updated with an enhanced library, new games and other user interface improvements since launch.

The new Read Along app is now globally available, except in the Philippines, Colombia and Denmark and offers stories in English, Spanish, Portuguese, Hindi, Marathi, Bengali, Tamil, Telugu and Urdu.

The app is a free download on Google Play for children ages 5 and up.


Read Full Article

Flic 2 Review: The Ultimate Smart Button That Integrates Anything With a Web API


Flic 2 smart buttons
Our verdict of the Flic 2 Starter Kit:
The smartest smart buttons money can buy, and very developer friendly. Which is good, because the APIs of the products it integrates with are often lacklustre, and you'll need to spend time on workarounds getting things to work as you want.
810

Shouting at Alexa to control your lights and other smart home devices is all well and good, but sometimes you just want a button. You know, a physical switch you can press to make things happen! Remember those? Me neither, but the Flic button from Shortcut Labs is exactly that–and a whole lot more besides.

As well as integrating with a host of smart home lights and other devices, it can also connect to your favorite web services like IFTTT, Zapier and Slack. You can chain together multiple commands, and each button has a press, double-press, or hold action.

Is now the time to add some smart buttons to your smart home? We think so.

Flic 2 Design and Specs

Now in its second iteration, the Flic 2 Starter Kit ($160) includes a Bluetooth 5 “Long Range” hub and three buttons, as well as a micro USB power cable. Note that a USB power adaptor and Ethernet cable is not included in the package, but is required to use the Flic LR Hub.

While this might be seen as a failing in something marketed as a starter kit, it’s a win for reducing e-waste as they’re common components that you likely have spares of already. There is no Wi-Fi receiver in the Flic hub, so it will need to be connected to your router or switch via the Ethernet cable.

The buttons can be paired with the hub, a smartphone, or your Mac. In future, they hope to have MIDI and Bluetooth HID keyboard features implemented too.

Flic hub LR simpel design

However, we think they’re most useful when paired with the hub, which means they’ll operate even when your smartphone is off or you’re not there, so this is what we’ve focussed on in this review.

You can of course purchase additional Flic 2 buttons, as well as an Infra-Red module for the LR Hub, which allows you to issue IR commands to devices within line of sight of the hub (such as a TV or ceiling fan). Those who are really serious about adding buttons for everything should look at the Flic 2 Mega Kit ($400), which comes with a hub, 15 buttons, and the IR connection accessory.
You’ll also find one other port on the Flic LR Hub: an audio-out jack. This allows you to connect a speaker, and use the Play a Sound action in your command lists. So it can be a really elaborate doorbell if you fancy (although thinking about it, don’t put the buttons outside, they aren’t waterproof).

Setting Up the Flic 2 Buttons and Hub

As the simplistic product packaging and design imply, everything about the Flic 2 is simple to set up. For the initial setup and creating the action sequences, you will need to use a smartphone, but after that, the logic is stored locally on the hub itself. Assuming you paired the Flic 2 buttons with your hub, your smartphone doesn’t need to be in-range or powered on for the buttons to function.

the Flic hub LR model

Once you’ve connected the Flic 2 LR hub to your router and USB charger, simply open the app and add a new hub. It’ll be automatically detected on your network; then you can add the buttons. This involves tapping the Add Flic button, then holding it down until the hub detects it. This worked flawlessly during testing, and we were up and running in no time at all.

Then comes the tedious task of remembering credentials for services that you want to connect; or doing the “press this button within 30 seconds” dance that some devices require for authentication.

Range Testing

Flic 2 buttons use an enhanced Bluetooth 5.0 Long Range connection to the hub, so I placed the hub at one end of my home in the office area along with the SmartThings and Hue hub. I typically don’t have issues with Z-Wave or Zigbee devices since they operate on a mesh, with each device relaying messages to those further away in a chain. Wi-Fi is another matter though. Parts of my home were built in 1850, so the walls are thick stone that’s impenetrable to weak signals. To further complicate matters, the house is built onto a hillside, resulting in a long corridor with one side branching off into rooms. As expected, the Flic 2 buttons couldn’t quite reach from one side of the house to the other, nor could the Bluetooth signal penetrate some areas. I managed about 15 meters unobstructed down the corridor, or 10m through some walls.

Flic 2 button

To be clear, most homes obviously shouldn’t have this issue: the range is certainly further than standard Bluetooth devices, and I’m impressed it even got as far as it did. If you have a more traditional “cube” shaped home and can place the Flic hub somewhere in the middle of it, you should have no issues with reception. Multiple hubs can also be used if necessary.

I probably could have placed the hub more centrally for better coverage, but would have needed to do some serious rewiring. This brings me to my only real complaint about the design of the hub: the lack of Power Over Ethernet capability. POE enables low-powered devices to be situated anywhere you can run a single Ethernet cable. That’s easy enough, and I have Ethernet throughout the loft for security cameras and Wi-Fi access points that are mounted on the ceiling. Alternatively, adding Wi-Fi to the hub would enable it to plug directly into a power socket.

As it is, the requirement for both Ethernet and USB power restrict optimal placement of the hub.

What Can The Flic 2 Buttons Do?

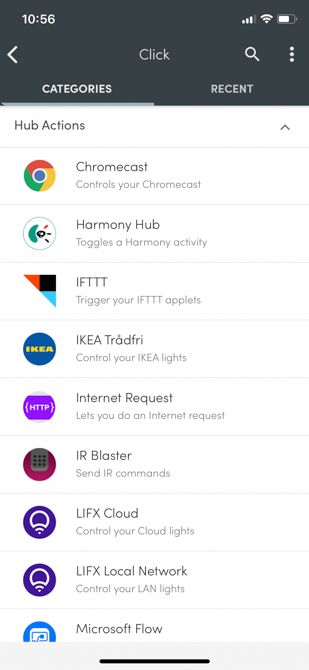
The Flic buttons can interface directly with a range of smart home devices, as well as web services like IFTTT, Zapier, or even generic HTTP requests. This makes the system highly extensible: anything that has a web API is theoretically supported.

In terms of direct API implementations from the hub, smart lighting seems to have the broadest support. You’ll find LiFX, Philips Hue, Nanoleaf, and Ikea Traddfi. Wemo and Wink are present, but Samsung SmartThings is not. On the entertainment side, there’s VLC, Chromecast, Spotify and Sonos. However, even with official support I found the implementations were limited (and not necessarily the fault of Flic).

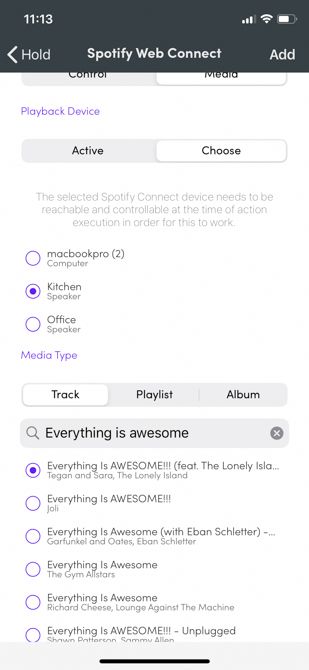
For instance, I really wanted one button to play a specific song from Spotify to one or more Sonos speakers. My first point of call was Spotify. The Spotify Connect feature shows all my Sonos speakers in the regular Spotify app, but for some reason, the API doesn’t report them as available targets (only Alexa speakers were listed, and my Macbook Pro running the Spotify app). So my next attempt was through the Sonos skill; unfortunately, those actions are limited to play, next/previous, and volume controls. At this point, I reached out to support, and they suggested using IFTTT as an intermediary. Sure enough, the IFTTT Sonos skill allows you to play a specific item from your Sonos favorites; so all I had to do was find the song, add it to my favorites, create a IFTTT Sonos skill and link it to a button. It took a good half hour of fiddling so I can press a button and have “Everything in Awesome” played on a speaker, and I’ll need to group them first in the Sonos app

if I want it on all speakers. There’s an inherent delay when going through services like IFTTT, and they do of course rely on an internet connection rather than a direct local link to say your Philips Hue hub. But it does work.

But as well as playing a song, I can also dim the room lights (a Philips Hue bulb), turn on the party lights in music reactive mode (a Nanoleaf scene), and send a message to Slack to announce “It’s Party Time!”–all from a single button press. That is, indeed, awesome.

Interestingly, there are a whole lot more implementations when the Flic 2 buttons are paired with an Android device; you can view the full list at Flic.io. Hopefully, some of those make their way over to the hub soon.

Should You Buy the Flic 2 Starter Kit?

If you’re bored of constantly shouting at Alexa to turn on the lights and just wish you had a button instead, then this can certainly do the job. It can also message your colleagues on Slack to tell them you’re taking a coffee break. Then instruct your web-connected coffee machine to actually make said coffee. It’ll lock the front door so your moment of calm won’t be disturbed. And put on your favorite Spotify playlist. With one press of a button.

Flic buttons can post to Slack, too. You can probably think of a more meaningful message to relay to your coworkers.

However, I do realize the irony of spending hundreds of dollars to install smart bulbs that can no longer be turned off at the switch, only to then go to the expense of installing smart switches so you can once again turn on your smart bulbs with a physical switch.

In my experience, the Flic 2 buttons themselves are very reliable, and the Bluetooth 5 range should be enough for most households. But precisely how easy it is to integrate with your favorite devices will depend very much on what the manufacturer has opened in their API, as well as which bits of it Flic has implemented. Like any smart home gadget, it never quite fulfills the sci-fi dream of an integrated, automated, and intelligent home.

On the other hand, Flic has proven themselves to be very developer-friendly, and you’ll find full SDK documentation available to implement Flic features yourself. You can even integrate Flic in your Arduino projects. This bodes well for the future of Flic, and means that community integrations will continue to grow.

Enter the Competition!

Flic 2 Starter Kit Giveaway

Read the full article: Flic 2 Review: The Ultimate Smart Button That Integrates Anything With a Web API


Read Full Article

Zoom vs. Houseparty: The Best Video Chat Apps, Compared


The COVID-19 pandemic has sent the world scrambling for ways to stay in contact. And video chat apps are one of the easiest ways you can keep in touch with friends and family.

Two video chat apps are making more headlines than most: Zoom and Houseparty. Both video chat apps promise to keep things simple, allowing you to video chat with multiple people at once. Better still, both Zoom and Houseparty are free to use.

So, how do you choose between them? In this article, we pit Zoom versus Houseparty to see which is best…

Zoom vs. Houseparty: Which Is Best?

There are three important criteria to consider:

  • Features
  • Security and Privacy
  • Ease of Use

These three categories contain the most important information that will help you decide between Houseparty and Zoom. You can explore the information in detail or check out the table below for a quick overview.

houseparty zoom comparison table

Zoom vs. Houseparty: Features

First things first: which video calling app has the best features?

Zoom Features

This is an interesting question because it depends on what you want from your video chat app. Before the pandemic, Zoom’s focus was on enterprise customers. Home users calling friends and family were not a priority for Zoom. In that, the feature-focus slants toward business users.

Using the basic plan, Zoom users can add up to 100 participants in a call that lasts a maximum of 40 minutes. Once the time expires, Zoom ejects all users from the video chat. You can upgrade to a premium account to remove the time restrictions. Or you can just reconnect and continue chatting.

Zoom Schedule Meetings

As you can see in our overview of Zoom, the app also features integrated chat, screen sharing, local recording, multiple screen layouts (handy when you have several participants), and various meeting scheduling options.

Zoom is available on Windows, macOS, Linux, Android, iOS, and through most web browsers.

Houseparty Features

Houseparty, on the other hand, was built with fun and games in mind. Eight participants can connect to a Houseparty video chat. There is no time limit, and you can drop in and out of Houseparty chats by selecting the next room.

Now, here’s the thing. Houseparty attempts to offer the “experience” of a party. You move through rooms, chat with different people, and find the mood that suits you. A Houseparty video call starts as soon as you launch the app. Moreover, your room launches without a lock, so anyone from your contacts list can join from the outset.

houseparty chrome desktop version

This extremely open approach is, in part, what has led to Houseparty’s success. But it is also one of its most glaring security and privacy issues.

Once you’re in a Houseparty video chat, you can launch one of the integrated games and start playing. Games include Heads Up! (virtual charades), Trivia (a quiz game), Quick Draw (somewhat like Pictionary), and Chips and Guac (which is like a clean version of Cards Against Humanity).

Houseparty is available on Android, iOS, macOS, and through the Google Chrome web browser.

Zoom vs. Houseparty: Security and Privacy

When you engage in a video chat, you want to feel secure. That means no snooping, no chance for video-based intruders, and options to control the security of the app. Can you trust Zoom or Houseparty with your next business meeting or family quiz night?

Zoom Security and Privacy

At the time of writing, Zoom has a terrible reputation regarding security and privacy. Regardless, it remains extremely popular in the face of adversity. How much of that comes from users unable to switch services now that their business or school is using Zoom? We don’t know.

What is well understood, however, is that Zoom has a poor reputation regarding security and privacy. Which is why we dedicated a whole article explaining how to secure your Zoom chats. Zoom’s meteoric rise caught the development team napping. Suddenly, the eyes of the world were focusing on and pulling apart the app and its inner workings.

As well as Zoom’s privacy issues, users face a new type of online threat: Zoom-bombing. A Zoom-bombing attack is the act of crashing an insecure Zoom video call. The intruders then display offensive material or cause a general menace, forcing participants to leave.

Although Zoom did improve the default password option for Zoom meetings, you should still learn about Zoom-bombing and how to protect yourself.

Houseparty Security and Privacy

Houseparty’s security and privacy is a mixed bag.

At the start of the COVID-19 pandemic, several websites reported that Houseparty suffered a major data breach. Furthermore, the app was allegedly insecure, and hackers could use the app maliciously.

No evidence ever came to light regarding the data breach allegations. What’s more, Houseparty owner, Epic Games (of Fortnite and Gears of War fame) announced a bounty of $1 million for anyone that could find specific evidence of the leak. The bounty is as yet unclaimed.

Potential data breach aside, Houseparty still has a few privacy and security issues. For one, when you sign up to Houseparty, you agree to let them use any footage from your video chats in their marketing or advertising.

Which leads to the next issue. Houseparty offers very little in the way of encryption to protect your video call from snoopers. Is someone interested in your family game of Trivia? Probably not. But the potential for exploitation is there.

On the plus side, you cannot search for people online. This means that it is highly unlikely that a stranger will crash your Houseparty.

Houseparty is not grabbing negative headlines for its security and privacy issues. At least, not to the same degree as Zoom. It definitely helps that Epic Games and Houseparty didn’t make a series of claims about the security of their products, only to have to walk those claims back under the scrutiny of security researchers and privacy advocates.

Still, Houseparty is a long way from perfect.

Zoom vs. Houseparty: Ease of Use

The final thing to consider is ease of use. How easy is it to use Zoom or Houseparty to make a video call? What about using the more advanced features?

Zoom Ease of Use

Zoom is incredibly easy to use. Anyone with a webcam and microphone can create a Zoom video call and begin inviting people. Likewise, anyone can click a Zoom link and enter a video chat. The web interface is mostly intuitive, as are the Android and iOS apps.

One area that Zoom could improve on is hiding options deep within the various settings menus. Three different settings menus relate to different aspects of Zoom. At times, finding the correct option for the setting you want to change can take a while. Furthermore, for less technical users, the array of options available can feel overwhelming.

In terms of hosting a video chat for a large volume of people without requiring much technical know-how, Zoom is a useful option.

Houseparty Ease of Use

Like Zoom, Houseparty is extremely easy to use. Once you sign up and add your contacts to the app, you can begin to search for your friends and family. Houseparty shows a list of active chats that you can join, too.

As for entering the Houseparty app, straight into an active room, there is a way to join in incognito mode. When launching the app, hold down the Houseparty icon. You can then select the “Sneak into the House” option, which allows you to enter the app without alerting any other users.

Zoom vs. Houseparty: Which Is the Best Video Chat App?

How you use Houseparty or Zoom depends on the type of video chat you want to have.

If you’re meeting up with family and friends to play some games, Houseparty is a great option. On the other hand, if you’re hosting a business meeting or attempting to teach a class, Zoom is better suited to the job.

As one review states, Houseparty is like the happy-hour of video calling, while Zoom is the office job. And that’s a pretty accurate statement.

Of course, Houseparty and Zoom are not the only video chat apps around. You could try Jitsi, the open-source and privacy focused alternative which offers similar functionality to Zoom. Or, if you have previously used Skype, here are the best free Skype alternatives giving you even more options.

Read the full article: Zoom vs. Houseparty: The Best Video Chat Apps, Compared


Read Full Article