11 April 2020

How to Back Up, Restore, and Transfer Text Messages to a New Android Phone


manage-text-messages-android

If you often communicate via SMS, it makes sense to back up your Android text messages. That way, you’ll have a copy in case something goes wrong. It also makes transferring text messages to new phone simple.

We’re going to walk you through SMS backup on Android using the default option, as well as a selection of popular third-party apps. Each of them allows you to easily restore those text messages later.

1. Built-in Google Drive Backup

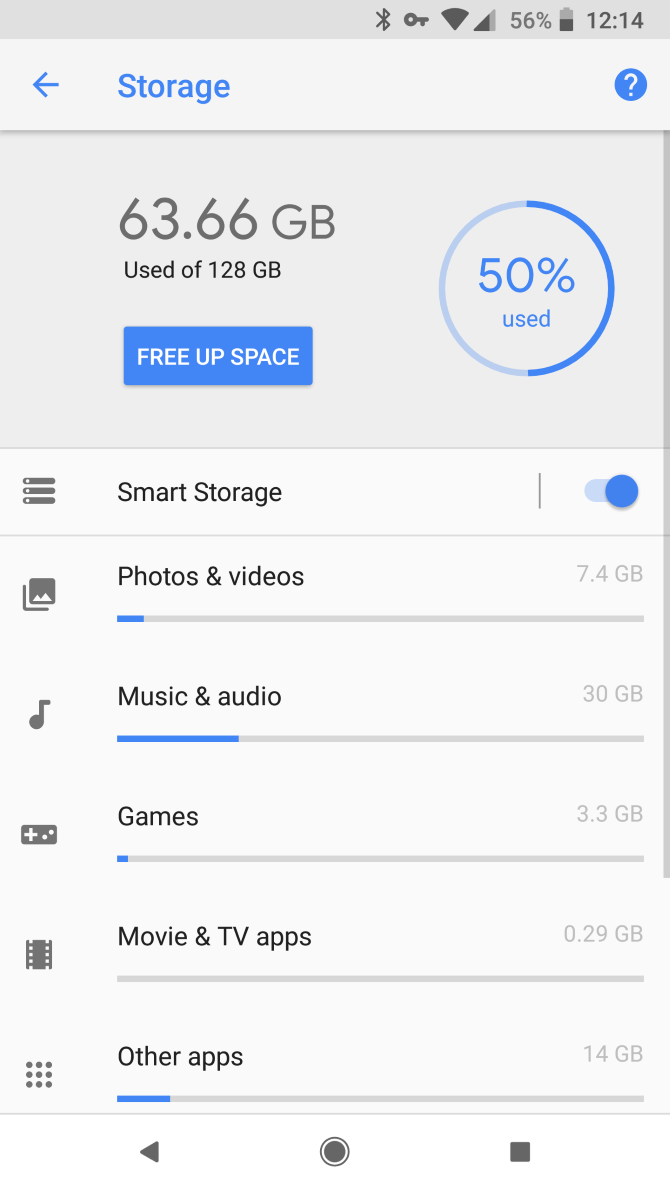
As long as you’re signed into your Google account on your phone, your data automatically back up to Google Drive. To make sure that the backup is working, head to Settings > Google > Backup or Settings > System > Advanced > Backup.

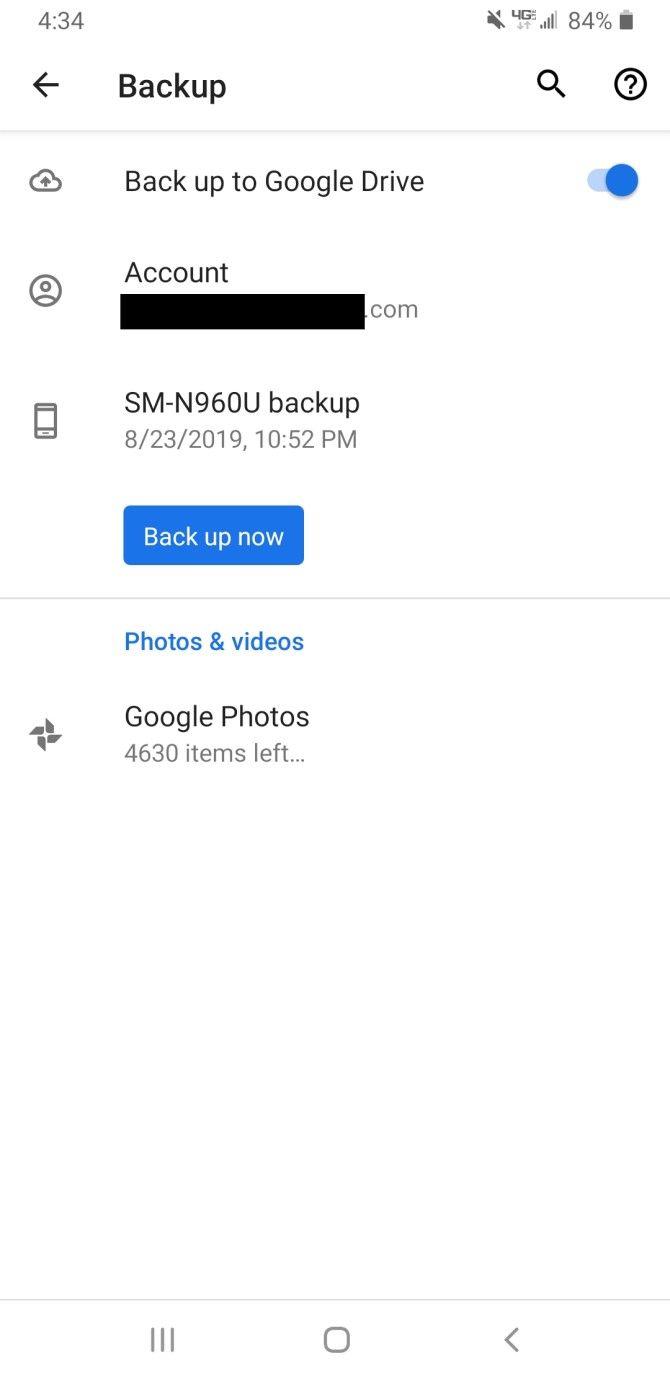
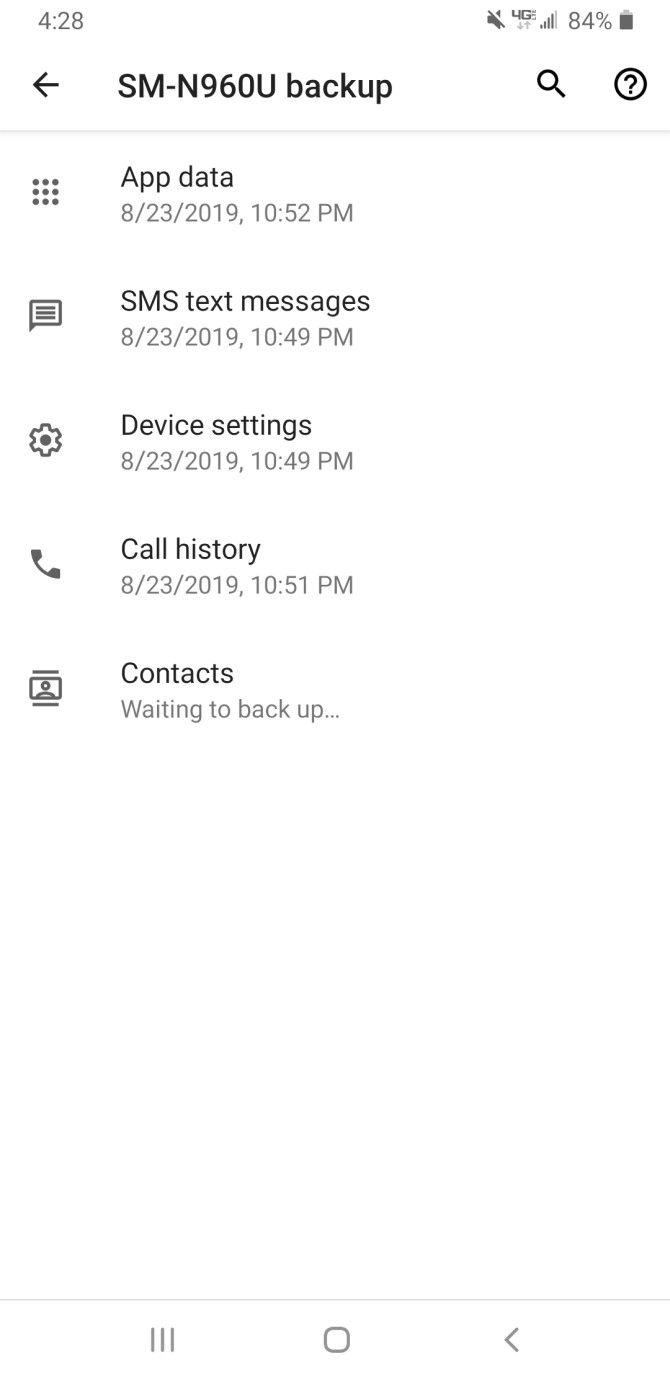
To perform a manual backup, hit Back up now. You can also check what the feature has already backed up by tapping on your phone’s name. Here, you should see the last time that a backup ran for your app data, SMS, device settings, call history, and contacts.

Unfortunately, old backups get deleted after 57 days, and this doesn’t support MMS (unless you have a Google One plan). You also can’t view your backups whenever you want—they’re only available when you get a new phone or perform a factory reset on your current device.

This is one of the many ways to back up everything on your Android device.

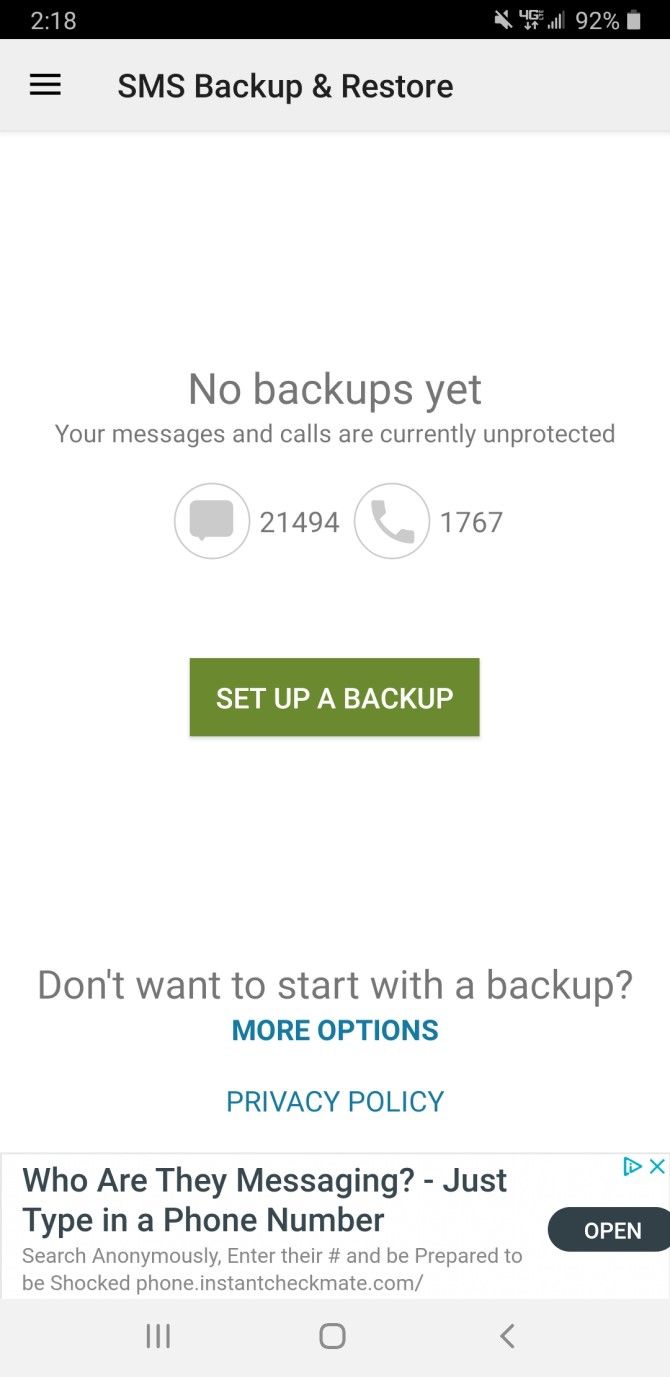
2. SMS Backup & Restore

You can back up your messages directly on your phone using an app called SMS Backup & Restore.

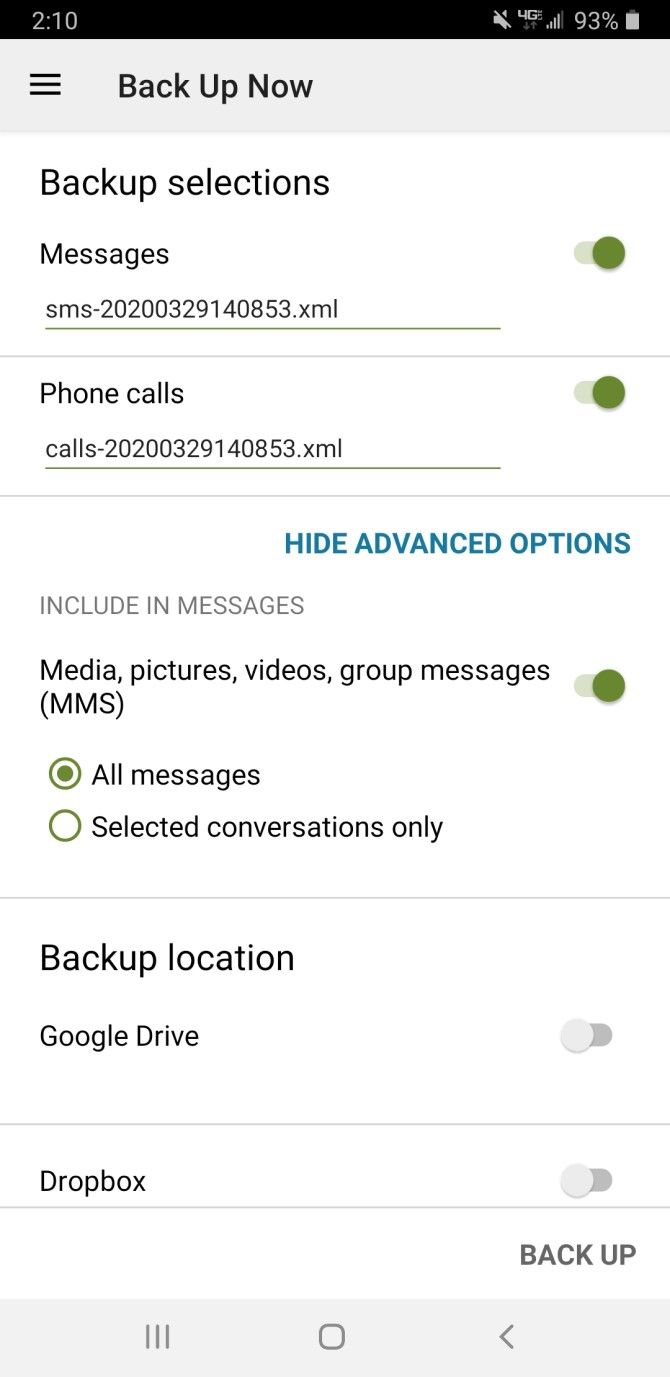
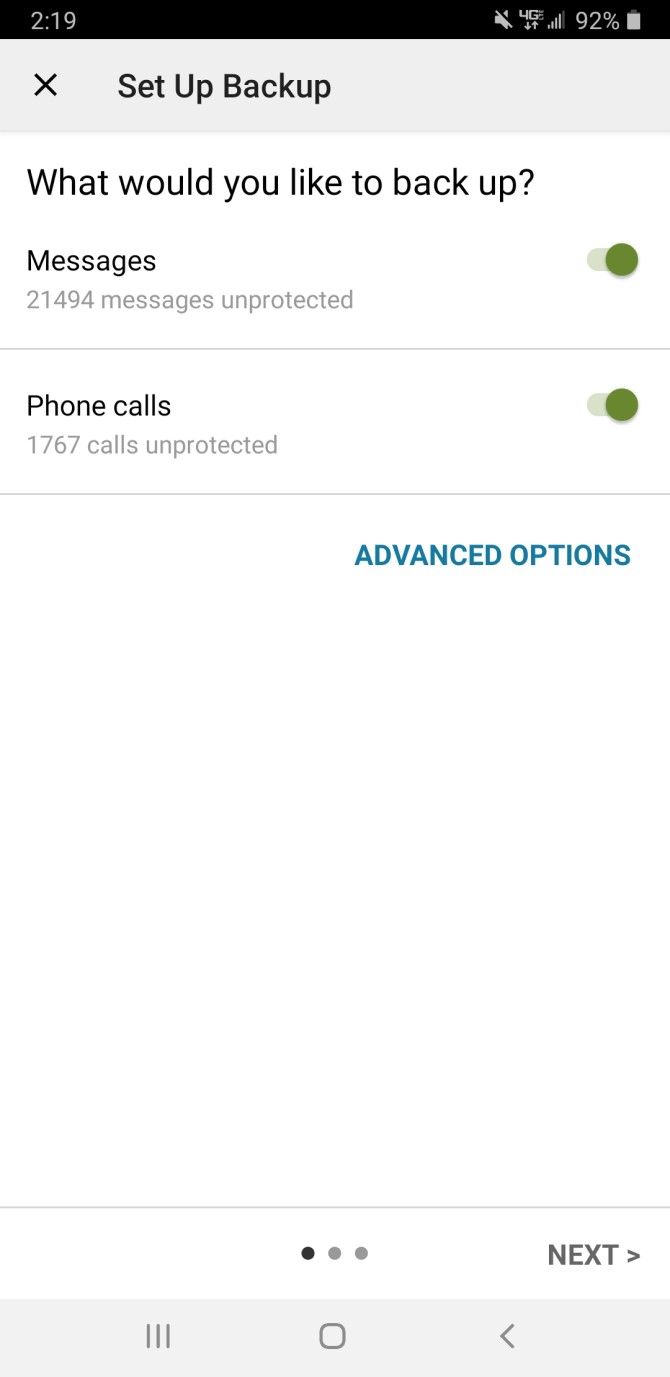
To get started, open up the app and tap Back Up Now. You can choose to back up all call logs, SMS messages, and/or selected SMS conversations. Make sure there’s a check next to the items you want to back up.

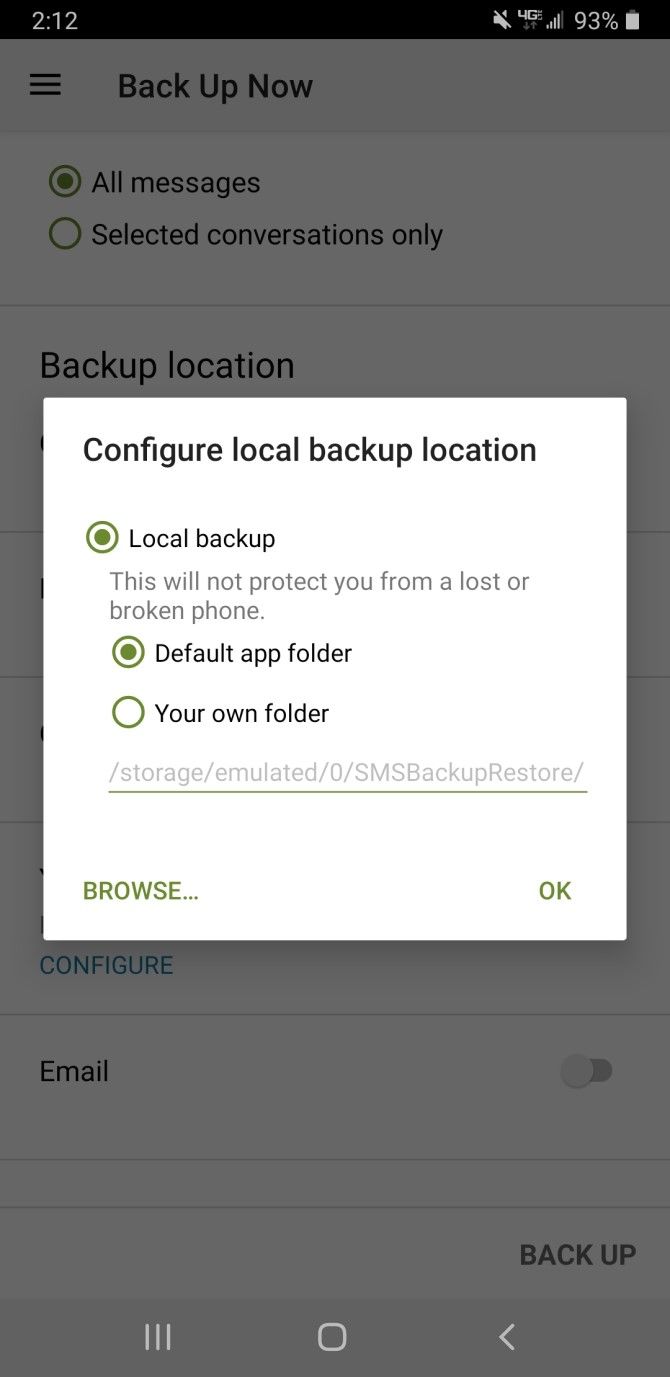
You can then choose a backup location: Google Drive, Dropbox, OneDrive, or locally on your phone. If you choose to save it locally, you can choose the exact location of the backup. However, this isn’t a wise option, as the backup file will be lost if you lose or break your phone.

You can also use SMS Backup & Restore to schedule automatic backups, repeating them by the hour, day, or week. This feature is particularly handy as you can set it and forget it, knowing that your messages will be safely backed up.

If you want to create or edit a schedule, navigate to the app’s home screen and tap Set Up a Backup. After selecting the frequency of the backup and the backup storage location, the app will schedule the job. And when you need to get them back, open the left menu and tap Restore to import your backup file.

Download: SMS Backup & Restore (Free)

3. SMS Backup+

SMS Backup+ allows you to conveniently back up your messages to your Gmail account. However, because a change to Google’s API broke the way SMS Backup+ used to function, you’ll have to do a few extra steps to get it working correctly.

Setting Up SMS Backup+ in Gmail

Before you download SMS Backup+, head to your Gmail settings on a desktop or laptop by clicking the Gear icon and choosing Settings. Click on the Forwarding and POP/IMAP tab, scroll down, and select Enable IMAP. Don’t forget to click Save Changes before you leave.

Backup Android Messages Gmail

From here, go to your Google account’s security settings by clicking your profile picture at the top-right of any Google page and clicking Manage your Google Account. In the Security section, find the heading that reads Signing in to Google and click App passwords.

If you don’t see App passwords, make sure to enable the 2-Step Verification setting first. Follow our guide to two-factor authentication if you’re not familiar with this.

Backup Android Messages Google Security Settings

Once you open the App passwords section, you’ll see a page with two dropdown menus. On the one labeled Select app, click Other (Custom name) and type in SMS Backup+. Hit Generate, and you’ll get a 16-digit code to use in place of your normal password.

Once you close this page, you can’t access the code again (though you shouldn’t need it after the initial setup). Make sure to write it down, or just keep the page open until you’re done setting up the app.

Google Security Settings App Passwords

Using SMS Backup+

Now, you can finally download SMS Backup+ on your phone. Open the app, then tap Advanced Settings > Custom IMAP server. Select Authentication at the top of the screen, followed by Plain text.

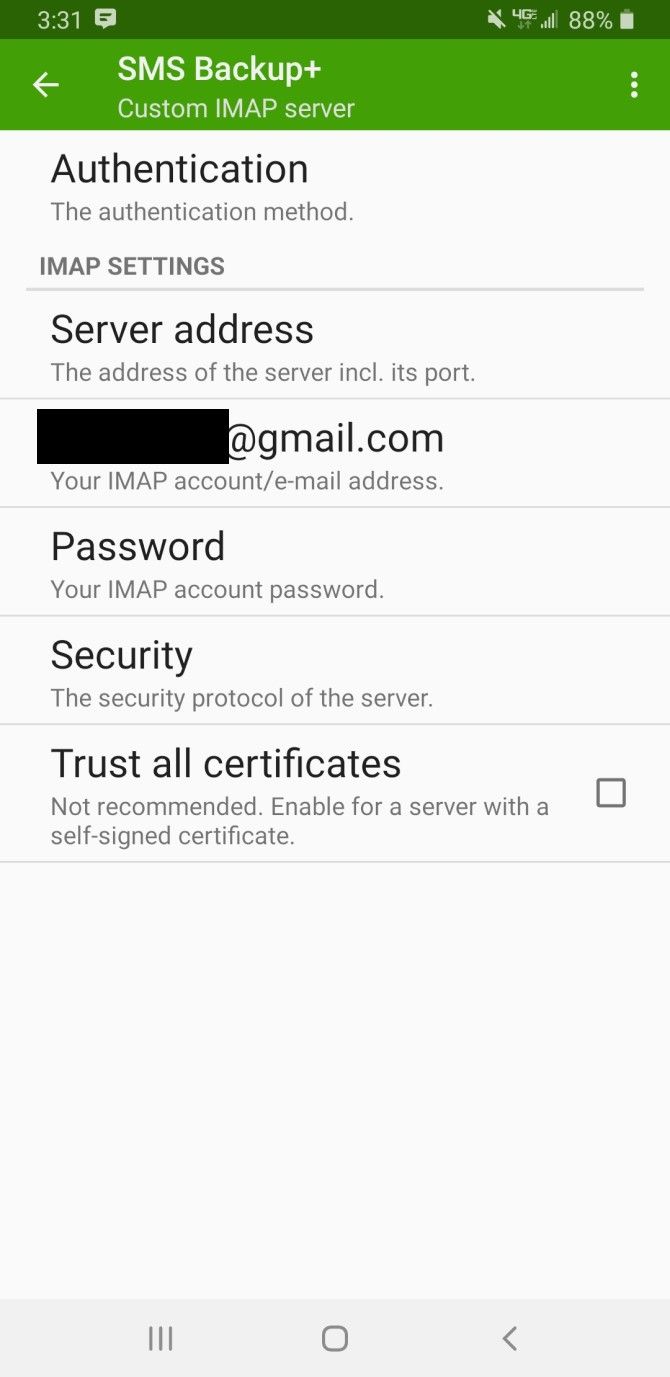
After you input your email address, you can then enter the 16-digit password without spaces in the Password section of the page. Ensure that the Security option is toggled to TLS and you can finally return to the app’s home screen.

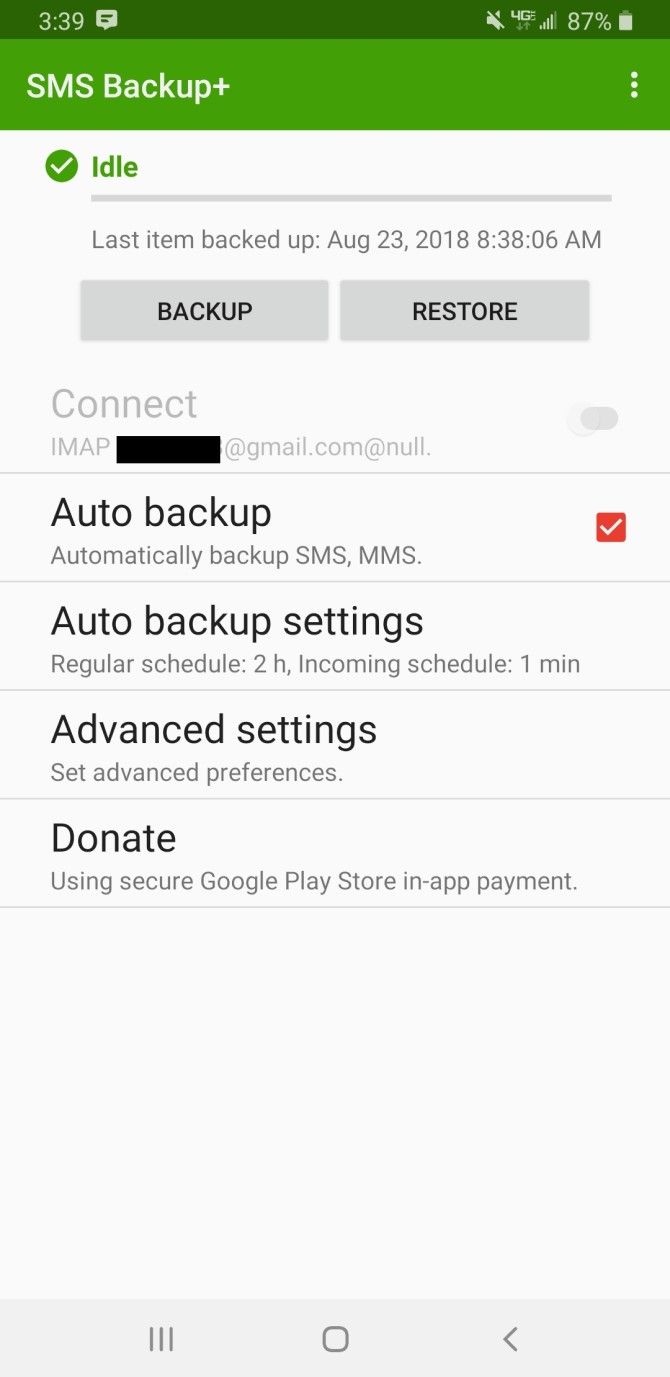
You can now back up your phone’s text messages to your Gmail account! Click Backup at the top of the page to begin backing up your messages. You can also set automatic backups by enabling the Auto backup option. If you choose to do this, you can always edit the backup frequency under Auto backup settings.

Like the other apps, use the Restore option within SMS Backup+ on your new device to get your texts back.

Download: SMS Backup+ (Free, in-app purchases available)

4. SMS Organizer

If you want an all-in-one messaging and SMS backup app, SMS Organizer is for you. This app is a Microsoft Garage project that’s currently in early access. Despite this, it’s still a reliable alternative SMS app that also doubles as a backup service.

The organization aspect of this app is what draws in most people—it automatically categorizes your texts into four sections: personal, transactions, promotions, and starred.

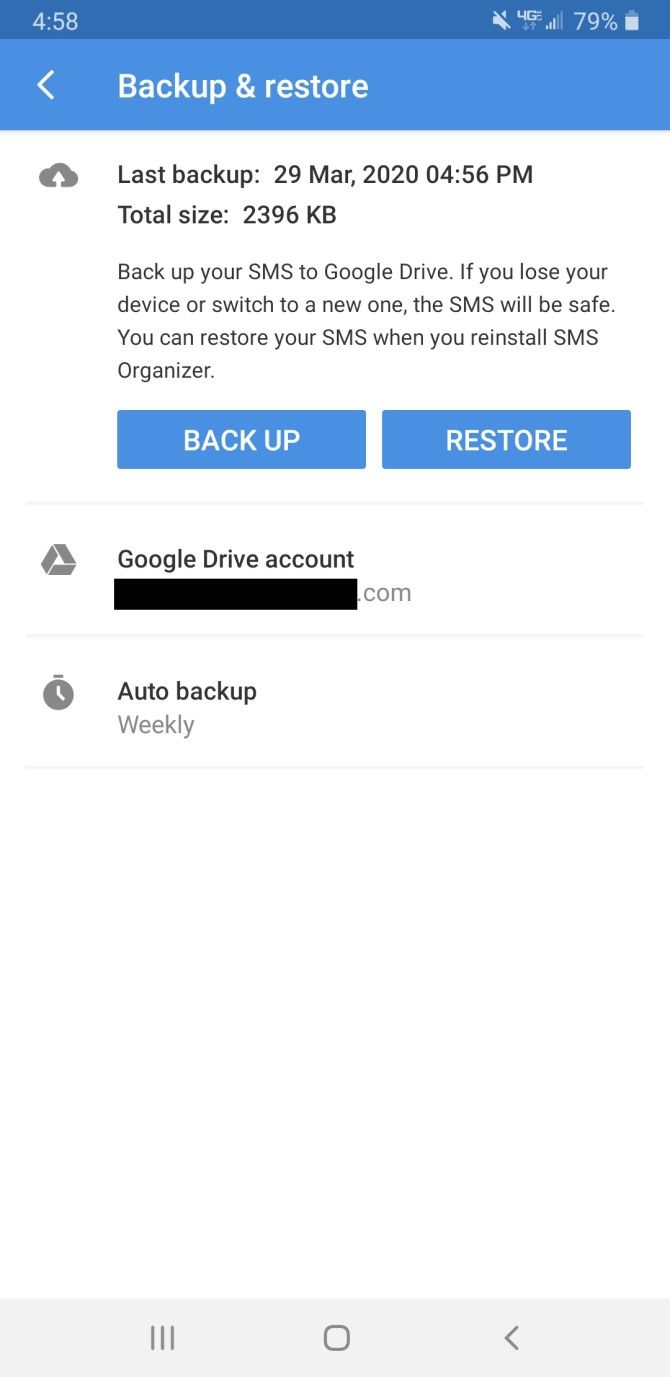
To start backing up your messages, click the three-dot menu in the top-right corner and navigate to Settings > Backup & Restore. Here, you can connect your Google Drive account and back up or restore your phone on-demand.

You can change the frequency of automatic backups by selecting Auto backup. This lets you stick to manual backups as well as opting to do daily, weekly, or monthly backups.

When you want to transfer text messages to a new phone, all you have to do is download the SMS Organizer app on your new phone, add your Google account, and hit Restore.

Download: SMS Organizer (Free)

Keeping Your Messages Safe With SMS Backups

Learning how to save text messages is especially useful when you need to transfer them to a new phone, as well as keeping a spare copy if your phone suddenly breaks. Keeping a backup of these conversations, which could have major sentimental value, is a smart idea.

If you didn’t back up before it was too late, take a look at how to restore deleted text messages on Android.

Read the full article: How to Back Up, Restore, and Transfer Text Messages to a New Android Phone


Read Full Article

10 Safari Settings You Should Tweak for Better Browsing on Mac


safari-settings-better-experience

A lot of Mac enthusiasts prefer using Safari over Chrome, thanks to its lower battery consumption. Nowadays, Safari is better than ever before, but as with all browsers it has some quirks that need fixing.

Fortunately enough, you can smooth out most of the browser’s rough edges by making a quick visit to Safari’s settings. Some need a little more work, but we’ll cover those step by step.

Ready to upgrade the Safari browsing experience on your Mac? Let’s go!

1. Enable a Link Preview in the Status Bar

When browsing around the web, you come across all sorts of hyperlinks. Some links take you exactly where you want, while other links can redirect you to phishing websites that could steal your personal information. Thus, it’s a good idea to preview links before actually going to the websites behind them.

Safari doesn’t show link previews by default, but you can enable this with just a couple of clicks. Click on View in the menu bar and select Show Status Bar to do so.

Showing the status bar in Safari via the View menu

Once enabled, you should see link previews at the bottom-left of the window.

2. Show the Entire URL in the Address Bar

By default, Safari shows only the main domain name in the address bar. While this makes Safari look a more minimalist, it also hides useful information including your exact location on a website.

To always show the full URL, open Safari > Preferences and switch to the Advanced tab. Check the Show full website address box there. Now, Safari should display the full URL so there’s no doubt.

Safari Show Full Website Address

3. Use Reader View Automatically for All Websites

Whenever you come across a messy webpage in Safari, you can simply click on the Reader view icon to declutter the webpage and view it in an easy-to-read format. What if you’re spoiled with the simplicity of Reader view and want to use it on all websites automatically?

That’s possible with the following steps:

  1. Open Safari > Preferences.
  2. Switch to the Websites tab and select Reader from the left pane.
  3. Configure the currently open websites to use Reader view automatically by clicking On in the dropdown menu. To set this for all other websites, select On in the dropdown menu at the bottom beside When visiting other websites.

Safari Use Reader View All Sites

Once enabled, all supported websites will load in Reader view automatically.

4. Stop Plugins to Save Power

Browser plugins like Flash and Java aren’t common on the modern internet. However, you might still come across some sites that use them for videos, ads, or other content.

To avoid wasting battery power and resources on these plugins, you can tell Safari to use plugins only when you need them. To do this, open Safari > Preferences and switch to the Advanced tab. Check the Stop plug-ins to save power box and your browser will automatically suspend unnecessary plugins.

Safari Stop Plugins

5. Block Auto-Playing Videos

Don’t you hate it when you’re browsing a website and a video starts playing automatically without your consent? It’s a pain to fumble around your open tabs to find the offending page and close it. You could mute that tab, but the video will keep playing, which wastes resources.

To resolve this problem, Safari lets you block all auto-playing videos. To do so, open Safari > Preferences and head to the Websites tab. Here, select Auto-Play from the sidebar on the left.

On this page, you can configure websites to either Stop Media with Sound or Never Auto-Play videos.

Safari Disable AutoPlay

6. Disable Website Notifications

Sometimes, browser notifications can be useful. For instance, when you have Gmail open, the site can send you a push notification to alert you of new messages. But some pages abuse this feature to deliver ads or other unwanted content. If you feel bombarded with unnecessary notifications from websites, Safari provides an easy way to get rid of them.

Open Safari > Preferences, switch to the Websites tab, and choose Notifications on the left. Here, you can check out all the websites that have asked for permission to show alerts in the Notification Center.

You can choose to Allow or Deny permission for these existing websites. If you’d like to disallow all websites from sending you push notifications, uncheck the Allow websites to ask for permission to send notifications box.

Safari Notifications Allow or Deny

7. Enable Picture-in-Picture for Videos

Did you know that the handy picture-in-picture (PiP) feature is available in Safari? This lets you pop out a video to a small window that you can move anywhere while keeping it on top of other windows.

To use PiP in Safari, start playing a video, such as something on YouTube. Then click and hold the volume button in the Safari address bar and select Enter Picture in Picture.

Safari Enter Picture In Picture

To exit this mode, click the Exit button next to the Pause/Play button and the video will pop back into Safari.

While the feature works well, the only problem is that it doesn’t work with all online video services. For shows from Amazon Prime Video, for instance, you’ll need a little help.

PiPifier is a native Safari extension that lets you use PiP mode on almost any HTML5 video. Once you download it from the App Store, open Safari > Preferences > Extensions and check PiPifier button.

PiPifier for Safari on Mac

After it’s enabled, you should see a pop-out button in your toolbar. When you’re playing an HTML5 video, just click on this button to play it in PiP mode. Make sure to play and pause a video once before you click on the button.

Download: PiPifier (Free)

8. View Favicons in the Tab Bar

You’d probably agree that it’s easier to identify tabs by their favicons instead of just the page title. This is especially the case when you’ve got lots of tabs open. In macOS Mojave, Apple finally brought the ability to display icons in tabs.

To enable them, open Safari > Preferences and select Tabs. Check the box for Show website icons in tabs.

Safari Show Icons In Tabs

9. Utilize Quick Website Search

Quick website search in Safari

Safari’s address bar lets you search many websites directly. For instance, you can search Wikipedia by typing “Wikipedia [query]” in the address bar. This helps you save a few clicks and navigate faster. Even better, this supports a range of websites.

To check out a list of all supported sites, open Safari > Preferences > Search. Click on Manage Websites to take a look.

10. Set the Default Search Engine

Not everyone is a Google fan. Since you probably use the search function in Safari every day, setting up the default search engine is another minor change that can make a big difference.

You can choose from Google, Yahoo, Bing, or DuckDuckGo as your default. To modify this, open Safari > Preferences and select the Search tab. Next to Search engine, select an option from the dropdown menu.

Safari Set Default Search Engine

From then on, when you enter a search term into the Safari address bar, your results will display from your chosen search engine.

More Safari Tips to Improve Your Browsing Experience

Major features often hog the limelight, which leaves room to discover for small, nifty features to be discovered. We hope these cool Safari settings helped you get more out of your Mac’s browser.

Interested in more? Have a look at essential Safari tips and tricks, along with more ways to customize Safari that you might like.

Read the full article: 10 Safari Settings You Should Tweak for Better Browsing on Mac


Read Full Article

Why Can’t I Download Certain Apps on the Play Store?


cant-download-apps-playstore

Can’t download some apps on Google Play? This is frustrating, especially when other apps work just fine.

Whether you can’t even see an app, found it but can’t download it, or the app won’t install, we’re here to help. Let’s look at why you can’t download certain apps from the Play Store and how to fix the problem.

1. Device Incompatibility

Google Play Incompatible App

The most common explanation for why you can’t download certain apps is that the app’s developers have marked it as “incompatible” for your device. For example, you’ll see this message if the app was deigned for tablets and you have a smartphone.

However, this doesn’t necessarily indicate that the app has zero chance of working on your device. Developers may choose to mark it as incompatible due to unfixable glitches or bugs with your particular model. Alternatively, you might have a rooted device that’s not compatible with certain apps.

One way around this is to download the APK from an alternative site and force it to install. Do this at your own risk, however, because if there are actual incompatibility issues, they could potentially harm your device. Most likely, though, you won’t be able to access certain features in the app.

2. Region Restrictions

Google Play Region Not Available

Another common explanation when you can’t find an app on Google Play is that it doesn’t work in your region of the world. This could be due to government restrictions, but more than likely, it’s a decision by the developers to filter out people who can’t use their app anyway.

For example, there’s little point to installing an app for a US-only bank if you live in Australia. Even if you force the app to install by sideloading it, you won’t be able to create an account or use the bank’s services anyway. Another example is Hulu, which is only available in the US.

In other cases, an app may only service certain locations in its early stages, so the owner decides to limit who can download it. This prevents negative reviews from confused users and makes sure they’re testing with the right people. If you’re not sure why an app is region-restricted, it’s worth reaching out to the developers to ask.

If you’ve moved recently, you may need to update your region setting in the Google Play Store to access compatible apps.

3. Missing Device Features

No AR mode in Pokemon Go

As long as your device is from the last several years, it probably includes the latest hardware features. Gyroscopes, accelerometers, ambient sensors, proximity sensors, and other functions allow your device to pick up data from the world around it.

Some app require these tools. If your phone is really outdated and missing a component that an app requires, then you can’t install it from the Play Store. Budget phones are more likely to skip out on these features than flagships, of course.

An app also might require more powerful hardware than your phone has. Apps that need a lot of resources might demand a certain amount of RAM, for example. This was a big problem when Pokemon Go launched—many people were left out when the game didn’t run on their phones due to insufficient hardware.

The only real solution here is upgrading to a more modern device. It’s frustrating, but it’s probably time anyway if you run into this problem.

4. You’re Running an Outdated Android Version

Google Play Requires Android

In addition to the hardware requirements discussed above, many apps also have software requirements in the form of your phone’s Android version. To check this, visit the app’s page on Google Play’s web interface. Scroll down, and you’ll find it as Requires Android in the Additional Information section.

Every new major version of Android comes with a handful of new features and improvements that apps can take advantage of. If an app relies on one of these features that you don’t have, it may not work at all. There’s no point in allowing you to install the app if that’s the case.

Much more common, however, is the developer deciding on the oldest version of Android the app will support as a cutoff point. Like desktop software, it’s difficult to keep Android apps backwards-compatible for versions released many years ago. Almost nobody uses ancient Android versions (such as Jelly Bean) anymore, so it makes no sense for developers to keep supporting them.

Unfortunately, Android’s fragmentation means that your old device will probably never see another update. Consider the best Android manufacturers for timely updates to avoid this issue when you buy your next phone.

5. Insufficient Storage Space

Apps take up a surprising amount of storage space. If your device has a small amount of storage, you may be unable to install any more apps until you make some room. This can even prevent you from installing app updates, in some cases.

You should thus free up space on your Android device to make room for the new app. You can do this by uninstalling old apps, removing local photos and videos that you’ve saved to cloud storage, and similar. If this becomes a recurring problem, you should look at getting a new phone with more storage space.

6. Google Play Store Glitches

If you run into an app that appears to be compatible with your device, yet the download doesn’t work for some reason, the problem may lie elsewhere. Chances are that you have an issue with the Google Play Store app.

When a download or installation from Google Play doesn’t work right, you should first reboot your phone. If that doesn’t work, read our full troubleshooting guide to fixing Play Store issues.

7. Unavailable Manufacturer-Specific Apps

Google Play Samsung Music Unavailable

A less common reason you can’t find an app in the Play Store is that it’s intended only for devices from certain manufacturers. Some apps are (supposedly) designed to take advantage of features that are only available on that company’s devices. As an example, the Samsung Music app is on the Play Store, but won’t install on a Pixel 4.

If the app has a manufacturer name in its title, it might not be compatible with other devices. The good news is that most of these manufacturer-specific apps have alternatives that are often better anyway. You shouldn’t bother forcing an install or switching to a new device unless you really want a particular app.

Resolving Play Store App Issues

Now that we’ve explained why some apps don’t show in the Play Store or let you download them, you should understand why the app you want to download is incompatible with your device. Hopefully it’s an easy fix, but a lot of the time, the app won’t work until you get a new device.

Note that when you search the Play Store on your phone, it will only show apps compatible with your device. However, if you search the Play Store’s web interface, you’ll see all available apps on the platform. Knowing this will help you check on an app’s availability.

Don’t fret if the Play Store fails you, though. It’s easy to download Android apps from alternative app stores.

Read the full article: Why Can’t I Download Certain Apps on the Play Store?


Read Full Article

Amazon Fire Stick vs. Roku: Which One Is Better?


amazon-roku

The popularity of cord-cutting continues to gather pace. Collectively, cable TV companies are losing millions of subscribers every year, with no sign of that stopping.

If you have recently ditched your TV subscription, there’s a good chance you’re trying to decide between an Amazon Fire TV Stick and one of the many Roku devices.

Unlock the list of "Essential Amazon Fire Stick TV Channels" now!

This will sign you up to our newsletter

Enter your Email

In this article, we pit the Amazon Fire Stick vs. Roku devices, determining which is best in order to help you decide.

A Complicated Comparison

Unfortunately, it’s impossible to make a like-for-like comparison between all Amazon Fire TV devices and Roku devices.

Instead, we need to focus on two Amazon products: The Fire TV Stick and the Fire TV Stick 4K. On the Roku side, there are three devices that can be thought of as Fire TV Stick competitors: the Roku Express, Roku Premiere, and Roku Streaming Stick+.

NB: The Roku Ultra costs $100 and is more of an alternative to the Amazon Fire TV Cube, so we will not include it in this analysis of Fire Stick vs. Roku.

Amazon Fire Stick vs. Roku: Cost

Before we get into the features and the technical specifications, let’s deal with the elephant in the room—the cost of the devices.

Amazon’s entry-level Fire TV Stick costs $40. The 4K model will set you back a further $10, coming in at $50.

The cheapest Roku model is the Roku Express. At $30, it’s more affordable than the Fire TV Stick. At the other end of the scale, the top Roku model (Ultra excluded) is the Roku Streaming Stick+, which costs $50.

So, for the sake of simplicity we’re going to pit the Amazon Fire TV Stick and Fire TV Stick 4K vs. the Roku Express ($30), the Roku Premiere ($40), and the Roku Streaming Stick+ ($50)

Amazon Fire Stick vs. Roku: Specifications

This is where things get confusing. Let’s try and make sense of all the different models on offer from the two companies.

First, the Amazon devices. The basic Fire TV Stick has a Quad-core ARM 1.3 GHz processor, 8GB of internal memory, and support for Bluetooth 4.1. It plays videos in 720p or 1080p resolution at up to 60 frames-per-second (FPS).

The 4K model is a notable improvement. You’ll find a Quad-Core 1.7GHz processor, support for Bluetooth 5.0, and 2160p video resolution. The internal storage stays at 8GB and there’s 1.5GB of RAM.

The Roku Express only supports 1080p resolution. The other Roku options support 4K.

Amazon Fire Stick vs. Roku: Controls

All Roku and Amazon Fire TV devices ship with a dedicated remote control.

Both Amazon controllers support Alexa. If you want to control your Roku with your voice, you will need to buy a Streaming Stick+.

Roku and Amazon have both developed an accompanying remote control smartphone app.

And remember, if you have an Amazon Echo speaker, you can sync it with your Fire TV Stick and use it to control your content.

Amazon Fire Stick vs. Roku: Interface

Image result for amazon fire tv home screen

Visually, the Amazon platform is more modern and feels more polished. However, critics have argued that it pushes Amazon’s own content too aggressively.

It’s a valid viewpoint. You’ll only see one row of your own apps at the top of the screen.

The rest of the homescreen is taken up by content from Amazon Prime Video. Even if you don’t subscribe to the service, you will still see it.

Roku’s interface is more customizable. All of your channels are displayed in a scrollable list and you can create shortcuts for your most-used channels. If you install third-party add-ons, you can even place your channels into groups for easier navigation.

Amazon Fire Stick vs. Roku: TV Shows and Movies

If you’re looking for a provider-agnostic device, Roku offers the best streaming sticks on the market. They’re not only better than Amazon Fire TV sticks; they’re also better than Android TV, Apple TV, and Chromecasts.

You’ll find apps for just about every on-demand video and music streaming app, including Netflix, Hulu, YouTube, Google Play Movies, Spotify, and TuneIn Radio. Roku also offers its own ad-supported streaming channel providing access to a large number of free movies and TV shows.

Roku also offers a vast library of private channels. You need to enter a code in the Roku web portal to install them on your device. Be warned—many of the private channels reside in a gray area of legality.

The Amazon Fire TV Stick run a highly modified version of Android. Which means you can sideload any app as long as you have its APK file. There are several safe and secure APK download sites you can use. Just remember that most Google Play Store apps are not designed for Fire Sticks, meaning you will also need to install a mouse app.

Amazon Fire Stick vs. Roku: Web Browsing

Only the Amazon products let you easily surf the web. Two Fire TV browsers are available—Amazon’s own Silk Browser and Firefox. You can control them both easily using the Fire TV remote. We’ve compared Silk and Firefox to find the best browser for the Amazon Fire TV Stick if you’d like to learn more.

There are web browsers that work on Roku devices, but they are not suitable for regular browsing.

Amazon Fire Stick vs. Roku: Gaming

roku games store

Roku devices and Amazon Fire TV Sticks both offer games on their platform.

However, hardcore gamers might find Fire TV devices are more suitable for their needs. Generally speaking, Roku games are a bit “cutesy”. Sure, they’ll keep you entertained for half an hour, but they don’t offer longevity.

The games on Amazon’s devices are beefier. You’ll find titles such as Minecraft, Badland, and Star Wars.

Of course, if the ability to game on your streaming device is high on your list of priorities, neither a Roku or a Fire TV Stick can hold a candle to the Nvidia Shield. You can stream titles from your PC using Nvidia GameStream, download a host of local games from Nvidia and Google Play, and install emulators for classic consoles.

We have written about the best games on Amazon Fire TV and the best games on Roku if you’d like more information before making a purchase.

Amazon Fire Stick vs. Roku: Screen Mirroring

Roku devices have Miracast technology built-in. If you’re not aware, Miracast is like a wireless version of an HDMI cable. Most Android and Windows devices are Miracast-compatible. Apple devices are not.

Some older Amazon Fire TV models also support screen mirroring. Oddly, it’s not available on the Amazon Fire Stick or Fire Stick 4K.

Roku vs. Fire TV Stick: Which Is Best?

It’s really difficult to choose a clear winner between the Roku and Fire Stick. Much depends on how you plan to use your device, which gadgets you already own, and which streaming service you subscribe to.

All else being equal, we’d recommend either the Amazon Fire Stick 4K or the Roku Streaming Stick+. And remember, you could even buy a Chromecast or Android TV.

We have pitted the Chromecast vs. Roku and the Android TV vs. Amazon Fire TV if you want to learn more.

Read the full article: Amazon Fire Stick vs. Roku: Which One Is Better?


Read Full Article

7 Tips for Typing Faster on Your Android Phone


type-faster-android

Typing on a touchscreen device is nowhere near as convenient as typing on a physical keyboard. Tapping away on a slab of glass gives you little feedback aside from vibration, and the tiny keys make it easy to mistype.

While there’s no perfect solution to this problem, you can learn some shortcuts and tips to help you type faster on your Android smartphone. Since most people spend a fair amount of the time with their phone typing, learning how to text faster on Android can save a ton of time.

1. Download an Alternate Keyboard

The keyboard that comes with your Android phone isn’t always the best option, especially if you want to type faster. Some default keyboards (like Samsung’s) might make you more prone to make mistakes that the autocorrect feature won’t always catch.

Fortunately, there are a lot of other great Android keyboards to try. Here are some worthy alternatives that can help you learn how to type faster:

  • Gboard: Gboard is one of the most well-known Android keyboards, since it’s made by Google. Not only does it allow for glide typing, voice typing, gesture controls, and seamless multilingual typing, but it also supports emoji predictions.
  • SwiftKey: SwiftKey has been around for a long time, and it boasts highly accurate text prediction and swipe typing. It also offers emoji suggestions and helps you with multi-lingual auto-correction across 300+ languages.
  • Fleksy: Fleksy prides itself on providing powerful text predictions and more natural gesture typing. It’s no wonder that a long-time Fleksy user broke the Guinness World Record for fastest mobile typing.

Personally, I prefer SwiftKey—I find that its autocorrect catches more of my mistakes, and the AI-powered text prediction helps you select words and phrases that you’re actually about to type. If you’re looking for more keyboard options, check out some free and open source Android keyboards.

2. Take Advantage of Swipe Typing

What if you could type without barely lifting a finger? When you take advantage of swipe typing, you can do just that. It’s easy to form words and sentences just by dragging your finger across the keyboard.

Gboard comes with this feature by default. To toggle or adjust it, head to Settings > System > Languages & input > Virtual keyboard > Gboard > Glide typing and adjust the options as needed. Most alternative keyboards support this feature, so you’ll find similar options in its settings.

A line will follow your finger as you type, allowing you to see the path you make. Simply lift your finger when you want to create a space between words. It takes some getting used to, but once you get the hang of it, you’ll find yourself typing even faster.

3. Use Google Voice Typing

If you want to avoid mobile typing altogether, you can enter text quickly by talking into your phone. Android comes with Google Voice Typing pre-installed—this accurate voice-to-text feature comes in handy as long as you can speak clearly into the microphone.

To access it on Gboard, tap the microphone icon on your keyboard. Other keyboards might have a similar key. If not, you can manually switch your keyboard to Google Voice Typing by tapping the Keyboard icon that appears at the bottom-right when typing.

4. Add Text Shortcuts

You can’t learn how to type faster on your phone without utilizing shortcuts. These let you create abbreviations for certain words that easily expand to the full string. When you type an abbreviation, such as “OMW”, the keyboard will recognize this, and you’ll see the expanded “On my way” in Gboard’s text suggestion bar.

In order to create your own shortcut dictionary in Gboard, tap the arrow at the top-left of Gboard to show additional options and hit the Gear icon to open it settings. Then head to Dictionary > Personal Dictionary and select your language. From here, tap the Plus icon in the top-right corner.

Type in the word you want to shorten at the top, then enter your preferred abbreviation in the Shortcut box. You’ll now see this shortcut in your dictionary, allowing you to type long words and phrases quickly. Repeat this as many times as you’d like for additional phrases.

In SwiftKey, you’ll find this option under Rich input > Clipboard > Add a new clip.

5. Master Text Predictions

Most keyboards come with a text prediction feature. Keyboards like SwiftKey and Gboard use AI to learn your typing patterns and most frequently used words.

As you type a sentence, the keyboard will predict what you’re going to type next. These options typically appear in the bar above your keys—tapping one of them will insert that word or phrase directly into your message. You can also take advantage of this to insert the rest of a long word after you type the first few letters.

6. Modify Your Keyboard Layout

Bigger isn’t always better when it comes to phone keyboards. Trying to use a big Android phone with one hand is a challenge, especially when it comes to typing.

You can change your layout settings in SwiftKey to accommodate this. To do so, start by tapping the double-arrow icon at the top-left of the keyboard to reveal the shortcut bar, if you don’t see it already. Next, tap the three-dot button on the right side to show all options.

In the list, select Resize to adjust the keyboard size to your liking. Alternatively, choose One-handed mode to shrink the keyboard and shift it to the left or right side of your screen. Thumb is another great option that places a gap in the middle of your keyboard, making it easier for you to type with your thumb.

Gboard has the same one-handed option, so you’ll want to take advantage of that if you stick with Google’s keyboard. To access this, open Gboard’s settings as described above. Then go to Preferences, tap One-handed mode, and select Right-handed mode or Left-handed mode. You can also use Keyboard height to choose from several different sizes.

7. Practice With Typing Games on Android

No matter what Android keyboard tips you use, your own typing speed might be a bottleneck. Here are some great Android games you can play to practice typing and have fun simultaneously:

  • ZType: ZType is a fun action game that helps you improve your typing skills. Each letter you type shoots off a plasma bullet into the enemy’s ships, so you need to type really fast!
  • Typing Master: Typing Master features words engraved on bricks that fall down from the top in the style of Tetris. Your aim is to type those words quickly and accurately before the brick hits the ground.

If you’re unskilled with a keyboard in general, visit some other great websites that help you master typing in a fun way.

How to Text Faster on Android Today

Hopefully, you’ll take advantage of these tips to learn how to type faster on your mobile device. Whether you use Gboard, SwiftKey, or another third-party keyboard app, typing on Android becomes a lot quicker once you master these tricks.

For even more options to help you enter text more efficiently, you might want to consider using these Android apps for easy speech-to-text dictation.

Read the full article: 7 Tips for Typing Faster on Your Android Phone


Read Full Article

6 Reasons Why You Should Upgrade Your PC Motherboard


upgrade-mainboard

When your PC is getting slow and it’s time to upgrade it, you might wonder: Should I upgrade my motherboard? It is an essential component of your system, but it’s not always easy to know when you should upgrade your motherboard. Replacing the motherboard can be expensive, but it can also bring you benefits in terms of speed, hardware support, and better graphics support.

We’ll explain some reasons why you should upgrade your motherboard and some considerations to keep in mind when you do.

1. For Faster CPUs

If your CPU is rather new, the performance gains that come from upgrading to a newer one are going to be fairly minimal. If you have a processor that’s three or more years old, however, you’re going to notice massive gains jumping to a newer processor.

But to do that, you’ll need a motherboard that supports the upgrade.

On another note, if you’re upgrading for the sake of gaming, save your money and upgrade your graphics card instead. Most modern games lean more heavily on your GPU than your CPU.

2. For Faster RAM

Making the upgrade to newer iterations of RAM requires a motherboard that will support those new RAM modules. If you’re currently using DDR3, for example, you can’t make the jump to DDR4 or the newer DDR5 without swapping out the motherboard and the CPU first.

The performance increase between iterations of RAM, however, isn’t all that mind-blowing. If speed is the sole reason for the upgrade, rethink where you’re spending your money.

3. For Better Graphics Cards

All of the above reasons are good, but in my opinion, this is the single greatest reason to upgrade your motherboard.

If you’re a gamer or video editor, a new CPU/motherboard combination and a higher-performance GPU will make your PC feel like an entirely different machine. Games will run faster and with less lag, all while letting you increase the in-game settings to run at more graphically-intense levels than your previous card. (Depending on when you last upgraded, that is.)

If you’re not a gamer, and you’re more of a casual internet user, the best bang for your buck is going to be a RAM or SSD upgrade, and you can skip GPU upgrades altogether.

4. For Faster Data Transfers

Making the upgrade to SATA III or USB 3.0 increases the transfer speed of data from one piece of hardware to another. For example, SATA III has a maximum rated speed of 6Gbps and USB 3.0 tops out at 5Gbps. Both are fast enough for simple file and data transfers, but the highest-end SSDs top out around 2Gbps in terms of transfer speed. Most don’t even hit that mark.

There are other considerations at play, such as SATA III being faster than USB 3.0 due to drive options like native queuing, and USB 3.0’s disadvantage of being a shared bus.

But the reality of the matter is that while both are fast enough for what you’ll need them to do, neither will hit their max speeds. You’ll probably have to upgrade your motherboard on an older system in order to use them.

It’s not all sunshine and rainbows in upgrade land, however. For those of you that don’t have a lot of experience in building your own PCs and don’t typically catch on to written tutorials all that quickly, you may be spending additional cash to fix novice mistakes.

5. You Have Damaged Parts

Damaged motherboards are an infrequent but huge problem. Snapped pins, disconnected plugs, static electricity discharge, and other issues will all lead you back to the repair shop to buy new plugs, or, hopefully, to get a professional installation.

Same thing goes for fire damage, smoke damage, water damage, and even physical trauma from impact.

Remember, the CPU/motherboard upgrade is one of the most expensive upgrades you can make to your existing PC.

If you aren’t confident in your ability to match up parts or to correctly piece everything together once you’re in the midst of your build, it’s always going to be best to opt for a professional installation rather than the cost of replacing damaged hardware.

6. You Want New Features

Finally, you might not think about motherboards as things which come with exciting features. But there are technological developments in the world of motherboards. And you may want to upgrade to take advantage of these.

For example, you might want to use an M.2 SSD. This is a very small format SSD which screws directly into your motherboard. But you’ll need a motherboard which supports M.2 drives for this to work. Or perhaps you want a computer which supports fast transfers via Thunderbolt 3, in which case you’ll need a motherboard with Thunderbolt 3 connectivity.

Finally, if you’re looking to squeeze a bit more performance from your system, or you’re just looking to learn, you might want to try overclocking your CPU. To do this, you’ll need not only an overclockable CPU, but also a motherboard which supports overclocking.

Beware of Issues With Compatibility

To facilitate an upgrade, you’ll need to match up your new hardware to your existing hardware — or you can go buy a set of all new equipment.

The most crucial bit is that the motherboard and CPU must match. More specifically, the motherboard CPU socket needs to match that of the CPU’s socket. For example, if the motherboard supports LGA 1150, your CPU must support that as well.

There are other considerations too, such as BIOS compatibility, TDP support, and the number of SATA ports. You can use online sites like PC Part Picker, which is an invaluable resource for first-time PC builders, to check whether your parts are compatible with each other.

Choosing the Right RAM

Remember that the option of DDR3, DDR4 and the emergence of DDR5 RAM means that you’ll have to take extra caution to ensure that your motherboard/CPU combo is capable of handling the specified memory you select. If it’s not, you’ll need to upgrade. Unfortunately, there isn’t a workaround for this one, but you can write it off as a learning experience.

The RAM’s frequencies and voltage must also match up to the motherboard’s desired range. 1,333, 1,600, 1,866, 2,133 and 2,400MHz with voltages of 1.65v should match up equally to the stated range of the motherboard.

Meaning, if you have 2,400MHz RAM and use it with a 2,133MHz CPU at 1.65v, you could run into compatibility issues that could be detrimental to performance or lead to machine failure.

Watch Out for Bottlenecks When Upgrading Your Motherboard

Remember, the motherboard connects to the CPU, RAM, HDD, GPU, and other hardware, so it’s not only important to ensure compatibility, but also that you aren’t experiencing a bottleneck in the system somewhere.

No matter how fast your CPU/motherboard combination is, it’s still reliant on existing adapter cards that control video, storage, and processing speed (as it relates to RAM). If any of these items are on their last legs, incompatible, or lagging behind in performance, your entire machine can slow to a crawl with or without the new CPU/motherboard combo.

To learn more about how to avoid bottlenecks, see our guide to how to pick the right components for building your next PC.

Read the full article: 6 Reasons Why You Should Upgrade Your PC Motherboard


Read Full Article

How to Use Your iPhone as a Webcam: A Step-by-Step Guide


Did you know it’s possible to use your iPhone as a webcam? Of course, it’s can’t quite mimic a webcam in the traditional sense. You can’t plug your iPhone into a computer’s USB port and expect it to work right away. But you can use apps to recreate the webcam experience.

Our favorite app for this purpose is EpocCam. Let’s look at how to use EpocCam to make your iPhone act like a webcam. We’ll also introduce you to a couple of EpocCam alternatives.

What Is EpocCam?

EpocCam can turn your iOS device (iPhone or iPad) into a webcam for both Windows and Mac computers. There’s also an Android version that offers the same functionality. The developer claims the app can completely replace traditional USB webcams and integrated webcams.

The app supports both video and audio and is compatible with many of the leading video player apps, including Skype, Streamlabs OBS, and YouTube. It doesn’t matter whether you want to chat with your family, stream games to your followers, or engage in video conference calls with your colleagues—EpocCam is up to the task.

EpocCam Free vs. EpocCam Pro

EpocCam offers a free and a paid version. The free version provides 640×480 video resolution, USB support (if used with macOS), the ability to use your device’s front and rear cameras as the webcam input, and Wi-Fi connectivity. When using the free edition, you must accept watermarks on your videos as well as in-app ads.

The Pro version removes ads and the watermark. However, it’s only worth considering if you have a Mac. Many of the pro features are only available to users of Apple’s desktop operating system. Pro features include pinch-to-zoom, manual focus, flashlight support, HDR video, dual-camera, and dim-screen (also called “spycam”).

The other major benefit of using the paid version is the increased video resolution. It jumps from 640×480 to 1920×1080.

Download: EpocCam for iOS (Free)
Download: EpocCam Pro for iOS ($7.99)

How to Use Your iPhone as a Webcam With EpocCam

Let’s take a quick look at how to set up EpocCam on your iOS and macOS or Windows devices.

Install EpocCam on macOS or Windows

The EpocCam software comes in two parts—an app for your mobile device and the drivers for your computer.

Although you can view your iPhone’s camera output on your Mac using nothing more than the EpocCam Webcam Viewer (available for free in the Mac App Store), we recommend installing the drivers. They allow EpocCam to integrate with Skype, Zoom, and any other video chat tool you use. The Webcam Viewer only allows you to see your phone’s video output; it offers no integration with other services.

The EpocCam Mac drivers (as well as drivers for Windows) are available for free on the developer’s website, kinoni.com. Download and install them on your computer before moving on.

(Note: It’s a good idea to restart your machine after installing any new drivers.)

Set Up EpocCam on iPhone or iPad

epoccam ios connection screen

Once you’ve downloaded and installed the mobile version of EpocCam on your iOS device, it’s easy to connect it to a Mac. Just make sure your iOS and macOS devices are on the same Wi-Fi network, then open the EpocCam app on your phone. You’ll see a black screen with a phone icon.

Now head back to your Mac and open an app that EpocCam supports. If you only want to test the connection, open the EpocCam Webcam Viewer app mentioned earlier. As soon as the phone app detects a supported app running on your Mac, it will make an instant connection and display a broadcasting image.

Make sure you set the video input method to EpocCam on the chat app you’re using the webcam with.

EpocCam Alternatives

If you’re not satisfied with EpocCam, there are a few other apps that allow you to use your iPhone as a webcam.

1. iCam

iCam is a paid app that can turn an iPhone into a webcam. The mobile app is just one part of the equation; like EpocCam, you’ll also need the iCamSource component on your computer. Once you have both apps installed, you can stream live video and audio from any iOS device.

iCam also works as a security camera; it can send you instant alerts if it detects motion or sound. All motion events are automatically backed up to the cloud. In addition to the original iCam, the company also offers iCam Pro with some additional features. Check out the iCam Feature Comparison to learn more.

Download: iCam for iOS ($4.99, in-app purchases available)
Download: iCam Pro for iOS (Free, in-app purchases available)
Download: iCamSource for Windows | macOS (Free)

2. iVCam

iVCam is specifically designed for iPhone owners who have a Windows PC—you cannot use iVCam to stream your iPhone’s video output to a Mac.

The app works via WLAN or USB and allows you to connect multiple phones to one computer at the same time. You can stream video in 1080p, 720p, 480p, or 360p resolution. This multi-connection aspect means the software is ideal for anyone who wants to use their old iPhone as a CCTV device, a baby monitor, or a pet cam.

Download: iVCam (Free, premium version available)

3. AtHome Camera

AtHome Camera is unique. In addition to letting a a computer remotely view your iPhone’s camera feed, the iPhone app can also remotely view your computer’s webcam feed. It supports both Windows and Mac.

Some of the app’s key features include:

  • Two-way talk: Whether you’re using the streamer app or the viewer app, you can talk to any connected device and hear the audio from that device.
  • Motion detection: You’ll get an instant notification if there is movement on your camera.
  • Scheduled recording: If you want to monitor your camera at certain times of the day—perhaps while you’re at work—you can pre-program the app to do this.

The app is ad-supported and comes with options to upgrade for a premium fee. As with the others, try before you buy to see if it works for you.

Download: AtHome Camera (Free, in-app purchases available)

Other Ways to Use Your iPhone Camera

It’s fairly easy to use your iPhone as a webcam. But that’s not the only way get can more out of your iPhone’s camera hardware.

To learn more, check out the best iPhone camera tricks and iPhone camera settings you should tweak to take better photos.

Read the full article: How to Use Your iPhone as a Webcam: A Step-by-Step Guide


Read Full Article

Thermometer


Thermometer

The galactic recipe for a living planet | Karin Öberg

The galactic recipe for a living planet | Karin Öberg

Did you know that one of the most notorious poisons is also a key ingredient for life as we know it? Join space chemist Karin Öberg and learn how she scans the universe in search of this paradoxical chemical using ALMA, the world's largest radio telescope, to detect hotbeds of molecular activity and the formation of life-sustaining planets.

Click the above link to download the TED talk.