04 March 2020

How to Turn On AirDrop on Your Mac and iPhone to Share Files


airdrop

Looking to transfer files between two different Apple devices? Find out how to turn on AirDrop for your iPhone or Mac to send photos, documents, locations, websites, and more to anyone you want.

Unlock the free "Most Useful Mac Keyboard Shortcuts" cheat sheet now!

This will sign you up to our newsletter

Enter your Email

If you’ve never used AirDrop before, it’s the quickest and easiest way to transfer files from one Apple device to another. Here’s all you need to know to start using it.

How Does AirDrop Work?

AirDrop uses a combination of Wi-Fi and Bluetooth to create a wireless connection between two devices. You can use this connection to transfer files of almost any size at lightning-fast speeds.

What’s more, every file you transfer is fully encrypted. So you don’t need to worry about your privacy, even when using AirDrop on a public network. You can send files to anyone within Wi-Fi and Bluetooth range (usually around 30 feet) and it doesn’t even matter if you have them as a contact or not.

In the next two sections, we’ll explain how to use AirDrop on a Mac and on an iPhone.

How to Use AirDrop on a Mac
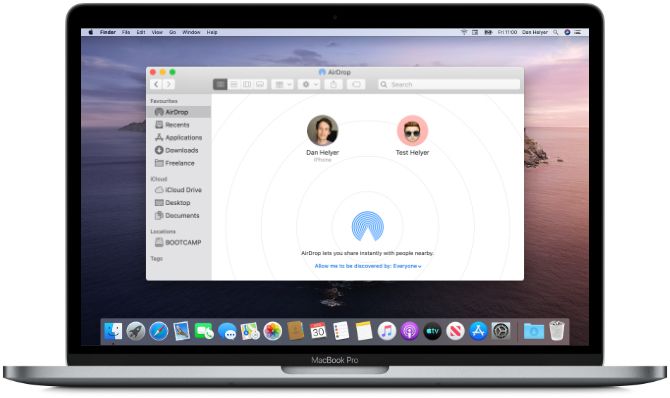
AirDrop in Finder on a Mac

AirDrop works with every Mac released after 2012 (excluding the 2012 Mac Pro), as long as it’s running OS X Yosemite or later. To check these details for your Mac, open the Apple menu at the top-left and select About This Mac.

If your Mac is compatible—most of them are—follow the steps below to turn on AirDrop and start transferring files to other Macs or iPhones.

How to Turn On AirDrop on a Mac

First, make sure both Wi-Fi and Bluetooth are turned on. This must be the case for your Mac as well as the device you want to AirDrop files to.

To turn on Wi-Fi, click the Wi-Fi icon in the menu bar and connect to a network. For Bluetooth, go to System Preferences > Bluetooth and click Turn Bluetooth On.

Turn Bluetooth On button from Mac System Preferences

You also need to make sure your Mac is visible to anyone who wants to AirDrop files. To do this, open a new Finder window and select AirDrop from the sidebar. If you can’t see it, select Go > AirDrop from the menu bar instead.

At the bottom of the AirDrop window, open the dropdown menu where it says Allow me to be discovered by: and choose Contacts Only or Everyone.
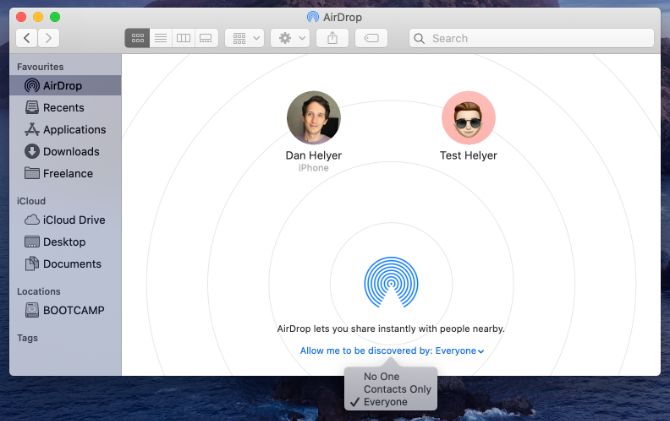
AirDrop in Finder on Mac with Everyone visibility option

Even if you choose Everyone, no one can AirDrop files to your Mac without your permission first.

How to Transfer Files From a Mac Using the Share Button

The quickest way to AirDrop files from your Mac is to look for a Share button in your current app. Most apps let you choose AirDrop as a method to share files. Thus, you should be able to transfer what you’re working on without changing apps.

AirDrop option in Share menu from Photos app

After selecting AirDrop from the Share menu, a window appears with every other Mac or iPhone you can transfer files to. Sometimes it takes a moment for other devices to appear, so be patient.

AirDrop contact options from Photos app Share Sheet

If the device you want to AirDrop files to doesn’t show up, make sure AirDrop is turned on for that device as well as your own.

How to Transfer Files From a Mac Using Finder

If there isn’t a Share button in your current app—or if it doesn’t give AirDrop as a sharing option—you can use Finder to transfer files over AirDrop instead.

Open a Finder window and click AirDrop in the sidebar, or select Go > AirDrop from the menu bar. After a moment, you should see the people or devices available for you to AirDrop files to.

Drag and Drop for AirDrop in Finder

Open a second Finder window and navigate to the file you want to transfer. Now drag and drop it onto the device you want to send it to in the AirDrop window.

How to Receive AirDrop Files on a Mac

When you AirDrop files to someone, they get the chance to accept or decline them before the transfer starts. Similarly, if someone else AirDrops a file to your Mac, you need to click Accept in the notification that appears.

AirDrop transfer request on Mac

You should see this notification appear in the top-right corner of your Mac. After clicking Accept, you can choose where to save the file. If you didn’t see this option and you’re wondering where AirDrop files go on your Mac, take a look in the Downloads folder.

If someone is trying to AirDrop a file to your Mac but can’t find you, make sure you’ve turned on AirDrop first.

How to Use AirDrop on an iPhone
You can use Airdrop on any iPhone, iPad, or iPod touch running iOS 7 or later. The method for each device is exactly the same.

To use AirDrop on your iPhone, you first need to turn off Personal Hotspot. Go to Settings > Personal Hotspot and turn off the option to Allow Others to Join.

How to Turn On AirDrop on an iPhone

Just like with a Mac, you need to turn on Wi-Fi and Bluetooth to use AirDrop on your iPhone. The same goes for the device you want to transfer files to.

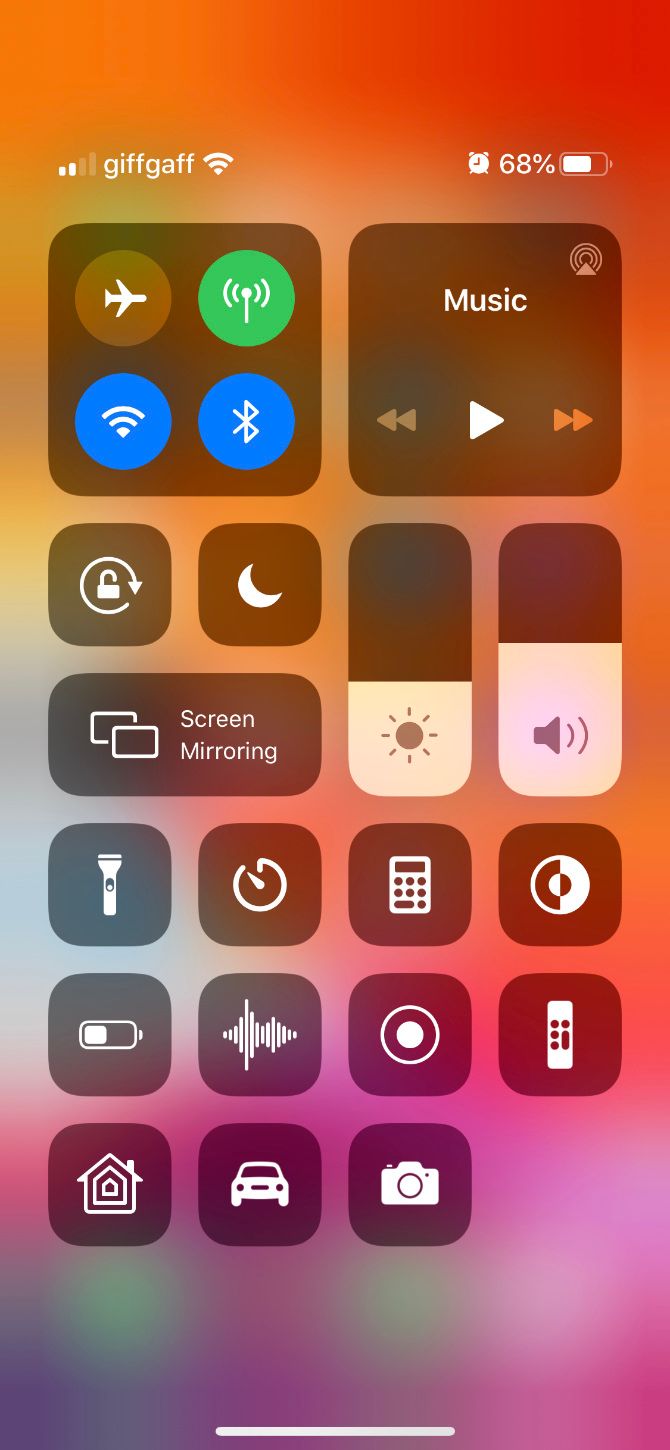
Swipe down from the top-right corner to open Control Center (or swipe up from the bottom on iPhone 8 and earlier), then tap the Wi-Fi and Bluetooth icons to turn them on.

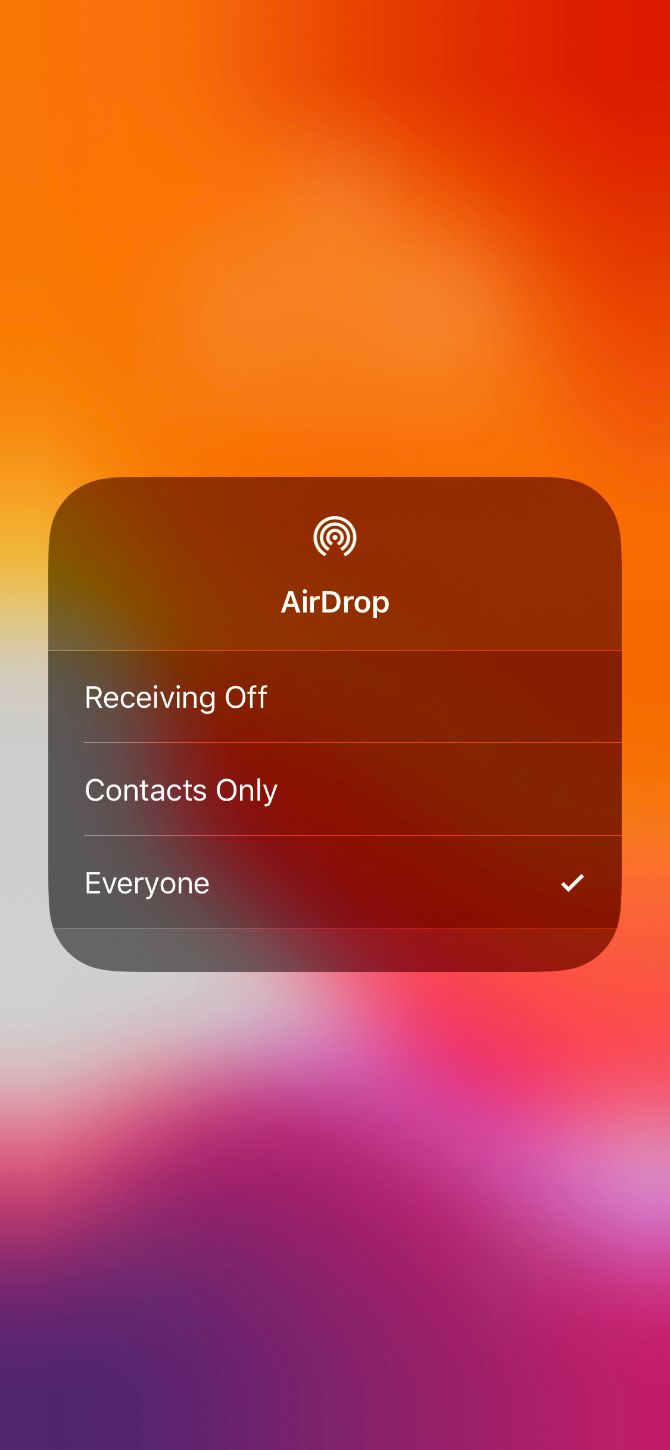
To choose who can find you using AirDrop, press and hold on the network settings in the top-left section of Control Center to reveal more options. Then tap AirDrop and choose Contacts Only or Everyone.
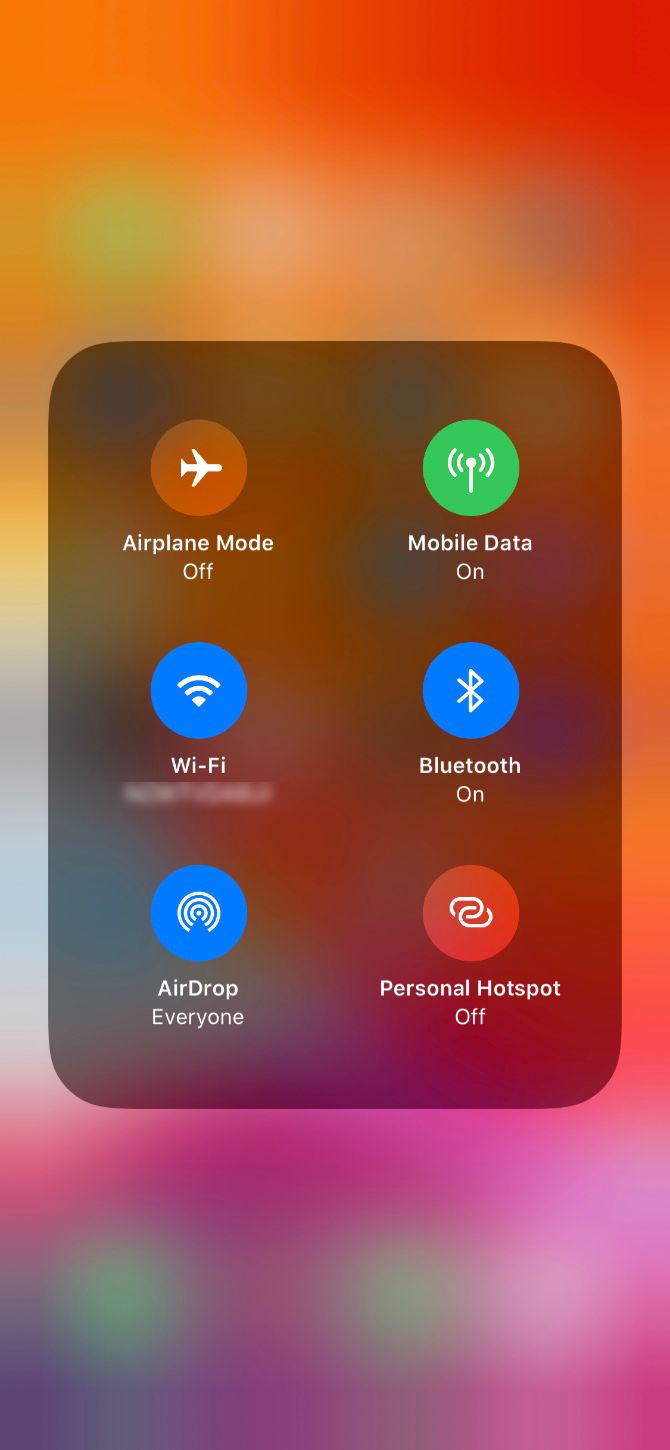
Selecting Everyone is still safe, since you need to accept transfers before anyone can AirDrop files to your iPhone. However, you might want to choose Contacts Only to avoid NSFW AirDrop attempts while you’re out and about.

How to Transfer Files From an iPhone

The only way to Airdrop files from your iPhone is using the Share button inside a particular app. It doesn’t matter if you want to use AirDrop to transfer files to a Mac or to another iPhone—the method is the same.

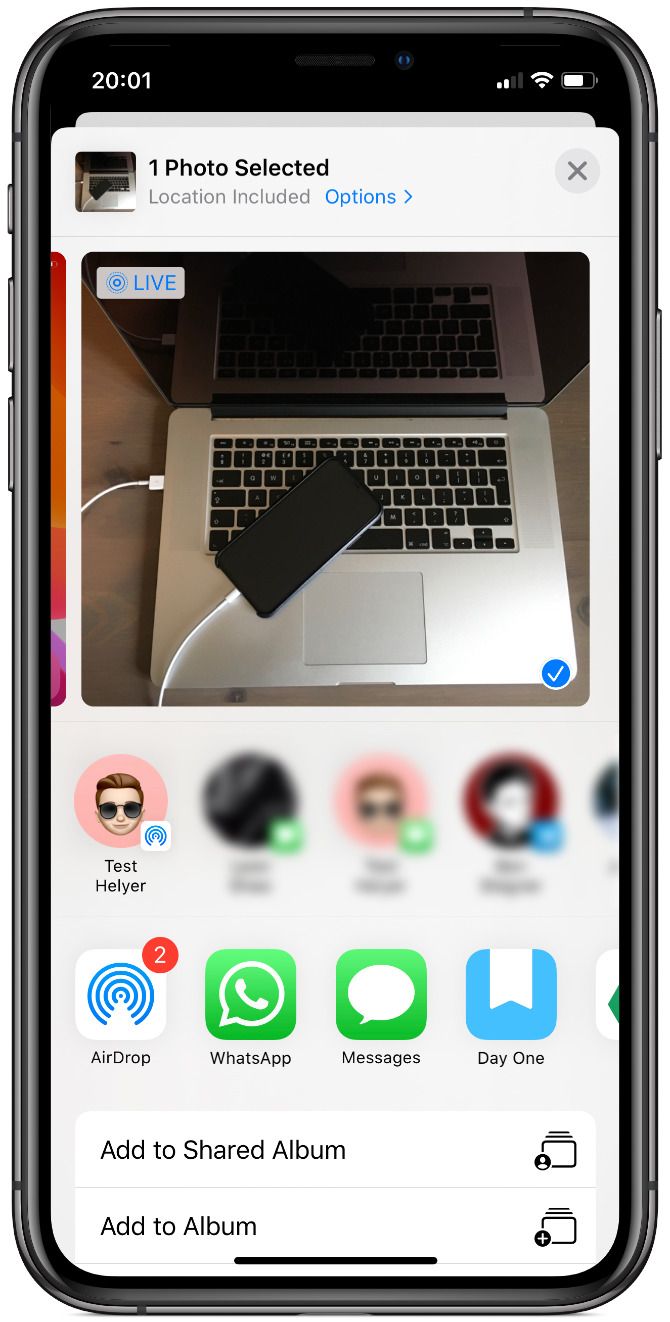
Open the photo, website, note, or whatever document you want to send using AirDrop and look for a Share icon in the app. After you hit Share, you should see AirDrop appear in the second row of the Share Sheet.

iPhone Share Sheet with AirDrop option

Tap AirDrop and wait for other devices to appear. Then simply tap the person, iPhone, or Mac you want to AirDrop that file to and the transfer should begin.

If you want to transfer a file or a document, follow this same process using the Files app. You may need to tap and hold on a particular file to reveal the Share button.

How to Receive AirDrop Files on an iPhone

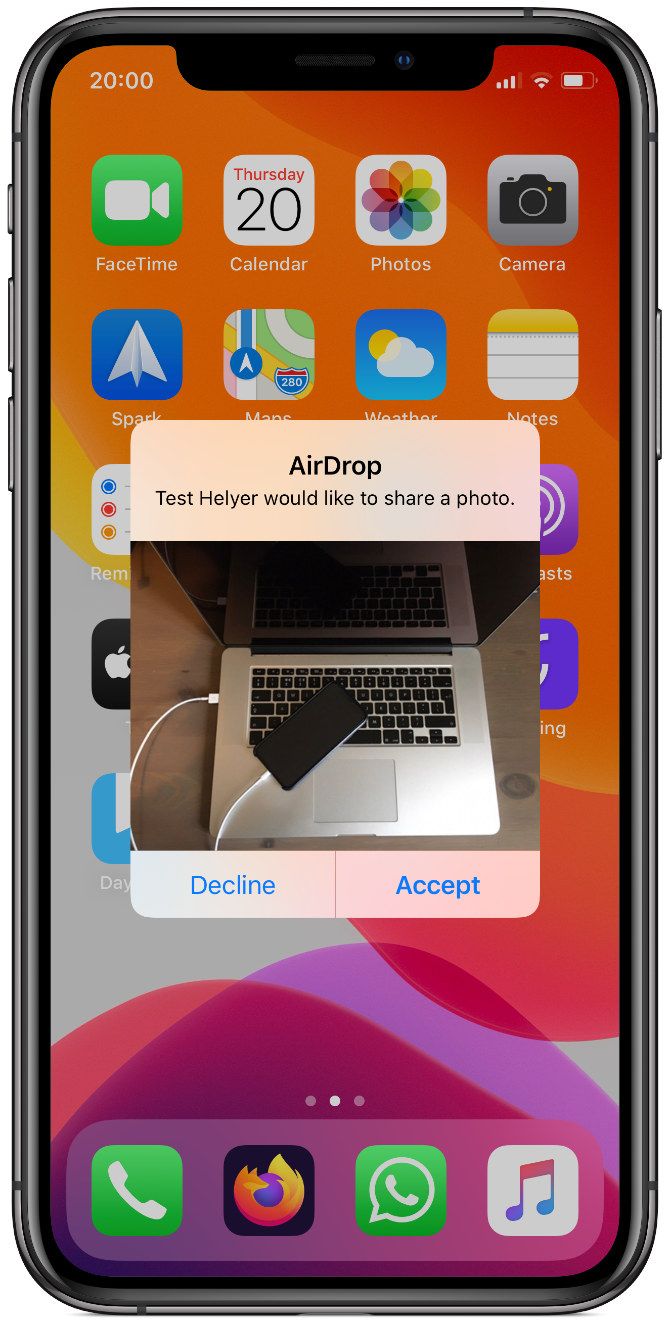
If someone else tries to send you a file, you should see an AirDrop notification appear on your iPhone. This notification usually shows a preview of the file and gives you the option to accept or decline the transfer. If your device is locked, you should find the notification on the lock screen instead.

AirDrop notification on iPhone lock screen

When you tap Accept, AirDrop asks which app to open the file with on your iPhone. Exactly where that AirDrop file goes depends on what kind of file it is. For example, a photo should save to your Photos app, while a note should save to the Notes app.

If you can’t find a particular AirDrop file, take a look in the Files app.

Troubleshooting AirDrop Problems

If you’re having trouble finding your intended recipient in AirDrop, make sure they’ve turned AirDrop on from their own device. You should also ensure both devices are powered on, unlocked, and in range of one another.

If you’re still having problems, try our AirDrop troubleshooting steps.

Transfer Files Between All Your Devices

By now, you should be acquainted with the speed of transferring files via AirDrop. It’s easy to turn on and use AirDrop from an iPhone or a Mac, but it won’t be long until you need to transfer files to other devices as well.

That’s no problem. There are plenty of options for transferring files from your iPhone to an Android device, or from your Mac to a Windows PC. Take a look at the fastest file transfer methods to use between any devices to get started.

Read the full article: How to Turn On AirDrop on Your Mac and iPhone to Share Files


Read Full Article

Can I Reuse My Old PC’s Power Supply in a New Computer?


One of the best ways to reduce the cost of upgrading your PC is to re-use some old components. You can retain some parts, like the sound card, DVD drive, and particularly the power supply unit (PSU).

In the case of the PSU, this could save you up to $150. While the graphics card, CPU, motherboard, and RAM might need upgrading, the PSU doesn’t.

But is your old PSU truly reusable? Can you use an old power supply for a new computer? Let’s find out if will be reliable and have the power required.

Finding and Removing Your PC’s Power Supply Unit

Desktop PCs, whether tower (vertical) or horizontal, will have the power supply unit on the reverse. Alongside all other cables for sound and USB devices, you’ll find the power cable connected. This will be accompanied by a standard on-off rocker switch and an outlet fan for cooling.

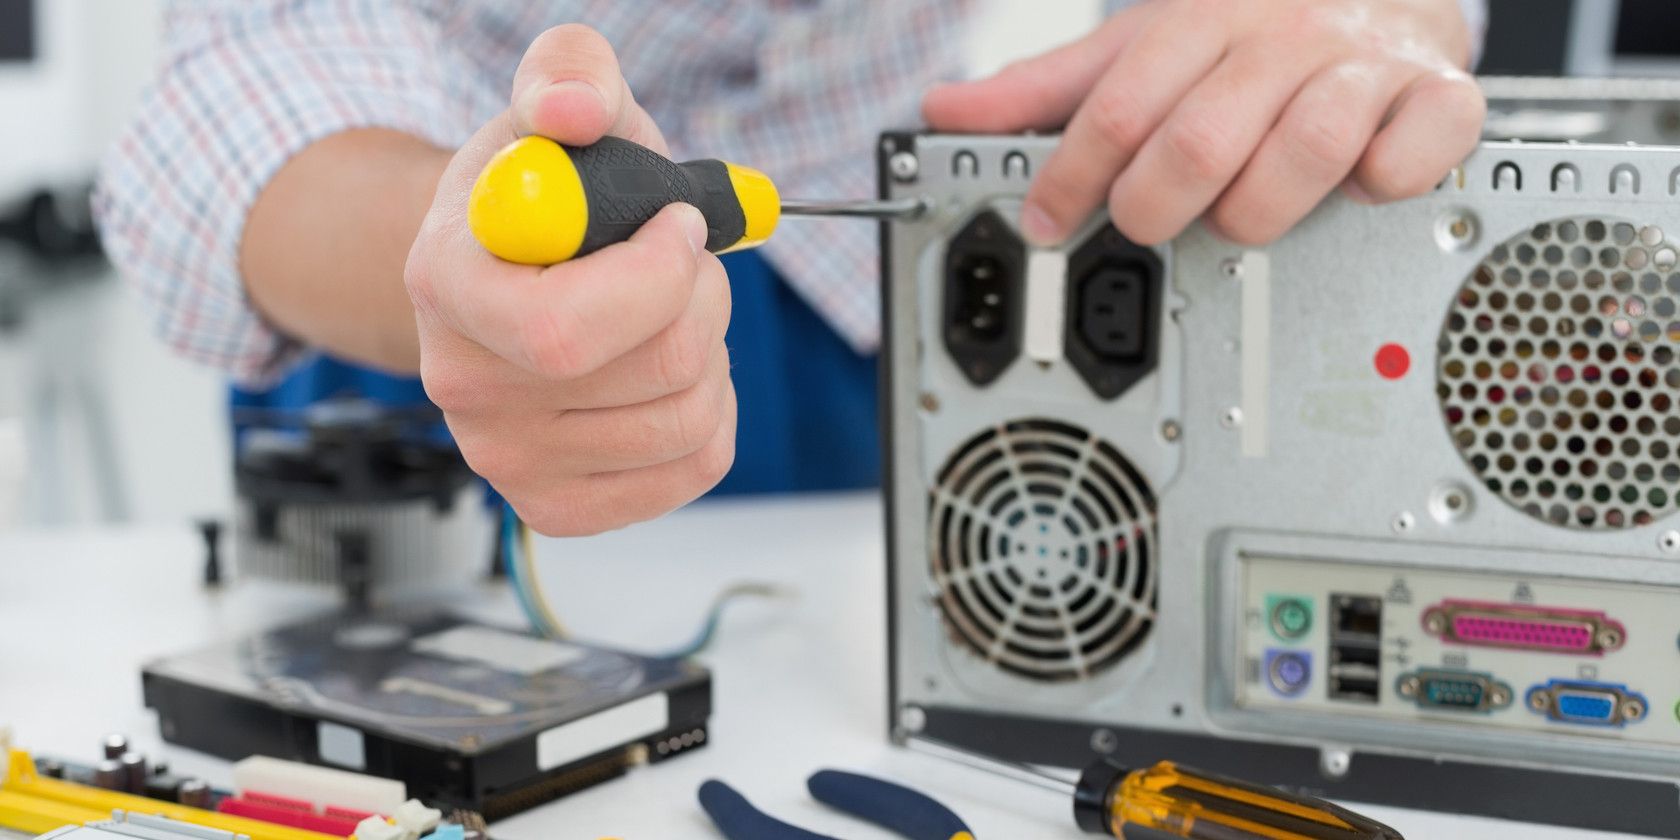
The old PSU will be found on the back of the PC

Now you know where the PSU is on the back of your PC. But what about on the inside?

Before proceeding, ensure the PC is shutdown and the PSU disconnected from the mains. You should also take anti-static precautions to maintain the integrity of your hardware.

If you remove the case, you should see the PSU, or at least work out its position. But it might be difficult to physically reach. This will typically be down to the next of wires, but it might also be due to the position of the DVD drive, or even the CPU fan and RAM.

To remove the PSU, safely remove the power cables to the motherboard, CPU, disk drives, and other components. Bundle these over the side of the case, briefly securing with a cable tie.

Next, remove the PSU’s securing screws on the back of the case. Save these for later, then pull the PSU out of the PC case.

You should always remove the PSU from the case first when dismantling a PC.

Understanding Your Power Supply

While the specs of your computer system can be analyzed with benchmarking tools the PSU is different. To learn more about it, you’ll need to look at the device.

You should have noticed that the PSU features a label listing its maximum output and other information. While the labels differ depending on model and manufacturer, there should be a section describing maximum load or output.

All PSUs feature a label of specifications

That is the total amount of power that the supply can handle overall. You can use that figure and compare it to what’s recommended for the new hardware you’d like to purchase.

Most PSUs also feature a section describing output for each type of voltage. That’s the list +5V, +3.3V, +12V and etc. Each value is shown alongside an amp rating. Pay close attention to the 12V value (aka rail). The graphics card, which is often among the most power-hungry components in a system, draws power from it.

To run a moderately powerful graphics card, look for a PSU with around 30A on the 12V rail.

If the maximum wattage and 12V rail are enough for the components you’re installing you should have no problems.

Will the Old Power Supply Remain Reliable?

Some manufacturers are reliable and make power supplies that perform up to or even beyond their specifications. Others are more concerned with shifting units. To find out more, find your PSU’s brand (listed on the label) and check its reputation online. No brand? Maybe time to buy a new PSU.

Bad things can happen with poorly manufactured power supplies. A PSU labelled 750-watt might struggle to supply over 500 watts. Some supplies will even smoke and burn when they fail.

While old power supplies might still work, it could be because your old PC hardware didn’t need too much power.

Upgrading the CPU, motherboard, and graphics card could change that.

A supply that fails can, in the worst case, take out other components in your PC or even catch fire. Upgrading to a reliable drive from a company like Antec, Corsair or Cooler Master is often the better choice.

Connect an Old Power Supply to a New Motherboard

After confirming the capability and capacity of your old PSU, make some checks:

  • Dust the PSU down—you might need a vacuum cleaner to draw dust out from the fan.
  • Ensure cables are all in good condition with no splits in the insulation.
  • Confirm the plugs are not cracked or broken.
  • Compare the plugs on the PSU with the motherboard and other new components you’re planning to upgrade.

(As some connectors are omitted on old power supplies, this could prevent using an old PSU in your “new” computer.)

While modern motherboards accept a 24-pin primary power connection, some old PSUs will only have a 20-pin plug available. Fortunately, these are rare—while the 20-pin plug might work, it is best avoided. If there is also a 4-pin (two by two) connector you should be okay. This will probably feature a slot to fix to the 20-pin strip.

Current computers require more power than a 20-pin supply can deliver. Relying on such a PSU is likely to result in power failures, which can cause issues with the operating system. This can also impact the integrity of valuable personal data stored on your hard disk drive (HDD).

Some motherboards require an 8-pin (two rows of four) secondary connection for the CPU. A CPU will often run without with just a 4-pin connection, but it may be unstable in certain situations. A Molex to 8-pin ATX adapter usually resolves any problems that might occur, such as from overclocking.

2 Pack 4-Pin Female to 8-Pin Male ATX 2 Pack 4-Pin Female to 8-Pin Male ATX Buy Now On Amazon $7.19

Connecting Modern PC Components to an Old Power Supply

It isn’t just the motherboard you’ll need to connect to the old PSU. Graphics cards and storage devices need power and there’s a good chance you’ll need some adaptors for compatibility.

Video cards were once content drawing power straight from a motherboard. While most motherboards feature integrated video output, gaming requires discrete graphics cards.

While prices (and power) vary, even inexpensive cards usually need a dedicated 6-pin PCI Express power connection. Some even need two 6-pins or an 8-pin. You’ll often be able to power the card using multiple Molex connections with an adapter.

Cable Matters 2-Pack 8-Pin PCIe to Molex Cable Matters 2-Pack 8-Pin PCIe to Molex Buy Now On Amazon $7.49

Some video cards might come with these adapters in the box. But note that more powerful cards may not work with this solution.

When it comes to HDDs and Solid-State Drives (SSDs), you may find the old PSU lacks SATA power connectors. Again, an adapter can be used, this time a Molex to SATA adapter.

3-Pack 4 Pin Molex to SATA Power Cable 3-Pack 4 Pin Molex to SATA Power Cable Buy Now On Amazon $6.99

What If You Can’t Use Your Old PSU?

Hopefully you’ll find that you can use your old power supply and save yourself a few bucks. Just make sure it’s up to scratch, take some time to clean it, and ensure the cables aren’t worn. Check the voltage rating to ensure it’s suitable for your new PC build.

If not, it’s time to replace your old power supply.

You’ll find the choice of replacement power supply units is considerable. To help, check our guide to buying a new PSU before you commit to spending.\

Image credit: Wavebreakmedia/Depositphotos

Read the full article: Can I Reuse My Old PC’s Power Supply in a New Computer?


Read Full Article

Google Authenticator Codes Stopped Working? Try This Quick Fix


google-authenticator-alternatives

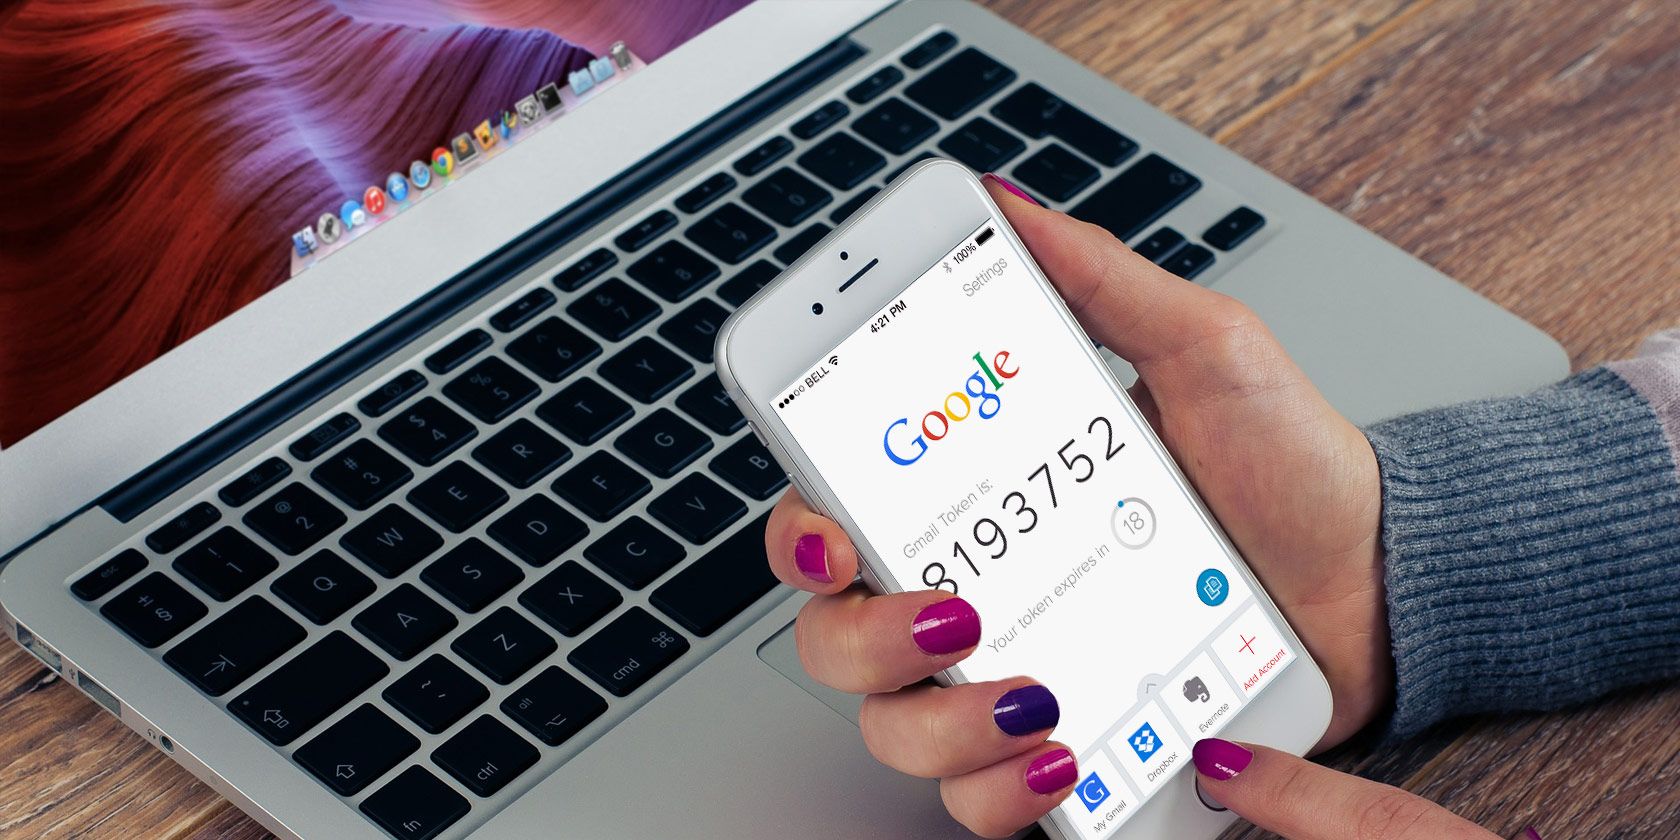
With phishing scammers constantly coming up with creative ways to fool Gmail users into revealing their passwords, two-factor authentication is an important step to keeping your account safe. But if your Google Authenticator codes suddenly stop working, it might be related to a problem on your phone.

Mobile users might find that their Google Authenticator codes aren’t working when logging into their accounts. And strangely enough, the problem may actually have to do with Google Authenticator’s time settings.

How to Fix Google Authenticator

If Google Authenticator app is not working, either on Android or iPhone, there may be a problem with the time sync. Fortunately it’s easy to fix this if Google Authenticator has stopped working.

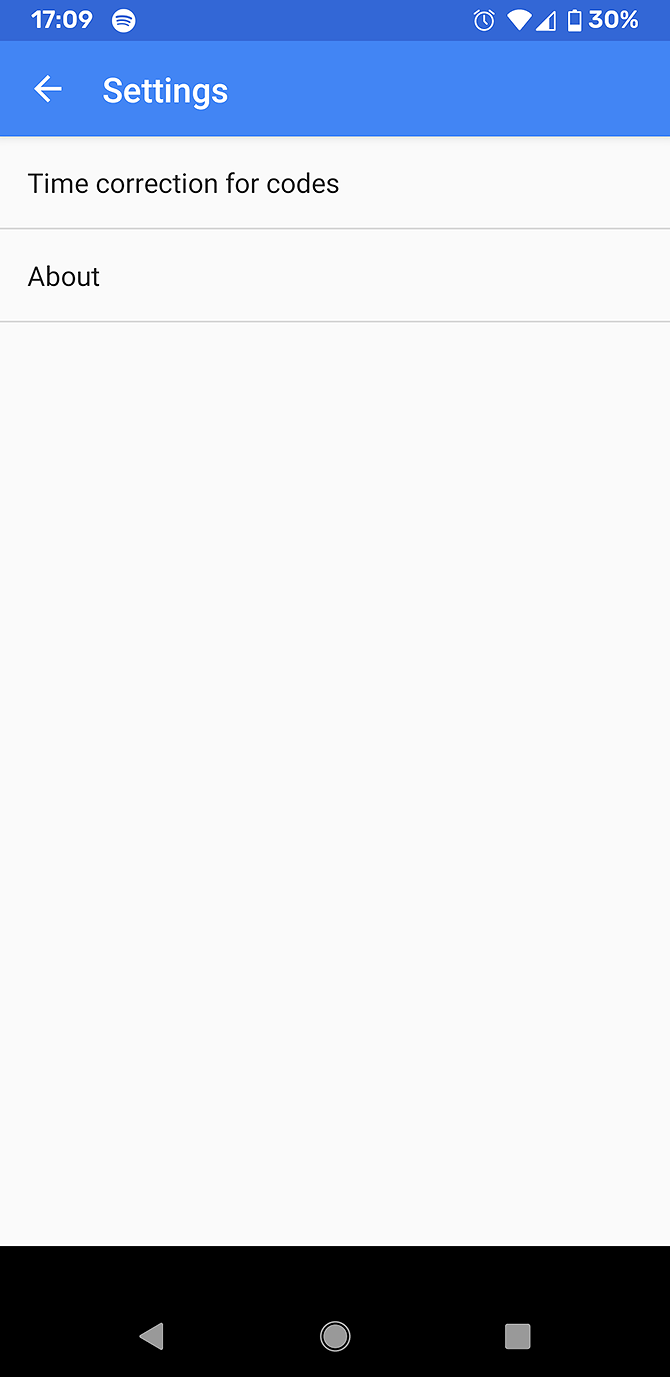
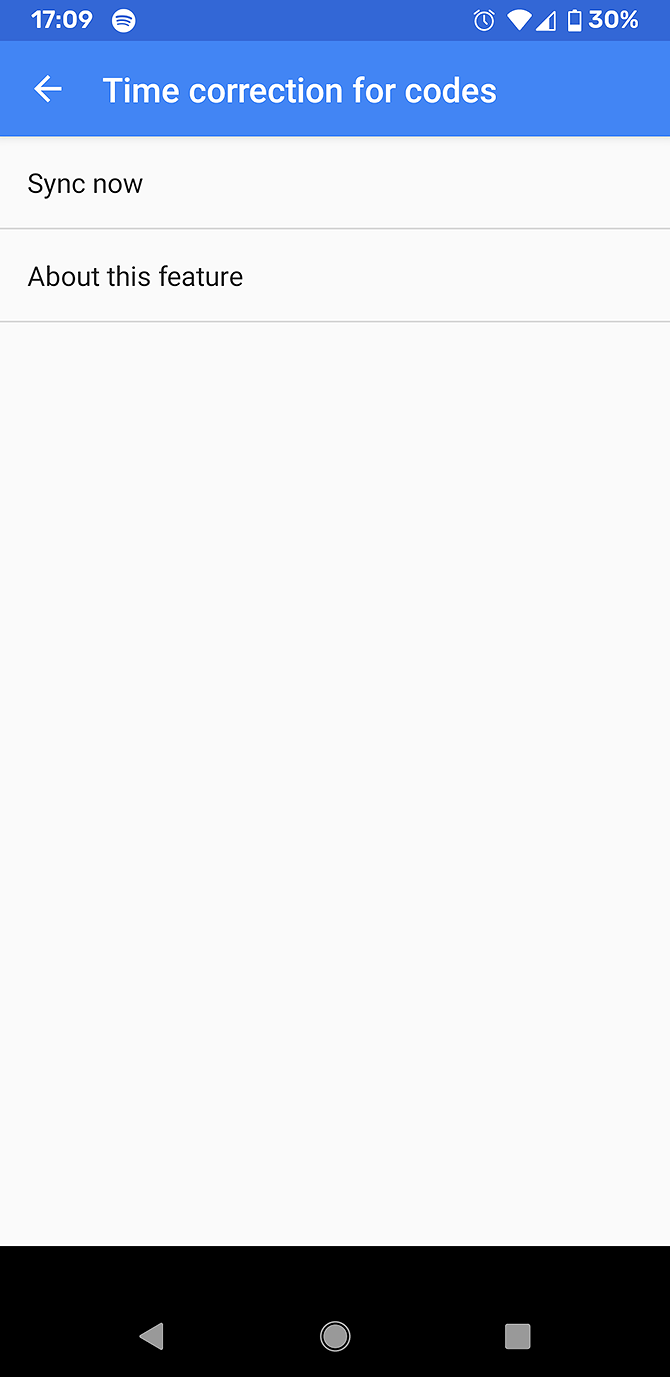
All you have to do is make sure your Google Authenticator app’s time is synced correctly. Launch the app, tap the Menu button (three dots), and go to Settings > Time Correction for Codes > Sync now.

You should find that your Authenticator codes work properly after this. Syncing the time in the Google Authenticator app won’t affect the time setting on your phone.

Install Google Authenticator on Multiple Devices

google-authenticator-alternatives

You might be concerned about relying on just one device as your authenticator. For example, you may lose your primary device. Or its battery may run out when you need it. Or it could be inaccessible when you travel for some reason. There are many reasons for Google Authenticator not working.

In these cases, one option is to install Google Authenticator on multiple devices. If you have an old phone that you no longer use, you can use that. Or you could install the app on your tablet as well as your phone.

Setting up two devices with Google Authenticator is actually quite simple. Firstly, install the app from the Play Store on both devices. Now, navigate to the page for setting up two-factor authentication. You will see a QR code.

Use this QR code first on your primary device, then on your secondary device. Enter the numeric code from either device to confirm it works. Now, both devices will show the same numeric codes for logging in. If your primary device isn’t available, you can use your secondary device instead. If you do this, remember that you’ll need to keep your secondary device somewhere safe.

Alternatively, if you have recently purchased a new device, you might want to look into how to switch Google Authenticator to a new phone.

Log in to Google Authenticator Using Backup Codes

When you set up your Google Authenticator app, you have an option to create backup codes. These codes are strings of numbers, and you can use each code just one to log in.

Backup codes are very useful if you lose your device with Google Authenticator installed on it. Or if the Google Authenticator app isn’t working for some reason. It’s a good idea to take a copy of your backup codes and keep them somewhere safe.

How to Generate Backup Codes on Desktop

Google Authenticator generate backup codes

To generate backup codes for your Google Authenticator app when you are browsing on a computer, follow these steps:

  1. Go to your Google Account 2-Step Verification page at myaccount.google.com/signinoptions/two-step-verification. You may need to sign in to your account.
  2. Scroll down to the Add more second steps to verify it’s you section. Find the Backup codes subheading.
  3. If you’ve already set up codes you’ll see an option for Show codes. If not, click on Set up.
  4. The page will generate ten codes. Each is eight digits long.
  5. You should keep these codes somewhere safe. Ideally, you should not store them digitally on your computer as this could be a security issue. Instead, write them down on paper for safekeeping in a notebook.
  6. If you have used your codes and need to generate new ones, you can click on Get new codes.
  7. Click Print to print the codes on paper. Or click Close to close the window.

How to Generate Backup Codes on Android

Alternatively, if you are on an Android device then you can generate backup codes in another way:

  1. Go to Settings in your Android device.
  2. Go to Google and then to Manage your Google Account.
  3. Select Security from the menu at the top.
  4. Find the Signing into Google heading and select 2-Step Verification. You may need to sign into your account.
  5. Now find the Backup codes section and tap Show codes to see your codes. Alternatively, if you have not set up codes yet, tap Set up.
  6. From here you can choose to print your codes, or to write them down. There is an option to download your codes onto your device, but this is not ideal for security reasons. Write the codes down on paper instead.
  7. If you have used up your codes, you can tap Get new codes to generate new ones.

How to Use Backup Codes

If you ever find your Google Authenticator app isn’t working and you need to use your backup codes, here’s how to do that.

  1. Sign into a Google service as usual, with your username and password.
  2. When you are asked for a verification code, select More options.
  3. Select Enter one of your 8-digit backup codes.
  4. Type in your backup code.
  5. Now you’ll be logged in as normal.
  6. Remember that each code can be used only once, so make sure you still have spare codes for the future.

What to Do When Google Authenticator Isn’t Working

If you find Google Authenticator has stopped working on your device, first try adjusting the time sync issue. Usually this will make the app work again.

It’s a good idea to also have a backup in case the app stops working or you don’t have access to your device. You can generate backup codes and write these down on paper somewhere safe. Or you can also install the Google Authenticator app on multiple devices.

Using two-factor authentication is important to keep your accounts safe. However, you should be aware that there are some security concerns regarding apps like Google Authenticator. To learn more, see our article on why it’s time to stop using SMS and 2FA apps for two-factor authentication.

Read the full article: Google Authenticator Codes Stopped Working? Try This Quick Fix


Read Full Article

How to Learn C++ Programming: 6 Sites to Get Started


Learning to program can be difficult for many, even with relatively easy programming languages. C++ is one of the “bread and butter” coding languages, and there are plenty of programming websites that can help you learn C++ for free.

Let’s explore why you’d want to learn C++ programming and find out where you can learn it online.

Why Learn C++?

There are plenty of other easy programming languages for beginners to learn. Why choose C++ in particular?

C++ is a powerful programming language that uses a “trust the programmer” motto. This design increases the chance for errors to appear during compiling, but it also gives the programmer more flexibility in how they code.

Due to this, most programs use at least a little bit of C++ code, or its cousin C. Learning C++ is also beneficial in another way—as C++ is very similar to C, you can understand and (for the most part) code in C as well.

1. Udemy: The Best Way to Learn C++ for Beginners

The Udemy website

If you want to be taught C++ instead of poring over websites, try Udemy. Udemy is different from studying from a website, as you’ll have an instructor who will help answer your questions and guide you. This is an excellent choice if you find yourself staring in confusion at walls of code and need someone to guide you through it.

You can take a look through Udemy’s catalog of courses to find the one best suited to you. If you want to see if C++ is right for you, we recommend the C++ Tutorial for Complete Beginners course. It’s free and will teach you how to program using C++.

If you want to try something more in-depth, we also recommend Beginning C++ Programming—From Beginner to Beyond. Over 70,000 people have taken this course, which holds a 4.5/5 rating at the time of writing, and is taught by someone with 25+ years of C++ experience. It covers everything you need to know about C++, from comments and variables to input-output streams. There’s even a section dedicated to setting up C++ and making sense of the compiler errors you’ll find during your coding experience.

2. edX

The edX website

Do you want a course with the best content, but you don’t want to pay the costs that come with such high esteem? Try edX for your learning needs. edX was set up by Harvard and MIT to provide free lessons for the public, with no need for entry fees or qualifications.

edX offers the Introduction to C++ course. The professor’s credentials don’t get much higher; your tutors for this course are Microsoft employees. Despite their high rank, they’ll help you learn C++ programming for free, with the potential to move onto Microsoft’s Intermediate and Advanced courses if you enjoy it.

The course is a little small on content; you’ll only learn C++ syntax and how to create functions. However, it is an excellent taster session for anyone unsure if they want to learn C++ thoroughly. If you do wish to continue, you can use this course as a stepping stone for Microsoft’s advanced classes.

3. LearnCpp

The LearnCpp website
LearnCpp is an excellent place for both beginners and experienced programmers to get started with C++. The author of the site has well written, thorough tutorials that cover every basic lesson to some pretty advanced stuff.

This website is practically an entire C++ course in itself. There’s a lot of content on this website—18 chapters in total. The first 15 chapters all feature a quiz at the end, allowing you to grade your knowledge after each chapter.

Each lesson also has a comment section where fellow learners can ask questions and share knowledge. It’s also a great place to leave a comment if something has left you scratching your head.

4. CPlusPlus

The Cplusplus website

CPlusPlus is another excellent website for learning C++. Although this website also has some tutorials, its true potential shines as a reference. There are multitudes of programming concepts explained, which is helpful if a specific element is confusing you.

This site may not be the absolute best for beginners, as its referential nature includes more jargon than LearnCpp does. However, the information contained on the website is still excellent for anyone who knows the lingo.

5. Cprogramming

The CProgramming website

In case the above websites aren’t for you, you might instead like Cprogramming. This website also includes a well-written tutorial and other goodies you can use. While this website’s tutorial isn’t as in-depth as the above examples, they are arranged in an easy-to-navigate way. If you took one look at LearnCpp’s wall of tutorials and shied away, you may find luck on this site instead.

This website also has some challenges for you to try. The basic challenges have you code a Celcius to Fahrenheit converter, while the advanced ones include coding a program which prints and runs itself.

The good thing about Cprogramming.com is the fact that it includes both tutorials for C++ as well as C. This means you can learn to code C through tutorials written by the same author.

6. Edabit

The Edabit website

Ready to put your new-found skills to the test? Edabit is a useful website for testing your C++ knowledge. It will give you a series of challenges to solve using C++, ranging from simple addition and division tasks to very hard challenges. Just be sure that C++ is selected in the drop-down at the top left before you start.

If a challenge stumps you, don’t worry. You can use the resource tab to find some useful tips on how to beat the test. If you get very stuck, you can view the solution to get a better understanding of how C++ can solve the challenge.

What makes Edabit so useful is the way it presents tests. Edabit has its own code compiler so you can write your code into the website as you would any other IDE. When you think you’ve solved the challenge with your code, the website will compile it and run a few tests on it. If you get the results it’s looking for, you pass!

Because Edabit grades you based on raw results, it won’t give you any direct advice on how to make your code cleaner. However, you can see how everyone else solved the puzzle, with an upvote option that puts the more elegant solutions at the top. You can use these upvoted solutions to better understand how to make your own code concise and straightforward.

If you love the feel of solving puzzles with your code, why not use that passion to fuel your career? Some coding challenges and competitions may lead to money or a job, so you can practice your craft and build your portfolio simultaneously.

Getting to Know the C++ Programming Language

Hopefully, armed with these six sites, you’ll be able to get a grasp on C/C++ and start writing your programs. Just remember that when you start, the functionality should be the priority over appearance. Don’t feel dejected if your program doesn’t have a flashy UI or buttons to click; as long as you code well and make a robust program, you’re doing fine.

If you prefer to use a video as a reference, try the best code-along YouTube videos to learn programming.

Image credit: iunewind/Depositphotos

Read the full article: How to Learn C++ Programming: 6 Sites to Get Started


Read Full Article

How to Turn On or Off Autocorrect for Android and Samsung Devices


android-autocorrect

Android’s autocorrect feature can be both a blessing and a curse. One minute, it’ll save you from an embarrassing typo in a message to your boss. The next, you’ll be left blushing as you send something wholly inappropriate to a family member.

It’s time you took back control. If you want to learn how to turn on autocorrect on your Android device, plus how to turn it off autocorrect again, keep reading. We’ll also touch on a few other settings to help you get the autocorrect feature working the way you want.

How to Turn Off Autocorrect on Android

By default, most Android devices come preinstalled with Gboard, Google’s in-house keyboard app. If you use using Gboard, you can follow our instructions to turn off autocorrect.

If, however, you instead use one of the many third-party keyboards for Android, the instructions might differ slightly. Consult with your keyboard developer’s official literature for more information.

The toggle to disable autocorrect on Gboard is hidden deep within your phone’s Settings menu.

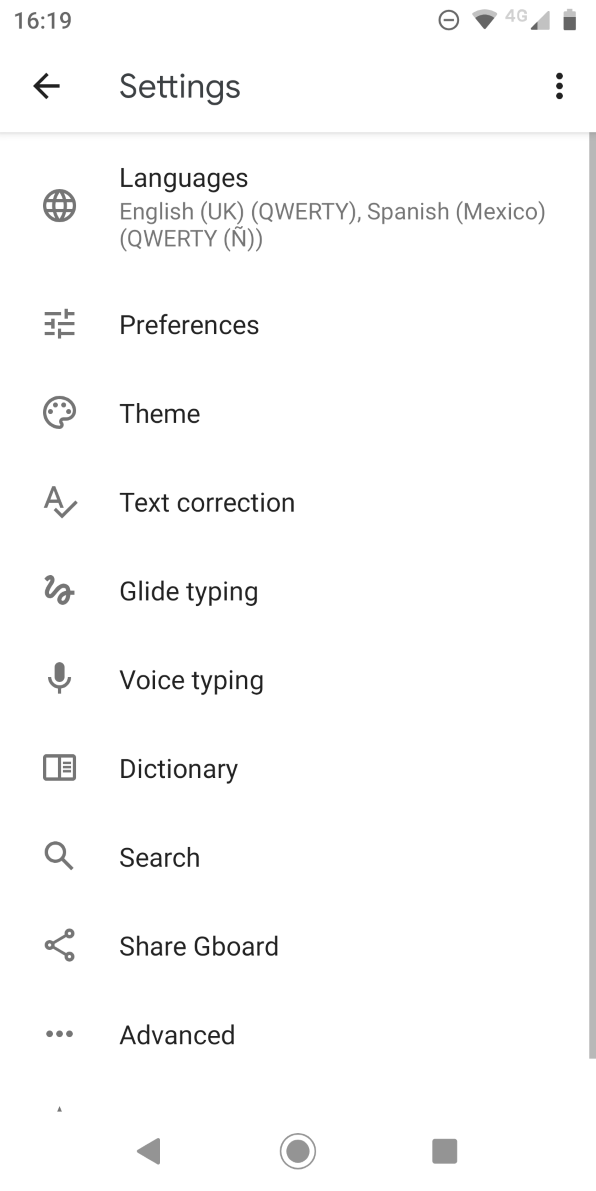
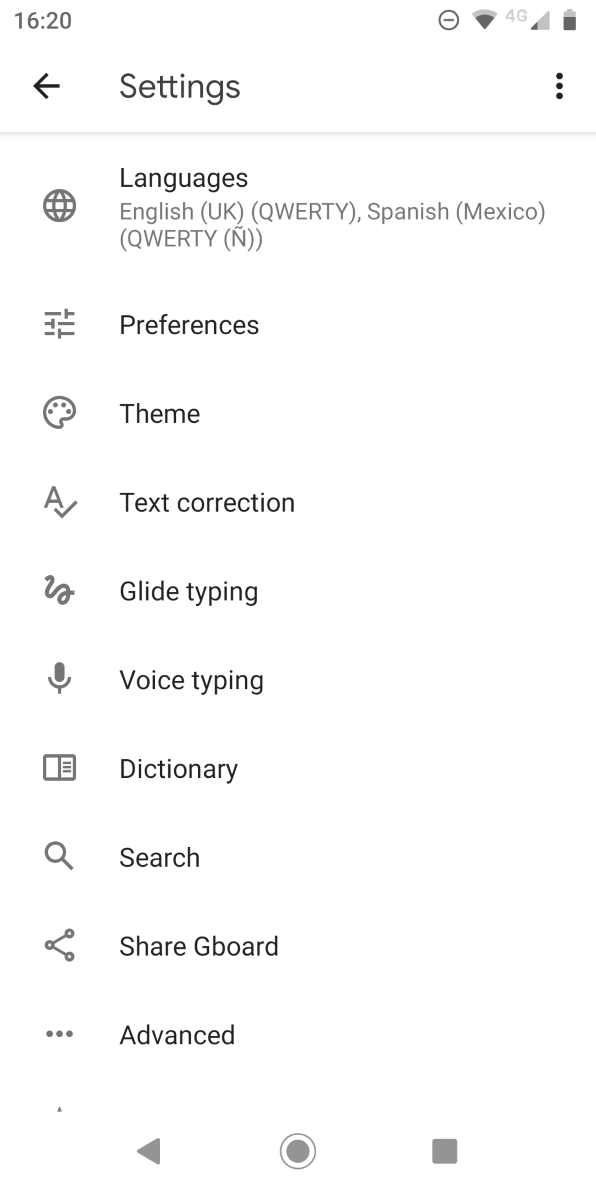
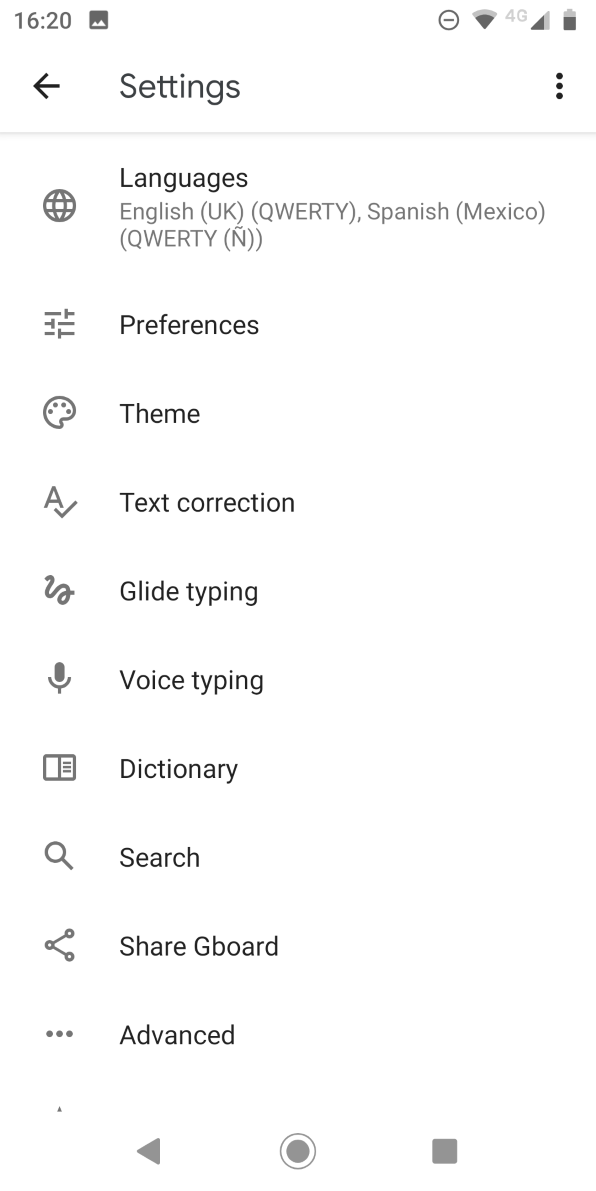
To reach it, you’ll need to open Gboard settings. You can do this through the Settings app by going to Settings > System > Languages and input > Virtual keyboard > Gboard. For a faster method, open your keyboard and long-press on the comma key, then tap the gear icon that appears.

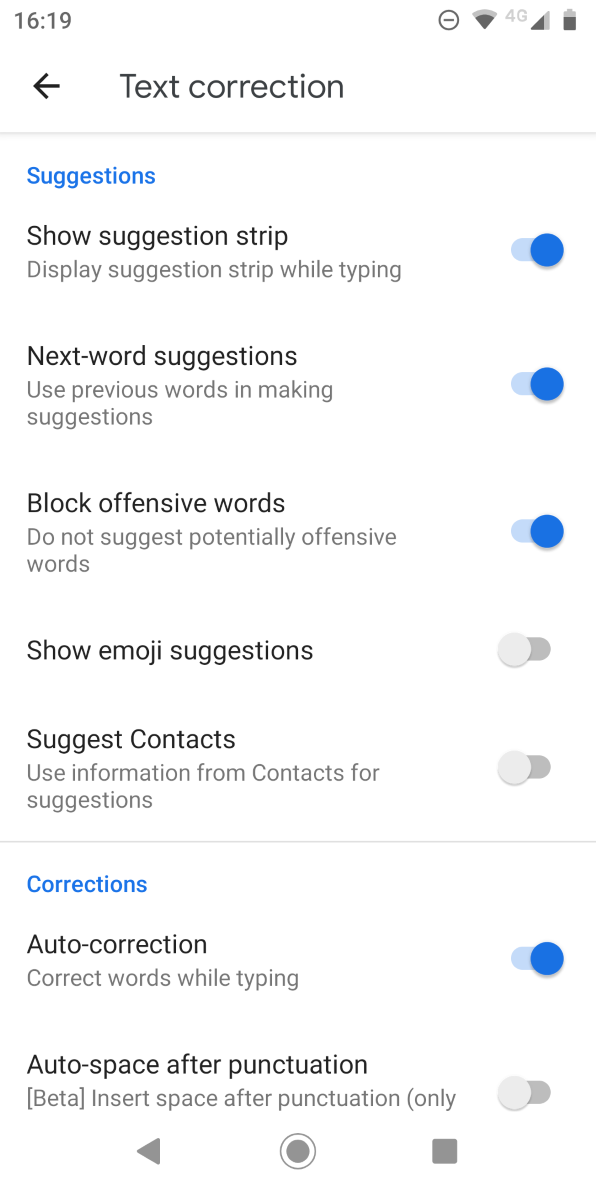
Once you reach Gboard’s settings with either method, select Text correction and under the Corrections heading, slide the toggle for Auto-correction into the Off position.

How to Turn On Autocorrect on Android

If you change your mind later, you can re-enable the autocorrect feature at any time.

Simply perform the same instructions as above, tweaking the final step:

  1. Open the Settings app and go to System > Languages and input > Virtual keyboard > Gboard.
    1. Alternatively, open the keyboard, hold the comma key, and tap the gear icon.
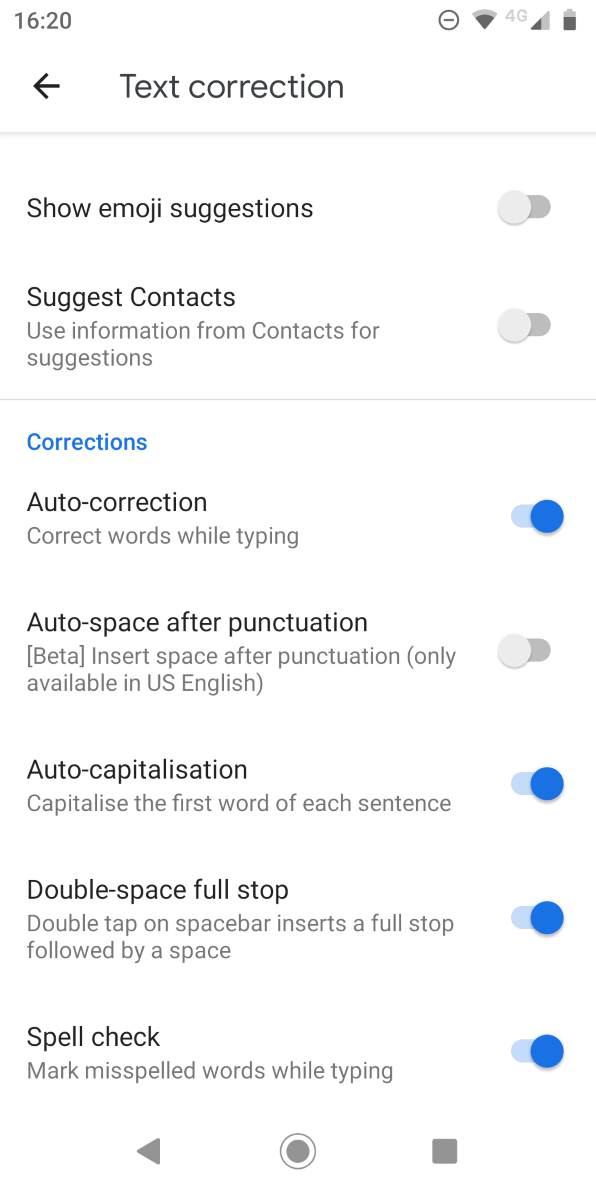
  2. Choose Text correction and scroll down to the Corrections section.
  3. Locate the toggle labeled Auto-correction and slide it into the On position.

Again, if you’re using a different Android keyboard, you might find that the instructions vary. Any keyboard you have installed should appear under the Virtual keyboard section of the Settings app. Open it from there, then you’ll need to look for the appropriate setting.

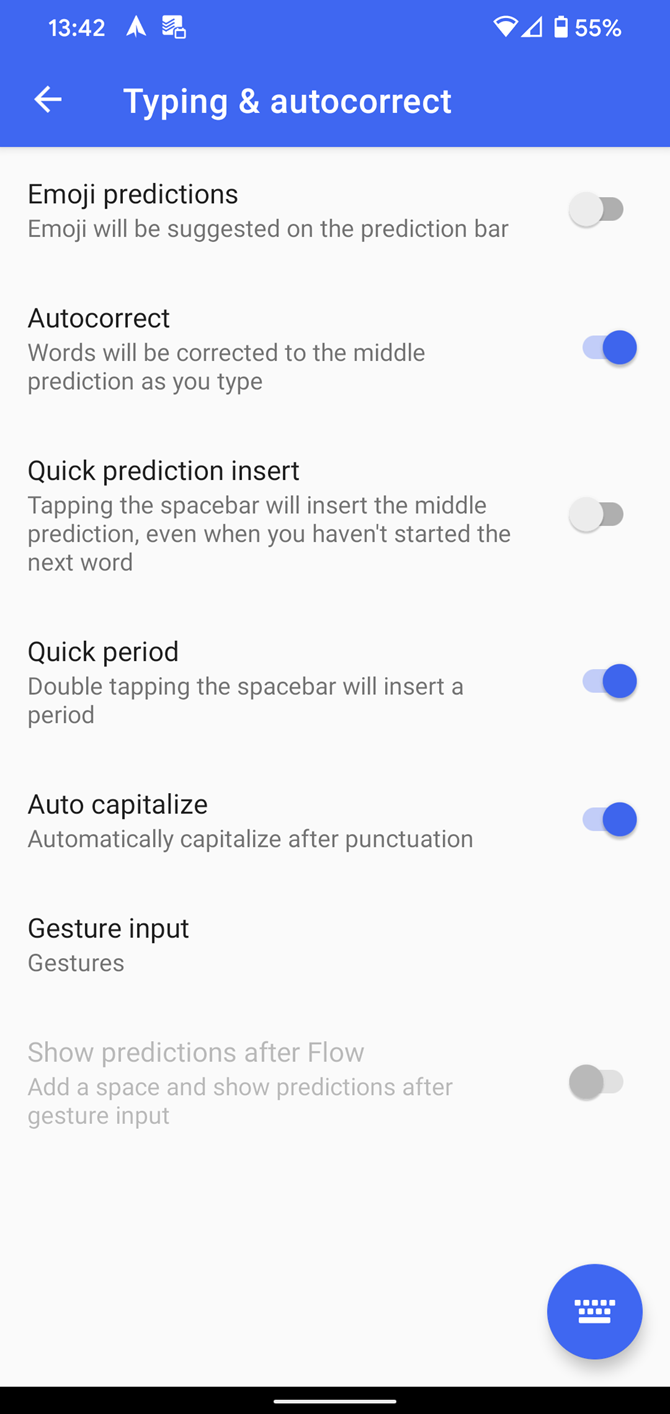
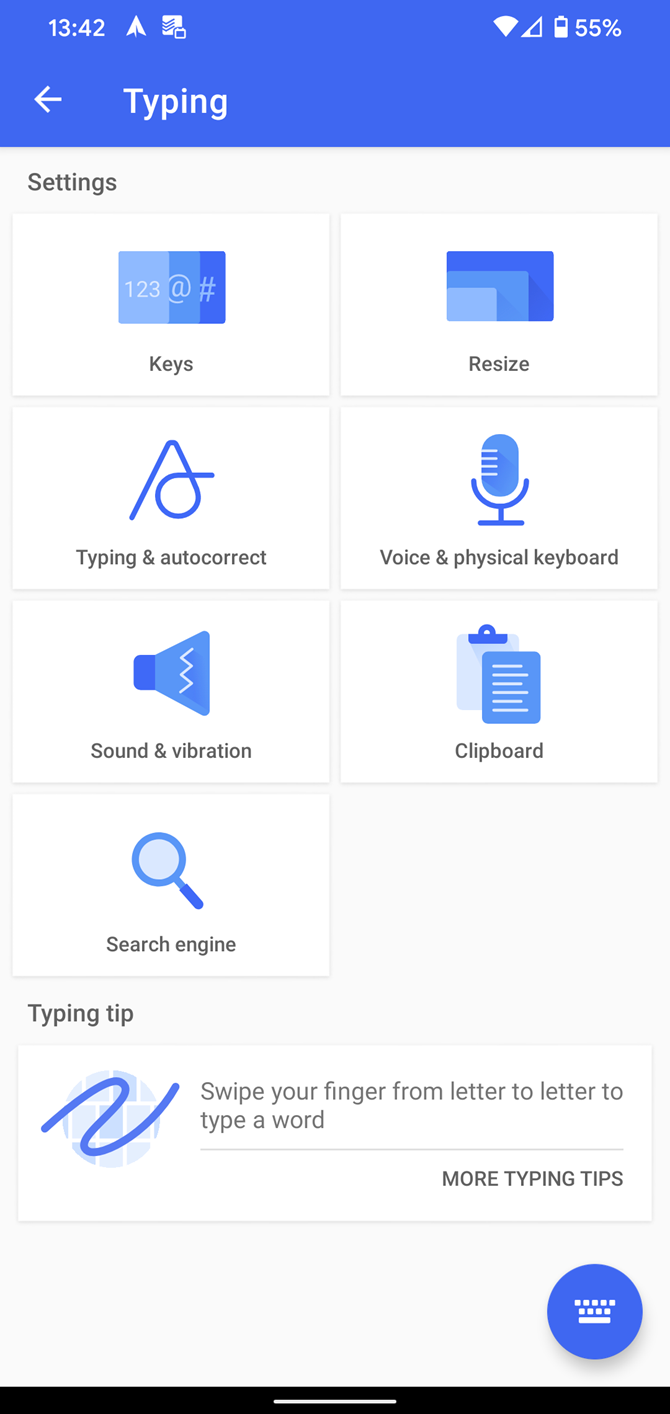
SwiftKey, for example, has autocorrect under Typing > Typing & Autocorrect > Autocorrect.

How to Turn Off Autocorrect on Samsung Devices

If you’ve ever owned a Samsung phone or tablet, you know that the company does not use the stock Android operating system. Instead, Samsung devices run a proprietary skin on Android. This is now known as Samsung Experience, but was previously called TouchWiz.

Stock Android and Samsung’s skin differ in a lot of ways, one of which is how to turn autocorrect on and off.

Below are instructions for disabling autocorrect on Samsung devices running Android 10:

  1. Visit Settings > General management > Language and input > On-screen keyboard.
  2. Select Samsung Keyboard, assuming that you’re using the built-in solution.
  3. Choose Smart typing.
  4. Turn Predictive text off.

To turn off autocorrect on older Samsung phones and tablets, you need to use these instructions instead:

  1. Open the Settings app by heading to Apps > Settings.
  2. Scroll down to the System section.
  3. Tap on the icon labeled Language and input.
  4. Select Default from the list of options available. This may have a different name if you have other keyboard installed.
  5. Scroll down until you find the Auto replace menu item, and select it.
  6. Flick the toggle in the upper right-hand corner into the Off position.

(Note: If you have multiple keyboard languages installed, you can turn on/off autocorrect for each language layout individually using the checkboxes alongside the languages on this page.)

How to Improve Autocorrect on Android

We’ve all seen those funny autocorrect screenshots. When you read some of them, it is understandable why you might have a sudden urge to turn off autocorrect on your Android device.

In truth, however, such drastic measures are rarely required. Android keyboards have a bevy of options that allow you to tweak, refine, and improve the autocorrect feature, thus making it work better for your needs.

Let’s take a quick look at some of the other settings that are worth investigating. These mainly apply to Gboard, but you’ll find similar options on most keyboard apps.

Auto-Capitalization

Android can automatically fix capital letters at the start of sentences and on proper nouns as you type.

In normal circumstances, it is a useful feature. But for some people, it might not be ideal. Lots of words are both proper nouns and regular nouns (for example, “Turkey” the country and “turkey” the bird). If you find yourself using such words regularly, you might want to turn off the auto-capitalization feature.

You can do so by heading to Settings > System > Languages and input > Virtual keyboard > Gboard > Text correction > Auto-capitalization. Slide the toggle into the Off position to disable it.

Spell Check

Rather than relying on the autocorrect feature to fix your errors, you could just use Android’s native spell check feature. It will alert you to typos and other misspelled words using those familiar squiggly red lines under the text.

To turn spell check on or off on Android, you need to go to Settings > System > Languages and input > Virtual keyboard > Gboard > Text correction > Spell check and flick the toggle into the desired position.

(Note: If you wish, you can run the spell-check and autocorrect tools simultaneously.)

Customize the Android Dictionary

You will always come across some legitimate words that are not part of Android’s built-in dictionary. Obscure place names, brand names, and specific jargon related to your job are common culprits.

It gets old really fast when Android continually tries to autocorrect “Sonos” into “sonar” or “Logitech” into “logical.” To prevent this from happening—and save yourself some stress in the process—you should add the words to your personal dictionary.

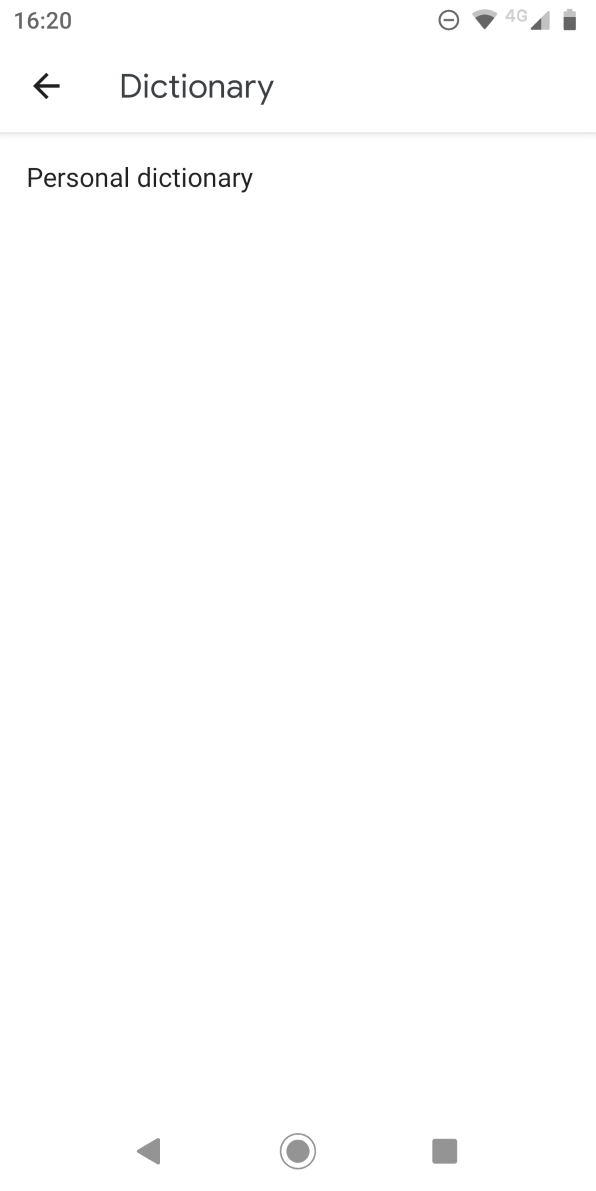
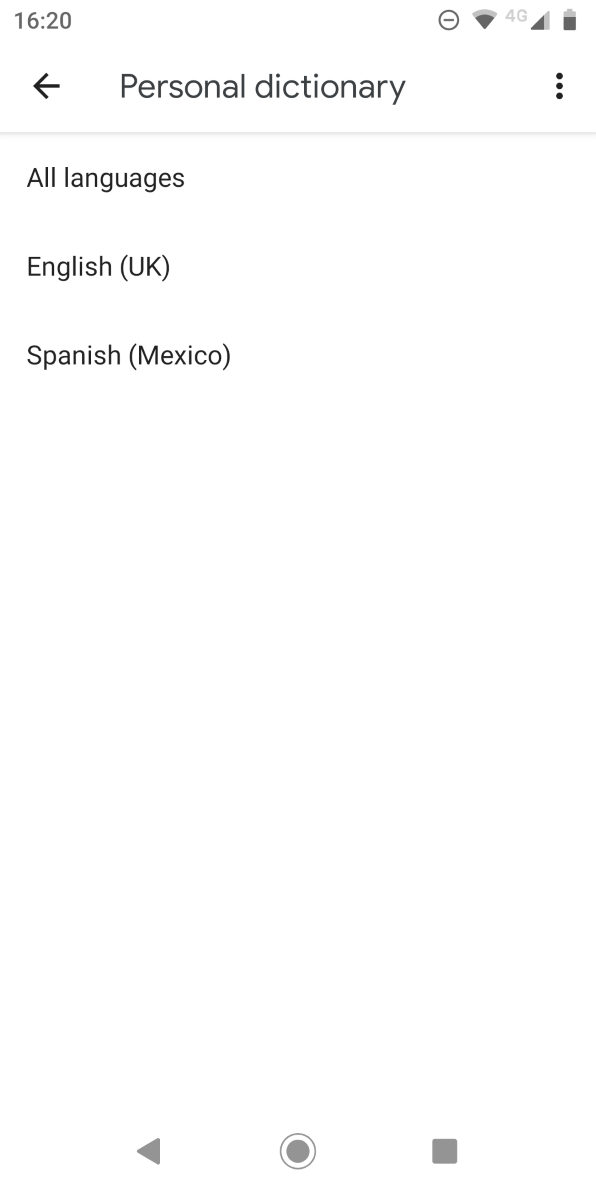
You can access the dictionary by heading to Settings > System > Languages and input > Virtual keyboard > Gboard > Dictionary > Personal Dictionary. Tap the language you’d like to edit the dictionary for, even if you only have one installed. Then you can use the Plus button to add new words.

Try Voice Typing

Some keyboard (including Gboard) provide you with alternative ways to type on Android. One of these is using your voice rather than an on-screen touch keyboard.

From an autocorrect standpoint, you’re less likely to make a typo when speaking rather than typing. However, you’ll introduce the issue of potentially misunderstood words.

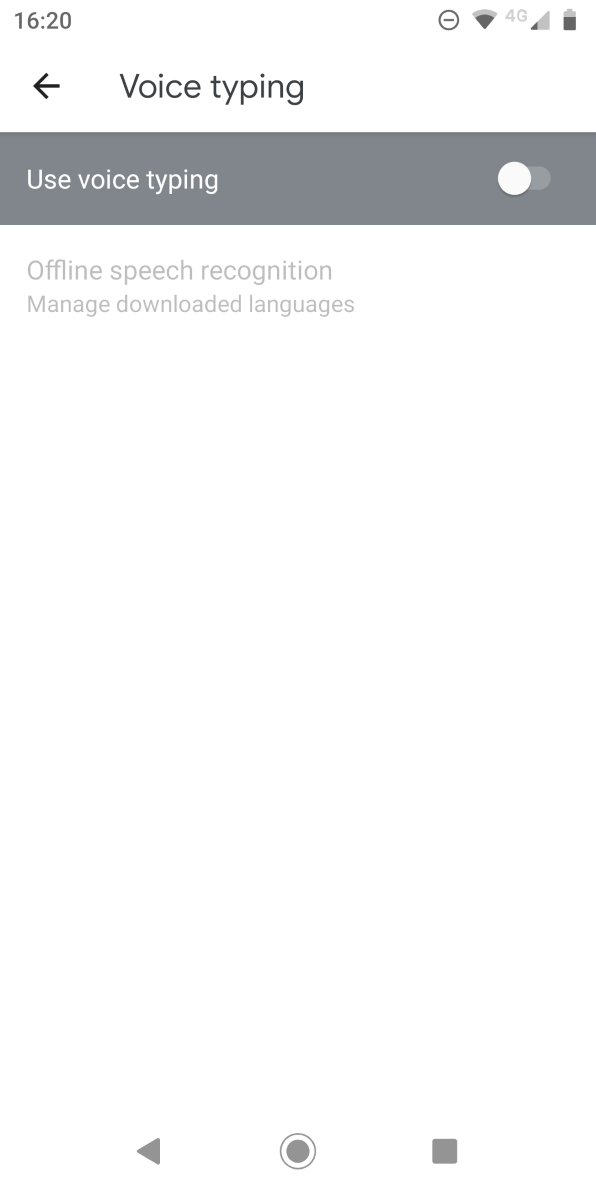
If you would like to try voice typing, go to Settings > System > Languages and input > Virtual keyboard > Gboard > Voice typing and turn the toggle on. Then you can tap the Microphone icon at the top-right of the keyboard to speak.

If you use another keyboard, you can also switch to Google voice typing using the keyboard switch button that appears while typing.

Learn More About Typing on Android

Turning autocorrect on and off is only one small way you can improve the typing experience on your Android device. For example, you can change the keyboard’s theme, install third-party options, and even switch to a non-QWERTY keyboard layout.

To learn more, have a look at ways to type more efficiently with Gboard, or even consider changing your Android keyboard entirely.

Read the full article: How to Turn On or Off Autocorrect for Android and Samsung Devices


Read Full Article
Save Space on Android by Moving Netflix Content to an SD Card


The ability to download and watch movies and TV shows offline is one of the best features of Netflix. It makes the service so much easier to use when you’re traveling and don’t have access to the internet.

However, phones have a limited amount of internal storage, and you need it for your apps, photos, and everything else too. Fortunately, Netflix allows you to download content to an SD card, allowing you to save space on Android.

In this article, we’ll show you how to save Netflix downloads to an SD card, and explain where to find Netflix downloads on your Android phone.

How to Save Netflix Downloads to an SD Card

There’s a simple three-step process to download Netflix movies and TV shows to your microSD card:

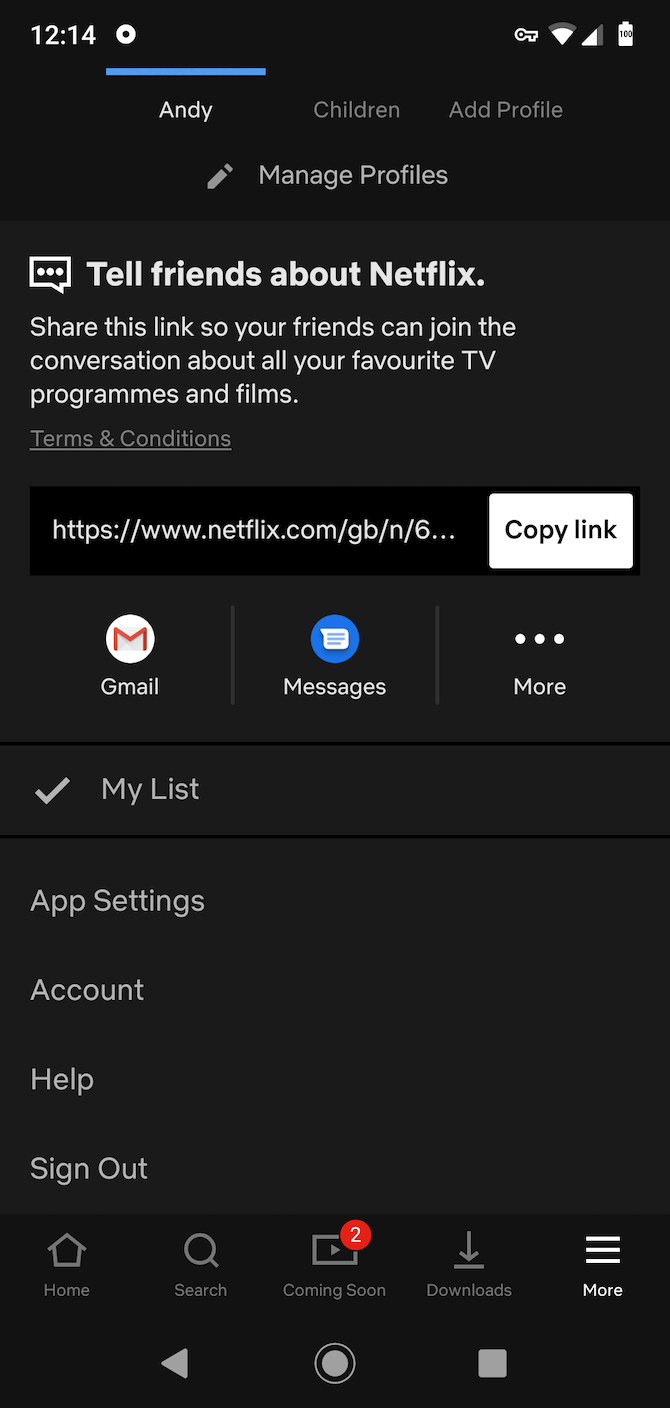
  1. Open the Netflix app and go to More > App Settings.
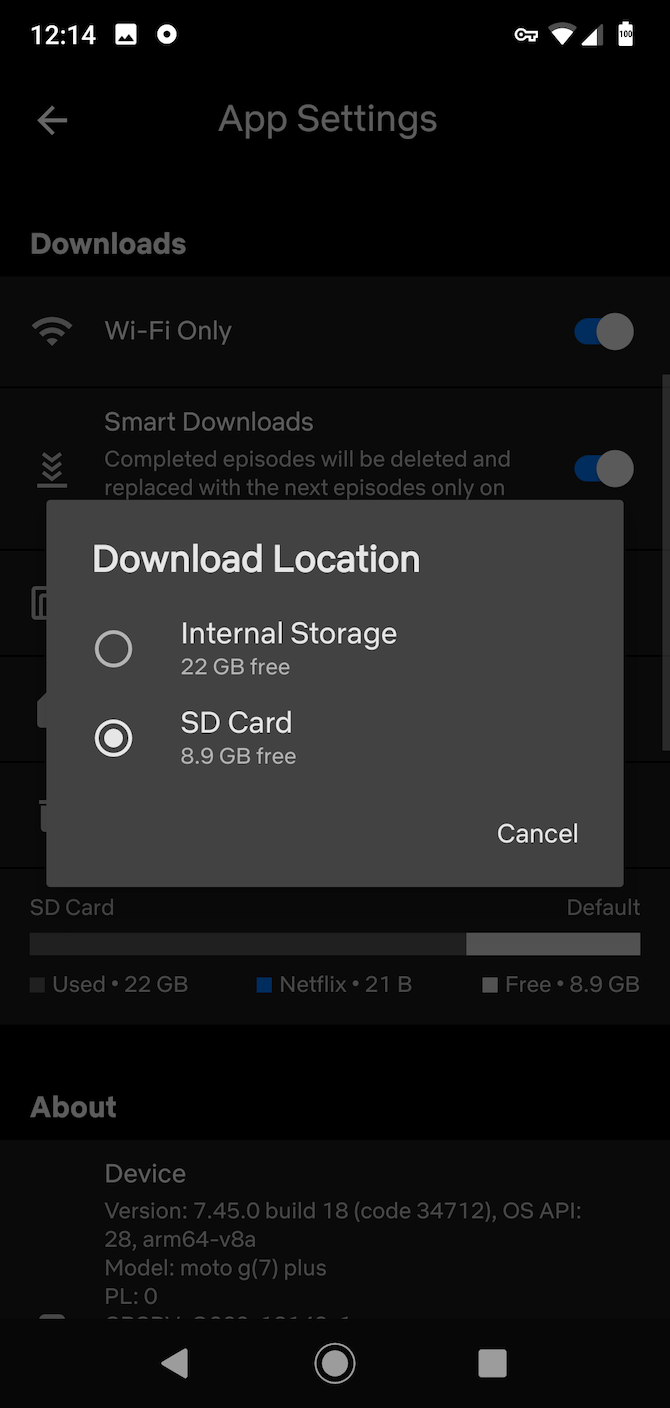
  2. Scroll down to the Downloads section and tap Download Location.
  3. Select SD Card from the list.

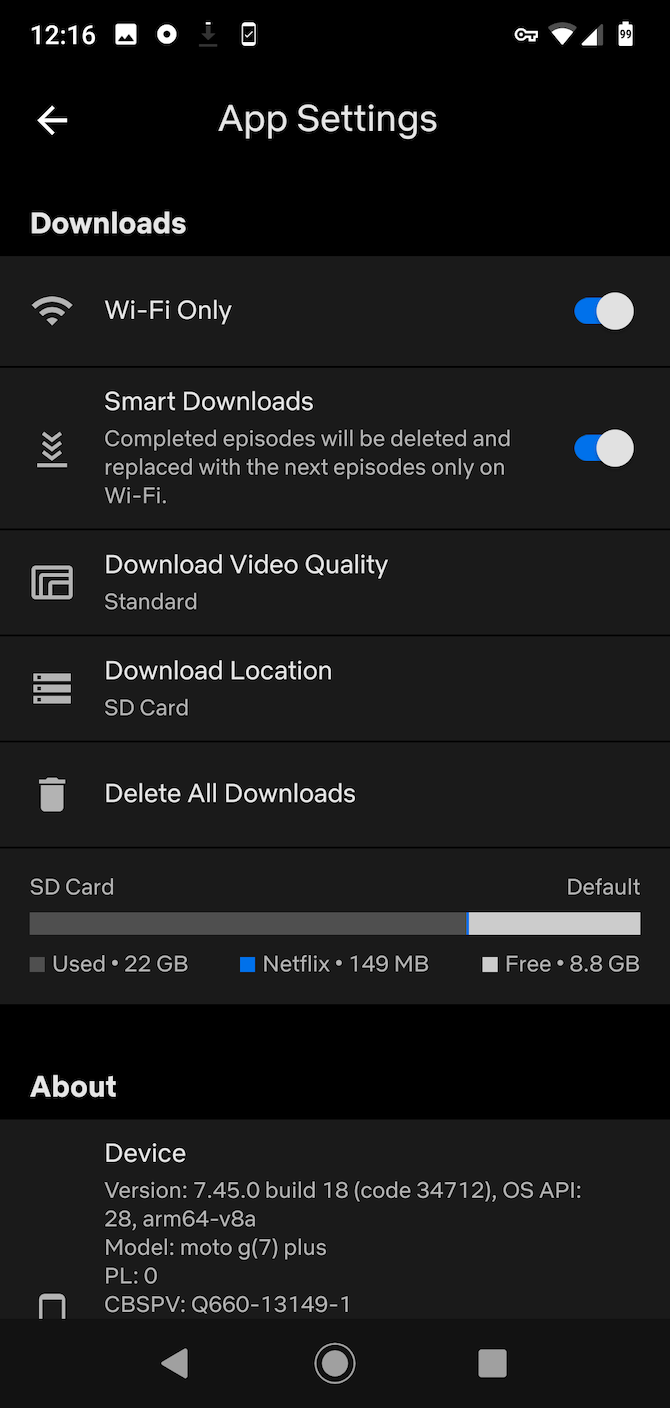
And that’s it. The app shows you how much free space you’ve got left on your card, and how much of it your Netflix content is using.

It will now save all of your future downloads to your microSD card. Anything you’ve already downloaded will remain on your phone’s internal storage. If you want to put that onto your card you’ll have to re-download it.

To watch your downloaded movies and shows, back out of the Settings screen and tap the Downloads button at the bottom. All of your content is here, with shows and other collections grouped together for convenience. Hit the Edit button in the top-right to delete anything you no longer want.

netflix download limit

Netflix downloads don’t last forever. The number of times you can download something, and how long you can keep it, varies depending on the license for each piece of content. Some downloads expire within 48 hours of you starting to watch them; others that have less than seven days left will show the expiry date on the Downloads screen.

Also, note that you can’t share your downloads with someone else by putting your memory card into their phone. And if a movie or TV show leaves the Netflix library your download will disappear at the same time.

Now you know how to download Netflix content, check out the best and fastest microSD cards available to find the right one for you.

Where are Netflix Downloads Stored on Android?

Now that you’ve downloaded Netflix content to your SD card, you may be wondering, where does Netflix store downloads on Android?

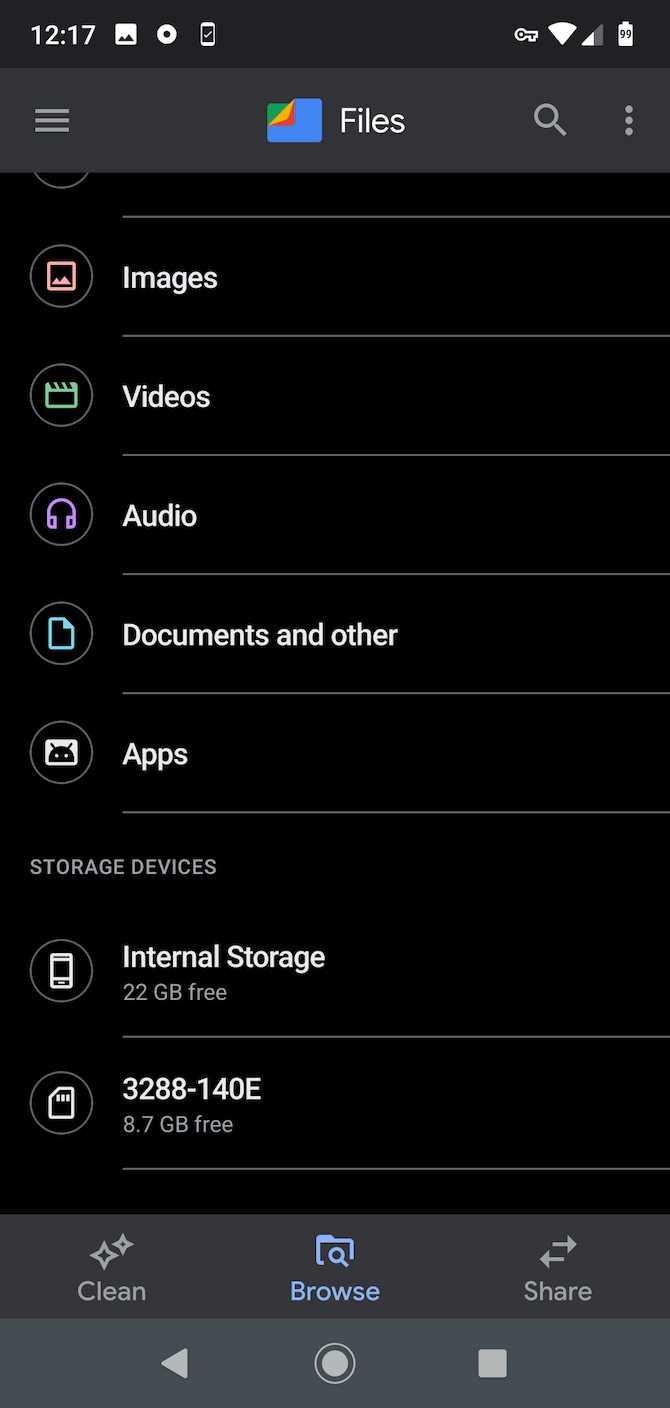
They’re hidden by default, but you can access them using a file manager app. We recommend Files by Google. It’s free and doesn’t come with any of the bloat associated with many other file managers.

Here’s how to find the Netflix download location:

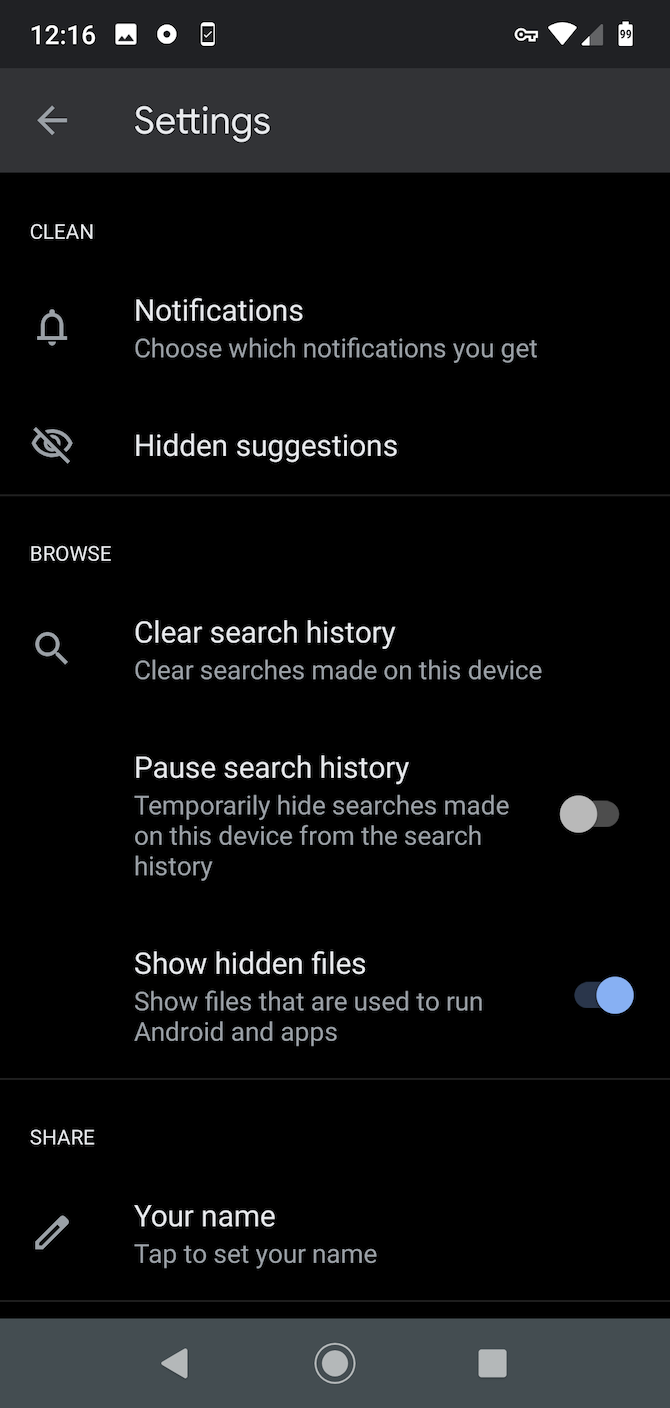
  1. Open Files and go to Settings > Show hidden files. (You’ll need to find the equivalent setting if you’re using a different file manager.)
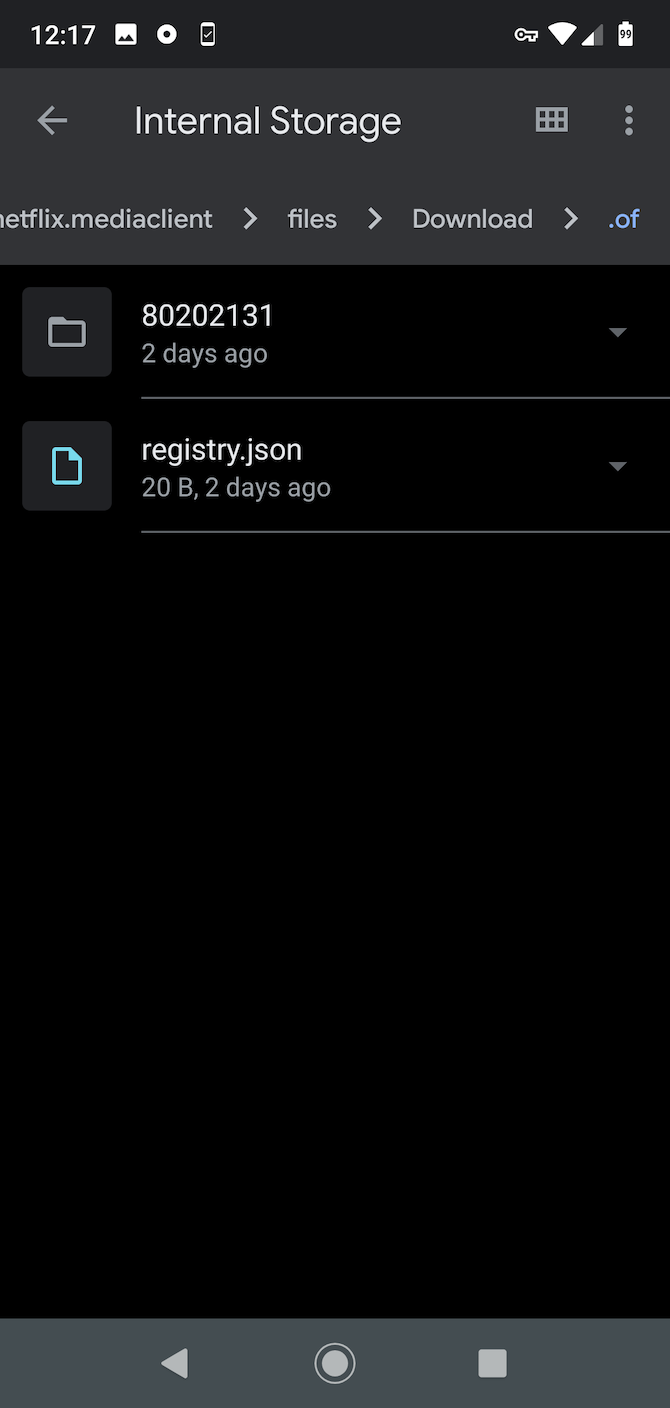
  2. Navigate your way to Internal Storage > Android > data > com.netflix.mediaclient > files > Download > .of
  3. You’ll now see some folders with eight-digit random numbers as the name. Open one of these to find a downloaded movie.

Netflix downloads are in the NFV format, and are encrypted. You can’t save your Netflix downloads to the Gallery app, or watch them in any other player.

If you’ve already downloaded movies to your phone’s internal storage and would like to move them to your SD card instead you can try moving them manually using your file manager.

However, you will have to move them back before you watch them, and you can’t open the Netflix app in the meantime because it will no longer recognize the downloads if you do.

How to Watch Streaming Movies Offline

Netflix isn’t the only streaming service that lets you watch content offline. Our guide detailing how to legally download movies for free to watch offline has a rundown of many other services you can use.

And if you fancy saving some money, we have previously listed the best free movie streaming sites for a way to catch some of the hottest films on your phone at any time.

Read the full article: Save Space on Android by Moving Netflix Content to an SD Card


Read Full Article
Watch Star Wars Out of Order to Make Everything Better


star-wars-watch

Whether you’re taking your first steps into a galaxy far, far away or returning to these movies for the 20th time, your first question is probably going to be the same: In what order should I watch the Star Wars movies?

With a set of three trilogies—and side stories to boot—there are plenty of options to play with, at a total runtime of almost 25 hours. However, deciding the right order in which to watch the Star Wars movies is no small feat. After all, the saga famously opened with Episode IV.

In this article, we list the most popular ways to watch the Star Wars movies. We also try to help you decide which is the best order for you. And in case you’ve never seen Star Wars before, we’ve avoided as many spoilers as possible.

Introducing the Star Wars Movies

Star Wars is one of the longest-standing franchises in cinema history, and the expanded universe goes beyond the feature films. There are countless novels, comic books, video games, and TV shows, but for the purposes of this article we’re going to stick to the live-action movies, most of which are available on Disney+.
That includes the original trilogy, the prequel trilogy, the sequel trilogy, and two Star Wars stories. For clarity, here they all are:

The Original Trilogy:

  • Episode IV: A New Hope
  • Episode V: The Empire Strikes Back
  • Episode VI: Return of the Jedi

The Prequel Trilogy:

  • Episode I: The Phantom Menace
  • Episode II: Attack of the Clones
  • Episode III: Revenge of the Sith

The Sequel Trilogy:

  • Episode VII: The Force Awakens
  • Episode VIII: The Last Jedi
  • Episode IX: The Rise of Skywalker

The Star Wars Stories:

  • Rogue One: A Star Wars Story
  • Solo: A Star Wars Story

George Lucas launched Star Wars with Episode IV in 1977, but continued to tweak his original trilogy for decades to come. This creates all sorts of continuity issues for first-time viewers as the original trilogy now contains unexpected references to the prequels, controversial new edits, and distracting 90s-era CGI.

If possible, get hold of Harmy’s Despecialized Edition for the original trilogy. These fan-made edits restore the movies to their theatrical cuts, undoing many of the changes in the process. However, you should purchase the official release before exploring these fan restorations.

With that out of the way, let’s look at the various orders in which you can watch all of the Star Wars movies.

Episode Order

Episode Order: I, II, III, Solo, Rogue One, IV, V, VI, VII, VIII, IX

At a glance, it seems the most logical way to watch the Star Wars movies is in Episode Order. Simply start with Episode I and work your way through to Episode IX, slotting the Star Wars stories chronologically between Episode III and IV.

Although this might be what Lucas claims he had in mind, most people would agree that it isn’t the best introduction to the series.

Many of Star Wars’ defining moments from the original trilogy are major plot points in the prequels. You don’t want the best twists of the series to be revealed by off-hand comments made in Episode III.

What’s more, a lot of Star Wars fans consider Episode I to be the worst film in the series, and almost all of them rank the entire prequel trilogy poorly. If you start with these movies, you might hate the idea of Star Wars before ever getting to the good stuff.

That said, returning viewers might enjoy this option to watch the story unfold in chronological order, although there are more interesting options below.

Release Order

Release Order: IV, V, VI, I, II, III, VII, Rogue One, VIII, Solo, IX

Release order is one of the best ways to watch the Star Wars films if you’ve never seen them before. Start with the original trilogy (released in the 70s and 80s), then move onto the prequels (from 1999 to the mid 2000s), and finish up with the sequel trilogy intercut by the Star Wars stories (2015 onwards).

This is the order most people watched Star Wars in for the first time, catching each movie as it was released. So Release Order offers the best chance at replicating most people’s experiences.

As we previously mentioned, this order would work better if Lucas hadn’t continuously meddled with the original trilogy after its release. Watching it now, you can expect to see shots of planets or actors in the original trilogy that don’t get properly introduced until the prequels.

Denial Order

Denial Order: IV, V, VI, VII, VIII, IX

What we’re calling Denial Order is one of the most contentious suggestions you’re bound to come across when asking what order to watch the Star Wars movies in. Since the prequel trilogy is so loathed, why not deny its existence and skip it altogether?

Of course, starting with Episode IV and watching the original trilogy works perfectly well. Those movies were released before anything else and work as a complete story already.

The sequel trilogy also seems as though it was designed to work without the prequels. It makes occasional references to the unpopular movies, but you won’t even notice those references if you have never seen the movies before.

One of the issues with this order, however, is choosing where the line is. There is plenty of criticism for the Disney-era Star Wars movies as well as the prequels.

Neither Rogue One nor Solo received huge critical praise, so you may as well lift those out of the viewing order. And both Episode VIII and Episode IX appear to have split the Star Wars fan base in two. Should you deny their existence as well and stop at Episode VII?

You can skip the prequels without missing any major story beats, but you’re still losing out on some great Star Wars moments as well. And a galaxy’s worth of memes.

Machete Order

Machete Order: IV, V, I, II, III, VI, VII, VIII, IX, Rogue One, Solo

One of the most interesting ways to watch the Star Wars movies is Machete Order. Developed by Rod Hilton, and detailed in a post on his blog, Absolutely No Machete Juggling, Machete Order inserts the prequels as a flashback at a climactic moment between Episode V and Episode VI.

Since it is particularly bad—and doesn’t add anything valuable to the plot—Hilton suggests you leave out Episode I entirely. Any relevant characters are reintroduced in Episode II or III anyway, so you don’t lose anything important.

Machete Order works well for two reasons: it preserves all of the plot twists in each trilogy and it works to keep the focus on Luke Skywalker’s journey. Episode IV and Episode V establish the Star Wars universe. Episode II and Episode III reveal the history of the main villain. And Episode VI through to Episode IX concludes the rest of the story.

Hilton developed Machete Order before the sequel trilogy or the Star Wars stories existed but he maintains that you should stick to Machete Order, adding all subsequent episodes to the end and watching the standalone stories when you’re finished.

Flashback Order

Flashback Order: IV, Rogue One, V, I, II, III, Solo, VI, VII, VIII, IX

Flashback Order is similar to Machete Order, except it includes Episode I and inserts the Star Wars stories as additional flashbacks at pertinent points in the saga. This might be the best way to watch the Star Wars movies because it builds on the narrative flow from Machete Order without skipping any of the films.

Start with Episode IV, the world’s introduction to Star Wars, then flash back with Rogue One to learn more about the events leading up to that film. Episode V moves the narrative further along still, then the prequel trilogy and Solo fill in more backstory before concluding the original trilogy. And finally, tie it all up in a nice bow with the sequels.

What Is the Best Order to Watch the Star Wars Movies?

We have listed five different ways to watch Star Wars. Each option seems to have its own faction of die-hard fans, but there is no correct order that you’re supposed to watch the Star Wars movies in.

Personally, I think that Flashback Order is the most exciting, but ultimately, it’s up to you.

Episode Order is best if you’re revisiting the saga. Release Order dishes out information in the same sequence the rest of the world received it. Denial Order is a great way to cut some unnecessary hours out of the runtime, and Machete Order is a more narratively fulfilling way to do so.

The benefits of Flashback Order are that it includes every film, preserves most of the narrative twists, and stretches out the original trilogy (which is favored by most fans).

Get Your Fill With Star Wars Fan Films

If 25 hours of Star Wars movies isn’t enough for you, why not delve into the expanded universe with TV shows, comics, podcasts, and games? Disney has excised a lot of Star Wars content from the official canon since its takeover in 2012, but plenty of canonical content is still out there waiting to be discovered.

If you aren’t bothered about the official canon, there are also plenty of Star Wars fan films on YouTube. You can watch these for free, and they’re a real blast, even if the official Star Wars saga doesn’t acknowledge them.

Read the full article: Watch Star Wars Out of Order to Make Everything Better


Read Full Article