24 December 2019

How to Take a Screenshot on Your Mac


mac-screenshot

When you want to capture the screen on macOS, you have both native and third-party tools to choose from. Let’s see how to make the best of the screenshot options on your Mac and explore some useful tricks along the way.

Unlock the free "Most Useful Mac Keyboard Shortcuts" cheat sheet now!

This will sign you up to our newsletter

Enter your Email

How to Take a Screenshot on a Mac With Keyboard Shortcuts

macOS has a few default keyboard shortcuts to help you capture the screen instantly. We’ll go through them one by one, as which one to use depends on what exactly you want to take a screenshot of.

(Having trouble with your Mac’s screenshot shortcuts? Ensure that you haven’t disabled them under System Preferences > Keyboard > Shortcuts > Screenshots.)

Capture the Entire Screen

For this, you need the shortcut Cmd + Shift + 3. It takes a snapshot of the entire screen and saves it to the desktop as a PNG image.

Want to copy the screenshot to the clipboard to paste it elsewhere instead of saving it automatically? Add the Control key to the keyboard shortcut—hit Control + Cmd + Shift + 3. For more on this basic copy-paste procedure, see how to copy and paste on your Mac.

Capture a Part of the Screen

Capture screen portion with keyboard shortcut on mac

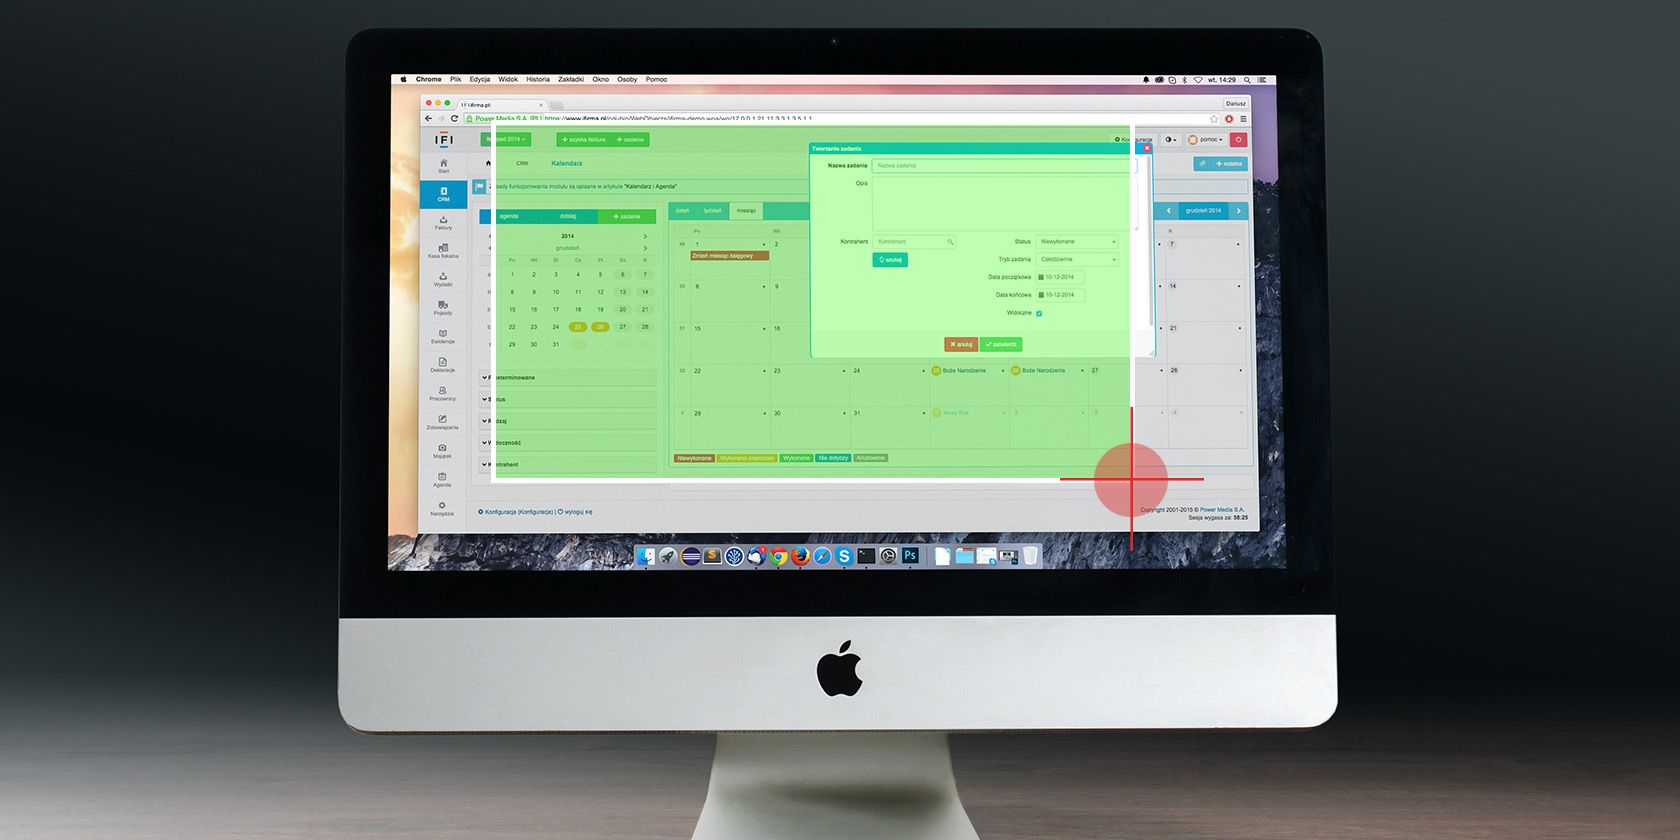
You’ll need to hit Cmd + Shift + 4 if you want to snap a specific portion of the screen. This shortcut turns the cursor into a crosshair; you can then click and drag it across the part of the screen you want to capture.

While making the selection, hold down the Shift key if you want to limit your adjustments to either the X or Y axis. To resize your selection proportionally from the center, hold down the Option key. And if you want to move the selection, hold down Space instead.

(Changed your mind about taking the screenshot? No problem. Hit the Escape key to cancel the action.)

Once you’re satisfied with the selection, release the mouse. The screenshot then ends up on the desktop as a PNG file. As above, if you want to copy the captured image to the clipboard instead of saving it, you’ll need to tweak the shortcut a bit. Modify the shortcut to Control + Cmd + Shift + 4 to copy what you capture.

Capture an Application Window

capture application window with keyboard shortcut on mac

Want to take a screenshot of the active window? First hit Cmd + Shift + 4. Then hit Space, and you’ll see the crosshair turn into a camera.

The active window appears highlighted, and if you click the camera, you get a screenshot of the window. Before clicking, you can also choose to move the focus of the camera to a different window.

If you want to take a timed screenshot, you’ll need to open your Mac’s built-in screenshot utility. We’ll discuss this in the next section.

How to Take a Screenshot on a Mac With the Screenshot App
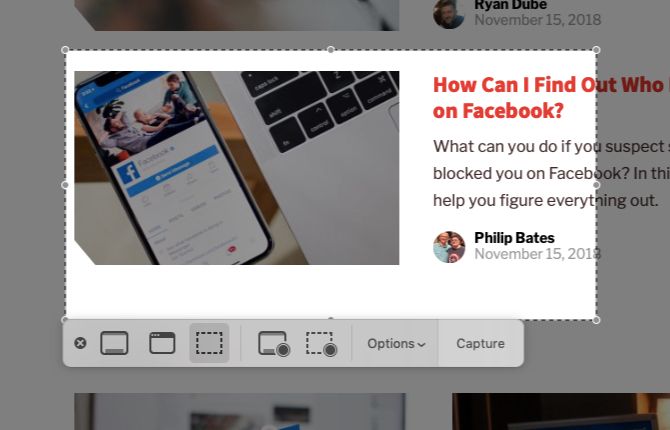
screenshot app on mac

Under Applications > Utilities, you’ll find your Mac’s stock screen capture app, aptly named Screenshot. You can also bring up this app with the shortcut Cmd + Shift + 5.

(If your Mac isn’t running Mojave or later, look for the Grab app instead of Screenshot in the Utilities folder.)

With Screenshot, Apple has simplified the whole screen capture process. The app is useful if you prefer a more point-and-click approach over keyboard shortcuts.

Screenshot’s toolbar has three buttons that make screen capture on macOS quick and painless: Capture Entire Screen, Capture Selected Window, and Capture Selected Portion. (The app also has a couple of buttons for screen recording.)

For timed selections, click on the Options button in the toolbar. You’ll find the timer options in the menu that shows up.

After you take a screenshot using any of the options above, you’ll see a tiny thumbnail preview at the bottom-right of the screen. Click on it to reveal a full-fledged preview window with tools to edit, annotate, and delete the screenshot. Here, you can add text, sketches, shapes, and even your signature to a screenshot.

The full-sized preview window also contains an option to open the screenshot with other Mac apps like Notes, Mail, and Reminders.

If you want to turn off the thumbnail feature, uncheck the Show Floating Thumbnail item in the Options menu from the screenshot toolbar.
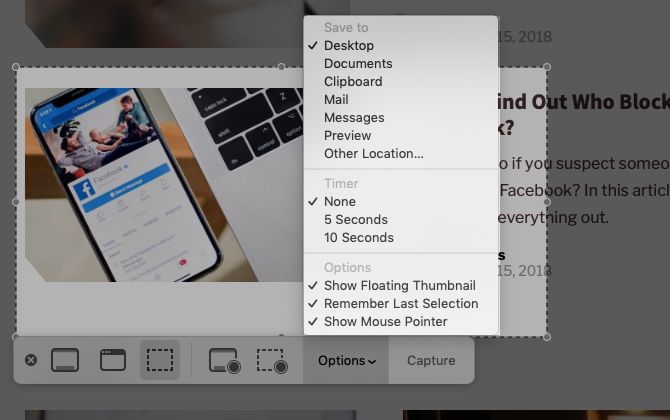
options menu in screenshot app on mac

Configuring Screen Grab Settings on Mac

You might want to, say, change the default screenshot format or change where screenshots save to on your Mac. In such cases, you’ll need to execute a command from the Terminal app. Let’s take a look at three of the most useful commands.

We have appended each command with a second one that’s needed to cement the changes. It reads as follows:

killall SystemUIServer

To Change the Default Screenshot Format

You can save screenshots in other formats like JPG, BMP, and PDF. To do so, you’ll need to replace [file type] in the command below with the relevant three-letter format name:

defaults write com.apple.screencapture type [file type] && killall SystemUIServer

To Change Where Screenshots Get Saved

On Mojave and later macOS versions, you can change the default destination folder directly from the Screenshot app. To do this, click on the Options button in the screenshot toolbar and select a folder of your choice under the Save To section of the resulting menu.

On a pre-Mojave Mac, you’ll have to rely on this Terminal command:

defaults write com.apple.screencapture location [path] && killall SystemUIServer

Replace [path] with the new Finder save location that reads something like this:

/Users/[Username]/Pictures/Screenshots

You can either type the pathname into Terminal, or drag and drop the relevant folder into Terminal to paste its pathname.

Alternatively, you can also copy the pathname and then paste it into Terminal. You’ll find the Copy as Pathname command in the destination folder’s context menu or right-click menu. However, the command appears only when you hold down the Option key while right-clicking.

To Change the Default File Name for Screenshots

If you want to replace the default prefix (Screen Shot) in screenshot names with a different keyword, try this command:

defaults write com.apple.screencapture name [file name] && killall SystemUIServer

Be sure to replace [file name] in the command with the new keyword before execution.

If you’d rather not fiddle with the Terminal, install a utility that lets you tweak macOS settings without Terminal commands.

How to Take a Screenshot on a Mac With Preview

The Preview app on your Mac also allows you to take screenshots. It’s just one of the essential macOS Preview tricks you’ll want to know about.

The advantage of using Preview for screenshots is that you can specify a different file format and save location with each new capture. Of course, you can also instantly edit the screenshot in Preview before saving it.

You’ll find the screenshot tools in Preview under File > Take Screenshot. Unfortunately, a timed screenshot option is missing here.

The Best Screen Capture Apps for Your Mac
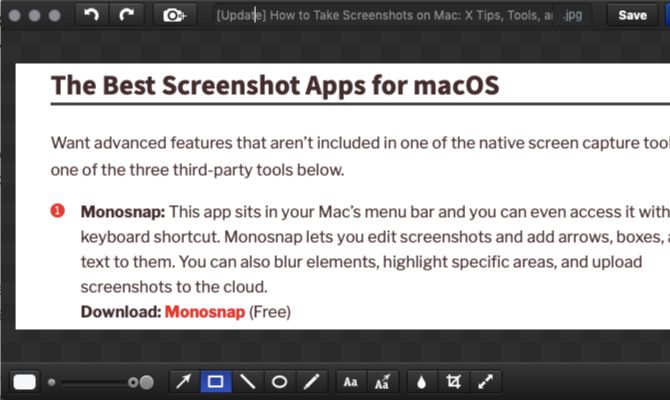
monosnap app for mac

Want advanced features that aren’t included in the in-built screen capture tools on your Mac? Try one of the three third-party tools below.

1. Monosnap

This app sits in your Mac’s menu bar and you can access it with a keyboard shortcut. Monosnap lets you edit screenshots and add arrows, boxes, and text to them. You can also blur elements, highlight specific areas, and upload screenshots to the cloud. Monosnap made it to our list of the top Mac menu bar apps.

Download: Monosnap (Free)

2. Skitch

This app lets you capture various onscreen elements and edit/annotate them without having to open another app. Skitch also supports timed screenshots.

Download: Skitch (Free)

3. Snappy

Get Snappy if your work involves collaborating on screenshots or “snaps” often. You can not only edit and annotate screenshots as usual, but also share them with ease. The sharing options include a password-protection feature and a self-destruct timer.

Download: Snappy (Free)

Take Screenshots on Other Apple Devices, Too

Now you know how to take a screenshot on your MacBook quickly and efficiently. macOS gives you the tools to capture whatever you need.

Why not master the basics of iPhone screenshots next?

Read the full article: How to Take a Screenshot on Your Mac


Read Full Article

How to Force Restart an iPhone and Enter Recovery Mode


iphone-force-restart-recovery

Starting with 2016’s iPhone 7 line, Apple dropped the old mechanical home button in favor of a capacitive touch panel. Since that home button relies on software, it’s no longer used for button inputs like taking a screenshot. Further complicating this, the iPhone X line of devices introduced yet different button combinations.

This means that you might have no idea how to enter iPhone recovery mode on your new device. We’ll show you how to put your iPhone (as well as iPad or iPod touch) in recovery mode, no matter which model you have.

Jump to your device:

Force Rebooting and Recovery Mode Explained

You’ll hopefully never need to hard reset your iPhone, but it’s a good tip to know about for those occasions when something goes wrong. For example, this can help you fix ghost touch on your iPhone.

When your device becomes completely unresponsive, you can choose between waiting for the battery to deplete and initiating a hard reset. A hard reset is basically the equivalent of pulling the power plug, forcing your iPhone to shut down and start up again.

Recovery mode takes this a step further, putting your device into a state where you can reinstall iOS by connecting your iPhone to a computer running iTunes (or by using Finder on macOS Catalina and newer). If your iPhone refuses to boot or crashes on startup, you’ll need to put the device into recovery mode in order to rescue it.

iPhone Recovery Mode

Note that when you reinstall iOS, you’ll lose all the data on your iPhone. This isn’t a problem if you make regular iPhone backups, which you can do using iCloud or locally in iTunes or Finder. Unfortunately, you can’t back up your device in recovery mode, since iTunes will only offer to restore the firmware.

As such, if you are stuck with an iPhone that won’t boot and you don’t have a backup to restore, there’s nothing you can do to save your data.

How to Enter Recovery Mode on iPhone 8, iPhone X, and Newer

iPhone X and iPhone 8

Apple changed the button combination to force restart on the iPhone 8 and later. The below steps will work with the iPhone 8/8 Plus, iPhone X, XS, and XR, and iPhone 11 line.

Note that you’ll need to perform these button combinations fairly quickly.

How to Force Restart the iPhone 8 and Newer

  1. Press then release the volume up button.
  2. Immediately press then release the volume down button.
  3. Hold the side button till you see an Apple logo. Let go of the button when you see this logo.

How to Put the iPhone 8 and Newer Into Recovery Mode

  1. Connect your iPhone to a computer.
    1. On a Windows PC or Mac running macOS Mojave or earlier, launch iTunes. On a Mac running macOS Catalina or newer, open Finder.
  2. Press then release the volume up button.
  3. Immediately press then release the volume down button.
  4. Hold the side button, and don’t let go when you see the Apple logo.
  5. Keep holding till you see the Recovery Mode screen.

How to Enter Recovery Mode on iPhone 7 and iPhone 7 Plus

iPhone 7 and 7 Plus

Both the iPhone 7 and larger iPhone 7 Plus model were released in September 2016. These were to first iPhones to lack a mechanical home button, which required Apple to change these shortcuts for the first time since the iPhone launched in 2007.

You’ll also need to follow these steps to force restart the 7th generation iPod touch, released in 2019.

How to Force Restart the iPhone 7 or 7 Plus

  1. Press and hold the side button and volume down buttons at the same time.
  2. Continue holding the buttons until you see the Apple logo, then let go.

How to Put the iPhone 7 or 7 Plus Into Recovery Mode

  1. Connect your iPhone to a computer.
    1. On a Windows PC or Mac running macOS Mojave or earlier, launch iTunes. On a Mac running macOS Catalina or newer, open Finder.
  2. Press and hold the side button and volume down button at the same time.
  3. Keep holding the buttons, even once you see the Apple logo.
  4. Release both buttons when you see the Recovery Mode screen.

How to Enter Recovery Mode on iPhone 6s and Older

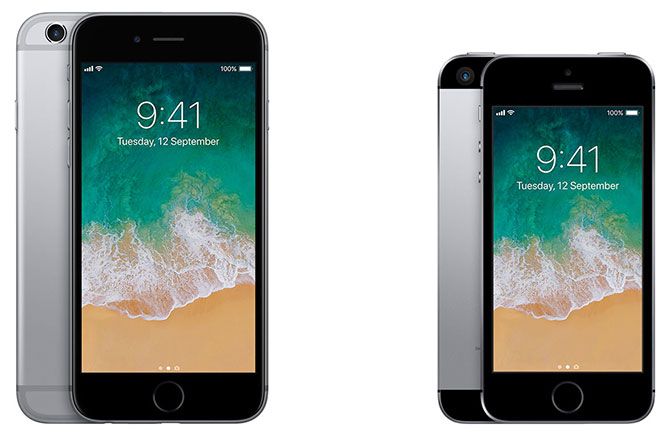
iPhone 6 and iPhone SE

The iPhone 6s, released in 2015, was Apple’s last iPhone with a mechanical home button. The following advice is good for that device, as well as all iPhones that came before it. This includes the Plus models, iPhone SE, and iPod touch 6th generation and earlier.

How to Force Restart the iPhone 6s and Older

  1. Press and hold both the home and lock buttons.
    1. On the iPhone 6 or later, the lock button is on the right side. For the iPhone 5s and earlier, it’s on top of the device.
  2. Release the buttons once you see the Apple logo.

How to Put the iPhone 6s and Older Into Recovery Mode

  1. Connect your iPhone to a computer.
    1. On a Windows PC or Mac running macOS Mojave or earlier, launch iTunes. On a Mac running macOS Catalina or newer, open Finder.
  2. Press and hold the home and lock buttons as mentioned above.
  3. Keep holding the buttons even once you see the Apple logo.
  4. Release both buttons when you see the Recovery Mode screen.

How to Force Restart and Enter Recovery Mode on iPad

iPad Air 2

Need to force restart or use recovery mode on your iPad instead? The process is simple.

To do this on an iPad model with a Home button, follow the same instructions for force restarting the iPhone 6s and earlier described above. If you have an iPad with Face ID, follow the above steps to force restart an iPhone 8 or newer.

Just note that on iPad, the power button is on top, not on the side.

You’re Ready to Recover Your iPhone

When you put your device into recovery mode, you’ll have 15 minutes to begin reinstalling iOS before your device automatically exits Recovery Mode. You’ll need to repeat the combination of button presses in order to put it back into Recovery Mode if this happens.

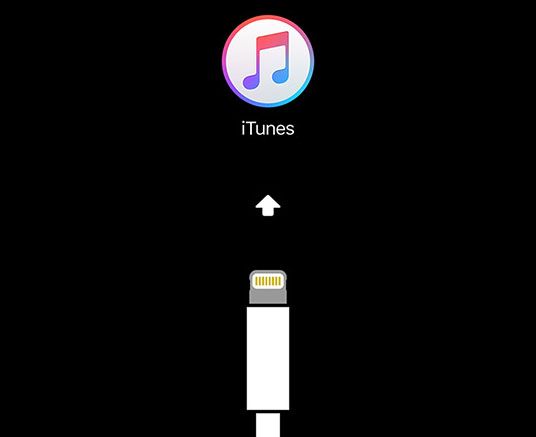
Your device will not show up as normal in iTunes or Finder while in Recovery Mode, and you’ll see an error message like the one above. You can always choose to update the firmware, or simply restore the existing version.

iTunes Repair iPhone

Once your iPhone reboots as normal, you will need to log in with your credentials to remove Apple’s Activation Lock. This is a security feature that prevents someone from using your device if you reset it without signing out of iCloud.

Because of this, you should never buy an iPhone if the seller refuses to unlock it in front of you. A reset phone with Activation Lock still enabled will ask for the owner’s Apple ID before you can begin the setup process.

iPhone Recovery Mode Made Easy

We’ve seen how to force restart your device and enter recovery mode, no matter what iPhone, iPad, or iPod touch model you have. It’s a simple process once you know it, but the increasingly confusing button combinations are a bit obtuse.

For more on recovery, check out what to do if you forget your iPhone passcode.

Read the full article: How to Force Restart an iPhone and Enter Recovery Mode


Read Full Article

DJI patents an off-road rover with a stabilized camera on top


DJI is easily the leading brand when it comes to camera drones, but few companies have even attempted a ground-based mobile camera platform. The company may be moving in that direction, though, if this patent for a small off-road vehicle with a stabilized camera is any indication.

The Chinese patent, first noted by DroneDJ, shows a rather serious-looking vehicle platform with chunky tires and a stabilized camera gimbal. As you can see in the image above, the camera mount is protected against shock by springs and pneumatics, which would would no doubt react actively to sudden movements.

The image is no simple sketch like those you sometimes see of notional products and “just in case” patents — this looks like a fleshed-out mechanical drawing of a real device. Of course, that doesn’t mean it’s coming to market at all, let alone any time soon. But it does suggest that DJI’s engineers have dedicated real time and effort to making this thing a reality.

Why have a “drone” on the ground when there are perfectly good ones for the air? Battery life, for one. Drones can only be airborne for a short time, even less when they’re carrying decent cameras and lenses. A ground-based drone could operate for far longer — though naturally from a rather lower vantage.

Perhaps more importantly, however, a wheeled drone makes sense in places where an aerial one doesn’t. Do you really want to fly a drone through narrow hallways in security sweeps, or in your own home? And what about areas where you might encounter people? It would be better not to have to land and take off constantly for safety’s sake.

It’s likely that DJI has done its homework and knows that there are plenty of niches to which they could extend if they diversified their offerings a bit. And like so many situations where drones have become commonplace, we’ll all think of these robot-powered industries as obvious in retrospect. For instance the winner of our Startup Battlefield at Disrupt Berlin, Scaled Robotics, which does painstaking automated inspections of construction sites.

In fact DJI already makes a ground-based robotic platform, the RoboMaster S1. This is more of an educational toy, but may have served as a test bed for technologies the company hopes to apply elsewhere.

Whether this little vehicle ever sees the light of day or not, it does make one think seriously about the possibility of a wheeled camera platform doing serious work around the home or office.


Read Full Article

Fyre Festival meets Mr. Bone Saw


Social media influencers have been known to promote events around the world for the right price — decisions that sometimes prove to be mistakes. Bella Hadid, who’d promoted the failed Fyre Festival with a gaggle of other models who’d vacationed in the Bahamas for a video designed to help sell tickets, later apologized for her involvement.

Not everyone is apologizing for what’s widely seen as a new misstep in the world of influencer marketing: the paid attendance of celebrities and other social media influencers this past weekend to the three-day-long MDL Beast Festival in Riyadh, Saudi Arabia. The country billed the event as its largest arts, culture and music festival — one attended by “150,000 eager fans from across the region and further afield.”

Among those being called out for dropping onto the scene are models Alessandra Ambrosio and Romee Strijd; actors Ryan Phillippe, Wilmer Valderrama and Armie Hammer; DJ Steve Aoki; and social media stars Sofia Richie and Scott Disick, all of whom were photographed at the event and some of whom also posted pictures to Instagram and other social media outlets, singing the region’s praises and including the hashtag #mdlbeast.

The festival aims to promote the efforts of its de facto ruler, Crown Prince Mohammed bin Salman (known as MBS), to reform the conservative kingdom, which is well-known for its oppression of women’s rights and ethnic and racial minority rights. Indeed, the country has been aggressively trying to polish its image amid growing concern over the years-long, Saudi-led civil war in Yemen that has led to mass starvation and more than 100,000 fatalities; the gruesome, state-directed assassination of Saudi Arabian dissident and Washington Post columnist Jamal Khashoggi, who was reportedly dismembered with a bone saw; and the kingdom’s many other efforts to stifle dissent.

In just one example of how far the kingdom is willing to go, it staged the first-ever WWE women’s match in Riyadh on Halloween, an effort that Amnesty International’s advocacy director for the Middle East and North Africa called “sportswashing.” The MDL Beast Festival is another attempt to highlight how progressive Saudi Arabia has ostensibly come.

Some have pushed against the kingdom’s charm offensive. Hip-hop star Nicki Minaj canceled a planned performance in Saudi Arabia in July at a separate new international music festival there, after the nonprofit Human Rights Foundation asked her to back out of the gig.

At the time, Minaj issued a statement, saying, “I want nothing more than to bring my show to fans in Saudi Arabia, [but] after better educating myself on the issues, I believe it is important for me to make clear my support for the rights of women, the LGBTQ community and freedom of expression.”

Model Emily Ratajkowski also turned down a paid invitation to attend this past weekend’s festival, citing Saudi Arabia’s human rights record. “It is very important to me to make clear my support for the rights of women, the LGBTQ community, freedom of expression and the right to a free press. I hope coming forward on this brings more attention to the injustices happening there.”

Philippe is meanwhile defending on Instagram his decision to accept the trip to this past weekend’s extravaganza, writing: “i had a magical day with wonderful people. i love travel. i love different cultures. i love how we can find ways to connect through our human oneness, the pure desire for love and freedom. no matter where in the world. hoping those connections help to bring even more positive change and progress.”

It’s a decision that’s likely to earn Phillippe — and other high-wattage attendees — more bad publicity in the coming days. While more than a year ago, the CIA concluded that MBS ordered Khashoggi’s assassination, the kingdom has continued to deny any involvement in his murder, alleging instead that it was a last-minute decision by Saudi agents on the ground. (This narrative, notes The New York Times, “contradicts ample evidence that the agents came with an intent to kill and the tools to do so.”)

Now, in a court today in Saudi Arabia, following a trial that was shrouded in secrecy, five men were sentenced to death and three others to prison terms totaling 24 years over Khashoggi’s killing, while a former top adviser to MBS and a former deputy intelligence chief were both cleared.

The sentences are subject to appeal, notes the Times, which also notes that in Saudi Arabia, death sentences typically involve beheadings in public squares. Either way, the sentencing seems poised to further complicate Western relations with the kingdom, for influencers and a lot of others in the position of having to decide whether or not to accept its money. The verdict, said Lynn Maalouf, Amnesty International’s Middle East research director, in a statement, is a “whitewash.”


Read Full Article

23 December 2019

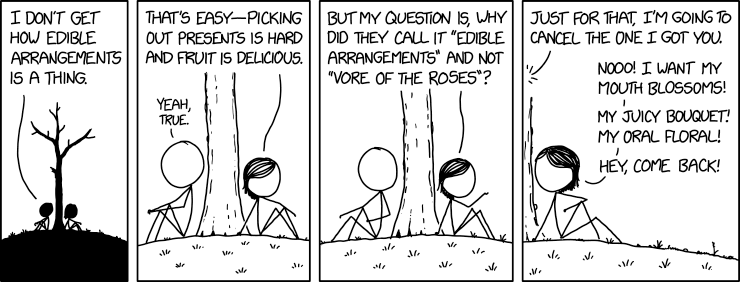
Edible Arrangements


Edible Arrangements

A false start for foldables in 2019


A year from now, this is likely to have all blown over. A year from now, the Samsung Galaxy Fold’s turbulent takeoff may well be a footnote in the largest story of foldables. For now, however, it’s an important caveat that will come up in every conversation about the nascent product category.

How history remembers this particular debacle will depend on a number of different factors, the ultimate success of the category chief among them. If foldables do takeoff, the Galaxy Fold’s very public false start will be remembered as little more than a blip. There’s plenty of reasons to root for this — devices have seemingly hit the upper threshold of product footprint. If the trend toward larger screens continues, it’s going to take a clever form factor like this to accommodate that need. 

If foldables are relegated to the dustbin of history, however, the Fold misfire will take much of the heat. It’s clear that a trail of broken units will have little impact on Samsung’s bottom line. Two Galaxy Note 7 recalls were a testament to the hardware giant’s resilience in the public eye, after serving as a rounding error in the company’s bottom line that year. Sending some half-baked models to a handful of reviews wasn’t nearly as major of a mistake, but the category, much like the Fold itself, is in a fragile state.


Read Full Article

The beautiful balance between courage and fear | Cara E. Yar Khan

The beautiful balance between courage and fear | Cara E. Yar Khan

After being diagnosed with a rare genetic condition that deteriorates muscle, Cara E. Yar Khan was told she'd have to limit her career ambitions and dial down her dreams. She ignored that advice and instead continued to pursue her biggest ambitions. In this powerful, moving talk, she shares her philosophy for working on the projects that matter to her most -- while letting courage and fear coexist. Watch for heart-stopping, vertigo-inducing footage of a trip that shows her living her theory to the full.

Click the above link to download the TED talk.

8 Cool HTML Effects That Anyone Can Add to Their Website


You want your website to look awesome—but your web development skills are lacking?

Don’t despair! You don’t have to know CSS or PHP to build a fancy site with cool effects. Some simple HTML tags and knowing how to copy-and-paste will do.

To get you started with some cool html effects, we’ve compiled these free HTML effect code templates. They will enhance the functionality and user experience of your site, while not breaking the bank. While they’re mostly HTML effects, they may also contain some CSS and PHP.

1. Cool Parallax Effect

You have probably seen the Parallax Effect used on websites with online ads. As you scroll down an article, the background image appears to scroll at a different pace, or an advert appears. Perhaps the background image changes as you visit different parts of the site. It’s a cool effect that adds visual depth to the content and ideal even if you don’t understand basic HTML code.

Since this is not a pure HTML effect, we can only offer animated GIFs to demonstrate the output.

Below you’ll see a basic version of the Parallax effect; a box of text moves across a static background image as you scroll.

Parallax is a cool HTML effect

You can play with the effect and copy the code for the above simple Parallax scrolling effect from W3Schools.

In its most sophisticated version, this effect is a combination of HTML, CSS, and JS.

Enjoy cool HTML web effectts

Go ahead and fetch the codes for the above Header/Footer Parallax effect from CodePen.

2. Scrollable HTML Comment Box Code

This is a simple but helpful HTML element that lets you pack long snippets of text into a compact format. This way it doesn’t take up the entire space on the page.

HTML input:

<div >Putting some text in this box will let you see how large it can stretch to - eventually the scrollbars should show, enabling you to scroll through the text. That's it! :)</div>

Output demo:

Putting some text in this box will let you see how large it can stretch to – eventually the scrollbars should show, enabling you to scroll through the text. That’s it! :)

You can play with the colors and the size of the text box to make it fit your needs.

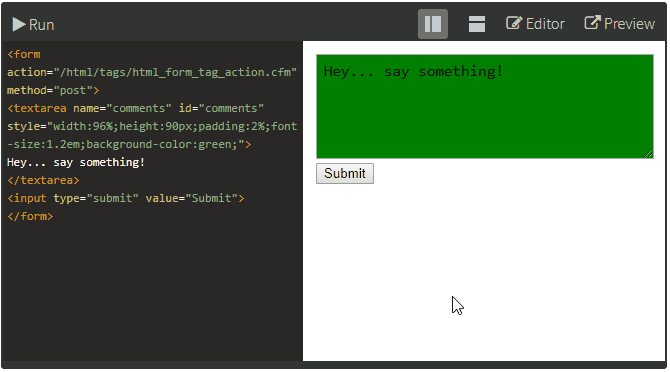
If you desire something a little fancier, you can also fetch code for a customizable comment box from Quackit. They offer several templates, but you can also use their editor to manually change and test (run) your custom code.

Create a HTML comment box

3. Highlight Text

With a simple <span>HTML tag you can add a ton of cool effects to your text or images. Note that not all of them work across browsers. The ones mentioned here work in Google Chrome, Microsoft Edge, and Mozilla Firefox.

This HTML text effect highlights the text between the <span></span> tags.

Input:

<span >Your highlighted text here.</span>

Output demo:

Highlighting text is a simple HTML trick

4. Add Background Image to Text

Likewise, you can change the color of your text or add a background image. This one looks great if the text’s font size is larger.

Input:

<span >MakeUseOf presents...</span>

The same effect is achieved by adding the style and font elements to text in a<strong> tag.

Output demo:

HTML tricks include adding background images to text

5. Add Title Tooltip

A title tooltip comes up when you scroll with the mouse over a piece of “manipulated” text or image. You know these from images, linked text, or menu items in desktop apps. Here is how you can add a tooltip to plain text.

Input:

<span title="See, this is the tooltip. :)">Move your mouse over me!</span>

Output demo:

Tooltips are easily added in HTML

6. Make Scrolling or Falling Text

When you search for “marquee html” on Google, you’ll discover a little Easter Egg. See the scrolling search result count at the top? That’s an effect created by the now obsolete marquee tag. While this HTML feature has been deprecated, most browsers still support it.

Input:

<marquee>I wanna scroll with it, baby!</marquee>

Output demo:

The Marquee HTML effect can still be stunning

You can add further attributes to control the scrolling behavior, background color, direction, height, and more. These effects can become quite irritating if you overdo it.

Add a marquee text effect to your webpage

For a cool falling text effect, head to Quackit again and copy their highly customized marquee code.

7. Add a Switchmenu

The most exciting HTML effects are dynamic HTML effects. However, they are often script based. Here is one effect for menus that you’ll agree looks very slick. have come to adore.

It’s a little more complicated than your average HTML tag because it works with a style sheet and scripts. The advantage is that you don’t have to upload a CSS or script file to make it work. Instead, paste the code into the <head> section of your website.

Input:

Add the following code into the <head> section of your page:

<style type="text/css">
.menutitle{
cursor:pointer;
margin-bottom: 5px;
background-color:#ECECFF;
color:#000000;
width:140px;
padding:2px;
text-align:center;
font-weight:bold;
/*/*/border:1px solid #000000;/* */
}.submenu{
margin-bottom: 0.5em;
}
</style><script type="text/javascript">/***********************************************
* Switch Menu script- by Martial B of http://getElementById.com/
* Modified by Dynamic Drive for format & NS4/IE4 compatibility
* Visit http://www.dynamicdrive.com/ for full source code
***********************************************/var persistmenu="yes" //"yes" or "no". Make sure each SPAN content contains an incrementing ID starting at 1 (id="sub1", id="sub2", etc)
var persisttype="sitewide" //enter "sitewide" for menu to persist across site, "local" for this page onlyif (document.getElementById){ //DynamicDrive.com change
document.write('<style type="text/css">n')
document.write('.submenu{display: none;}n')
document.write('</style>n')
}function SwitchMenu(obj){
if(document.getElementById){
var el = document.getElementById(obj);
var ar = document.getElementById("masterdiv").getElementsByTagName("span"); //DynamicDrive.com change
if(el.style.display != "block"){ //DynamicDrive.com change
for (var i=0; i<ar.length; i++){
if (ar[i].className=="submenu") //DynamicDrive.com change
ar[i].style.display = "none";
}
el.style.display = "block";
}else{
el.style.display = "none";
}
}
}function get_cookie(Name) {
var search = Name + "="
var returnvalue = "";
if (document.cookie.length > 0) {
offset = document.cookie.indexOf(search)
if (offset != -1) {
offset += search.length
end = document.cookie.indexOf(";", offset);
if (end == -1) end = document.cookie.length;
returnvalue=unescape(document.cookie.substring(offset, end))
}
}
return returnvalue;
}function onloadfunction(){
if (persistmenu=="yes"){
var cookiename=(persisttype=="sitewide")? "switchmenu" : window.location.pathname
var cookievalue=get_cookie(cookiename)
if (cookievalue!="")
document.getElementById(cookievalue).style.display="block"
}
}function savemenustate(){
var inc=1, blockid=""
while (document.getElementById("sub"+inc)){
if (document.getElementById("sub"+inc).style.display=="block"){
blockid="sub"+inc
break
}
inc++
}
var cookiename=(persisttype=="sitewide")? "switchmenu" : window.location.pathname
var cookievalue=(persisttype=="sitewide")? blockid+";path=/" : blockid
document.cookie=cookiename+"="+cookievalue
}if (window.addEventListener)
window.addEventListener("load", onloadfunction, false)
else if (window.attachEvent)
window.attachEvent("onload", onloadfunction)
else if (document.getElementById)
window.onload=onloadfunctionif (persistmenu=="yes" && document.getElementById)
window.onunload=savemenustate</script>

And this code goes wherever you want the dynamic menu to appear.

<!-- Keep all menus within masterdiv-->
<div id="masterdiv"><div onclick="SwitchMenu('sub1')">Topics</div>
<span id="sub1">
- <a href="//www.makeuseof.com/service/browser">Browsers/Addons</a><br>
- <a href="//www.makeuseof.com/service/web_based">Web Apps</a><br>
- <a href="//www.makeuseof.com/service/how-to">How-To Tips</a><br>
- <a href="//www.makeuseof.com/service/applications">Cool Software</a><br>
...and more!
</span><div onclick="SwitchMenu('sub2')">Staff Writers</div>
<span id="sub2">
- <a href="//www.makeuseof.com/tag/author/karl-l-gechlik/">Karl Gechlik</a><br>
- <a href="//www.makeuseof.com/tag/author/tinsie/">Tina</a><br>
- <a href="//www.makeuseof.com/tag/author/varunkashyap/">Varun Kashyap</a><br>
...and more!
</span><div onclick="SwitchMenu('sub3')">Miscellaneous</div>
<span id="sub3">
- <a href="//www.makeuseof.com/about/">About</a><br>
- <a href="//www.makeuseof.com/contact">Contact</a><br>
- <a href="//www.makeuseof.com/archives-2">Archives</a><br>
- <a href="//www.makeuseof.com/disclaimer">Disclaimer</a><br>
</span></div>

Output demo:

Unfortunately, we cannot demonstrate this effect here. But the original source, Dynamic Drive, features a working copy of this dynamic HTML effect.

Cool HTML menu effect

8. Get a HTML Spreadsheet With Tableizer

If you want to display a spreadsheet on your site, let Tableizer! transform your data into an HTML table. Just paste the raw data from Excel, Google Doc, or any other spreadsheet into the converter tool at tableizer.journalistopia.com. Tweak the table options, then click Tableize It! to receive the HTML output.

Display your spreadsheet in a webpage with this cool HTML trick

Click Copy HTML to Clipboard to copy the HTML code and add it to your website. Consider editing the background-colors to make it look a lot cooler.

While this is not really an HTML effect, it’s quite handy.

More Awesome HTML Effects

The power of HTML, CSS, and JavaScript offers potentially unlimited options for stunning text effects on your website. Want more?

We’ve shown you eight (mostly) HTML effects that you can use to enhance your website. Some are basic, others come with bells and whistles. All of them are easy to implement.

If you’d like to go deeper and write your own HTML, start with these easy to learn and simple HTML code examples.

Read the full article: 8 Cool HTML Effects That Anyone Can Add to Their Website


Read Full Article

How Do Forensic Analysts Get Deleted Data From Your Phone?


forensic-analyst-phone-data

If you’ve watched a crime TV show before, you’ve probably seen analysts extracting data from a phone. How realistic are these procedures, and can the police recover deleted photos, texts, and files from a phone?

Let’s look into what a forensic analyst can do with a phone.

Why Mobile Forensic Investigations Happen

A mobile forensic investigation takes place when data on the phone is crucial to a case. Back in 2014, when two Minnesotan girls went missing, digital forensics helped police find their abductor. Many other cases have been broken open by the information taken from a victim’s or perpetrator’s phone.

Even a simple piece of information, like a single text message, could help investigators solve a case. Other times, it’s a more complicated picture painted by deleted call logs, time stamps, geolocation data, and app usage.

Search history could prove to be incriminating. Many types of information could help the police solve a crime—and phones store a lot of that kind of information

Even if you’re not a prime suspect, the police may want to look into your phone. Phones belonging to victims of crimes can provide police with valuable data, especially if those victims are incapacitated or missing.

The Different Types of Data Acquisition

Forensic analysts can perform different kinds of data acquisitions. The simplest is known as “manual acquisition,” and it involves searching through the phone normally. This doesn’t reveal deleted data, so it doesn’t tell analysts much.

A “logical acquisition” provides more detailed data. This involves transferring data from the phone to a PC. This transfer makes it easy for forensic investigators to work with the data, but is still unlikely to recover deleted information.

When investigators want to see hidden data, they use a “file system acquisition.” Mobile devices are big databases, and a file system acquisition gives an investigator access to all of the files in the database. This includes hidden and root files, but still no deleted data.

Finally, there’s a “physical acquisition.” This is the hardest kind of acquisition, as it needs special tools to dump a copy of the storage into a file. However, this lays everything bare—even deleted files. This allows procedures such as forensic text message recovery to take place.

How Can Deleted Files Be Recovered?

You might be wondering how the police can read text messages that have been deleted. In truth, when you delete something from your phone, it doesn’t vanish instantly.

The flash memory in mobile devices doesn’t delete files until it needs to open up space for something new. It merely “deindexes” it, essentially forgetting where it is. It’s still stored, but the phone doesn’t know where or what it is.

If the phone hasn’t overwritten the deleted data, another piece of software could find it. Identifying and decoding it isn’t always easy, but the forensic community has extremely powerful tools that help them with this process.

The more recently you’ve deleted something, the less likely it will have been overwritten. If you deleted something months ago, and you use your phone a lot, there’s a good chance that the file system will have overwritten it already. If you only deleted it a few days ago, the chances are higher that it’s still there somewhere.

Some iOS devices, like newer iPhones, take an additional step. As well as deindexing the data, they also encrypt it—and there’s no known decryption key. That’s going to prove extremely difficult (if not impossible) to bypass.

Many phones automatically back up to the user’s computer or to the cloud. It can be easier to extract the data from that backup than from the phone. The efficacy of this strategy depends on how recently the phone had a back up performed, and the service used to store the files.

Which Types of Files Can Be Recovered?

The types of recoverable files may depend on the device a forensic analyst is working on. However, there are a few basic types that are likely to be recovered:

  • Text messages and iMessages
  • Call history
  • Emails
  • Notes
  • Contacts
  • Calendar events
  • Images and videos

It’s also possible that investigators can trace deleted WhatsApp messages—unless they were encrypted. If you use your Android for file storage, those files might still be hanging around in storage, too.

What About Encryption?

Mobile device encryption poses a big problem for forensic analysis. If the user used secure encryption, and there’s no way to get the encryption key, it’s going to be difficult or impossible to get any data from the phone. iTunes even asks users to encrypt the backups they make on their computers.

While this makes phones less useful to forensic investigators, there are some ways to get past the encryption. Some phones have backdoors built in that allow professionals access to the files. Other investigators might be able to guess or crack your password.

If they can’t, however, those encrypted files are going to cause serious problems. If you’re worried about forensic examination of your phone (e.g., you’re a journalist with sensitive sources), it’s a good idea to use the most secure encryption settings you can.

Is Any of Your Information Safe?

In the end, there are no guarantees when it comes to mobile forensic investigation. There’s no way to completely secure every piece of data on your phone against a committed and intelligent investigator. At the same time, there’s no way to access data on every phone.

However, there’s a wide variety of continually evolving tools out there. These take into account the always-changing landscape of data protection. And, of course, there’s some luck involved as well.

As always, we recommend the same things if you want to keep your data safe. Encrypt everything. Be smart about where and how you back up. Use strong passwords. Lastly, don’t do anything that will put you in the crosshairs of a forensic investigation.

How to Recover Deleted Text Messages

If you feel like performing some do-it-yourself cell phone forensics, you can recover deleted text messages on your phone. There are some limitations you’ll have to overcome, but it is possible!

The steps involved are quite lengthy, so be sure to read how to recover text messages on Android or iPhone for the whole picture.

Keeping Your Data Secure

So, can police recover deleted pictures, texts, and files from a phone? The answer is yes—by using special tools, they can find data that hasn’t been overwritten yet. However, by using encryption methods, you can ensure your data is kept private, even after deletion.

If you want to learn how to secure your data, why not try some ways to encrypt your daily life with very little effort?

Read the full article: How Do Forensic Analysts Get Deleted Data From Your Phone?


Read Full Article

Google Home Mini vs. Amazon Echo Dot: Tiny Smart Speakers Compared


home-vs-echo

If you’ve narrowed your options for voice-activated speakers down to the Google Home Mini vs. Amazon’s Echo Dot, it still takes some work to figure out which you may like best.

Unlock the "Mega List of 100+ Useful Amazon Alexa Commands" now!

This will sign you up to our newsletter

Enter your Email

Comparing Google Home vs. Alexa is just the start, which is why we’ve put together this smart speaker comparison.

What Do These Speakers Have in Common?

While there is plenty that separates them, the Google Home Mini and Amazon Echo Dot have plenty in common. The most recent generations of each are roughly the same size. The Google Home Mini measures 98mm across and is 42mm tall, while the Echo Dot measures 99mm across and 43mm tall. This is close enough that in inches, they’re basically the same: 3.9 inches by 1.7 inches.

Amazon Echo Dot 3 Charcoal

They’re also similar when it comes to sound quality. While both sound much better than you may expect given the small size, you can only get so much volume out of such a tiny package. If you’re looking for something to handle serious music listening, you might want to consider either one of the larger units offered by either company or a companion speaker for the Echo Dot or Google Home Mini.

They’re also priced the same, retailing for around $50. You’ll frequently find them on sale or included with other hardware as package deals so you might get them for even less.

Google Home Mini vs. Amazon Echo Dot: Hardware

While the Google Home Mini and Amazon Echo Dot are similarly sized and shaped, they take different approaches to how you use them. The Google Home Mini is a minimalist affair, with only a single USB port for power and just one button; a slider switch to disable the microphone. You might think this is it, but there are touch zones on top that let you turn the volume up and down by touching the right or left side or trigger Google Assistant by touching the middle.

Google Home Mini Coral

The Amazon Echo Dot gives you more options for using the hardware. In addition to the power port, you also get an audio out, letting you plug it into an external speaker or stereo system. It also has more buttons on the top. Like the Google Home Mini, there is a button to disable the microphone, but you also get a pair of volume buttons and a button you can use to trigger Alexa instead of using your wake word.

Both voice-activated speakers come in a variety of colors. In the case of the Echo Dot, you can choose from Sandstone, Heather Gray, Charcoal, and Plum. Charcoal is also an option for the Google Home Mini, as is Chalk, and two fun colors; Coral and Aqua.

Google Home Mini vs. Amazon Echo Dot: Software

While the hardware is important, the software has much more to do with which of these is the best smart speaker for you. Whether you’re talking about Google Home vs. the Alexa app on your phone or Google Assistant vs. Alexa on the device itself, this is how you’ll be interacting with these voice-activated speakers most of the time.

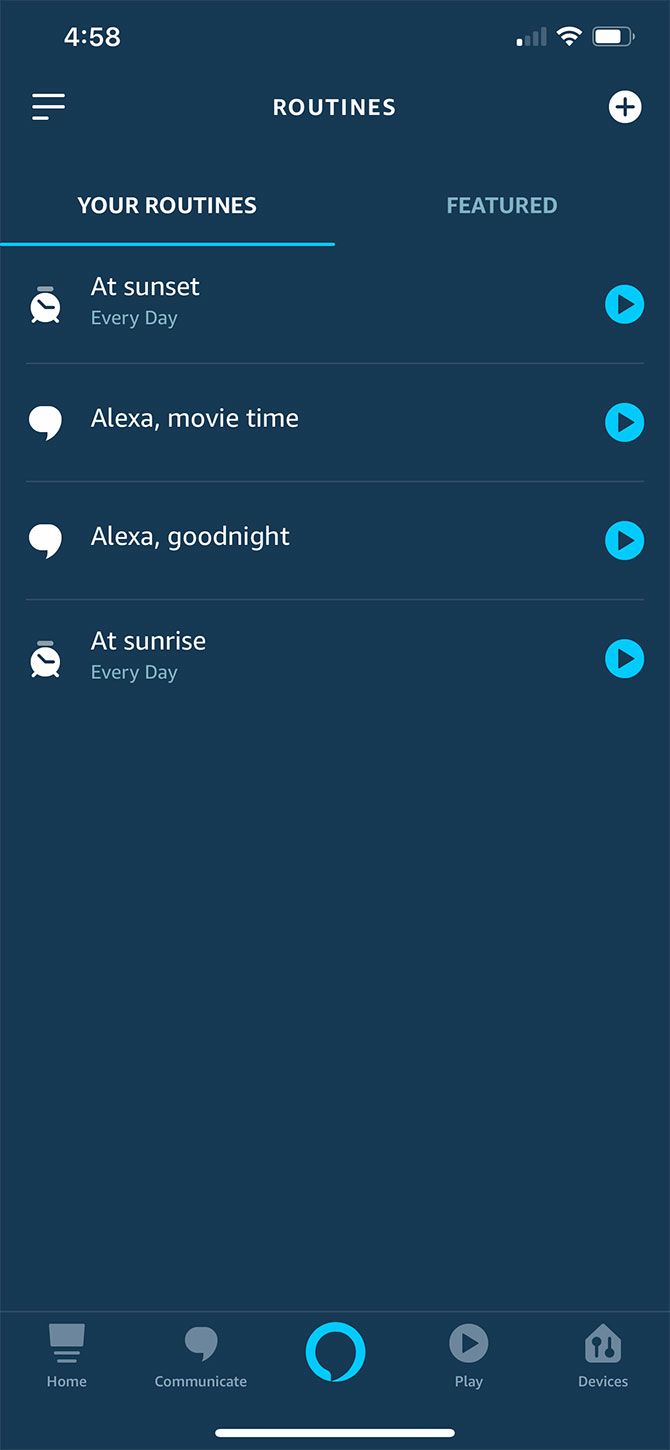
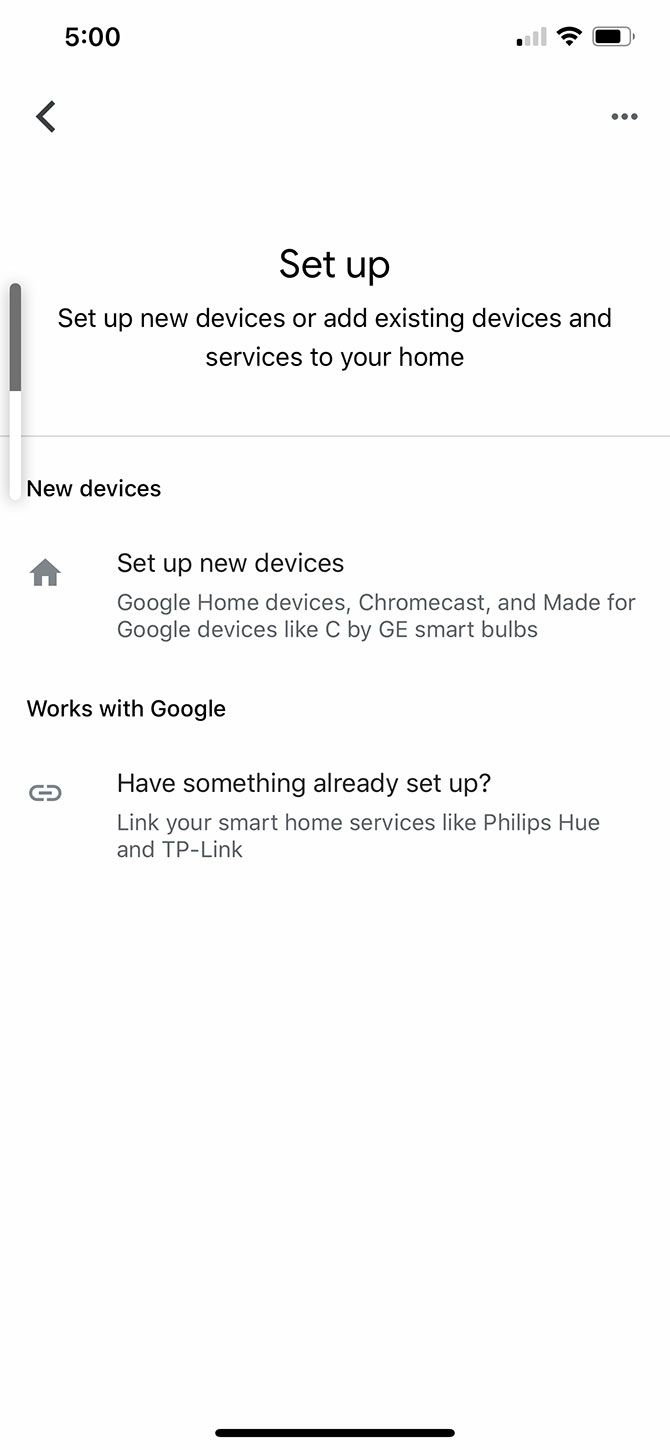
As you might imagine, the base software works similarly on the devices, especially for simple functions like setting timers. Controlling them from your mobile device is where the differences tend to show up. Alexa is slightly more user-friendly, hiding its more powerful features in submenus, while Google Home tends to lay all your options out in front of you more directly.

Both Alexa and Google Assistant feature Routines (a name both services use), which allow you to set up more complex automations. Google’s initial rollout of Routines was limited, but now both Google Home and Alexa let you create custom routines that can turn on sets of lights, play music. You can even control your thermostat based on voice commands or the time of the day.

Whether you’re controlling simple functions or creating complex routines, Alexa will be easier to use for most people. You can get similar functionality out of Google Home, but you’ll likely spend more time on it.

Google Home Mini vs. Amazon Echo Dot: Ecosystem and Integrations

Amazon’s Alexa has been around longer than Google Home, which gives it an edge. Most smart home services support Alexa, unless they are made by Google, Apple, or use the Z-Wave protocol. This means that you can count on the Echo Dot working with most smart home equipment. Plenty of hardware also supports Google Assistant, but it hasn’t got the same presence that Alexa has.

Plenty of digital services can connect with each platform, too. For example, you can use the Echo Dot to play music from Amazon Music, Spotify, Apple Music, Tidal, Deezer, SiriusXM, Pandora, Gimme, Vevo, and iHeartRadio. On the Google Home Mini, you can use YouTube Music, Spotify, Pandora, Deezer, iHeartRadio, and TuneIn.

When it comes to linking with other services, the Echo Dot has the edge again, thanks to Amazon’s head start in this area. While Google Home is constantly adding more services and options, the Echo Dot is a better option if you don’t want to worry as much about what is and isn’t compatible. Just look at the variety of free Alexa skills that are available. That said, there are plenty of fun Google Home commands, as well.

Variants and Name Confusion

You may already be leaning toward one of these voice-activated speakers more than the other, but you’re not done yet. Even if you’ve decided between Alexa vs. Google Assistant, for example, you need to choose which slight variation on the speaker you prefer.

In Amazon’s case, the decision is easy. With the most recent generation of the Echo Dot, there are two variants; the Echo Dot and the Echo Dot with Clock. Do you want a clock on your speaker or not? That’s all you need to decide.

In Google’s case, it’s a little trickier. The company offers the Google Home Mini and the Google Nest Mini. They have been using the Nest brand name more often, but this adds confusion. The two offer largely similar functionality, and they even look the same.

Right now, you’re probably better off choosing the Google Home Mini over the Nest Mini for better compatibility. However, the Nest Mini may replace the Google Home Mini at some point.

The Best Smart Speaker for You

If you think the two speakers are tied on features that matter to you, the best way to choose is to think about the services you already use. If you’re all-in on Google’s ecosystem, the Google Home Mini is probably your best bet. That said, just because you use an Android phone and Gmail doesn’t mean you should rule out the Echo Dot.

Alexa still has a leg up in terms of available skills and compatible devices, so you may already have more products that work with Amazon’s speaker than Google’s. Both devices sound pretty good, especially considering the small size. That said, if you just want to add functionality to a speaker or stereo you love, you might want to consider the Echo Input over the Echo Dot.

Read the full article: Google Home Mini vs. Amazon Echo Dot: Tiny Smart Speakers Compared


Read Full Article

You Can Now Play Podcasts on Your Echo Using Alexa


It has just got much easier to listen to podcasts on your Amazon Echo. This is because you can now ask Alexa to play a podcast from either Apple Podcasts or Spotify. So there’s now no excuse not to start listening to podcasts. Unless you find them boring, obviously.

Unlock the "Mega List of 100+ Useful Amazon Alexa Commands" now!

This will sign you up to our newsletter

Enter your Email

Podcasts Have Entered the Mainstream

While podcasts have been a thing for many years, they have now crossed into the mainstream. Finally. More and more people are listening to podcasts, and many people are even launching their own podcasts. Which is easier than it looks.

If you’re new to podcasts, check out our article detailing how to get started listening to podcasts. And if you’re a fan of the medium and looking to launch your own, check out our article explaining how to start your own successful podcast.

How to Listen to a Podcast Using Alexa

To listen to a podcast on your Amazon Echo using Alexa, you just need to ask. Say, “Alexa, play [name of podcast] on [name of service]”. The two services now supported are Apple Podcasts and Spotify. With an infinite number of podcasts to choose from.

Official support adds useful elements. By making Apple Podcasts or Spotify your default podcast provider in the Alexa app you can pause and resume a podcast, play the next episode, and even pick up listening where you left off in the Spotify/Apple Podcasts app.

To read more about how to listen to Apple Podcasts on your Echo, read this post on Day One. And to read more about how to listen to Spotify podcasts on your Echo, read this post on For the Record. And then crack on with discovering new podcasts worth listening to.

The Best Podcasts, Whatever Your Tastes

Now that you can listen to podcasts on your Echo using Alexa, you’re probably looking for recommendations. And there are podcasts about every subject you can think of. Here are the best true crime podcasts and the best podcasts for kids to get you started.

Read the full article: You Can Now Play Podcasts on Your Echo Using Alexa


Read Full Article

4 Mistakes to Avoid When Programming Excel Macros With VBA


mistakes-excel-macros

Microsoft Excel is already a capable data analysis tool, but with the ability to automate repetitive tasks with macros by writing simple code in Visual Basic for Applications (VBA) it’s that much more powerful. Used incorrectly, however, VBA can cause problems.

Unlock the FREE "Essential Excel Formulas" cheat sheet now!

This will sign you up to our newsletter

Enter your Email

Even if you’re not a programmer, VBA offers simple functions that allow you to add impressive functionality to your spreadsheets.

It doesn’t matter if you’re a VBA guru who creates dashboards in Excel, or a newbie writing simple scripts that do basic cell calculations. Follow these simple programming techniques to learn how to write clean, bug-free code.

Getting Started With VBA

VBA can do all kinds of neat things for you. From writing macros that modify sheets to sending emails from an Excel spreadsheet using VBA scripts there are very few limits on your productivity.

If you haven’t programmed in VBA in Excel before you’ll need to enable the Developer tools in your Excel program. The good news is, enabling the Developer tools is actually pretty easy. Just go to File > Options and then Customize Ribbon. Just move the Developer tab from the left pane over to the right.

Excel Developer Tab Ribbon

Make sure the checkbox has this tab enabled, and now the Developer tab will appear in your Excel menu.

Excel Developer Tab Shortcut

The easiest way to get into the code editor window from here is just to click on the View Code button under Controls in the Developer menu.

You’re now ready to write VBA code! This tab is where you will access VBA as well as recording macros in Excel. Now that Excel is ready to work let’s go over some common mistakes to avoid, and the ways to prevent them.

1. Horrible Variable Names

Now that you’re in the code window, it’s time to start writing VBA code. The first important step in most programs, whether it’s in VBA or any other language, is defining your variables. Not properly naming variables is one of the most common programming mistakes that new developers make.

Throughout my decades of code writing, I have come across many schools of thought when it comes to variable naming conventions and learned a few rules the hard way. Here are some fast tips for creating variable names:

  • Make them as short as possible.
  • Make them as descriptive as possible.
  • Preface them with the variable type (boolean, integer, etc…).

Here’s a sample screenshot from a program that I use often to make WMIC Windows calls from Excel to gather PC information.

Excel VBA Variables

When you want to use the variables inside of a function within the module or object (I will explain this below), then you need to declare it as a “public” variable by prefacing the declaration with Public. Otherwise, variables get declared by prefacing them with the word Dim.

As you can see, if the variable is an integer it’s prefaced with int. If it’s a string, then str. This is a personal preference that helps later on while you’re programming because you’ll always know what type of data the variable holds by glancing at the name.

Also, be sure to name the sheets in your Excel workbook.

Naming Excel Sheets in VBA Code

This way, when you refer to the sheet name in your Excel VBA code, you’re referring to a name that makes sense. In the example above, I have a sheet where I pull in Network information, so I call the sheet “Network”. Any time I want to reference the Network sheet, I can do it quickly without looking up what sheet number it is.

2. Breaking Instead of Looping

One of the most common problems newer VBA programmers have when they start writing code is properly dealing with loops.

Looping is very common in Excel because often you are processing data values down an entire row or a column, so you need to loop to process all of them.

New programmers often want to just break out of a loop (VBA For loops or VBA Do While loops) instantly when a certain condition is true.

Exit Statement in Excel VBA Code

Here’s an example of this method being used to break a VBA loop.

For x = 1 To 20
 If x = 6 Then Exit For
 y = x + intRoomTemp
Next i

New programmers take this approach because it’s easy. Try and avoid explicitly breaking a loop.

More often than not, the code that comes after that “break” is important to process. A much cleaner and more professional way to handle conditions where you want to leave a loop halfway through is just to include that exit condition in something like a VBA While statement.

While (x>=1 AND x<=20 AND x<>6)
 For x = 1 To 20
 y = x + intRoomTemp
 Next i
Wend

This allows for a logical flow of your code. Now the code will loop through and stop once it reaches 6. No need to include awkward EXIT or BREAK commands mid-loop.

3. Not Using Arrays

Another interesting mistake that new VBA programmers make is trying to process everything inside of numerous nested loops that filter down through rows and columns during the calculation process.

This could also lead to major performance problems. Looping through a column and extracting the values every single time is a killer on your processor. A more efficient way to handle long lists of numbers is to utilize an array.

If you’ve never used an array before, have no fear. Imagine an array as an ice cube tray with a certain number of “cubes” you can put information into. The cubes are numbered 1 to 12, and that’s how you “put” data into them.

You can easily define an array just by typing Dim arrMyArray(12) as Integer.

This creates a “tray” with 12 slots available for you to fill up.

Here’s what a row looping code without an array might look like:

Sub Test1()
 Dim x As Integer
 intNumRows = Range("A2", Range("A2").End(xldown)).Rows.Count
 Range("A2").Select
 For x = 1 To intNumRows
 If Range("A" & str(x)).value < 100 then
 intTemp = (Range("A" & str(x)).value) * 32 - 100
 End If
 ActiveCell.Offset(1, 0).Select
 Next
End Sub

In this example, the code is processing down through every single cell in the range and performing the temperature calculation.

If you ever want to perform some other calculation on these same values the process would be clunky. You’d have to duplicate this code, process down through all of these cells, and perform your new calculation. All for one change!

Here’s a better example, using an array. First, let’s create the array.

Sub Test1()
 Dim x As Integer
 intNumRows = Range("A2", Range("A2").End(xldown)).Rows.Count
 Range("A2").Select
 For x = 1 To intNumRows
 arrMyArray(x-1) = Range("A" & str(x)).value) 
 ActiveCell.Offset(1, 0).Select
 Next
 End Sub

The x-1 for pointing to the array element is only necessary because the For loop starts at 1. Array elements need to start at 0.

Now that you have the array it’s very simple to process the contents.

Sub TempCalc()
 For x = 0 To UBound(arrMyArray)
 arrMyTemps(y) = arrMyArray(x) * 32 - 100 
 Next
End Sub

This example goes through the entire row array (UBound gives you the number of data values in the array), does the temperature calculation, and then puts it into another array called arrMyTemps.

4. Using Too Many References

Whether you’re programming in full-fledged Visual Basic or VBA, you’ll need to include “references” to access certain features.

References are sort of like “libraries” filled with functionality that you can tap into if you enable that file. You can find References in Developer view by clicking on Tools in the menu and then clicking on References.

Excel References in VBA

What you’ll find in this window are all of the currently selected references for your current VBA project.

Excel VBA references

You should check this list because unnecessary references can waste system resources. If you don’t use any XML file manipulation, then why keep Microsoft XML selected? If you don’t communicate with a database, then remove Microsoft DAO, etc.

If you’re not sure what these selected references do, press F2 and you’ll see the Object Explorer. At the top of this window, you can choose the reference library to browse.

Excel VBA object explorer

Once selected, you’ll see all of the objects and available functions, which you can click on to learn more about.

For example, when I click on the DAO library it quickly becomes clear that this is all about connecting to and communicating with databases.

Keep references low in VBA

Reducing the number of references you use in your programming project is just good sense, and will help make your overall application run more efficiently.

Programming in Excel VBA

The whole idea of actually writing code in Excel scares a lot of people, but this fear really isn’t necessary. Visual Basic for Applications is a very simple language to learn, and if you follow the basic common practices mentioned above, you’ll ensure that your code is clean, efficient, and easy to understand.

Don’t stop there though. Build a strong foundation of Excel skills with a VBA tutorial for beginners. Then keep learning about VBA and macros with resources to help you automate your spreadsheets.

Read the full article: 4 Mistakes to Avoid When Programming Excel Macros With VBA


Read Full Article