Anyone can use Microsoft PowerPoint to make a basic presentation, but not everyone can make a great one that stands out. We’ve all sat through a lousy presentation that offers nothing exciting, and it’s not fun.
If you want to take your presentations to the next level, you need iSlide, a free add-in for PowerPoint. Here’s what it offers and how to get started.
Meet iSlide
You can download iSlide free from its website. It supports every version of Microsoft Office from 2007 onwards, including Office 365. The tool also works with WPS Office. Windows 7 and higher are compatible.
After you’ve installed iSlide, you’ll see it integrated into PowerPoint on the Ribbon. Click the iSlide entry to access its wealth of options.
First, you should click the Login button under Account. This will let you create a free iSlide account so you can access the many offerings.
Let’s go through the sections of this tab and see what iSlide provides.
Design
Under the Standard Specification button, you can apply a uniform format to all or a certain set of slides. This lets you easily make all of your slides uniform in font, paragraph style, margins, and color for a clean look.
Design Layout includes tools to keep everything straight. You can crop, select colors, add a watermark, and more.
Click Design Tools to access a toolbar full of quick functions. You can change alignment, rotate images, move items to the foreground or background, and more, all in one place.
Resources
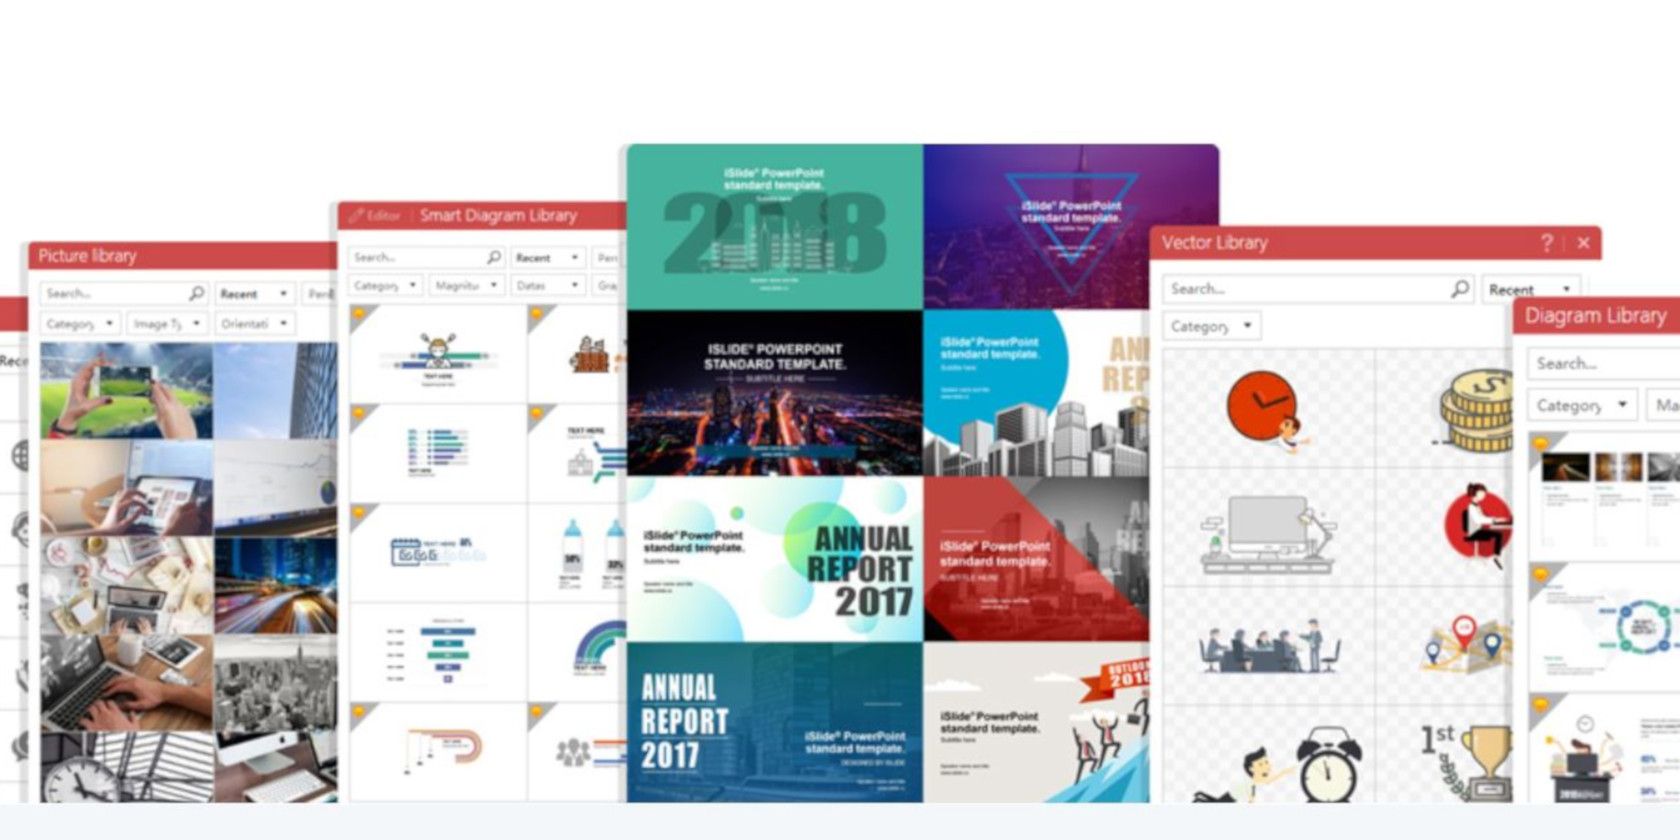
This is where you’ll finds the majority of what iSlide offers: plenty of theming options to make your slideshow stand out. There’s a total of 1500+ themes, 7800+ diagrams, 1900+ smart diagrams, 160,000+ icons, 12,000+ pictures, and 4100+ vectors available with iSlide.
Open the Theme Library to find tons of ready-made themes to apply to your presentation. You can filter by categories and styles, or search for something specific.
If you don’t feel confident in your color-coding abilities, you can choose a ready-made set from the Color Library. You can filter by hue or category if you’d like to drill down the options a bit.
To illustrate your data in a fresh way, check out the Diagram Library. It’s full of charts and other illustrations to display findings. You’ll find even more in the Smart Diagram section.
The Icon Library holds thousands of simple icons. Whether you want to add them to charts or just make your presentation a little more lighthearted, they can help.
Find just the right stock image in the Picture Library tab, which has thousands of royalty-free images to use. And the Vector Library provides clip art-like premade images.
Animations and Tools
Come to Animations to tweak your animations with more control than PowerPoint provides.
In Tools, you’ll find options for exporting your slideshow (such as images or a video). You can also join images inside your presentation, compress the file to save space, and more.
iSlide Pricing
iSlide’s basic features are all free. For full access, you’ll need to upgrade to the Premium subscription for $9.99/month or $39.95/year. This lets you download premium themes and diagrams, and removes the daily download limits on photos, icons, and colors.
To upgrade, click the Upgrade Premium button on the iSlide tab in PowerPoint.
iSlide Beefs Up Your Presentations
If you often work in PowerPoint, iSlide offers a ton of value. A quick and free download adds thousands of themes, images, colors, and editing tools you can use in any presentation. Give it a try and see how much better your slideshows become.
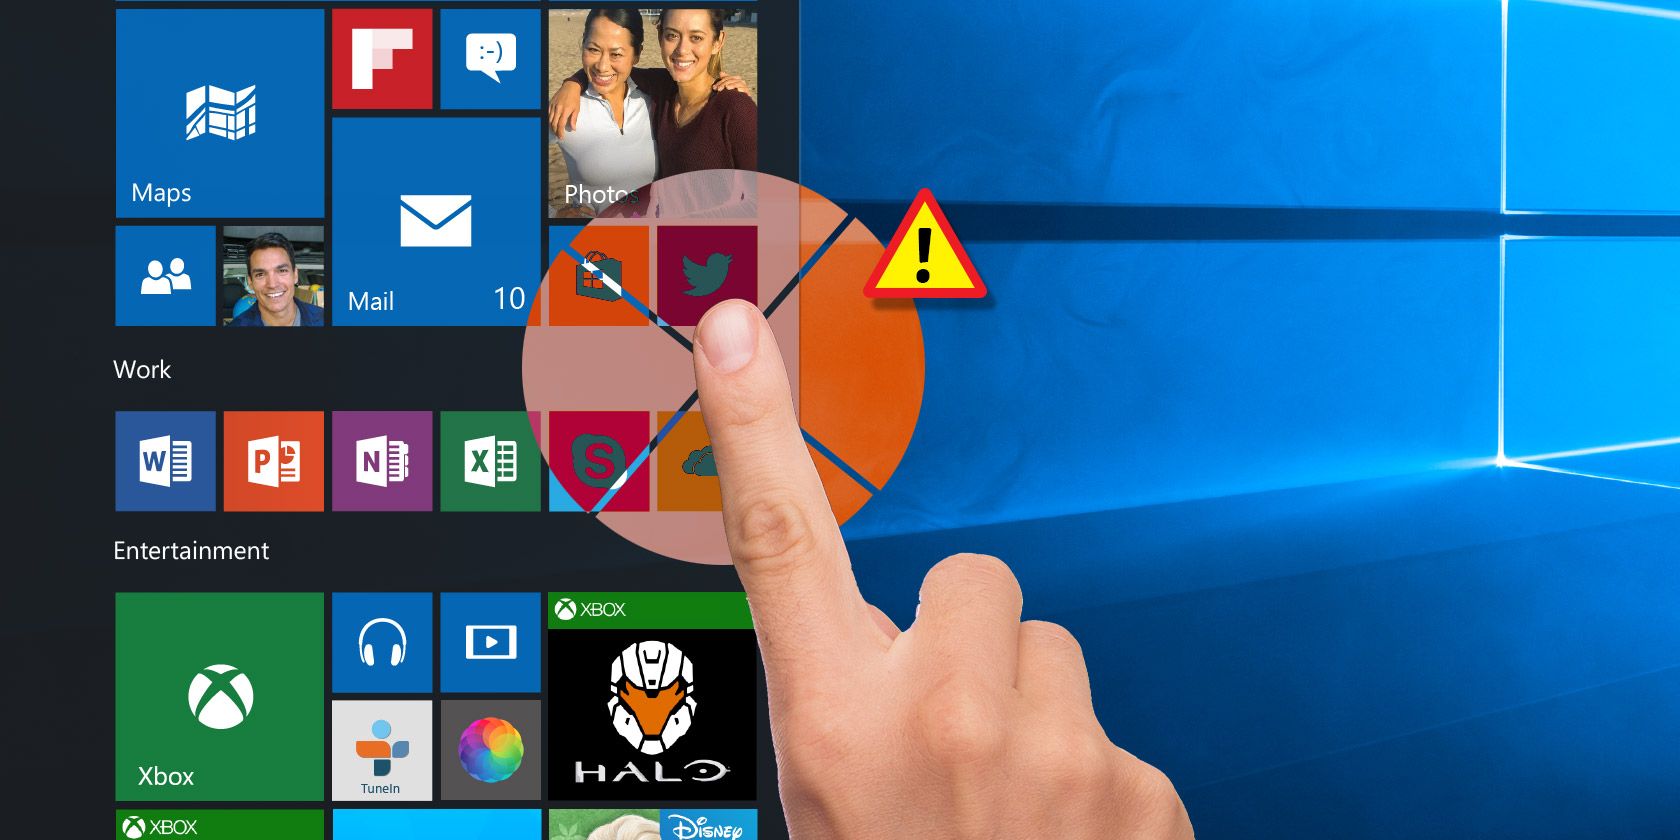
Windows 10 is great for touch screens, especially thanks to the special touch-designed apps part of the Windows Ink Workspace. But is your touchscreen not working? Sometimes it can break for seemingly no reason, so we’re here to show you how to fix your touchscreen in Windows 10.
The majority of the problems are caused by driver incompatibility. This is even more likely if the touchscreen has stopped working between your upgrade from a previous operating system to Windows 10. We’ll cover this, along with many other troubleshooting tips.
1. Run Troubleshooting
The Windows troubleshooting tool could be the quick and easy fix to any problem with your touchscreen.
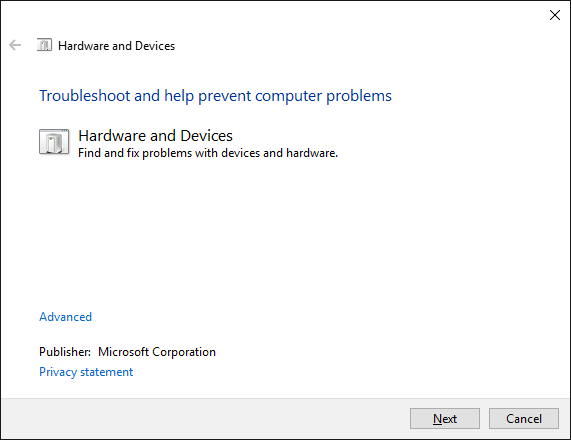
Do a system search for troubleshooting and select the relevant result. In the new window, click View all from the left-hand menu. From the list that appears, click Hardware and Devices.
Click Next and run the wizard through. The tool will automatically detect issues and then repair them. However, it’s by no means comprehensive and you may need to carry on reading.
2. Calibrate the Touchscreen
When your touchscreen is slow to respond or records your touch gestures inaccurately, a re-calibration might be all it takes to bring it up to speed. Here’s how to perform a touchscreen calibration.
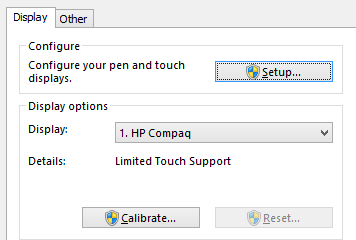
Do a system search for calibrate and select Calibrate the screen for pen or touch. A new window will open containing tablet PC settings.
On the Display tab, use the Setup… and the Calibrate… buttons in turn to see if this resolves the issue.
3. Disable and Re-enable the Touchscreen
The closest fix to rebooting the entire computer, which should have been your very first step, is turning the touchscreen off and back on.
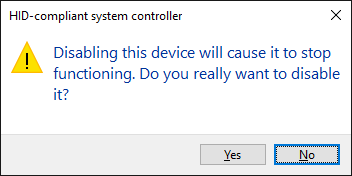
Press CTRL + X and select Device Manager. Double click on Human Interface Devices to open the dropdown. Right click the listing for HID-compliant touch screen and select Disable. You’ll be asked to confirm this, so click Yes.
You now need right click the listing again, but this time select Enable. This is one of the simplest solutions, but it doesn’t always work. In fact, you may find that the issue still continues after a system restart. If that’s the case, please read on.
4. Change Power Management Settings
Windows 10 will do its best to converse power, but sometimes the settings can be overzealous and turn off your touchscreen after a period of activity.
While the touchscreen should automatically enable itself again when it detects input, this isn’t always the case. As such, you can disable the power saving of your touchscreen to see if this fixes the problem.
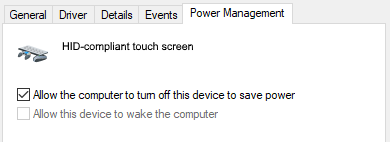
To begin, press Windows key + X and click Device Manager. Next, double click on Human Interface Devices, then double click the listing for HID-compliant touch screen.
This will open a new window. Switch to the Power Management tab. Untick Allow the computer to turn off this device to save power. Click OK, then restart your system.
5. Update the Drivers
A driver is a piece of software that helps your hardware. For example, your touchscreen communicates with your computer’s processor. Thus touchscreen malfunctions could be due to a faulty driver.
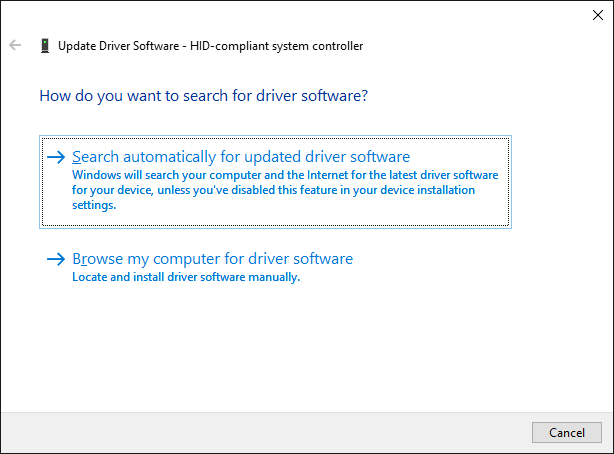
Following on from the instructions above, with Device Manager still open, right click the HID-compliant touch screen and select Update Driver Software….
You’ll want to Search automatically for updated driver software. This will scan Microsoft’s database for any updates available for your touchscreen device. Follow the wizard through as necessary, then restart and see if your problem is resolved.
If not, you should try going directly to the manufacturer’s website, look for their drivers page, select your device number, and download the latest driver.
With this driver downloaded, you may be able to extract it and install it automatically. However, you can select Update Driver Software… again, but this time click Browse my computer for driver software. Use Browse… to locate it, then follow the wizard through.
In Windows 10, the Windows Update also updates your hardware drivers. Unfortunately, not all driver versions work equally well. If it’s actually driver updates that are causing the problems, you should try rolling back to the default.
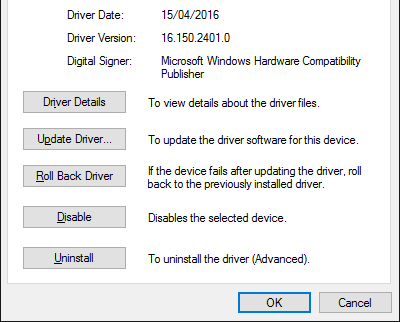
For this, again in Device Manager, right click the HID-compliant touch screen and then select Properties. Then switch to the Driver tab and select Roll Back Driver.
You know that there’s a specific older driver version that will work but aren’t able to get to it through a rollback. Within the Driver tab select Uninstall instead and then follow the method outlined in step four above.
For whatever reason, some programs cause touchscreen problems. If your touchscreen has only recently broken, you should uninstall any recently added programs.
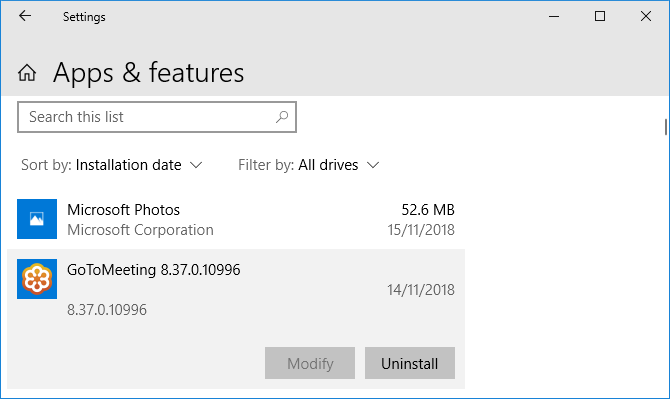
To do this, press Windows key + I to open Settings. Click Apps. Use the Sort by dropdown and select Installation date.
Look for the date when the touchscreen problem started. Working up, click each app in turn and Uninstall it. Restart your computer each time and see if it fixes the touchscreen.
8. Move to Another Room
This one sounds weird but bear with me. Other nearby electronic devices can interfere with the touchscreen. It could be caused by something you’ve got plugged into the same power bank or because you’ve got lots of computers in close proximity.
It’s simple to diagnose this, though. Take your touchscreen device somewhere else and try it. If it works, electromagnetic interference is the culprit.
To resolve, go back to the original room and turn off everything else. Then turn them back on one by one to see what causes the problem. If none of them seems to be at fault, check nearby areas for powerful equipment that could be the cause.
9. Contact the Manufacturer
Have you tried all of these tips and your touchscreen is still broken? If so, you should probably contact your system manufacturer to get them to investigate.
It’s likely that the problem is a hardware fault, rather than a system one, and they will have the expertise to fix it. You may find that you’re still covered by warranty, depending on what caused the damage.
Touch Problems Resolved
Hopefully, our advice above has resolved any problems that you were having with your touchscreen.
GIMP is a very powerful image editing tool that offers lots of different ways to remove the background of an image. But which is the right one to use, and how do they work?
In this guide we’ll take a look at six tweaks to help you get started. They’ll enable you to take a picture and make the background transparent, to erase the background so you can blend it with other images, and much more. Please make sure you update to GIMP 2.10 before you begin.
1. Make the Background Transparent in GIMP
When you open a flat image in GIMP it doesn’t support transparency by default. If you want to make the background transparent, there are two simple tricks to enable it to happen.
Right click on the layer in the Layers dock and select Add Alpha Channel, or go to Layer > Transparency > Add Alpha Channel.
Alternatively, duplicate the background layer by pressing Shift + Ctrl + D on Windows or Linux, or Shift + Cmd + D on Mac. Now delete the original background layer.
In either case you can now make a selection then hit delete to make the selected area transparent.
We’ll now take a look at the various ways GIMP lets you select the background to make it transparent.
2. Change Background With Foreground Select Tool
When your image has reasonably clear separation between the foreground and background, GIMP has an excellent tool that enables you to select one or the other. It’s called the Foreground Select Tool, and you can use it to remove the background in GIMP then slot in a new one.
With Foreground Select, you simply highlight the area which contains the foreground object and GIMP takes care of the rest.
Open your image, right click on the layer, and select Add Alpha Channel.
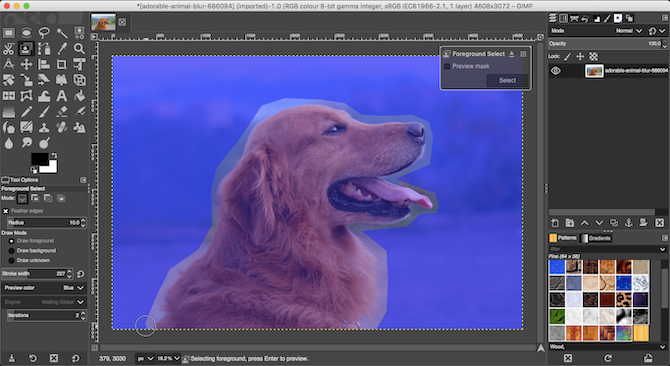
Pick the Foreground Select Tool. Draw a rough outline around the foreground object. You can trace a single line, or click to add a series of connected points. You don’t need to get too close, but the closer the better. Hit Enter when done.
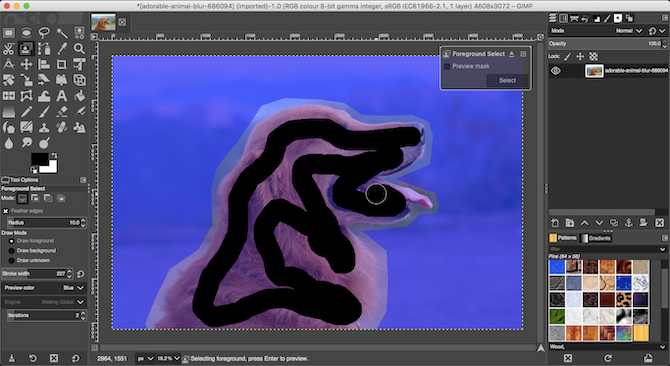
GIMP now selects the brush tool for the next step. Set an appropriate brush size for your image, then paint over the foreground object in a single line. Don’t color it all in, just make a line that crosses over all the image’s different colors and tones. Then hit Enter again.
After a few seconds, GIMP will analyze the image and create a selection containing only the background. Fine-tune the selection by picking the Free Select Tool. Set the Mode to Add to the Current Selection or Subtract from the Current Selection, then draw round the areas you need to add or remove.
Press Ctrl + I or Cmd + I to invert the selection so that the foreground is now selected. Hit Delete and you’ll remove the background.
Paste in your new background on a new layer, and position it beneath your original image to complete the job.
3. More Tools to Delete the Background in GIMP
GIMP has three other tools you can use to select and then delete the background of an image. Which you should use depends on how well separated the foreground and background are, or whether you’re using one of these graphics tablets with a pen, or a mouse.
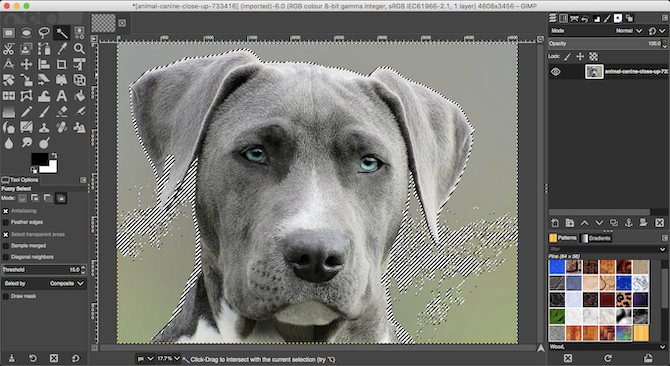
Fuzzy Select
This tool selects connected parts of an image containing the same color.
Simply click on the area of the image you want to select, and GIMP will do the rest.
Set the Threshold to a higher value to include a greater range of similar colors in your selection, or lower to be more precise.
This tools works well where an image has large areas of flat color. It’s better for icons and logos than photos.
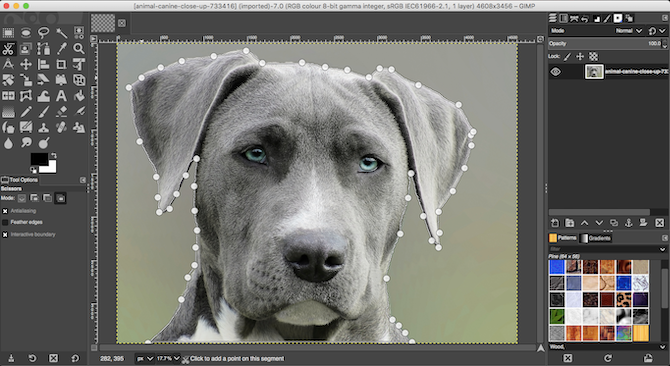
Scissors Select
The Scissors Select Tool enables you to semi-automatically select and isolate the foreground object, so that you can then erase the background.
Add an Alpha Channel to the image.
Pick the Scissors Select Tool. Then, in Tool Options, select Interactive boundary.
Click and release on the edge of the foreground object you want to select. This drops an anchor point onto the image.
Move the cursor a little way along the edge of the object, then click and hold. A line will appear, connected to the previous anchor point, showing the edge of your selection. If this line tightly follows the edge of the object you’re trying to cut out, release the mouse button to create a new anchor point.
If the line deviates from the edge of your object, drag backwards or sideways until it lines up properly. Shorter gaps between the anchor points usually work better.
Now repeat until you’ve selected the entire object. Hit Enter to complete the selection.
Finally, press Ctrl + I or Cmd + I to select the background, then hit Delete.
Pen Tool
Like Scissors Select, the Pen Tool also allows you to make a selection by drawing a line between a series of anchor points. However, this time the line does not magnetically attach to the object you’re selecting.
Add an Alpha Channel to your image.
Select the Pen Tool and click on the edge of the object you want to select. This places the first anchor point.
Now move the cursor a little way along the edge of the object and click again to drop a new anchor point. Click and release to connect to the previous anchor point with a straight line; click and drag to connect with a curved line. The direction in which you drag will determine the depth and angle of the curve.
Repeat this until you’ve selected the whole foreground object. When you’re finished, hit Enter.
Press Ctrl + I or Cmd + I to invert the selection, then hit Delete to remove the background.
No matter which tool you use, it’s usually easier to create your selection from whichever is the smaller of the foreground or background, so there’s less work to do.
4. Remove a White Background in GIMP
GIMP has a specialist tool that enables you to remove a white background. It’s particularly good for graphics elements like logos and icons, where the background is a flat, solid white.
With your image open, go to Layer > Transparency > Add Alpha Channel.
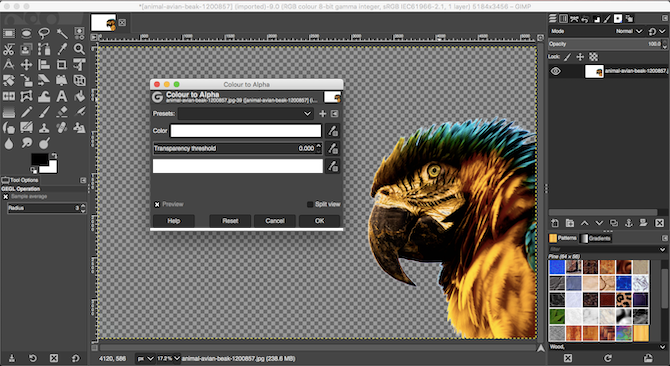
Select Colors > Color to Alpha. This will open a new dialog box.
Click the dropper icon next to Color, then click the white background in your image. This will make the white area transparent, and may be enough.
To fine tune the selection, select the dropper next to Transparency Threshold then click the darkest area of the background you’d like to remove. You can use this to pick up areas of slight shadow, such as in portrait photos.
Select the dropper next to Opacity Threshold then click the lightest area of the foreground object. This will ensure you don’t accidentally remove parts of the foreground.
Click OK to finish.
5. Change the Background Color in GIMP
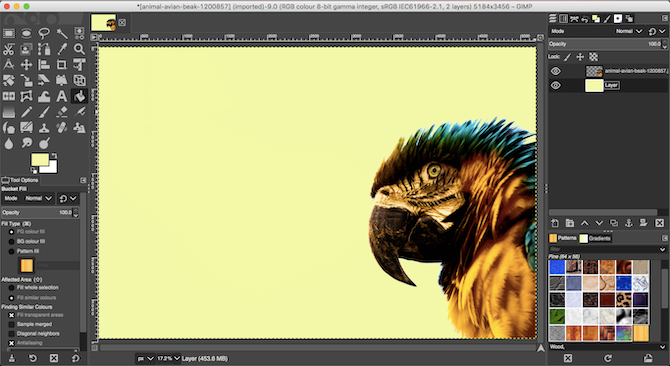
To change the background color in GIMP, use the same process we’ve explained to remove a white background.
Now add one extra step.
Create a new layer, and use the Bucket Fill Tool to fill it with the color you need. In the Layers dock, drag the new layer below the original one to set it as the background.
6. Erase the Background in GIMP With Masks
Finally, if you’re blending multiple images together, you may need to erase the background of one of the top layers in order to reveal what’s underneath. You can do this very quickly using Masks.
Open your two images on separate layers in the same file.
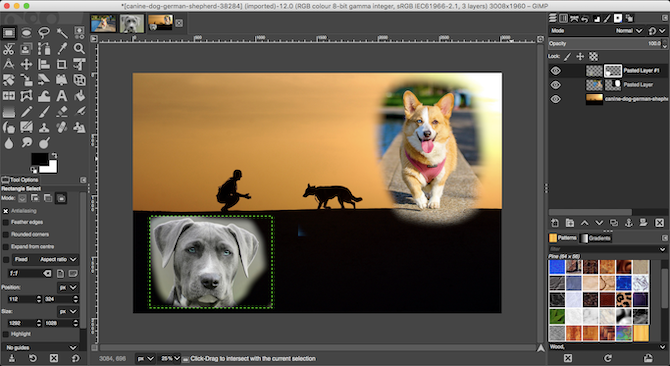
Select the top layer and click the Masks button at the bottom of the Layers dock. Click Add to add the mask.
Select the Brush tool and set the color to black.
Now start painting onto the top layer. Where you paint black, the top layer will be erased and the bottom layer will become visible.
If you make a mistake, change the brush color to white. Now paint over the black areas of the mask and that will make the top layer visible once again.
Once you’ve got your head around these tweaks, there’s a whole lot more for you to learn, too. Take a look at our guide to using GIMP for photo editing, where you’ll master everything from color correction to removing unwanted objects from your shots.
Getting support for a computer issue is much easier when you can share your screen. Compared to describing your issue over the phone, the difference is night and day.
Your Mac already comes with the software required to make this happen between two users on Apple computers. You can also share your screens across your own Macs, thanks to iCloud.
And if you happen to need support from someone running Windows or Linux, we’ve got that covered too.
Use iMessage for Screen Sharing on a Mac
The easiest way to share your screen, or request to view another user’s screen, is to use Apple’s iMessage chat. Through the Messages app on macOS, you can share your screen with another party provided they are using a Mac and are signed into iMessage with an Apple ID.
While sharing your screen, the other party will have the opportunity to control your computer by requesting access. This requires you explicitly provide permission via a popup dialog box. You should never relinquish control of your Mac to someone you do not know or trust absolutely.
To get started, launch the Messages app and make sure you’re logged in to your Apple ID under Messages > Preferences. To share, or request a screen share:
Start a new chat with the person you want to share with.
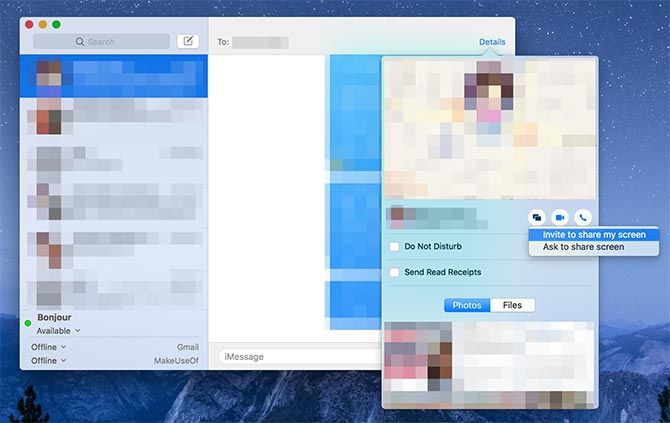
Click Details next to their name in the top-right corner of the window.
Click the screen sharing button (it looks like two overlapping rectangles).
Choose Invite to share my screen to share your own screen, or Ask to share screen to request to see the other person’s screen.
The other party will need to agree to your request. Once they’ve confirmed it, a FaceTime audio call will begin alongside screen sharing. You can then chat with the other party and discuss the problem (or whatever it is you’re sharing).
You can allow the other party to control your screen via the screen sharing app icon in the menu bar. Look in the top-right corner of your Mac’s screen for the two overlapping rectangles. Click it, then choose Allow [contact] to control my screen.
To undo your decision but still keep screen sharing active, click the screen sharing menu bar icon again and uncheck this option. We’ve covered more on sharing your Mac’s screen via FaceTime if you need additional info.
Access Other Apple Computers With Back to My Mac
You might also want to share a screen with yourself. This is particularly handy if you have more than one Mac in your house, or if you’re at work and you need to access something on a home computer.
This feature uses an iCloud tool called Back to My Mac. You’ll need to enable the feature on any computers you want to access and control before you can use it. Here’s how you set up Back to My Mac on a computer you want to control:
Make sure you’re logged in to iCloud under System Preferences > iCloud.
On the same screen, make sure Back to My Mac is enabled by checking it in the list of iCloud services.
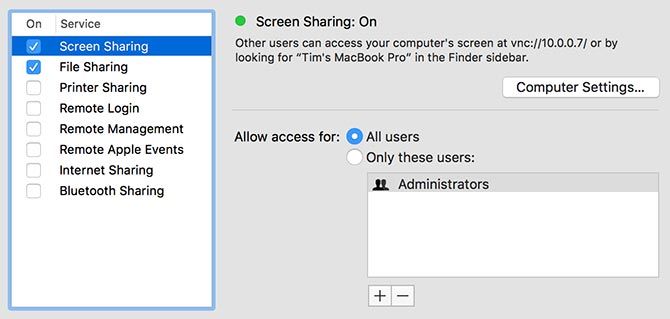
Now head to System Preferences > Sharing and enable Screen Sharing.
Any computer you wish to access must be powered on, but not necessarily logged in. You can log in with Back to My Mac as if you were using the computer directly.
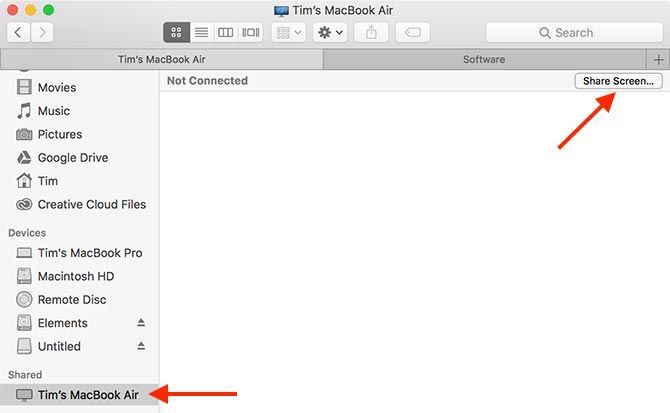
To access a computer you have set up with Back to My Mac, launch Finder and look for the computer in the sidebar under the Shared heading.
If you’ve disabled the Finder sidebar, use View > Show Sidebar to enable it. If you can’t see the Shared section, head to Finder > Preferences. Click Sidebar and enable Back to My Mac under the Shared heading.
Once your computer appears in the Finder sidebar, click on it. You should now see the Share Screen button at the top of the window. Click on this and wait.
You’ll soon see your computer’s screen show up in a new window on your desktop. As soon as the connection establishes, you can control this computer.
Mac Screen Sharing With Third-Party Apps
If you want to share your screen with someone who doesn’t use iMessage or someone who hasn’t got a Mac, you’ll need to rely on third-party apps to do so. Check out our roundup of easy screen sharing and remote access tools for a comprehensive list.
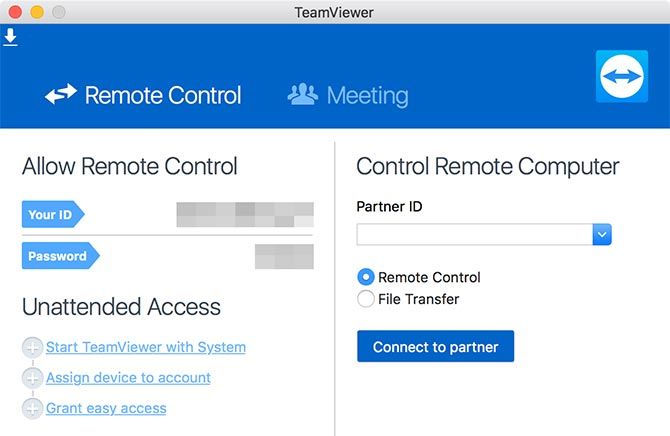
By far one of the easiest third-party tools to use is TeamViewer. You don’t need an account to use it—just download the Team Viewer remote control app to get started. This is all you need to receive support or offer support to others using the service.
Once you’ve got the remote control application, you’ll have a user ID and a password. Give your user ID and password to someone else and they’ll be able to view your screen and control your Mac. The usual advice rings true as always: be careful who you trust!
Get Support and Work Remotely on a Mac
The easiest way to get help with a Mac computer problem is to use iMessage and its built-in Screen Sharing function. For working remotely, enable Back to My Mac on your home or work computers and get access whenever you need it, no matter where you are.
And if you’re really stuck, you can always get computer support from a Windows user via TeamViewer. If you can’t get anyone to take a look at your computer, consider consulting the web’s best support forums and websites to enlist the help of a complete stranger.
Slow page loading speed is one of the main reasons why your website is not getting the hits it deserves.
As audience attention is at an all-time low, here are some top tips to speed up your site to make sure your visitors stick around.
1. Decrease the Actual Size of Your Website
If your website loads slower than three seconds, people are likely to abandon it even before the homepage loads. Using the wrong format for your images can easily bloat your website, and ruin an otherwise great browsing experience.
Over 70% of mobile web pages are over 1MB, and 12% are over 4MB! Keep in mind that it takes seven seconds to download 1.5MB on a good 3G connection. The best practice is to keep each page under 0.5MB.
The average time it takes to fully load a mobile landing page is 22 seconds, according to a new analysis. Yet 53% of mobile site visitors leave a page that takes longer than three seconds to load. That’s a big problem.
Over 75% of mobile sites take 10 seconds or more to load over 3G. Well over half of all traffic is via mobile devices, and this is not likely to go down. So keep a small website footprint to make mobile internet users happy, and make sure they stick around!
If you use a CMS like WordPress, Joomla, or Drupal, there are plugins to help make your website more mobile-friendly.
Alternatively, you can use tools like bMobilized or Duda Mobile to convert your desktop website to mobile. That said, it’s often best to design a separate website to ensure the best experience for your mobile users.
You should also consider offering a simplified version of your website using the Accelerated Mobile Pages (AMP) project. Using AMP pages will improve the page loading speed on mobile. There are strict guidelines for JavaScript and CSS, but the benefits are measurable.
Whichever route you decide to go down, make sure your mobile website is a lightweight option.And try to keep under the 0.5MB recommendation per page.
3. Make Sure Your Website Is Minified
If you’re writing your own website from scratch, edit it regularly. As your project develops, you’re likely learning more efficient ways of doing things, so make sure you go back through your code as you improve.
Minify and combine your CSS, HTML, and JavaScript. If you use a CDN like Cloudflare for example, there is a specific tab for speed improvements, where the first option is Auto Minify. If you use a website builder (like Squarespace or Weebly) this is likely done for you by default.
Make sure you test your website after enabling anything that combines or minifies your website’s resources. Experiment with the different options to see what’s best for your website, as some features can break with Minify enabled.
4. Avoid Loading Scripts When Not Needed
Having to load several JavaScript files before they are needed will slow down the speed of the entire page unnecessarily. Avoid loading scripts from third-party servers if you can.
Requesting these will slow down your loading speed, further and can potentially pose a security risk. Keep them on your website’s server when possible.
You can use defer or async to delay the loading of specific JavaScript files to reduce the strain on visitor’s devices and improve the load speed of your pages. Alternatively, for small scripts, you can inline the JavaScript directly into the HTML document.
Async will tell the browser to continue parsing the HTML at the same time as the JavaScript files are being downloaded. The pause will then happen after the file is fully downloaded.
Meanwhile, defer will tell the browser to execute JavaScript files after the browser has finished parsing the entire HTML document.
A browser will by default pause parsing HTML files while any JavaScript files are fetched and executed.
Inlining JavaScript in the HTML document will help by reducing the number of files a browser has to download before displaying a page. You can inline JavaScript by adding the content of any external JavaScript file between script tags.
You can safely use defer and async on Google Analytics, Facebook Pixel, and other analytics and error reporting tools without affecting the functionality of the page.
Lastly, consider whether the tracking codes, analytics, extra features, and ads you have running on your website are necessary. Use more lightweight options when possible, and scrap them if they don’t add anything of value to you or your visitors.
5. Use Caching and a CDN
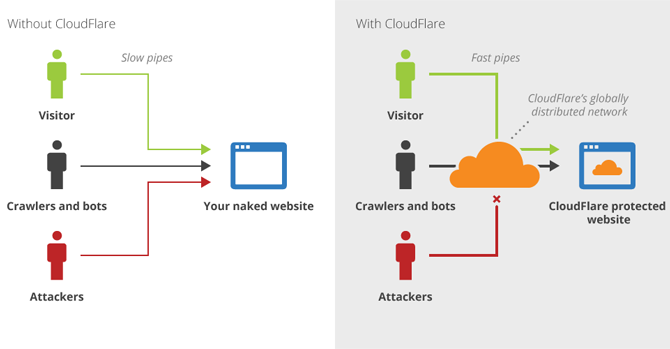
A Content Delivery Network (CDN) will copy your site onto servers worldwide and reduce the data’s travel time by connecting visitors to a server geographically closer to them. Static content will also be cached and delivered by the CDN’s servers.
Make sure you also leverage browser caching to improve the loading speed of your website for repeat visitors. Browser caching works by downloading these files from the server onto the user’s device.
On further page views or visits, these files will load locally from the user’s device instead of requesting them from the external server (depending on the expiry date of the files).
Plugins can cause a high CPU or memory strain on your server, and this can slow down or even stop your website from loading.
If you use WordPress, it’s likely that you’re not using all of its built-in features. Disable these with a plugin like Clearfy.
Always consider the plugins you are using. If you’re using few features in plugins like JetPack, consider removing them altogether, and replace them with more lightweight plugins that do the same job.
7. Server Settings to Speed Up Your Website
Server delay will have a big negative impact on your page load speed and your PageRank.
Google recommends that the Time to First Byte (TTFB) is 1.3 seconds or less. This is the longest delay before a device starts downloading a page after initially contacting the server. That said, the average page has a TTFB of over 2 seconds, well above their recommendation.
Shared hosts are usually the reason for this, but there are some settings you can configure to improve your server response time.
Use the latest version of PHP that your website is compatible with. The latest version (PHP 7.2) has massive speed improvements.
Switch on “Keep-Alive”
Enable HTTP/2
Take advantage of HTTP Strict Transport Security (HSTS)
Set your backups to complete at night
If your website is made in WordPress, make sure you use a host that specializes in WordPress hosting, like Bluehost. This will make sure that the server settings are configured specifically for WordPress performance.
Finished Tweaking? Now Test Your Site
Now that you know the ideal page load time, size, and Time to First Byte (TTFB) that you should be aiming for, how do you know what yours is?
Here are some of our favorite online tools to test your site:
varvy.com: these tools will test your desktop and mobile page speed and performance, and give you valuable guides on how to improve your website
Google PageSpeed Insight: recently updated, the Google PageSpeed tool will test your speed and give you improvement suggestions
WebPageTest: test your website on different devices, operating systems, and locations
Pingdom: a very popular tool, similar to WebPageTest with a nicer interface
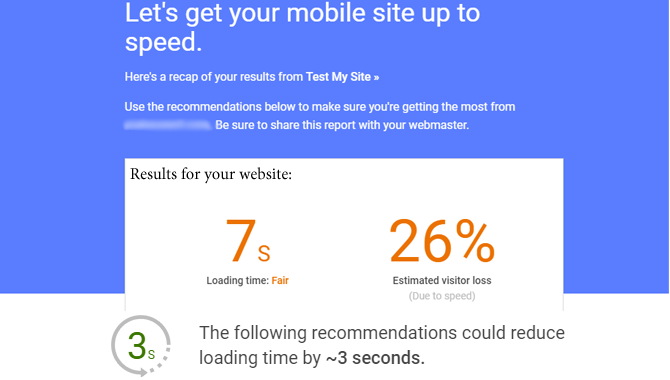
You can test your mobile site with the links above, and also the ThinkWithGoogle Mobile Test (powered by WebPageTest). The results will give you specific tips on what you can improve, with an estimated loading time reduction if you follow the tips.
The recommended best practices are constantly changing, so keep checking your page speed regularly as you make improvements.
Facebook has a new area of its app it will have to police for fake news and biased sensationalism. Facebook is launching “Today In”, its local news aggregator it began testing in January, in 400 small to medium-sized US cities. It’s also now testing it in its first overseas spot in Australia. iOS and Android users can open the Today In bookmark or opt in to getting digests of its local news in their feed. The feature includes previews that link out to news sites about top headlines, current discussions, school announcements and more.
“We have a number of misinformation filters in place to ensure that fake news and clickbait does not surface on Today In. We also provide people the ability to report suspicious content on Facebook and within Today In specifically” a Facebook spokesperson tells me. “The misinformation filters are the same across Facebook that we’ve previously talked about – downranking clickbait, ratings from third-party fact checkers” they said. However, “the content in the surface is pulled by algorithm”, so there’s always a chance that problematic content slips through. For now, there will be no ads in Today In.
Facebook is also now testing Local Alerts with 100 local government and first responder Pages that can be issued to inform citizens about urgent issues or emergencies, such as where to take shelter from a hurricane. The Local Alerts are delivered via News Feed, Today In, and Pages can also target users with notifications about them. Again, while Facebook may be vetting which Pages get access to the Local Alerts feature, it must closely monitor to make sure they’re using it to provide vital info to their communities rather than just grab traffic at sensitive moments.
Facebook is hoping to fill a void after surveys found 50 percent of users wanted more local news through Facebook. It previously tested Today In with New Orleans, La.; Little Rock, Ark.; Billings, Mont.; Peoria, Ill.; Olympia, Wash.; and Binghamton, N.Y. The feature could give local outlets a referral traffic boost that could help offset the fact that Facebook has drained ad dollars from journalism into its own News Feed ads. And to make sure “news deserts” without enough local outlets still have robust Today In sections, Facebook will collect headlines from surrounding areas.
But the launch also opens up a new vector for policy issues, and it’s curious that Facebook would push forward on this given all its policy troubles as of late. It will have to ensure that Today In only aggregates content from reliable and fact-focused local outlets and doesn’t end up peddling fake news. But that in turn could open it to criticism suggesting it’s biased against fringe political outlets that believe their clickbait is the real story.
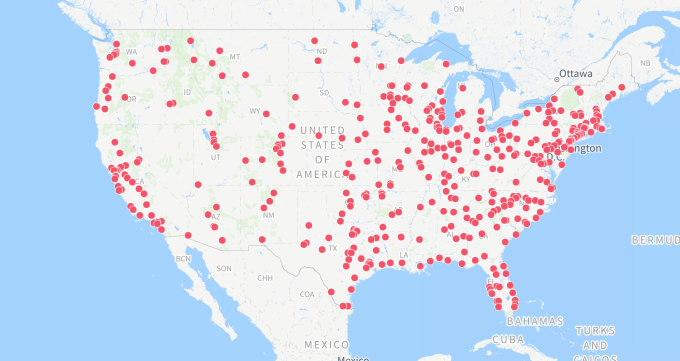
Users who want to check if they have access to Today In can visit this interactive map. The list includes Facebook’s hometown of Menlo Park and nearby Oakland, but not San Francisco. It’s also skipping big cities like New York and Washington, D.C. in favor of places like Mobile, Alabama; and Provo, Utah.
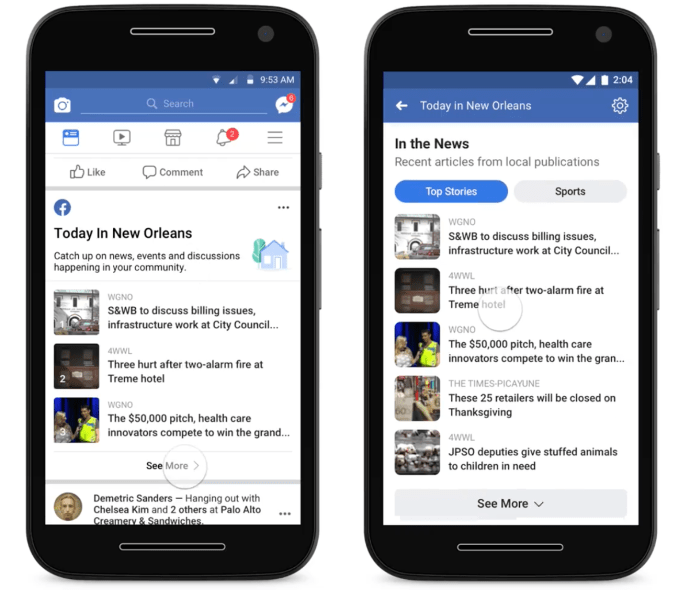
To find the mobile-only feature in Facebook (there’s no desktop version), users will hit the three-line “More” hamburger button and scroll down looking for “Today In [their city]”. Otherwise, they may stumble across one of its digests showing the headlines, thumbnail images, and publications for three of the biggest local news stories.
After tapping through or opening the Today In bookmark, they’ll be able to horizontally swipe through different sections like In The News that features recent stories and can be toggled to display sports. As per usual, Facebook isn’t above promoting its own content, like user and Page News Feed posts discussing local topics, Groups you could join, or Events you could RSVP to. Once you hit the end of a daily edition, you’ll see a “You’re all caught up” notice, similar to Instagram’s feature designed to keep you from over-scrolling.
Facebook infamously turned away from news in favor of content from friends at the start of 2018, precipitating a significant decline in News Feed reach and referral traffic for links to articles. That left a lot of outlets feeling burned, as many had staffed up thanks to the that flow of traffic and the ad dollars it generated. Now some are having to lay off journalists, especially those making video content that Facebook also dialed down.
By resurfacing local news, Facebook could help strengthen ties in local communities as part of its new mission statement to “bring the world closer together”. But if that news contains heavy partisan bias or hypes up nothingburgers, it could lead to more polarization. Facebook already has trouble finding enough third-party fact checkers to verify viral news stories. Now it may expose itself to even more liability to be the arbiter of truth now that it’s fragmented the news space into hundreds of distinct digests.
This conundrum will play out again and again. Facebook wants to keep pushing forward with product launches it thinks can help society, but it in turn takes on even greater responsibility to protect us that it hasn’t proven it deserves.
Facebook has a new area of its app it will have to police for fake news and biased sensationalism. Facebook is launching “Today In”, its local news aggregator it began testing in January, in 400 small to medium-sized US cities. It’s also now testing it in its first overseas spot in Australia. iOS and Android users can open the Today In bookmark or opt in to getting digests of its local news in their feed. The feature includes previews that link out to news sites about top headlines, current discussions, school announcements and more.
“We have a number of misinformation filters in place to ensure that fake news and clickbait does not surface on Today In. We also provide people the ability to report suspicious content on Facebook and within Today In specifically” a Facebook spokesperson tells me. “The misinformation filters are the same across Facebook that we’ve previously talked about – downranking clickbait, ratings from third-party fact checkers” they said. However, “the content in the surface is pulled by algorithm”, so there’s always a chance that problematic content slips through. For now, there will be no ads in Today In.
Facebook is also now testing Local Alerts with 100 local government and first responder Pages that can be issued to inform citizens about urgent issues or emergencies, such as where to take shelter from a hurricane. The Local Alerts are delivered via News Feed, Today In, and Pages can also target users with notifications about them. Again, while Facebook may be vetting which Pages get access to the Local Alerts feature, it must closely monitor to make sure they’re using it to provide vital info to their communities rather than just grab traffic at sensitive moments.
Facebook is hoping to fill a void after surveys found 50 percent of users wanted more local news through Facebook. It previously tested Today In with New Orleans, La.; Little Rock, Ark.; Billings, Mont.; Peoria, Ill.; Olympia, Wash.; and Binghamton, N.Y. The feature could give local outlets a referral traffic boost that could help offset the fact that Facebook has drained ad dollars from journalism into its own News Feed ads. And to make sure “news deserts” without enough local outlets still have robust Today In sections, Facebook will collect headlines from surrounding areas.
But the launch also opens up a new vector for policy issues, and it’s curious that Facebook would push forward on this given all its policy troubles as of late. It will have to ensure that Today In only aggregates content from reliable and fact-focused local outlets and doesn’t end up peddling fake news. But that in turn could open it to criticism suggesting it’s biased against fringe political outlets that believe their clickbait is the real story.
Users who want to check if they have access to Today In can visit this interactive map. The list includes Facebook’s hometown of Menlo Park and nearby Oakland, but not San Francisco. It’s also skipping big cities like New York and Washington, D.C. in favor of places like Mobile, Alabama; and Provo, Utah.
To find the mobile-only feature in Facebook (there’s no desktop version), users will hit the three-line “More” hamburger button and scroll down looking for “Today In [their city]”. Otherwise, they may stumble across one of its digests showing the headlines, thumbnail images, and publications for three of the biggest local news stories.
After tapping through or opening the Today In bookmark, they’ll be able to horizontally swipe through different sections like In The News that features recent stories and can be toggled to display sports. As per usual, Facebook isn’t above promoting its own content, like user and Page News Feed posts discussing local topics, Groups you could join, or Events you could RSVP to. Once you hit the end of a daily edition, you’ll see a “You’re all caught up” notice, similar to Instagram’s feature designed to keep you from over-scrolling.
Facebook infamously turned away from news in favor of content from friends at the start of 2018, precipitating a significant decline in News Feed reach and referral traffic for links to articles. That left a lot of outlets feeling burned, as many had staffed up thanks to the that flow of traffic and the ad dollars it generated. Now some are having to lay off journalists, especially those making video content that Facebook also dialed down.
By resurfacing local news, Facebook could help strengthen ties in local communities as part of its new mission statement to “bring the world closer together”. But if that news contains heavy partisan bias or hypes up nothingburgers, it could lead to more polarization. Facebook already has trouble finding enough third-party fact checkers to verify viral news stories. Now it may expose itself to even more liability to be the arbiter of truth now that it’s fragmented the news space into hundreds of distinct digests.
This conundrum will play out again and again. Facebook wants to keep pushing forward with product launches it thinks can help society, but it in turn takes on even greater responsibility to protect us that it hasn’t proven it deserves.
Google is making a major move to expand the availability of its Fi wireless service.
It’s been a few years since Google launched Project Fi with the promise of doing things a bit differently than the large carriers. Because it could switch between the cell networks of multiple providers to give you the best signal, the service only ever officially supported a select number of handsets. You could always trick it by activating the service on a supported phone and then moving your SIM card to another (including an iPhone), but that was never supported.
That’s changing today, though. The company is opening up Fi — and renaming it to Google Fi — and officially expanding device support to most popular Android phones, as well as iPhones. Supported Android phones include devices from Samsung, LG, Motorola and OnePlus. iPhone support is currently in beta, and there are a few extra steps to set it up, but the Fi iOS app should now be available in the App Store.
One thing you might not get with many of the now-supported phones is the full Fi experience, with network switching and access to Google’s enhanced network features, including Google’s VPN network. For that, you’ll still need a Pixel phone, the Moto G6 or any other device that you can buy directly in the Fi store.
Fi on all phones comes with the usual features, like bill protection, free high-speed international roaming and support for group plans.
To sweeten the deal, Google is also launching a somewhat extraordinary promotion today: If you open a new Fi account — or if are an existing user — you can buy any phone in the Fi shop today and get your money back in the form of a travel gift card that you can use for a flight with Delta or Southwest, or lodging with Airbnb and Hotels.com. There’s some fine print, of course (you need to keep your account active for a few months, etc.), but if you were looking at getting Fi anyway, like to travel and want to get a Pixel 3 XL, that’s not a bad deal at all.
The fine print is below:
Travel on Fi with Any Device Purchase Promotion Terms (Google Fi)
Limited time, 24-hour offer applies to any qualifying device purchased from fi.google.com from 11/28/18 12:00 AM PT through 11/28/18 11:59 PM PT, or while supplies last. When you purchase a qualifying device on fi.google.com, you can redeem a travel gift card in the amount you paid for the device, excluding taxes (details below).
To qualify for this promotion, a device must be activated within 15 days of device shipment and remain active for 60 consecutive days within 75 days of device shipment. The device must be activated within the same plan that was used to purchase the device. Activation must be for full service (i.e., activation does not apply to a data-only SIM).
This offer is available for new Google Fi customers as of 11/28/18 12:00 AM PT and existing, active Google Fi customers. If the customer is new to Google Fi, the customer must transfer (port-in) their current personal number over to Google Fi during sign up. The number being transferred must be currently active and have been active with the previous carrier and the customer since 8/28/18 12:00 AM PT.
After the terms have been satisfied, the customer will receive an email from Google Fi (around 75 – 90 days after device activation) with instructions on how to obtain a gift card from Tango subject to Tango’s terms and conditions. The user can redeem gift card amounts with select travel partners: Airbnb, Delta Airlines, Hotels.com, and Southwest Airlines. Gift cards may also be subject to the terms of the travel partners.
If Fi service is paused for more than 7 days or cancelled within 120 days of activation, the value of the gift card will be charged to your Google Payments account to match the purchased price of the device. Limit one per person. This offer is only available for U.S. residents ages 18 and older, and requires Google Payments and Google Fi accounts. Unless otherwise stated, this offer cannot be combined with other offers. Offer and gift card redemption are not transferable, and are not valid for cash or cash equivalent. Void where prohibited.














 That’s changing today, though. The company is opening up Fi — and renaming it to Google Fi — and officially expanding device support to most popular Android phones, as well as iPhones. Supported
