20 August 2018

15 Must-Have iMessage Sticker Packs for Fun Conversations


imessage-stickers

Stickers are downright fun, and way better than using plain old emoji. With the iMessage App Store, Apple has elevated the art of stickers. Now you can send animated stickers, and even place stickers on top of a message like you’d do in real life.

The App Store has a staggering collection of sticker packs. You’ll find everything from cartoons to memes, and of course, cats. Here are 15 packs you should definitely download. Check our guide to installing stickers if you’re new to them.

1. Made With Love
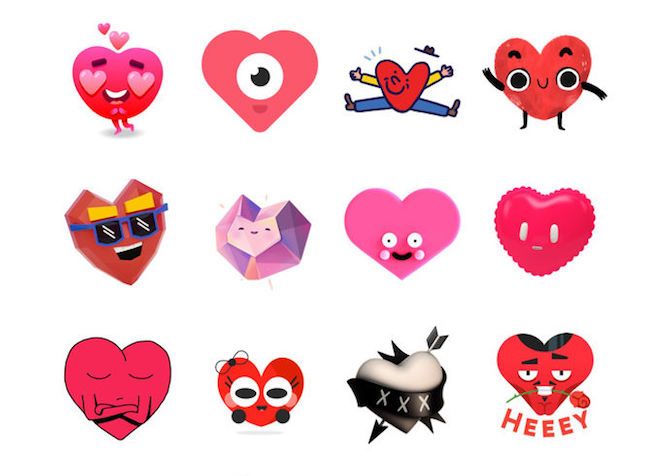
Made with Love iMessage Sticker Pack

Made With Love is a huge collaboration project between artists, designers, and illustrators. You’ll find more than 50 stickers, all about love, from one artist each. On the surface, it looks like 50 different versions of the heart. But as you look closely, you’ll discover subtle details that convey emotions you perhaps can’t find the right words for.

Download: Made With Love (Free)

2. Cookie Monster Stickers

Cookie Monster iMessage Sticker Pack

Who doesn’t like the Cookie Monster? He’s adorable and loves cookies just like most of us. You can easily place Cookie’s googly eyes on anything in your conversation. Peel that cookie-loving goofball and place him on photos, inside bubbles, or even over other stickers. This free pack gives you 20+ stickers, with more (including 15 animated stickers) available from an in-app purchase.

Download: Cookie Monster Stickers (Free, premium version available)

3. Kleptocats

Kleptocats iMessage Sticker Packs

This free sticker pack is a-meow-zing. You’ll find no shortage of cat stickers on offer, but this particular one has the snuggles, naps, hunger, and other feline cuteness combined in various colors and expressions. Let your inner cat person out with these adorable stickers.

Download: Kleptocats (Free)

4. Moonpig

Moonpig iMessage Sticker Pack

Messaging gets interesting with this sticker pack, as it allows you to personalize the stickers using the company’s own characters. It has an amazing make-it-yourself feature with goofy handwritten fonts along with funny one-liners.

Download: Moonpig (Free)

5. Toca Life Paper Bag Cat

Toca Cat Sticker Pack

If you’re tired of being a diva, the Paper Bag Cat is your spirit animal. It’s the perfect combination of expressing your grumpiness while you fly around on a slice of pizza. The cat has an interesting story as well, making it easy to relate to these fun stickers.

Download: Toca Life Paper Bag Cat (Free)

6. Powerpuff Girls

Powerpuff Girls iMessage Sticker Pack

Place Blossom, Buttercup, and Bubbles on your bubbles with this pack. Fight the Mojo Jojos in your life by sending them these stickers. It’s easy get the power of nostalgia as well as the Powerpuff Girls to fight the crime of boring messages. Make your conversations, cool, cute, and more importantly—sassy!

Download: Powerpuff Girls (Free)

7. TMNT Stickers
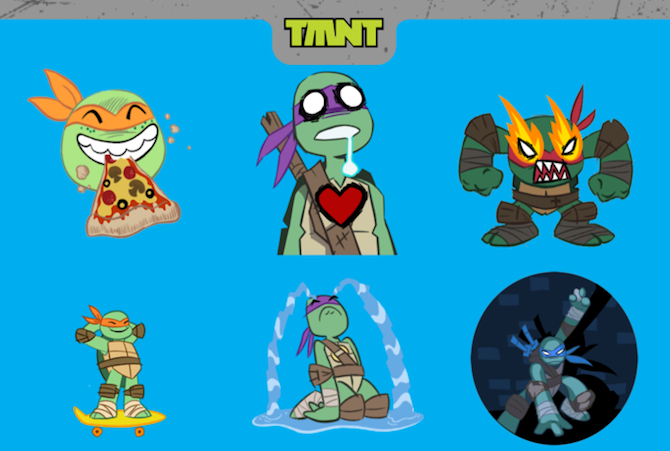
TMNT iMessage Sticker Pack

Here’s another one for the cartoon lovers. Your messages are about to get sliced and diced with Leonardo, Raphael, Donatello, and Michelangelo.

The official Teenage Mutant Ninja Turtles are here to rescue your conversations with their ninja skills. Go ahead, defend yourself with these four heroes against the harsh words of your friends. Cowabunga!

Download: TMNT Stickers (Free)

8. Solid Solids

Solid Solids iMessage Sticker Packs

These adorable solids are perfect for geeks. The sticker pack takes solid shapes and adds a whole lot of personality them. Its shapes are animated, with cute colors.

Some of them are just downright eatable, while the angry cone is intimidating. Get sweet and geeky with these beautiful stickers.

Download: Solid Solids ($1)

9. Buzz Bees

Buzz Bees iMessage Sticker Pack

These wonderfully simplistic stickers are an overload of adorable. The app comes with a huge catalog of stickers showing the bees with every expression you can imagine. Noticing the cute tiny details on the stickers will instantly make your day (and the person you’re sending them to).

Download: Buzz Bees (Free)

10. Memes—Rage Comic Stickers

Meme Faces iMessage Sticker Pack

Reacting in memes is the mark of a true friendship. But saving and collecting your own memes for every possible reply is a lot of work. With more than 100 popular memes and faces to choose from, this iMessage app helps you level up your meme game in no time.

Download: Memes—Rage Comic Stickers ($1)

11. Truly Furry

Truly Furry iMessage Sticker Pack

Got a friend who’s both adorable and furry? Your iMessage thread is about to get a lot more vibrant. Truly Furry gives you adorable and colorful fuzzy monsters to brighten up your messages.

They are funny faces with goofy reactions to help your inner furry-self communicate. The sticker pack is beautifully designed and comes with an array of vibrant pop colors.

Download: Truly Furry (Free)

12. Rejoinders

Rejoinders iMessage Sticker Pack

These stickers are filled with sarcasm, from gaping maws to menacing smirks. Rejoinders is an Old Masters pack featuring several centuries’ worth of art history. It includes around 50 faces to express your mood swings and emotions over messages. Send them to your friends and enemies alike.

Download: Rejoinders ($1)

13. WWF Origami
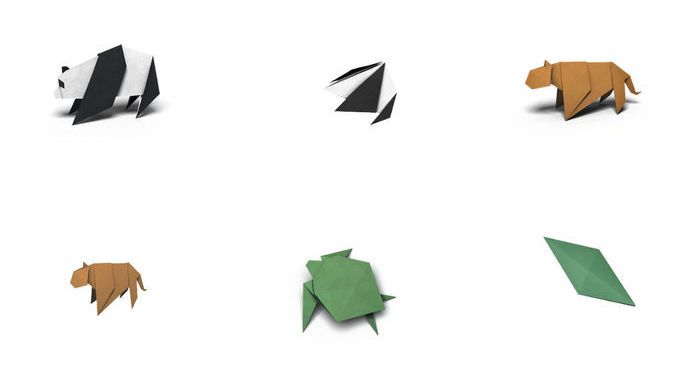
WWF Origami iMessage Stickers Pack

Share the love for animals and origami through these neatly designed stickers by the World Wildlife Fund. This pack is inspired by the WWF Together app and has many animals showcased in origami structures.

Download: WWF Origami (Free)

14. Asthetixx

Aesthetixx iMessage Sticker Pack

This pack adds a range of beards, caps, and other funky elements to flair up the photos you send to your friends. They are useful to mask the identities of certain people, especially since you can put pink mustaches on pictures.

Download: Asthetixx (Free)

15. Yippies!

Yippies iMessage Sticker pack

Spread the happiness in everything you discuss with these stickers. If you find texting too basic, use the cute language of Yipee and attain inner happiness. You’ll be one step closer to inner peace.

Download: Yippies! (Free)

iMessage Apps Are Versatile

Granted, iMessage stickers are amazing. But did you know that iMessage apps can do a lot more? You can use third-party iMessage apps to share music, translate text, and even share files from cloud storage services like Dropbox.

Read the full article: 15 Must-Have iMessage Sticker Packs for Fun Conversations


Read Full Article

Hotspot Shield Is An Easy-To-Use VPN With Elite Security

Antivirus Software Isn’t Enough: 5 Things You Must Do to Avoid Malware


antivirus-not-enough

Just bought a new notebook or desktop computer and have concerns about online security? Worried about losing valuable study time to viruses and other online infections?

Staying safe and secure online is simple, as long as you take the right precautions. Besides installing an online security or antivirus suite, follow these steps for safer computing.

1. Catch Phishing Emails With a Spam Filter

Typical Gmail spam

Over half of all emails are spam, and of those, 50 percent are carrying malicious attachments. That’s an unbelievably powerful method of delivering of malware infections to computers: just via email. As such, it’s vital that you take steps to ensure that the emails that make it into your inbox are safe.

You don’t have any control over the emails that are sent to you. Sadly, once your email address ends up in a database, it’s a free-for-all as far as the scammers are concerned. They’re going to target you with as much rubbish as possible, hoping that you click, and they get lucky.

Phishing emails, which typically strongly resemble official emails and include a link to a spoof website that fools you into entering your personal details, are particularly concerning. While browser based email solutions like Gmail and Outlook are good at blocking these, they’re not perfect.

As such, it’s worth using an email client and employing a spam filter to help in blocking these messages. Don’t leave anything to chance. Oh, and don’t open attachments from unrecognized email accounts!

2. Start Using Encrypted Email

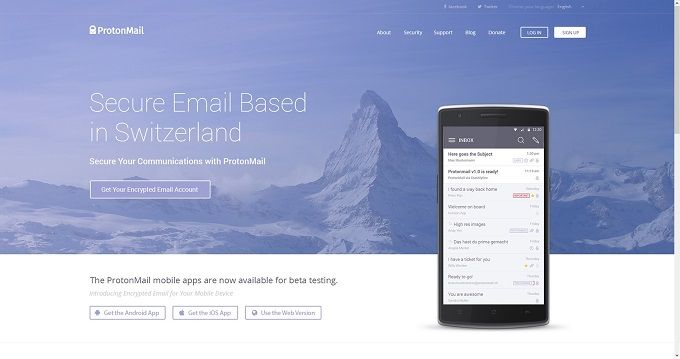
Encrypted email from ProtonMail

Using Gmail or Outlook, or the email service your ISP enforces is all very well, but it’s probably not secure. Having a username, password, perhaps two-factor authentication and a HTTPS connection is great, but these days, it’s not enough.

We know that Gmail displays adverts, and these are chosen by Google based on the contents of your inbox. So, what can you do about this? Well, the smart money is on using encrypted email.

At one time, this meant you and the recipient both being signed up to the same email service. Fortunately, this is no longer the case.

Several encrypted email providers are available, each offering varying levels of security. You should consider each service on merit, if encrypting your email sounds like a secure option. Just be sure to use a secure password to decrypt your messages!

Of these top options, ProtonMail is often cited as the very best encrypted email provider. However, we’re also fans of Disroot, which combines free encrypted email with a secure cloud drive. This includes an online office suite.

3. Only Use Trusted Browsers and Extensions

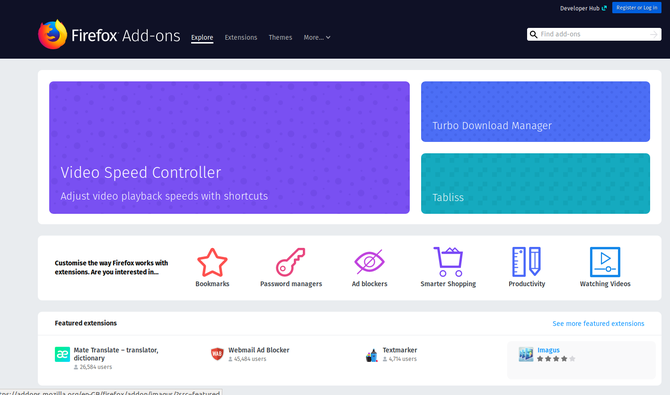
Choose your browser extensions with care to stay secure online

Staying safe online means being able to browse the web without risk of danger from malware, scammers, ransomware, and all of the other risks.

Besides email, most issues threatening your online security come via your browser. As such, it is vital to ensure that you’re using a browser that receives regular updates. Mozilla Firefox is a good example of a reliable browser that is constantly updated thanks to the hard work of its development team.

You might also rely on Google Chrome, although the privacy aspects of this browser with regard to the way in which Google tracks your behavior may well discourage you.

But it doesn’t end with the browser.

A wide selection of extensions (also known as “add-ons”) are available for you to install, but you shouldn’t just go ahead and install what looks good. Instead, narrow your selection, researching the reputation of the extensions or add-ons; ensure the choice you make is good. Don’t simply install the first add-ons that does the job you’re looking for.

Limiting your use of add-ons to specific purposes from reputable developers is a wise tactic.

4. Check Links Before You Click

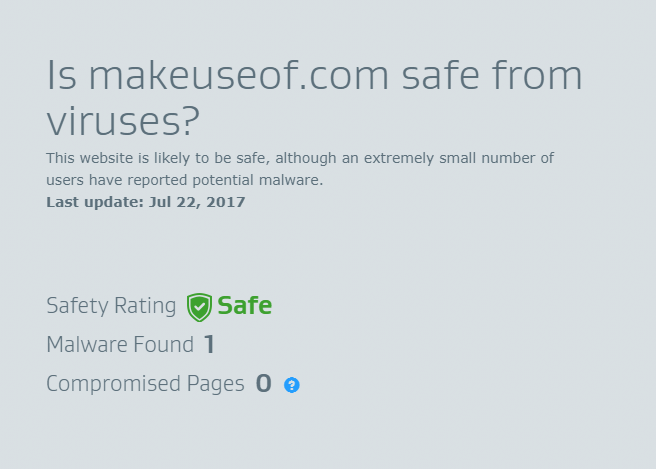
Check web links to ensure destination websites are safe

Once upon a time, the web was more or less safe. Sure, there were scam websites, malware-loaded adverts, dangerous popups, and insecure browsers, but…

Okay, fair point: the web has almost never been safe. Which is why link checking tools are so vital. It is a source of constant amazement that so few people take the time to install a link checking tool. Many security suites include these, and they’re even available as browser extensions.

What better way to stay secure online than to have a tool that quickly checks if the link you’re about to click is safe?

Don’t leave your homepage without a link checker. Don’t want to use a browser extension? These link checking sites can help.

5. Browse via Proxy Server or VPN

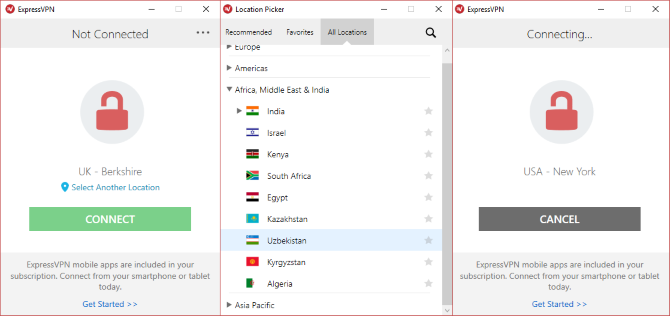
Express VPN desktop client

If you want to access the web without being seen online—perhaps to avoid identity theft—then you should consider a proxy server, or a VPN (Virtual Private Network).

A proxy server (in which you access a website via an anonymizing service—the proxy), will also let you access restricted or censored information, prevent any sort of profiling of your online activity, and enable you to conduct sensitive research. You should also be able to engage in anonymous messaging, should that be necessary.

While most of these uses for a proxy server might seem more suited to freedom fighters in oppressive states, awareness of how privacy is breached on a minute-by-minute basis is useful.

However, it is worth considering a VPN if you’re planning on regular proxy use. A VPN employs encryption (typically 256-bit AES), obfuscating your online activity from outside observers. These days, it’s non-negotiable if you want improved security and privacy on the web.

Not sure which VPNs are reputable? We highly recommend ExpressVPN, HotSpot Shield, and CyberGhost.

Don’t Just Install a Security Suite: Think “Secure”

So many people install security software on their computers and think that the job is done. But online security is about far more than viruses and malware.

That is why installing an antivirus tool or security suite is just the first step in keeping your PC secure. After that, it’s about developing good habits and awareness. To repeat, you should:

  1. Use a spam filter
  2. Rely on email encryption
  3. Switch to a trustworthy browser
  4. Check links before clicking
  5. Browse the web via proxy server or VPN

Looking for a security suite to get started with? We’ve sorted out the best security software to help you tighten up your online security.

Read the full article: Antivirus Software Isn’t Enough: 5 Things You Must Do to Avoid Malware


Read Full Article

Watch Nvidia unveil the RTX 2080 live right here


Nvidia is taking advantage of the Gamescom in Germany to hold a press conference about its future graphics processing units. The conference will start at 6 PM in Germany, 12 PM in New York, 9 AM in San Francisco.

Just a week after the company unveiled its new Turing architecture, Nvidia could share more details about the configurations and prices of its upcoming products — the RTX 2080, RTX 2080 Ti, etc.

The name of the conference #BeForeTheGame suggests that Nvidia is going to focus on consumer products and in particular GPUs for gamers. While the GeForce GTX 1080 is still doing fine when it comes to playing demanding games, the company is always working on new generations to push the graphical boundaries of your computer.

According to Next INpact, you can expect two different products this afternoon. The GeForce RTX 2080 is going to feature 2,944 CUDA cores with 8GB of GDDR6. The GeForce RTX 2080 Ti could feature as many as 4,352 CUDA cores with 11GB of GDDR6.

Nvidia already unveiled Quadro RTX models for professional workstations last week. The company is expecting significant performance improvements with this new generation as those GPUs are optimized for ray tracing — the “RT” in RTX stands for ray tracing.

While ray tracing isn’t new, it’s hard to process images using this method with current hardware. The RTX GPUs will have dedicated hardware units for this task in particular.

And maybe it’s going to become easier to buy GPUs now that the cryptocurrency mining craze is slowly fading away.


Read Full Article

10 AmazonBasics Tech Products That Are Actually Pretty Good

Walmart completes its $16 billion acquisition of Flipkart


Walmart announced over the weekend that it has completed a $16 billion investment in Flipkart that sees it become the majority owner of the Indian e-commerce company.

The deal was first revealed back in May and now it has closed after receiving the necessary approvals. It sees Walmart take a 77 percent share in the company, buying out a number of prior investors in the process and expanding its rivalry with Amazon to a new horizon. The investment capital also includes $2 billion in new equity funding which will be used for growth while the transaction was structured so that Flipkart itself can still go public. That latter point could mean that the Indian firm must go public within four years, as TechCrunch previously reported.

Flipkart will continue to be run by its leadership with Tencent and Tiger Global retaining board seats. Those two have remained investors in the business, alongside others that include Flipkart co-founder Binny Bansal and Microsoft. Walmart previously suggested that other allies would come aboard as investors. Google was strongly mooted, but so far there have been no strategic additions.

Walmart said that its plans for India will include investments that “support national initiatives and will bring sustainable benefits in jobs creation, supporting small businesses, supporting farmers and supply chain development and reducing food waste.”

As we previously reported, it also plans to use Flipkart as a “key center of learning” for the rest of its business across the world, and that includes its home market.

“Not only is [Flipkart] innovative [with the] problem-solving culture that they have, but they are doing some great work both in the AI space, how they are using data across their platforms but particularly in terms of the payment platform that they’ve created through PhonePe. All of those things we can learn from for the future and see how we can leverage those around the international markets and potentially into the US as well,” Walmart COO Judith McKenna said back in May when the deal was announced.

Flipkart’s business could also get a whole lot more transparent since its quarterly results will be reported as part of Walmart’s earnings. Although they will be part of its international business so that might provide some protection from direct scrutiny.


Read Full Article

Dark Matter Candidates


Dark Matter Candidates

Jack Dorsey admits Twitter hasn’t ‘figured out’ approach to fake news


Jack Dorsey is hedging his bets. In an interview with CNN’s Brian Stelter, the beard-rocking CEO said Twitter is reluctant to commit to a timetable for enacting policies aimed at curbing heated political rhetoric on the site.

The executive’s lukewarm comments reflect an embattled social network that has been the brunt of criticism from both sides of the political divide. The left has taken Twitter to task for relative inaction over incendiary comments from far right pundits like Alex Jones. The site was slow to act, compared to the likes of services including YouTube, Facebook and even YouPorn (yep).

When it ultimately did ban Jones’ Infowars, it was a seven day “timeout.” That move, expectedly, has drawn scrutiny from the other side of the aisle. Yesterday, Trump tweeted a critique of social media in general, that is generally being regarded as a thinly-veiled allusion to his embattled supporter, Jones.

Social Media is totally discriminating against Republican/Conservative voices. Speaking loudly and clearly for the Trump Administration, we won’t let that happen. They are closing down the opinions of many people on the RIGHT, while at the same time doing nothing to others

Trump also recently called for an end to what the right has deemed the “shadow banning” of conservative voices on social media.

“How do we earn peoples’ trust?” the CEO asked rhetorically during the conversation. “How do we guide people back to healthy conversation?”

Dorsey suggested that his company is “more left-leaning,” a notion that has made him extra cautious of blowback from the right. He also continued his position of refusing to hold the company to be accountable for fact-checking, a policy that runs counter to proclamations of other social media like Facebook.

“We have not figured this out,” Dorsey said, “but I do think it would be dangerous for a company like ours… to be arbiters of truth.”

For now, Dorsey and co. appear to be in a holding pattern, an indecisiveness that has drawn fire from all sides. The exec pines for a less polarized dialogue, citing NBA and K-Pop accounts as examples of Twitter subcultures that have been more measured in their approach.

Of course, anyone who’s spent time reading replies to LeBron or The Warriors can tell you that that’s a pretty low bar for discourse.

The fact of the matter is that this is the state of politics in 2018. Things are vicious and rhetoric can be incendiary. All of that is amplified by social media, as political pundits lean into troubling comments, conspiracy theory and outright lies to drive clicks. 

Dorsey, says he’s pushing for policies “that encourage people to talk and to have healthy conversation.” Whatever Twitter’s “small staff” might have in the works, it certainly feels a long way off.


Read Full Article

18 August 2018

Fix Common Gmail Annoyances With These 5 Free Chrome Extensions and Apps


gmail-chrome-ext

Gmail is the most popular email service in the world, but it’s not without its flaws. Even with the new changes in Gmail, Google hasn’t fixed several common annoyances and mistakes. A few fans of Gmail have tried to fill that void.

Most of them are Chrome extensions, but one of them works with Gmail on Chrome or Android. All these tools assume that you know the basics of using Gmail, and are looking for something more.

Email Studio for Gmail (Desktop Browsers, Android)

Schedule emails, send bulk emails, purge inbox, and much more

Amit Agarwal of Labnol is a master at using Google scripts. Over the years, he has created a number of scripts for Gmail that add much-needed features, like scheduling an email to be sent later or sending an email in bulk. Now he has put all of them in one handy suite.

Email Studio for Gmail has seven different features:

  1. Send bulk emails that look personal, with the contact’s name appearing in the body.
  2. Add a date and time to send an email later, or set a regular schedule for an email (like monthly rent).
  3. Forward old Gmail messages to a new email address to create a backup.
  4. Set up an auto-responder for certain emails.
  5. Clone Gmail drafts.
  6. Set up a rule to automatically delete emails before a certain date or time.
  7. Email unsubscriber to remove yourself from unwanted mailing lists.

Email Studio will work in any desktop browser and also on the Gmail for Android, since it uses the new Gmail sidebar. The Email Studio button will show up when you open any message, after which you can use it for the above functions.

If you have any trouble, check the individual videos for each feature on the Email Studio for Gmail official page.

Install: Email Studio for Gmail (Free)

Murmure for Gmail (Chrome)

Send a private message to someone you add as BCC

Blind Carbon Copy (BCC) is one of these essential email features that lets you add someone on a mass email while hiding them from other recipients. It’s useful to mark a person who needs to be in the know about what’s happening.

Murmure builds on the BCC feature by letting you add a private message along with the email, which can be read only by the BCC-ed contact. Murmure restricts the message to 200 characters and will send it as a second email to that recipient while including the text of the first.

It’s much easier than the manual way you would have to use right now. Plus, if you automatically BCC yourself in Gmail, you can use this to send notes to yourself about conversations.

Download: Murmure for Gmail for Chrome (Free)

Gmail Audio Alerts (Chrome)

Get a sound notification when you receive a new message

get an audio notificaiton when you receive a new email in gmail

Google Chrome has built-in notifications (which you can block) with audio and visual alerts, so it’s not like Google doesn’t know people like audio notifications. Yet even after so many years, there is no option to get a simple “ding!” when a new message lands in my inbox. Finally, someone else fixed that.

Gmail Audio Alerts is an extension that works in the background, so you can hide it from the Chrome toolbar. When you get a new email, it will sound an alert. That’s all we needed, right? You can choose between a few different tones: Simple, Clean, Future, Laser, Organic, Quirky, AOL, Outlook, Apple.

Gmail Audio Alerts is a Chrome extension, but you can use it on Opera and other Chromium browsers too.

Download: Gmail Audio Alerts for Chrome (Free)

Inbox When Ready (Chrome)

Hide inbox, or lock it for productivity sessions

Some of us tend to unnecessarily open our inbox many times in the day to check if we’ve got an email. Email addiction is a problem, and Inbox When Ready is a good solution for it.

This extension gives you a button to hide or show your inbox, which means you can leave Gmail open (to search messages and do other tasks) but not get distracted by new mails. Inbox When Ready also tracks your usage to show you how often you checked your inbox and how much time it was open today. Try it out, it can be a sobering reality check

Finally, the extension has a neat feature to lock the inbox for a while. Once it’s locked, you are forced to focus on work instead of checking for emails constantly. And don’t worry, in case of the oh-so-dreaded “email emergency” that your important self is surely going to face, you still have Gmail on your phone.

Download: Inbox When Ready for Chrome (Free)

Neat Messages for Gmail (Chrome)

Fix the annoyingly long lines of text in emails

Format Gmail inbox so messages are easier to read

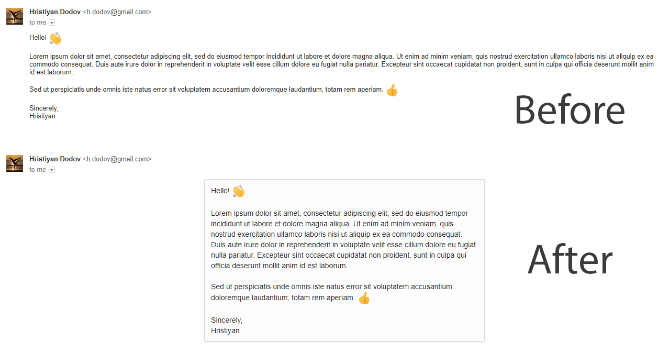
By default, Gmail uses a responsive design. That means when you open an email, the text will flow as wide as the window allows it to. However, that’s not an ideal reading experience.

Neat Messages for Gmail formats this long flowing text into a more concise window that is better for reading. Each line will only have about 10-12 words, which is better for your eye to jump to the next line and read faster. The demo picture above is a good indication of how much it improves the reading experience.

This isn’t the only trick you can use to make Gmail look better. You can change the themes, increase font size, or change the font entirely. Learn those tricks in our guide to changing Gmail’s appearance.

Download: Neat Messages for Gmail for Chrome (Free)

Have You Seen Our Favorite Gmail-Chrome Extensions?

It’s surprising that Google focuses so much on design but doesn’t add these tiny features that can make life easier for its users. There are several other Gmail annoyances, and it’s up to third-party developers and fans to fix them.

The good news is that if you use Google Chrome, you might be able to have a much better Gmail experience. With the right Chrome extensions for Gmail, you can turn it into a task manager, create professional signatures, rename emails to how you want to see them, and really power up your inbox.

Read the full article: Fix Common Gmail Annoyances With These 5 Free Chrome Extensions and Apps


Read Full Article
It’s Friday so relax and watch a hard drive defrag forever on Twitch


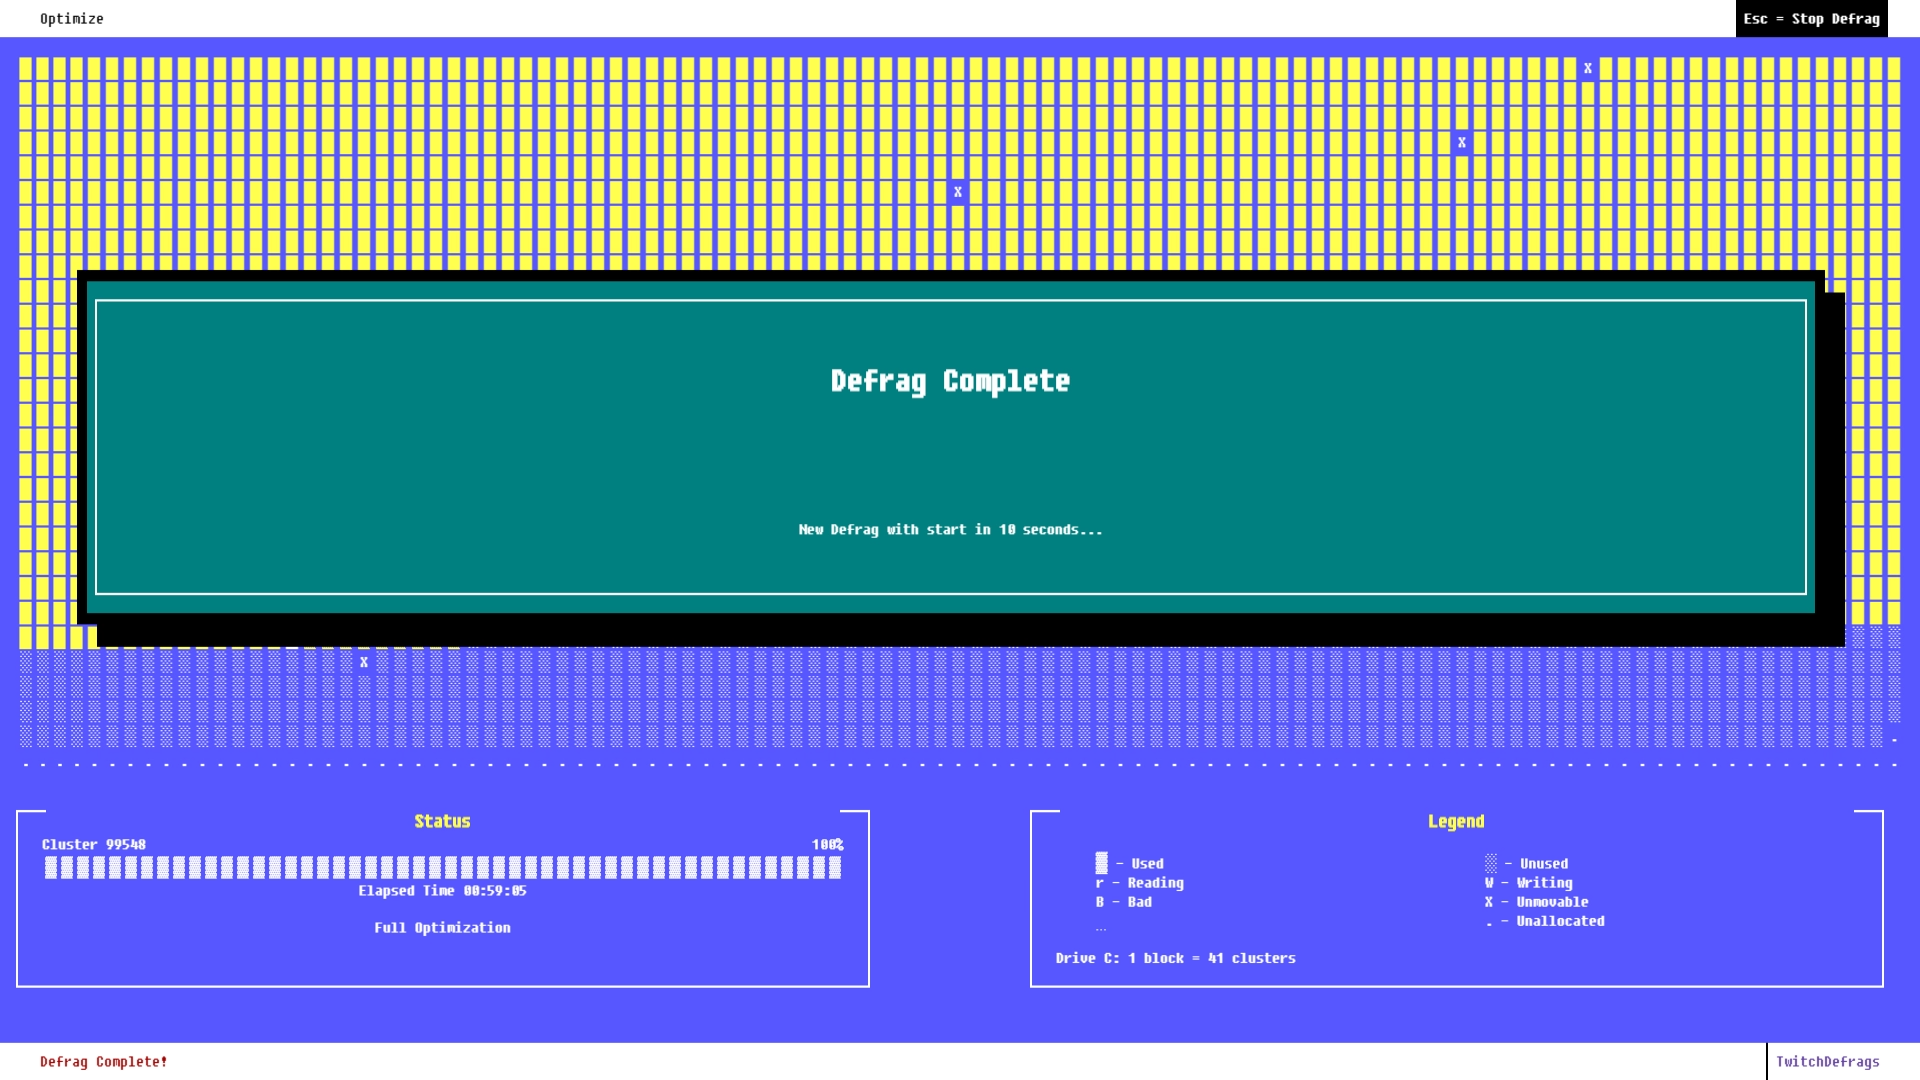
It’s been a while since I defragged — years, probably, because these days for a number of reasons computers don’t really need to. But perhaps it is we who need to defrag. And what better way to defrag your brain after a long week than by watching the strangely satisfying defragmentation process taking place on a simulated DOS machine, complete with fan and HDD noise?

That’s what you can do with this Twitch stream, which has defrag.exe running 24/7 for your enjoyment.

I didn’t realize how much I missed the sights and sounds of this particular process. I’ve always found ASCII visuals soothing, and there was something satisfying about watching all those little blocks get moved around to form a uniform whole. What were they doing down there on the lower right hand side of the hard drive anyway? That’s what I’d like to know.

Afterwards I’d launch a state of the art game like Quake 2 just to convince myself it was loading faster.

There’s also that nice purring noise that a hard drive would make (and which is recreated here). At least, I thought of it as purring. For the drive, it’s probably like being waterboarded. But I did always enjoy having the program running while keeping everything else quiet, perhaps as I was going to bed, so I could listen to its little clicks and whirrs. Sometimes it would hit a particularly snarled sector and really go to town, grinding like crazy. That’s how you knew it was working.

The typo is, no doubt, deliberate.

The whole thing is simulated, of course. There isn’t really just an endless pile of hard drives waiting to be defragged on decades-old hardware for our enjoyment (except in my box of old computer things). But the simulation is wonderfully complete, although if you think about it you probably never used DOS on a 16:9 monitor, and probably not at 1080p. It’s okay. We can sacrifice authenticity so we don’t have to windowbox it.

The defragging will never stop at TwitchDefrags, and that’s comforting to me. It means I don’t have to build a 98SE rig and spend forever copying things around so I have a nicely fragmented volume. Honestly they should include this sound on those little white noise machines. For me this is definitely better than whale noises.


Read Full Article
7 Top Secret Features of the Free VLC Media Player


vlc-features

A few months back, VLC Media Player got Chromecast support and 360-degree video views. It’s just another tiny notch on the popularity of the open source player which can handle anything that you throw at it (as long as it’s a media file!).

The Windows version of the player is closing in on 50 million downloads, and that’s discounting all the other platforms it can be installed on. Perhaps the secret to its longevity is the modular design which gives it a rich set of features. Today, let’s focus on the few “secret” features under the hood which you can use every day.

1. Use VLC as a Video Downloader for YouTube

There are several capable free downloaders available for YouTube. But, VLC has this feature built in. Though it’s not a one-click downloader and you will have to take the help of your browser.

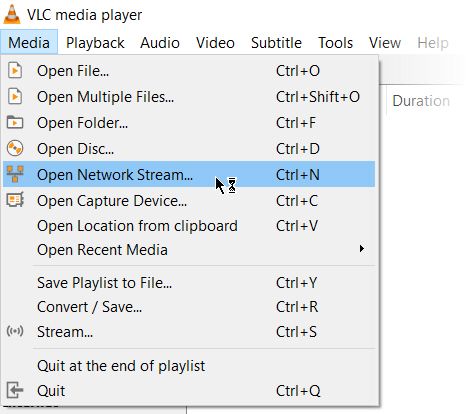
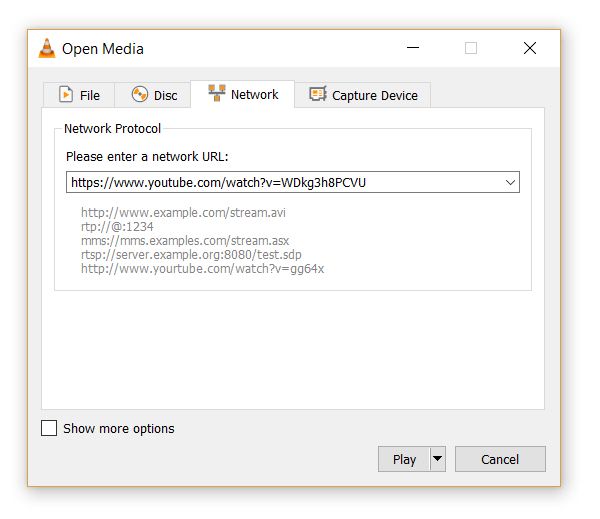
  1. Click on Media > Open Network stream.
    Capture YouTube URL
  2. Paste the YouTube URL and click the Play button in the player.
    Stream YouTube
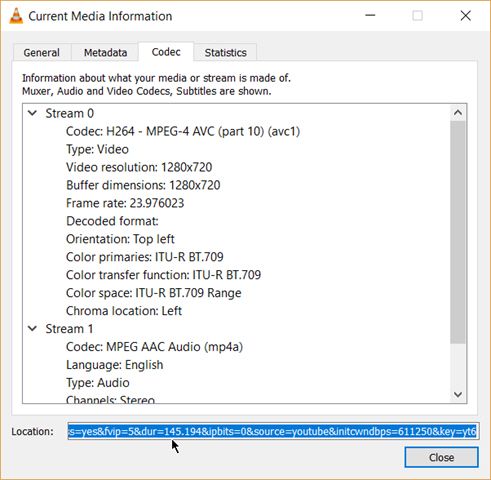
  3. VLC Media Player starts streaming the video.  Now, click Tools > Codec Information and at the bottom of the window you will see a Location box.
    Copy-paste YouTube location information.
  4. Copy the long URL in the box and paste this into your browser’s address bar. The browser will now start playing the video file. You can download the video file to your desktop by doing a Save video as with a right-click on the video. Or you can choose to record the video.

2. Convert Videos to Any Format

Downloading a video is often the first part. Converting that video so you can play it on a device of your choice is the second part. The VLC Player can do this too.

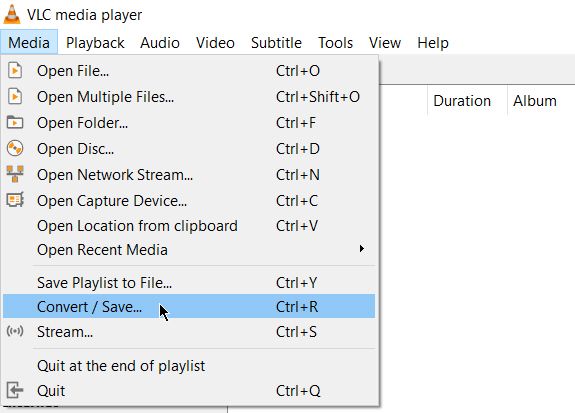
  1. From the toolbar, click on Media > Convert / Save.
    VLC Convert Video
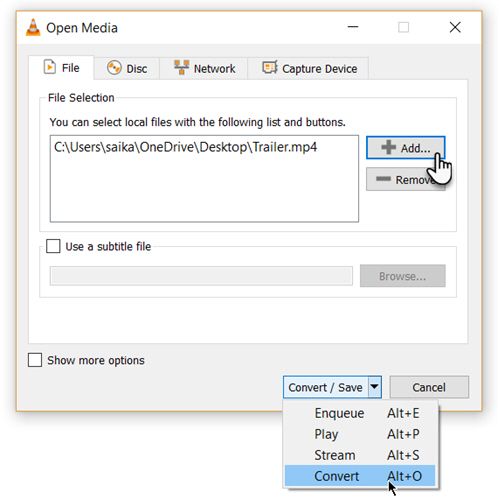
  2. In the Open Media dialog box, click on the Add button and choose the media file for conversion. Then, click on the Convert / Save dropdown > Convert.
    VLC - Convert Video-Choose File
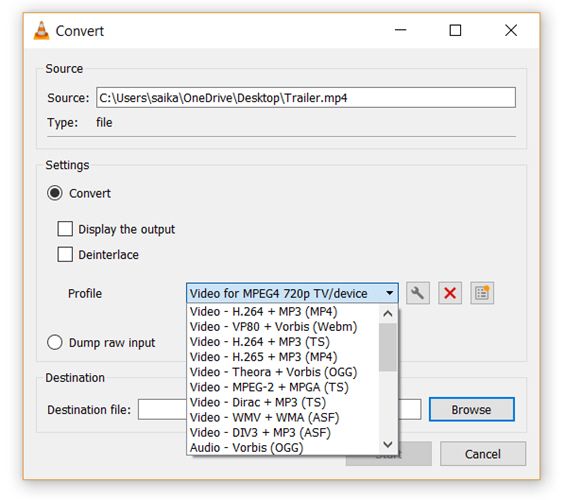
  3. Open the dropdown menu for Profile and select the file format that you would like to convert your file to. You can also click on the gear icon next to it and edit the chosen profile.
    Pick a profile and start conversion.
  4. Click on Browse and select a location to save the converted file. Then, click on Start to begin the conversion and monitor its progress in the bar below.

3. VLC as a Graphic Equalizer for Your Music

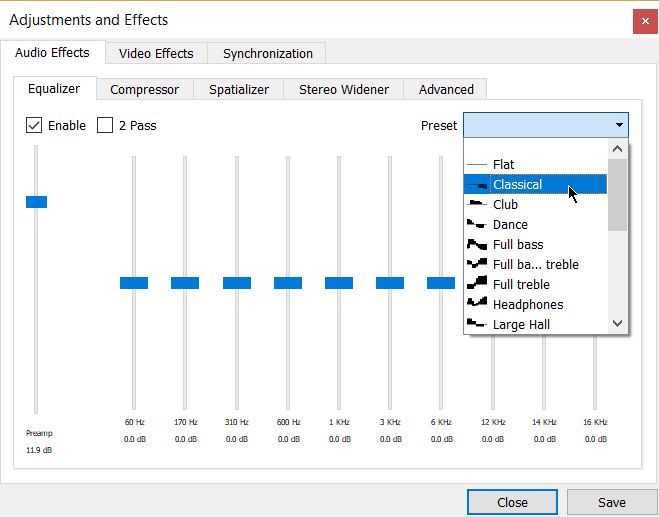
VLC Graphic Equalizer

You may be using VLC as a video player only, but VLC is a cross-platform standalone media player too and that brings full audio effects with playlist support. VLC not only displays cover art but also has a pretty good graphic equalizer tucked away inside it.

Display it with the shortcut keystrokes Ctrl + E (or go to Tools > Effects and Filters > Audio Effects). Adjust the sound quality with the available presets, or fine-tune it with the Equalizer, Compressor, and Spatializer tabs.

4. Activate Audio Normalization to Protect Your Ears

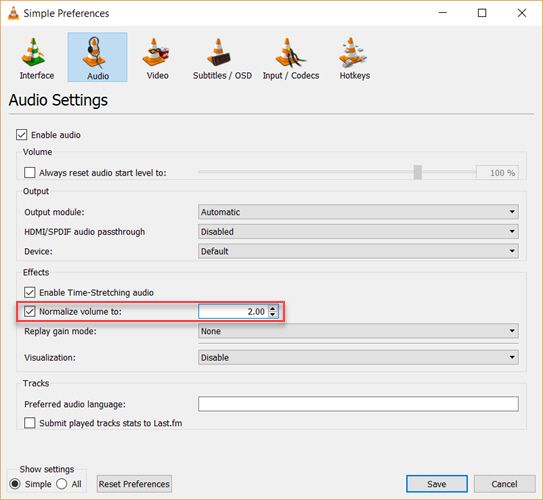
Normalize Volume

The general audio settings for the VideoLan Player are located under Preferences. One of the key features called Audio Normalization helps to optimize the volume of any media by a fixed amount and improve the sound quality.

Go to Tools > Preferences > Audio > Enable Normalize volume to. The value you set here will help to adjust the decibel levels of dialog, music, explosions, gunshots etc. in the movies you watch. Restart VLC after enabling the setting.

In fact, configure this immediately after you download and install the VLC player. It will make your audio sound better.

5. Play Internet Radio and Podcasts in VLC

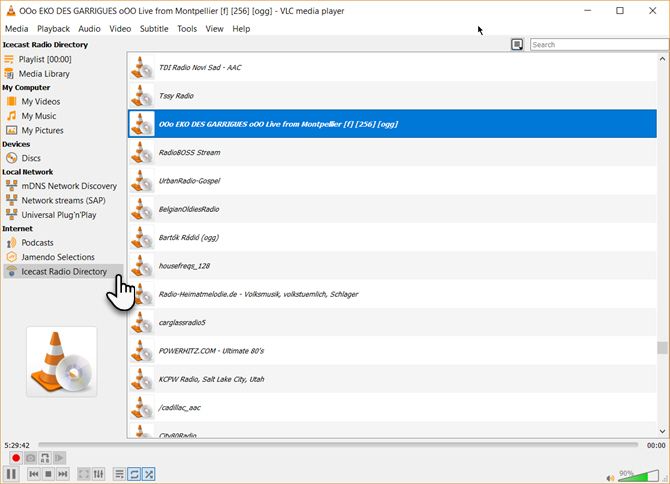
One of VLC’s little used features could definitely be its ability to find and play internet radio. The VLC Player can fill all your audio needs as it can not only stream radio but also play podcasts.

  1. Launch VLC and open the Playlist sidebar.
  2. Under Internet, you can browse through the two radio servers—Jamendo and Icecast—and choose a station of your choice by clicking on it. Also, make sure the Playlist view mode is set to List (Go to View > Playlist View Mode > List).
    VLC - Internet Radio
  3. If your favorite internet radio station is not on the list, use the station’s URL to stream it via VLC. Go to Media > Open Network Stream… Enter the URL and press Play in order to begin listening.

And to play podcasts in VLC:

  1. You can manage your favorite podcasts via the same Playlist interface.
  2. Go to Playlist and under the Internet section, select Podcasts.
  3. As soon your cursor is over the Podcasts section, click the plus sign.
  4. Copy and paste the RSS feed URL of the podcast you wish to listen and click on OK. The podcast will be added to the sidebar and you can pick the episode you want to listen to.

6. Loop a Section of a Video or Audio File

Most media players can loop an entire video or a soundtrack. With VLC, you have the added bonus of looping any specific section of a media file.

  1. Open the video or audio file with VLC. Go to View > Advanced Controls.
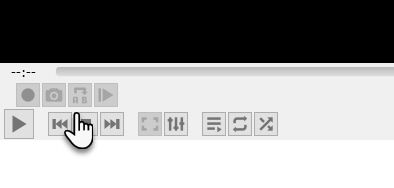
  2. Now, a few more buttons will be displayed above the normal play and stop controls.
    VLC Advanced Controls
  3. To start the loop from a specific part of the video, move the playhead to the part where you want the loop to start (Point A).
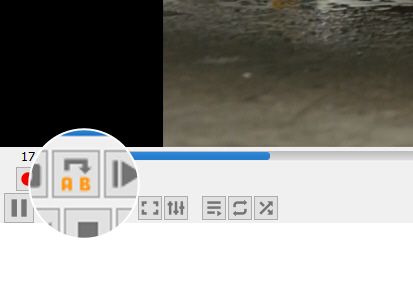
  4. Click the loop button once. The “A” mark on the button will turn red. To finish the loop, take the video to the endpoint and click on the same button again. You will see both the A and B points of the button are red.
    Set VLC Loop
  5. Now play the video and the section will loop. Click the loop button once again if you want to switch it off.

This is a handy feature when you want to review a how-to video or hear an audio file over and over to get it right. I often use this feature to study Photoshop tutorial videos.

7. Add Features With VLC Add-Ons and Extensions

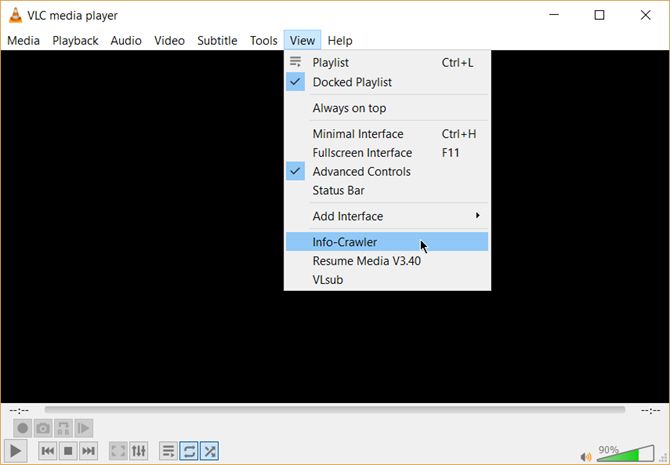
Install and View VLC Add-ons

For everyday use, VLC’s default package of features may be enough. But if you are looking for added functionality then there’s an entire catalog of add-ons you can install alongside. Remember, VLC has a huge open-source community behind it and they have helped create extensions, skins, playlist parsers, and other assorted tools.

These extensions will help you add more “secret” features to the player like tools which will help you search for subtitles from the player itself. Extensions may also work in macOS and Linux, so do doublecheck the instructions on the add-on’s page.

  1. Visit the VLC add-ons page and browse through the two views—Top or Latest.
  2. Click the Download button on the add-ons page and download the ZIP file. Extract the file. (VLC add-ons have the LUA extension.)
  3. On Windows, place the .lua files in this Windows directory:
    C:\Users\NAME\AppData\Roaming\vlc\lua\extensions folder.
    
  4. Restart VLC. You can access all your installed extensions from the View menu.

Some of the better extensions to consider include:

VLC Is Full of Cool Tricks

If you know about these features, then VLC hides few secrets from you. Now, flex your muscles and explore the more advanced possibilities of this fantastic player that has stood the test of time. Maybe create a streaming media server for your home or cast your media files from a Windows PC to your Android phone.

Read the full article: 7 Top Secret Features of the Free VLC Media Player


Read Full Article
How to Properly Resize Images in Photoshop


Knowing how to resize an image in Photoshop is an essential skill that’s useful whether you’re a photographer or not. In this article we’ll explain how it’s done in less than five minutes.
You’ll need Adobe Photoshop CC to follow along. These steps WILL work in older versions of Photoshop, although some menus may look different depending on which version you are using.

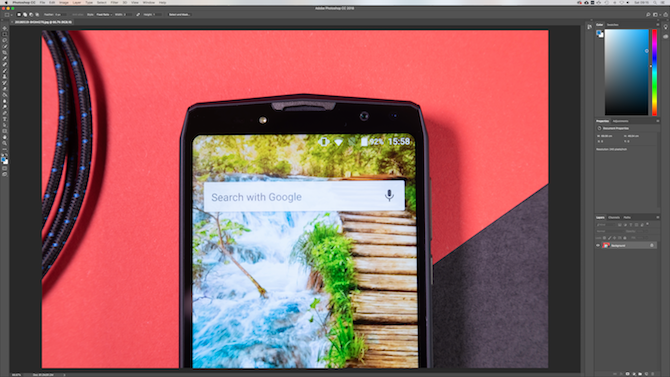
1. Resize Photos Using the Image Size Tool

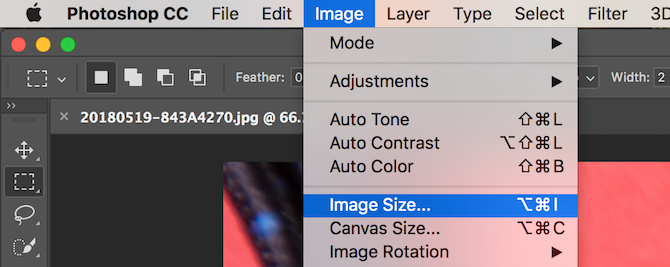
The easiest way to resize images in Photoshop is through the Image Size panel. You can access this through the Image > Image Size buttons found in the top menu bar.

Photoshop image size tool

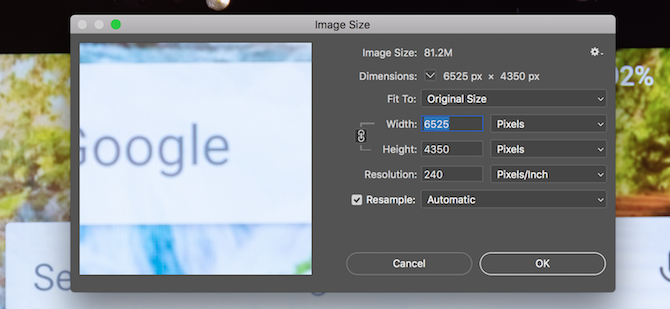
Once in the Image Size panel, you’ll see that there are several options available.

Photoshop image size panel

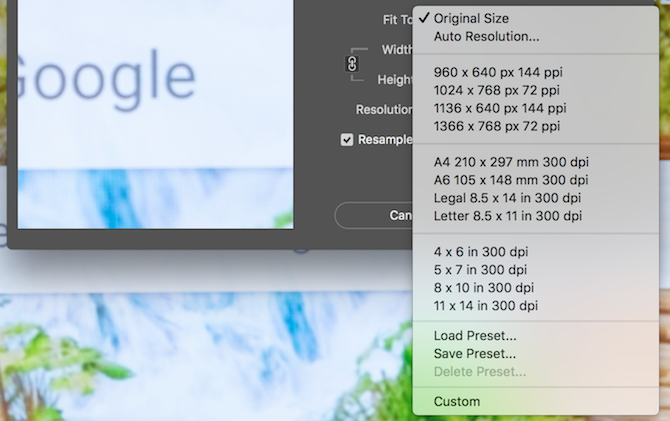
Underneath the Fit To option, you can choose from a series of predefined-image sizes. Choose a suitable size and then hit OK and Photoshop will adjust your image to match this preset size.
Photoshop image size fit to options

By using the Width, Height, and Resolution options you can change your image size to a specific set of dimensions. The drop-down menus to the right adjust the unit of measurement. Here’s where you can specify whether you want to measure your image in pixels or inches, for example.

Photoshop image size width and height options

You may notice that when changing the height, the width changes relative to the new height. Photoshop does this to maintain the correct aspect ratio in your photo. If you’d prefer this not to happen, then click the Do not constrain aspect ratio button, which sits to the left of the Width/Height options.

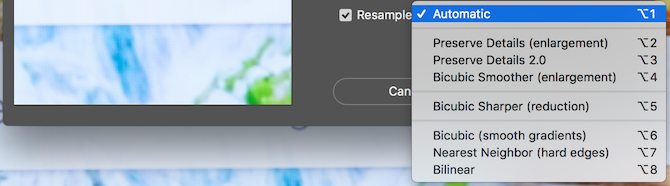
Finally, the Resample option defines how Photoshop will resize your image. The default of Automatic is suitable for most tasks, but there are other choices available, which are better suited at things like enlarging images. In any case, each resampling type outlines what it is suitable for in brackets after its name.

Photoshop image size resample options

Once you’re ready to resize, choose OK, and Photoshop will resize your image.

2. Resize Images Using the Canvas Size Tool

The Canvas Size panel is accessible through the Image > Canvas Size buttons found in the top menu bar. Unlike the Image Size tool, this will not change the size of your current image. By changing the canvas size, you can add or remove pixels to increase or reduce the total canvas size. Any photos or images already present get cropped, or shown with a colored border.

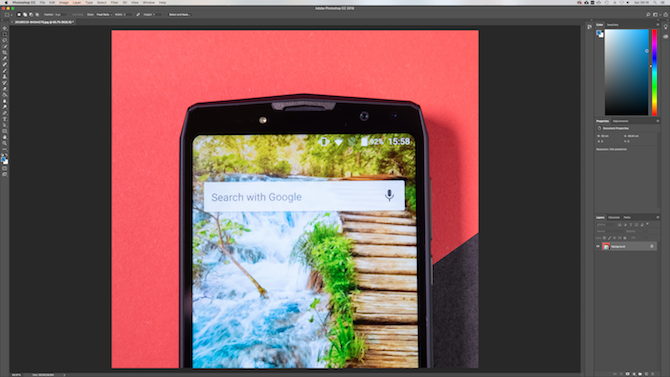
Let’s look at an example. Here’s an image in Photoshop:

Image in Photoshop

By reducing the canvas width, the image is cropped:

Photoshop canvas size reduced

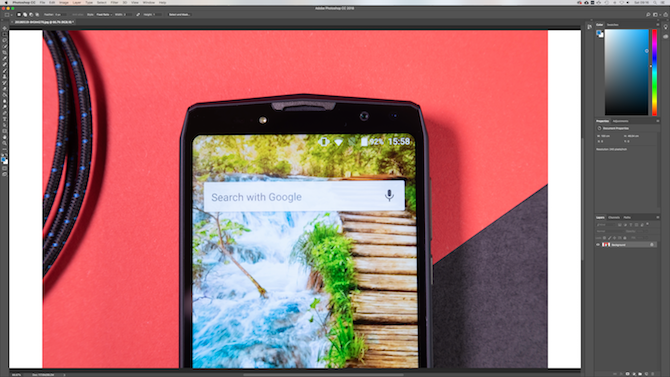
By increasing the canvas width, two white borders are added to the left and right of the image:

Photoshop canvas size increased with white background

The image is still the same size, but now there are more pixels to work with. You could use this method to add a border to an image or create more space for adding text, graphics, or other artwork.

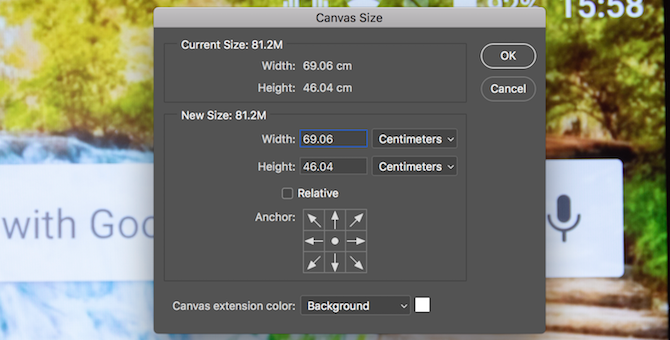
There are two main areas inside the Canvas Size Tool.

The Current Size area at the top provides basic information about the size of your canvas before any changes are made. The New Size area is where you can change the size of the canvas.

Photoshop canvas size tool

Change the numbers inside the Width and Height options to change your canvas size. Like before, you can change your unit of measurement by using the drop-down menu to the right of your dimension entry.

The Anchor option allows you to specify where to add or remove data from. This anchor consists of a 3 x 3 grid. Selecting one of these nine squares will alter where the canvas is enlarged or reduced from.

For example, choosing the topmost, center box, and then increasing the height using the previous options, will add data to the top of the image. Choosing the middle anchor will split any enlargement or reduction between all sides.

Photoshop canvas size anchor selection

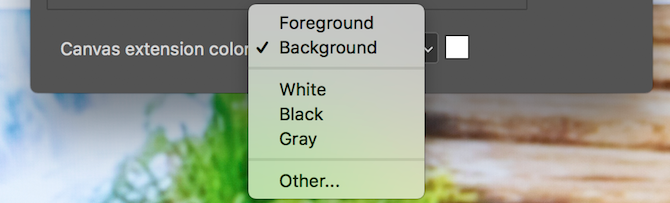
At the bottom is the Canvas extension color option. This is only relevant if you enlarge the canvas. Select a color here, and Photoshop will fill any enlarged areas with your selected color.

Photoshop canvas extension color options

3. Resize Images Using the Crop Tool

As the name implies, the Crop tool is a destructive way to resize images. It will resize them, but at the expense of your image. Any part of the image which has been cropped will no longer be visible.

The crop tool is best used for removing parts of an image you no longer wish to see, which will, in turn, reduce the width or height of your image.

Get started by selecting the Crop Tool, found in your Toolbar.

Photoshop toolbar crop tool

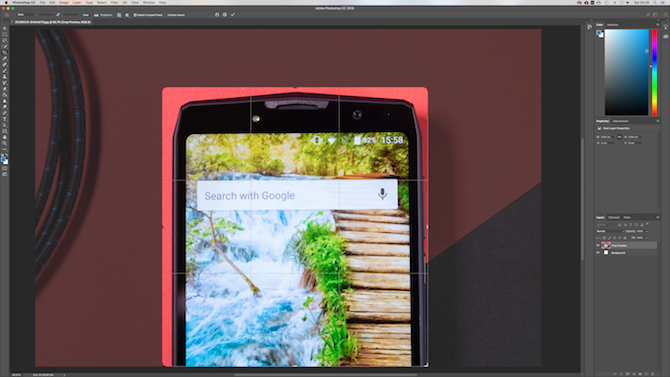
Once selected, a series of “handles” will appear in the corners and center edges of your canvas. Click and drag these from an edge or corner to start cropping your image.

Image being cropped in Photoshop

Once you’ve started cropping, you’ll see that the new image is its original brightness, but any parts that will be lost after the crop are now dark. When you’re ready, press Enter to complete the crop.

If you’d like to know more about the cropping tool, then take a look at our Photoshop cropping guide.

4. Resize Images Using the Transform Tool

The final method of resizing images is through the Transform tool. This allows you to resize Objects instead of everything. Suppose you’re producing a poster or combining two different images into one. By using the Transform tool, you can resize separate parts of the image, rather than the whole thing.

The Transform tool works best with objects in their own layers, so take a look at our Photoshop Layers tips if you’re in need of some practice.

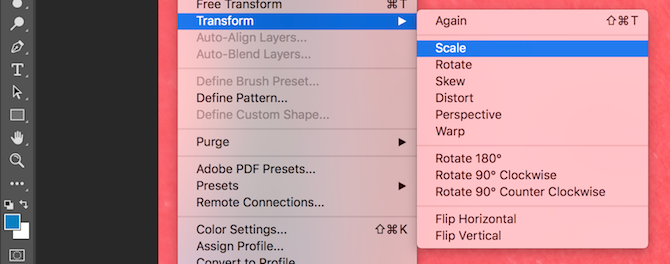
Select the layer containing the image or graphic you’d like to resize. Choose the Transform tool found in the Edit > Transform > Scale menus.

Photoshop transform scale menu

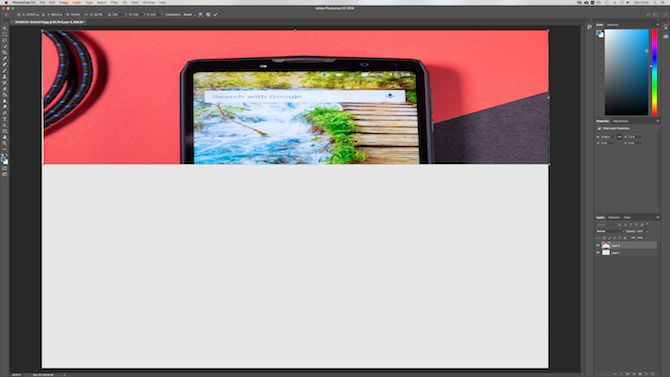
Much like the crop tool, the Transform tool provides several “handles” around the edge of the image. Click and drag a handle to start resizing the image. Notice how your image starts to look stretched? Hold the Shift key to constrain the aspect ratio. Photoshop will adjust the opposite edge to maintain your image proportions.

Image transformed in Photoshop

When you’re ready, press the Enter key to complete the resize.

The 4 Main Ways to Resize Images in Photoshop

These four techniques each show how easy resizing images in Photoshop can be. In summary:

  1. Image Size: Use precise numbers and measurements to alter your image size.
  2. Canvas Size: Increase or reduce the background size, without enlarging your image.
  3. Crop Tool: Reduce image size by removing part of your image.
  4. Transform Tool: Resize individual parts of an image, without changing the size.

Now that you know everything about image resizing, why not automate editing with Photoshop Scripts and speed up your workflow?

Read the full article: How to Properly Resize Images in Photoshop


Read Full Article