18 August 2018

The Automatica automates pour-over coffee in a charming and totally unnecessary way


Most mornings, after sifting through the night’s mail haul and skimming the headlines, I make myself a cup of coffee. I use a simple pour-over cone and paper filters, and (in what is perhaps my most tedious Seattleite affectation), I grind the beans by hand. I like the manual aspect of it all. Which is why this robotic pour-over machine is to me so perverse… and so tempting.

Called the Automatica, this gadget, currently raising funds on Kickstarter but seemingly complete as far as development and testing, is basically a way to do pour-over coffee without holding the kettle yourself.

You fill the kettle and place your mug and cone on the stand in front of it. The water is brought to a boil and the kettle tips automatically. Then the whole mug-and-cone portion spins slowly, distributing the water around the grounds, stopping after 11 ounces has been distributed over the correct duration. You can use whatever cone and mug you want as long as they’re about the right size.

Of course, the whole point of pour-over coffee is that it’s simple: you can do it at home, while on vacation, while hiking, or indeed at a coffee shop with a bare minimum of apparatus. All you need is the coffee beans, the cone, a paper filter — although some cones omit even that — and of course a receptacle for the product. (It’s not the simplest — that’d be Turkish, but that’s coffee for werewolves.)

Why should anyone want to disturb this simplicity? Well, the same reason we have the other 20 methods for making coffee: convenience. And in truth, pour-over is already automated in the form of drip machines. So the obvious next question is, why this dog and pony show of an open-air coffee bot?

Aesthetics! Nothing wrong with that. What goes on in the obscure darkness of a drip machine? No one knows. But this – this you can watch, audit, understand. Even if the machinery is complex, the result is simple: hot water swirls gently through the grounds. And although it’s fundamentally a bit absurd, it is a good-looking machine, with wood and brass accents and a tasteful kettle shape. (I do love a tasteful kettle.)

The creators say the machine is built to last “generations,” a promise which must of course be taken with a grain of salt. Anything with electronics has the potential to short out, to develop a bug, to be troubled by humidity or water leaks. The heating element may fail. The motor might stutter or a hinge catch.

But all that is true of most coffee machines, and unlike those this one appears to be made with care and high quality materials. The cracking and warping you can expect in thin molded plastic won’t happen to this thing, and if you take care of it it should at least last several years.

And it better, for the minimum pledge price that gets you a machine: $450. That’s quite a chunk of change. But like audiophiles, coffee people are kind of suckers for a nice piece of equipment.

There is of course the standard crowdfunding caveat emptor; this isn’t a pre-order but a pledge to back this interesting hardware startup, and if it’s anything like the last five or six campaigns I’ve backed, it’ll arrive late after facing unforeseen difficulties with machining, molds, leaks, and so on.


Read Full Article

Movado Group acquires watch startup MVMT


The Movado Group, which sells multiple brands including Lacoste, Tommy Hilfiger and Hugo Boss, has purchased MVMT, a small watch company founded by Jacob Kassan and Kramer LaPlante in 2013. The company, which advertised heavily on Facebook, logged $71 million in revenue in 2017. Movado purchased the company for $100 million.

The acquisition of MVMT will provide us greater access to millennials and advances our Digital Center of Excellence initiative with the addition of a powerful brand managed by a successful team of highly creative, passionate and talented individuals,” Movado Chief Executive Efraim Grinberg said.

MVMT makes simple watches for the Millennial market in the vein of Fossil or Daniel Wellington. However, the company carved out a niche by advertising heavily on social media and being one of the first microbrands with a solid online presence.

“It provides an opportunity to Movado Group’s portfolio as MVMT continues to cross-sell products within its existing portfolio, expand product offerings within its core categories of watches, sunglasses and accessories, and grow its presence in new markets through its direct-to-consumer and wholesale business,” said Grinberg.

MVMT is well-known as a “fashion brand,” namely a brand that sells cheaper quartz watches that are sold on style vs. complexity or cost. Their pieces include standard three-handed models and newer quartz chronographs.


Read Full Article

How to Identify Music and Songs in YouTube Videos


youtube-streaming-music

It’s a common situation. You are happily watching a video on YouTube, perhaps a commercial or a movie trailer, and it has a catchy song playing in the background. You want to know what the music is, but how do you find out?

Identifying some music and songs is easy, while others require a little more persistence. But thanks to this step-by-step walkthrough, you are (almost) guaranteed to identify any music or songs you hear online. All you need is a little time and patience.

1. Check the Video’s Description

youtube music description

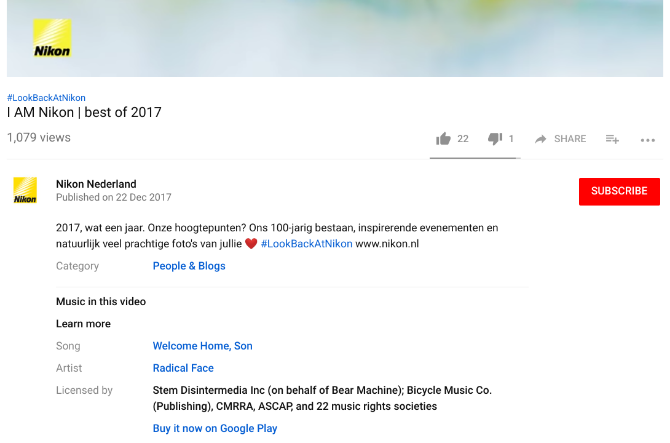
The first step is the easiest, but it’s one that most people overlook. If a company or your favorite YouTuber is using a song in one of their videos, the chances are they will credit the original songwriter in the description. If they don’t, there’s a chance YouTube will take down the video.

So, the first thing to do is go to the video’s description box, and click Show More. Scroll down and you’ll find a section called Music in this video. This will have the song’s name and the artist. Click it to be taken to the song; on YouTube if it’s uploaded officially or the Play Store if not.

Videos that use multiple songs will list multiple titles in the description. However, they don’t always appear in the right order, so you will need listen to them all to figure out which one is which.

2. Search for the Lyrics on Google

youtube search lyrics

If the background track has lyrics, your job became a whole lot easier. Listen carefully for what the lyrics are and search for a line or two on Google.

Google might not give the best results every time, so if it didn’t work, try the same search on Find Music By Lyrics. It’s powered by Google too, but it tweaks Google’s settings to deliver better results.

The problem with this method, however, is it doesn’t account for covers. For example, the movie trailers of both Thor: Ragnarok and The Girl With The Dragon Tattoo used Immigrant Song as the background music. However, while Thor used the original by Led Zeppelin, the latter used a cover by Trent Reznor. So if you were trying to find the song used in The Girl With The Dragon Tattoo by searching for the lyrics, you’d end up with the original Led Zeppelin piece, which is not what you wanted.

3. Check the Comments (or Ask)

youtube comments search

YouTube has become one of the best ways to discover new music. There’s a good chance that you aren’t the first viewer who is trying to track down the name of that song. So, read or search through the YouTube comments and you might just come across the question and its answer.

You can try the old-fashioned way first. Press Ctrl + F (or Command + F on Macs) to open the Find In Page box. Type song, and scroll through the comments that use the word. In my experience, this method doesn’t yield the best results, and only searches the comments that have loaded so far.

A better way is to get the Comments Search for YouTube extension on Google Chrome. It adds a Search option at the top of the comments. Type any keyword like song or music, and watch it bring all the results, complete with their comment thread, so the question and answer are both visible. It works better than any other sites and extensions that let you search in the comments.

Download: Comments Search for YouTube for Chrome (Free)

Of course, if you don’t find anything, you can hop in there yourself and leave a comment asking for help to identify the music. In case you didn’t know, you can also read comments while watching YouTube, you don’t need to choose between the two.

4. Use a Music Identification App

Music identification apps like Shazam and Soundhound have changed the game when it comes to helping you figure out what song is playing. There are also a couple of extensions that specialize in identifying songs used in YouTube videos.

AHA Music (Chrome)

aha music youtube

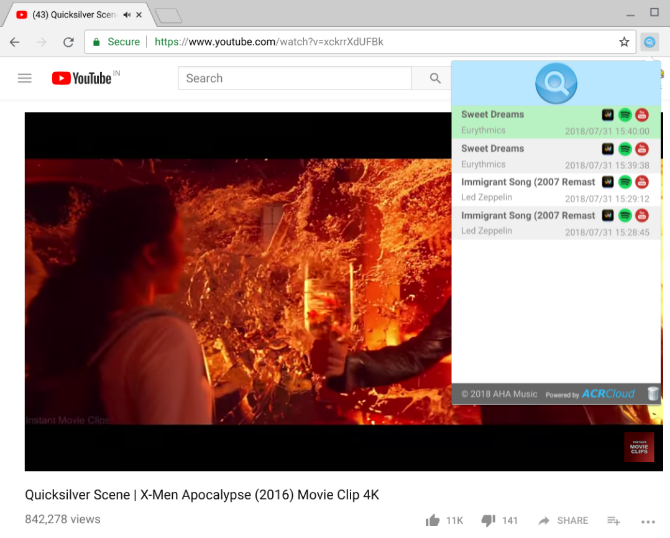
Once you play your video, click this Chrome extension’s icon. It will attempt to identify the song used in the video, as long as the song itself starts playing in the first minute. AHA Music also maintains a history log of all the songs it has identified, so you can easily look it up again. You can immediately stream the song on Spotify too. But that one-minute limitation is a bummer when you want to identify a song that starts much later.

Download: AHA Music for Chrome (Free)

Shazam (Android, iOS)

shazam youtube

Shazam is the best music identification app, and it works like a charm for YouTube videos. You’ll need to download the app on your mobile, but you can use it for desktop too.

When you’re watching a video on your computer, fire up Shazam on your phone. Hold the phone close to the speakers when the song starts playing, and Shazam will identify it in no time.

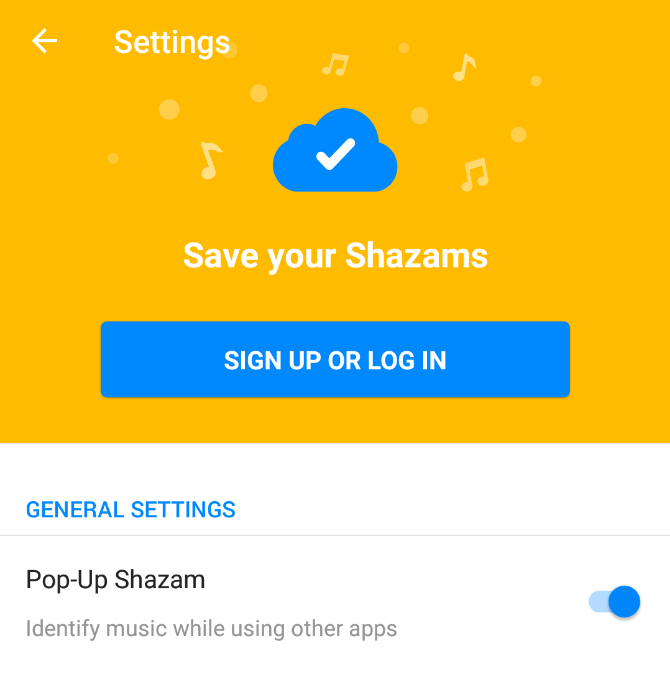
If you’re watching a YouTube video on your phone itself, use the Pop-Up mode. First, go to Shazam > My Shazam > Settings > Pop-up Shazam and enable it. Go back to your video and play it. When the song you want to identify is playing, tap and hold the floating Shazam button. Again, Shazam will identify the song and you’ll finally know what it is.

Download: Shazam for Android | iOS (Free)

5. Ask Experts on a Forum

youtube name that song

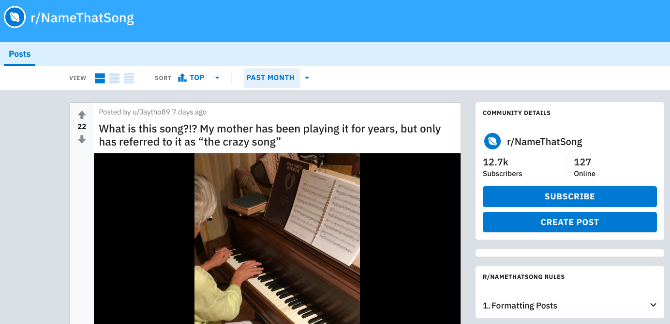
If the music identification apps all fail to identify your song, your only real option left is to ask someone else, hoping they know what it is. Lucky for you, the internet has a couple of forums and communities that focus on uncovering hard-to-identify songs.

There are three places you should look at:

You’ll need a Reddit or Facebook account to post to these groups.

Each of these forums assumes you have already tried the above options and failed, so don’t even think of posting before you Shazam the video. If the song starts later in the video, use the old YouTube URL trick to link to that part of the video. The clearer your question is, the better your chances are of getting a quick and accurate answer.

For YouTube Music Listeners

YouTube has really upped its game with its music offerings recently, but there is still a lot left to be desired. For now, if YouTube is your preferred music streaming service, it would be a good idea to check out these tools to make listening to music on YouTube better.

Read the full article: How to Identify Music and Songs in YouTube Videos


Read Full Article

6 million users had installed third-party Twitter clients


Twitter tried to downplay the impact deactivating its legacy APIs would have on its community and the third-party Twitter clients preferred by many power users by saying that “less than 1%” of Twitter developers were using these old APIs. Twitter is correct in its characterization of the size of this developer base, but it’s overlooking millions of third-party app users in the process. According to data from Sensor Tower, six million App Store and Google Play users installed the top five third-party Twitter clients between January 2014 and July 2018.

Over the past year, these top third-party apps were downloaded 500,000 times.

This data is largely free of reinstalls, the firm also said.

The top third-party Twitter apps users installed over the past three-and-a-half years have included: Twitterrific, Echofon, TweetCaster, Tweetbot and Ubersocial.

Of course, some portion of those users may have since switched to Twitter’s native app for iOS or Android, or they may run both a third-party app and Twitter’s own app in parallel.

Even if only some of these six million users remain, they represent a small, vocal and — in some cases, prominent — user base. It’s one that is very upset right now, too. And for a company that just posted a loss of one million users during its last earnings, it seems odd that Twitter would not figure out a way to accommodate this crowd, or even bring them on board its new API platform to make money from them.

Twitter, apparently, was weighing data and facts, not user sentiment and public perception, when it made this decision. But some things have more value than numbers on a spreadsheet. They are part of a company’s history and culture. Of course, Twitter has every right to blow all that up and move on, but that doesn’t make it the right decision.

To be fair, Twitter is not lying when it says this is a small group. The third-party user base is tiny compared with Twitter’s native app user base. During the same time that six million people were downloading third-party apps, the official Twitter app was installed a whopping 560 million times across iOS and Android. That puts the third-party apps’ share of installs at about 1.1 percent of the total.

That user base may have been shrinking over the years, too. During the past year, while the top third-party apps were installed half a million times, Twitter’s app was installed 117 million times. This made third-party apps’ share only about 0.4 percent of downloads, giving the official app a 99 percent market share.

But third-party app developers and the apps’ users are power users. Zealots, even. Evangelists.

Twitter itself credited them with pioneering “product features we all know and love,” like the mute option, pull-to-refresh and more. That means the apps’ continued existence brings more value to Twitter’s service than numbers alone can show.

Image credit: iMore

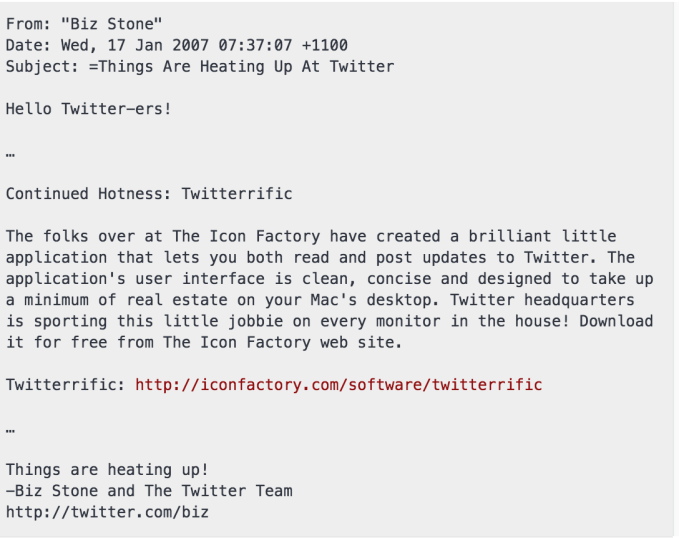
They are part of Twitter’s history. You can even credit one of the apps for Twitter’s logo! Initially, Twitter only had a typeset version of its name. Then Twitterrific came along and introduced a bird for its logo. Twitter soon followed.

Twitterrific was also the first to use the word “tweet,” which is now standard Twitter lingo. (The company used “twitter-ing.” Can you imagine?)

These third-party apps also play a role in retaining users who struggle with the new user experience Twitter has adopted — its algorithmic timeline. Instead, the apps offer a chronological view of tweets, as some continue to prefer.

Twitter’s decision to cripple these developers’ apps is shameful.

It shows a lack of respect for Twitter’s history, its power user base, its culture of innovation and its very own nature as a platform, not a destination.

P.S.

twitterrific


Read Full Article

17 August 2018

6 Smart Photo Management Apps for Android for Easy Sorting

All the Best Laptops Under $400 for Students

Google gives its AI the reins over its data center cooling systems


The inside of data centers is loud and hot — and keeping servers from overheating is a major factor in the cost of running them. It’s no surprise then that the big players in this space, including Facebook, Microsoft and Google, all look for different ways of saving cooling costs. Facebook uses cool outside air when possible, Microsoft is experimenting with underwater data centers and Google is being Google and looking to its AI models for some extra savings.

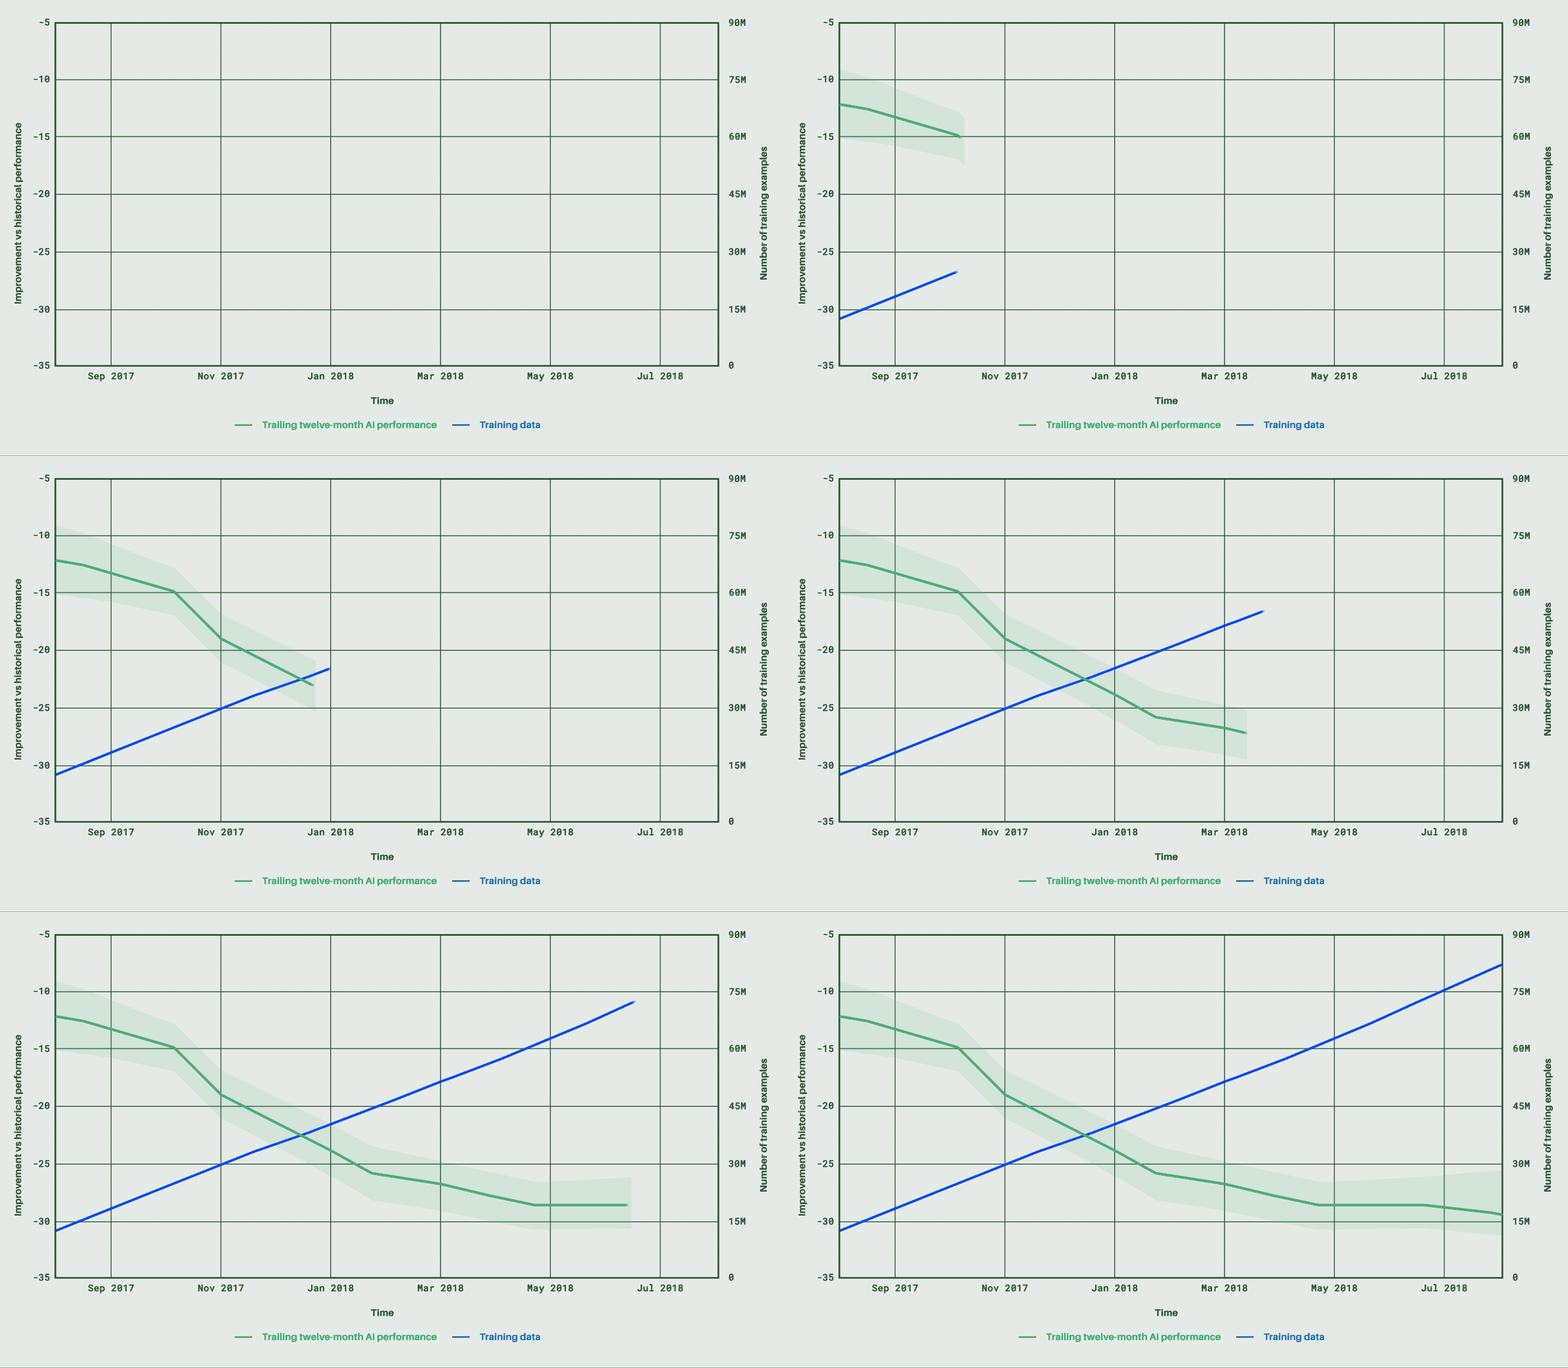
A few years ago, Google, through its DeepMind affiliate, started looking into how it could use machine learning to provide its operators some additional guidance on how to best cool its data centers. At the time, though, the system only made recommendations and the human operators decided whether to implement them. Those humans can now take longer naps during the afternoon, because the team has decided the models are now good enough to give the AI-powered system full control over the cooling system. Operators can still intervene, of course, but as long as the AI doesn’t decide to burn the place down, the system runs autonomously.

[gallery ids="1693037,1693038,1693039,1693040"]

The new cooling system is now in place in a number of Google’s data centers. Every five minutes, the system polls thousands of sensors inside the data center and chooses the optimal actions based on this information. There are all kinds of checks and balances here, of course, so the chances of one of Google’s data centers going up in flames because of this is low.

Like most machine learning models, this one also became better as it gathered more data. It’s now delivering energy savings of 30 percent on average, compared to the data centers’ historical energy usage.

One thing that’s worth noting here is that Google is obviously trying to save a few bucks, but in many ways, the company is also looking at this as a way of promoting its own machine learning services. What works in a data center, after all, should also work in a large office building. “In the long term, we think there’s potential to apply this technology in other industrial settings and help tackle climate change on an even grander scale,” DeepMind writes in today’s announcement.


Read Full Article

How to Stop Switching To-Do Apps (And Find the One You’ll Love Instead)


todo-app-find

The list of to-do list apps on the market is endless. Both major app stores are crammed full of task management software that claims to solve your to-do list woes.

For first-timers, there’s a healthy selection to choose from. But for those who have a habit of switching to-do apps, the problem only adds complexity.

Switching to-do list apps on a whim has become a routine for many, and that’s not good for our productivity. Let’s explore the downsides to switching apps and how you can find the perfect to-do list application for yourself.

Do You Have Shiny New Toy Syndrome?

Chances are if you’ve installed a to-do list application it won’t have been your first.

Popular task management solutions include TickTick, Todoist, Wunderlist, Microsoft To-Do, Any.DO, Things 3, 2Do and many more. Switching to-do list applications isn’t a crime. But it must be regulated.

Regular switches for the sake of a feature can be damaging to your workflow. Many people compare moving to a new application to a house move. Bringing all of your details, information, and tasks with you. And once you’re in, changing all the rooms to your liking. Moving apps can be time-consuming!

It can stall your productivity. By stopping and starting you can put pressure on your time. But it’s not all doom and gloom. Many people have switched with hugely successful results. And in some cases, it’s needed!

It’s all about evaluating your need to switch. From here, you can decide whether switches are needed and suitable for your work. And that’s valuable as you move forward with any productivity software.

How Do I Find My Perfect To-Do List App?

Helping productivity app fans on a daily basis with their app decisions is one part of our routine.

When it comes to task managers, I’ve seen people commit to paying for expensive software, just then a week later, seeing a flaw and switching applications. It’s scary when money is spent. With the majority of cases, the decisions tend to be rushed. The right decisions can save money.

You need just three keys to find your idea to-do list app:

The first key is patience. Patience can help when it comes to decision-making. The number one mistake is impulsive experimenting before you explore the full feature set.

The second key is your needs. What are your needs? Why are you looking for a new to-do list application? Is it for work or personal, or both? Shortlisting based on your needs will pay dividends.

The third and final key is testing. Light testing of your application across a one week period will give you a better insight. Spending hours setting up your optimum layout won’t solve anything. It should all be about your process, not anything else. This will prove whether your solution stands the test of time.

Step 1: Get to Know Your Needs

Determining what type of resource you need is a good starting point. These four types help distinguish the style of features. There’s no ideal target here, it’s about what’s working for you in this current scenario in time.

  • Light Personal: Perfect for simple list taking and no sharing needs.
  • Light Professional: Perfect for basic task management with sharing with team members.
  • Heavy Personal: Perfect for advanced users, with no sharing abilities.
  • Heavy Professional: Perfect for project management purposes with teams.

This breakdown will help to confirm what you are looking for before you jump in. Of course, you’ll change over time as you expand or downsize your use of your task management software.

Let’s explore examples for each style of application, with a few other notable recommendations.
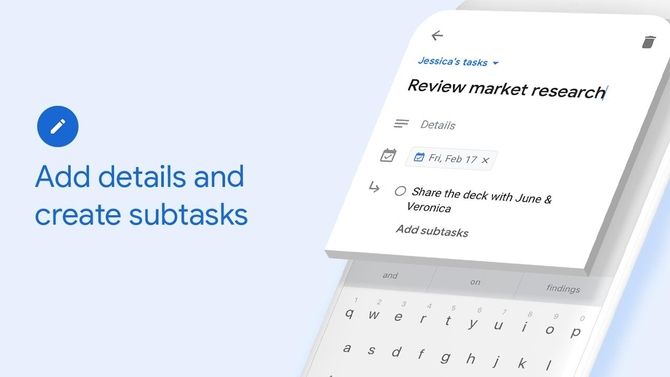
Light Personal: Google Tasks

Tasks by Google - To-Do List App Recommendations

Google Tasks provides all you need for adding simple tasks. Add due dates, sub-tasks and task notes. It makes a great light personal thanks to its simplicity. You can access Tasks via the iOS and Android app, or on Gmail for Web. If you’re looking for a dead-simple task manager, this is one of your best bets!

Other recommendations for light personal task managers:

Light Professional: Trello
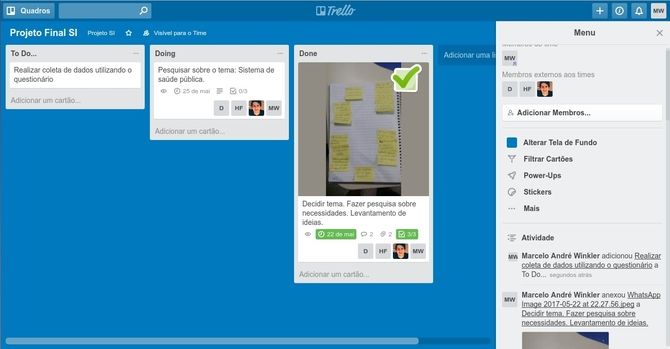
Trello - To-Do List App Recommendation

Trello is a favorite productivity application used by millions every day. The great thing about Trello is the way you can manage any task in your life. Organize them into “cards” and then easily create boards for your projects. Then when comes to sharing with teams, simply share your board.

Other recommendations for light professional task managers:
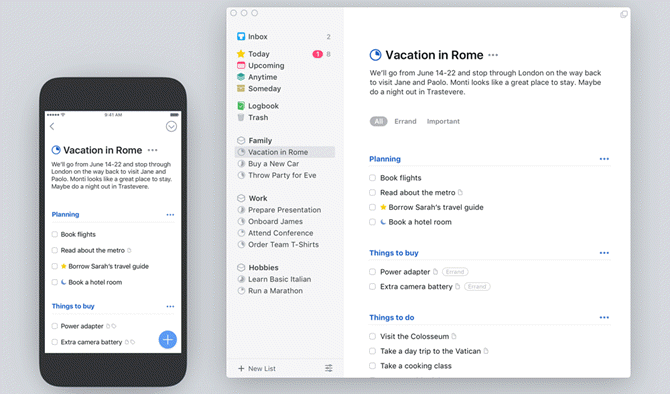
Heavy Personal: Things 3

Things 3

Things 3 is one of the most well-designed to-do list applications on the market. Things 3 springs to life with its reactive design and range of features. It has won the hearts of many Mac and iOS users as a great way to organize tasks. With the ability to implement things like GTD it’s a favored tool for boosting personal productivity.

Other notable recommendations for “heavy personal” task managers include:

Heavy Professional: Todoist
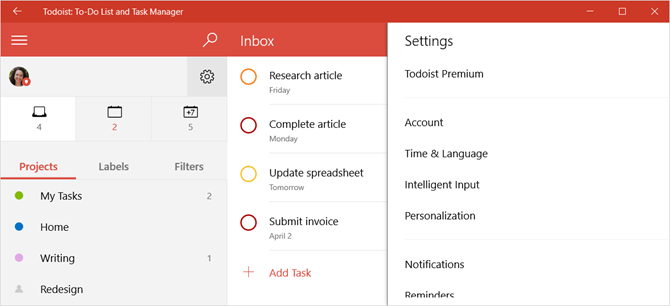
Todoist is one of the more advanced to-do list applications out there. The features range from due dates, sub-tasks, projects, labels and even filters. You can share tasks with colleagues, really easily! It’s actually my to-do list app of choice. It’s a very versatile solution ideal for a range of professionals and even students.

Other recommendations for “heavy professional” task managers:

Step 2: It’s Time to Shortlist

Once you’ve found your type of resource. Next up is the actual features inside of the tools. This is very much dependant on what features you need to get things done. Do you traditionally work well with kanban boards? Or even labels to help organize tasks?

One person might be interested in one feature, whilst others prefer another. It’s totally open to discussion.

First things first, take some time to shortlist the top five applications that match the features you need. Use some paper totally the top five pros and cons for your needs, for each application.

This exercise will help you to draw out the initial flaws from your website research scramblings.

  • Examples of Pros: Strong design, Pomodoro timer included, labels, sub-tasks ability, cheap premium.
  • Examples of Cons: Works only on Android, locked under premium, bad support reviews, lacks priority tags, fixed menu.

From this analysis, you should get a well-rounded opinion of the advantages and drawbacks. Time to pick.

Step 3: Try It for One Full Week

Picking the resource with the best pros and the weakest cons might be harder than it looks.

Once you’re there, it’s time to trial for one full working week.

The working week will help put your application into the spotlight. Bringing your attention to game-changing flaws or struggles. This full 5-day period should help gather your thoughts on the application without committing to the resource.

Most major to-do list applications have some form of trial for their premium, giving you enough time to run this small experiment. Use the application until the full week wraps up.

Exercise time.

Grab a pen and paper and re-write your pros and cons based on your week-long experience.

After this, move onto your next application in the top five list. After another week, write the pros and cons for this application. Place these two applications against each other to determine what you’ll be going for.

Determining between these two will only help put things in perspective. If these two don’t make the cut, only explore one more application. If you’ve been into three of your top five, chances are you’ll need to repeat your research into what type works for you.

Getting the Best Results From Your Search

The more time invested in research, the better.

Spending the time beforehand investigating the pros and cons will curb your impulsive streak, help you improve decision-making and lead to a longer-term solution. The time saved from pausing to research will save your hours in the future changing resources.

These final tips and recommendations should help when you commence the search:

  • YouTube: Visually seeing an application saves time. There are countless videos online covering apps and software. A lot of them give opinions and insights into personal experiences, which is perfect.
  • Pen and paper: If you’re not with a to-do list application before you start. Keep tallying your task list on paper. This non-bias service will help you to keep focused and avoid
  • Colleagues: After that first working week with the application, ask your friends and colleagues for their experiences with the application, if they’ve had any. This will help to round-off any issues or notes.

Changing your mindset on switching is the most important element of this process. Switching should be done only when you are certain and have done your research. This will pay off in the long-term. From someone who’s been with his to-do list application for five years, it’s paid off evaluating in such detail.

And the end of the day, hopping from to-do list app to to-do list app is nothing more than a time-wasting habit that you need to kill. Find one that works for you, then stick with it!

Read the full article: How to Stop Switching To-Do Apps (And Find the One You’ll Love Instead)


Read Full Article

Google said to be releasing its own smart display this year


Back at CES in January, Google put on a big show with the launch of a new product category designed to take on Amazon’s Echo Show and Spot. Three companies — LG, Lenovo and JBL — were waiting in the wings with their own take on the screen-powered smart speaker.

Google itself, on the other hand, was conspicuously absent. The company seemed content to rely on third-party hardware makers to do the heavy lifting in taking on Amazon. According to a new report from Nikkei Asian Review, however, the company is planning a screen sporting Home device before year’s end.

Lenovo’s Smart Display — the best looking of the original trio — launched late last month. Google, meanwhile, has been actively courting hardware makers to develop their own take on the product. At I/O, the company even handed out prototyping kits to attendees.
The strategy seemed a bit surprising, given the success Google has had with its own Home line. A recent report from Canalys shows a 449 percent year over year growth in global shipments, putting the company comfortably ahead of Amazon. If nothing else, however, letting manufacturers go first here was a vote of confidence that Google would continue to support third-party use of Google Assistant, even as it expands its own Home line.

Given the expected launch of the Pixel 3 in October, Google could well have the perfect platform to showcase new Home products just in time for the holidays.


Read Full Article

Google updates Location History language after tracking backlash


Four days after admitting that it continues to track users even after the Location History tracking has been disabled, Google has updated its website to more accurately reflect the nature of its location policy. 

“This setting does not affect other location services on your device, like Google Location Services and Find My Device,” the updated Google Account Help page now reads. “Some location data may be saved as part of your activity on other services, like Search and Maps. When you turn off Location History for your Google Account, it’s off for all devices associated with that Google Account.”

The update was noted by the Associated Press, which first brought the tracking issue to light earlier this week in a report. Google initially denied its own inaccurate reporting, but later backtracked, adding that it had added clarifying language.

The company told TechCrunch earlier this week,

Location History is a Google product that is entirely opt in, and users have the controls to edit, delete, or turn it off at any time. As the story notes, we make sure Location History users know that when they disable the product, we continue to use location to improve the Google experience when they do things like perform a Google search or use Google for driving directions.

Google further clarified that it had tweaked the language to offer more insight into continued tracking. The company told AP, “We have been updating the explanatory language about Location History to make it more consistent and clear across our platforms and help centers.”

Of course, fixing the language on a Help page isn’t the same as addressing the issue of continued tracking. Nor does it fully clarify the company’s tracking policy. And let’s be honest, most users will never see the Help page with that information listed. Transparency on the issues goes a long way when it comes to maintaining consumer trust.


Read Full Article

9 DIY Smart Home Automation Projects for a Shoestring Budget

The 5 Best Windows 10 Sound Equalizers to Improve Your PC Audio


windows-10-sound-equalizers

If you’re an audiophile, a heavy gamer, or simply enjoy customizing the sound on Windows 10, you’re probably looking for a sound equalizer app.

An equalizer can adjust the loudness of specific audio frequencies—called bands—to suit both the listener’s preferences and the acoustics of the environment. For example, an equalizer will let you boost the bass when listening to dance music or increase the treble in a room that responds to low-frequency sounds.

1. Windows 10 Sound Equalizer

Windows 10 Sound Equalizer

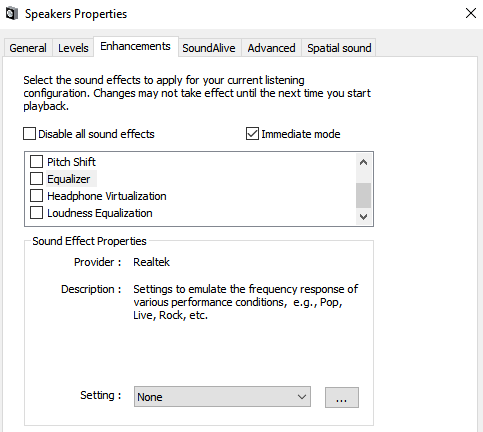
Windows includes a native sound equalizer. However, it’s very basic. You can’t adjust the various bands or create your own profiles. For anyone who’s serious about their audio, it will not suffice.

If you’d like to check it out anyway, right-click on the speaker icon on your taskbar and go to Sounds > Playback. Next, right-click on your speakers and choose Properties.

In the new window, open the Enhancements tab and mark the checkbox next to Equalizer. You can choose one of the default sound profiles from the drop-down menu in the Sound Effect Properties section.

2. Equalizer APO

Equalizer APO for Windows 10

So, we’ve established that the native sound equalizer in Windows 10 is disappointing. Which apps should you use instead?

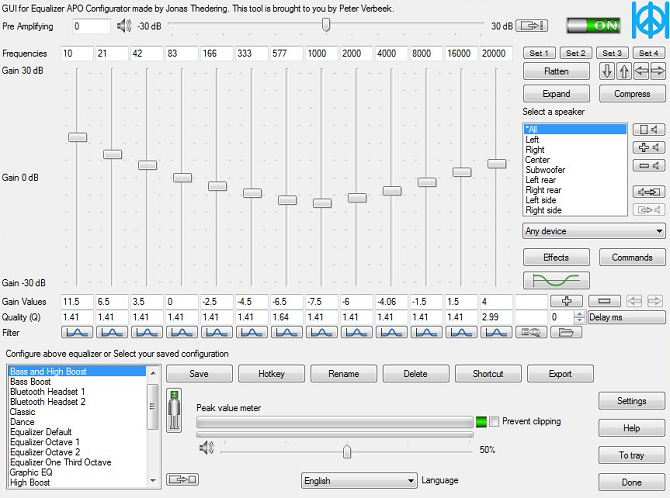
Our first recommendation is Equalizer APO. It’s the most powerful, customizable, and full-featured free sound equalizer that you’ll find.

The app operates as an Audio Processing Object (APO), so if your audio uses APIs like ASIO or WASAPI, it will not work.

Equalizer APO’s best features include an unlimited number of filters, multi-channel use, support for 3D surround sound, and very low CPU usage. You can also create multiple profiles (perhaps for your external speakers and your headphones) and hop between them in a flash.

The big drawback is the lack of a graphical user interface (GUI). You need to edit the filters in a TXT file. Thankfully, several third-party GUIs are available. We recommend Peace Equalizer.

Download: Equalizer APO (Free)

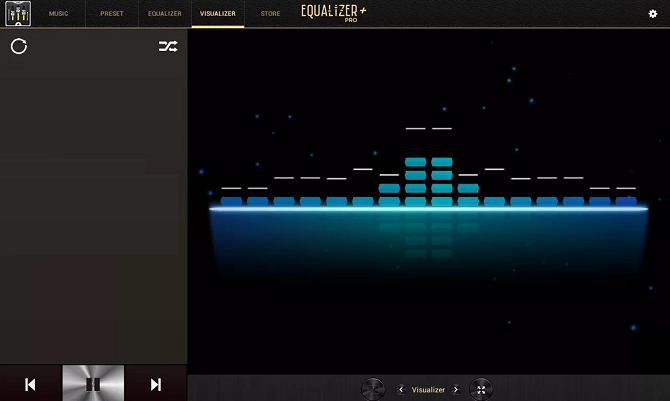
3. Equalizer Pro

Equalizer Pro for Windows 10

Equalizer Pro is another popular choice. It’s much more user-friendly than Equalizer APO thanks to its clean and clutter-free interface.

The app offers a ten-band equalizer. That’s not as many as some of the other sound equalizers in this list and way behind professional music equipment which might provide 30 or more. However, it’s more than adequate for all but the most dedicated audiophiles.

Equalizer Pro comes with 20 equalizer presets, a system-wide bass boost feature, and the ability to save your own equalizer profiles. The app also offers a preamp volume control. It means you can adjust a single band to boost low tones with needing to tweak each band individually.

Equalizer Pro is not free. You can enjoy a seven-day trial, but thereafter you will need to pay $19.95 for the license.

Download: Equalizer Pro ($19.95)

4. Viper4Windows

Viper4Windows for Windows 10

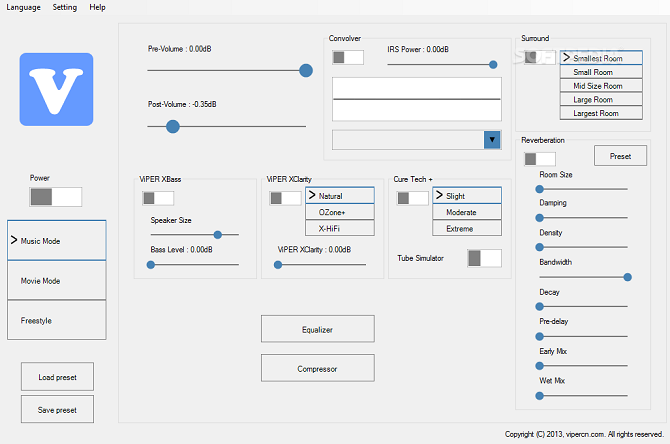
Viper4Windows is an open-source sound equalizer for Windows 10. It also works with Windows Vista, 7, and 8.1.

The equalizer offers an impressive 18 bands; it’s as many as you can hope to find on a consumer-level computer-based equalizer. The bands’ ranges run from -120dB to 13dB. As you’d expect, you can create your own profiles or use one of the many available presets.

Viper4Windows also offers some features beyond sound equalization. They include:

  • Room Size: You can set the size of the room you’re listening in, and Viper4Windows will adjust the surround sound settings accordingly.
  • Bass Boost: The app offers a customizable extra boost to the low-end sounds.
  • Distortion Control: You can choose from three presets or use the slider to tweak the control in decibels.
  • Reverberation Settings: Viper4Windows offers settings to control audio damping, density, bandwidth, decay, and more.

Note: Make sure you set Viper4Windows to run in administrator mode. Right-click on the app’s file and go to Properties > Compatibility > Settings > Run this program as administrator. Doing so ensures the equalizer will still work if another app runs the software.

Download: Viper4Windows (Free)

5. FXSound

FXSound for Windows 10

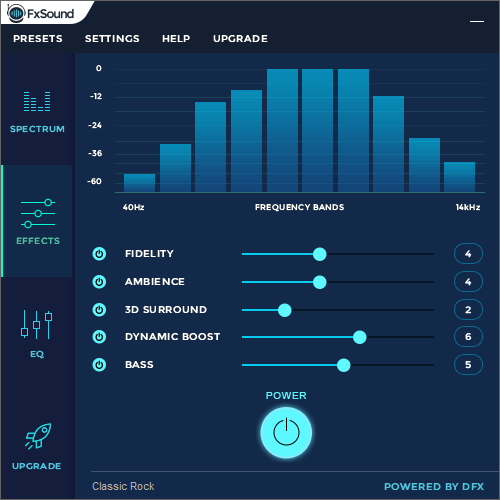
The FXSound app is two tools in one. There’s the equalizer (and its associated effects) and the real-time audio processing feature.

Firstly, let’s look at the equalizer. It comes with 10 bands that go from 110Hz to 15KHz. There are also customizable sliders for fidelity (to reduce the muffled sound in compressed audio), ambiance (to add extra stereo depth), surround sound, dynamic boost (to increase the loudness with increasing the dynamic range), and bass boost.

The preset profiles include Rap, Alternative Rock, Dialog Boost, Country, Techno, and countless more.

The real-time processing excels when you’re listening to audio on the web. internet audio is only 16-bit, but FXSound uses a 32-bit processor. The processor automatically adjusts the fidelity, ambiance, and surround sound of the audio, then re-dithers it into 16-bit. This allows the app to improve significantly on the theoretical limits of the web’s 16-bit output.

FXSound offers a seven-day free trial. The full app costs a one-off payment of $49.99.

Download: FX Sound ($49.99)

Bonus: Voicemeeter Banana

Voicemeeter Banana for Windows 10

If you do a lot of work with a microphone—perhaps because you’ve started your own podcast or upload a lot of videos to YouTube—you should try Voicemeeter Banana.

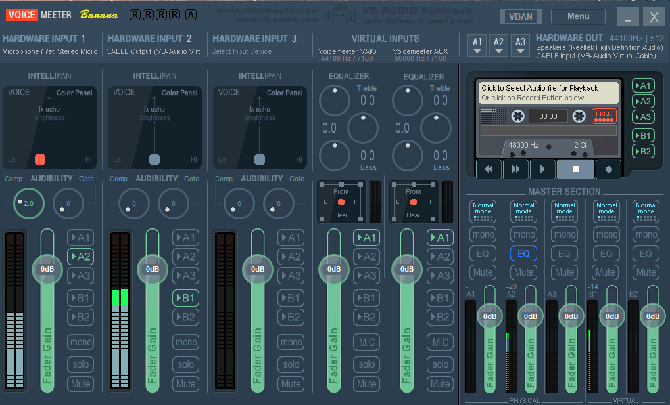
The app’s main feature is the advanced audio mixer. It lets you control your computer’s audio for any kind of streaming or recording.

From an equalizer perspective, the mixer lets you adjust audio input as well as output. Therefore, if you’re casting your screen via Twitch, speaking to the family on Skype, or recording a podcast with your friends, you can make up for any microphone deficiencies by making the sound crisper and less distorted.

You can play with the equalizer settings in the app’s Master Section.

Voicemeeter Banana is donationware. You can pay what you like for the software, and you don’t have to pay anything at all.

Download: Voicemeeter Banana (Free)

Learn More About Sound on Windows 10

Using a sound equalizer in Windows 10 is just one part of the battle. There are lots of ways to tweak the operating system’s audio output to your liking.

For example, did you know it’s possible to set the sound output devices on a per-app basis? Or use a hidden feature to give yourself virtual surround sound?

And remember, if anything ever goes wrong, we’ve got you covered. Just check out our article on how to fix audio issues on Windows 10.

Read the full article: The 5 Best Windows 10 Sound Equalizers to Improve Your PC Audio


Read Full Article

The 5 Best Windows 10 Sound Equalizers to Improve Your PC Audio


windows-10-sound-equalizers

If you’re an audiophile, a heavy gamer, or simply enjoy customizing the sound on Windows 10, you’re probably looking for a sound equalizer app.

An equalizer can adjust the loudness of specific audio frequencies—called bands—to suit both the listener’s preferences and the acoustics of the environment. For example, an equalizer will let you boost the bass when listening to dance music or increase the treble in a room that responds to low-frequency sounds.

1. Windows 10 Sound Equalizer

Windows 10 Sound Equalizer

Windows includes a native sound equalizer. However, it’s very basic. You can’t adjust the various bands or create your own profiles. For anyone who’s serious about their audio, it will not suffice.

If you’d like to check it out anyway, right-click on the speaker icon on your taskbar and go to Sounds > Playback. Next, right-click on your speakers and choose Properties.

In the new window, open the Enhancements tab and mark the checkbox next to Equalizer. You can choose one of the default sound profiles from the drop-down menu in the Sound Effect Properties section.

2. Equalizer APO

Equalizer APO for Windows 10

So, we’ve established that the native sound equalizer in Windows 10 is disappointing. Which apps should you use instead?

Our first recommendation is Equalizer APO. It’s the most powerful, customizable, and full-featured free sound equalizer that you’ll find.

The app operates as an Audio Processing Object (APO), so if your audio uses APIs like ASIO or WASAPI, it will not work.

Equalizer APO’s best features include an unlimited number of filters, multi-channel use, support for 3D surround sound, and very low CPU usage. You can also create multiple profiles (perhaps for your external speakers and your headphones) and hop between them in a flash.

The big drawback is the lack of a graphical user interface (GUI). You need to edit the filters in a TXT file. Thankfully, several third-party GUIs are available. We recommend Peace Equalizer.

Download: Equalizer APO (Free)

3. Equalizer Pro

Equalizer Pro for Windows 10

Equalizer Pro is another popular choice. It’s much more user-friendly than Equalizer APO thanks to its clean and clutter-free interface.

The app offers a ten-band equalizer. That’s not as many as some of the other sound equalizers in this list and way behind professional music equipment which might provide 30 or more. However, it’s more than adequate for all but the most dedicated audiophiles.

Equalizer Pro comes with 20 equalizer presets, a system-wide bass boost feature, and the ability to save your own equalizer profiles. The app also offers a preamp volume control. It means you can adjust a single band to boost low tones with needing to tweak each band individually.

Equalizer Pro is not free. You can enjoy a seven-day trial, but thereafter you will need to pay $19.95 for the license.

Download: Equalizer Pro ($19.95)

4. Viper4Windows

Viper4Windows for Windows 10

Viper4Windows is an open-source sound equalizer for Windows 10. It also works with Windows Vista, 7, and 8.1.

The equalizer offers an impressive 18 bands; it’s as many as you can hope to find on a consumer-level computer-based equalizer. The bands’ ranges run from -120dB to 13dB. As you’d expect, you can create your own profiles or use one of the many available presets.

Viper4Windows also offers some features beyond sound equalization. They include:

  • Room Size: You can set the size of the room you’re listening in, and Viper4Windows will adjust the surround sound settings accordingly.
  • Bass Boost: The app offers a customizable extra boost to the low-end sounds.
  • Distortion Control: You can choose from three presets or use the slider to tweak the control in decibels.
  • Reverberation Settings: Viper4Windows offers settings to control audio damping, density, bandwidth, decay, and more.

Note: Make sure you set Viper4Windows to run in administrator mode. Right-click on the app’s file and go to Properties > Compatibility > Settings > Run this program as administrator. Doing so ensures the equalizer will still work if another app runs the software.

Download: Viper4Windows (Free)

5. FXSound

FXSound for Windows 10

The FXSound app is two tools in one. There’s the equalizer (and its associated effects) and the real-time audio processing feature.

Firstly, let’s look at the equalizer. It comes with 10 bands that go from 110Hz to 15KHz. There are also customizable sliders for fidelity (to reduce the muffled sound in compressed audio), ambiance (to add extra stereo depth), surround sound, dynamic boost (to increase the loudness with increasing the dynamic range), and bass boost.

The preset profiles include Rap, Alternative Rock, Dialog Boost, Country, Techno, and countless more.

The real-time processing excels when you’re listening to audio on the web. internet audio is only 16-bit, but FXSound uses a 32-bit processor. The processor automatically adjusts the fidelity, ambiance, and surround sound of the audio, then re-dithers it into 16-bit. This allows the app to improve significantly on the theoretical limits of the web’s 16-bit output.

FXSound offers a seven-day free trial. The full app costs a one-off payment of $49.99.

Download: FX Sound ($49.99)

Bonus: Voicemeeter Banana

Voicemeeter Banana for Windows 10

If you do a lot of work with a microphone—perhaps because you’ve started your own podcast or upload a lot of videos to YouTube—you should try Voicemeeter Banana.

The app’s main feature is the advanced audio mixer. It lets you control your computer’s audio for any kind of streaming or recording.

From an equalizer perspective, the mixer lets you adjust audio input as well as output. Therefore, if you’re casting your screen via Twitch, speaking to the family on Skype, or recording a podcast with your friends, you can make up for any microphone deficiencies by making the sound crisper and less distorted.

You can play with the equalizer settings in the app’s Master Section.

Voicemeeter Banana is donationware. You can pay what you like for the software, and you don’t have to pay anything at all.

Download: Voicemeeter Banana (Free)

Learn More About Sound on Windows 10

Using a sound equalizer in Windows 10 is just one part of the battle. There are lots of ways to tweak the operating system’s audio output to your liking.

For example, did you know it’s possible to set the sound output devices on a per-app basis? Or use a hidden feature to give yourself virtual surround sound?

And remember, if anything ever goes wrong, we’ve got you covered. Just check out our article on how to fix audio issues on Windows 10.

Read the full article: The 5 Best Windows 10 Sound Equalizers to Improve Your PC Audio


Read Full Article

Twitter Cripples Third-Party Apps Like Tweetbot and Twitterific


Twitter is no longer allowing developers to access its old APIs. This means that some key features of third-party Twitter apps such as Tweetbot, Twitterific, Talon, and Tweetings no longer work. Which has rather annoyed the people using those apps for obvious reasons.

A Longstanding Love-Hate Relationship

For many years, Twitter has enjoyed endured a love/hate relationship with third-party apps. A lot of Twitter’s best features were born on these apps, but Twitter would really rather they didn’t exist.

Everyone who uses a third-party Twitter app isn’t using Twitter’s own apps. Which means Twitter loses control over their experience, which just won’t do for a company already struggling to make ends meet. And so Twitter has now taken the nuclear option.

Twitter Makes Third-Party Apps Worse

Twitter has rescinded access to the old APIs, which means third-party apps can no longer deliver push notifications or automatically refresh timelines. The result is broken apps, with the likes of Tweetbot and Twitterific having to disable some of their core features.

Twitter has defended its actions, with Rob Johnson, the Senior Director of Data Enterprise Solutions, saying this is the company “removing support for some outdated developer tools” in order to “deliver the best Twitter for you”.

Essentially, Twitter wants to focus on servicing its own apps, with these third-party apps a distraction. Developers can switch to using Twitter’s Account Activity API, but doing so isn’t cheap, which is why so many have held back from switching so far.

Twitter Gave Developers Ample Warning

No one, including the developers of the third-party apps affected and their users, should be surprised by any of this. Twitter has been planning this move for a long time, and developers have known Twitter was planning to shut down the old APIs since April 2018.

However, none of this actually matters when it comes down to it. Developers have seen their ability to keep their apps working pulled out from under them, and users are discovering that most third-party Twitter apps are now not as good as they used to be.

Image Credit: Andreas Eldh/Flickr

Read the full article: Twitter Cripples Third-Party Apps Like Tweetbot and Twitterific


Read Full Article

How to See How Much iCloud Space Your Messages Are Using

How to Link PayPal to eBay


When making purchases on eBay, one of the safest methods of transactions is to use PayPal.

Both buyer and seller are protected, and you’ll find that a lot of sellers will only accept PayPal as a method of payment. And as a buyer, there’s no cost to using the service.

How to Link PayPal to eBay

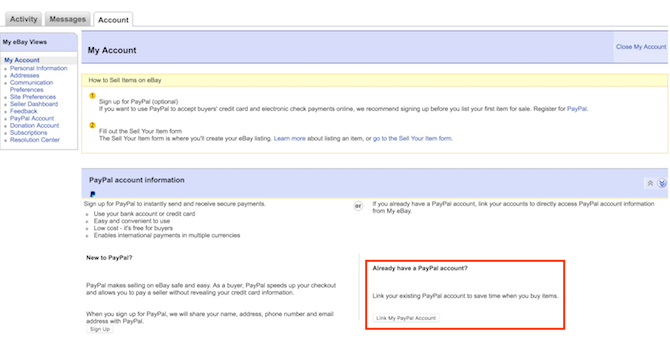
Linking your PayPal and eBay accounts is a very simple process:

  1. Click My eBay in the top right corner of the page.
  2. Click the Account tab.
  3. Scroll down to Paypal Account information and click Link My Paypal account
  4. You may be prompted to sign in to your eBay account again. Enter your credentials and click login.
  5. You’ll then be prompted to sign in to your PayPal account. Enter your credentials and click login.
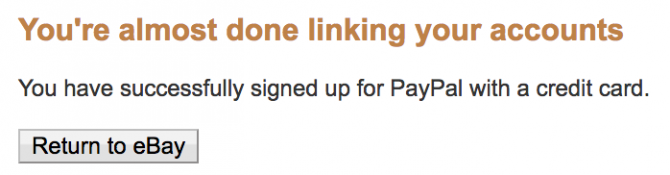
  6. When you see the message that you’re almost done linking your accounts, click Return to eBay

How to Disconnect PayPal From eBay

Unlinking your PayPal account from eBay is a one-click process:

  1. Click My eBay in the top right corner of the page.
  2. Click the Account tab.
  3. Scroll down to Paypal Account information and click Unlink accounts and your PayPal information will be removed from eBay.

You can also revoke access through your PayPal account:

  1. Go to Settings > Security > Permissions you’ve given and click Update.
  2. You’ll see a list of the sites or services you’ve granted access to your PayPal account. Find eBay and click Remove.

Using PayPal on eBay is one of many great tips for first-time buyers on eBay, including carefully researching both the seller and the item you’re purchasing, and using automatic bidding.

Image Credit: prykhodov/Depositphotos

Read the full article: How to Link PayPal to eBay


Read Full Article

How to Automatically Add Copyright EXIF to Images From Your Camera


Even amateur photographers need to copyright their photos. Imagine you took the perfect group photo of your family and it ended up in a blog without your permission. There’s little you can do about brazen theft.

But if there were some copyright information on the photo, you could check the violation. Fortunately, it’s easy to add a copyright to the EXIF data on images straight from the camera. So why not turn it into a good photography habit?

How to Add Copyrights to Images From Your Camera

Adding the copyright information to the EXIF data does not mar the original photo with an ugly logo. If someone crops the original or modifies it in an image editing program, the data stays intact. Most medium to high-end cameras of all brands have the feature—and all you have to do is enable it in the camera’s settings.

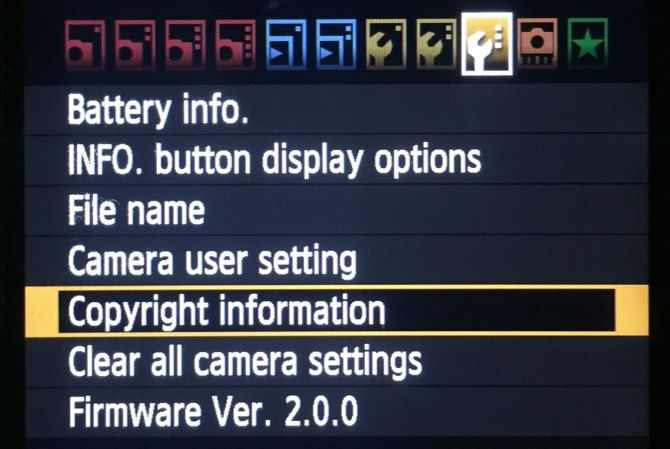
The screens are from a Canon 7D camera. You can find the copyright setting in other brands somewhere on the Menu/Setup screen as well. The symbol is commonly a spanner.

  1. Press the Menu button.
  2. Use the Multi-controller to navigate to the Camera Settings 4 tab.
  3. Again, use the Multi-controller or the Quick Control dial to highlight Copyright Information and then press the Set button.
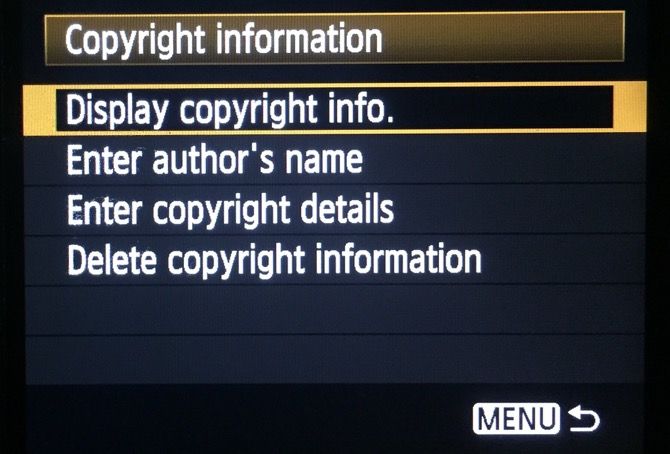
    Add Copyright Information
  4. The Copyright Information will display four options. Go through them with the Quick Control Dial:
    Copyright Settings
    Select Display copyright info to check the data that is currently set.
    Select Delete copyright information if you want to erase and enter new details.
    Select Enter author’s name. Alternatively, you can also select Enter copyright details.
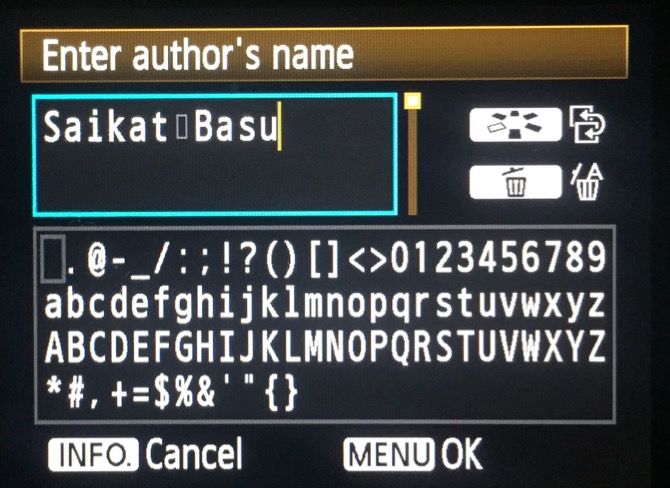
  5. In both cases, a text entry dialog box will be displayed with a complete character set below it.
    Add Copyright Text
  6. Use the Picture Style selection button (in Canon) to toggle to the character section of the dialog box. Use the Multi-controller to select an uppercase or lowercase letter, and then press Set to add the letter to your copyright information. Continue to highlight and add each letter until you complete the text. Use the Delete icon to cancel a letter.
  7. Press the Menu button to exit the dialog screen and finalize the copyright information.

Remember: This isn’t a watermark. It is a part of the EXIF information that is hard-coded into the photos. You might want to remove this EXIF data if you ever sell or loan your camera.

Read the full article: How to Automatically Add Copyright EXIF to Images From Your Camera


Read Full Article