Do you have a Windows CD or DVD, but cannot use your optical drive to install your Windows operating system on your new computer? Maybe you are worried about CD/DVD rot and want to create a backup?
Instead of a disc, you can use a USB flash drive to install Windows. Flash drives are smaller, have more storage, and if you use the right tool, you can boot multiple operating systems from the same drive.
Here’s how you create a bootable USB flash drive from your Windows installation CD.
The Benefits of USB Flash Drive Installation Media
There are several situations where USB flash drive installation media is better than a DVD or CD:
- You can easily create backup installation media.
- Significantly faster installation rate versus regular installation media.
- Keep your original installation media in pristine condition.
- Easy to carry multiple operating systems on a single USB drive.
Our relationship with Windows CDs and DVDs is different, too. For instance, you can purchase an official Windows 10 USB flash drive instead of a DVD or CD. Discs are still available but are far from the only method of installation. Furthermore, if you purchase new hardware with Windows preinstalled, there’s a chance you will never have installation media unless you make it yourself. (Read on to find out how!)
Copy Your Windows Installation Disc Using WinToFlash
If you have a Windows installation disc that you want to update to a USB flash drive, WinToFlash makes it an easy task to create a CD to USB bootable drive. The WinToFlash Lite edition will create a bootable USB flash drive directly from your existing Windows installation CD. Here’s how you do it.
- First head to the WinToFlash site, then download and install the WinToFlash Lite edition. After installation, WinToFlash will open automatically.
- Accept the EULA, and view the non-intrusive advert before continuing.
- Make sure your Windows installation disc is your optical drive, as well as the USB flash drive you want to copy your installation too.
- Now, select Windows Setup Bootable USB Wizard, then I have CD inserted into my computer…, followed by Next.
- On the next page specify the location of your Windows installation disc in the first box, and the destination USB flash drive in the second. Select Next to confirm your settings, agree to the terms of the license agreement, and Continue.

Please be aware that this process will format your USB flash drive and you will lose all existing data permanently.
The Windows CD to bootable USB flash drive copy process can take some time to complete, so go and pop the kettle on.
WinToFlash Multiboot
WinToFlash also has multiboot support. You can build a customized bootable USB drive filled with Linux distros, recovery disks, and other handy tools. The only limit is the size of your USB drive.
Note: WinToFlash Lite will only allow two ISOs on your multiboot. I’ve curated a comprehensive list of multiboot USB tools that do the job much better, and without restriction.
- Head back to the Wizard mode tab and select Mutiboot USB Drive Creation Menu.
- On the next screen, select Add. This opens the Add new item panel. Like other multiboot USB drive tools, WinToFlash has a long list of potential tools. Scroll down the list and select a tool.
- The option to Download selected ISO now will appear. Choose this option to download the latest version of the selected tool or OS. Alternatively, you can select and add ISOs already stored on your computer.
- Complete your selection and select Run.

Create Windows ISO From Original Installation Media Using ImgBurn
If you prefer a more manual approach to rip your Windows installation media, you can use ImgBurn. ImgBurn is a great free tool that you can use to write an image file to disc or create an image file from an existing disc.
- Head to the ImgBurn website. Download and install ImgBurn.
- After installing, open ImgBurn. Make sure your original Windows installation media is in your optical drive.
- Select Create image file from disc.
- Select the Windows installation media drive source, then set the Destination
- Hit the Read button to begin the process.

The disc image creation process depends on the write speed of your optical drive, so this could take a moment.
Once your Windows installation media image file (ISO) finishes ripping, you can move onto the next section where you will use Rufus to create a bootable USB flash drive.
Burn Windows Installation ISO to USB Flash Drive Using Rufus
Now you can burn the Windows installation ISO ripped from your original installation disc as a bootable USB flash drive. Rufus is a handy tool for all manner of bootable USB burning tasks. It is simple and gets the job done—a great combination! Here’s what you need to do:
- Head to the Rufus website, then download and install the latest version of the tool.
- Open Rufus. Under Device, select the USB flash drive you want to use.
- Under Boot Selection, hit Select, then browse to the location of the Windows installation ISO created in the last section.
- Set a new volume label, so you know what’s on the USB flash drive in the future.
- Select Start.

Wait for Rufus to complete the burn process Once complete, you have successfully manually moved your Windows installation disc to a bootable USB flash drive. Better still, you made a Windows installation media backup in the process (the ISO from the last section).
Use the Windows 10 Media Creation Tool
WinToFlash is great for automating the disc to USB flash drive process. ImgBurn and Rufus are great if you want to do it yourself. But you don’t have to use either of those methods. At least, not if you don’t want to and you’re using Windows 10.
The Microsoft Media Creation Tool makes the process of downloading a Windows ISO simple. Accordingly, the Media Creation Tool automatically downloads an ISO to your specification, eliminating the need for copying physical media to your computer, then onto your USB flash drive.
Here’s how you do it:
- Download and run the Windows 10 Media Creation Tool. Accepting the licensing agreement.
- Select Create installation media for another PC.
![windows media creator option]()
- Select the language, edition, and architecture of your operating system. The Media Creation Tool offers recommended settings. However, if you are downloading for a different system, you may need to change these.
- Next, choose either USB flash drive or ISO file. The latter creates an ISO file with the details you entered on the previous page, which you can install using a USB burning tool like Rufus.
- In this case, choose USB flash drive and continue.
- Select the USB flash drive, then create the installation media. The Media Creation Tool will download the latest version of Windows 10, so it will take a moment.

Can I Boot From USB?
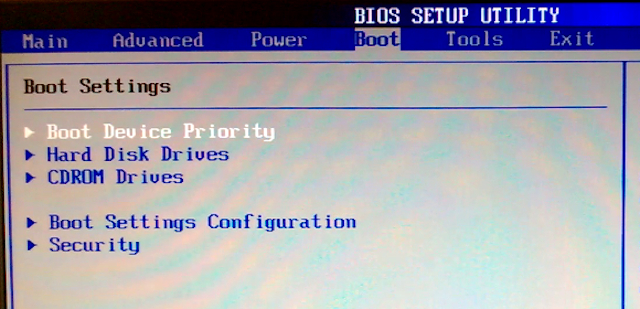
This is a very common question. It is largely system specific but can be altered by the user via the BIOS. This is controlled by the boot sequence.

Your system will usually seek to boot from wherever your OS is installed. The drive containing your main OS will be the first option in the boot sequence. It is possible to manually override this, instead of booting from a USB drive containing new installation media.
BIOS configurations are different for each manufacturer. I would suggest searching the internet for “[hardware manufacturer] BIOS tutorial/boot sequence.”
Create a Bootable USB from a CD or DVD
You’re now ready to create a bootable USB flash drive from your Windows installation CD or DVD. This installation process should speed up your next clean installation while giving you the chance to get rid of some of those pesky old discs. Just remember to write down your license codes and keep them in a safe place!
Can’t find your old license codes? Here are your options for a cheap and legal Windows license.
Read the full article: How to Create a Bootable USB Drive From Your Windows CD
Read Full Article

No comments:
Post a Comment