Photoshop can rightly be considered Adobe’s pride and joy. One of the most used image editing programs available, it’s a treasure trove of all the tools, techniques, and libraries a graphic designer could ever want.
That said, it’s also probably one of the most annoying pieces of software to use. That’s especially true for beginners, who aren’t familiar with the software’s maze-like user interface.
In this article we detail a number of the most common Photoshop annoyances, and how to fix them.
Note: This article won’t cover keyboard commands, which are absolutely vital for every Photoshop aficionado. But we’ve already covered Photoshop keyboard shortcuts before, and you may want to check out that article before continuing.
1. Change Measurement to Pixels
By default or chance, you might find yourself using inches as a unit of measurement rather than pixels in Photoshop. This can be very annoying when you’re dealing with work designed for the web rather than for print.
To change, click on Edit, mouse over Preference, and click Units & Rulers. You can also open the Preferences window by typing Ctrl + K and selecting the Units & Rulers section on the side menu.
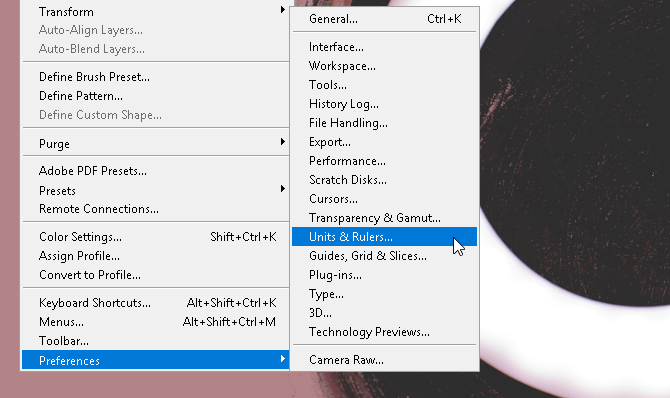
From the Preferences window, change the Rulers setting to Pixels using the drop down menu.
![]()
Click OK and you should now have all of your selection measurements as pixels.
2. Rule of Thirds Guidelines
Most people choose not to work with grid lines when using Photoshop, even though they can be of help when creating (particularly free form) graphic works. You can change this immediately by creating a rule of thirds guideline which you can access using a simple keyboard macro.
First, press Ctrl + K on your keyboard to open your Preferences window. Then, select the Guides, Grid & Slices option in the side menu.
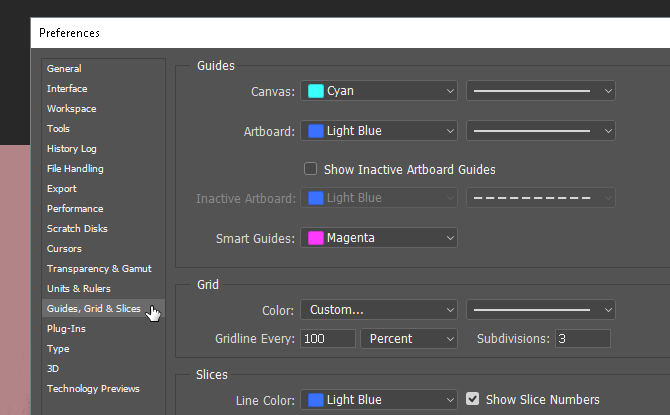
In the Grid section, change what you have to the following: Gridline Every to 100 and Percent, and Subdivisions to 3. Then, hit OK. That’s it. Now, you can access a quick and simple rule of thirds guide by pressing Ctrl + Tilde on your keyboard whenever it suits you.

If you’d like to have a measurement counter all of the time while you work, you can also press Ctrl + R on your keyboard to open a ruler that displays pixel information on your art board at all times.
3. Pen Tool Practice
If you have ever seen impressive Photoshop artwork, you can rest assured it required the pen tool. The pen tool is not only one of the most versatile Adobe tools out there—available on most Adobe software products—it’s also one of the hardest to learn to use well.
After all, Adobe products are designed for and cater mostly to professionals. Considering there’s no real official tutorial for it, and using the Pen tools assumes you’re already familiar with creating and editing shapes free hand, most people simply don’t bother.
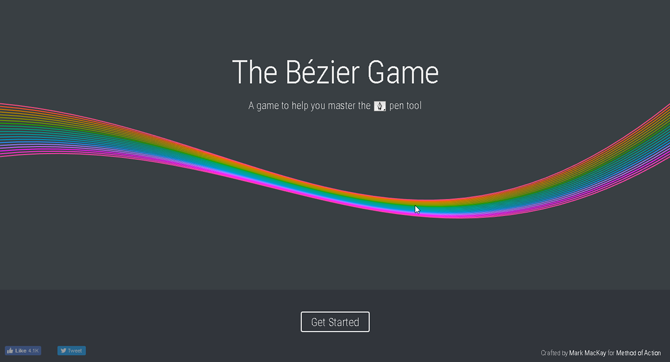
To get used to drawing freehand, try The Bezier Game by Mark MacKay. A simple and sophisticated interactive game, all you have to do is create simple shapes using the pen tool. It’s simple, quick, and will surely teach you a few things if you’re new to the pen tool game.

Trust me when I say that playing this simple game will extend your knowledge and ability of the pen tool by a surprising amount. Especially if you’re just starting out with digital drawing techniques.
4. Proper Image Rotation
Stop trying to rotate your image using the Image adjustment page. You’ll only end up rotating the whole art board, and feeding your bad habit. To rotate, move, or skew your image, use the Transform tool.
Place your image, select it, and then press Ctrl + T on your keyboard. A box should open around your image. Then, right-click the image and select your option.
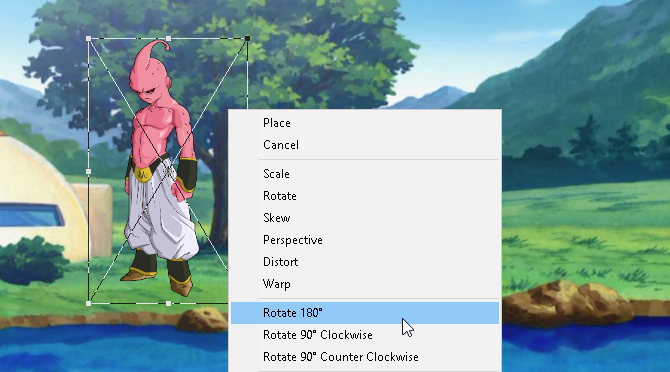
Unfortunately, most users will try to rotate images using the Image option (causing unnecessary anguish any time) or other options along the toolbar. As plentiful as Photoshop’s tools are, try to wander from your art board as little as possible.
5. Bird’s Eye View
Most of the time you’ll spend in Photoshop—especially when you’re new to Photoshop—is looking at and editing small details in a project. It can be a serious pain, too, considering you constantly have to zoom in and out when finishing an entire canvas.
Unless you use the hand tool. If you’ve zoomed in on a part of your design and want to zoom in the same amount on another spot, simply press and hold H, click and drag your cursor, and place the magnifying square on any other place on your art board.
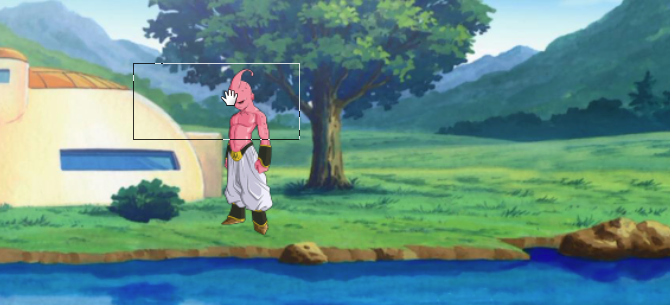
Now you don’t have to keep zooming in and out manually to finish your project.
6. Smart Object Layering
Let’s say, for example, you’re applying filters to a layer to make it look good. Typically, if you made a mistake, you’d have to revert every filter and reapply to get it looking good.
What if you forget the specific value of a filter, or a filter entirely? What if a filter is giving you issues, but you don’t know which it may be? All of these issues can be fixed by converting your layer to a Smart Object. To show the difference, here’s an image of a simple layer scheme:
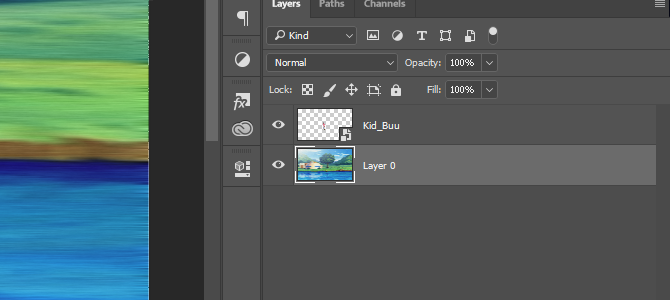
Smart objects allow users to list the growing modifications they commit to a layer, and allow users to modify, delete, or create any modification without losing track. To convert a layer into a smart object, right-click the layer name and select Convert to Smart Object. A small icon should appear in your layer thumbnail.
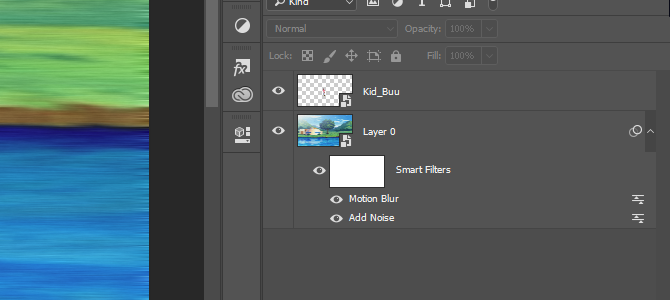
Now you should have a smart object as your layer. To view or delete a filter, just click on the eye icon to the left of the listing. To modify options, double-click on the levels icon on the right.
It’s Not You, It’s Photoshop
Photoshop is one of the most powerful and prolific applications around. That said, it won’t hold your hand throughout the learning process. It takes years to weave your way through all of it. So, if you ever have a problem with Photoshop, bear in mind that you might just need to adjust some settings rather than give up on Photoshop altogether.
Hopefully, this short list of Photoshop annoyances has fixes some of your woes. And even if you run into some more annoyances down the line, don’t give up, as Photoshop is a powerful tool once you get the hang of using it.
Image Credit: eggeeggjiew/Depositphotos
Read Full Article
No comments:
Post a Comment