14 May 2020

Custom Mouse Cursors for Windows 10: How to Get Started


Are you sick of the default white cursor in Windows? Most people customize their computer wallpaper, sounds, and other elements, but don’t think to tweak the cursor.

Thankfully, it’s easy to change your cursor’s look. Let’s look at how to use a custom cursor in Windows.

Where to Find Custom Mouse Pointers

To change your Windows cursor, you’ll first need a new cursor set. The easiest way to add custom cursors to Windows is to download ready-made packs. You’ll find tons of great free cursor options online with a bit of searching.

One of our favorite cursor packs is Oxygen Cursors, created by LAvalon on DeviantArt. It includes a glassy-looking cursor in 37 different color schemes, meaning that you’re sure to find a color setup you’ll like. In addition to a clean look, they’re also easy to install, making it a great choice if you’re new to cursor customization.

Oxygen Cursors

For tons of cursor options, have a look at the Cursor tag on DeviantArt and Open Cursor Library. You’ll be able to find all sorts of interesting options there.

Sample Mouse Cursor Packs

While we can’t list all the available cursors options, here’s a sampling from DeviantArt that will appeal to most people. Note that you’ll need to have a free DeviantArt account to download these:

  • Capitaine cursors by krourke: A cursor scheme inspired by macOS, with a clean dark look and several alternative icons for loading and other symbols.

Capitaine Cursors

Android Material Cursors

Numix Cursors

  • Entis Cursors by zhorak: A bold cursor set, which is perfect if you often lose track of your cursor.
  • Wii Cursors by allewun: If you’re nostalgic for the pointer from the Nintendo Wii, this pack lets you revive it on your PC.

How to Install Custom Cursor Packs

Because they contain multiple files, most cursor packs download in an archived format, like ZIP or RAR. To proceed, you’ll need to extract the folder contents so you can use them.

If you don’t have it already, install 7-Zip, one of our favorite file extraction tools, to unpack these. Simply right-click on the downloaded folder and choose 7-Zip > Extract to [archive name] and the software will create a new folder with the archive’s contents.

Extract Cursors Windows

Depending on your cursor pack, there may be multiple folders inside for the various themes, so open the one you’re most interested in. Inside, you’ll see several files ending in CUR and ANI. CUR files are static cursors, while ANI file formats are animated cursor files.

Most cursor packs will also have an INF file, typically install.inf or [cursor name].inf. This is an easy installation file that you can use to add the custom cursor to your system.

Right-click on the INF file and choose Install. Windows will show a UAC prompt; once you accept it, the process only takes a moment.

Windows Install Cursors

(If your cursor pack didn’t include an INF file, see the section below on manually changing your mouse cursor.)

Repeat these steps for any other cursor packs you want to install. Now that you’ve added the packs to Windows, you’ll need to apply the cursor set you want to use.

How to Change Your Cursor in Windows

Even on Windows 10, you’ll need to open the Control Panel to change mouse cursors. Type control panel into the Start menu to launch it. If the view option in the top-right says Category, change it to Small icons and choose Mouse.

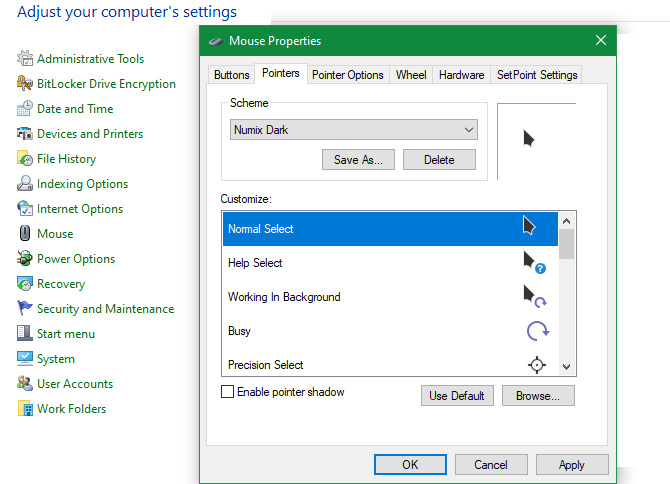
This opens a new dialog box with several options for customizing mouse behavior. Switch to the Pointers tab to change the look of your mouse cursor. There, click the dropdown box under Scheme to show all your installed cursor sets.
Windows Mouse Options

Everything you installed earlier using INF files should appear here. Select a cursor pack to preview its icons; you’ll see what each one looks like in the Customize box. Choose Apply to try the pointer out for yourself and OK when you’re done.

That’s all it takes to use a new cursor. When you want to change to another theme or revert back to the default, return to this menu and select your new cursor. You’ll also find a few other Windows default cursors here, though they aren’t particularly exciting.
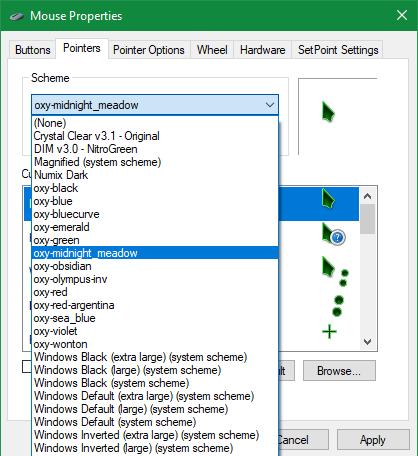
Windows Cursor Choices

How to Manually Change Your Mouse Cursor

If you downloaded a cursor pack that doesn’t include an INF file or want to make your own mouse cursor scheme by combining multiple cursor icons, you can add them manually. This is less convenient than the INF install, but it’s still straightforward.

First, navigate to the Mouse section of the Control Panel using the above instructions. Select any scheme from the top dropdown box to use as a base; (None) is fine.

Next, you’ll need to step through each option in the Customize box and manually assign a cursor. To do this, select an entry and hit the Browse button. Navigate to the folder where you unpacked your cursors earlier and select the appropriate CUR or ANI file for that entry.

Windows Manually Select Cursor

Remember that ANI files have some sort of animation. Also, while some packs use filenames that make it obvious what each icon’s purpose is (such as “normal”, “help”, “busy”, etc.), others aren’t so clear. Feel free to assign cursors based on what you think is best.

Repeat this for each entry in the Customize box until you have a complete cursor set (most have 15 cursors). Once this is done, click the Save As button and give your new scheme a name. This will add it as an option in the dropdown box so you can easily switch to it in the future.

If you ever want to get rid of a scheme, pick it from the list and choose Delete.
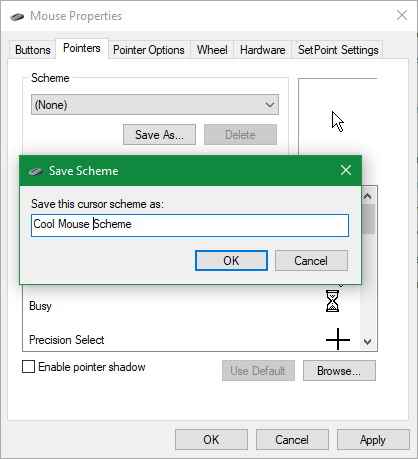
Windows Save Cursor Scheme

How to Create Your Own Mouse Cursors

Want to try your hand at creating your own cursors? You’ll find several tools available that let you make a cursor and use it on your system.

Cursor.cc is a simple site that gives you basic tools to create a cursor. You can even publish it on the site so others can use it.

For something more powerful, take a look at Stardock’s CursorFX. It’s available with a 30-day trial, then you’ll need to pay $5 to purchase the software.

If you’re an advanced designer, it’s also possible to convert an image file you created in another tool into a CUR file. Services like Convertio offer CUR conversion from PNG, JPG, and other common image formats. And try AniTuner if you want to create animated cursor images.

Safety When Downloading Cursors

To keep your system safe, you should keep a few security tips in mind when customizing your cursor.

First, only download cursors from trusted websites. An INF file can potentially harm your system because it gives Windows a set of administrator instructions. This is why you should only install cursors from legitimate sources.

Popular resources, like DeviantArt, shouldn’t pose an issue. Beware cursor downloads that appear from ads or on shady-looking websites that you’ve never heard of, though. Remember that cursors are image files, not applications. If a website asks you to run software to install your cursors, it’s malicious.

If you haven’t already, you should enable file extension display in Windows so you can easily see what kinds of files you’ve downloaded. To do this, open a File Explorer window and select the View tab at the top. In the Show/hide section, check the File name extensions box and Windows will show extension types for all files.

Windows File Name Extensions Option

Aside from readme text files and image samples, the only types of files a cursor pack should contain are CUR, ANI, and INF. If you download a pack with an EXE or MSI file, it’s dangerous and you should delete it.

Now You’ve Made Your Cursor Look Cool

You now have everything you need to customize your Windows cursor. Whether you download a ready-made pack or create your own from scratch, we hope you enjoy a more personalized computer with a custom mouse cursor.

Now that you’ve tweaked your mouse, have a look at more ways to change the look and feel of your Windows desktop.

Read the full article: Custom Mouse Cursors for Windows 10: How to Get Started


VMware to acquire Kubernetes security startup Octarine and fold it into Carbon Black


VMware announced today that it intends to buy early-stage Kubernetes security startup Octarine and fold it into Carbon Black, a security company it bought last year for $2.1 billion. The company did not reveal the price of today’s acquisition.

According to a blog post announcing the deal, from Patrick Morley, general manager and senior vice president at VMware’s Security Business Unit, Octarine should fit in with what Carbon Black calls its “intrinsic security strategy” — that is, protecting content and applications wherever they live. In the case of Octarine, that is cloud native containers in Kubernetes environments.

“Acquiring Octarine enables us to advance intrinsic security for containers (and Kubernetes environments), by embedding the Octarine technology into the VMware Carbon Black Cloud, and via deep hooks and integrations with the VMware Tanzu platform,” Morley wrote in a blog post.

This also fits in with VMware’s Kubernetes strategy, having purchased Heptio, an early Kubernetes company started by Craig McLuckie and Joe Beda, two folks who helped develop Kubernetes while at Google before starting their own company,

We covered Octarine last year when it released a couple of open-source tools to help companies define the Kubernetes security parameters. As we quoted head of product Julien Sobrier at the time:

Kubernetes gives a lot of flexibility and a lot of power to developers. There are over 30 security settings, and understanding how they interact with each other, which settings make security worse, which make it better, and the impact of each selection is not something that’s easy to measure or explain.

As for the startup, it now gets folded into VMware’s security business. While the CEO tried to put a happy face on the acquisition in a blog post, it seems its days as an independent entity are over. “VMware’s commitment to cloud native computing and intrinsic security, which have been demonstrated by its product announcements and by recent acquisitions, makes it an ideal home for Octarine,” the company CEO Shemer Schwarz wrote in the post.

Octarine was founded in 2017 and has raised $9 million, according to PitchBook data.


Read Full Article

Inria releases some source code of French contact-tracing app


French research institute Inria has released a small portion of the source code that is going to power France’s contact-tracing app, StopCovid. It is available on several GitLab repositories under the Mozilla Public License 2.0. While the French government announced that everything would be open source, it’s going to be bit a more complicated than that.

As Inria wrote in the announcement, the project is now divided in three parts. Critical elements of the infrastructure are not going to be available on the GitLab repositories. Instead, Inria will only release documentation on the security implementations, as ANSSI and France’s data protection watchdog CNIL recommended some level of transparency on this front.

A second part is going to be released publicly, but Inria is not looking for external contributions or, as developers would say, pull/merge requests. You can expect front-facing work here and things that don’t interact directly with the contact-tracing protocol.

The third part consists of the contact-tracing protocol and its implementation. This time, Inria and the community of companies and research teams working on StopCovid are looking for external contributions. The idea here is to improve the protocol itself when it comes to privacy and security.

France is moving forward with its centralized contact-tracing protocol called ROBERT. I analyzed the pros and cons of the protocol when Inria and Fraunhofer released the specifications.

It’s very different from Apple and Google’s contact-tracing API, as ROBERT relies on a central server to assign a permanent ID as well as a bunch of ephemeral IDs attached to this permanent ID. Your phone collects the ephemeral IDs of other app users around you. When somebody is diagnosed COVID-19-positive, the server receives all the ephemeral IDs associated with people with whom they’ve interacted. If one or several of your ephemeral IDs get flagged, you receive a notification.

By choosing a pseudonymous system, you have to trust your government that its implementation is rock-solid. For instance, if the app sends too much information when it communicates with the server, it would become possible to put names on permanent IDs.

Inria says that StopCovid could be released in early June, if everything goes well. France’s digital minister, Cédric O, said in a TV interview that the government wanted to release StopCovid on June 2.


Read Full Article

How to create the best at-home videoconferencing setup, for every budget


Your life probably involves a lot more videoconferencing now than it did a few weeks ago – even if it already did involve a lot. That’s not likely going to change anytime soon, so why not make the most of it? The average MacBook webcam can technically get the job done, but it’s far from impressive. There are a number of ways to up your game, however – by spending either just a little or a whole lot. Whether you’re just looking to improve your daily virtual stand-up, gearing up for presenting at a virtual conference, or planning a new video podcast, here’s some advice about what to do to make the most of what you’ve got, or what to get if you really want to maximize your video and audio quality.

Level 0

Turn on a light and put it in the right place

One of the easiest things you can do to improve the look of your video is to simply turn on any light you have handy and position it behind the camera shining on your face. That might mean moving a lamp, or moving your computer if all your available lights are in a fixed position, but it can make a dramatic difference. Check out these examples below, screen grabbed from my Microsoft Surface Book 2 (which actually has a pretty good built-in video camera, as far as built-in video cameras go).

The image above is without any light beyond the room’s ceiling lights on, and the image below is turning on a lamp and positioning it directed on my face from above and behind the Surface Book. It’s enough of a change to make it look less like I got caught by surprise with my video on, and more like I actually am attending a meeting I’m supposed to take part in.

Be aware of what’s behind you

It’s definitely too much to ask to set dress your surroundings for every video call you jump on, but it is worth taking a second to spot check what’s visible in the frame. Ideally, you can find a spot where the background is fairly minimal, with some organized decor visible. Close doors that are in frame, and try not to film in front of an uncovered window. And if you’re living in a pandemic-induced mess of clutter, just shovel the clutter until it’s out of frame.

Know your system sound settings

Get to know where the input volume settings are for your device and operating system. It’s not usually much of an issue, because most apps and systems set pretty sensible defaults, but if you’re also doing something unusual like sitting further away from your laptop to try to fit a second person in frame, then you might want to turn up the input audio slider to make sure anyone listening can actually hear what you have to say.

It’s probably controllable directly in whatever app you’re using, but on Macs, also try going to System Preferences > Sound > Input to check if the level is directly controllable for the device you’re using, and if tweaking that produces the result you’re looking for.

Level 1

Get an external webcam

The built-in webcam on most notebooks and all-in-ones isn’t going to be great, and you can almost always improve things by buying a dedicated webcam instead. Right now, it might be hard to find them in stock, since a lot of people have the same need for a boost in videoconferencing quality all at the same time. But if you can get your hands on even a budget upgrade option like the Logitech C922 Pro Stream 1080p webcam I used for the clip below, it should help with sharpness, low light performance, color and more.

Get a basic USB mic

Dedicated external mics are another way to quickly give your setup a big boost for relatively low cost. In the clip above, I used the popular Samson Meteor USB mic, which has built-in legs and dedicated volume/mute controls. This mic includes everything you need, and should work instantly when you plug it in via USB, and it produces great sound that’s ideal for vocals.

Get some headphones

Headphones of any kind will make your video calls and conferences better, since it minimizes the chance of echo from your mic picking up the audio from your own speakers. Big over ears models are good for sound quality, while earbuds make for less obvious headwear in your actual video image.

Level 2

Use a dedicated camera and an HDMI-to-USB interface

If you already have a standalone camera, including just about any consumer pocket camera with HDMI out capabilities, then it’s worth looking into picking up an HDMI-to-USB video capture interface in order to convert it into a much higher quality webcam. In the clip below I’m using the Sony RX100 VII, which is definitely at the high end of the consumer pocket camera market, but there are a range of options that should give you nearly the same level of quality, including the older RX100 models from Sony.

When looking for an HDMI interface, make sure that they advertise that it works with videoconferencing apps like Zoom, Hangouts and Skype on Mac and Windows without any software required: This means that they likely have UVC capabilities, which means those operating systems will recognize them as webcams without any driver downloads or special apps required out of the box. These are also in higher demand due to COVID-19, so the Elgato Cam Link 4K I used here probably isn’t in ready stock anywhere. Instead, look to alternatives like the IOGear Video Capture Adapter or the Magewell USB 3.0 Capture device, or potentially consider upgrading to a dedicated live broadcast deck like the Blackmagic ATEM Mini I’ll talk more about below.

Get a wired lav mic

A simple wired lavalier (lav) microphone is a great way to upgrade your audio game, and it doesn’t even need to cost that much. You can get a wired lav that performs decently well for as little as $20 on Amazon, and you can use a USB version for connecting directly to your computer even if you don’t have a 3.5mm input port. Rode’s Lavalier GO is a great mid-range option that also works well with the Wireless GO transmitter and receiver kit I mention in the next section. The main limitation of this is that depending on cord length, you could be pretty limited in terms of your range of motion while using one.

Get multiple lights and position them effectively

Lighting is a rabbit hole that ends up going very deep, but getting a couple of lights that you can move to where you need them most is a good, inexpensive way to get started. Amazon offers a wide range of lighting kits that fit the bill, or you can even do pretty well with just a couple of Philips Hue lights in gooseneck lamps positioned correctly and adjusted to the right temperature and brightness.

Level 3

Use an interchangeable lens camera and a fast lens

The next step up from a decent compact camera is one that features interchangeable lenses. This allows you to add a nice, fast prime lens with a high maximum aperture (aka a low ‘f’ number’) to get that defocused background look. This provides natural-looking separation of you, the subject, from whatever is behind you, and provides a cinematic feel that will wow colleagues in your monthly all-hands.

Get a wireless lav mic

A lav mic is great, but a wireless lav mic is even better. It means you don’t need to worry about hitting the end of your cable, or getting it tangled in other cables in your workspace, and it can provide more flexibility in terms of what audio interfaces you use to actually get your sound into the computer, too. A great option here is the RODE Wireless GO, which can work on its own or in tandem with a mic like the RODE Lavalier GO for great, flexible sound.

Use in-ear monitors

You still want to be using headphones at this stage, but the best kind to use really are in-ear monitors that do their best to disappear out of sight. You can get some dedicated broadcast-style monitors like those Shure makes, or you can spring for a really good pair of Bluetooth headphones with low latency and the latest version of Bluetooth. Apple’s AirPods Pro is a great option, as are the Bang & Olfusen E8 fully wireless earbuds, which I’ve used extensively without any noticeable lag.

Use 3-point lighting

At this stage, it’s really time to just go ahead and get serious about lighting. The best balance in terms of optimizing specifically for streaming, videoconferencing and anything else your’e doing from your desk, basically, is to pick up at least two of Elgato’s Key Lights or Key Light Airs.

These are LED panel lights with built-in diffusers that don’t have a steep learning curve, and that come with very sturdy articulating tube mounts with desk clamps, and that connect to Wi-Fi for control via smartphones or desktop applications. You can adjust their temperature, meaning you can make them either more ‘blue’ or more ‘orange’ depending on your needs, as well as tweak their brightness.

Using three of these, you can set up a standard 3-point lighting setup which are ideal for interviews or people speaking directly into a camera – aka just about every virtual conference/meeting/event/webinar use you can think of.

Level 4

Get an HDMI broadcast switcher deck

HDMI-USB capture devices do a fine job turning most cameras into webcams, but if you really want to give yourself a range of options, you can upgrade to a broadcast switching interface like the Blackmagic ATEM Mini. Released last year, the ATEM Mini packs in a lot of features that previously were basically only available to video pros, and provides them in an easy-to-use form factor with a price that’s actually astounding given how much this thing can really do.

On its own paired with a good camera, the ATEM Mini can add a lot to your video capabilities, including allowing you to tee up still graphics, and switch to computer input to show videos, work live in graphics apps, demonstrate code or run a presentation. You can set up picture-in-picture views, put up lower thirds and even fade-to-black using a hardware button dedicated to that purpose.
But if you really want to make the most of the ATEM Mini, you can add a second or even a third and fourth camera to the mix. For most uses, this is probably way too much camera – there are only so many angles one can get of a single person talking, in the end. But if you get creative with camera placement and subjects, it’s a fun and interesting way to break up a stream, especially if you’re doing something longer like giving a speech or extended presentation. The newer ATEM Mini Pro is just starting to ship, and offers built-in recording and streaming as well.

Use a broadcast-quality shotgun mic

The ATEM Mini has two dedicated audio inputs that really give you a lot of flexibility on that front, too. Attaching one to the output on an iPod touch, for instance, could let you use that device as a handy soundboard for cueing up intro and title music, plus sound effects. And this also means you can route sound from a high-quality mic, provided you have the right interface.

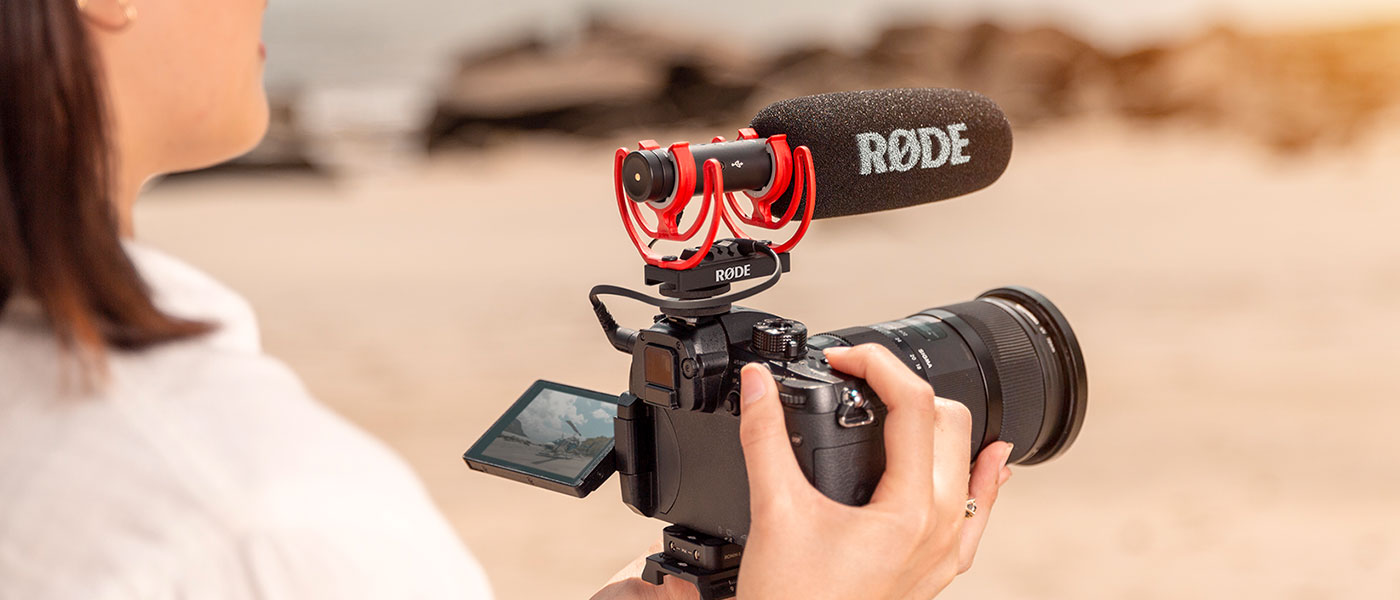
For top level streaming quality, with minimal sacrifices required in terms of video, I recommend going to a good, broadcast-quality shotgun mic. The Rode VideoMic NTG is a good entry-level option that has flexibility when it comes to also being mountable on-camera, but something like the Rode NTG3m mounted to a boom arm and placed out of frame with the mic end angled down towards your mouth, is going to provide the best possible results.

Add accent lighting

You’ve got your 3-point lighting – but as I said, lighting is a nearly endless rabbit hole. Accent lighting can really help push the professionalism of your video even further, and it’s also pretty easy and to set up using readily available equipment. Philips Hue is probably my favorite way to add a little more vitality to any scene, and if you’re already a Hue user you can make do with just about any of their color bulbs. Recent releases from Philips like the Hue Play Smart LED Light Bars are essentially tailor made for this use, and you can daisy chain up to three on one power adapter to create awesome accent wall lighting effects.

All of this is, of course, not at all necessary for basic video conferencing, virtual hangouts and meetings. But if you think that remote video is going to be a bigger part of our lives going forward, even as we return to some kind of normalcy in the wake of COVID-19, then it’s worth considering what elements of your system to upgrade based on your budget and needs, and hopefully this article provides some guidance.


Read Full Article

Common Cold


Common Cold

Instagram Lite shuts down in advance of a relaunch


Instagram Lite, the two-year-old version of the Instagram app aimed at emerging markets, has quietly disappeared. The previously highly ranked app vanished from the Google Play charts on April 13 in the countries where it was active, including Kenya, Mexico, Peru and the Philippines. Existing Instagram Lite users have been directed to the main Instagram app via a message that claimed “Instagram Lite is No Longer Supported.”

Android Police first reported the news of Instagram Lite’s shutdown. TechCrunch has since confirmed details of the app’s removal with Instagram parent, Facebook.

“We are rolling back the test of the Instagram Lite app, a Facebook spokesperson said. “You can start using the latest version of Instagram instead to connect with the people and things you love,” they noted.

Instagram Lite launched on Google Play in June 2018 without fanfare. Like other “Lite”-branded apps on the market, Instagram Lite’s goal was to offer a smaller download that takes up less space on a mobile device — a feature that specifically caters to users in emerging markets, where storage space is a concern. At launch, the “Lite” version of Instagram was 573 kilobytes, or roughly 1/55th the size of Instagram’s then 32-megabyte application.

Like Instagram, the slimmed-down Instagram Lite app allowed users to filter and post photos to a feed or to Stories, and to browse the Explore page for more content. However, it lacked the option to post videos or direct-message friends upon arrival.

On June 28, 2018, Mexico was the first market to receive Instagram Lite. It also accounted for the majority — 62% — of its total installs. To date, Instagram Lite was downloaded approximately 4.4 million times in Mexico, according to data from Sensor Tower, shared with TechCrunch. The second largest market was the Philippines, with 14% of installs. Kenya and Peru trailed, with 12.5% and 12% of installs, respectively.

Due to demand for “Lite” applications in these regions, Instagram Lite was able to climb to the top of Google Play’s charts. The app was ranked No. 8 in Kenya in the “Social” category on Google Play, as well as No. 12 in Peru, No. 15 in Mexico and No. 22 in the Philippines.

On April 15, it vanished from the charts, indicating a removal in those regions, which the company has now confirmed.

While it’s unusual to pull an app entirely when an update is planned, we understand that’s what Facebook has in store for Instagram Lite.

The company — which has always characterized the app as a “test” — is planning to take what it has learned over these past years to develop a new version of Instagram Lite. It’s unclear how far out that launch may be, but the new version is currently being built.

Instagram Lite was one of a few “Lite” apps that Facebook offers, led by the early launch of Facebook Lite in 2015, followed by Messenger Lite in April 2018. A number of major tech companies also offer apps aimed at emerging markets, often dubbed their “Lite” version, including Uber, Tinder, Spotify, Twitter and others. Google does the same under the “Go” brand.

But unlike many of these efforts, Instagram Lite had not yet reached some of the larger emerging markets these apps tend to target, like India, Indonesia, Brazil and others. That could change in the future, however.

In the meantime, Lite users are being directed to the main Instagram app. Alternately, they can use Instagram via the web from their phone.


Read Full Article

Top members of Google’s Pixel team have left the company


Key Pixel team members Marc Levoy and Mario Queiroz are out at Google. The departures, first reported by The Information, have been confirmed on the pages of the former Distinguished Engineer and Pixel General Manager, respectively.

Both members were key players on Google’s smartphone hardware team before exiting earlier this year. Levoy was a key member of the Pixel imaging team, with an expertise in computational photography that helped make the smartphone’s camera among the best in class. Queiroz was the number two on the Pixel team.

The exits come as the software giant has struggled to distinguish itself in a crowded smartphone field. The products have been generally well-received (with the exception of the Pixel 4’s dismal battery life), but the Android-maker has thus far been unable to rob much market share from the likes of Samsung and Huawei.

The Information report sheds some additional light on disquiet among the Pixel leadership. Hardware head Rick Osterloh reportedly voiced some harsh criticism during an all-hands late last year. It certainly seems possible the company saw fit to shake things up a bit, though Google declined TechCrunch’s request for comment.

Breaking into the smartphone market has been a white whale for the company for some time. Google has explored the space through its Nexus partnerships, along with its short-lived Motorola Mobility acquisition (2012-2014). The Pixel is possibly the most successful of these projects, but Google’s struggles have coincided with an overall flattening of the market.

The company did find some success with last year’s budget Pixel 3A. The followup Pixel 4A was rumored for a late May launch, though the device has reportedly been delayed.


Read Full Article

Top members of Google’s Pixel team have left the company


Key Pixel team members Marc Levoy and Mario Queiroz are out at Google. The departures, first reported by The Information, have been confirmed on the pages of the former Distinguished Engineer and Pixel General Manager, respectively.

Both members were key players on Google’s smartphone hardware team before exiting earlier this year. Levoy was a key member of the Pixel imaging team, with an expertise in computational photography that helped make the smartphone’s camera among the best in class. Queiroz was the number two on the Pixel team.

The exits come as the software giant has struggled to distinguish itself in a crowded smartphone field. The products have been generally well-received (with the exception of the Pixel 4’s dismal battery life), but the Android-maker has thus far been unable to rob much market share from the likes of Samsung and Huawei.

The Information report sheds some additional light on disquiet among the Pixel leadership. Hardware head Rick Osterloh reportedly voiced some harsh criticism during an all-hands late last year. It certainly seems possible the company saw fit to shake things up a bit, though Google declined TechCrunch’s request for comment.

Breaking into the smartphone market has been a white whale for the company for some time. Google has explored the space through its Nexus partnerships, along with its short-lived Motorola Mobility acquisition (2012-2014). The Pixel is possibly the most successful of these projects, but Google’s struggles have coincided with an overall flattening of the market.

The company did find some success with last year’s budget Pixel 3A. The followup Pixel 4A was rumored for a late May launch, though the device has reportedly been delayed.


Read Full Article

Announcing Meta-Dataset: A Dataset of Datasets for Few-Shot Learning


Recently, deep learning has achieved impressive performance on an array of challenging problems, but its success often relies on large amounts of manually annotated training data. This limitation has sparked interest in learning from fewer examples. A well-studied instance of this problem is few-shot image classification: learning new classes from only a few representative images.

In addition to being an interesting problem from a scientific perspective due to the apparent gap between the ability of a person to learn from limited information compared to that of a deep learning algorithm, few-shot classification is also a very important problem from a practical perspective. Because large labeled datasets are often unavailable for tasks of interest, solving this problem would enable, for example, quick customization of models to individual user’s needs, democratizing the use of machine learning. Indeed, there has been an explosion of recent work to tackle few-shot classification, but previous benchmarks fail to reliably assess the relative merits of the different proposed models, inhibiting research progress.

In “Meta-Dataset: A Dataset of Datasets for Learning to Learn from Few Examples” (presented at ICLR 2020), we propose a large-scale and diverse benchmark for measuring the competence of different image classification models in a realistic and challenging few-shot setting, offering a framework in which one can investigate several important aspects of few-shot classification. It is composed of 10 publicly available datasets of natural images (including ImageNet, CUB-200-2011, Fungi, etc.), handwritten characters and doodles. The code is public, and includes a notebook that demonstrates how Meta-Dataset can be used in TensorFlow and PyTorch. In this blog post, we outline some results from our initial research investigation on Meta-Dataset and highlight important research directions.

Background: Few-shot Classification
In standard image classification, a model is trained on a set of images from a particular set of classes, and then tested on a held-out set of images of those same classes. Few-shot classification goes a step further and studies generalization to entirely new classes at test time, no images of which were seen in training.

Specifically, in few-shot classification, the training set contains classes that are entirely disjoint from those that will appear at test time. So the aim of training is to learn a flexible model that can be easily repurposed towards classifying new classes using only a few examples. The end-goal is to perform well on the test-time evaluation that is carried out on a number of test tasks, each of which presents a classification problem between previously unseen classes, from a held out test set of classes. Each test task contains a support set of a few labeled images from which the model can learn about the new classes, and a disjoint query set of examples that the model is then asked to classify.

In Meta-Dataset, in addition to the tough generalization challenge to new classes inherent in the few-shot learning setup described above, we also study generalization to entirely new datasets, from which no images of any class were seen in training.

Comparison of Meta-Dataset with Previous Benchmarks
A popular dataset for studying few-shot classification is mini-ImageNet, a downsampled version of a subset of classes from ImageNet. This dataset contains 100 classes in total that are divided into training, validation and test class splits. While classes encountered at test time in benchmarks like mini-ImageNet have not been seen during training, they are still substantially similar to the training classes visually. Recent works reveal that this allows a model to perform competitively at test time simply by re-using features learned at training time, without necessarily demonstrating the capability to learn from the few examples presented to the model in the support set. In contrast, performing well on Meta-Dataset requires absorbing diverse information at training time and rapidly adapting it to solve significantly different tasks at test time that possibly originate from entirely unseen datasets.
Test tasks from mini-ImageNet. Each task is a classification problem between previously unseen (test) classes. The model can use the support set of a few labeled examples of the new classes to adapt to the task at hand and then predicts labels for the query examples of these new classes. The evaluation metric is the query set accuracy, averaged over examples within each task and across tasks.
While other recent papers have investigated training on mini-ImageNet and evaluating on different datasets, Meta-Dataset represents the largest-scale organized benchmark for cross-dataset, few-shot image classification to date. It also introduces a sampling algorithm for generating tasks of varying characteristics and difficulty, by varying the number of classes in each task, the number of available examples per class, introducing class imbalances and, for some datasets, varying the degree of similarity between the classes of each task. Some example test tasks from Meta-Dataset are shown below.
Test tasks from Meta-Dataset. Contrary to the mini-ImageNet tasks shown above, different tasks here originate from (the test classes of) different datasets. Further, the number of classes and the support set sizes differ across tasks and the support sets might be class-imbalanced.
Initial Investigation and Findings on Meta-Dataset
We benchmark two main families of few-shot learning models on Meta-Dataset: pre-training and meta-learning.

Pre-training simply trains a classifier (a neural network feature extractor followed by a linear classifier) on the training set of classes using supervised learning. Then, the examples of a test task can be classified either by fine-tuning the pre-trained feature extractor and training a new task-specific linear classifier, or by means of nearest-neighbor comparisons, where the prediction for each query example is the label of its nearest support example. Despite its “baseline” status in the few-shot classification literature, this approach has recently enjoyed a surge of attention and competitive results.

On the other hand, meta-learners construct a number of “training tasks” and their training objective explicitly reflects the goal of performing well on each task’s query set after having adapted to that task using the associated support set, capturing the ability that is required at test time to solve each test task. Each training task is created by randomly sampling a subset of training classes and some examples of those classes to play the role of support and query sets.

Below, we summarize some of our findings from evaluating pre-training and meta-learning models on Meta Dataset:

1) Existing approaches have trouble leveraging heterogeneous training data sources.

We compared training models (from both pre-training and meta-learning approaches) using only the training classes of ImageNet to using all training classes from the datasets in Meta-Dataset, in order to measure the generalization gain from using a more expansive collection of training data. We singled out ImageNet for this purpose, because the features learned on ImageNet readily transfer to other datasets. The evaluation tasks applied to all models are derived from a held-out set of classes from the datasets used in training, with at least two additional datasets that are entirely held-out for evaluation (i.e., no classes from these datasets were used for training).

One might expect that training on more data, albeit heterogeneous, would generalize better on the test set. However, this is not always the case. Specifically, the following figure displays the accuracy of different models on test tasks of Meta-Dataset’s ten datasets. We observe that the performance on test tasks coming from handwritten characters / doodles (Omniglot and Quickdraw) is significantly improved when having trained on all datasets, instead of ImageNet only. This is reasonable since these datasets are visually significantly different from ImageNet. However, for test tasks of natural image datasets, similar accuracy can be obtained by training on ImageNet only, revealing that current models cannot effectively leverage heterogeneous data towards improving in this regard.
Comparison of test performance on each dataset after having trained on ImageNet (ILSVRC-2012) only or on all datasets.
2) Some models are more capable than others of exploiting additional data at test time.

We analyzed the performance of different models as a function of the number of available examples in each test task, uncovering an interesting trade-off: different models perform best with a particular number of training (support) samples. We observe that some models outshine the rest when there are very few examples (“shots”) available (e.g., ProtoNet and our proposed fo-Proto-MAML) but don’t exhibit a large improvement when given more, while other models are not well-suited for tasks with very few examples but improve at a quicker rate as more are given (e.g., Finetune baseline). However, since in practice we might not know in advance the number of examples that will be available at test time, one would like to identify a model that can best leverage any number of examples, without disproportionately suffering in a particular regime.
Comparison of test performance averaged across different datasets to the number of examples available per class in test tasks (“shots”). Performance is measured in terms of class precision: the proportion of the examples of a class that are correctly labeled, averaged across classes.
3) The adaptation algorithm of a meta-learner is more heavily responsible for its performance than the fact that it is trained end-to-end (i.e. meta-trained).

We developed a new set of baselines to measure the benefit of meta-learning. Specifically, for several meta-learners, we consider a non-meta-learned counterpart that pre-trains a feature extractor and then, at evaluation time only, applies the same adaptation algorithm as the respective meta-learner on those features. When training on ImageNet only, meta-training often helps a bit or at least doesn’t hurt too much, but when training on all datasets, the results are mixed. This suggests that further work is needed to understand and improve upon meta-learning, especially across datasets.
Comparison of three different meta-learner variants to their corresponding inference-only baselines, when training on ImageNet (ILSVRC-1012) only or all datasets. Each bar represents the difference between meta-training and inference-only, so positive values indicate improved performance from meta-training.
Conclusion
Meta-Dataset introduces new challenges for few-shot classification. Our initial exploration has revealed limitations of existing methods, calling for additional research. Recent works have already reported exciting results on Meta-Dataset, for example using cleverly-designed task conditioning, more sophisticated hyperparameter tuning, a ‘meta-baseline’ that combines the benefits of pre-training and meta-learning, and finally using feature selection to specialize a universal representation for each task. We hope that Meta-Dataset will help drive research in this important sub-field of machine learning.

Acknowledgements
Meta-Dataset was developed by Eleni Triantafillou, Tyler Zhu, Vincent Dumoulin, Pascal Lamblin, Utku Evci, Kelvin Xu, Ross Goroshin, Carles Gelada, Kevin Swersky, Pierre-Antoine Manzagol and Hugo Larochelle. We would like to thank Pablo Castro for his valuable guidance on this blog post, Chelsea Finn for fruitful discussions and ensuring the correctness of fo-MAML’s implementation, as well as Zack Nado and Dan Moldovan for the initial dataset code that was adapted, Cristina Vasconcelos for spotting an issue in the ranking of models and John Bronskill for suggesting that we experiment with a larger inner-loop learning rate for MAML which indeed significantly improved our fo-MAML results.

Google Chrome will finally help you organize your tabs


Google Chrome is rolling out a new feature to help you better manage all your open tabs. The company announced today the launch of “tab groups” for the beta version of its web browser, which will allow you to organize, label, and even color-code your tabs for easy access. The feature will make its way to the stable release of Chrome starting next week.

To use the new feature, you can right-click on a tab and choose “Add tab to group.” You can then select an existing group to move the tab to or create a new one, which you’ll also name and label.

The company had been testing this solution for several months before today’s public release, as some had already spotted. Based on this early research, Google says it found that many people tended to organize their tabs by topic — like a project they’re working on or a set of shopping and review sites, for example.

Others, however, would organize tabs by urgency — labeling them things like “ASAP,” “this week,” or “later.” Google also suggests tab groups can be used to help keep you focused on task progress, by grouping them into areas like “in progress,” “need to follow up,” and “completed.”

And if you prefer a more minimalist look, tab groups also support the use of emoji in their labels,


The problem of having too many tabs open is one that’s common to anyone who spends time on the internet, whether for work, school, research, online shopping, or even just browsing for fun. Tabs start to stack up with all those things you need to come back to at some other time — unless, of course, they’re part of your permanent collection of pinned tabs that never get closed.

Despite the prevalence of the “too-many-tabs” problem, Google had yet to introduce a solution for Chrome users. That led to the creation of a cottage industry of tab management tools like OneTab, Workona, Toby, and many others.

Meanwhile, other browser makers tapped into consumer demand for better tab management solutions to make that a selling point for their own Chrome alternatives. For instance, Vivaldi offers automatic tab stacking to keep tab clutter down. And Opera earlier this year introduced a new version of its web browser that lets you organize tabs into various workspaces.

Google isn’t likely too worried about losing its majority market share to its rivals, given its near-complete dominance on the desktop. But Chrome has fallen from a 71.15% share of the desktop browser market in August 2019 to 67.15% as of April 2019, as other browsers made inroads. That could have been just enough of a push to get Google to focus on new features that will keep consumers in its ecosystem.

Tab Groups are available in Google Chrome Beta for preview as of today. The feature will also be available for Chrome on the desktop across Chrome OS, Windows, Mac and Linux when the updated version begins rolling out next week.

However, Google cautions tab groups will be slowly rolled out to ensure Chrome’s stability and performance aren’t impacted. So if you’re itching to use the new tab groups feature sooner, you may want to switch to the beta for the time being.


Read Full Article

13 May 2020

Daily Crunch: Facebook will pay $52M to content moderators


Facebook strikes a deal to compensate content moderators with PTSD, Tesla might reopen its factory next week and Twitter says some employees can work from home indefinitely.

Here’s your Daily Crunch for May 13, 2020.

1. Facebook to pay $52M to content moderators suffering from PTSD

Facebook employs thousands of content moderators to sift through the vast number of posts, images and other content posted to the site.

The Verge reported Tuesday that the settlement — to which Facebook has agreed “in principle — will cover more than 11,000 content moderators who developed depression, addictions and other mental health issues while they worked moderating content on the social media platform.

2. Alameda County may allow Tesla’s Fremont factory to reopen as soon as next week

The Alameda County Public Health Department may be close to resolving a dispute with Tesla CEO Elon Musk. The department released a statement saying, “If Tesla’s Prevention and Control Plan includes these updates, and public health indicators remain stable or improve, we have agreed that Tesla can begin to augment their Minimum Business Operations this week in preparation for possible reopening as soon as next week.”

3. Twitter says staff can continue working from home permanently

Jack Dorsey recently sent an email notifying employees that they will be able to continue working from home as long as they see fit. The CEO noted that Twitter was an early adopter of a work-from-home model, though — like much of the rest of the world — that push has been accelerated by COVID-19 stay-at-home orders.

4. Deliveroo criticized over ‘inadequate’ PPE provision and income support for riders risking coronavirus exposure

More than forty U.K. legislators from across the political spectrum have co-signed a letter urging the company to provide all riders with adequate personal protective equipment, given the risks faced to those who continue making deliveries during the COVID-19 pandemic.

5. Adding three more companies to the $100M ARR club

When Alex Wilhelm kicked off his series on private companies that have reached $100 million ARR, he says he didn’t expect it to last. But today’s entry brings the series past the 30-company mark. (Extra Crunch membership required.)

6. Slice, an online ordering and marketing platform for pizzerias, raises $43M

Slice has created a mobile app and website where diners can order a custom pizza delivery from their local, independent pizzeria. And for those pizzerias, CEO Ilir Sela said the startup helps to digitize their whole business by also creating a website, improving their SEO and even allowing them to benefit from the “economies of scale” of the larger network through bulk orders of supplies like pizza boxes.

7. Loon signs deal to expand commercial internet service to Mozambique

Loon has signed a new deal with carrier Vodacom to expand its internet-via-stratospheric-ballon offering to Mozambique. This is the second commercial agreement the Alphabet-owned company has in place in the continent. Mozambique’s close proximity to Kenya — the location of its first deal — means that Loon will be able to use balloons across both markets.

The Daily Crunch is TechCrunch’s roundup of our biggest and most important stories. If you’d like to get this delivered to your inbox every day at around 9am Pacific, you can subscribe here.


Read Full Article

Amazon Launches All-New Fire Tablets to Keep You Entertained


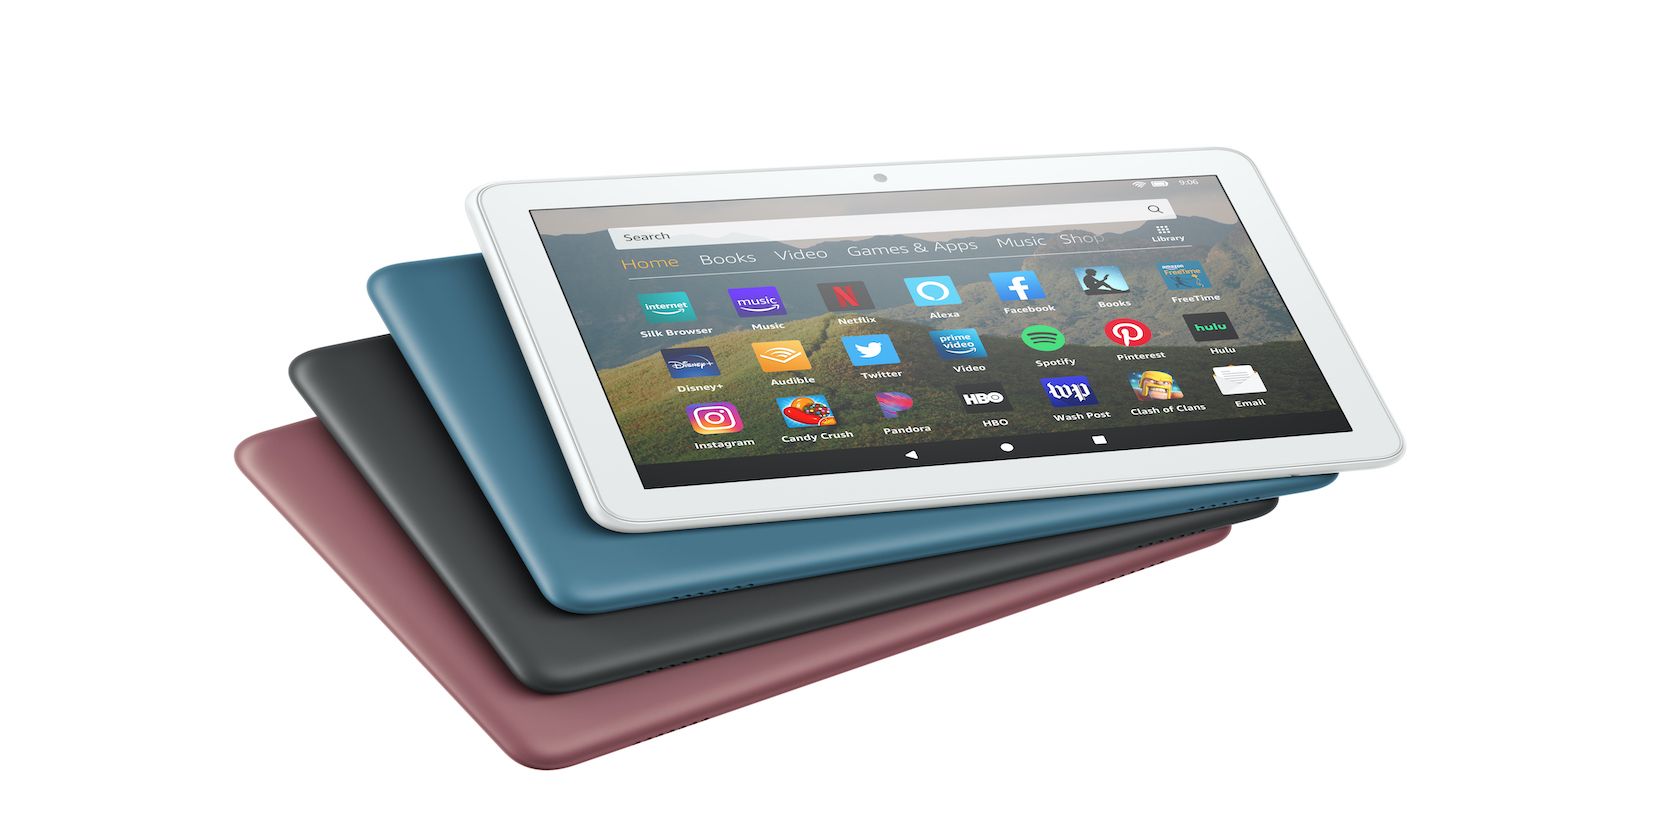
For many years, Amazon has produced some of the best low-cost, value for money Android tablets released under its Amazon Fire brand.

Today, the company announced a whole new line of Fire tablets, with a range of devices suitable for the entire family.

Here’s everything you need to know about Amazon’s new Kindle Fire tablets.

All-New Fire HD 8

All-New Fire HD 8 All-New Fire HD 8 Buy Now On Amazon $89.99

The All-New Fire HD 8 is the most affordable of the new tablets. The 8-inch 1280×800 display means you’ll get a crisp experience while watching movies and TV shows. The tablet comes equipped with 2GB of RAM and a quad-core 2GHz processor.

It is available in 32GB or 64GB variants, although this can be expanded up to 1TB via a microSD card. The All-New Fire HD 8 now uses a USB-C charging port, meaning that the tablet will fully charge in just five hours.

As with the company’s other devices, the tablet comes pre-loaded with Amazon services like Prime Video, Kindle, and Amazon Music. There’s also support for Alexa, Amazon’s voice assistant. The brand-new Game Mode allows you to enjoy a distraction-free gaming experience on the tablet, too.

All-New Fire HD 8 Plus

All-New Fire HD 8 Plus All-New Fire HD 8 Plus Buy Now On Amazon $109.99

When a smartphone launches with a Plus model, that often means the device is physically larger. That’s not the case here; the Plus refers to the additional services and component upgrades found on the All-New Fire HD 8 Plus.

The tablet comes with 3GB of RAM, a 2GHz quad-core processor, and support for wireless charging. There’s also a specialized 9W charger included, which can fully charge your Fire HD 8 Plus in just four hours.

All-New Fire HD 8 Kids Edition

All-New Fire HD 8 Kids Edition All-New Fire HD 8 Kids Edition Buy Now On Amazon $139.99

The Fire HD tablets are firm favorites for families. The low-cost devices are easy to use and, as they are geared towards Amazon’s entertainment services, generally family-friendly, too. However, the All-New Fire HD 8 Kids Edition is specifically tailored to younger children.

The tablet comes in a colorful bumper, which protects it against unexpected drops and knocks. The software is adapted, too, using Amazon’s Fire for Kids interface. This keeps all media, including ebooks, videos, and audio, age-appropriate. There are improved parental controls available as well.

The Best Affordable Android Tablets

The newly-launched Fire HD 8 tablets can be pre-ordered on Amazon now, and the company expects shipments to start on June 3rd, 2020. Despite coming loaded with Amazon’s services, they are still a great deal even if you don’t use that ecosystem.

That said, if you think these entertainment devices don’t quite suit your needs, consider one of the best tablets for reading digital books instead.

Read the full article: Amazon Launches All-New Fire Tablets to Keep You Entertained


Read Full Article

The Best Projector Screens for Your Home Theater


projector-home-theater

If you have a home theater system with a projector, then it is wise to invest in a good-quality screen. Given that projector screens can come in all manner of shapes, sizes, and materials, there’s a lot to consider when deciding on the best projector screen for you.

We’ve rounded up five of the best, each with different benefits. That way, you can decide on the ideal projector screen for your home theater system. Here’s what we found.

Best 4K HD Projector Screen:
Silver Ticket Projector Screen

Silver Ticket Projector Screen Silver Ticket Projector Screen Buy Now On Amazon $239.98

Many projectors now come with 4K support, so it makes sense to buy a screen to match. In this respect, the Silver Ticket Projector Screen is an excellent choice. You can customize the screen with a selection of projection materials. These vary in color, mainly, although you can alter the material, too.

For example, placing your projector screen over wall speakers will require a woven acoustic material. This won’t absorb any of the sounds, so the audio will still be clear. Black velvet surrounds the screen and is incorporated into the frame. This is great as it will absorb any light overthrow from the projector itself.

This is a 120-inch true widescreen projector screen, with an aspect ratio of 16:9. Be sure that your projector can throw out a 16:9 image before you take the plunge. It is also worth noting that you are required to build this screen yourself, although users have confirmed it is a reasonably straightforward process.

Best Manual Pull-Down Projector Screen:
Elite Screens Manual B

Elite Screens Manual B Elite Screens Manual B Buy Now On Amazon $69.00

Elite Screens are among the most well-known projector screen manufacturers. For that reason, the Elite Screens Manual B projector screen is an excellent option. The low price-point and high-quality build help, too. You can select from a range of screen materials, and when you have finished watching, you can store this one away easily until next time.

The unit boasts a 100-inch screen with a 4:3 aspect ratio, making it ideal for tight spaces. The real clincher is its storable construction, though. That makes it an unobtrusive screen as a simple pull on the lanyard at the bottom will retract the screen back into its housing. There’s no assembly needed either, as the screen comes already wound into its housing.

The only thing you’ll need to do is measure up the brackets and fit the unit onto the wall. The screen itself is compatible with 4K, 8K, and Active 3D images. You also have a 180-degree viewing angle, so nobody misses out, wherever they are in the room.

Best Motorized Projector Screen:
Elite Screens Spectrum

Elite Screens Spectrum Elite Screens Spectrum Buy Now On Amazon $199.00

If manual screens aren’t your style, then you should consider a motorized option. With this in mind, the Elite Screens Spectrum could be the right choice for you. The Spectrum is a 100-inch screen, so it is great for smaller or mid-size rooms.

The Spectrum comes pre-fabricated, so no construction is required past mounting the screen to the wall. There are several screen materials to choose from, each with different properties. All of them are active 3D, 4K and 8K Ultra HD, and HDR ready.

With the exception of the woven acoustic screen, each option is a front projection screen with a black backing. This means your image won’t be dulled by any light coming in through the back of the screen.

Best Outdoor Projector Screen:
JWSIT Projector Screen

JWSIT Projector Screen JWSIT Projector Screen Buy Now On Amazon $185.99

If you want to enjoy your movies outdoors, then you’ll need a dedicated outdoor projector screen. The JWSIT Projector Screen comes with a stand, so you can use it both indoors and outdoors and quickly put it away when you’re finished.

The JWSIT model is 4K and 8K compatible, too. The 120-inch screen is ideal for BBQs and even for camping, so long as you have a portable projector. The screen has three layers for improved image quality and light absorbance.

The rear layer is black, preventing light from coming through to the front and disrupting your viewing. The middle is polyester to prevent creasing, while the front layer is PVC for a smooth face.

Best Budget Projector Screen:
Vankyo Projector Screen

Vankyo Projector Screen Vankyo Projector Screen Buy Now On Amazon

Vankyo manufactures affordable projectors, so it would make sense that they would put this experience to good use and offer screens to match. The Vankyo Projector Screen is an excellent purchase as the 100-inch screen is suitable for both indoor or outdoor use.

That said, you might need to use some elasticated rope with hooks in an outdoor setting, or a frame. The screen is manufactured from polyester, so it is crease-resistant. It does require some construction, but at such a low price, you can’t really complain about that.

This screen is good for anything up to and including 4K images, so you can watch the latest movies or play the latest games without loss of definition. As a result, the Vankyo unit is of the best affordable projector screens available today.

The Best Projector Screen for You

There really are a lot of options available for you where projector screens are concerned. Keep in mind that you will need the correct screen to do your home theater setup justice. Importantly, be selective with the material, constructed size, and the screen’s aspect ratio.

Once you’ve chosen your favored screen, it’s time to get watching. However, if you want a more mobile setup, consider investing in one of the best portable projectors.

Read the full article: The Best Projector Screens for Your Home Theater


Read Full Article