09 April 2020

The New Firefox Address Bar Enables Faster Searching


Mozilla has updated Firefox, and besides the usual security fixes, the headline feature is a revamped address bar. In a nutshell, the new Firefox address bar is designed to make it faster and easier to find what you’re looking for when you search the web.

How to Use the New Firefox Address Bar

As detailed in a post on The Mozilla Blog, Firefox 75 introduces three major changes to the address bar. The new Firefox address bar will have a new look and feel, be capable of delivering smarter searches, and put your favorite websites at your fingertips.

First, Mozilla has updated the Firefox address bar to give it a new look and feel. This means that when you start to search for something, the address bar will get larger. It also boasts a larger font, shorter URLS, and shortcuts to the most popular sites to search.

Next are the aforementioned smarter searches. These are suggestions for ways you can further refine your search. As you type, Firefox will bold additional keywords you may not have thought of, but which, once added, will narrow your search down.

Lastly, the new Firefox address bar gives you easy access to your favorite websites. Click on the address bar, and links to these sites will appear. And if you already have one open in a tab, clicking the name will jump to that tab, saving you yet another hassle.

Other Ways to Refine Your Web Searches

With the web full of sites on every topic you can think of, no matter how niche, being able to find what you’re looking for quickly and easily is an absolute must. And the new Firefox address bar is certainly a step in the right direction.

There are other ways to narrow your searches down though, whether you’re using Firefox or any other web browser. Our Google Search cheat sheet contains all of the operators you need to know to refine your search and make the results more accurate.

Read the full article: The New Firefox Address Bar Enables Faster Searching


Read Full Article

Ubuntu Remote Desktop: Easy, Built-In, VNC Compatible


If you’re working from home, or are too far from your Ubuntu PC, setting up a remote connection seems smart.

Ubuntu features a built-in remote desktop tool. This gives you total control over your desktop from any other computer or mobile device. You’ll see what’s on that screen and be able to move the mouse, and even type!

The remote desktop feature supports RDP and VNC and is built into Ubuntu by default. Here’s how to use remote desktop software with Ubuntu.

3 Ways to Remote Control Ubuntu

Generally speaking, you have three options to remote control an Ubuntu PC:

  1. SSH: Secure Shell
  2. VNC: Virtual Network Computing
  3. RDP: Remote Desktop Protocol

While many Linux users see SSH as their remote connection tool of choice, it lacks a graphical user interface (GUI).

Usually, these three options are separate. However, thanks to Ubuntu’s built-in remote desktop tool, you can use SSH, VNC and RDP in the same app. Linux, Mac, and Windows PCs can use remote desktop tools to control Ubuntu, as can Android and iOS.

Enabling Ubuntu Remote Desktop

Enabling the Ubuntu Remote Desktop could not be easier. You don’t need to install a thing: Ubuntu has built in VNC support. However, you will need to move to the Ubuntu PC to set it up the first time.

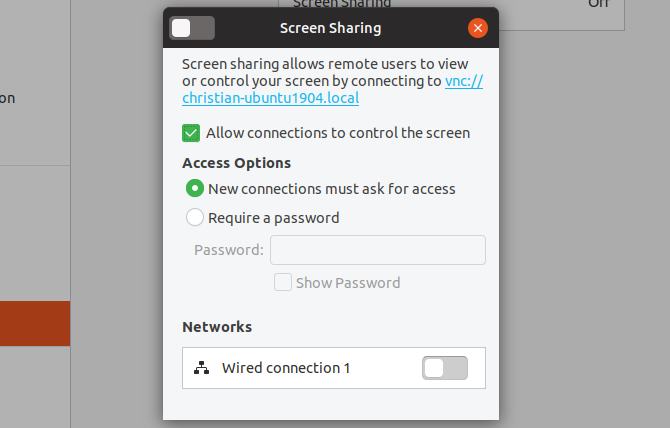
Click Search and enter desktop sharing, then click Sharing. You’ll be presented with a simple window of options. Along the top edge of the window, click the switch to enable the feature. Next, click the Screen Sharing button and again, find the switch on the window and click it to enable.

Enable Ubuntu remote desktop

Ensure that Allow connections to control the screen is enabled. For security purposes, you should also set a password here.

As soon as you enable remote connection, the local name of your Ubuntu device will be displayed. This is a VNC address—keep a note of it for remote access later.

Remote Control Ubuntu With VNC

Controlling an Ubuntu PC over VNC is straightforward from another device. Just be sure you have a VNC client or viewer app installed. Here’s how to use VNC from another desktop computer.

Remote Desktop Ubuntu From Another Linux Device

Ubuntu (and many other Linux distributions) comes with a preinstalled remote desktop viewer. This means that once your Ubuntu PC is configured for remote connection, you can connect to it from whatever Linux distro you’re using.

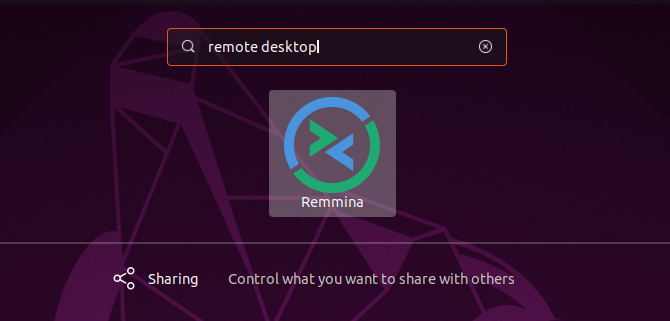
  • Click Search and enter remote.
  • Select the first result, Remmina.

Search for Remmina remote desktop software on Ubuntu

  • Select VNC in the drop-down menu on the left.
  • Enter the VNC address (or IP address) you noted earlier for the Ubuntu PC.
  • Tap Enter to commence the connection.
  • When prompted, input the password.

As you add devices, they’ll be saved in the list so you can quickly access them in future.

Use this tool to connect to other Ubuntu desktops on your network, and you’ll be controlling that computer remotely. The tool can also be used to control any computer with a VNC client installed.

Remotely Connect to Ubuntu From Windows

Want to control your Ubuntu computer from a Windows computer? Using the same VNC address (or your Ubuntu computer’s IP address) you can.

First, however, you’ll need a VNC client, such as VNC Viewer (from VNC Connect) installed on your Windows computer. Then you can connect to your Ubuntu machine by entering the VNC or IP address.

Check our guide about establishing a remote desktop connection to Ubuntu from Windows for full details.

Establish an Ubuntu Remote Desktop From a Mac

Mac users wanting to connect to their Ubuntu machines should use the built-in VNC Viewer tool.

Again, connecting to your Ubuntu machine is a simple matter of entering your IP address or the provided VNC address., Want for some in-depth information about using VNC on a Mac?

Check our tutorial to easy remote desktop support on the Mac.

What About RDP on Ubuntu?

It’s also possible to connect to an Ubuntu PC over RDP.

Remote Desktop Protocol is a proprietary system developed by Microsoft. It has proven so successful that RDP server and client apps are available on most software platforms.

RDP’s authentication system relies on your computer username and password and is quick and easy to set up.

Configure Ubuntu RDP

Before connecting to Ubuntu over RDP, you’ll need to know the remote computer’s IP address. The easiest way is to open a terminal and enter

ifconfig

Be sure to note the inet addr value that corresponds with the connection type. For example, if the Ubuntu computer is on Ethernet, use this IP address.

Next, you’ll need to install xrdp. This is an RDP server for Ubuntu (and other Linux devices) and is required before remote connection.

Install with

sudo apt install xrdp

Once installed, launch the server with

sudo systemctl enable xrdp

With xrdp running, you’re ready to use RDP.

Set Up a Remote Desktop RDP Connection With Ubuntu

As noted, RDP clients are available for most platforms. For example, you can use Remmina’s RDP function if you’re using a Linux computer to remotely control Ubuntu. Similarly, RDP is built into Windows.

If you’re using a standard desktop, use these steps to use RDP to connect to Ubuntu.

  • Ubuntu/Linux: Launch Remmina and select RDP in the drop-down box. Enter the remote PC’s IP address and tap Enter.
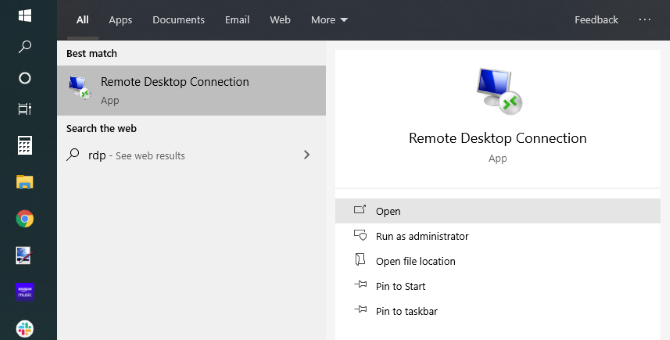
  • Windows: Click Start and type rdp. Look for the Remote Desktop Connection app and click Open. Input the IP address of your Ubuntu computer and click Connect.

Set up a Windows Remote Desktop connection with Ubuntu

  • Mac: Start by installing the Microsoft Remote Desktop 10 software from the App Store. Launch the software, click Add Desktop, add the IP address under PC Name, then Save. Simply double-click the icon for the connection in the app window to start a remote desktop session.

Our guide to using RDP on a Mac will help here. It’s aimed at remote controlling a Windows PC, but the setup is the same for Linux.

Note that RDP will prompt for your Ubuntu PC account credentials when the connection is first established.

Use Chrome Remote Desktop With Ubuntu

If you can’t establish remote desktop access with Ubuntu, there is an almost-universal alternative you can try: Chrome Remote Desktop.

This is a cross-platform downloadable tool for Linux, Windows, macOS, and Chrome OS that lets you remotely access your PC. You can also use the Android or iOS mobile app for remote access.

With Chrome Remote Desktop, remote access is managed via your Google account. All you need is an access code for the remote PC. Once a remote desktop session with Ubuntu is initiated, you can control your computer as with any other remote tool.

For more information, see our guide to Chrome Remote Desktop.

Can You Remote Control Ubuntu Away From Home?

Want to connect to your Ubuntu machine while traveling? This is a little trickier, but not totally impossible. You’re going to need a static IP, or a dynamic address from a service such as DynDNS.

This basically forwards a web address to a device running DynDNS on your network. Read our tutorial for using DynDNS to connect to your computer from anywhere for details and examples.

Make a Remote Desktop Connection With Ubuntu

Whatever your remote desktop requirements don’t feel limited by Ubuntu. It has built-in tools to ensure that you can SSH, VNC, and RDP to your Ubuntu PC.

And if the native remote-control app is too complicated, you can use the simpler option of Chrome Remote Desktop.

Have different remote requirements? Here’s how to remote control Ubuntu from Windows. Use a Mac? Learn how to use Apple remote desktop.

Read the full article: Ubuntu Remote Desktop: Easy, Built-In, VNC Compatible


Read Full Article

What Is Thermal Design Power? Explained


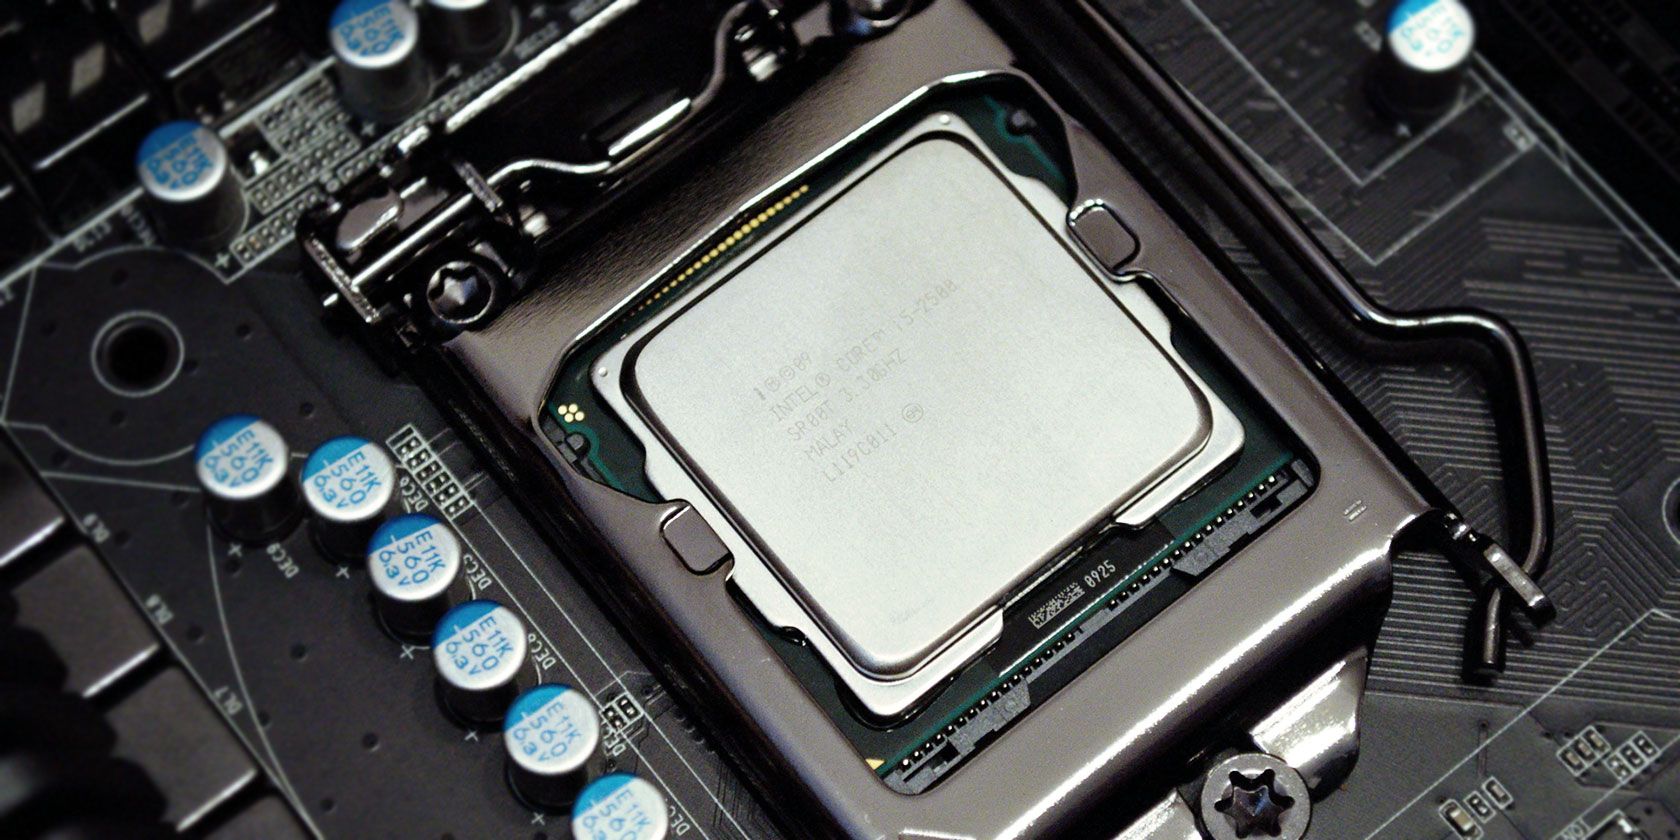
cpu-cache

Acronyms are not uncommon in the world of computer hardware. CPU, GPU, RAID, SSD… the list goes on.

Many of these acronyms have entered the common geek vocabulary. Most people know what a CPU is (at least they think they know), but others are more obscure. One example is TDP, which stands for Thermal Design Power.

This specification is rarely made available in marketing material, but it’s important for developing a full understanding of a processor’s potential.

What Does TDP Mean?

Thermal Design Power, or TDP, refers to the maximum amount of heat a CPU or GPU is expected to generate under general usage. TDP values are expressed in watts and are often used as a guide for how much power the hardware requires to function, as well as the level of cooling required to stop the hardware overheating.

For example, a part with a 12W TDP will potentially be cooled by a very small fan or a passive heatsink. A part with a 95W TDP, on the other hand, is going to need a substantial dedicated heatsink with a reasonably large fan (probably 80mm).

You’re most likely to see these three little letters attached to a CPU or GPU’s spec sheet, but it can be used to express the maximum power draw of a wide variety of electronics.

Is TDP Accurate?

Since this metric is based on power, it’s a useful way to understand how much power a component will draw relative to the competition. A lower thermal design power generally results in lower power consumption, which means greater battery life. However, TDP doesn’t always express the exact maximum. Rather, TDP is a nominal value to use as a guide.

Furthermore, TDP is a self-reported metric. What that means, in terms of TDP, is that each manufacturer announces TDP ratings for their hardware through internal research. Such a system can result in exaggerations, but for the most part, manufacturers report TDP with accuracy. There is a good reason for this.

If CPU and GPU manufacturers didn’t report TDP accurately, it would cause all kinds of hardware problems for consumers. In turn, the manufacturer’s reputation would suffer, and its hardware would quickly gain a negative reputation.

Intel vs. AMD TDP Ratings

Although the onus is on manufacturers to report hardware TDP ratings accurately, there are differences in the approach to reporting.

On the side of an Intel CPU box, you’ll find the three important bits of information: the advertised TDP value, the base clock speed, and the turbo clock speed. For example, in my PC is a now slightly aging Intel Core i5-3570K. The CPU has a base clock speed of 3.40GHz, a turbo clock speed of 3.80GHz, and a TDP rating of 77W.

However, Intel only guarantees the TDP rating of 77W up to the maximum base clock speed of 3.40GHz. Once it exceeds that and enters the turbo range, the TDP value also rises. But there is no information on the Thermal Design Power requirements for that extra processing power.

The difference in clock speed isn’t huge. But it is enough that should your computer run at that capacity for a prolonged time, your cooling will also begin to suffer. If you knew your system required better cooling, you would purchase that at the outset instead of a suboptimal alternative.

Conversely, many hardware enthusiasts believe AMD accurately rate their CPUs and GPUs, including the boost frequency settings. Hence why Intel CPUs carry a reputation for being hot and prone to overheating, while you can quite happily use the stock AMD cooler to keep your system working (in most cases).

PC cooling is important, especially for high-end builds. Check out the best PC cooling systems to keep your hardware working perfectly.

Examples of TDP Ratings for CPUs and GPUs

CPUs, GPUs, and other hardware types can have vastly different TDPs. One of the most common examples is the difference between a smartphone processor and a computer processor.

Take the Qualcomm Snapdragon 865, one of the most recent ARM-developed smartphone systems on a chip. The Snapdragon 865 has a TDP of 5 watts, yet it is a 64-bit 2.84GHz octa-core processor. Compare that to the top-tier Intel Core i9 9900K, which is a 3.60GHz octa-core processor with a TDP of 95 watts.

That’s a massive difference and representative of the difference in each part’s power consumption and performance.

Modern GPUs have even higher TDPs, with some parts quoting a TDP of over 250 watts. The rating doesn’t mean that the part will be consuming that much power all of the time, but it does mean that engineers designing the part consider it possible that this level of power draw will need to be dissipated for a sustained period of time.

For example, the Nvidia GeForce RTX 2080 Super carries a TDP rating of 250W but has been seen with peak consumption readings of over 265W.

How TDP Knowledge Will Benefit You

Now you know the meaning of TDP, and how CPU and GPU manufacturers use TDP, you’ll see how understanding TDP is useful. While TDP is commonly quoted, it’s not a precise gauge of power consumption or performance, but rather an engineering guideline.

Looking at the TDP of a piece of hardware can tell you about what to expect in terms of performance. Take two of the most popular desktop CPUs at the current time, the Intel Core i7-9700K and the AMD Ryzen 7 2700X. These two CPUs hit the market within six months of each other and boast similar specs. Take a look at the following PassMark comparison:

passmark cpu comparisons intel vs amd

At a glance, you can see that the AMD Ryzen 7 2700X has a faster clock speed (3.7GHz to 3.6GHz) and a higher maximum TDP (105W to 95W), and a much lower turbo clock speed. Does that translate to a better CPU? The PassMark benchmark certainly indicates that, with the AMD Ryzen 7 2700X receiving a 17,772 rating to the Intel Core i7-9700K’s 14905.

You can use the TDP ratings to assess mobile processors, too. Check out this list of 7th generation Intel Core i7 mobile processors:

Intel 7th generation mobile processor list i7

You can see there are several TDP ratings across the ten different processors. From here, you can cross-check the TDP rating with the processor clock speed to figure out how much power the processor uses in comparison to its processing capabilities and how that will, in turn, affect the battery life of the mobile device.

So, an Intel i7-7920HQ with a 3.1GHz processor and a TDP of 45W will provide more processing power than an Intel i7-7567U—but also use much more battery while doing so. Of course, manufacturer battery life is another kettle of fish. Still, you can at least begin to plan how long a battery might last if you understand the relationship between TDP and processor performance.

Also, if you want the upper hand when buying a new laptop, check out our short guide to Intel laptop model numbers and letters. Once you know what the numbers and letters mean, as well as the meaning of TDP, you’ll always buy the best laptop processor possible.

TDP Means Power and Cooling

TDP is one of several important statistics that can help you hash out the performance and power efficiency of a new processor. While nothing can replace benchmarking, knowing a part’s TDP (as well as its architecture and clock speed) will help you make an educated guess about how a new part will perform.

If you do want to know how your laptop battery is performing, check out the best ways to analyze your laptop battery health.

Read the full article: What Is Thermal Design Power? Explained


Read Full Article

Why Every OneNote User Needs to Start Using Tags Right Now


onenote-features

Microsoft OneNote tags add a visual marker to your notes for identifying the type of information, its relation to any project, and whether it represents an action item you should complete.

Some of the notes you take are easy to organize because of the OneNote structure. Other aspects, like your comments on a topic and ideas generated during brainstorming, are less structured and can be improved with the right tag.

We’ll show you how to use OneNote tags and why you should use them to keep track of anything you want to remember.

Using Tags in OneNote

By default, OneNote includes a library of preset tags. These tags let you label notes according to the type of information or the action you want to take on an item.

Each tag contains a symbol and a text label. You can apply tags to an entire page, individual paragraphs, or multimedia content; the choice is yours.

OneNote’s tagging feature not only helps you identify items that need special attention, but it can then compile all the tagged notes in a single pane for easy access, lookup, and printout.

Here are some reasons for using tags:

  • Keep track of notes, wherever they’re in your notebook and make them accessible.
  • Highlight important points, add a to-do tag to pinpoint things like homework that you should finish, or mark unclear parts with a question tag.
  • OneNote allows you to collaborate on the same notebook with several members. You can assign and manage the work of your project team easily with tags.
  • Use to-do tags together with any template (kanban, calendar, and more) to track your projects and manage them seamlessly.

How to Use Built-in Tags in OneNote

OneNote 2016 provides different types of tags. Those that are commonly used get assigned with a keyboard shortcut. For example, To Do, Important, Question, Remember for Later, and more are tags that you might often use.

There are tags to help you identify categories of information useful to your writing, research project, or for inspiration. You’ll also find tags related to project communication, priority, and delivery.

Assign a Tag

To add a tag, click or select the text you want to tag. Click the Home tab.

From the Tags group, click the More arrow in the lower-right corner of the Tags gallery. Then, click the tag you want to assign.

You can even use a shortcut to create a tag. For example, press Ctrl + 1 to make a to-do tag, Ctrl + 2 for a star, and so on.

assign a tag to an item from tags gallery

Modify a Tag

If the built-in tag doesn’t suit your needs, you can make some modifications to change its name, icon, font, or highlight color.

To modify an existing tag, click the Home tab. In the Tags group, click the More arrow, and from the bottom of the gallery list, click Customize Tags.

click customize tags to modify a tag in OneNote 2016

From the dialog box that opens, select a tag that you want to change and click the Modify Tag button.

Type in your display name, choose a symbol, font or highlight color, and click OK.

Remember that any customizations you make to a particular tag do not affect the notes you have already tagged.

modify a tag with your choosen preference

OneNote for Windows 10

The OneNote app has fewer built-in tags. Although you won’t see any visual confirmation of shortcuts, the procedure for adding it remains the same. As of now, there is no facility to modify a tag.

using tags in OneNote for Windows 10

How to Create and Use Custom Tags in OneNote

Again, the tags you want to create depend a lot on your work, needs, and domain. While you can create many custom tags, we recommend you to limit them as much as possible.

Remember: Tags should be specific, widely used across all your domain, and of high value.

To create a tag, we’ll repeat the same procedure used previously.

From the dialog box that appears, click the New Tag button. Type in the tag name.

Then, click the Symbol button and select a symbol from the gallery. Also, choose a font or highlight color, and click OK.

create a custom tag in OneNote 2016

In the OneNote app, click the Tags dropdown in the Home tab, and choose + Create New Tag. A new panel appears from the right.

Type in the name, select an icon and click Create. Any tags you create will sync with the OneNote app for all your devices.

create a custom tag in OneNote for Windows 10

Search Your Content With Tags

When you add a tag to any item, it gives OneNote information to index them and help you find the notes. Press Ctrl + F to bring up the search box. Type in your tag name to find the content by note tags. Click on one of the results to go to its specific location.

By default, the search scope is limited to the Current Page. To adjust the range, click the dropdown menu to include Current Section/Notebook or All Notebooks.

search your tagged notes in OneNote app

In OneNote 2016, you can easily find the tagged notes using the Tag Summary pane. It organizes your tags according to the groups.

You can choose to group them by name, section it appears in, the text of the notes (in ascending alphabetical order), and more.

To open it, navigate to the Tags group of the Home tab and click the Find Tags button. From the pane, click the Group tags by dropdown arrow and select a filter.

If you’re unable to find a note, you can increase the scope of your search. Click the Search box arrow, and choose a specific section or notebook.

find tagged notes in OneNote 2016

Create a Tag Summary Page

OneNote 2016 lets you create a page that summarizes your tagged notes. It’s a list of your tags across pages and sections in your notebook.

To create a summary page, repeat the procedure as described above, and click Create Summary Page. OneNote will then insert a new page in the section.

Since many tag summary pages will get created, make sure to delete any existing summary page. Also, change the page’s title to indicate that it is a summary.

Do remember that tagged notes on the summary page are the copies of original notes, but they don’t link to the originals.

create a tag summary page in OneNote 2016

Use OneNote as Your To-Do List

Tagging in OneNote is beneficial for avid note-takers. If you don’t use tags, start using them today, no matter which profession you belong to and what kind of notes you take regularly.

A well-tagged to-do list can be a great way of ensuring you’re making progress in day-to-day tasks. However, the right tags can help you set up and manage your to-dos and tasks with OneNote.

Read the full article: Why Every OneNote User Needs to Start Using Tags Right Now


Read Full Article

The Ultimate Sandwich Cost Calculator: How Much Does a Sandwich Cost?


How much does a sandwich cost?

It’s a simple question, but one that’s more important than it sounds. By figuring out your average sandwich price, you can take a closer look at your spending habits and dietary choices.

Using a Sandwich Cost Calculator

sandwich calculator

While it might seem simple to just total up ingredient costs, there aren’t a lot of resources online. Often, you’ll just run into calculators geared towards restaurants buying food in bulk.

So the challenge of figuring out your sandwich cost comes from attempting to quantify your toppings.

What if you could skip those hypotheticals though?

Cockeyed.com decided to share their sandwich price calculator with the world after their own specialized research. It even provides a surprising amount of options that range from cheap to pricier.

Plus, their sandwich cost calculator doesn’t take long to try out. Simply check the boxes and make your selections from the pull-down menu. After you click the calculate price button, you’ll see a graphic breaking down the cost of each sandwich ingredient.

After the image, you’ll see the total cost of your sandwich once all the ingredients factor in. It’s a great little reminder that cheap food can be great and save you money.

Using a Sandwich Calorie Calculator

sandwich calorie calculator

Once you’ve finished figuring out how much does it cost to make a sub sandwich, why not look at the calories? My Food Buddy offers a deli sandwich calorie calculator.

By using this calculator in tandem with the sandwich cost calculator, you get a calorie break down of your ingredients on a sub roll, hard roll, sliced bread, and thick-sliced bread.

If you’re trying to stay to any weight goals, the cheapest sandwich might not necessarily be the healthiest sandwich.

How Much Is a Sandwich?

Figuring out your average sandwich’s cost with a calculator provides a great first step towards being more informed. Whether you’re trying to be more frugal or healthy with your diet, don’t be discouraged.

If you’re a beginner, try using these food apps and sites to cook delicious and healthy meals.

Read the full article: The Ultimate Sandwich Cost Calculator: How Much Does a Sandwich Cost?


Read Full Article

The Top 10 Sites for Video Game Deals and Bargains


Although video games provide some of the best value-per-dollar for entertainment, gaming can be an expensive hobby. Those purchases add up, and it’s easy to spend upwards of $1,000 in a year.

Fortunately, if your budget is tight, you have ways to cut back. First and foremost, stop pre-ordering games. You could even take it one step further and avoid buying new games altogether.

However, the best idea of all is to wait for deals! You’ll need some patience, and you won’t always get to play the games you want right away, but video game deals can save you lots of money.

With that in mind, here are the best sites to buy video games.

1. Is There Any Deal

Is There Any Deal

Is There Any Deal is a deal comparison site for video games. It not only aggregates pretty much every video game deal currently available, but lists them all side-by-side and ranks them by how much you can save. Just search for the game you want, then view all of the deals on its page.

Other nifty features include:

  • Wait for a better price: Set a price point and get alerted when the price drops below it.
  • Price history: See if the game’s current price really is a deal or not.
  • Trends: See how quickly the game has sold.

If price is your only criterion, then this site is what you need. But Is There Any Deal also lists stores selling the game without deals. This allows you to use the site as a “where can I buy this game?” tool, regardless of deals.

2. CheapShark

CheapShark

CheapShark only aggregates video game prices from a dozen or so online retailers, but lets you search for any game and gives you a quick comparison of what it costs at each one.

Two features you’ll find useful: “Cheapest ever” shows a game’s lowest price ever and when that price occurred. “Price notifications” lets you set a price point and receive an alert when the game drops below it at any of the tracked retailers.

CheapShark’s deals listing page has an interesting sorting measure called “Deal Rating.” It considers various factors (e.g. absolute price, percent off, Metascore, release date) to determine how good the deal is. Very nifty at a glance!

3. Humble Bundle

Humble Bundle

The Humble Bundle started in 2010 as a discounted collection of video games with some proceeds donated to charity. Its first few bundles consisted of mainly indie games, but it has since evolved to include AAA titles and other more desirable games.

Humble Bundles are known for the “pay what you want” approach, which means you can grab lots of games for very cheap. However, in every Bundle, some of the most desirable titles are only available if you spend a minimum amount.

You can also browse the Humble Store for regular sales. Either way, these two options comprise some of the best ways to save money when gaming.

4. Fanatical

Fanatical

Fanatical is an online games store that always has deep discounts on the latest and greatest games. It not only sells PC games for Steam, but also Switch and 3DS games—which is rather unique, since Nintendo games are rarely discounted.

While the prices on Fanatical are usually great anyway, the site often holds sales or flash deals where you can get even cheaper prices than usual. You should also check out its bundles, where similar games are packaged together for a discount rate.

5. Slickdeals

Slickdeals

Slickdeals is one of the best sites for daily deals, period. Users post deals whenever they spot them around the web, receive them in emails, etc. And since deals are available across many other departments (e.g. home, tech, travel), Slickdeals is a great choice if you want an all-in-one deals site.

After using Slickdeals for a while, you’ll see why it’s one of the best bargain sites cheaper than eBay. Lots of people use it, which means any deal is likely to pop up there.

6. Daily Game Deals

Daily Game Deals

Daily Game Deals may not have the easy browsability other deal sites, but it functions perfectly as a “check once per day” kind of site. It’s a blog that publishes once per day, with each post covering a massive roundup of new gaming-related deals around the web.

Most of the deals come from the same retailers, including Amazon, Newegg, Gamefly, Gamestop, Walmart, etc. For truly effortless notifications, just sign up for the daily newsletter and get the deals sent straight to your inbox.

7. Reddit’s /r/GameDeals and /r/ConsoleDeals

Reddit game deals

These two communities on Reddit are fantastic for catching deals fast and early. While /r/GameDeals is technically for all game deals, it does have a heavy slant towards PC gamers. That’s why /r/ConsoleDeals was born.

While PC games are usually cheaper than console games, the beauty is that you can play whichever you want and still benefit from the deals subreddit that applies to you. These deals aggregators are two of the best you’ll find.

And while you’re on Reddit, you may as well check out /r/patientgamers. It’s a community of gamers who wait at least six months after a game is released before buying it, which often results in super savings thanks to things like Black Friday sales.

8. Cheap Ass Gamer

Cheap Ass Gamer

Cheap Ass Gamer is run by a small team who constantly post the latest game deals they find on the internet. The site covers all platforms and you can filter to specific ones you want to see.

It also has a handy price tracker, so you can see the historical price of a game and know whether the current deal really is that great. If you don’t want to check the site, you can also subscribe to its Twitter feed instead.

9. Gocdkeys

Gocdkeys

Gocdkeys compares the cost of keys for games on PC, PS4, and Xbox One. It not only scans the usual retailers like Amazon and GoG, but also lots of lesser-known sites too—across many regions too.

The site also displays reviews for all of its retailers, so you can compare price and trustworthiness side by side. As such, you can be confident knowing that you’re getting a great deal on the game you want to buy.

Be careful to only buy from legit and safe key sites. To help you stay safe, here’s what to know before buying discounted game keys.

10. DLCompare

DLCompare

You might be willing to play a game on multiple platforms, especially if you own a gaming PC and a console. If so, DLCompare is the site for you, because it compares a game’s price across all the platforms.

This means that you can easily see whether it would be cheaper to buy the game on PS4 rather than Xbox One, for example. Of course, you can also filter if needs be, either by platform, store, or type of game (like “standard edition” or “season pass”).

How to Decide What Game to Buy

These sites are sure to net you a great bargain on the next game that you want to play. Many of them let you sign up for email alerts and newsletters, so be sure to do that so you don’t miss out on a bargain.

If you can’t decide what titles you want to play, check out our advice listing ways to decide what game to buy next.

Image Credit: SergPoznanskiy/Depositphotos

Read the full article: The Top 10 Sites for Video Game Deals and Bargains


Read Full Article

Retroflag GPi is the Ultimate Portable Retro Gaming Console


retroflag gpi case featured
Our verdict of the Retroflag GPi Case:
This straightforward retro-style portable gaming case for the Raspberry Pi is easy to assemble, with a collection of retro gaming platforms and extra buttons on the back, useful power switching avoids unplanned shutdowns. It's the best Gameboy-like Raspberry Pi gaming project around.
910

With the explosion of retro gaming, many gamers looking for a shot of nostalgia have turned to the Raspberry Pi. Compatible with most emulation systems, it is as ideal for playing Nintendo 64 games as it is with Atari 2600 titles.

But it lacks portability, which is where the Raspberry Pi Zero comes in. Half the size of the standard Raspberry Pi boards, the Zero is the hub of many portable retro kits, mostly based on the Nintendo Gameboy.

We’re looking at one such kit, the Retroflag GPi Case from AKNES. How does it improve over similar kits and 3D printed DIY builds?

What You Get in the Retroflag GPi Case

Cracking open the box, you’ll find a GPi Case, the Gameboy-like handheld console with a built-in display.

There’s also a tote bag, heatsink, USB power cable, a screwdriver with reversible heads, and two sets of four screws. A larger case is also included for carrying the GPi Case and any additional bits and pieces. Oh, and there’s a free GPi Case-keyring, and detailed instructions.

Note that this kit ships without a Raspberry Pi Zero. You’ll need to provide your own.

Raspberry Pi Zero and Zero W Case, Retroflag GPi CASE with Retro Handheld Game Console and Safe Shutdown - with Carring Bag, a Keychain Piece, Heatsink Raspberry Pi Zero and Zero W Case, Retroflag GPi CASE with Retro Handheld Game Console and Safe Shutdown - with Carring Bag, a Keychain Piece, Heatsink Buy Now On Amazon $69.99

The GPi Case itself features a D-pad, ABXY buttons, and Select and Start. Two additional buttons have been added to the back of the case. A headphone port is found at the bottom of the console, while an Off/On switch is at the top. A volume wheel is on the right side; the power jack plugs in on the left, alongside the brightness wheel.

GPi Case cartridge port

Around the back, the GPi Case has a battery hatch, supporting 3xAA batteries. Hidden in here is a Safe Shutdown switch; above this, a micro-USB port for firmware upgrades.

Finally, you’ll find a removable “cartridge” on the back of the GPi Case. Not quite as big as a Gameboy cartridge, this device holds your Pi Zero. An operating system can be installed on a microSD card. A small door covers the card slot on your Raspberry Pi Zero, devised to prevent the card getting lost.

While powered by a Raspberry Pi Zero, the GPi Case has its own hardware inside. Weighing 183g and measuring 135x81x32mm, the GPi Case also includes a 2.8-inch color IPS display.

Assembly is solderless, and supposedly simple—all you need to do is insert a Raspberry Pi Zero.

You’ll Need Your Own Raspberry Pi Zero—But Which One?

Several versions of the Raspberry Pi Zero have been released. The Zero is a slimline Raspberry Pi, half the size of the main version, with a 32-bit 1Ghz CPU and 512MB of memory. Along with a micro-USB power input, the card features a micro-USB port and microSD slot for booting an operating system.

Raspberry Pi Zero is at the heart of the GPi Case

The original version launched for just $5, although later versions are twice this much. Since first launching in November 2015, three main iterations have been issued:

  • Raspberry Pi Zero 1.2: the basic model, with only USB connectivity. A 1.3 revision appeared in May 2016.
  • Raspberry Pi Zero W: released February 2017 with an MPI camera interface, Bluetooth 4.1 BLE, and b/g/n single band 2.4GHz Wi-Fi.
  • Raspberry Pi Zero WH: another wireless version, this time with GPIO pins.

Sadly, the Raspberry Pi Zero WH isn’t compatible with the GPi Case. However, the original Pi Zero models and the main W board will all fit.

A Choice of Retro Gaming Platforms

The build starts by flashing your preferred retro gaming platform to the Pi Zero’s microSD card. Four systems have been prepared for the GPi Case:

  • Recalbox: perhaps the most popular retro gaming platform for Raspberry Pi.
  • Lakka: basic retro gaming front end that can be customized with themes.
  • Batocera: popular Linux retro gaming platform.
  • Supreme Retro Gaming: a vast bundle of front ends (EmulationStation, AttractMode, Pegasus), support for 101 systems, 96 game collections, 42 system tweaks, and 27 display themes. Use this if you just want a quick start with games already provided.

These are dedicated builds available from download.retroflag.com/.

Some customization scripts are also available from the same source.

  • GPi Case Patch: routes display output through GPIO for Recalbox
  • Safe Shutdown and Safe Reset: this script can be used in conjunction with the Safe Shutdown switch

Assembling the GPi Case With a Raspberry Pi Zero

Putting the GPi together is stunningly straightforward and quick. Everything is perfectly designed so that you can effectively slot in a Pi Zero, boot up, and play.

Most of the GPi case comes ready-assembled. However, you’ll need to insert your Raspberry Pi Zero. This is housed in the removable “cartridge” which is fitted with an adaptor board. A micro-USB power connector is attached to the adaptor, along with a row of 40 GPIO pogo pins. These contact the Pi Zero’s GPIO array, for full power and integration with the main GPi Case.

Raspberry Pi Zero in GPi case

Installing the Pi Zero requires first opening the cartridge section, flipping the adaptor board out of the way, and plugging the micro-USB power connector into the PCB. After placing the heatsink on the Pi’s SoC, place the Pi in the cartridge. As a guide, the microSD slot lines up with the door in the side of the cartridge.

Four screws secure the Pi Zero. Once fastened, flip the adaptor board over, lining up the holes with the mounting points. The back of the cartridge can then be attached—this snaps into place with some well-situated catches.

Finish by screwing the back onto the cartridge, then insert it into the GPi Case. You’re ready to power up and start gaming. Note that when the power is switched to “On”, the cartridge is locked in place. This precaution prevents the Pi Zero being removed while the GPi is powered up, protecting the PCB and microSD card.

Powering the GPi

With the case assembled, it’s a good idea to stick some batteries in. You can use the DC power input, although the USB-to-DC cable is short so motion is restricted. Note that the DC in is not connected to the battery compartment; rechargeable batteries won’t be charged in this device, although you can still use them.

GPi Case Power Button

Just be sure to stick to batteries with lower voltages as per standard shop bought R6 AA batteries. The device requires 5V so don’t exceed this.

Retro Gaming With the GPi Case

Most of our testing was with Lakka. While it offers a more basic, menu-driven experience, Lakka is tried and tested, and gives good results with this setup.

We also tried the Supreme Retro Gaming bundle, which perhaps offered too much choice. Presentation is slick, however, offering a modern console-like experience—quite a contrast to Lakka, While SRG is easier to use, it’s a large download requiring at least a 16GB microSD card to be usable.

With games up and running, you’re reliant on the D-pad and ABXY controls. R and L trigger buttons are also provided for extra control.

Regardless of which platform you choose, there is a more satisfying experience with console games than those intended for computers. Nintendo Gameboy and Gameboy Advance (GBA) titles in particular play really well—hardly a surprise.

GPi Case cartridge houses Raspberry Pi Zero

There is some advantage to using the Pi Zero W, namely in easily copying new game ROMs to the device. Just make sure it’s connected to your wireless network and there’s no need to remove the SD card.

Setting up a secure SSH FTP connection (SFTP) in a tool like FileZilla lets you easily add and remote ROMs. You just need to be sure you’re using the right username and password for the retro platform of choice. SSH can be enabled within the software settings.

Unless you’re reinstalling or installing a different OS, you shouldn’t need to eject the microSD card.

The GPi Is Moddable, Too

Since its release several cool modifications have been released for the GPi.

GPi Case D-pad

For example, you can find hacks online that add built-in battery charging to the GPi. Meanwhile, a particularly impressive addition to the GPi is the GPiMate. Rather than use a Raspberry Pi Zero for your GPi, this module is designed to house a Raspberry Pi Compute 3+. Slightly larger than a Pi Zero (the cartridge is correspondingly large), this brings quad-core processing to the console.

The Best Gameboy-Like Raspberry Pi Case Available

We’ve seen a few portable retro gaming systems based on or inspired by the Raspberry Pi. The Retroflag GPi Case stands out in the way it relies on the popular board. Plenty of devices start off with a Pi as proof off concept, then move onto dedicated boards.

Take Raspberry Pi retro gaming anywhere with the Retroflag GPi Case

The GPi Case retains the Pi Zero as an integral part of the design and build. Meanwhile, the assembly is simple enough that anyone from around 11 and above could build it.

Raspberry Pi Zero and Zero W Case, Retroflag GPi CASE with Retro Handheld Game Console and Safe Shutdown - with Carring Bag, a Keychain Piece, Heatsink Raspberry Pi Zero and Zero W Case, Retroflag GPi CASE with Retro Handheld Game Console and Safe Shutdown - with Carring Bag, a Keychain Piece, Heatsink Buy Now On Amazon $69.99

While there is an argument for a better power solution, the same could be said of the original Gameboy. Fortunately, the power scripts and hidden switch make power issues manageable, avoiding the data loss and corruption seen with other portable Raspberry Pi projects.

The display is surprisingly clear and crisp for its size, the buttons responsive, and the select of retro gaming platforms encouraging. If you’re looking for a Raspberry Pi-based retro gaming kit you can take anywhere, start with the Retroflag GPi Case.

Enter the Competition!

Retroflag GPi Case for Raspberry Pi Zero

Read the full article: Retroflag GPi is the Ultimate Portable Retro Gaming Console


Read Full Article

The 5 Best Tools for Microsoft Outlook


best-outlook-tools

Microsoft Outlook is a feature-rich email client. But have you ever wanted a feature it doesn’t have? There are many third-party tools for your Outlook inbox that help you manage your emails better.

Today we’ll cover five tools for the Microsoft Outlook desktop app for Windows that add extra functionality or give you quick access to Outlook’s many settings and features.

1. OutlookTools

OutlookTools is a free toolkit for Outlook on Windows that provides quick and easy access to Outlook settings and data folders. You can also access some Windows tools in OutlookTools, like the Registry Editor and Event Viewer.

The OutlookTools window includes a menu on the left where you can access the various tools available.

OutlookTools

The General screen displays information about your Outlook installation and some Quick Access buttons providing access to Outlook and Windows tools.

If you’re having problems with a PST or an OST Outlook data file, use the Run ScanPst button to scan the file. The Run ScanOst is obsolete now because it is not supported by Outlook.

But, the Run ScanPst tool will work for OST files also. If the tool doesn’t work, check out our guide to repairing Outlook inbox files.

You can also Start Outlook in Safe Mode directly from the General screen, which is handy if you’re having trouble with Outlook.

OutlookTools

The Folder Paths screen provides quick access to folders Outlook uses to store data and settings. Most of these are just for reference, but you can open the folders directly from the Folder Paths screen.

There is a temporary folder used when opening attachments, listed at the bottom of the window. You can empty this folder using the Empty Folder button.

HowTo-Outlook, the company that makes OutlookTools, also makes a separate tool for managing the temporary attachments folder, which we’ll cover next.

OutlookTools

The Startup Switches screen lists all available command-line switches you can use to launch Outlook in specific ways. Hover your mouse over each switch to learn what it does.

For example, you can remove all the names and email addresses from the AutoComplete list when starting Outlook.

Once you select a switch, you can click Start Outlook to open Outlook using that switch. If you’d rather use the switch directly on the command line, click Copy Command.

Then, open a Command Prompt window, paste the command at the prompt, and press Enter.

Note: Unsure how to use the Command Prompt? Here’s how you can master the Command Prompt in Windows 10.

OutlookTools

Outlook maintains several Most Recently Used (MRU) lists. On the Clear MRU screen, select your mail profile at the top. Then, click a button to clear that MRU list in the selected mail profile.

OutlookTools

Outlook includes a security feature that blocks attachments that might damage your computer with viruses or other threats.

Certain types of files, like EXE files, sent as attachments are automatically blocked. A blocked attachment remains in the email message, but you cannot access it.

The Blocked Attachments screen lists the file types that are blocked by Outlook. You can find out what each extension is in Microsoft’s support article about blocked attachments.

To unblock a file type, check the box for the desired type in the list.

Be careful what you unblock. Outlook blocks these file types because they can pose a risk to your computer. When unblocking file types, be sure you trust the sender when you receive attachments of those types.

OutlookTools

The Support Guides screen provides links to various Outlook support articles on the HowTo-Outlook web site. The More Tools screen contains links to free and paid Outlook add-ins and tools.

OutlookTools is a free tool, but you can Donate to help the developer keep it up-to-date.

Download: OutlookTools for Windows (Free)

OutlookTempCleaner

When you send an attachment or open an attachment in an email message, Windows stores temporary files. All these files hang around in the temporary folder, taking up space. Your files are also accessible to anyone who gains access to your computer and the temporary folder.

Windows stores these temporary files in a subdirectory in the temporary internet files directory on your PC.

There are many ways to delete temporary internet files, but HowTo-Outlook makes a free, small tool, called OutlookTempCleaner, just for deleting the temporary attachment files stored by Outlook.

OutlookTempCleaner does the same thing as the Outlook uses the following temporary folder to open attachments feature under Folder Paths in OutlookTools, except it also allows you to see the size of the Outlook temporary folder for attachments.

Click the Folder Size button.

OutlookTempCleaner

An information dialog box displays telling you how much space will be freed up by emptying the temporary folder for attachment files.

outlook secutemp folder size delete 1

Between Outlook Tools and OutlookTempCleaner for Windows, HowTo-Outlook make some of the best tools for Outlook users.

Download: OutlookTempCleaner for Windows (Free)

2. Email Insights

Email Insights is a lightweight search client for Outlook and Gmail. It provides a fast autocomplete feature and a fuzzy name search, and it automatically corrects spelling.

Email Insight allows you to perform searches faster and presents relevance-based and time-ordered search results, making it easier to find the email you’re looking for.

Of course, if your Outlook search isn’t working, you’ll need to fix it first.

When you run Email Insights, the Account Selection screen displays. Click Outlook.

Then, on the next dialog box, select the account you want to search.

outlook email insights 2

Enter your search term in the search box. As you type, suggestions are listed below the search box. If you see your search term in the list, select it with the mouse or use the arrow keys on your keyboard to select the term you want.

email insights search box

Press Enter or click the Search icon to perform the search.

You can also open additional tabs to do multiple searches in the same window. Each tab is labeled with the search term for that tab.

outlook email insights button 3

The integrated Outlook search tool is handy but doesn’t always find what you want. Thankfully, the alternative option of Email Insights makes it easier to find the email you need.

Download: Email Insights for Windows (Free)

3. Outlook-Google Calendar Sync

Do you use both Google and Outlook calendars? If so, are you looking for a way to keep the two calendars in sync? You can add your Google Calendar to Outlook, but we have a solution for you that allows you to sync your Google calendar with your Outlook calendar, so you don’t have to maintain separate calendars.

Outlook Google Calendar Sync is a free tool that provides one- and two-way sync between your Google and Outlook calendars. You can sync from Google to Outlook, Outlook to Google, or sync both directions, merging the two calendars.

Event attributes like subject, description, location, attendees, reminder events, availability, and privacy are synced. Only new attributes or attributes that have changed are updated.

When you open Outlook Google Calendar Sync, you must choose the Outlook mailbox and Google calendar you want to sync.

On the Outlook tab, select Default mailbox or Alternative mailbox and then select the mailbox you want to use. If you have more than one calendar for the selected mailbox, select the calendar you want to sync from the Select calendar dropdown list.

outlook google calendar sync 1

Then, click the Google tab, click Retrieve Calendars, and select the email account containing the calendar you want to sync from the Select calendar dropdown list.

You’ll be asked to sign in to your Gmail account in your default browser. Click Allow in your browser when prompted to give Outlook Google Calendar Sync permission to access your calendar.

Then, you’ll be presented a code that will allow Outlook Google Calendar Sync access to your Google calendar. Select the code, copy it, paste it into the Authorisation Code box on the Authorise Google Access dialog box, and click OK.

outlook google calendar sync 2

Click the Sync Options tab and select a Direction in the How section. Select whether you want to copy Google entries to Outlook or Outlook entries to Google. Or, you can sync the entries in both directions, if you’ve entered items on both calendars separately.

Select the Date range under When, and Attributes to include under What. You can also change the way the application operates on the Application Behaviour tab.

Once you’ve chosen your settings, click Save.

To sync your calendars, click the Sync tab and then click Start Sync. The progress and the result displays on the Sync tab.

The next time you want to sync the same calendars, open Outlook Google Calendar Sync and click Start Sync. Your settings remain the same if you saved them.

Download: Outlook-Google Calendar Sync for Windows (Free)

4. Stellar PST Viewer

Stellar PST Viewer is a free tool that scans a corrupt Outlook PST file and allows you to view all items (emails, contacts, journals, calendars, tasks) in the file and save individual items, or all items, in different formats.

When you run Stellar PST Viewer, select a PST file using the Select Outlook File button. You can also use the Find Outlook File to search for a PST file. By default, PST files are in the C:\Users\%username%\Documents\Outlook Files\ folder.

stellar pst viewer 1

All your emails, contacts, journals, calendars, tasks are listed in a tree structure on the left side of the main window. You can select an item, right-click on it, and select a format to save the item as.

Download: Stellar PST Viewer for Windows (Free)

5. Grammarly for Microsoft Office

Grammarly allows you to communicate more effectively by making your email messages, documents, social media posts, and more clear, effective, and free of mistakes.

Grammarly flags possible issues in your text and suggests corrections for spelling, grammar, wordiness, style, punctuation. Grammarly explains the reasoning for each suggested correction, allowing you to decide whether, and how, you want to correct each issue.

Download the Office add-in from the Grammarly site. You’ll have to sign in to your account first. Then, install the add-in into Outlook, and Word, if you choose to.

As you type a new email or a reply to an email, Grammarly checks your message for various issues. Suggestions for corrections display in a pane on the right side of the message window.

outlook grammarly check

Grammarly is a freemium app. You can use the free app, although it does have limitations. A Grammarly Pro subscription comes in at $11.66 per month for a yearly subscription or $29.95 per month for a rolling monthly subscription.

Download: Grammarly for Microsoft Office for Windows (Free)

Improve Your Productivity in Outlook

These are just some of the tools available that’ll help you boost your Outlook productivity. You might also want to look at the best anti-spam tools for Outlook.

We also offer some tips to help you get better at using Outlook.

The Outlook desktop app is part of Office 365, which is not free. If you’d rather use a free email client, we’ve explored the best free alternatives to Outlook.

Read the full article: The 5 Best Tools for Microsoft Outlook


Read Full Article