04 September 2018

How Expensive Is Gaming as a Hobby? 3 Tips for Gaming on a Budget


gaming-hobby-budget

If you’re happy to play free games for your smartphone all day, every day, gaming will barely cost you a cent. However, if you want to step up a level and play on your PC or consoles, the story is very different.

How expensive is gaming as a hobby? This is something worth figuring out before you dive in, or allow your kids to get the gaming bug. So, let’s try and analyze some of the costs associated with playing video games as a hobby…

The Basics

Let’s assume you’re starting from scratch. What are the essentials that you need to be able to begin your gaming journey?

Consoles
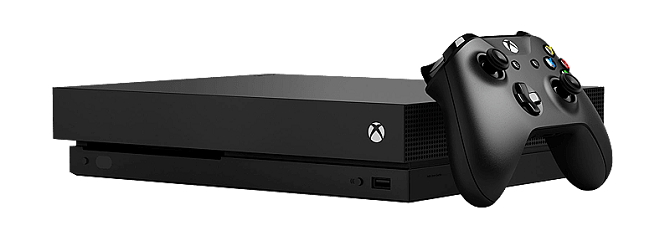
xbox one x

Two companies dominate the traditional console market—Sony and Microsoft. If you want to play the latest big-budget titles, you’ll inevitably need one of their products.

The latest PlayStation model is the PS4 Pro, while the latest hardware from Microsoft is the Xbox One X. Both products are incremental upgrades on the standard PS4 and Xbox One; they offer a few hardware and design improvements, but little else.

The PS4 Pro currently retails for $399.99. The Xbox One X currently retails for $499.99.

TV

There’s little point in splashing out on top-end consoles if you don’t have a screen to enjoy their glorious 4K output, multiple teraflops of GPU power, and high-quality audio.

At the very least, you’ll need a well-sized 4K TV. When we reviewed some of the cheapest 4K HDR TVs, we established that the 55-inch Sony XBR55X900E and the 55-inch LG 55SJ8500 were good picks for gamers. So, if you don’t already own one, you’re looking at another $500 to $1,500 for a good TV.

PC

Of course, lots of hardcore gamers insist that playing on a dedicated desktop computer is the best way to enjoy your hobby.

If you’re just getting into the world of gaming, you probably don’t need a console and a computer, so pick whichever works best for you.

But beware—buying a gaming computer isn’t as straightforward as buying a regular machine. If you don’t want to invest in a new machine, you could try tweaking your current PC for gaming instead.

For a top-of-the-range gaming computer, you can expect to pay upwards of $1,500.

Games

You can’t be a gamer if you don’t have any games to play. New AAA games typically cost around $60. However, if you’re happy to play games that are more than a year old—especially annual-release franchises—you can spend considerably less.

The Extras

While the things we’ve listed above might be enough to get you started, other costs will soon begin to rack up.

Peripherals

It doesn’t matter whether you’ve taken the console or PC approach to gaming, there are lots of add-ons that make gaming more fun.

The list of gaming peripherals you can buy is almost endless: racing wheels, headsets, cameras, console stands, gaming keyboards—each of which has the potential to set you back $100 or more.

Extra Controllers

Consoles usually only ship with one controller, so you’ll want to pick up a second one almost immediately. After all, gaming is more fun when you do it with friends.

Both a new Xbox controller and PS4 controller cost about $60, though retailers sometimes offer a discount if you buy one at the same time as you buy the console.

ps4 controllers

Online Gaming

If you play on PC, you can play against other gamers online for free using apps like Steam.

Unfortunately, Sony and Microsoft aren’t so generous. They both force you to pay for a subscription in order to play online via Xbox Live or PlayStation Plus. The most cost-efficient way to sign up is to buy an annual plan. Sony’s PlayStation Plus subscription is $50/year; Microsoft’s Xbox Live Gold is $60/year.

Downloadable Content and Microtransactions
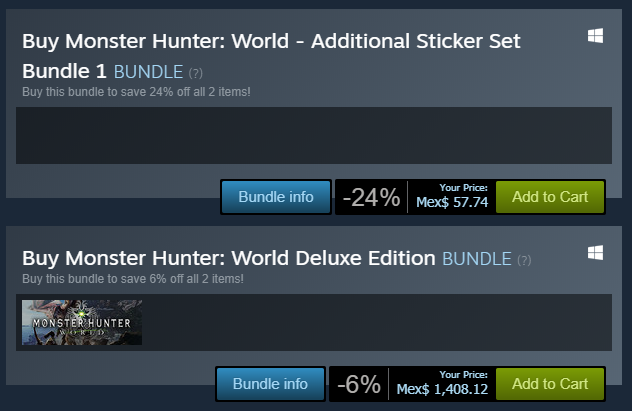
steam dlc

Microtransactions and downloadable content (DLC) are now commonplace throughout the gaming world. Players don’t like them—there are endless stories of expensive games locking some of the best content behind a paywall—but they are here to stay regardless.

The cost of DLC varies considerably. Some content can cost almost as much as the original game, while lesser items can be picked up for a couple of dollars apiece.

Similarly, microtransactions have become almost necessary if you want to keep pace with the top players online. They can cost anything from a few cents to tens of dollars.

Virtual Reality

Right now, the cutting edge of consumer gaming is virtual reality. Perhaps surprisingly, the entry cost is not as high as you might expect.

For example, when we reviewed the standalone Oculus Go VR headset, we gave it a score of 10/10 and called it a “must buy.” Best of all, the headset costs a mere $200. It’s an absolute steal. On the downside, it only has access to the games from the Oculus Store, and they cost a few dollars each.

For a more extensive selection of games, you will need to pay a bit more. The HTC Vive costs around $500, and the Oculus Rift is about $400. The Rift has access to the SteamVR library. Check out our article if you need help deciding between the Vive and the Rift.

And, before you head to the shops, you need to make sure you’ve got a suitable space in which to use your headset. If you don’t, you might be wasting your money.

How to Start Gaming on a Budget

The price of all these elements add up to a tidy sum, but there are a few ways you can eat away at the total.

Subscribe to PlayStation Plus and Xbox Live Gold

Yes, we just listed the two consoles’ subscriptions as an expense. We didn’t mention, however, the impressive number of free games that the two plans give you.

In the last 12 months, both services have given their users around $700-worth of free titles. And these aren’t junk games that you’d never want to play. Example freebies include Mafia III, Assassin’s Creed IV, Halo 3, and Gears of War 3.

If you’re a casual gamer who doesn’t play for more than a few hours a week, you might never need to buy another game again.

Note: The two plans also offer up to 50% discounts on games.

Buy Cheaper Consoles

Although Sony and Microsoft might dominate the world of big-ticket consoles, there are plenty of other choices out there.

If you spend a lot of time on the road, you might find the portable Nintendo Switch or 3DS XL to be a good option. Those looking for family fun could even pick up a Nintendo Wii on the cheap. And if you’re looking for retro fun, you could even grab the recently re-released Super NES Classic.

Games on other consoles are also cheaper than on the Xbox and PS4.

Cut the Cord and Play More Games

You could offset some of the cost of your new hobby by cutting the cord. These days, it’s possible to save a lot of money on your cable bill without losing access to your favorite TV shows and live channels.

But why not kill two birds with one stone? The Nvidia Shield is one of the best devices for cord cutters, but it also has excellent gaming potential.

The GeForce Now beta gives you access to a massive library of high-quality free games, including NBA 2K18, Call of Duty, Bioshock, Sonic, Civilization VI, Overwatch, and many more.

A new Nvidia Shield even comes with a gaming controller in the box.

And the Total Cost Is…

Gaming isn’t cheap. Gone are the days when a Gameboy and two games could keep you entertained for six months. If you want to truly experience what the world of gaming has to offer, you need to get your wallet out.

And as for how much gaming costs? There’s no easy answer; no two people are the same. However, we estimate an average family household might look something like this:

  • Xbox One X: $500
  • 5 x AAA games: $300
  • Other games: $100
  • 2 x extra controllers: $120
  • Other peripherals: $150
  • Xbox Live Gold: $60
  • Total: $1,230

This should be enough to get you started gaming, but you’ll inevitably spend more as the years pass. Especially when Microsoft, Sony, and Nintendo release their next must-have consoles.

If you’d like to learn more about gaming, check out our article about the best websites for gaming news and reviews.

Read the full article: How Expensive Is Gaming as a Hobby? 3 Tips for Gaming on a Budget


Read Full Article

The VoCore2 is a tiny computer that can play tiny Doom


The VoCore2 is a Wi-Fi capable computer with a 580 MHz CPU and 128 RAM that supports video, USB, and Ethernet. And it plays Doom. That’s right: this is a computer you can easily swallow and allow your biome flora to play a hard core FPS while you slowly digest the package.

The product started life on Indiegogo where it raised $100,000. Now it’s available for $17 for the barebones unit or $24 for the unit with USB and MicroSD card. You can also buy a four inch display for it that lets you display video at 25fps.

What is this thing good for? Well, like all single board computers it pushes the limits on what computing means in the 21st century. A computer the size of a Euro coin could fit in all sorts of places and for all sorts of weird projects and even if you don’t use it to build the next unmanned Red-Tailed Hawk nest surveillance drone it could be cool to blast some demons on a computer the size of a joystick button.

The VoCore2 is shipping soon and is available for purchase here.


Read Full Article
Wireless headphones and earbuds to fit your budget


Editor’s note: This post was done in partnership with Wirecutter. When readers choose to buy Wirecutter’s independently chosen editorial picks, Wirecutter and TechCrunch may earn affiliate commissions.

Headphones keep us connected to our favorite music, podcasts, and audiobooks. They make sure we don’t drop an important phone call. As our devices ditch the headphone jack and Bluetooth technology improves, more and more people will need to upgrade to something that offers great sound, solid performance, and helpful features.

We’ve tested hundreds of wireless earbuds and headphones, and whether your budget is $30 or $300, we’ve found a pair to fit your needs.


Bluetooth earbuds: Skullcandy Ink’d Bluetooth

For the cheapest option that still offers good sound quality, the Skullcandy Ink’d Bluetooth earbuds are the best wireless earbuds under $50. They come with a collar that’s equipped with large control buttons, but it’s so light you’ll forget that it’s around your neck. The Ink’d Bluetooth are comfortable and made to fit all but the largest ear canals. Plus, they’re water-resistant.

The Ink’d Bluetooth’s battery will get you through a full day before it’s time to recharge. During testing, we were able to walk two rooms away from our connected smartphone before experiencing a signal drop.

Photo: Kyle Fitzgerald

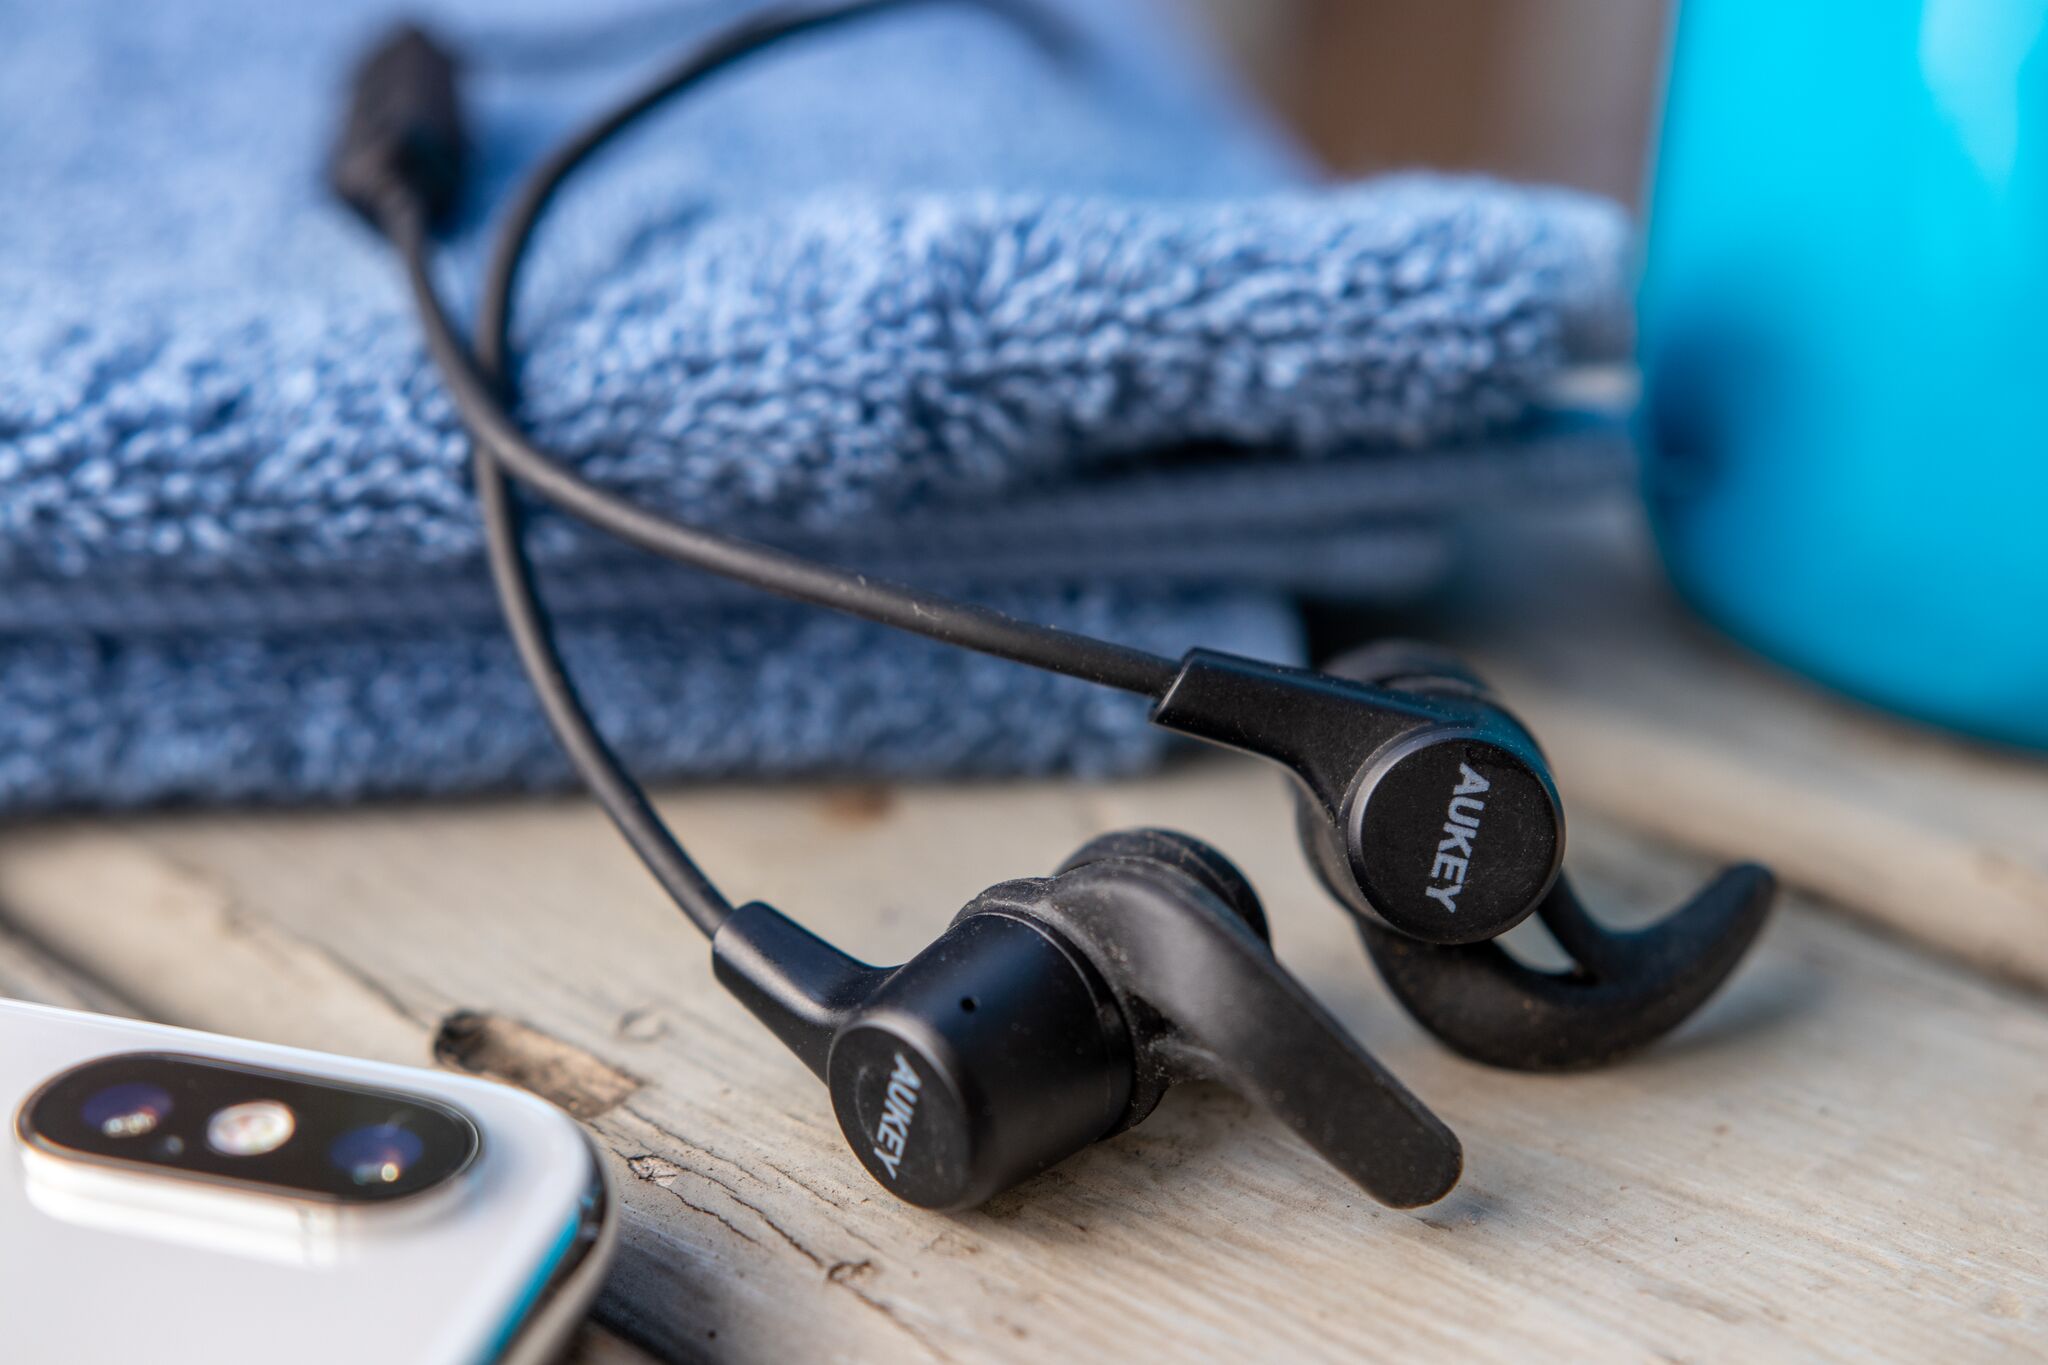
Workout headphones: Aukey Latitude EP-B40

When it’s time to focus at the gym, there’s no better way to tune out distractions than a reliable pair of earbuds. For a cheap but comfortable pair that can handle casual workouts and a bit of sweat, we recommend the Aukey Latitude EP-B40. They’re the best workout headphones under $50 and they offer more than eight hours of battery life, which is enough for a few gym sessions before recharging.

Silicone tips and wings help with keeping them secured during high-intensity activities. The cable that connects the earbuds is longer than we’d like, but the Latitude EP-B40 are a better option for working out than similarly priced wired earbuds, and they offer good sound quality.

Photo: Kyle Fitzgerald                                                               

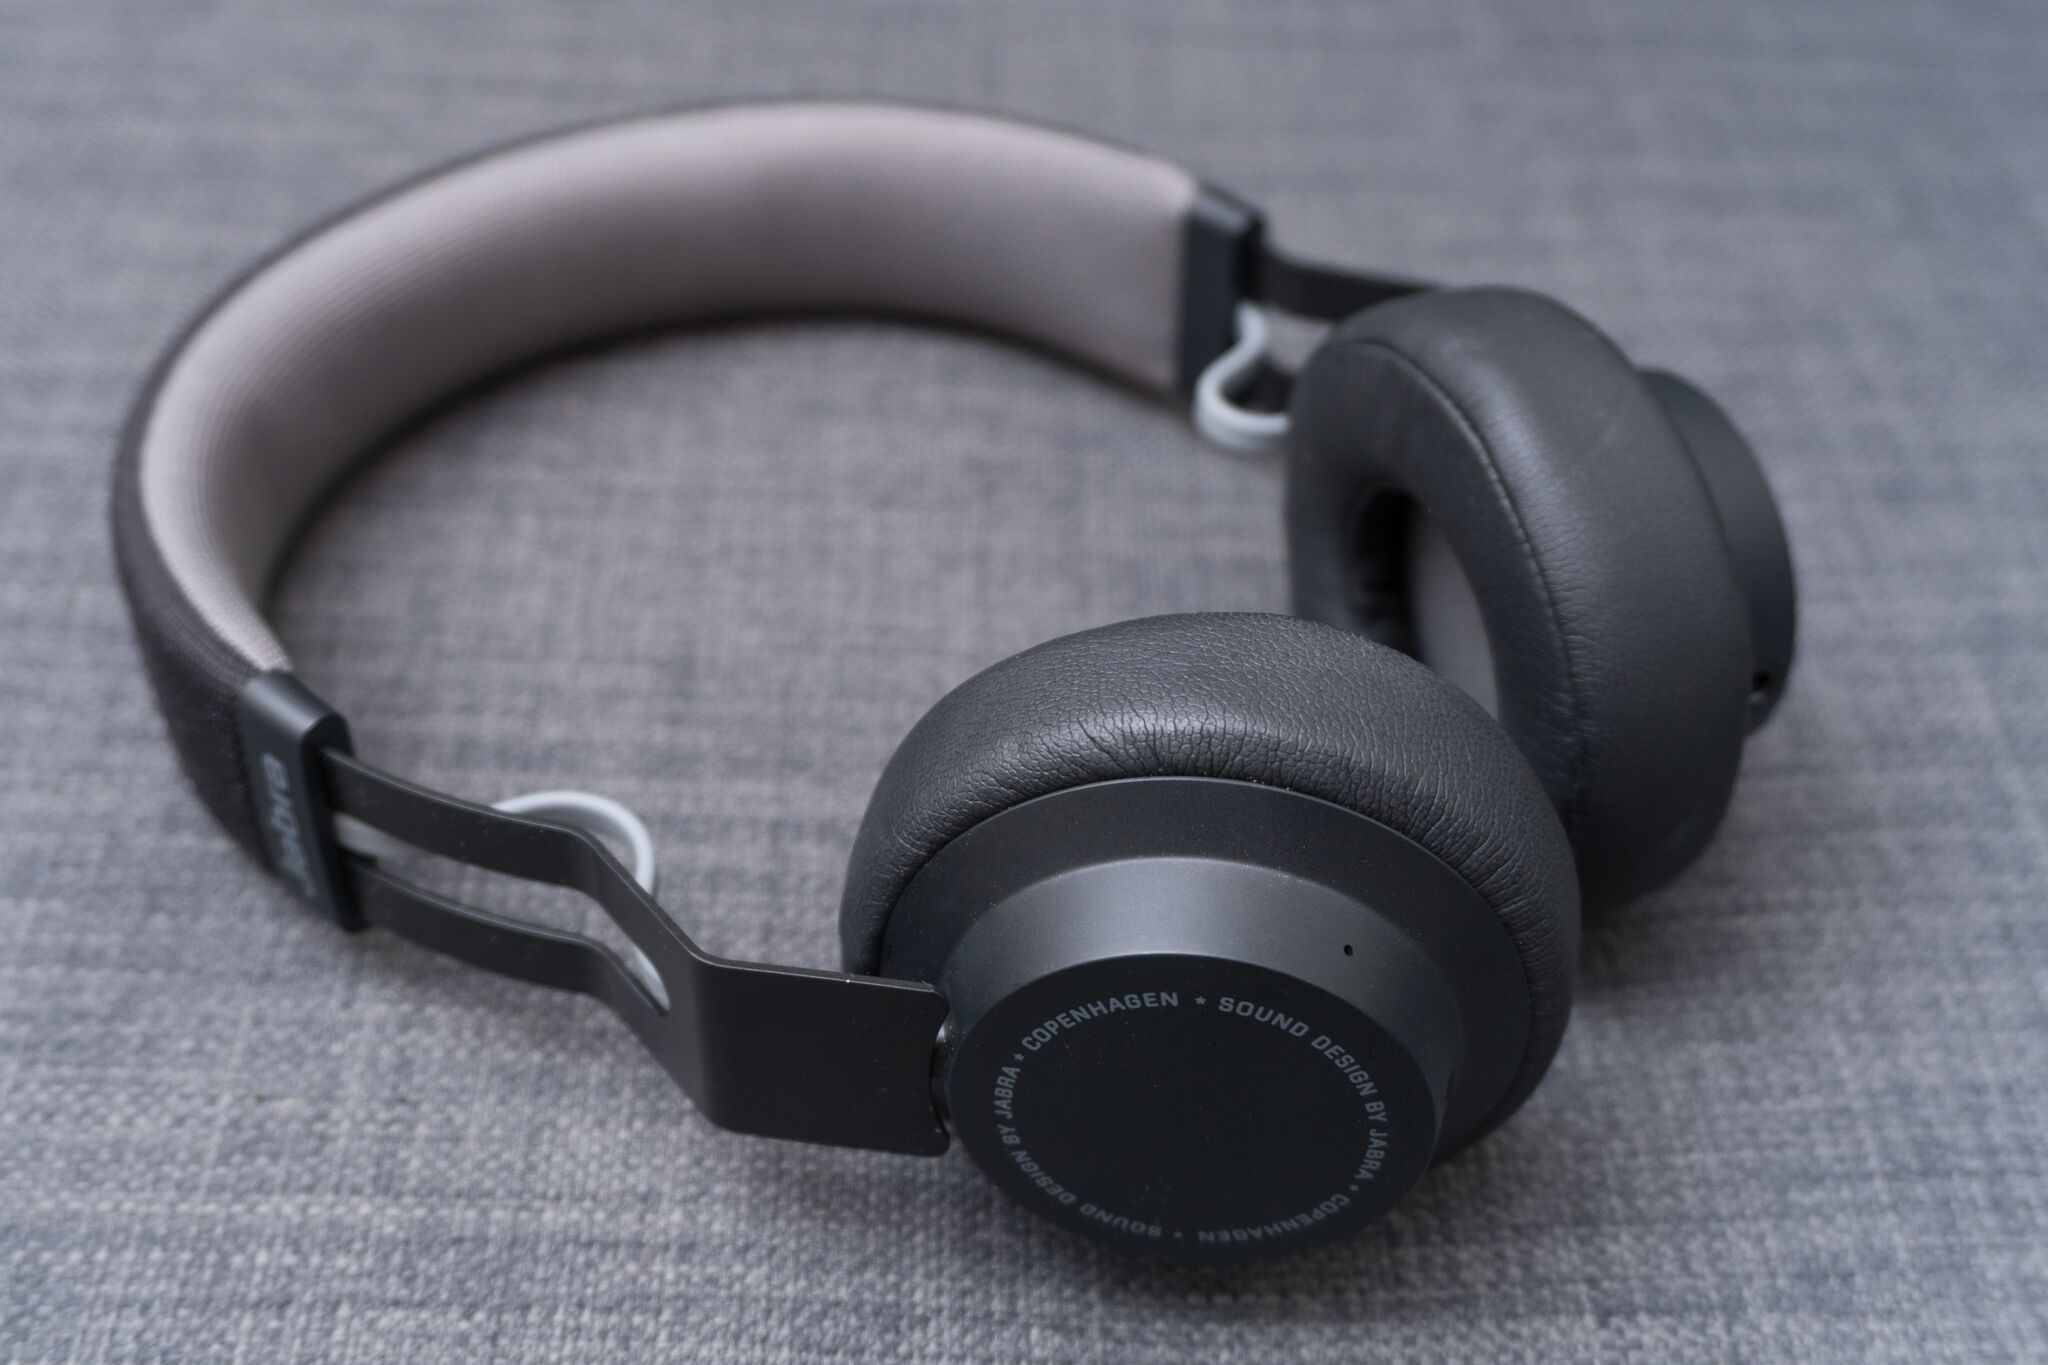
Budget Bluetooth wireless: Jabra Move Wireless

For some, earbuds just don’t cut it. The Jabra Move Wireless are the best Bluetooth wireless headphones under $100. They’re ideal for someone who prefers over-ear headphones and doesn’t want to spend a lot of money. The Move Wireless sound almost as good as Bluetooth headphones that cost four times as much—without sacrificing solid basic features like intuitive and easily accessible controls. The Move Wireless’ pivoting earcups and a padded headband add to comfort.

Photo: Rozette Rago

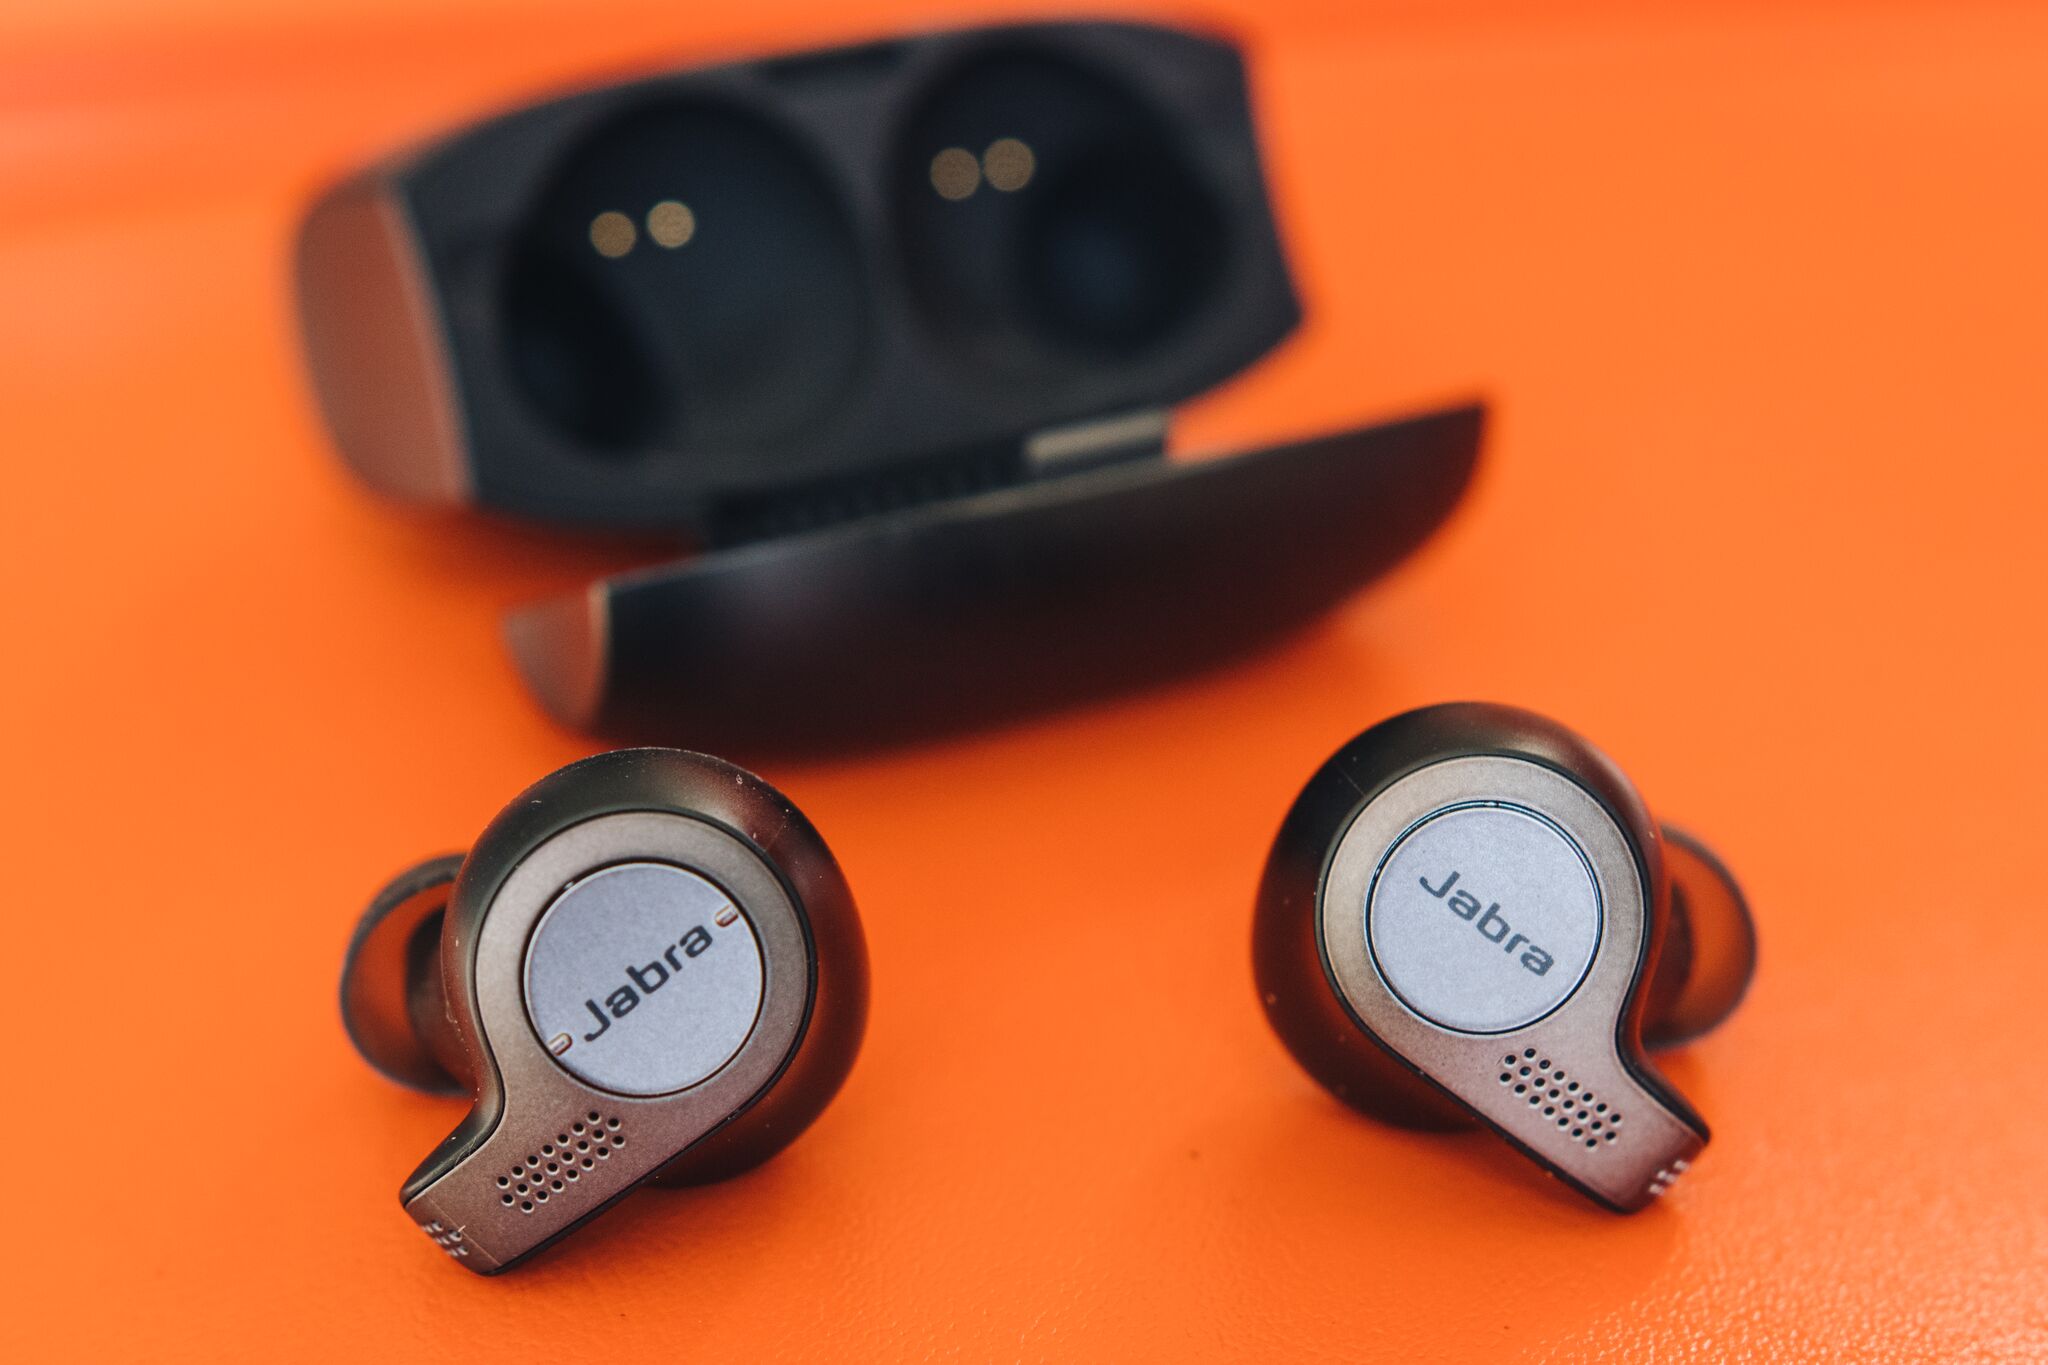
True Wireless: Jabra Elite 65t

If keeping up with the latest tech gear is important to you, you’ve probably already done your research on true wireless headphones. The majority of them are still first-generation models and come with a few kinks. Still, the Jabra Elite 65t perform just as well as standard Bluetooth earbuds—offering great sound, battery life, and comfort—without a wire connecting each earpiece.

The Elite 65t usually block out a good amount of noise, but you have the option of using the mics to hear your surroundings by activating transparency mode. We like that these headphones work with voice assistants (Google Assistant, Siri and Alexa) and they have both track and volume controls. During testing, the Elite 65t’s Bluetooth 5.0 offered seamless and stronger connections than competitors, making calls sound especially clear. For a true wireless workout version of these headphones, we recommend the Jabra Elite Active 65t.

Photo: Rozette Rago

Bluetooth Wireless: Sony H.ear On WH-H900N

If you’re ready to invest in a pair of high-end Bluetooth wireless headphones that come with the best features, we recommend the Sony H.ear On WH-H900N. You’ll get above-average active noise cancelling, long-lasting battery life, a clear mic for voice calls, and, most importantly, a pair of headphones that sound great.

During testing, the H.ear On WH-H900M sounded better than competitors (with or without noise cancelling) and the bass added a noticeable boost that didn’t overpower vocals. We like that these headphones are lightweight, comfortable to wear for long periods of time, and that they come in a variety of colors.

These picks may have been updated by WirecutterWhen readers choose to buy Wirecutter’s independently chosen editorial picks, Wirecutter and TechCrunch may earn affiliate commissions.


Read Full Article
How Much Money Do Programmers Make?


how-much-money-coders

Thinking of becoming a programmer? While there’s a lot to consider, the money you’ll make is no small part of the decision.

If you’re wondering how much money the average programmer makes in a variety of positions, you’ve come to the right place. Let’s look at standard coding positions, their usual job descriptions, and how much you can expect to earn.

Note: We used aggregate results from Glassdoor, PayScale, and Salary.com to provide the average numbers here. These are not guarantees.

1. Web Developer

Job description: Responsible for creating and maintaining web applications.

Web development is a diverse field. Your exact work depends on the programming languages you’ve learned, whether you’re a front or back-end developer, and similar.

Glassdoor rates the average base pay for web developers at $93,000 per year. That’s much higher than PayScale ($58,000) and Salary.com, which claims a median of $60,000. It truly depends on the type of web work you do.

Most web developers move into a Senior Web Developer position later in their careers. Check out our comparison of programmers and web developers for more info.

2. Web Designer

Job description: Create and design websites for the best user experience.

While web developers focus on building apps for a website, web designers are the ones who build the site in the first place. Their primary concern is how the website looks and feels.

Taking into account averages from all three sites, you can expect a salary between $49,000 and $75,000 per year as a web designer.

Depending on the organization’s size, web designers may also branch out to copywriting, SEO work, and similar. Some of the best channels for web design can help you learn more.

3. Computer Programmer

Job description: Someone who creates and debugs computer software by writing code.

“Programmer” is a broad generalization for many standard programming jobs. Typically, an entry-level programmer in this position will know one primary language (like C++, Java, or Python) and may expand as they become more experienced.

They usually report to a project manager and work on a variety of projects. This may involve coding a brand-new application, updating an old app to work with modern standards, or similar.

Your salary will vary quite a bit depending on the languages you know, the company you work for, and your location. Expect a ballpark low of $60,000 per year and $75,000 on the higher end. Entry-level programmers may well earn $10,000 less than this.

4. PLC Programmer

Job description: Write and test programs for machine equipment.

PLC (programmable logic controller) refers to a computer that controls a machine process. These are often used in assembly lines and similar environments where consistency and having an easy way to identify faults is paramount. Thus, PLC programmers code these system to run optimally.

The average salary for a PLC programmer is between $64,000 and $74,000. Note that many jobs in this position require experience due to the sensitive nature of the machines being programmed. Thus, salary rises significantly as you become more experienced.

5. Game Developer

Job description: Create video games through coding logic, creating art, and similar tasks.

Programming video games for a living sounds like a dream. And it’s definitely a real career path, though the pay you can expect depends wildly on where you work. Small independent studios obviously can’t pay as much as major developers like Sony.

Thus, it’s hard to give an estimated salary here. PayScale provides a $61,000 average for a “video game designer” but just $45,000 for a “video game developer”. Meanwhile, Glassdoor rates the salary for a “game programmer” at $89,000.

If you want to make a game on your own, check out some free game development software tools.

6. Mobile Developer

Job description: Design, test, and support mobile applications.

More people access the internet on their phones and tablets than ever, which is why mobile development is so important. This type of programmer works to create mobile-specific apps for companies, typically for Android or iOS.

Mobile developers earn a good wage, with average estimates around $72,000 on the low end and $103,000 on the high end.

Read up on the programming languages you must know to create Android apps if this interests you.

7. Database Developer

Job description: Develops and improves database systems to ensure simplicity and usability.

Databases are critical to almost every company, especially with the advent of big data. Because of this, businesses have an interest in making sure their databases are clean, easy to access, and efficient. This is what database developers (an in-demand type of programming job) handle.

If you’re looking into database development, expect your annual wages to be somewhere between $73,000 and $99,000.

Which Programming Path Will You Pursue?

We’ve taken a look at the average salary for seven different types of programming jobs. No matter which part of programming you pursue, you can expect a decent wage.

The 2015 median household income in the US was $56,516 according to the Census Bureau. In 2016, the real median personal income was $31,099.

These numbers have risen somewhat in the past few years, but it gives a good indication of how lucrative a career in programming is. You probably won’t make the above salaries right out of college, but with some experience, you’ll be well on your way.

If this talk of salaries has you interested in pursuing a new job, check out the best job search engines.

Read the full article: How Much Money Do Programmers Make?


Read Full Article
03 September 2018

iPhone Speaker Not Working? Here’s How to Fix It

Get Started With Image Recognition Using TensorFlow and Raspberry Pi


image-recognition-raspi-tensorflow

TensorFlow is Google’s Neural Network library. Given that machine learning is the hottest thing around currently, it is no surprise that Google are among the leaders in this new technology.

In this article, you will learn how to install TensorFlow on the Raspberry Pi, and run simple image classification on a pre-trained neural network.

Getting Started

To get started with image recognition, you will need a Raspberry Pi (any model will work) and an SD card with the Raspbian Stretch (9.0+) operating system (if you’re new to the Raspberry Pi, use our installation guide). Boot up the Pi and open a terminal window. Make sure your Pi is up to date, and check your Python version.

sudo apt-get update
python --version
python3 --version

You can use both Python 2.7 or Python 3.4+ for this tutorial. This example is for Python 3. For Python 2.7, replace Python3 with Python, and pip3 with pip throughout this tutorial.

Pip is a package manager for Python, usually installed as standard on Linux distributions. If you find you don’t have it, follow the install for Linux instructions in this article to install it.

Installing TensorFlow

Installing TensorFlow used to be quite a frustrating process, but a recent update makes it incredibly simple. While you can follow this tutorial without any prior knowledge, it might be worth understanding the basics of machine learning before trying it out.

Before installing TensorFlow, install the Atlas library.

sudo apt install libatlas-base-dev

Once that is finished install TensorFlow via pip3

pip3 install --user tensorflow

This will install TensorFlow for the logged in user. If you prefer to use a virtual environment, modify your code here to reflect this.

Testing TensorFlow

Once it has installed, you can test whether it is working with the TensorFlow equivalent of a Hello, world!

From the command line create a new Python script using nano or vim (If you aren’t sure which one to use, they both have advantages) and name it something easy to remember.

sudo nano tftest.py

Enter this code, provided by Google for testing TensorFlow:

import tensorflow as tf
hello = tf.constant('Hello, TensorFlow!')
sess = tf.Session()
print(sess.run(hello))

If you are using nano, exit by pressing Ctrl + X and save your file by typing Y when prompted.

Run the code from the terminal:

python3 tftest.py

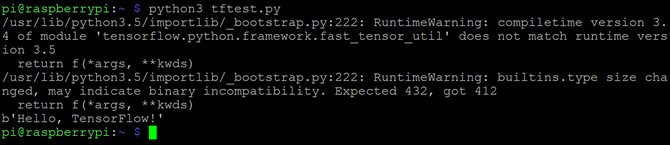
You should see “Hello, TensorFlow” printed. If you are running Python 3.5, you will get several runtime warnings. The official TensorFlow tutorials acknowledge that this happens, and to ignore it.

TensorFlow and Python3.5 - Ignorable error

It works! Now to do something interesting with TensorFlow.

Installing the Image Classifier

In the terminal, create a directory for the project in your home directory and navigate into it.

mkdir tf1
cd tf1

TensorFlow has a git repository with example models to try out. Clone the repository into the new directory:

git clone https://github.com/tensorflow/models.git

You want to use the image classification example, which can be found at models/tutorials/image/imagenet. Navigate to that folder now:

cd models/tutorials/image/imagenet

The standard image classifying script runs with a provided image of a panda:

Tiny TensorFlow Panda

To run the standard image classifier with the panda image provided enter:

python3 classify_image.py

This feeds an image of a panda to the neural network, which returns guesses as to what the image is with a value for its level of certainty.

TensorFlow Panda Classifying Output

As the output image shows, the neural net guessed correctly, with an almost 90 percent certainty. It also thought the image might contain an custard apple, but it was not very confident with that answer.

Using a Custom Image

The panda image proves that TensorFlow works, but that is perhaps unsurprising given it is the example the project provides. For a better test, you can give your own image to the neural net for classification. In this instance, you’ll be seeing if the TensorFlow neural net can identify George.

George the Dinosaur

Meet George. George is a dinosaur. To feed this image (available in cropped form here) into the neural net, add arguments when running the script.

python3 classify_image.py --image_file=/home/pi/george.jpg

The image_file= following the script name allows the addition of any image by path. Lets see how this neural net did.

TensorFlow Dinosaur Classification Output

Not bad! While George is not a triceratops, the neural net classified the image as a dinosaur with a high degree of certainty when compared to the other options.

TensorFlow and Raspberry Pi, Ready to Go

This basic implementation of TensorFlow already has potential. This object recognition is happening on the Pi, and needs no internet connection to function. This means that with the addition of a Raspberry Pi camera module and a Raspberry Pi-suitable battery unit, the whole project could go portable.

Most tutorials only scratch the surface of a subject, but it has never been truer than in this case. Machine learning is an incredibly dense subject. One way to take your knowledge further would be by taking a dedicated course. In the meantime, get hands on with machine learning and the Raspberry Pi with these TensorFlow projects you can try yourself.

Read the full article: Get Started With Image Recognition Using TensorFlow and Raspberry Pi


Read Full Article
Network Drives at IFA 2018: What’s New and What’s Hot?


The were several new NAS systems on show at IFA 2018, along with updated versions of previous systems. Here is a rundown of what we saw.

Note: This article may be updated at a later date.

QNAP

TS-251B NAS

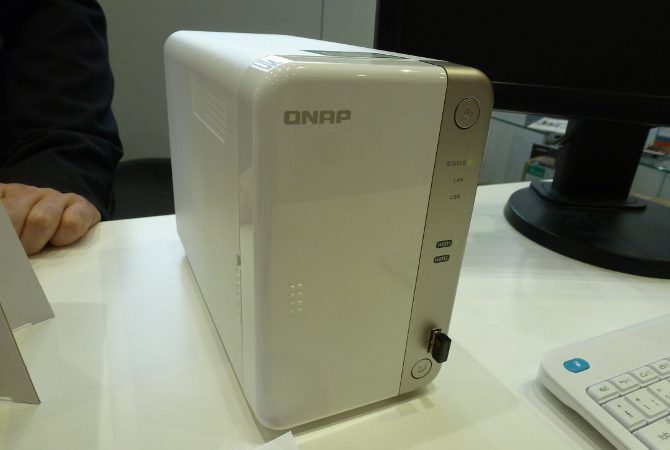
QNAP TS-251B NAS Storage

Price: Around $350

QNAP showcased it’s 2018 version of the TS-251B NAS system. Aimed at the home/home office market, the small NAS box has a few interesting features. Equipped with an Intel Celeron J3335 dual-core 2.0 GHz processor and a choice of 2GB or 4GB of RAM, its PCIe expansion slot adds a variety of extra functions.

Onboard LAN is 1 Gigabit with dual RJ34 ports, but this can extend to 10 Gigabits via the QM2 PCIe expansion card. This card serves a dual purpose, as it can also house extra storage. Alongside the two drive bays, further storage is available through an M.2 SSD PCIe expansion card. Some flexibility is available here as the card can contain up to 4 M.2 SSDs, or 2 SSDs with a 10 Gigabit LAN port. A Wi-Fi card is also available, though M.2 SSDs cannot be fitted in conjunction with it.

The modular feature set and small form factor of this NAS make it a good contender for a home NAS unit. It comes with an HDMI port, and while transcoding is not possible, it would make an excellent media center alongside all of the features expected of home and small office NAS systems.

Terra Master

F8-421

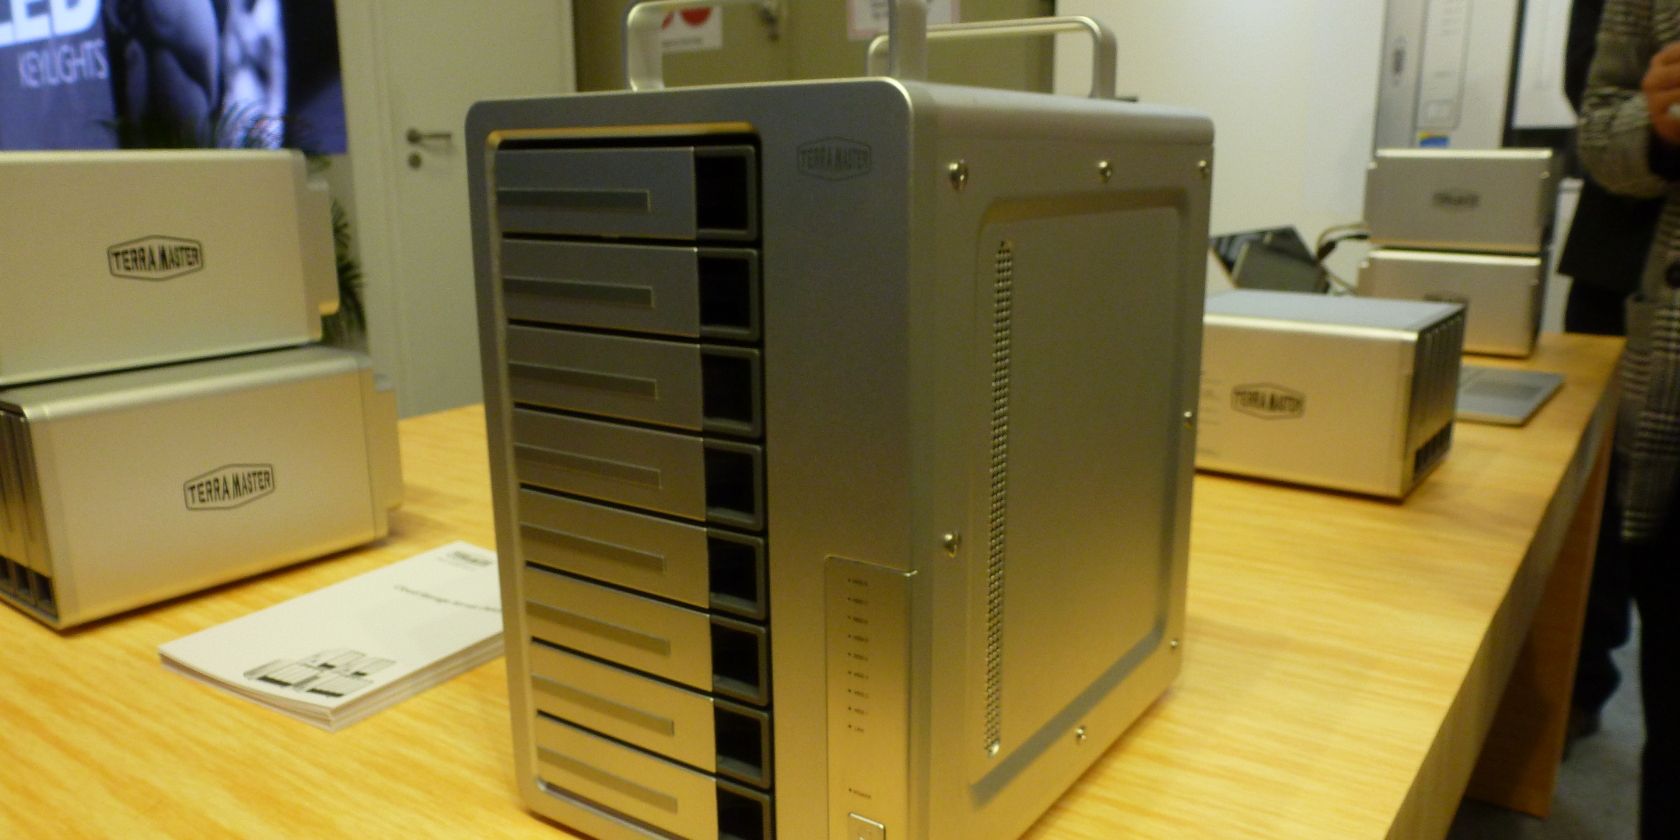
Terra Master F8-421 at IFA 2018

Price: Not Given

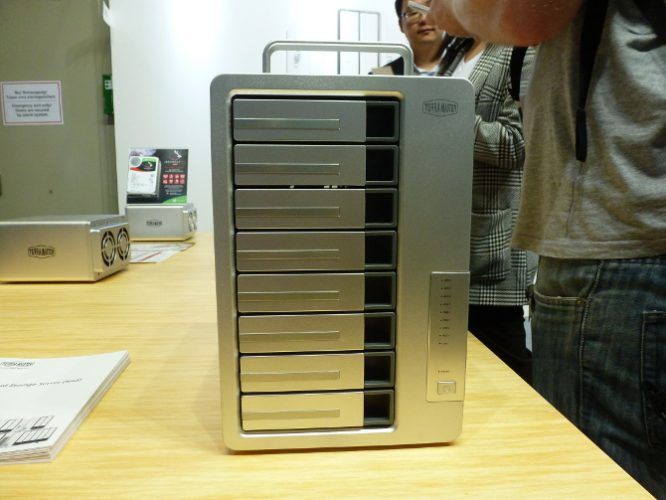
Terra Master showcased an eight-bay NAS system aimed at home and professional users alike. Featuring a Quad Core 1.5 GHz processor and 8GB of DDR4 RAM, it is capable of sustaining up to 96TB of storage (8 x 12 TB).

Alongside upgrading the number of drive bays, a software update was promised this month adding further functionality to the NAS with Docker along with other updates. Due to a new collaboration with Seagate, expect to see the Ironwolf drives sold in conjunction with Terra Master NAS systems in the future.

WD

My Passport Wireless SSD

WD Wireless SSD portable NAS at IFA2018

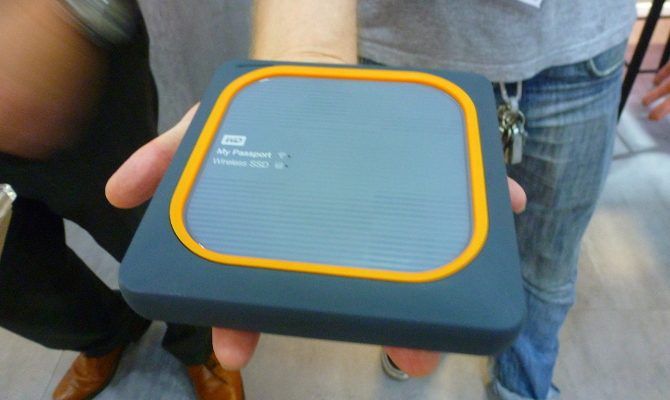
Price: 250GB ($191.99), 500GB ($289.99), 1TB ($499.99), 2TB ($774.99)

WD’s new Passport Wireless SSD (available on Amazon) came about through collaboration with professional photographers. As a standalone portable NAS, the previous version had a standard HDD and was prone to failure in harsh environments. The SSD version is less susceptible to this problem, and a silicon protective casing is designed to protect the unit in the event of it being dropped.

Available in various disk sizes, it is a fully functional Linux-based NAS system with a 6400 mAh battery. Devices connect to the box wirelessly, with up to 8 simultaneous connections possible. A connection is also available via SD card slot (configurable for automatic transfer) and USB 3.0 slot.

The My Passport app also can integrate with the Adobe Cloud allowing for the direct transfer of media into a working environment quickly. Plex and Twonky can be used with it, though the small form factor and battery requirements mean no transcoding. A use case presented to us by a WD representative was for car journeys with children—setting it up as a portable streaming hotspot for cartoons. While possible, this device seems to shine for media use, with up to 10 hours of battery life claimed when used in conjunction with one device.

Designed as the child unit to WD’s larger home NAS solutions, it works intuitively with them, though it should work perfectly as a standalone mobile storage solution with 250GB/500GB, and 1/2TB versions available.

NAS at IFA 2018

While there was little wholly new or groundbreaking in NAS at IFA 2018, some great systems were on show for users ranging from home and small office systems, to large-scale business uses.

Read the full article: Network Drives at IFA 2018: What’s New and What’s Hot?


Read Full Article

Drones at IFA 2018: What’s New and What’s Hot?

Cameras at IFA 2018: What’s New and What’s Hot?


If you’re not into Instant Cameras, the big announcement at IFA may be a series of rumored full-frame mirrorless cameras from Canon and Panasonic. For those interested in actual announcements, the bombshell revelation was the Mint line of instant camera products.

Polaroid

Mint 2-in-1 Instant Camera

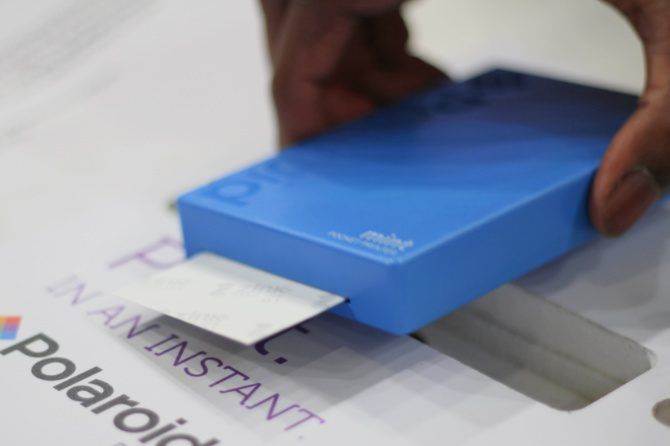
The new Polaroid Mint 2-in-1 Photo Printer takes Instant Camera portability to the next level. More so than other Instant Cameras, the Mint focuses on lighter weight, longer battery life, increased expandable storage size, and more. In fact, it can shoot 5o to 60 photos on a single battery charge and sport up to 256GB of expandable storage.

The biggest advantage, though, that the Mint 2-in-1 has over its competitors is its best-in-class portability. Not only is the Mint 2-in-1 sleek, it can also comfortably fit inside of a coat or pants pocket.

So how did Polaroid improve over last year’s products? The Polaroid Mint 2-in-1 combines wireless Bluetooth smartphone pairing, so if you want to print photos direct from an infinitely superior smartphone camera, you can.

However, the demonstration model did not, in any sense of the word, print instantly. Printing over Bluetooth causes a small amount of input lag, delaying photos by around 20 or 30 seconds. Not bad by any means, but perhaps not as instant as the product’s name would suggest.

The Mint 2-in-1 should cost $129 making it one of the most expensive Instant Cameras on today’s market.

Mint Printer

While the Mint 2-in-1 can shoot images and spit out physical photographs, the Polaroid Mint Printer more or less turns your infinitely better smartphone into an Instant Camera.

A point of confusion that readers might have is that the two devices (printer and 2-in-1) look almost identical, except that one includes a camera lens and costs more—$129 for the 2-in-1 and $99 for the photo printer.

Of the two devices, I’d say that the printer offers more value. Why would anyone want to take photos with a weaker quality camera sensor than what’s in their smartphone?

Panasonic

LX100 II

Panasonic may have officially announced the LX100 II at IFA, but there’s a rumor of another upcoming model scheduled for debut on September 25.

The LX100 II is more or less an incremental update on the fairly successful LX100. Like the LX100, it uses the Lumix’s Micro Four-Thirds sensor, which is—as the name suggests—a 4:3 aspect ratio sensor which is almost full-frame (but not). It improves on the previous camera sensor in terms of megapixels, going from 13MP to 17MP. A minor upgrade at best.

The real news will most likely come on September 25, just a few weeks after Canon’s highly anticipated full-frame mirrorless DSLR announcement. If true, Panasonic may attempt to counter Canon’s announcement with its own full-frame mirrorless Lumix model. However, keep in mind that these are all show-floor rumors and may be the product of overly vivid imaginations.

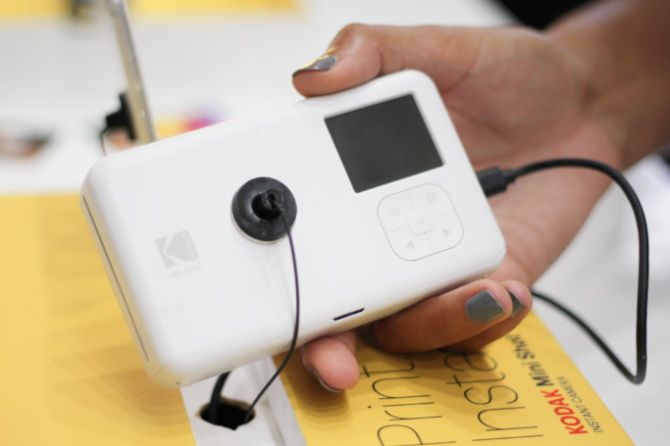
Kodak

PrintoMatic Instant Camera

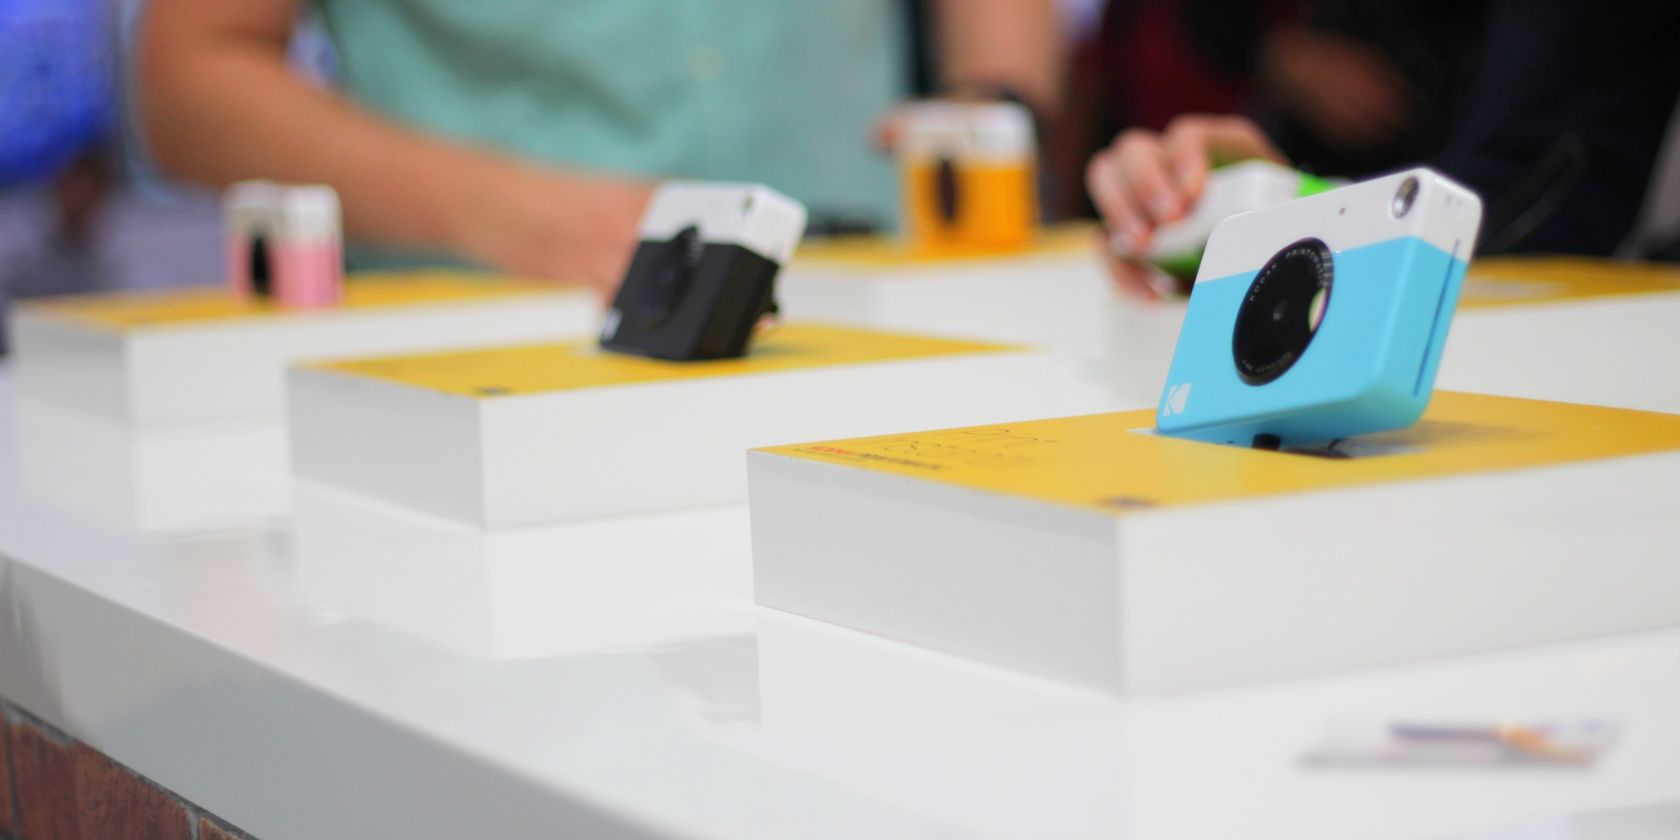
The newest model of PrintoMatic camera doesn’t add much in terms of features, but it managed to stand out with its lower cost and good print quality. At its listed price of $69.99, the PrintoMatic offers similar features as the more expensive Polaroid Mint.

2018’s PrintoMatic adds a simple but appealing feature: a wider array of color options. Among these are the colors:

  • Millennial Pink
  • White
  • Yellow
  • Black
  • Blue

I don’t know why Kodak rebadged pink as “Millennial Pink” while leaving their other colors with names as unoriginal as “Yellow” and “Blue,” but if you are a fan of the original PrintoMatic, the different colored models may impress you.

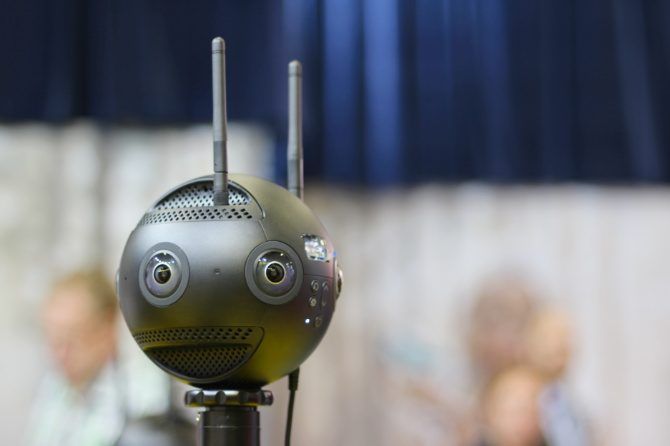
Insta360

Pro 2 360 Camera

The Insta360 360 camera is a professional-grade 360-degree camera capable of shooting 3D video in a complete circle.

A big issue with 360-degree 3D cameras is that they oftentimes unintentionally include the cameraman in the shot (because it shoots everything). The Insta360 is capable of removing the cameraman at up to 300-meters distance.

That’s extremely useful to professional filmmakers who don’t want to pay for digital cameraman removal in post-production.

What’s the Best Camera Announced at IFA 2018?

It’s a tossup between the PrintoMatic’s Millennial Pink color scheme or the Polaroid Mint Printer. If you forced me to choose between the two, I’ll come clean: the new camera revelations were overshadowed by the rumored announcement of full-frame mirrorless cameras from Canon and Panasonic. Look forward to them at Photokina 2018.

Read the full article: Cameras at IFA 2018: What’s New and What’s Hot?


Read Full Article
How to Use Smart Objects in Adobe Photoshop


smart-objects-photoshop

Smart objects are an incredibly useful feature in Photoshop. They let you edit images and add filters without any loss of quality. However, they aren’t that well known.

Beginners may not even have heard of smart objects, and casual users might think they’re an advanced option beyond their capabilities In fact, everyone should make use of smart objects.

In this guide, we’ll show you how to get started using smart objects in Adobe Photoshop.

What Are Smart Objects?

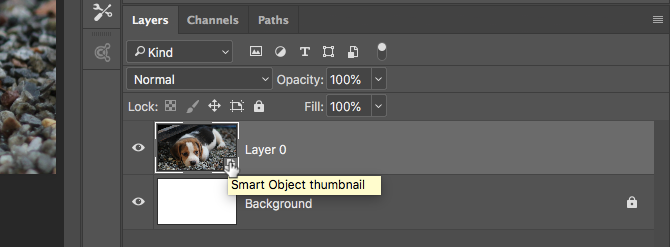
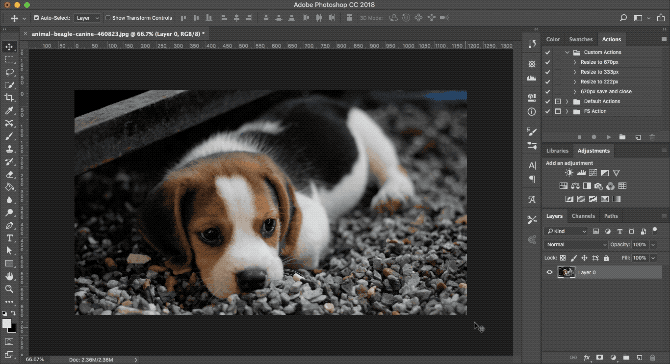
A smart object is a special kind of layer that enables true non-destructive editing in Photoshop.

When you convert a normal layer into a smart object, the content of that original source layer gets saved separately—as a file-within-a-file. No matter how much you edit the smart object, the original source content remains untouched.

smart object thumbnail

Smart objects can contain both raster and vector content, and work like normal layers. You can resize or transform them, apply filters or add adjustment layers. You’re also able to make selections and use masks.

What makes it even more useful is that you can access and edit the source content at any time, too. Just double-click the thumbnail image for the layer in the Layers panel.

Use Smart Objects for Non-Destructive Editing

Non-destructive editing is the main reason why you should use smart objects. You can scale, resize, and rotate them without any loss of quality.

Here’s how it works.

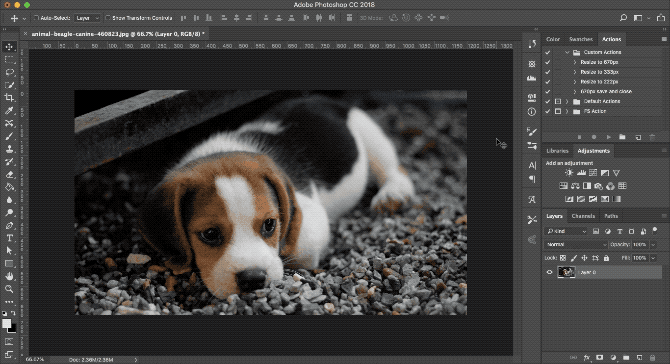
Open an image on a new layer. Use the Free Transform tool (Ctrl + T on Windows, or Cmd + T on Mac) to make the image smaller, then hit Enter to apply the change.

Now use Free Transform again to enlarge the image back to its original size. Notice how the image is now soft or pixellated.

free transform

This happens because when you made the image smaller Photoshop threw away the extra detail that was no longer needed.

Now try this.

Reopen the original image. Right click on the layer in the Layers panel and selecting Convert to Smart Object. Now repeat the above steps, making the image smaller, then bigger again.

free transform smart object

This time there’s no loss in quality. A smart object saves a copy of the original, unedited content so any changes you make are not permanent. You can even properly resize images fully without losing quality.

Edit Multiple Smart Objects Together

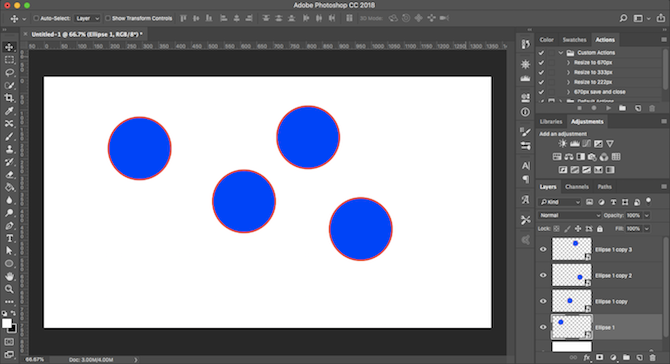
Often you’ll need to reuse the same picture, shape, or other object more than once in the same image. By turning it into a smart object you can edit multiple instances of that element in one go.

duplicate layer smart objects

Highlight the layer containing the content you want to repeat, right-click, and select Convert to Smart Object.

Next, duplicate the layer several times by hitting Ctrl + J on Windows, or Cmd + J on Mac. This creates multiple copies of the same smart object, all tied to the same source content.

Use the Move tool (V) to reposition all your duplicated layers.

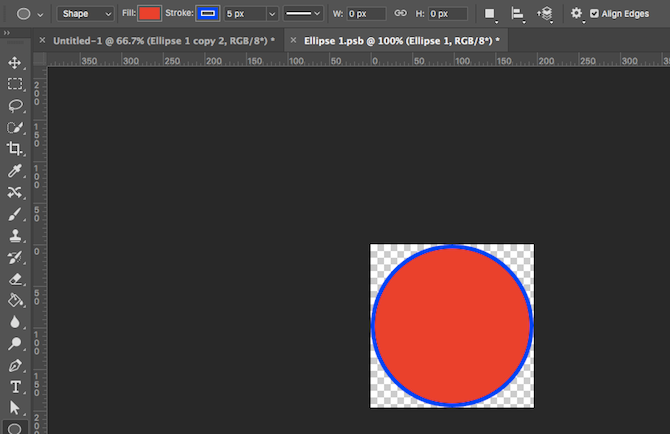
edit smart object source

Now, for any one of the duplicated layers, double-click the thumbnail in the Layers panel. This will open the original source content in a new tab. Edit it, then save, and close the tab.

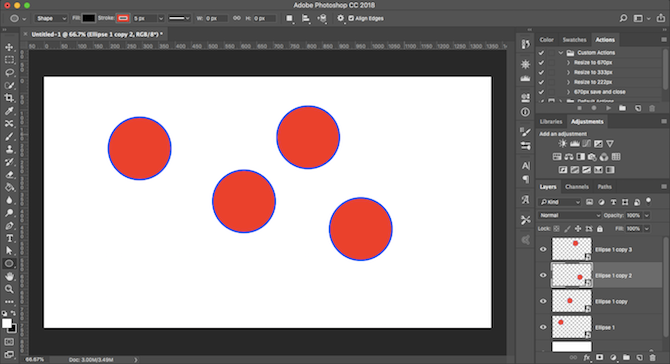
update smart objects

Back in your main file, all instances of the duplicated smart object will have been updated to reflect the changes you just made.

Edit Smart Objects Individually

You can, of course, use smart objects more than once but still edit them individually.

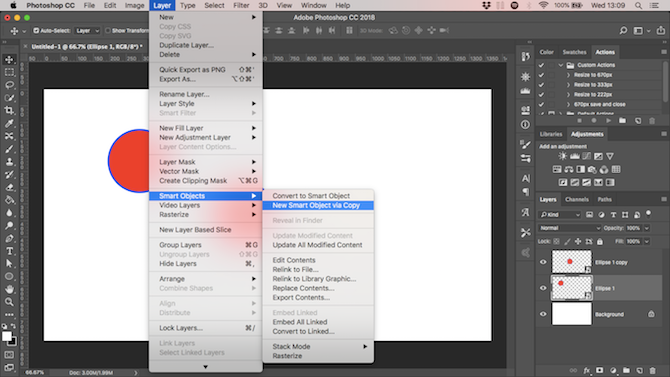
smart object via copy

To do this, don’t duplicate the layer.

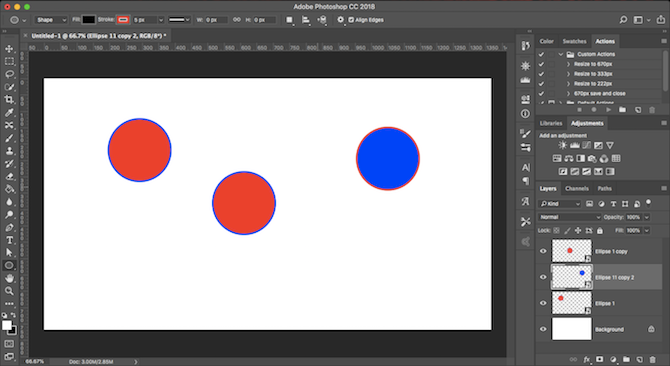
Instead, go to Layer > Smart Objects > New Smart Object via Copy. This creates a copy of both the smart object layer and the original source file.

edit single smart object

Use Linked Smart Objects Across Several Files

In most cases, a smart object uses content embedded in your image file. But you can also create smart objects linked to external files.

This allows you to reuse smart objects across several files and projects. Whenever you update the linked source image, all the files that share the smart object will also be updated.

Here’s an example.

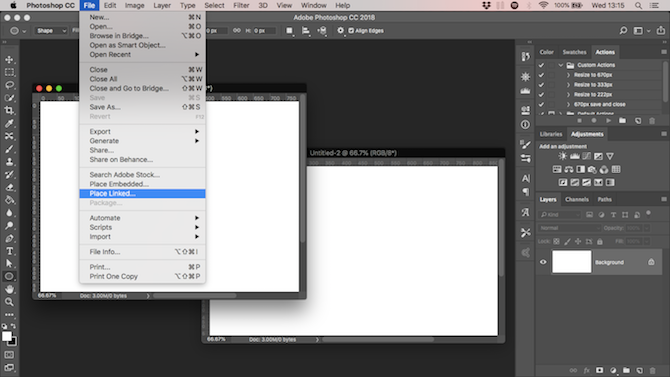
place linked

Go to File > Place Linked and select an image file from your desktop that you want to use as the basis for your smart object. This will open the image on your canvas as a smart object. Hit Enter to confirm.

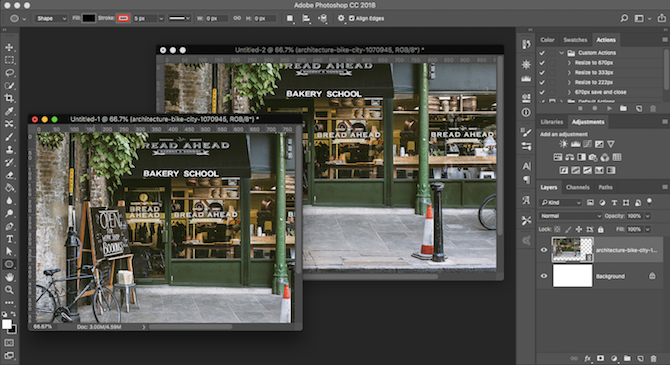
linked smart object

Create another file and do the same again, using the same source image. You should have two documents containing the same image.

Now open the external, linked source image, edit it, then save it. Both the files that link to this image will now be updated with the new changes.

update linked smart object

When you use this option, you need to take an extra step when saving your file. First, save it as normal. Then, go to File > Package then hit Choose to save both your Photoshop file and the linked image together in a folder. If you move or delete the linked image otherwise, your file will break.

Use Smart Filters

Smart objects give you a massive upgrade to Photoshop filters, turning them into smart filters.

Filters are normally quite heavy handed. You apply them, and if you don’t like the effect you have to undo it and try again.

Smart filters on smart objects are non-destructive. You can edit them at any time, and even hide or delete them if you no longer need them.

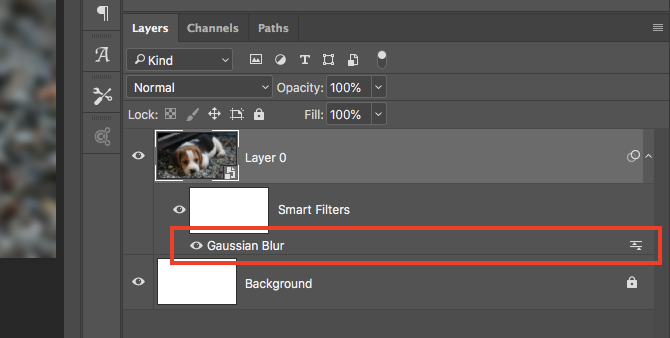
smart filters

It’s simple to use. Turn your layer into a smart object then apply a filter in the normal way. Look in the layers panel, and you’ll see the filter listed below the smart object layer.

Double-click to edit it, or drag it onto the trashcan to remove it.

Mask Filters in Photoshop

Even better, you can mask smart filters to control where on your image they take effect.

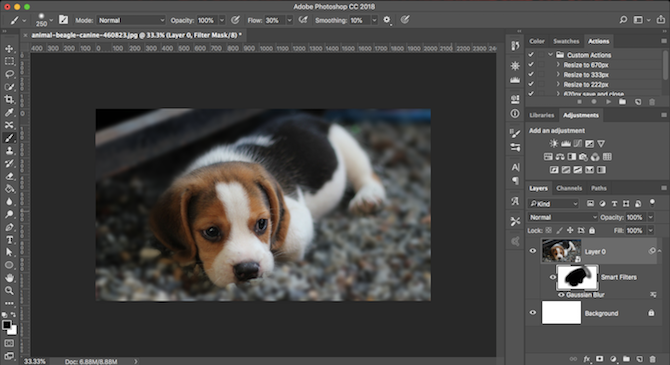
smart filter mask

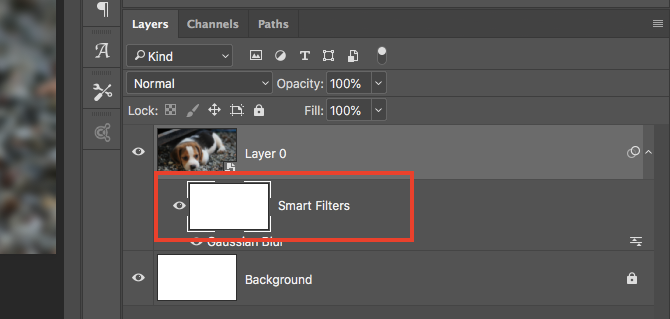
Smart filters have masks automatically applied to them. It’s the box above the filter in the layers panel. The mask is empty (white) by default. This means the filter effect is applied across the whole layer.

Click the mask thumbnail, select a brush, and set it to black. Now start painting over your image. The filter effect is removed from all of the black areas.

Set the brush to gray to make it partly visible.

smart filter bokeh effect

Masking filters like this enables you to create bokeh effects in portraits, or to selectively apply sharpening or noise reduction to specific areas of a photo.

Use Smart Objects to Create Templates

A final great reason to use smart objects is that they make it easy to create templates in Photoshop.

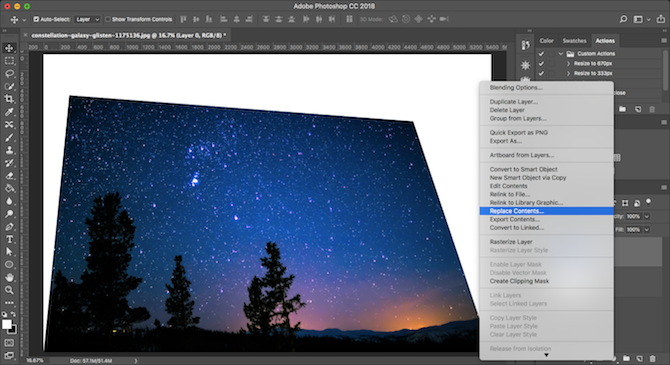
Just right-click on the smart object layer and select Replace Contents. Then select the new image that want to use as the source content.

replace smart object contents

Why is this so useful?

Because if you’ve applied filters, or altered the shape of a layer, then the new source image for your smart object will retain these properties. This wouldn’t happen if you simply dropped in a new image onto a separate layer.

Downsides to Using Smart Objects

Smart objects are extremely useful, but they have a few downsides you need to know about.

First, files that contain smart objects are heavier. They’re larger and often require more system resources.

Second, they can also be more complex. If you’re using a lot of smart objects you need to label and group your layers properly to help stay organized.

rasterize smart object

Third, smart objects are not directly editable. You can’t use things like the brush tool or clone stamp on one without converting it back to a raster layer, losing the benefits of smart objects in the process. Do this at Layer > Smart Objects > Rasterize.

Alternatively, you can directly edit the smart object’s source content. In most cases, this can be a better option.

The Next Steps

Smart objects are so useful, whether you use Photoshop for vector graphics or photo editing. And they’re easy enough to use that anyone—from beginners to pros—can benefit from using them.

As we’ve seen, one of their best uses is for adding filters to images. We’ve covered the basics in this article, but there’s a lot more you can do with them. Check out our guide on how to apply a smart filter to multiple layers to discover how you can take things to the next level.

Read the full article: How to Use Smart Objects in Adobe Photoshop


Read Full Article
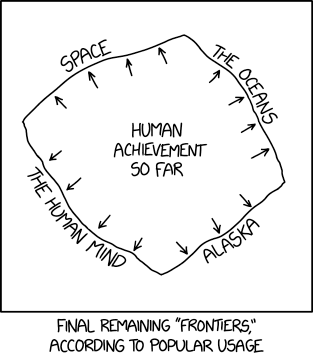
Frontiers


Frontiers