20 February 2013

Get an Email Alert (with Picture) When Someone Tries to Log into your Computer


You have a feeling that someone else used your computer (or at least made an attempt to login) while you were out for a quick coffee break. Maybe that colleague with whom you share the cubicle knows your password or he made a few guesses before finally giving up.


How do you get notified when such an attempt is made to intrude into your computer?


Computer Webcam Alert

Email alert with a webcam picture of the intruder.


Tweet this Share on Facebook


Digital Inspiration @labnol This story, Get an Email Alert (with Picture) When Someone Tries to Log into your Computer, was originally published at Digital Inspiration on 20/02/2013 under Security, Webcam, Internet.


1,000 Free Music Albums Up for Grabs at Flipkart


Flyte, if you are new, is an online music store from Flipkart where you can download individual songs and music albums in MP3 format. The files are DRM-free meaning you can listen to your purchased music on any device without restrictions and using your favorite media player.


It’s been a year since Flyte launched and, to celebrate, Flipkart is giving away 100 music albums per day, across various genres, for the next 10 days.


Download Free Music from Flipkart

Download music albums in MP3 format from Flipkart for free for the next 10 days.


To get started, go to flyte.com, pick your favorite genre and hit that “green” download button to add a music album to your online MP3 library. You can buy /add the tracks in one go and download them anytime later.


The listed music albums will change daily until February 28 so do remember to check the site every single day.


There are no string attached to this offer – you neither have to make any purchases at Flipkart nor do you need to have any minimum balance in your Flipkart Wallet. All you need is an account at Flipkart and the music is all yours.


You can download music directly from the Flyte website and they also have discovery apps for Android and iOS devices. The only restriction is that you can download music only within the territory of India.


Tweet this Share on Facebook


Digital Inspiration @labnol This story, 1,000 Free Music Albums Up for Grabs at Flipkart, was originally published at Digital Inspiration on 20/02/2013 under Music, Offers, India.


Find The Best GIFs On The Web With Giphy, A Dedicated Search Engine For Animated Images


search engine for animated gifsThe humble GIF, or Graphics Interchange Format , has been with us since 1987, meaning that it’s just over 25-years-old. While this is a format that can be used for still images, its most obvious use is in short animations. And by short we’re talking a few seconds at the most. Thus GIFs have become the staple of many websites which offer simple, easy-to-consume content.


GIFs are commonplace across the Web, but it’s sometimes hard to find the right one for the right situation. Thankfully a new dedicated animated image search engine just for GIFs has arrived. Its name is Giphy and it’s being touted as the place to “Search the best GIFs in the world.” But does it live up to the hype? Let’s “Search in a Giphy” to find out.


The Power Of GIFs


search engine for animated gifs


GIFs are now part of the lifeblood of the Web, being a stock source of memes across social networking sites such as Facebook and Twitter, and especially the likes of Reddit (one of the seven wonders of the Web) and Tumblr. This is due to their ability to deliver instant gratification, providing entertainment value in a short space of time.


While videos are arguably more popular, particularly thanks to YouTube, GIFs deliver a succinct message in an instant without the need to even press ‘Play’. GIFs are, in essence, perfect for those of us with short attention spans. Which accounts for 90 percent (a complete guess not based on any form of scientific analyses) of the Internet population.


And so we come to Giphy.


Giphy


animated image search


Giphy is an animated image search engine just for finding GIFs online. This is its single purpose in life, the whole reason it was created. It features a simple, stripped-down interface which places GIFs front and center. It was put together by Alex Chung and Jace Cooke, who, according to Daily Dot, “couldn’t get over how cumbersome it still was to find and share GIFs.


The homepage presents you with a generous search bar above single GIFs representing tags which are currently proving popular. Below that is a selection of the most popular tags overall, presented without accompanying GIFs. Click on a suggested tag or search for one of your own and you’re presented with the first 25 GIFs featuring that tag.


None of the GIFs move until you move your cursor over them, at which point they spring to life. If you see one you want to explore further you can click on it to be shown it in its original size. You’re also then given the option to share the GIF with others, view details about its source, and see other tags associated with it.


A Start, Not An End


animated image search


It should be noted at this point that Giphy is far from perfect. There have been numerous complaints from users that they’re getting no results, a lack of results, or GIFs not really suited to the search terms. This is primarily because Giphy is sourcing GIFs from Tumblr, and organizing them by the tags assigned to each one. Unfortunately not everybody plays by the rules and tag images correctly, hence the spotty results.


However, this is a young site, and so it’s likely to improve over time. Giphy may currently be lumbered with a crude system for finding and sorting results, but a little extra work on the part of the people behind the site could see it turned from a nice short-term diversion to a must-bookmark repository for all things related to GIFs.


What About Google Images?


search engine for animated gifs


You’ve probably reached this point of the article with the question, What about Google Images? running through your head. And it’s a fair point. Google already offers the ability to search the Web for GIFs, and only for GIFs. It’s as simple as clicking on ‘Advanced Settings’ and then narrowing your results by file type to ‘GIF’.


In some cases this method is superior to Giphy, with Google often throwing up older and better GIFs. But even Google isn’t perfect. For starters not all of the GIFs found through Google Images are animated ones, which is what most people are really after. You also have to actively click on the image to watch it, whereas Giphy sets it playing when the cursor is merely moved across the image.


Conclusions


Giphy can only be considered a work in progress right now, but I for one am glad it exists. There are several other GIF search engines out there, but they’re nowhere near as refined as Giphy already is. If Giphy is given the love and attention it deserves, with its search methodology refined and database grown, then it could become an essential part of the Web.


What do you think of Giphy? Or of the popularity of animated GIFs as a whole? As always you’re invited to let us know your thoughts and views in the comments section below.


Image Credit: Gareth Saunders


The post Find The Best GIFs On The Web With Giphy, A Dedicated Search Engine For Animated Images appeared first on MakeUseOf.


Cool Things To Search For With Graph Search [Weekly Facebook Tips]


graph search facebookFacebook Graph Search recently made a huge splash on the search scene, allowing all Facebook users to mine data that is either public or visible to them via their friends. The result is that regular users now have access to all sorts of information about friends and strangers. Some of that information can be quite interesting or useful, while some of it can be downright scary.


It’s worth noting that graph search has the power to divulge your personal information quite rapidly to friends or strangers, so please do re-check your Facebook privacy specifically for this. Regardless of what you think of Facebook Graph Search, it seems here to stay. So, here’s a bunch of interesting things to search for that could make your life easier, a little bit stranger or just make you more enlightened.


Get Graph Search


For starters, if you don’t already have Facebook Graph Search enabled, you can sign up for it here. You may need to wait a little while before it’s enabled. Soon though, it will be rolled out for everyone.


Use Facebook As A Dating Site


Facebook’s graph search makes it really easy to search for single people near you. Most importantly, you can narrow that down to friends-of-friends who have similar interests to you. So, the next time you go to a party and see that particular person, you already know of at least one common interest – and that they’re single! This means that life for single people on Facebook just got a whole lot easier and creepier, depending on how you look at it.


graph search facebook


Find Out Really Creepy Things About Your Friends


If you didn’t think searches like this could get really creepy and invasive, try searching for “My friends who are married and like prostitutes” or something equally crass. Luckily, my friends are either squeaky-clean or not silly enough to put that sort of information on Facebook.


graph search facebook technology


Stalk High-Profile People


Have you ever wanted to know the sorts of things Mark Zuckerberg likes? I mean, it’s only fair that we take a look. Similarly, we could be searching for pages, places or more.


graph search facebook technology


Since I don’t know any of Mark’s friends personally, all of these photos must be public ones. However, it’s still pretty interesting to take a peek. Flip that on its head, though, and you have a creepy way of stalking your friends and their friends – especially when you consider places check-ins. If that cute single person you found earlier has publicly shared their check-ins, you might easily learn their favourite coffee place, clubs and other haunts.


graph search facebook technology


Research Your Travel Destinations


If you’re heading off for a holiday, why not check out which places your friends visited in those cities? You’ll get a quick overview of the must-see places, plus if you narrow it down to restaurants or clubs you might find some great places to spend some leisure time while you’re there.


graph facebook search


Find Out About Your Workmates


If you’re struggling to find common topics to chat about around the water cooler, why not check out what the people you work with like to watch on TV? Or you could find out about movies they like, books, restaurants, hobbies, or whatever else takes your fancy. Perhaps if you’re preparing for a job interview you could do something similar with the new company.


graph facebook search


Find Out More About Your Customers


There are dozens of useful searches you can do to check out what your customers like. For starters, why not see what other pages are liked by fans of your company’s page? And which pages are liked by people who like the top pages of that search?


graph facebook search


But all that is very business-like. Why not check something fun instead? What movies do your fans like? What hobbies do they like? Just for interest, MakeUseOf fans seem to like photography, travelling and reading.


graph search facebook


As you can see, with Facebook Graph Search it is now really important to ensure your privacy settings are set precisely as you wish. Please do take the time to read more on how to limit your exposure on Facebook.


Have you tried Facebook Graph Search yet? What are your favourite searches so far? Have you found a great way to make use of it?


The post Cool Things To Search For With Graph Search [Weekly Facebook Tips] appeared first on MakeUseOf.


19 February 2013

Manage Your Hard Disk Partitions Like A Pro With EaseUS Partition Master [Windows]


hard drive partition softwareWhen you ask a tech crowd about hard drive partition managers, many people will agree that EaseUS Partition Master is the best tools for the job. Why? Because it offers many great features, yet remains easy to use. It’s also MakeUseOf’s favorite partition manager for Windows.


So what does a hard drive partition manager do? New hard drives typically come with one large logical storage unit that spans the entire size of the disk. A partition manager can slice that space up into multiple partitions, meaning it can be used like multiple disks. There are many reasons why you would want to do that, for example to boot more than one operating system from the same hard disk, or to store personal data separately from your operating system, meaning you can wipe the system partition without losing your files. Now, what if one partition becomes too small or you don’t need it anymore? A partition manager can also resize, move, and merge partitions. While Windows does provide native disk management tools, third party software usually provides additional features.


Note that EaseUS Partition Master is launched from a start screen that features two other EaseUS tools, which are the EaseUSData Recovery Wizard and EaseUS Todo Backup. This review focuses on the partition manager only.


hard drive partition software


Feature Overview


  • maintain data during any partitioning operations

  • resize or move partitions, includes extending NTFS system partition without reboot

  • merge two adjacent partitions into a bigger one

  • create multiple partitions

  • delete partitions (data is lost)

  • wipe data on unallocated space

  • wipe a whole disk or wipe a selected partition

  • format with new file system, including FAT, NTFS, EXT2, and EXT3 (data is wiped)

  • format with new cluster size between 512Bytes and 6KB (data is wiped)

  • change label and drive letter

  • hide partition

  • convert primary partition to logical partition and vice versa

  • defragment disk or partition

  • run a disk surface test to find bad sectors

  • rebuild MBR to boot system again

  • manage Linux partitions formatted with EXT2 or EXT3 file system

  • supports hardware RAID, multiple removable storage devices, standard hard disk and GPT disk

  • supports up to 2TB partition on MBR and 4TB partition on GPT

  • runs under Windows 2000 / XP / Vista / 7 SP1 / 8 with either 32-bit or 64-bit


Interface Overview


Front and center are all disks connected to your computer. Connected drives are listed as Disk1, Disk2 etc. Under each disk header, you will find all partitions of the respective disk and their properties.


hard drive partition manager


Below the drive list, you see the disk map, which presents a graphical overview of each disk’s partitions.


hard drive partition manager


The left-hand menu shows all available operations for each partition. See how the menu changes as you select different partitions.


hard drive partition manager


Key operations, like Resize/Move, Delete, or Merge are also shown as buttons in the toolbar on top.


windows hard drive partition manager


In addition, all operations are accessible via the menu shown in the screenshot above. Moreover, you can change what you see or how items are arranged via the View menu.


windows hard drive partition manager


Using EaseUS Partition Master


The main purpose of this tool is to create, resize, move, delete or merge partitions, and – with the exception of deleting a partition – without compromising the data stored on each disk or partition. After closely inspecting the interface, you should have an idea how to use EaseUS Partition Master. I will take you through the finer detail of basic operations here, using an unpartitioned external hard drive.


I want to create a partition. Note that this option does not exist. So first, I have to create some space, by resizing the existing single partition. To do this, I select Disk2, my external drive, and click Resize/Move. A window pops up that allows me to change the size and position of the selected partition.


windows hard drive partition manager


Grab one of the ball-shaped handles on the left or right of the partition and move it or grab the partition in its center to move it as a whole. The latter only works if there is unallocated space to its left or right. Note how the disk map at the bottom updates, showing the result of your changes.


I don’t want my data to be moved, so I create unallocated space on the right side of the existing partition and click OK. The disk map now shows unallocated space for my external hard drive.


I can select the unallocated space and click Create under Operations or in the toolbar to create a new partition. A window will pop up where you can select a partition label, file system, drive letter, cluster size, and how much of the unallocated space should be dedicated to the new partition. Again, you can drag the ball-shaped handles to change the location and size of your new partition.


Now I have a smaller partition with my data and a new partition flanked by unallocated space. Try to grab the partitions and move them around in the disk map. That is what I call intuitive software!


Now if you tried this yourself, you may have noticed that all of this went pretty quick. Did EaseUS Partition Master really create a new partition in a matter of milliseconds. No, it didn’t. None of the operations are immediate. They are all parked in Pending Operations in the bottom left.


hard drive partition software


You can undo changes via the toolbar or General menu and once you are ready, hit Apply. In other words, you can safely play around, without making any actual changes.


Conclusion


EaseUS Partition Master has a very clear interface, yet offers many advanced features. It is easy and intuitive to use and protects the novice from making hasty mistakes. It is superior to Windows’ native disk management because it is more flexible. For example a partition can be extended, regardless of where unallocated space sits, simply by dragging everything into place.


We have covered other drive partition tools in the past, including GParted. Do you have a favorite third party partition manager or are you completely satisfied with Windows’ native disk management?


The post Manage Your Hard Disk Partitions Like A Pro With EaseUS Partition Master [Windows] appeared first on MakeUseOf.


So, You Think You Can’t Write? Let’s Get You Back On Track


writer tipsStumped? Lost for words? Are you often in the position of being unable to get yourself to write anything, even though the deadline is fast approaching? Yeah, writer’s block sucks – and it happens to all of us. Most writers, after suffering a few days where it got really bad, make plans to get around the problem as best as possible. Now is your time to do the same.


There are lots of great ideas anyone can try, regardless of your writing needs. It doesn’t matter if you’re a student writing essays, a casual writer doing NaNoWriMo, or a professional author writing a new novel. In this list of writing tips there are bound to be a couple of ideas which will make a huge difference to the way you approach your writing. So, read on!


1. Get Comfortable


If you’re fussing around trying to avoid back-ache and eye strain, you’re not writing. Set up your desktop or laptop so that you’re actually comfortable, then every future attempt to write will only be thwarted by you not knowing what to write.


writer tips


2. Stop Procrastinating & Write


Sometimes, you just need to open up a blank page and get writing. It doesn’t matter what the subject is, really. Once you’ve written a few pages, you’ll be ready to get stuck into the important stuff. So, get yourself a random writing prompt and see how quickly you can get a few words out:


3. Ensure Your Desktop is Distraction-Free


Get rid of email notifications, turn off anything that beeps or pops up, ensure your digital writing space is clear and uncluttered, and make sure your real-world environment is clean, quiet and peaceful too. Serenity brings creativity with it & many writers swear by ensuring they have a neat and peaceful place to write, both digitally and physically.


writer tips tricks


4. Dictate When Possible


If you find your typing speed slows you down, or that getting free time with your hands ready for typing isn’t likely, you might be better off using some dictation software. This is great if you’re out and about with a tablet often.


5. Read & Listen To Creative Inspiration


If you get a daily dose of inspiration and advice on creating characters and other writing devices, you’ll be perpetually coming up with great ideas you can use. This is the state you want to be in! It’s better to forget a handful of half-formed ideas than to never have them in the first place. So, subscribe to creative podcasts, read blogs on writing, install brainstorming software, use free web tools, and take time to immerse yourself in decent literature. Every bit helps.


Here’s some recommendations from MakeUseOf staff:


6. Make Notes Of Any Great Ideas


It doesn’t matter what you use: Evernote, OneNote, RememberTheMilk or a spreadsheet. What matters is that whenever you have a great idea for an article, story, character or plot you jot it down somewhere where you can refer to it when you need some inspiration later. Nothing is better than realising that you already came up with the ideas and all you need to do now is write. Dictating your notes is also a great idea if you’re pressed for time.


writer tips


7. Keep Synced Backups


Nothing is more annoying than wanting to work on a particular piece you are writing, only to find that you don’t have a current version with you. Oh wait, yes there is – losing your work altogether. To avoid this issue, and to protect your writing from digital or real-world disasters, keep organised backups of your writing that are synced between your devices. MakeUseOf staff recommend numerous ways to do great backups, but here’s a few dedicated to writing backups:


What are your best tips for getting your writing back on track? How do you overcome procrastination? Where do you get your inspiration? Let us know in the comments!


Image Credit: Shutterstock, Shutterstock, Shutterstock, Shutterstock


The post So, You Think You Can’t Write? Let’s Get You Back On Track appeared first on MakeUseOf.


How To Open Folder Options In Windows 8


CLICK HERE TO SEE FULL POST


In Windows 8, Microsoft has introduced Ribbon in Windows Explorer. Because of this, the new file explorer or Windows Explorer looks drastically different from previous versions of Windows. The new Ribbon Explorer helps quickly access various files and folders options. Many advanced settings are located under Folder Options in Windows. Options such as show drive [...]

18 February 2013

Everything You Need To Know About Windows 8 Swipe Gestures On A Laptop


windows 8 gesturesWith the introduction of Windows 8, a lot of brand-new touch-friendly features have been added to make the operating system enjoyable to use on touch-enabled devices. However, for typical laptops which only have touchpads for their input, it may be a bit confusing as to how to move your mouse in order to achieve the same results. Therefore, with some tips and drivers in hand, here is how you can easily take advantage of Windows 8′s new Modern UI goodies.


Synaptics Drivers


Before we begin, it’s important to note that Windows 8 does support some touchpad gestures as well, in addition to simply pushing your mouse pointer to certain areas of your screen. There’s nothing you need to do if you bought your computer with Windows 8 already installed, but if you upgraded to Windows 8 yourself, you may need to go to Synaptic’s website and download their latest drivers to enable gesture support.


Charms Bar


windows 8 gestures

The Charms bar is what appears on the right side of your screen to access application and system settings, the start button, and a few other items. Touch-screen users can reach it by swiping to the left from the right edge of the screen. However, touchpad users have three options – either push your mouse pointer into the top right or bottom right corner and then move it to the center of the right edge, put your finger on the right edge of your touchpad and swipe inward, or hit Win + C on your keyboard.


App Switcher


Accessing the app switcher is very similar to how the Charms bar is accessed, except on the opposite side. Therefore, touchscreen users can swipe to the right from the left edge of their screen. Touchpad users can push their mouse pointer into the top left or bottom left corners and then move to the center of the left edge, put your finger on the left edge of your touchpad and swipe inward, or hit Win + Tab on your keyboard. One thing to note – all desktop applications are grouped together into the “Desktop” app, so switching between those desktop applications can still be achieved with the trusty Alt + Tab keyboard combination.


App Bar


windows 8 gesture control

If you would like to access the App bar of a native Windows 8 app, you have slightly different options. Touch-screen users can simply swipe down from the top edge of their screen, and touchpad users can do the same thing by swiping down from the top edge of their touchpad. You can also right-click anywhere on an app, or hit the Win + Z key combination.


Horizontal Scrolling


Horizontal scrolling is another feature in Windows 8 which can be easily accessed. Both touch-screen and touchpad users can do horizontal scrolling by swiping two fingers to either the left or right. If you are using a mouse, you can horizontally scroll by scrolling the wheel up or down. The reasoning why scrolling the wheel up or down corresponds into horizontal scrolling is because the start screen as well as all Windows 8 apps expand horizontally rather than vertically.


Zooming And Rotation


You can also zoom in and out as well as rotate. Zooming in and out can be achieved by placing two fingers on the touchpad and then spreading them out or putting them together. You can also use the Ctrl and + keyboard combination to zoom in, or the Ctrl and – keyboard combination to zoom out. Rotation can be accomplished by using two fingers and then turning them to mimic rotating a circle. Rotation doesn’t have a keyboard shortcut, however.


Turning Them Off


windows 8 gestures

While it’s cool to have these gestures to get easier access to Windows 8′s UI, it may get in the way of your productive habits if you tend to swipe around on your touchpad in much the same way as the gestures defined by Windows 8. If you need to turn them off, there’s a way to change entries in the registry which control whether the gestures are enabled or disabled. To do this, open up Notepad and copy and paste the following code into it:


Windows Registry Editor Version 5.00

[HKEY_CURRENT_USER\Software\Synaptics\SynTPEnh\ZoneConfig\TouchPadPS2\Right Edge Pull]

"ActionType"=dword:00000000

[HKEY_CURRENT_USER\Software\Synaptics\SynTPEnh\ZoneConfig\TouchPadPS2\Left Edge Pull]

"ActionType"=dword:00000000

[HKEY_CURRENT_USER\Software\Synaptics\SynTPEnh\ZoneConfig\TouchPadPS2\Right Edge Pull Extended Zone]

"ActionType"=dword:00000000

[HKEY_CURRENT_USER\Software\Synaptics\SynTPEnh\ZoneConfig\TouchPadPS2\Top Edge Pull]

"ActionType"=dword:00000000


Then save that file somewhere on your computer as “gestures.reg”. Just make sure to choose “All file types” in the Save As dialog and then typing out the whole filename, including the file extension. Then find the file you just saved and run it, clicking on Yes for all warnings that pop up. After it completes, you’ll need to restart your computer to load the new settings.


You can also enable them again if you previously disabled them using the same trick. However, you’ll need to paste this code into your gestures.reg instead:


Windows Registry Editor Version 5.00

[HKEY_CURRENT_USER\Software\Synaptics\SynTPEnh\ZoneConfig\TouchPadPS2\Right Edge Pull]

"ActionType"=dword:00000002

[HKEY_CURRENT_USER\Software\Synaptics\SynTPEnh\ZoneConfig\TouchPadPS2\Left Edge Pull]

"ActionType"=dword:00000002

[HKEY_CURRENT_USER\Software\Synaptics\SynTPEnh\ZoneConfig\TouchPadPS2\Right Edge Pull Extended Zone]

"ActionType"=dword:00000002

[HKEY_CURRENT_USER\Software\Synaptics\SynTPEnh\ZoneConfig\TouchPadPS2\Top Edge Pull]

"ActionType"=dword:00000002


Conclusion


Hopefully you can make better use of your new Windows 8 system now that you know about these tips for using the operating system with a touchpad. While I still think that the OS is better suited for actual touch-screens, it’s still easy to remain productive with just a typical laptop touchpad. And if these wordy instructions didn’t click in your mind, maybe this video will help you a bit. Also, if you have any other Windows 8 issues, check out this article, or if you’re just getting started with the new operating system, check out our guide on Windows 8!


What do you use with your Windows 8 system, a touchpad, touchscreen, or both? How do you feel about any of these input options? Let us know in the comments!


The post Everything You Need To Know About Windows 8 Swipe Gestures On A Laptop appeared first on MakeUseOf.


Chromebooks and Battery Life


There's something wrong about the latest Chromebooks: battery life. Cr-48, Google's prototype hardware, had a 63Wh battery that provided more than 8 hours per charge. Samsung's first Chromebook had a similar battery that provided "up to 8.5 hours of continuous use".


For some reason, a few months after introducing the Series 5 Chromebook, Samsung switched to a different battery: 41Wh and only 6.5 hours of use. The updated Series 5 Chromebook, which uses a Celeron processor, has a battery with a larger capacity: 51Wh, but the same battery life. Samsung's latest Chromebook, which uses a Cortex A15 chip, has a 30Wh battery and the same battery life because the ARM chip is more efficient.


What about the latest offerings from Acer, Lenovo and HP?


- Acer C7: 37Wh, 2.5Ah, 3.5 hours battery life

- HP Pavilion: 35Wh, 2.55Ah, 4.25 hours battery life

- Lenovo X131e: 6.5 hours battery life.


It's not clear why the latest Chromebooks no longer have a great battery life, but the new batteries are obviously cheaper and lighter. Google's Chromebook features page no longer mentions the word "battery", even if this was one of the main selling points for the first Chromebooks.


Google Docs Templates, Still Available


Google has recently updated the "Create" menu from Google Drive and removed the templates option from the menu. You can still find it if you visit this page.


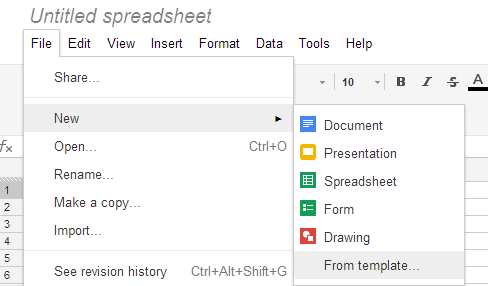
Another workaround is to create a document, spreadsheet, form, drawing or presentation, click the "File" menu, select "New" and then "From template".


Maybe Google finds a way to integrate the templates section with the Google Drive apps, so that it doesn't open in a new tab.