16 August 2020

7 Fixes When Your Android Phone Won’t Connect to Your Computer


android-wont-connect

Can’t get your Android phone to connect to your computer? This can happen for many reasons, including an incorrect connection mode or a lack of proper drivers. The smallest of issues can prevent your computer from detecting your device.

If you have no clue what’s causing this problem, walk through the below methods one by one. Each tip fixes a certain problem , so keep trying them until your computer detects your phone.

1. Check the USB Connection Mode on Your Phone (Windows/Mac)

Your Android device offers several connectivity modes when connecting your phone to your computer. Each mode has different purposes, and some could cause your phone not to show up on your computer.

Changing the connection mode on your phone can get your computer to recognize it. Here’s how to do that:

  1. Connect your phone to your computer using a USB cable.
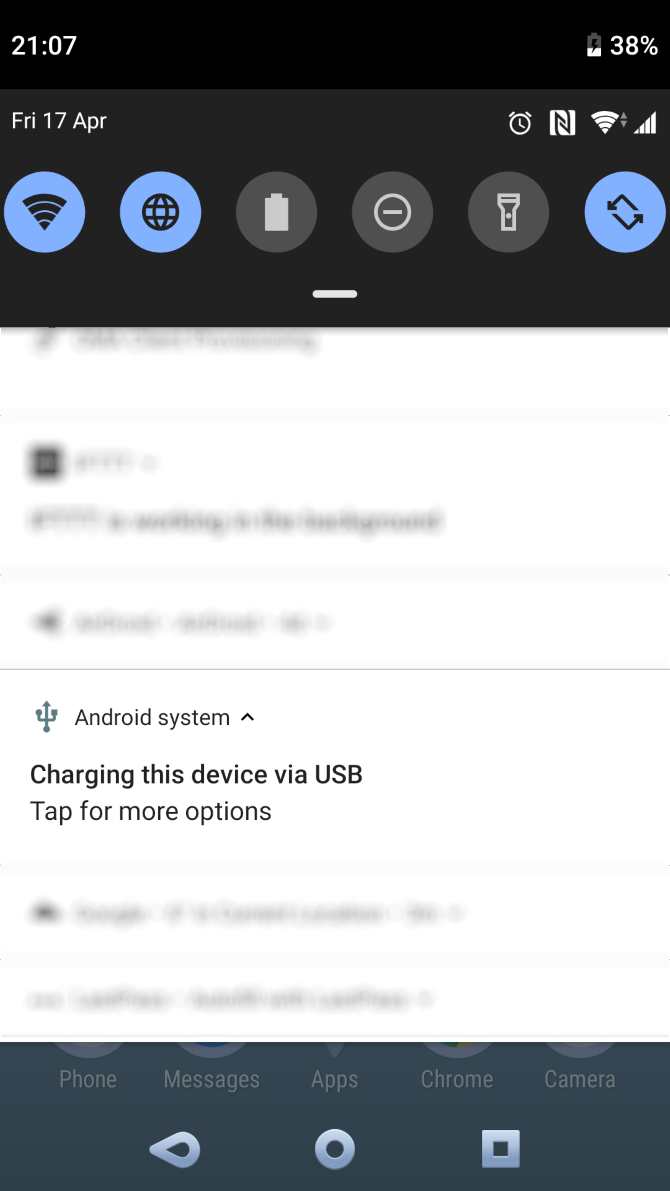
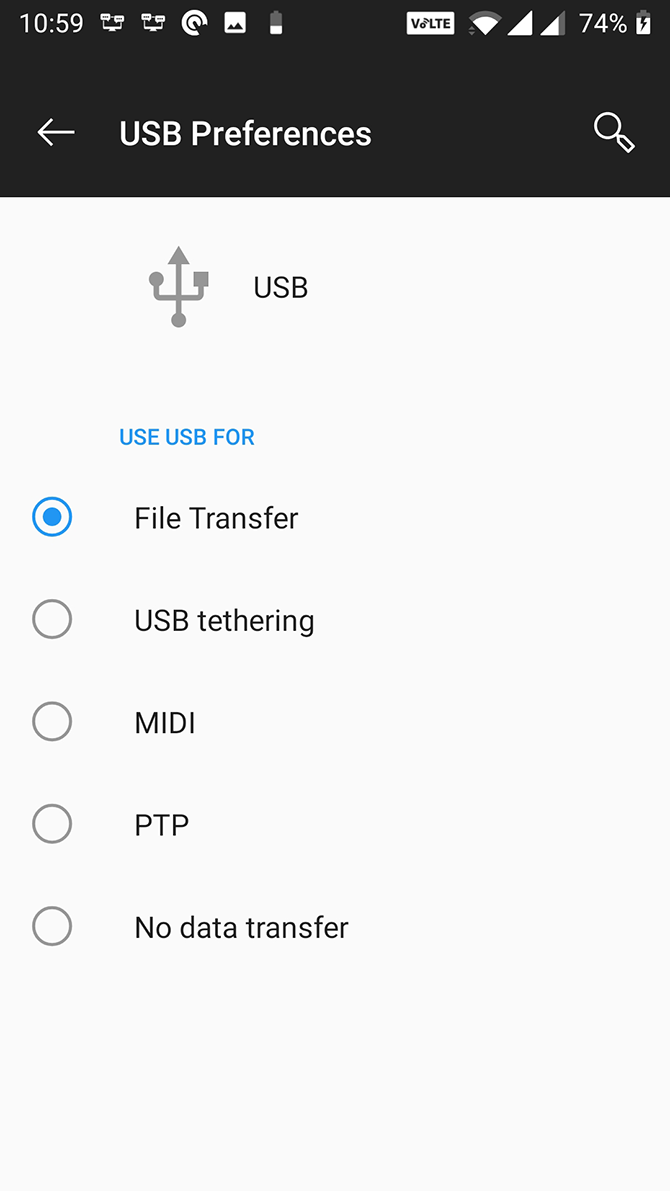
  2. Pull down the notification bar, and you should see an Android system entry that shows the current connection mode. Tap on the connection mode item to open the USB Preferences page.
  3. Select File Transfer.

Once you do this, your phone should appear as a storage drive in File Explorer or Finder. Now you can start copying files to and from your device.

2. Update the MTP USB Drivers on Your Computer (Windows)

If you’re looking to use your phone as a media device on your computer, you need to enable the MTP mode on your phone. This requires that you have MTP drivers installed and updated on your computer.

Most computers have those drivers installed already. If they’re outdated, you can easily update them using the Device Manager:

  1. Connect your phone to your computer using a USB cable.
  2. Open the Device Manager by right-clicking on the Start button or hitting Win + X.
  3. Find your Android device under Portable Devices, right-click on it, and choose Update driver.update android drivers
  4. Select Browse my computer for driver software.
  5. Click on the Let me pick from a list of available drivers on my computer option at the bottom.
  6. Select MTP USB Device from the list and click on Next at the bottom.update mtp android drivers

Once the drivers are updated, your phone should work as a media device.

3. Use the Android File Transfer Utility (Mac)

Unlike Windows, you can’t directly transfer files from Android to a Mac. You need to first install a utility on your Mac that acts as a bridge between your Mac and your Android device.

This utility is called Android File Transfer, which you can download from the official Android website:

  1. Grab the Android File Transfer tool from the Android website.
  2. Launch the downloaded file and drag the tool to your Applications folder.
  3. Double-click on the tool in your Applications folder (or search for it using Spotlight with Cmd + Space) to launch it.
  4. Plug your Android phone into your computer using a USB cable.
  5. Your phone should appear in the newly installed tool.android file transfer tool

Once you see your phone, you can start moving your files as you please.

4. Use a Different USB Port and USB Cable (Windows/Mac)

If you’ve run through the above and still have an issue, perhaps the USB port or cable that you’re using is defective or damaged. This will prevent your computer from recognizing your device, of course.

Luckily, most computers have multiple USB ports. Try another port on your machine to see if your phone connects. You should also connect using a different USB cable and see if that makes your computer recognize your device.

5. Update Your Operating System Version (Mac)

On Windows, you can connect your Android phone regardless of your operating system’s version. However, on Macs, older macOS versions can have issues with Android connections.

Therefore, you should update your macOS version when you run into connection issues between your phone and computer. You can do this as follows:

  1. Click on the Apple logo at the top-left corner and choose About This Mac.
  2. Click the Software Update button to update your Mac’s software.update macos version
  3. If a macOS update is available, download and install it on your machine, then try the connection again.

6. Uninstall Other Android Connectivity Tools (Windows/Mac)

Some phone manufacturers offer their own connectivity solutions, such as Samsung SideSync. These tools sometimes interfere with the standard Android connection methods; such conflicts can cause your computer not to recognize your phone at all.

If you have any of these tools installed, try removing them from your computer to avoid conflicts. Once that’s done, reconnect your phone to your computer and see if it works as normal.

7. Run Windows Device Troubleshooter (Windows)

Windows 10 comes with several troubleshooters to help you find and fix issues with various facets. Thankfully, one of these is to troubleshoot external devices like your Android phone.

You can enlist the help of this tool to fix connection issues and get your phone to show up on your machine. While it’s not always perfect, it’s worth a try.

Microsoft removed the Hardware and Devices troubleshooter from the list in the latest versions of Windows 10, but it’s still accessible via the command line:

  1. Press Win + X and choose Windows PowerShell (Admin) or Command Prompt (Admin) from the list.
  2. Enter the following command: msdt.exe -id DeviceDiagnostic
  3. You’ll see the Hardware and Devices troubleshooter. Click Next to let the tool detect issues with your devices. When it’s done, it will offer methods to fix the detected issues.hardware and devices troubleshooter

If you’re on an older version of Windows 10, you can find the tool using the following method:

  1. Launch Settings on your PC, click Update & Security, and choose Troubleshoot from the left sidebar.
  2. From the list, click the item that says Hardware and Devices to launch the devices troubleshooter.

Bonus Tip. Use an Alternate File Transfer Method

If your phone won’t connect no matter what you do, you might want to use some alternate methods to transfer files from Android to your computer. This way, you can at least get your files moving until your connection issue is sorted.

Keep Your Android and Computer Connected

At first, it might seem like your computer is never going to recognize your device. However, with the methods above, you should successfully get your computer to mount your phone and let you move files between them.

Meanwhile, if you urgently need to move something from your computer to your phone, you can use some of the computer to Android file transfer methods to get your file transfers going.

Read the full article: 7 Fixes When Your Android Phone Won’t Connect to Your Computer


Read Full Article

Bring Back the Magic With Minecraft Modpacks: 7 to Try


minecraft-modpacks

If you’re an old-school Minecraft player who hasn’t touched the game in a few years, now is a great time to come back to it. The development team keeps adding more awesome content to the experience.

But even with that, if you got tired of the game before, it will probably get old for you quickly again. If this describes you, or you’re a current player who finds the game stale, it’s time to explore Minecraft mods.

Why Use Minecraft Mods?

If you haven’t gotten into Minecraft mods yet, you’re only just getting started with what’s possible in the game. For almost as long as Minecraft has been around, people have made the game even better by modifying it.

If you’re into fantasy and wish there were more involved systems in place that let you do real magic, there are mods for that. Botania and Thaumcraft are a couple of great fantasy mods that alter the whole world and bring new ways to play.

Maybe sci-fi and industry are more your speed; there are a ton of great mods for that as well. There are mods like Immersive Engineering that can turn your Minecraft world into something closer to Factorio. You can even travel to other worlds and die from a lack of oxygen if you want.

One of the biggest arguments against Minecraft is that it’s more of a toy than an actual game. Sure enough, there are mods that can turn Minecraft into a full-blown RPG with skill progression and equipment leveling.

There’s a great mod called Pam’s Harvestcraft that adds new food items and recipes. There’s Open Gliders, which lets you build hang gliders. Meanwhile, Journey Map gives you an excellent full-featured in-game map.

With all these, plus the ability to make your own Minecraft mods, the only problem is that there are just too many options. It’s hard to know what’s available and which ones work well together. That’s where modpacks come in.

Introducing Minecraft Modpacks

Modpacks are collections of mods that turn Minecraft into a whole new game. Really, they are almost entire games by themselves. The best part is that modpacks are completely free.

Imagine if the green fields and soaring mountains with grazing sheep and cows were all gone. What if the entire Minecraft world had been devastated in a long-forgotten apocalypse, and it was your job to fix it? There are a lot of modpacks that offer this scenario.

regrowth minecraft modpack screenshot

What if you woke up on a 3×3 platform of dirt blocks with a tree in the middle and had to find a way to build a base? There are no caves, chickens, water, or minerals. You have to use the mods in the pack to create everything from scratch.

Maybe you just want to get lost in a fantasy world with dragons and warlocks. Or perhaps you want to explore deep underground dungeons loaded with epic loot. What if you could open doors to other dimensions where all the rules have changed? There are packs that provide all of this and more.

If checking off boxes and getting achievements is something you enjoy, there are a lot of great quest-based packs. These packs give you a ton of challenges that increase in difficulty as you play. The best ones even teach you how to use the mods without feeling like a tutorial.

Finding Minecraft Modpacks

The three best places to get modpacks are Feed The Beast, Technic Pack, and CurseForge. All three of them have their own installers, which makes it easy to get started.

For newcomers, the best one is CurseForge. It has the largest selection of modpacks and makes it easy to find them through search, sort, and filter options. The site has most or all of the Feed the Beast packs, as well as some of the Technic packs.

Installing Modpacks

It’s possible to run into issues with the individual loaders working on different platforms. You also might not want to install three loaders in addition to your Minecraft launcher. Thankfully, there’s a better way.

Multi MC is a tool that works great on macOS, Windows, and Linux. It will let you play any version of vanilla Minecraft—all the way back to pre-alpha if you’re feeling nostalgic. And it makes installing mods and modpacks super easy.

To start, download MultiMC. Once you have it installed, the next step is to pick a modpack. You can download a modpack from Curse Forge by clicking it and then selecting which file to install from the list of options on the right menu.

You’ll want to pick a file that has a green R (release version). Also, make sure you get the regular install file, not one for a server. Following the download link will take you to a page with a download button. Use it to grab the pack.

curseforge download links

Next, open MultiMC and click Add Instance.

MultiMC add instance button

Then select Import from zip and click Browse. Select the modpack you downloaded, click OK, and wait.

MultiMC new instance window

Installing and running modpacks takes a lot longer than with vanilla Minecraft. It also requires more memory. If your system is kind of sluggish, it’s best to stick with modpacks from Minecraft 1.7.

The Best Minecraft Modpacks to Try

Looking to try some modpacks, but don’t know where to begin? Have a look at these great choices.

1. MC Eternal

mc eternal modpack logo

Minecraft Version: 1.12

This is a great kitchen-sink style modpack with over 750 quests that can help you learn more about some of the best mods available. You can find sci-fi, fantasy, and automation mods in this epic pack. It’s a beast though, and may not work on older, slower systems.

Download: MC Eternal

2. Questing Mayhem

questing mayhem modpack logo

Minecraft Version: 1.07

If your system isn’t beefy enough to handle 1.12 modpacks, this is another awesome all-around pack. It’ll introduce you to the world of mods and give you quests to learn the ins and outs of each one. With over 1,400 quests, this one should keep you busy for a while.

Download: Questing Mayhem

3. SevTech: Ages

sevtech ages modpack logo

Minecraft Version: 1.12

This beautifully crafted evolution pack makes Minecraft a whole new experience. It takes you from being a stone-age caveman that can’t do much more than bang rocks together (literally) and evolves your game all the way up to space travel.

Many elements like mapping, object identification, and even ores are hidden until you unlock the appropriate tier.

Download: SevTech: Ages

4. Sky Factory 4

sky factory 4 modpack logo

Minecraft Version: 1.12

This is the fourth installment of a classic “sky island” pack. You’re given nothing but dirt and a tree and have to build an empire. This pack involves magic and automation, plus has multiple options and biomes to keep it fresh and interesting.

Download: Sky Factory 4

5. Compact Claustrophobia

compact claustrophobia modpack logo

Minecraft Version: 1.12

This is a crazy-fun pack where you start out locked in a 3x3x3 miniature cube and need to escape. But the only way out is to create more miniature cubes and dig yourself in deeper and deeper. This is a high-tech modpack that involves a lot of automation, machinery, and large functional structures.

Download: Compact Claustrophobia

6. Roguelike Adventures and Dungeons

rad modpack logo

Minecraft Version: 1.12

This is a true RPG-style modpack with dungeons, dragons, and progressive difficulty. But it’s still Minecraft, so how you play it is up to you. There are blueprints for instant structures like a hobbit house to get you started. It also has recipes for yurts and backpacks that let you become a nomadic dungeon-crawling adventurer.

Download: Roguelike Adventures and Dungeons

7. Regrowth

regrowth modpack logo

Minecraft Version: 1.12

This is the modpack with all the brown and gray blocks shown above—as you might expect, it’s extremely challenging! You start in a dead world with no resources and have to bring the world back to health through farming.

Almost every material and resource you’d normally find in Minecraft can be grown through farming mods. It makes progression quite slow in the beginning, but provides amazing opportunities for automation later on.

Download: Regrowth

Minecraft Is a Rich Challenge for Everyone

A lot of people think Minecraft is a simple kid’s game. There’s so much more to it than that, though. Modpacks turn the game into a deeply challenging obsession that will keep adults playing for hundreds or thousands of hours longer.

And for kids, it doesn’t need to stop at building castles. Minecraft’s Hour of Code can spark a passion for programming and STEM in children as well.

Read the full article: Bring Back the Magic With Minecraft Modpacks: 7 to Try


Read Full Article

15 August 2020

Microsoft OneNote Keyboard Shortcuts for Windows and Mac


onenote-templates

Microsoft OneNote is a popular personal information management application (PIM) that helps you collect notes of all kinds into one digital notebook. Those notes can be web page clippings, photos, videos, audio recordings, scribbles, and much more. You can organize notes in a section, group them, and bind them with a notebook.

OneNote is a powerful tool with many great features, which you can quickly access through keyboard shortcuts.

This list of OneNote shortcuts is a comprehensive collection for both Mac and Windows 10. In the cheat sheet, you’ll find separate sections for Windows and macOS shortcuts where necessary.

FREE DOWNLOAD: This cheat sheet is available as a downloadable PDF from our distribution partner, TradePub. You will have to complete a short form to access it for the first time only. Download Microsoft OneNote Keyboard Shortcuts for Windows and Mac.

Microsoft OneNote Keyboard Shortcuts for Windows and Mac

Shortcut Action
Common Keyboard Shortcuts
Ctrl + M Open a new OneNote Window
Ctrl/Cmd + Z Undo the last action
Ctrl/Cmd + Y Redo the last action
Ctrl/Cmd + A Select all the items on a current page (to expand the selection, press the keys again)
Ctrl/Cmd + X Cut the selected text or item
Ctrl/Cmd + C Copy the selected text or item to the clipboard
Ctrl/Cmd + V Paste the contents of the clipboard
Ctrl/Cmd + K Insert a hyperlink
Ctrl/Cmd + B Apply or remove bold formatting
Ctrl/Cmd + I Apply or remove italics formatting
Ctrl/Cmd + U Apply or remove underline formatting
Ctrl/Cmd + Alt/Option + 1...6 Apply heading style from 1 to 6 of the current note
Ctrl/Cmd + Period Begin a bulleted list
Ctrl/Cmd + / Begin a numbered (sorted) list
Ctrl/Cmd + Shift + N Clear all the formatting applied to the selected text
Ctrl/Cmd + L Left-align the selected paragraph
Ctrl/Cmd + R Right-align the selected paragraph
Ctrl/Cmd + O Open a OneNote notebook
Ctrl/Cmd + T Create a new section
Ctrl/Cmd + N Create a new notebook page
Ctrl + Shift + G Move keyboard focus to the section list
Ctrl + G View the list of notebooks
Ctrl/Cmd + Shift + T Select the page title
Ctrl/Cmd + P Print the current page
Page Up Scroll up in the current page
Page Down Scroll down in the current page
Tab Increase the indent by one level
Shift + Tab Decrease the indent by one level
Ctrl/Cmd + 1 Mark or clear the To Do tag
Ctrl/Cmd + 2, 3, 4, and 5 Mark or clear the Important, Question, Remember for Later, and Definition tag
Tab key, after typing a new line of text Create a table
Tab key Create another column in a table with a single row
Enter/Return Create another row when at the end cell of a table
Ctrl/Cmd + Enter/Return Insert a row below the current row in a table
Alt/Option + Enter/Return Create another paragraph in the same cell in a table
Shift + Enter/Return Insert a line break
Ctrl/Cmd + S Synchronize the current notebook
Ctrl/Cmd + Alt/Option + L Lock all password-protected sections
Windows Specific Shortcuts
Home / End Move to the beginning or end of the line
Ctrl + Left / Right arrow key Move one word to the left or right
Backspace / Delete Delete one character to the left or right
Ctrl + Backspace / Delete Delete one word to the left or right
Ctrl + Down / Up key Go the next or previous paragraph
Alt + Shift + Right / Left arrow key Increase or decrease the paragraph indent
Alt + Shift + Up / Down key Move the selected paragraph up or down
Ctrl + Shift + H Highlight the selected text
Ctrl + Shift + C / V Copy or Paste the formatting of the selected text
Ctrl + Hyphen (-) Apply or remove strikethrough formatting
Ctrl + Shift + Equals sign (=) Apply or remove superscript formatting
Ctrl + Equals sign (=) Apply or remove subscript formatting
Alt + Equals sign (=) Start a math equation or convert the selected text to math equation
Windows logo key + Period Insert emoji or symbol
Alt + Shift + Plus sign (+) / Minus sign (-) Expand or collapse an outline (you can selectively expand or collapse the outline at each level)
Ctrl + Alt + Shift + N Create a new subpage below the current page
Ctrl + Alt + M Move or Copy page to another location
Ctrl + Alt + G Move keyboard focus to the page list
Up or Down key / Ctrl + Page Up or Down After moving keyboard focus to the page list, press these keys to switch between pages
Ctrl + Tab Go the next section
Ctrl + Shift + Tab Go to the previous section
Alt + Shift + Up / Down key Move the selected page tab up or down
Ctrl + Home / End Scroll to the top or bottom of the current page
Ctrl + Alt + Shift + Plus sign (+) / Minus sign (-) Zoom in or out
Ctrl + Alt + A / S Create or Stop the recording
Ctrl + Alt + P Play the selected audio recording
Alt + Shift + D Insert the current date
Alt + Shift + F Insert the current date and time
Ctrl + Alt + R Create a column to the right of the current column in a table
Ctrl + E Open a search to search all currently opened notebooks
F9 Synchronize all notebooks
F6 Jump between the tab bar, navigation pane, and the page canvas
Left or Right arrow keys Move between the tabs on a ribbon (Home, Insert, Draw, and more)
Spacebar or Enter Perform the currently selected ribbon command (when the selection is over Navigation button, press Spacebar to enlarge the OneNote canvas)
Alt + Down arrow key Go to the next note container
Ctrl + Shift + M Insert the author name and last modified time stamp
Windows logo key + Shift + S Copy a screen clipping to the clipboard
macOS Specific Shortcuts
Cmd + Left / Right arrow key Move to the beginning or end of the line
Option + Left / Right arrow key Move one word to the left or right
Delete / Fn + Delete Delete one character to the left or right
Option + Backspace / Delete Delete one word to the left or right
Option + Down / Up key Go to the next or previous paragraph
Cmd + ] / [ Increase or decrease the paragraph indent
Option + Cmd + Up / Down Move the selected paragraphs up or down
Ctrl + Cmd + H Highlight the selected text
Option + Cmd + C / V Copy or Paste the formatting of the selected text
Ctrl + Cmd + Hyphen (-) Apply or remove strikethrough formatting
Option + Shift + Cmd + Equals sign (=) Apply or remove superscript formatting
Option + Cmd + Equals sign (=) Apply or remove subscript formatting
Ctrl + Equals sign (=) Start a math equation or convert the selected text to math equation
Ctrl + Cmd + Spacebar Insert emoji or symbols
Ctrl + Shift + Plus sign (+) / Minus sign (-) Expand or collapse the outline (you can selectively expand or collapse outline at each level)
Cmd + N then Option + Cmd + ] Create a new subpage below the current page
Cmd + Shift + C / M Copy or Move page to another location
Ctrl + Cmd + G Move keyboard focus to the page list
Up or Down key / Cmd + Page Up or Down After moving keyboard focus to the page list, press these keys to switch between pages
Cmd + Shift + } Go to the next section
Cmd + Shift + { Go to the previous section
Cmd + Option + Up / Down key Move the selected page tab up or down
Cmd + Up / Down Scroll to the top or bottom of the current page
Cmd + Plus sign (+) / Minus sign (-) Zoom in or out
Option + Shift + Cmd + R / S Create or Stop the recording
Option + Shift + Cmd + P Play the selected audio recording
Cmd + D Insert the current date
Cmd + Shift + D Insert the current date and time
Ctrl + Cmd + L / R Create a column to the left or right of the current column in a table
Cmd + Option + F Open a search to search all currently opened notebooks
Shift + Cmd + S Synchronize all notebooks
F6 Jump between the tab bar, navigation pane, and the page canvas (enable F1, F2 as standard function keys in System Preferences)
Tab Move between the tabs on a ribbon
Spacebar Perform the currently selected ribbon command (when the selection is over Navigation button, press Spacebar to enlarge the OneNote canvas)
Press Fn Twice Start dictation
Ctrl + Option + Cmd + L Use Smart Lookup

Discover Hidden Microsoft OneNote Features

The keyboard shortcuts listed here will help you become a OneNote power user. If you’re just getting started with OneNote, here is a guide on how to use OneNote for Mac and little known tips and tricks in OneNote you’ll love.

Read the full article: Microsoft OneNote Keyboard Shortcuts for Windows and Mac


Microsoft OneNote Keyboard Shortcuts for Windows and Mac


onenote-templates

Microsoft OneNote is a popular personal information management application (PIM) that helps you collect notes of all kinds into one digital notebook. Those notes can be web page clippings, photos, videos, audio recordings, scribbles, and much more. You can organize notes in a section, group them, and bind them with a notebook.

OneNote is a powerful tool with many great features, which you can quickly access through keyboard shortcuts.

This list of OneNote shortcuts is a comprehensive collection for both Mac and Windows 10. In the cheat sheet, you’ll find separate sections for Windows and macOS shortcuts where necessary.

FREE DOWNLOAD: This cheat sheet is available as a downloadable PDF from our distribution partner, TradePub. You will have to complete a short form to access it for the first time only. Download Microsoft OneNote Keyboard Shortcuts for Windows and Mac.

Microsoft OneNote Keyboard Shortcuts for Windows and Mac

Shortcut Action
Common Keyboard Shortcuts
Ctrl + M Open a new OneNote Window
Ctrl/Cmd + Z Undo the last action
Ctrl/Cmd + Y Redo the last action
Ctrl/Cmd + A Select all the items on a current page (to expand the selection, press the keys again)
Ctrl/Cmd + X Cut the selected text or item
Ctrl/Cmd + C Copy the selected text or item to the clipboard
Ctrl/Cmd + V Paste the contents of the clipboard
Ctrl/Cmd + K Insert a hyperlink
Ctrl/Cmd + B Apply or remove bold formatting
Ctrl/Cmd + I Apply or remove italics formatting
Ctrl/Cmd + U Apply or remove underline formatting
Ctrl/Cmd + Alt/Option + 1...6 Apply heading style from 1 to 6 of the current note
Ctrl/Cmd + Period Begin a bulleted list
Ctrl/Cmd + / Begin a numbered (sorted) list
Ctrl/Cmd + Shift + N Clear all the formatting applied to the selected text
Ctrl/Cmd + L Left-align the selected paragraph
Ctrl/Cmd + R Right-align the selected paragraph
Ctrl/Cmd + O Open a OneNote notebook
Ctrl/Cmd + T Create a new section
Ctrl/Cmd + N Create a new notebook page
Ctrl + Shift + G Move keyboard focus to the section list
Ctrl + G View the list of notebooks
Ctrl/Cmd + Shift + T Select the page title
Ctrl/Cmd + P Print the current page
Page Up Scroll up in the current page
Page Down Scroll down in the current page
Tab Increase the indent by one level
Shift + Tab Decrease the indent by one level
Ctrl/Cmd + 1 Mark or clear the To Do tag
Ctrl/Cmd + 2, 3, 4, and 5 Mark or clear the Important, Question, Remember for Later, and Definition tag
Tab key, after typing a new line of text Create a table
Tab key Create another column in a table with a single row
Enter/Return Create another row when at the end cell of a table
Ctrl/Cmd + Enter/Return Insert a row below the current row in a table
Alt/Option + Enter/Return Create another paragraph in the same cell in a table
Shift + Enter/Return Insert a line break
Ctrl/Cmd + S Synchronize the current notebook
Ctrl/Cmd + Alt/Option + L Lock all password-protected sections
Windows Specific Shortcuts
Home / End Move to the beginning or end of the line
Ctrl + Left / Right arrow key Move one word to the left or right
Backspace / Delete Delete one character to the left or right
Ctrl + Backspace / Delete Delete one word to the left or right
Ctrl + Down / Up key Go the next or previous paragraph
Alt + Shift + Right / Left arrow key Increase or decrease the paragraph indent
Alt + Shift + Up / Down key Move the selected paragraph up or down
Ctrl + Shift + H Highlight the selected text
Ctrl + Shift + C / V Copy or Paste the formatting of the selected text
Ctrl + Hyphen (-) Apply or remove strikethrough formatting
Ctrl + Shift + Equals sign (=) Apply or remove superscript formatting
Ctrl + Equals sign (=) Apply or remove subscript formatting
Alt + Equals sign (=) Start a math equation or convert the selected text to math equation
Windows logo key + Period Insert emoji or symbol
Alt + Shift + Plus sign (+) / Minus sign (-) Expand or collapse an outline (you can selectively expand or collapse the outline at each level)
Ctrl + Alt + Shift + N Create a new subpage below the current page
Ctrl + Alt + M Move or Copy page to another location
Ctrl + Alt + G Move keyboard focus to the page list
Up or Down key / Ctrl + Page Up or Down After moving keyboard focus to the page list, press these keys to switch between pages
Ctrl + Tab Go the next section
Ctrl + Shift + Tab Go to the previous section
Alt + Shift + Up / Down key Move the selected page tab up or down
Ctrl + Home / End Scroll to the top or bottom of the current page
Ctrl + Alt + Shift + Plus sign (+) / Minus sign (-) Zoom in or out
Ctrl + Alt + A / S Create or Stop the recording
Ctrl + Alt + P Play the selected audio recording
Alt + Shift + D Insert the current date
Alt + Shift + F Insert the current date and time
Ctrl + Alt + R Create a column to the right of the current column in a table
Ctrl + E Open a search to search all currently opened notebooks
F9 Synchronize all notebooks
F6 Jump between the tab bar, navigation pane, and the page canvas
Left or Right arrow keys Move between the tabs on a ribbon (Home, Insert, Draw, and more)
Spacebar or Enter Perform the currently selected ribbon command (when the selection is over Navigation button, press Spacebar to enlarge the OneNote canvas)
Alt + Down arrow key Go to the next note container
Ctrl + Shift + M Insert the author name and last modified time stamp
Windows logo key + Shift + S Copy a screen clipping to the clipboard
macOS Specific Shortcuts
Cmd + Left / Right arrow key Move to the beginning or end of the line
Option + Left / Right arrow key Move one word to the left or right
Delete / Fn + Delete Delete one character to the left or right
Option + Backspace / Delete Delete one word to the left or right
Option + Down / Up key Go to the next or previous paragraph
Cmd + ] / [ Increase or decrease the paragraph indent
Option + Cmd + Up / Down Move the selected paragraphs up or down
Ctrl + Cmd + H Highlight the selected text
Option + Cmd + C / V Copy or Paste the formatting of the selected text
Ctrl + Cmd + Hyphen (-) Apply or remove strikethrough formatting
Option + Shift + Cmd + Equals sign (=) Apply or remove superscript formatting
Option + Cmd + Equals sign (=) Apply or remove subscript formatting
Ctrl + Equals sign (=) Start a math equation or convert the selected text to math equation
Ctrl + Cmd + Spacebar Insert emoji or symbols
Ctrl + Shift + Plus sign (+) / Minus sign (-) Expand or collapse the outline (you can selectively expand or collapse outline at each level)
Cmd + N then Option + Cmd + ] Create a new subpage below the current page
Cmd + Shift + C / M Copy or Move page to another location
Ctrl + Cmd + G Move keyboard focus to the page list
Up or Down key / Cmd + Page Up or Down After moving keyboard focus to the page list, press these keys to switch between pages
Cmd + Shift + } Go to the next section
Cmd + Shift + { Go to the previous section
Cmd + Option + Up / Down key Move the selected page tab up or down
Cmd + Up / Down Scroll to the top or bottom of the current page
Cmd + Plus sign (+) / Minus sign (-) Zoom in or out
Option + Shift + Cmd + R / S Create or Stop the recording
Option + Shift + Cmd + P Play the selected audio recording
Cmd + D Insert the current date
Cmd + Shift + D Insert the current date and time
Ctrl + Cmd + L / R Create a column to the left or right of the current column in a table
Cmd + Option + F Open a search to search all currently opened notebooks
Shift + Cmd + S Synchronize all notebooks
F6 Jump between the tab bar, navigation pane, and the page canvas (enable F1, F2 as standard function keys in System Preferences)
Tab Move between the tabs on a ribbon
Spacebar Perform the currently selected ribbon command (when the selection is over Navigation button, press Spacebar to enlarge the OneNote canvas)
Press Fn Twice Start dictation
Ctrl + Option + Cmd + L Use Smart Lookup

Discover Hidden Microsoft OneNote Features

The keyboard shortcuts listed here will help you become a OneNote power user. If you’re just getting started with OneNote, here is a guide on how to use OneNote for Mac and little known tips and tricks in OneNote you’ll love.

Read the full article: Microsoft OneNote Keyboard Shortcuts for Windows and Mac


Read Full Article

The 7 Best Kodi Add-Ons for Gaming and Gamers


kodi-gamers

Most people think of Kodi as an app for streaming movies and TV shows. But while it’s true that streaming remains the app’s primary purpose, Kodi also has the ability to run games.

If you install the right gaming add-ons, you can play classic titles, Kodi-specific games, and more. So, for gamers everywhere, here are the best Kodi add-ons for gaming.

1. Retroplayer

Retroplayer is a native Kodi feature that made its debut in Kodi version 18 (codenamed Leia). Today, many game emulators require the add-on in order to work.

If you’re running an older version of Kodi, you can install the latest update by heading to the Kodi website and downloading the newest release (desktop) or upgrading via the app store (mobile).

We’ve written about how to play games on Kodi using Retroplayer if you’d like a more extensive walkthrough.

Note: If you’ve sideloaded Kodi, the update method is less straightforward. Read our guide on how to update Kodi on a Fire Stick for more information.

2. DOSBox

dosbox kodi install

To be able to play games on Kodi using Retroplayer, you’ll need an emulator.

One of the most popular is DOSBox. You can install the add-on by going to Settings > Add-ons > Download > Install from Repository > Kodi Add-on Repository > Game Add-ons > Emulators and selecting DOS (DOSBox) from the list.

DOSBox simulates an IBM PC running MS-DOS. It supports sound, input, graphics, and even networking.

Some of the classic games you can play through DOSBox include Pacman, Actua Soccer, Doom, and Wolfenstein. You can even use it to run Windows 2.x!

3. ROM Collection Browser

install rom collection browser kodi

As your collection of games grows, you’re going to need an add-on that lets you view, manage, and launch the games. After all, you don’t want to be jumping around multiple add-ons just to find the title you want to play.

As one of the best Kodi add-ons for gaming, ROM Collection Browser is the solution.

Not only will it list all of the games available on your Kodi system, but you can also use it to pre-define which parameters and emulator the game will use when launched, thus saving you time and stress. Many options are preconfigured; you can just select the correct option from the list.

The add-on is available in the official Kodi repo. You will find it in the Program Add-ons section.

4. The Internet Archive ROM Launcher

internet archive rom install on kodi

ROM-based emulated gaming falls into a legal gray area. The situation is similar to the legality of IPTV and the difference between the IPTV player app and the IPTV feeds themselves.

In the case of ROMs, the ROM emulator is entirely legitimate, but the legality of the ROMs themselves can be called into question. Remember, copyright in the US lasts for 75 years (other countries vary), and issues such as fair use and copying ROMs for which you already own an original cartridge have never been tested in US courts.

There are loopholes, however. One site which offers unambiguously legal ROMs that will keep you on the right side of the law is The Internet Archive. In 2003, it was granted a DMCA exception to allow it to preserve vintage apps. Some of the classic arcade games you will find on The Internet Archive include Joust, Astro Blaster, Commando, and Pitfall II. Hundreds of games are available.

Of course, you could play the games directly via The Internet Archive’s site. However, if you want a Kodi interface that’ll let you run them all from within the app, you need to grab the Internet Archive ROM Launcher.

You will find the add-on in the Zach Morris repo. To learn more about how to install the repo and set up the add-on, refer to our full article detailing how to play The Internet Archive’s retro games on Kodi.

5. Twitch

twitch kodi repo

These days, gaming is about more than simply firing up a console and letting yourself become engrossed for a few hours.

Apps like Twitch have revolutionized the way gamers can find and absorb gaming content. The Amazon-owned company streams gaming competitions, esports, chat shows, and plenty more.

The Twitch add-on for Kodi is available in the official Kodi repo. To install the app, go to Add-ons > Install from repository > Kodi Add-on repository > Video Add-ons > Twitch.

6. Steam Community

steam community kodi video list

The Steam Community acts as a central hub for every game on Steam. It includes screenshots, artwork, videos, news, walkthroughs, reviews, live streams, and mods for every game on the Steam platform.

This Kodi add-on ports some of the Steam Community’s features to the Kodi app. The main focus of the add-on is the live broadcasts; it means you can tune into your favorite gamer’s feeds without leaving the Kodi interface. Only public streams are supported. You can also use the add-on for viewing screenshots and artwork; text-based content is not yet available.

Steam Community has filters for language, popular videos, and new videos, as well as a search feature, meaning you will able to find the content you’re looking for in a flash.

Once again, the add-on is available via the official Kodi repo.

7. Netwalk

If you can’t be bothered fiddling with emulators, ROMs, and third-party repos, you could try playing a standalone Kodi game that doesn’t require any extra installations.

In truth, there are very few such games around, but one that’s worth installing is Netwalk. The premise is simple—you need to join together the different colored pipes in order to connect two computers to the network is as few moves as possible. The game is surprisingly addictive.

The game is best played on a tablet or touchscreen laptop, though it is possible to play with a mouse, too.

You can find the Netwalk game in the official Kodi repo. Just navigate to the Program Add-ons section of the repo to locate it.

Learn More About Using Kodi Add-Ons

Gaming remains a slightly underdeveloped part of the Kodi ecosystem, but the situation is improving. As the Kodi add-ons for gaming we’ve looked at in this article prove, it’s possible to find old games, dedicated Kodi games, and a mass of related gaming content if you know which repos to use and where to look.

If you would like to learn more about Kodi add-ons, check out our list of the best legal Kodi add-ons for free movies.

Read the full article: The 7 Best Kodi Add-Ons for Gaming and Gamers


Read Full Article

How to Use and Customize the Drummer Feature in GarageBand


drums-garageband

Drummer is one of GarageBand’s most impressive features. It offers an easy way to add professional drum tracks to your project, with almost unlimited customization options.

If you’ve never used Drummer in GarageBand before, we’ll explain everything you need to know to make the most of it in your next project.

What Is the Drummer Feature?

Drummer feature in GarageBand

GarageBand’s Drummer is a software instrument that plays automated drum patterns to use in your musical projects.

You can choose between 28 virtual drummers and three virtual percussionists, each with their own personal style. You can also edit the rhythm, sounds, and patterns of what Drummer plays to perfectly match your track.

If you haven’t already, go to GarageBand > Sound Library > Download All Available Sounds to download every Drummer option to your Mac.

In case you like to use loops with GarageBand, this also downloads the entire collection of free loops from Apple.

How to Add Drummer to GarageBand

To add Drummer to your GarageBand project, all you need to do is create a new track. Go to Track > New Track from the menu bar and select Drummer from the popup window that appears.

Track Type popup window in GarageBand

Alternatively, press Option + Cmd + U to instantly add a new Drummer track.

After you add a Drummer track, GarageBand creates an eight-bar region at the beginning of your project. It also opens the Library and the Editor windows to let you choose your virtual drummer, kit, and Beat Preset.

Choose a Drummer

The Library window on the left shows all the different GarageBand virtual drummers, separated into seven musical genres:

  • Rock
  • Alternative
  • Songwriter
  • R&B
  • Electronic
  • Hip Hop
  • Percussion

Choose a genre, then select an available drummer to read a short paragraph about their playing style.

Drummer selection in Garageband

Each drummer offers a different playing style. It might take a while to get to know each of them, so for now, focus on the sub-genre next to their name. You can always experiment with different drummers further down the line.

Choose a Kit

Changing the drum kit doesn’t change what Drummer plays; only how the actual drums sound. Every drum kit is available for every virtual drummer, although each one has a preferred kit they default to.

After choosing a virtual drummer, hit Space to listen to them play. Then select different kits in the Sounds section of the Library.

Drum Kit selection for Drummer in GarageBand

Don’t worry about the drum pattern they’re playing. Instead, listen to the tone of the kit or the sound of individual drums. You can tweak the controls in the Smart Controls window to further edit the sound, but we’ll get into that later.

Choose a Beat Preset

The Beat Preset refers to the actual drum pattern that Drummer plays. If you changed the drum kit, press E to open the Drummer Editor again and find a list of Beat Presets at the left edge of the window.

Beat Presets in the Drummer Editor Window

Each virtual drummer offers a different selection of Beat Presets to fit their genre. Click through each of them to find a drum pattern you like for your project.

Don’t worry if the Beat Preset isn’t perfect; we’ll edit it in a moment.

Structure Your Drummer Track

If you don’t want Drummer to play the same drum pattern for your entire project, you need to create separate Drummer regions in the Workspace window. You can edit the settings for each region so Drummer plays different patterns for the intro, verse, and chorus of your song.

Hover your mouse over the right edge of a Drummer region to reveal an Add (+) button. Click that to create a duplicate region immediately after the original. Then drag and drop it somewhere else, adjust the length, or loop it to fit your song structure.

Add button after Drummer region

A duplicate region starts with the same settings as the original. But you can choose a new Beat Preset and edit other settings to change it up. Unfortunately, you can’t change the drummer or drum kit without affecting all the other regions in the same track.

We also suggest adding short regions wherever you want to include drum fills. The easiest way to do this is to move the playhead where you want the fill, select the Drummer region, then press Cmd + T to split it into two regions.

Drum Fill splitting a Drummer region

How to Edit the Drummer Settings in GarageBand

Using a Beat Preset is a quick way to get started with Drummer. However, you can take far more control over what Drummer plays by adjusting the X/Y Pad, pattern variations, and style knobs in the Editor window.

Double-click a particular Drummer region to open the Editor. Then adjust the settings below to edit that region, making it different from what Drummer plays elsewhere.

Tweak the X/Y Pad

The X/Y Pad offers a quick and easy way to change the drum pattern to match your project. Drag and drop the yellow puck to different areas of the pad to completely change the pattern that Drummer plays.

X:Y Pad in Drummer Editor

Moving along the X-axis changes the drum pattern from Simple to Complex, while the Y-axis changes from Soft to Loud.

You don’t need to drag the puck to the far corners of the pad. Small movements still change the drum patterns a surprising amount.

Choose Your Percussion Sounds and Pattern Variations

To the right of the X/Y pad, you should see a drum kit or a grid of percussion instruments, depending on your chosen drummer. You might see cymbals, toms, shakers, bongos, or other instruments.

Click to highlight a percussion sound if you want to include it in your pattern. Alternatively, remove the highlight if you don’t want to hear that sound.

Percussion instrument pattern variations in Drummer Editor

The sliders next to each percussion sound let you change the pattern variation for it. Generally speaking, moving the slider to the right tells Drummer to use that sound more often in the drum pattern.

However, the last two positions for the Kick & Snare sounds let you choose between half-time and double-time drum patterns.

If your drummer uses brushes, you can also use a checkbox beneath these sliders to change the brush style.

Kick & Snare pattern variation showing half-time and Brush Sweep options

Add Fills and Swing

The right side of the Drummer Editor shows two knobs. These both let you change the style of playing for your selected region.

Increase the Fills level to make Drummer play longer and more complex fills throughout the drum pattern. A fill is an elaborate flourish, or a drum roll, that adds variety to the song. It usually comes at the end of a region.

Increase the Swing level to add a jazz-like swing to the rhythm of the drum pattern. This works best if other instruments in your project also play in swing time. Use the 8th and 16th buttons to choose how fast you want the swing to be.

Fills and Swing knobs in Drummer Editor

Close the padlock next to either of these knobs to lock those levels. That way, you can change the Beat Preset, the pattern settings, or even the virtual drummer without losing your Fills or Swing level.

How to Mix the Drummer in GarageBand

After creating a series of drum patterns to use in your project, you still need to mix the Drummer track to get the best sounds out of it. The easiest way to do this is using the Smart Controls window.

Select your drummer track and press B to open the Smart Controls. Use the knobs that appear to adjust the volume for each of the drums in your drum kit.

Smart Controls for Drummer in GarageBand

You can even use the lights beside each knob to turn certain drums off entirely.

The Compression knob allows you to “squash” the sound of your drums, making them feel louder. And you can use the Tone and Room levels to change the overall timbre of your kit.

Different drum kits offer different Smart Controls. But you can get even more control over your sound by converting Drummer regions to MIDI tracks.

Convert Drummer Regions to MIDI Tracks

If you recorded a real drum kit, you would usually create a separate audio track for each drum. This offers more control over the sound, as you can mix each drum independently.

To achieve the same result with Drummer in GarageBand, you need to convert your Drummer regions to MIDI. Create a software instrument track by going to Track > New Track in the menu bar. Then change the instrument to match the drum kit you chose earlier.

Now click and drag to select all your Drummer regions at once. Press Cmd + C to copy them, then highlight your new software instrument track and press Cmd + V to paste your Drummer regions as MIDI.

Drummer track copied into MIDI track

Open the MIDI Editor to edit the timing, velocity, quantization, and other parameters for your drum patterns.

Alternatively, select every beat from a particular drum, which you can do by clicking the relevant note on the MIDI sidebar keyboard. Then paste them into a separate software instrument track to split your Drummer region again. Repeat this process to create individual tracks for each drum in your Drummer regions.

Drummer region turned into separate MIDI drums

Now you can add plugins, change the EQ, or adjust the level and pan for each drum to create the perfect mix.

Learn All There Is to Know About GarageBand

Learning how to use the Drummer feature is crucial if you want to make the most of GarageBand. But Drummer isn’t the only worthwhile feature in this music production software.

Check out our guide on how to use GarageBand to learn all there is to know about loops, software instruments, score editors, and more.

Read the full article: How to Use and Customize the Drummer Feature in GarageBand


Read Full Article

Chromebook Users Can Get Roguelike Dead Cells for Free


dead cells chromebook

There are all sorts of benefits from using a Chromebook. And now, another benefit has arrived, with Google offering the stellar platformer roguelike Dead Cells for free, as discovered by Android Police.

Normally, Dead Cells sells for $8.99 on Google Play, which is a steal in its own right. However, for free, grabbing it is a no-brainer.

What Is Dead Cells?

Dead Cells is a platformer roguelike that will put your video game abilities to the test.

Here’s the description of the game from Motion Twin, the developers of Dead Cells:

Dead Cells is a rogue-lite, Castlevania-inspired action-platformer, allowing you to explore a sprawling, ever-changing castle… assuming you’re able to fight your way past its keepers.

To beat the game, you’ll have to master 2D “souls-lite combat” with the ever-present threat of permadeath looming. No checkpoints. Kill, die, learn, repeat.

Dead Cells has a score of 89 on Metacritic, which is an incredibly high score for a game from a small team without the AAA budget and pedigree behind it.

If that sounds like something that’ll appeal to you, then you absolutely should take advantage of this offer. You’ll get quite a few hours from the game and a real feeling of satisfaction as you grind your way through it.

How to Get Your Free Copy of Dead Cells

To snag a copy, you simply need to head to Google’s Chromebook perks page. Once there, scroll down a bit and you’ll see the Dead Cells section. Click Get Perk, and follow the steps to redeem your copy.

Of course, you must own a Chromebook to do so. Those without one can’t take advantage of this perk.

Google is making this perk available until August 7th, 2021, so you have ample time to jump in and grab the game for your Chromebook. And if you just purchased a Chromebook, check out our handy tips that all new Chromebook users need to know.

Read the full article: Chromebook Users Can Get Roguelike Dead Cells for Free


5 Tools to Search for Online Learning Courses and Study Partners


Find online classes

If you want to keep growing, you should never stop learning. These websites and apps help you learn new skills with the right online courses. You can also tap them to find study partners for that classroom feeling.

Many universities and schools make their coursework available for free online, in what is called Massive Open Online Courses (MOOC). You can go for paid courses too that offer legitimate degrees once you finish them.

Finding the right course for your time availability and budget, and completing it within the timeframe, is the difficult part. So here are a few ways to make that search easier.

1. Coursesity (Web): Directory of Online Courses Across Subjects

Coursesity homepage with a directory of online courses

If you’re looking for a list of different online courses about a subject or topic, head to Coursesity. The directory lists over 50,000 online courses from a variety of platforms, across subjects like programming, arts, office productivity, science, etc.

Pick a subject to see all the courses available in it. You can then filter the results by user rating, duration, price, language, certificate availability, and difficulty level. These filters are key to discovering the right course for you. Once you find it, add it to your collection.

Collections are an integral part of discovering courses on Coursesity. The founder, Keyul Shah, has a list of recommended courses in collections on different subjects, but you can also see any user’s collection for inspiration.

Collections like the Free Ivy League Courses help in narrowing choices and discovering authorized content you wouldn’t easily find otherwise.

2. Online Course Report (Web): Course Rankings for Part-Time Students

Online Course Report homepage with rankings of different online courses

Merrill Cook is curating online courses like a lot of other websites, but with a different focus. Online Course Report (OCR) recognizes that online learning is more popular with non-traditional students and adult learners. It’s often taken up by someone who has a full-time job, or is looking to add a skill set to their daily responsibilities.

OCR creates course rankings that put an emphasis on flexibility and affordability, which are two of the most important aspects for online learners. Visit the Rankings page to see links to the top 10 or top 50 rankings for different topics. Each article details why the ranks were chosen, hourly rates and eventual salary, graduation rate, and other important criteria to help you make a decision.

The website also has a floating “Find Your Degree” panel that’s always visible, but you can ignore it. It’s an ad that takes you to a different website, so don’t bother using it.

3. Prodeus (Chrome): Free YouTube Online Courses Search and Tracking

Prodeus Chrome extension for online courses on YouTube

YouTube has a vast library of free video courses to learn a variety of skills and subjects. Prodeus wants to help you earn a virtual degree on YouTube by searching for free online learning courses, and tracking your hours and classes.

You can find classes on YouTube through Prodeus in the dropdown pane when you click the Chrome extension icon. The library will show different courses uploaded to the video sharing site, which you can filter by newest, popular, or recommended for you.

You can sort by category, difficulty, and language. You can also switch between regular classes and full-fledged courses. Each course also shows a rating.

Once you’ve selected a course, Prodeus will track your progress in it. The extension watches how many hours you use YouTube for learning, which it converts into virtual “ProDegrees” based on the number of class hours, the number of classes, and “credits” you earn.

There’s a bit of gamification too, as you unlock stages based on the total number of class hours. In the end, you might just get a Master’s degree by learning on YouTube.

Download: Prodeus for Chrome (Free)

4. Knowable (Android, iOS): Podcast or Audio Online Learning Courses

Knowable list of audio and podcast online courses by experts

While most online courses feature a series of videos, that’s not every student’s preferred learning style or every expert’s favorite teaching style. Knowable focuses on audio-based online learning courses, so you can listen to them like a podcast when you’re working out, driving, or running chores around the house.

You’ll find a variety of courses, like startup and entrepreneurship advice, self-improvement and personal development, health, business, and more. There are a handful of free courses too, so you can try out what it’s like to learn through listening alone. But most of those by experts or well-known names are paid courses, each with a different price.

As with most online courses, you can preview an index of what the tutor will cover. A lot of the courses offer a free invitation for a friend, so two people can learn for the price of one. Having a study buddy is also a great way to stay motivated with online learning.

Download: Knowable for Android | iOS (Free)

5. Cuddy (Web): Find a Buddy to Take Courses Together

Cuddy's find a study partner page to take online courses with

School is more fun when you’ve got a friend to lean on. You can share notes, discuss what you learned, and even compete with each other. Cuddy wants to help you find a buddy for any online course you’re taking.

Click “Find a Buddy” to see listings of people looking for different types of partners. Some have specific course requirements, while others are interested in a general study partner regardless of the subject. You’ll find details like the type, the skill level, a course link, and a general description.

You can add your own listing if who you seek is not already on Cuddy. Be as clear as you can about the course name and type. And focus on the details or description, where you talk about yourself. This is what Cuddy users will look at and try to figure out if they want to be your study buddy. Talk about your learning style, objectives you want to achieve, and what you’re looking for from a buddy. It’ll lead to the best match.

Search Engines for MOOCs

The websites in this article feature a mix of paid and free courses, so you can get full-fledged university degrees or rely on expert advice. But before you do that, you should check out the number of free online courses too, which can offer a great education at no cost.

It can be difficult to research only about these free courses, but there are some options. Start with the best sites to search and find MOOCs, which also include free guides for degree paths.

Read the full article: 5 Tools to Search for Online Learning Courses and Study Partners