25 June 2020

How to Watch Classic Movies: The 10 Best Apps and Sites


flimstruck-classic-movies

Forget about modern Hollywood blockbusters. For real satisfaction, you need to dig into some classic movies—we’re thinking films from your childhood, early cinematic masterpieces, and notable older movies from other countries.

But what’s the best way to watch classic movies? In this article, we list the apps and sites you need to know about. They’re packed with old movies worth watching.

1. Turner Classic Movies

turner classic movies

Turner Classic Movies—better known as TCM—is a US TV channel with spinoff networks in the UK, Latin America, Germany, Asia, and Scandinavia.

The content is sourced from the Turner Entertainment film library. It holds the distribution rights to pre-1950 Warner Bros. films and pre-1986 Metro-Goldwyn-Mayer movies, as well as a North American license for movies from RKO Pictures.

If you live in the US and have a cable TV plan, you can sign in to Watch TCM for free and watch whatever is currently airing. There’s also an app available on Android and iOS.

The site also has a shop where you can buy classic movies and download them. Prices typically fall between $10 and $25.

2. Pluto TV

pluto

Pluto TV is most commonly associated with providing free live TV for cord-cutters. Did you know, however, that the service doubles as an excellent app for watching classic movies? It boasts several channels packed full of old movies.

Some of the classic movie channels worth checking out on Pluto include Paramount Movie Channel, CMT Westerns, Classic Movies Channel, and 80s Rewind.

3. Shout Factory

shout factory

Shout Factory is the home of cult movies, classic films, B-side movies, and even some TV shows, animation, and live music concerts.

The app has licensing agreements in place with several large networks and studios, including NBCUniversal, MGM, Warner Bros., Sony Pictures, and Fox.

4. The Criterion Channel

criterion channel

The Criterion Channel is a US network that specializes in licensing “important classic and contemporary films.” Collectively, the movies for which they hold the rights to are called The Criterion Collection.

Today, the Collection consists of more than 1,000 classic movies. You can watch them all on the app and site, along with a continually rotating mix of Hollywood, international, art-house, and independent films from well-known studios and independent filmmakers. You will also find stacks of supplementary content, such as interviews and discussions.

The service is not free. You’ll need to pay $10.99/month or $99 for 12 months of access.

5. Library of Congress: National Streaming Room

congress library films

The Library of Congress’ National Screening Room is a collection of historically or culturally significant movies that are available to watch for free. The collection includes both copyrighted and public domain content.

Some of the videos in the collection include 1903’s The Forbidden City, Pekin, Ghosts from 1915, and The Lost Battalion from World War I.

In total, more than 360 classic movies are available on the site. Fair warning, some of the videos reflect beliefs and attitudes from a different era. Against a modern backdrop, some viewers might find parts of the content offensive. However, if anything, that only underscores the importance of the collection’s place in history.

6. Netflix

netflix

Netflix’s catalog might have been slowly shrinking in the last few years, but the streaming service still boasts an impressively large collection of old movies and classic films.

The best way to see what classic movies are available on Netflix in your region is to use the secret genre codes. Just add them to the end of the Netflix URL, like so:

  • https://www.netflix.com/browse/genre/[CODE]

Here’s the complete list of classic movie genre codes that you can explore:

  • Classic Action and Adventure: 46576
  • Classic Comedies: 31694
  • Classic Dramas: 29809
  • Classic Musical Comedy: 32392
  • Classic Romantic Movies: 31273
  • Classic Sci-Fi and Fantasy: 47147
  • Classic Thrillers: 46588
  • Classic War Movies: 48744
  • Classic TV Shows: 46553
  • Classic Westerns: 47465
  • Film Noir: 7687
  • Epics: 52858
  • Silent Movies: 53310

7. Old Movies—Oldies but Goldies
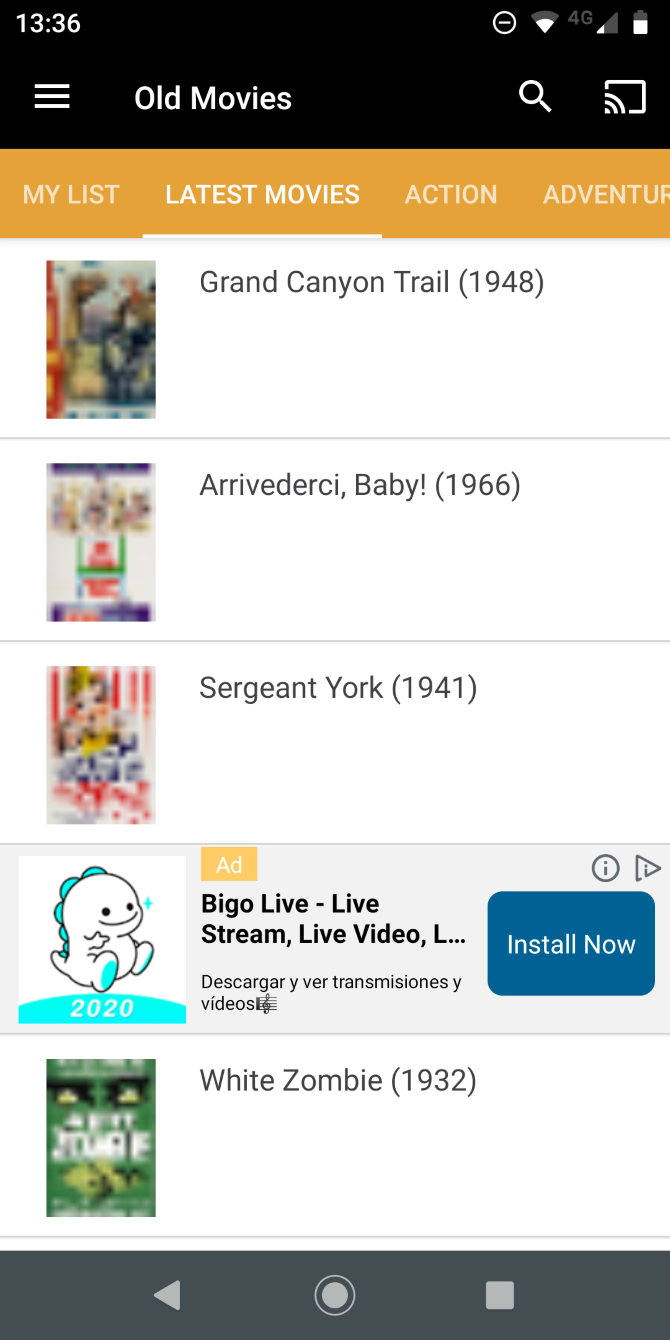
Old Movies—Oldies but Goldies is a free classic movies app for Android.

It has hundreds of free films from the “classic Hollywood cinema era,” loosely described as 1910-1969. That means you can watch many of the old-time actors that your grandparents used to talk about, including the best works from legends such as Charlie Chaplin, Marlon Brando, John Wayne, and Alfred Hitchcock.

The app is ad-supported.

Download: Old Movies—Oldies but Goldies on Android (Free)

8. The Film Detective

film detective

The Film Detective is another website where you can watch old movies. Almost all of the films available on the platform were made before the dawn of the color era.

You can watch movies such as the original The Fast and the Furious from 1954, The Pied Piper of Hamelin from 1957, 1976’s James Dean, and The Borrowers from 1973.

You can use the platform for free on the web and across all of the major streaming devices as long as you’re content to watch some ads. Alternatively, you can pay $3.99/month if you want to remove the ads.

9. Fandor

fandor

Fandor is a classic film site for movie geeks. It offers handpicked movies to its members, each of which has the underlying aim of “the advancement and preservation of film art and culture.” As part of its strategy, the company gives 50 percent of all revenues to the films’ rights holders.

The service has a large selection of independent movies from years gone by, as well as a healthy dose of foreign content.

It total, more than 4,000 movies are available. You’ll need to pay $5.99/month or $49.99/year to watch them.

10. Kanopy

kanopy

Kanopy provides a way for anyone in the US to watch free classic movies, as long as they hold a library card from a participating establishment. Many colleges and universities also have agreements in place.

You will find a mix of critically-acclaimed classic content, newer releases from indie filmmakers, and foreign films. The Kanopy service is available on Apple TV, Roku, Android TV, Fire TV, and some smart TVs.

The Best Apps and Sites for Old Movies

No single service offers all of the classic films ever made, and nor is every service available on every platform. So, in order to gain access to a wide range of classic movies, we recommend trying a few of the apps and sites listed above.

And if you need even more films to watch, check out our articles explaining how to find out which movies are available to stream and our list of the best free movie streaming sites.

Read the full article: How to Watch Classic Movies: The 10 Best Apps and Sites


Read Full Article

How to Convert the MOD Camcorder Video Format to MPG


video-converters-mac

Recording videos these days is so easy. There’s no need to carry a camcorder around when you have a smartphone video camera. Clips can be easily edited and shared online. It’s rare to come across a file format you can’t view or convert.

Whether you’re still using an old camcorder, or you’ve been tasked with copying and converting the footage, there’s a chance you’ll come across MOD files. These media files are difficult to read which means they need converting—but how do you convert MOD to MPG video formats?

What Is a MOD File?

You’ve probably never heard of a MOD video file, but if you have you’ve probably had the misfortune of using one.

It’s not that it is a bad file format. It is just that the MOD file is rarely encountered. In fact, the MOD file extension often appears in other places such as video game modifications. That’s not the MOD file we’re talking about here, however.

So: How do MOD files play? Why is this format used?

MOD and TOD files (the high definition equivalent) can be found on tapeless camcorders. These are the type of device that use memory cards rather than tape. MOD files are no longer used and only found on old camcorder hardware. If you have a reliable handheld video camera that you still use, you probably encounter the MOD file extension regularly.

Can you convert MOD files in Windows
Image credit: Mikus/Wikipedia

Therefore, this file extension becomes frustrating. MOD files cannot be easily read. Converting to MP4 format is bad enough—it’s tricky to convert MOD files to write them to DVD or Blu-ray. Most burning tools don’t recognize MOD files.

Another problem with MOD files is that you would assume from the name and the lack of support that it is a proprietary format. However, this isn’t the case. JVC and other well-known brands simply renamed a standard video file format.

MOD files are in fact standard MPEG2 audio/video files. As such, they should be simple to convert and watch.

What Devices Record in the MOD File Format?

Numerous camcorders record video in the MOD file format. They’re produced by JVC, Panasonic, and Canon, and were sold between 2004 and 2011. They range between using built-in media storage to removable SD cards, as well as compact hard disk drives (HDDs).

Where the storage is not removable, a USB Mini port can be used to transfer data to your computer.

But how can you view MOD and TOD files on a PC? Is there a MOD file converter?

How Do You Convert MOD Files?

If you have MOD video files that you need to convert you have three options:

  1. For older files, simply rename the file extension
  2. View in VLC media player
  3. Convert using FFmpeg

Let’s check those in turn.

1. Convert MOD Files to MPG by Renaming the Extension

To clarify the first option, older camcorders that save video as MOD files simply rename an existing format. The solution is to just rename the file. So, a file called movie.MOD, can be renamed to movie.MPG.

You should be able to see the MOD file extension on your video clip. If not, you’ll need to force Windows to show it.

Start by opening Windows Explorer and browsing to the location where the MOD file is stored. Open File > Change folder and search options and select View.

Here, clear the check against Hide extensions for known file types. Click OK to confirm.

Next, right-click the MOD file and change the file extension from .mod to .mpg. Tap Enter, then click OK when prompted to proceed. That’s all there is to it.

As alluded above, this probably will not work on the later devices using MOD files. In which case…

2. View MOD Files in VLC Media Player

VLC media player can convert media files

VLC media player is the Swiss army knife of media player software. It will play almost any media file, even some that other players declare corrupt. VLC can even play partially downloaded files.

MOD and TOD files can be played in VLC media player. Simply download the tool, install, then double click the file concerned to watch it play. Alternatively, in VLC select Media > Open File and browse the file and click OK to view the MOD file.

Download: VLC media player (Free)

3. Use FFmpeg to Conver MOD Files to MPG

Don’t want to use VLC media player? It’s one of the top must-have apps for Windows 10, but if you prefer an alternative, MOD and TOD files can be converted to MPG using FFmpeg. This is a command line tool that can be instructed to convert MOD files.

Download: FFmpeg (Free)

Once installed, FFmpeg is accessed in Windows PowerShell. You’ll need to know and enter the file path of the MOD file on your computer. Otherwise, open Windows Explorer then File > Open Windows PowerShell from the MOD file location.

In PowerShell, use the FFmpeg command to call the program, then use the conversion command:

ffmpeg -f mpeg -i originalClip.MOD -vcodec copy -acodec mp2 -ab 192k copyClip.mpg

Note that changing the file type will not improve the quality of the video file.

For high definition TOD files, convert using

ffmpeg -i myClip.TOD -vcodec copy -acodec copy myClip.mpg

With MOD files converted they should playback in any player. If you run into trouble, use VLC.

Play MOD Files on Your PC

Now you know what a MOD file is, and you know how to play them. The VLC media player is the answer to so many playback issues—it should be everyone’s default media player.

It’s important to maintain personal archive material, whether video, audio, or other data. CDs are as susceptible to decay as magnetic tape and vinyl, just in different ways.

Once you’re done backing up old MOD file video data, it’s time to convert your classic audio media to MP3.

Read the full article: How to Convert the MOD Camcorder Video Format to MPG


Read Full Article

How to Download IE6 and Other Old Versions of Internet Explorer


ie-6-download

Chances are that you haven’t used Internet Explorer for a long time. And if you have, it almost certainly wasn’t an ancient version like Internet Explorer 6 or Internet Explorer 8.

However, in the rare case that you need to download an old version of Internet Explorer, you have a few options. Let’s take a look at why you might want to do this and where you can download the browser.

Why Would You Need Old Internet Explorer Today?

IE6 showing Google

If you’ve ever used Internet Explorer 6 or other old versions, you probably wonder why people would willingly use those browsers. IE6 is notorious for its security issues and lack of compliance with web standards, and later versions were better but not exactly outstanding.

Today, most people who use Internet Explorer do so because of legacy enterprise software. Many companies built internal web apps decades ago that were designed to only work with IE. Internet Explorer was the dominant browser at that time, so it made sense to create tools that conformed to its standards.

If you’re still forced to use one of these ancient web tools for business use, it won’t work in modern browsers. In these cases, you’ll need to get your hands on an old copy of Internet Explorer.

Windows 10 still includes Internet Explorer 11 (the final version) for compatibility reasons. This should suffice for some web apps, but for more outdated tools, it might not cut it.

How to Download Old Versions of Internet Explorer

If you need to install IE6, IE8, or another old version on your computer, what are your options? Let’s take a look.

1. Use Compatibility View in IE11

Did you know that IE11 has a built-in mode that’s designed to help fix sites designed for older versions? It’s a good first step to try if you need to open a website formatted for an old version of IE, as it only takes a second to try.

To use Compatibility View, click the Tools button (which looks like a gear) at the top-right of the browser and choose Compatibility View settings. This will open a new dialog box with the name of your current page in the Add this website box. Click Add to put the website in Compatibility View, then hit Close and reload it.

IE Compatibility View

This only helps with display issues, not entire version incompatibilities. If you need a full copy of an old browser, try one of the methods below.

2. Download IE6 From the Internet Archive

Microsoft used to offer IE6 on its website but has since removed it. Thankfully, the Internet Archive, which is dedicated to preserving internet history, has a copy of IE6 with Service Pack 1 available to download.

It’s available as either a torrent download or ZIP file, weighing in around 78MB. This is the simplest option to grab a copy of IE6 if you need it since the Internet Archive is a trustworthy source.

3. Grab IE8 or Other Versions From OldApps.com

Internet Explorer Old Apps Download

Since IE8 was the browser shipped with Windows 7, some legacy apps require that version instead of IE6. And as it’s a little newer, you can find IE8 from more sources than IE6.

For instance, Microsoft still offers downloads of IE8 on its website. You can find IE8 for Windows Vista or Windows Server 2008 as well as IE8 for Windows Server 2003.

Since you probably don’t use either of these OSes, though, you’re better off grabbing a copy from OldApps.com. As the name suggests, this resource offers downloads of old software. From retro gaming to old audio apps to unsupported system utilities, it offers pretty much everything.

Head to the Internet Explorer page on OldApps to download the version you need. You’ll find versions going all the way back to Internet Explorer 3. Keep an eye on the supported platforms for each version, though. You can’t run anything lower than IE11 natively on Windows 10, so you’ll need a virtual machine (as we discuss below).

Keep in mind that this isn’t an official source. Thus, you should treat each file you download from here with caution. Check it with an online virus scanner before running the installer.

4. Access Old IE Versions Using a Virtual Machine

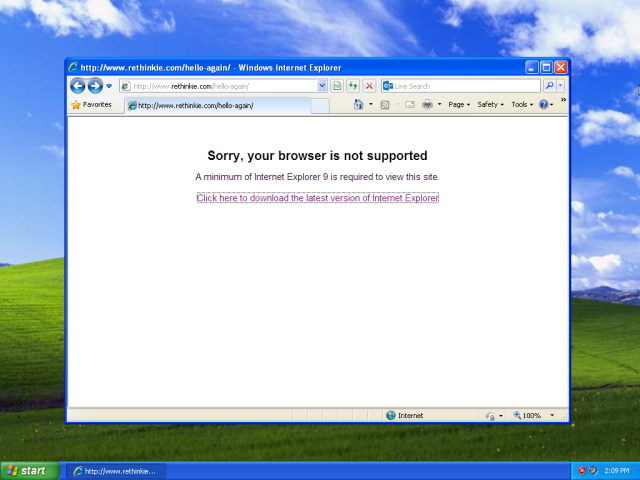
internet explorer 8 not supported

If you can’t install the older version of IE that you need on a real computer, virtual machines are a viable option. These allow you to run another operating system inside an app on your current computer.

This is more secure, as it lets you isolate the old browser from your actual system. In addition, when you install an older operating system, it will come with the original version of Internet Explorer.

Follow our full guide to VirtualBox to learn how to get started with it. If you’re interested in Windows XP, we’ve shown how to easily install Windows XP in a VM.

When you install Windows XP, you’ll have access to IE6 out of the box. Windows 7, meanwhile, comes with IE8. Just make sure you don’t install OS updates if you want to keep those old versions installed.

5. Try Browser Testing Tools

Browserling Testing IE

Because old versions of Internet Explorer like IE6 and IE8 are so old and no longer receive security updates, it’s a good idea to run them in an isolated and secure environment. If you’re not comfortable with or are unable to install IE on a real computer, you can use a testing solution in your browser.

Sites like BrowserStack and Browserling allow you to test websites using a variety of browsers while remaining in your own browser. You don’t need to download an app or set up remote access, so the work on your end is simple.

They work by leveraging hundreds of virtual machines, each configured to run different versions of various operating systems. Each of these services supports a broad range of browsers, including most versions of Internet Explorer.

Unfortunately, because these are professionals tools designed for testing, they aren’t free. BrowserStack offers a limited free trial, while Browserling restricts you to a few categories unless you subscribe. This means that you’ll likely need to pay to access IE6 or IE8 in this way.

6. Purchase IE Tab

If you need to open sites in ancient versions of Internet Explorer often but none of the above work for you, IE Tab is a good solution. This is a Chrome extension that allows you to render specific pages as if they’re running in IE.

Handy features include the option to choose which version of IE’s standards you want to apply, as well as creating a list of sites that always run in IE mode. Using this, you can open IE-only sites without ever leaving Chrome.

Since this tool is intended for business use, it’s not free. A lifetime license costs $19, which isn’t terrible compared to the time invested in some of the other solutions.

Keep in mind that this is not simply changing your browser agent to IE. Doing that only pretends that you’re using Internet Explorer, while this actually uses the proper rendering agent.

Only Use Internet Explorer If You Have To

We’ve shown you how to access ancient versions of Internet Explorer today. But it’s important to know that these should be used as compatibility solutions only. Running decades-old browsers on unsupported operating systems is a workaround that hopefully few people will have to experience.

There’s no reason to use Internet Explorer as your primary browser these days. Unless you need it to access a specific site, you’re better off with anything else. If you do have to use IE, see our Internet Explorer troubleshooting tips in case you run into trouble. Otherwise, consider a Chromium-based browser if you’re looking for something different.

Read the full article: How to Download IE6 and Other Old Versions of Internet Explorer


Read Full Article

The Best Smartphones With Micro-USB in 2020


Charging your smartphone is a daily hassle. First, you need to locate an outlet, then find the correct cable for each device. This is further complicated if there are other people in your household with differing chargers.

However, despite recent advances, most electronic devices still use the micro-USB standard. This familiar port has been with us for over a decade and can be reliably found in most households, workplaces, and retail outlets.

If you’re after a smartphone that you can easily charge, then we can help. Here are the best smartphones with micro-USB available today.

1. Oppo A9 2020

Oppo A9 2020 Oppo A9 2020 Buy Now On Amazon $249.99

The Oppo A9 2020 is one of the best Android phones with micro-USB charging. The affordable smartphone is equipped with a 6.5-inch Full HD+ display with a small waterdrop notch at the top to house the 16MP front-facing camera. On the back, there’s a fingerprint reader and a 16MP primary camera with a 2MP depth sensor.

The phone runs ColorOS 6, a modified version of Android 9.0 Pie. There’s a 4,020mAh battery, which should keep you juiced up through a whole day’s use. This is, in part, thanks to the A9’s MediaTek Helio P70 SOC. The Oppo A9 2020 operates on 4G/LTE bands, has dual-SIM support, and uses Bluetooth 4.2 Low Energy (LE). The phone is available in either Fluorite Purple or Marble Green.

2. Samsung Galaxy A11

Samsung Galaxy A11 Samsung Galaxy A11 Buy Now On Amazon $153.94

The Samsung Galaxy A11 combines some of the Galaxy smartphone range’s best features while keeping the price at an affordable level. Importantly, the phone uses a micro-USB port for charging and PC connectivity. The 6.4-inch HD+ display is coupled with 32GB of storage and 2GB of RAM. The Snapdragon 450 CPU supports these components for fast performance.

Although the A11 is available at an entry-level price, it does have a triple-lens rear camera commonly found on more expensive devices. The 13MP camera is supported by a 5MP ultrawide lens and a 2MP depth sensor. There’s also a front-facing 8MP selfie camera. The Samsung Galaxy A11 will run on 2G, 3G, and 4G/LTE networks as well.

3. Nokia 4.2

Nokia 4.2 Nokia 4.2 Buy Now On Amazon $109.00

Since purchasing the brand from Microsoft, HMD Global has taken the Nokia range from strength to strength. The Nokia 4.2 is no different and is the best affordable smartphone with micro-USB support. All Nokia devices are bloatware-free, and the 4.2 runs Android One, a Google-backed edition of Android with two years of operating system updates.

The phone has a dual rear camera, featuring a 13MP lens and a 2MP depth sensor. This is coupled with the 8MP front-facing selfie camera. For efficient performance, there’s a Snapdragon 439 CPU powering the Nokia 4.2. This means you should be able to get through a full day on the 3,000mAh battery. The 5.71-inch HD+ display is supported by 3GB of RAM and 32GB of onboard storage.

4. Motorola Moto G8 Power Lite

Motorola Moto G8 Power Lite Motorola Moto G8 Power Lite Buy Now On Amazon $179.99

The Motorola Moto G8 Power Lite continues the company’s well-received Moto G range of budget Android smartphones. This model is the International edition. As such, it does not come with a US warranty and works with most GSM, but not CDMA, cell networks. The 6.5-inch display is coupled with a front-facing 8MP selfie camera. The triple-lens rear camera consists of a 16MP primary camera, a 2MP macro lens, and a 2MP depth sensor.

The phone runs the Android 9.0 Pie operating system, comes with 64GB of onboard storage, and 4GB of RAM. The Moto G8 Power Lite is equipped with dual-SIM support and a 5,000mAh battery. Incredibly, this can power the phone for up to three days on a single charge. There’s even a fingerprint reader on the rear of the device as well.

5. Xiaomi Redmi 7A

Xiaomi Redmi 7A Xiaomi Redmi 7A Buy Now On Amazon $103.99

International smartphones are a great way to save some money, so long as you don’t mind the lack of US warranty and limited network compatibility. For instance, the Xiaomi Redmi 7A is a great value smartphone, but this international edition only supports GSM SIM cards and won’t work on CDMA networks. However, the 5.45-inch device is one of the best smartphones with a micro-USB port available today.

The device runs MIUI 10, a modified version of Android 9.0 Pie. The phone has 2GB of RAM and 32GB of built-in storage which can be expanded to 256GB via microSD. This smartphone is equipped with a 13MP rear camera and a 5MP front-facing selfie camera. The Xiaomi Redmi 7A has dual-SIM support and a 4,000mAh battery.

The Best Smartphones with Micro-USB

Although many recently-released smartphones come with USB-C or wireless charging, micro-USB ports are still commonplace. Technological progress is essential, but for most people, smartphones with micro-USB support are still preferable.

These devices are typically more affordable than their USB-C flagship counterparts. If the price is a factor in your decision, you may also want to consider one of the best budget smartphones.

Read the full article: The Best Smartphones With Micro-USB in 2020


Read Full Article

How to Create a Pivot Table for Data Analysis in Microsoft Excel


excel-tables

Microsoft Excel’s pivot tables are a powerful tool you can use to compare large datasets.

You can use the pivot table as an interactive data summarization tool to automatically condense large datasets into a separate, concise table. You can use it to create an informative summary of a large dataset or make regional comparisons between brand sales.

Pivot tables do not have to be intimidating—far from it—and we are here to help you unlock one of the real hidden power tools of Excel.

What Is a Pivot Table?

A pivot table is a method for arranging large datasets into easier to manage statistics. You can use the pivot table feature to “pivot” your data to uncover new trends and links between data.

The primary method for data entry in Excel is a regular flat table, like so:

microsoft excel flat table example

The flat table contains columns and rows containing data. You can discern some basic trends through the data, especially with a small dataset.

However, if you have a dataset containing thousands or even millions of entries, you cannot understand the data at a glance. In that instance, you can create a pivot table to sort and link the data using the categories available (typically taken from the data range names).

One of the best things about a pivot table is the speed with which you can rearrange data. You don’t have to understand complicated comparison formulas, and you don’t need to become an Excel pro to work with a pivot table. Better still, you can reset your pivot table whenever you want and begin afresh.

How to Create a Pivot Table in Excel

Microsoft Excel has an excellent integrated pivot table option. You should note that Excel is far from the only spreadsheet program that uses pivot tables. Microsoft Office alternatives such as Libre Office and Google’s G-Suite all have support for pivot tables in their spreadsheet programs.

Anyway, back to pivot tables in Excel. The following tutorial uses Microsoft Excel for Office 365. Furthermore, I’m using a generic generated dataset of UK names, addresses, and so on. If you would like to use the same practice data, the file is available for download below.

To create a pivot table, head to the Insert tab and select PivotTable. Select the table or data range you want to include in the pivot table. In the case of the example, the entire data range forms the selection.

microsoft excel pivot table range

As you can see, there are options to connect an external data source (i.e., MS Access), or place the pivot table within the existing worksheet. For the latter option, be sure to check that your new pivot table will not obscure or break your existing data (though you can always hit CTRL + Z to undo if something terrible does happen!).

Sorting Pivot Table Data

Once you hit OK, your pivot table will open in a new worksheet. The worksheet begins blank. On the right, you will see the PivotTable Fields panel. This panel contains the data ranges from the example dataset, such as names, addresses, sales, and so on.

microsoft excel pivot table blank

From here, you have two options for adding data to your pivot table:

  1. Drag and Drop: The pivot table fields listed on the right-hand side can be dragged into the four areas below (Filters, Columns, Rows, and Values). You can select specific data items that you wish to cross-reference against any number of differentials.
  2. Add to Report: Clicking individual dataset fields will add them directly to the waiting report table. Use this method to rapidly build, analyze, collate, and modify the available data.

While both methods deliver similar outcomes, Add to Report allows you to simply select your preferred data field and marvel in wonder as your report table transforms. As a bonus, each time we click a new data field, it is automatically added to the area Excel deems correct, while reminding us that we cannot add a data’ field with more than 16384 items to the column area.’

Selecting Pivot Table Data Ranges

The pivot table example we are using is basic. It contains a few sample data points that are easy to understand. For this example, we’re going to look at regional sales of the various products sold.

From the PivotTable Fields list, select County, Sales Volume, Sales Total, and Product. The example pivot table should now look like this:

microsoft excel pivot table filters

You can now glance at your pivot table data and analyze data for any trends. If you want to see an overview of each section, right-click and select Expand/Collapse > Collapse Entire Field.

Filtering Your Pivot Table Data

microsoft excel pivot table filter column options

Feel free at this point to play around with the different fields, learn which varieties of data produce concise correlation, which data fields need tweaking to reveal their secrets and to comprehend the value actions of filter settings:

  1. Hover over the desired data field, note the small black arrowhead to the right of the text
  2. Selecting the black arrowhead reveals a drop-down ‘Filter’ menu – extremely useful for isolating data within a single field, or comparisons between similar data ranges across multiple data sources.
  3. Select the County filter menu.
  4. By default, all data ranges are selected. Unselect all (by hitting select all), followed by reselecting a few different counties. This isolates the data for these countries, filling our pivot table with concise, comparative data we are able to begin to analyze for potential trends.

microsoft excel pivot table filtered groups

Modifying the filters of each available field will almost always directly alter the data presented in the pivot table and is a sure-fire method of unlocking the true potential of your data.

Use Pivot Tables to Uncover Data Trends

You can use a pivot table to work your data into new angles, helping you to uncover new trends and statistics for your work, business, or otherwise. Pivot tables work best when they have a large amount of data to work with, multiple data fields, and some duplicate data fields, too.

That’s not to say you cannot use them with a smaller data sample. The example data for this article was just 500 rows and 14 columns, three of which were in use to manipulate the data.

If you’re looking to up your Excel powers, check out these Excel formulas that do amazing things!

Read the full article: How to Create a Pivot Table for Data Analysis in Microsoft Excel


Read Full Article

How to Stop Telegram Saving Images to Your Phone Gallery


telegram-messenger

Telegram is much better than WhatsApp in countless ways, and here are the reasons why you should give Telegram a chance. For starters, it’s not owned by Facebook, which is one of the largest advertising companies in the world. So that’s a big plus.

As you’d expect, Telegram is packed with little tricks that make the messaging app even more enjoyable to use. One such feature is the ability to stop images you receive from being automatically saved to your phone’s picture gallery. So, in this article, we explain how that works.

How to Stop Telegram From Saving Photos

If your Telegram images are showing in your gallery and you don’t want them to, it is possible to prevent the auto-download process.

To learn how to stop Telegram from saving photos, follow the simple step-by-step instructions below:

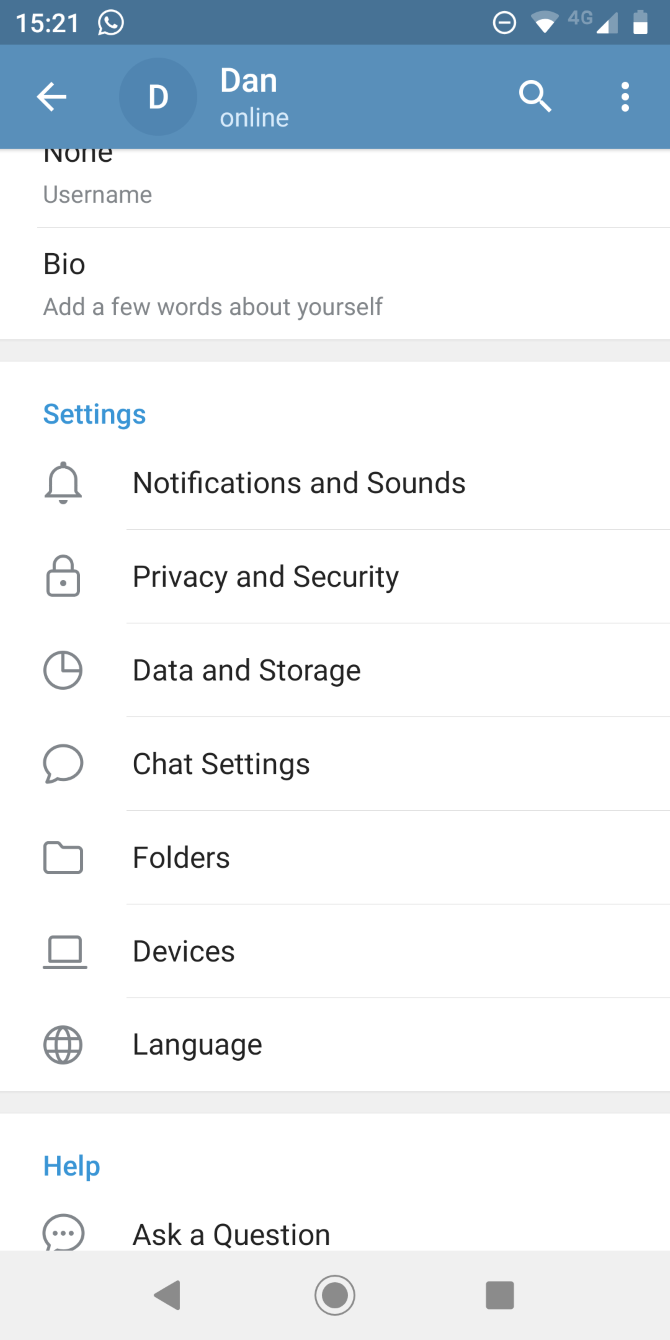
  1. Open the Telegram app.
  2. Tap on the three horizontal lines in the upper left-hand corner of the window.
  3. In the new menu, select Settings.
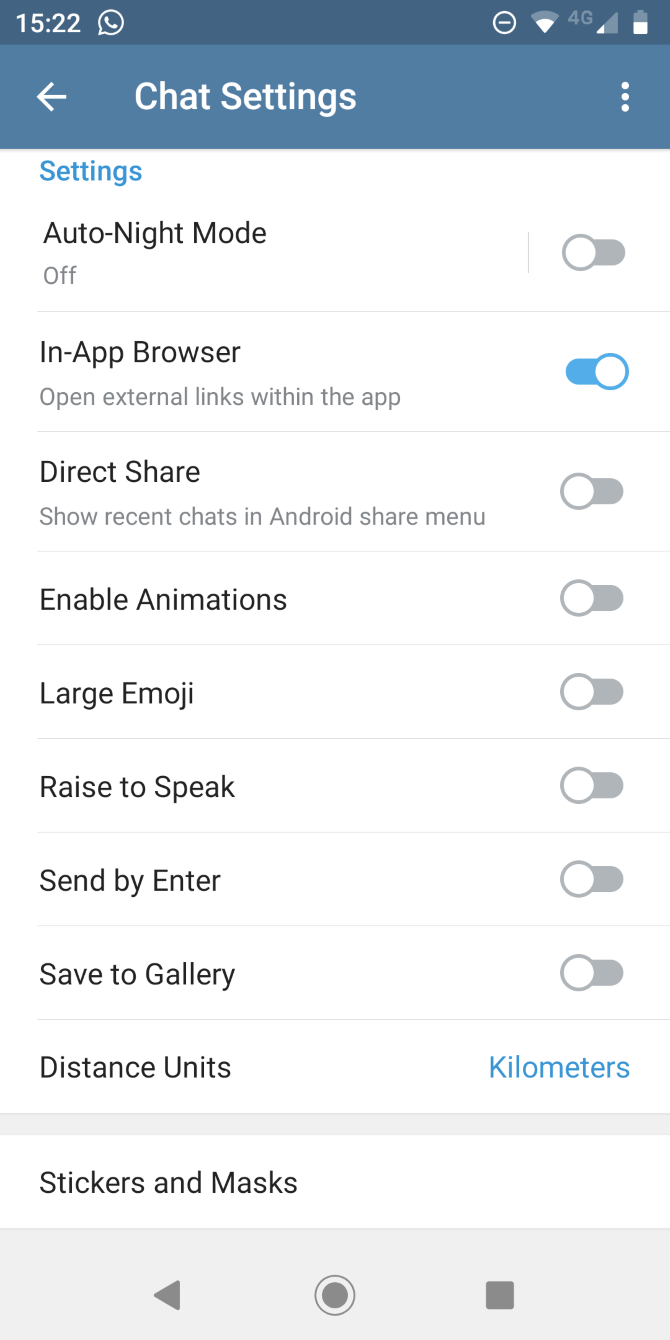
  4. Scroll down to the Chat Settings section.
  5. Slide the toggle next to Save to Gallery into the Off position.

(NB: Changing this setting will not affect images that you have already downloaded onto your device.)

Unlike WhatsApp (which blurs images when you disable automatic downloads), you will still be able to see Telegram images on the screen in all their glory.

If you’d like to save a single picture to your gallery, open the image and click on the three dots in the upper right-hand corner. In the pop-up menu, choose Save to Gallery.

More Cool Things to Do With Telegram

Telegram is a multi-faceted app that is constantly added exciting new features. To learn about some of the other cool stuff that Telegram is capable of, check out our article listing the best Telegram features you should be using.

Read the full article: How to Stop Telegram Saving Images to Your Phone Gallery


Read Full Article

What You Need to Know Before Playing The Last of Us Part II


last-of-us-2

The Last of Us Part II was released in June 2020 to eager anticipation. However, with seven years having passed since the first game, you may need a refresher. This may be because you have never played the original, or that you have played it but can’t remember all of the events that took place.

If you’re jumping into the series for the first time and just want some context, or need to jog your memory about the plot of the first game, here’s what you need to know before playing The Last of Us Part II.

What Is The Last of Us?

The Last of Us is a PlayStation-exclusive survival adventure game that was first released for PlayStation 3 in 2013. An additional DLC chapter followed in 2014. The game was developed by Naughty Dog, the same studio behind the Uncharted series.

With the release of the PlayStation 4, a remastered version of the game came out in July 2014.

The game’s story takes place in a post-apocalyptic world where a fungal outbreak has turned a large portion of humanity into zombie-like creatures. This Cordyceps fungus takes over the brains and nervous systems of victims, turning them into aggressive hosts that try to spread the fungus’ spores.

In the present day, survivors live in heavily policed quarantine zones controlled by the army. However, rebels known as the Fireflies oppose this military rule.

The wilderness outside of these quarantine zones is inhabited by the infected, bandits, rebels, and small colonies of survivors (who should have read our guide to surviving the zombie apocalypse).

The Last of Us Characters

the last of us ellie and joel

*Warning: The following section contains minor spoilers for the first part of The Last of Us.*

The Last of Us has two main characters: Ellie and Joel. However, you spend the vast majority of the first game playing as and controlling Joel.

You first meet Joel at the onset of the outbreak. Joel attempts to escape the chaos with his daughter Sarah and brother Tommy. While fleeing, a soldier shoots Sarah. The young girl dies in Joel’s arms.

Players continue Joel’s story 20 years later—with Joel becoming a smuggler and bitter survivalist. It’s through his work as a smuggler that he meets Ellie.

Joel and his partner are hired by Firefly leader Marlene to escort the young teen to a drop-off point.

Ellie’s importance to the rebellion soon becomes clear. It turns out that Ellie is immune to the Cordyceps fungus and therefore humanity’s only hope to finding a vaccine.

The Last of Us: Plot Summary and Recap

ellie and joel last of us

*Warning: This section contains major spoilers for the first The Last of Us game.*

Joel and his smuggler partner Tess agree to escort Ellie to Fireflies outside the quarantine zone. Along the way, Ellie reveals that she was bitten by one of the infected several weeks back. Despite this, the fungus hasn’t taken over—even though the transformation usually takes place within two days.

When they reach their destination, the group find their Firefly contacts dead.  Soldiers try to apprehend them, but Tess (who reveals she had been bitten shortly before) sacrifices herself so that Ellie and Joel can escape.

Joel decides to take Ellie to his brother Tommy, a former Firefly. Along the way, they meet brothers Henry and Sam who they form a friendship with. However, this ends in tragedy when Sam succumbs to a Cordyceps infection and Henry ends his own life in grief.

When they reach Tommy, Joel’s cold treatment of Ellie has warmed somewhat. After an emotional confrontation, he decides to finish the journey with Ellie. The pair then set off to the last known Firefly base.

The base is abandoned by the time they arrive. They discover that the Fireflies have since moved to a hospital in Salt Lake City.

Joel’s injury and Ellie’s abduction

ellie last of us infected

While setting off for their new location, bandits attack the pair and Joel sustains a life-threatening injury during the encounter. With winter setting in, Ellie shelters with Joel in the mountains and treats his injury.

Some time later, Ellie encounters some survivors while hunting alone. They agree to trade some medicine with her.

But things take a turn when one of the survivors, David, tells Ellie that a man traveling with a young girl killed some of his men a few weeks before. David, who heavily implies that he suspects her, lets Ellie go with the medicine.

Soon after returning to tend to Joel, she realizes that David’s group followed her. David captures Ellie and takes her back to his base, where she discovers that his group has resorted to cannibalism.

Ellie eventually escapes and during her final encounter with David, she kills him. Joel, who has tracked her down, finds her at this moment and comforts her.

last of us ending salt lake city

When spring comes, Ellie and Joel reach Salt Lake City. Joel suggests that they rather return to Tommy to live in the settlement. But Ellie wants to go through with their original plan. Remarking on the lives lost, including those by her hands, she says, “It can’t be for nothing”.

On their way into the city, they fall into water and Ellie, who cannot swim, falls unconscious. As Joel tries to revive her, Fireflies find him and knock him out.

The Last of Us Ending

last of us ending marlene

*Warning: This section contains major spoilers for the first The Last of Us game.*

When Joel wakes up, he sees Marlene. She tells Joel that doctors are preparing Ellie for surgery. The surgeons plan to remove the mutated Cordyceps growth on Ellie’s brain and use it to reverse engineer a vaccine.

Joel becomes enraged at the idea that Ellie likely won’t survive the operation and fights the Fireflies. He finds Ellie unconscious in the operating room and kills the doctors. While escaping, he encounters Marlene. She pleads with Joel to let them operate on Ellie, noting that it’s what Ellie would want and he knows it.

The game flashes forward to Joel driving away. Ellie regains consciousness in the back seat and asks what happened. He tells her that the Fireflies weren’t able to reverse engineer a vaccine and have given up trying.

However, flashbacks show what really happened—with Joel shooting and killing Marlene so that she can never come looking for Ellie.

When they reach Tommy’s settlement, Ellie asks Joel to swear that he told her the truth about the Fireflies. He promises her that he told the truth and she simply says “OK”.

Where The Last of Us Part II Picks Up

The Last of Us Part II takes place five years after the events of the first game. Ellie, now around 19 years old, has settled within Tommy’s community in Jackson. There, she has formed friendships and even a potential romantic relationship.

However, tragedy strikes and Ellie vows revenge on those responsible.

The game promises to provide players with escalating moral conflicts, shedding light on the repercussions of Ellie and Joel’s actions before and during the game. According to Sony, the story blurs the lines between hero and villain.

The sequel features similar mechanics to its predecessor, but you play primarily from Ellie’s perspective. Players are also able to use a greater variety of weapons, crafted items, and skills.

Other Unmissable PlayStation 4 Games to Play

Now you’re all caught up on the events of the first The Last of Us game and can jump right into the sequel. And once you finish The Last of Us Part II, it might be worth checking out the best PS4 exclusives. After all, the PlayStation 5 will soon be with us.

Read the full article: What You Need to Know Before Playing The Last of Us Part II


Read Full Article

How to Find the Serial Number for Any Apple Device


apple-serial-number

Every Apple product has a unique serial number that’s made up of a long string of numbers and letters. You often need this number to check your device’s warranty, schedule a repair, or make an insurance claim. Fortunately, there are usually a few different ways to find it.

Here are all the places you can find the serial number for your iPhone, iPad, iPod, Mac, Apple Watch, AirPods, Apple TV, or HomePod.

Common Places to Find Your Apple Serial Number

Before delving into the specific serial number locations for each device, you should know about several easy methods to find the serial numbers for any of your Apple products.

Typically, these options only work if the device is linked to your Apple ID account or if you originally purchased it from Apple. On the plus side, each of these universal options is available even if you can’t get your hands on the device itself—making them especially useful if you need to find the serial number after losing your device.

1. The Apple ID Website

You can view the serial number and other details of all your Apple products from the Apple ID website. This includes any Apple device that is currently signed in to your account. Unfortunately, it doesn’t include accessories, like AirPods.

From any device or computer, visit the Apple ID website and sign in using your username and password. If you use two-factor authentication, you may need to enter a security code to access your account.

After signing in, go to the Devices section to see a list of all your Apple devices. Select a device—iPhone, iPad, Mac, etc.—to view details about it, including the serial number.

Apple ID website with iPad serial number

2. The Apple ID Settings

You can also find the serial number of any device signed in to your Apple ID account from the settings menu of your iPhone, iPad, iPod touch, or Mac. Again, this option doesn’t show you the serial number for accessories, like AirPods.

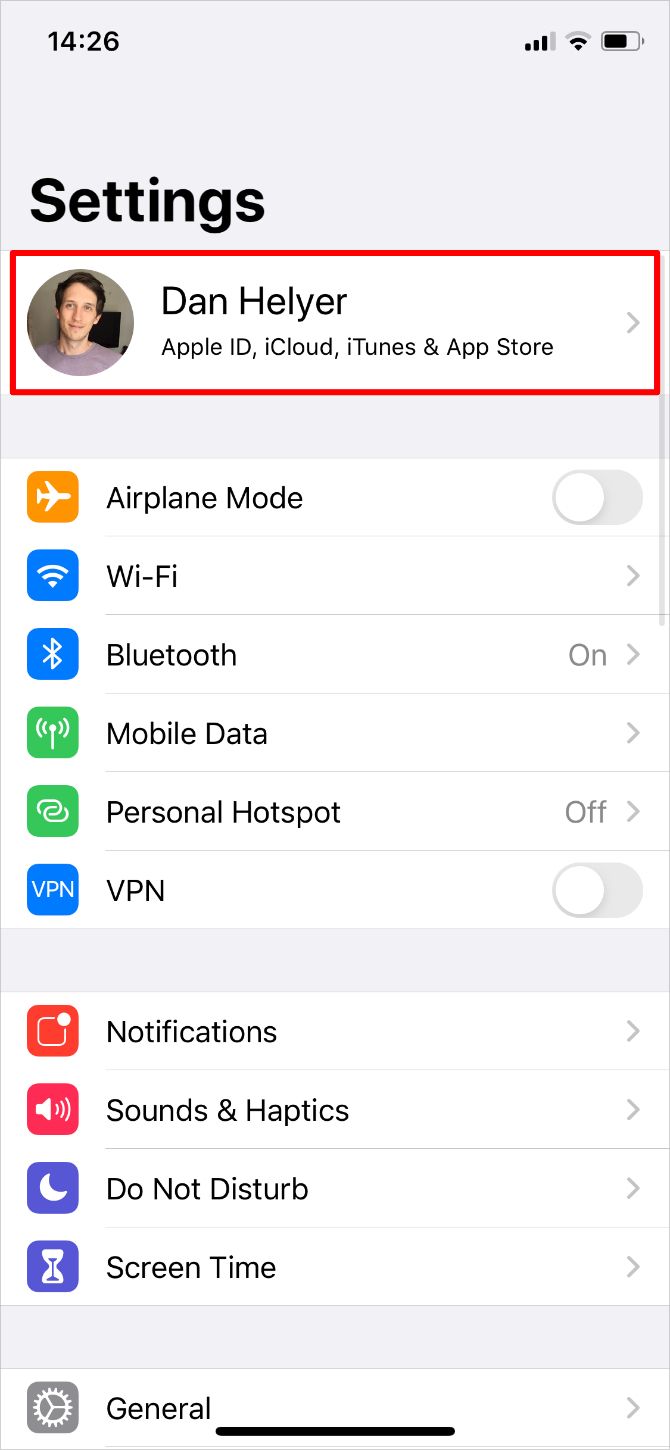
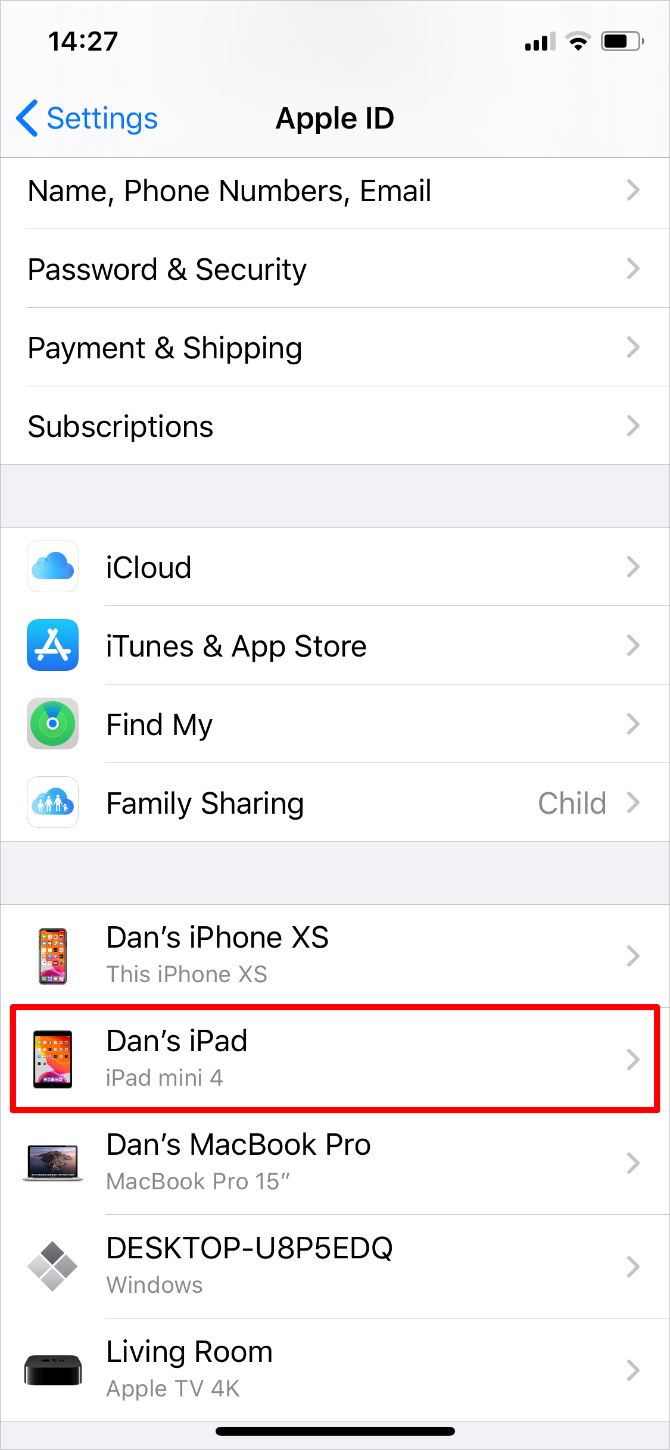
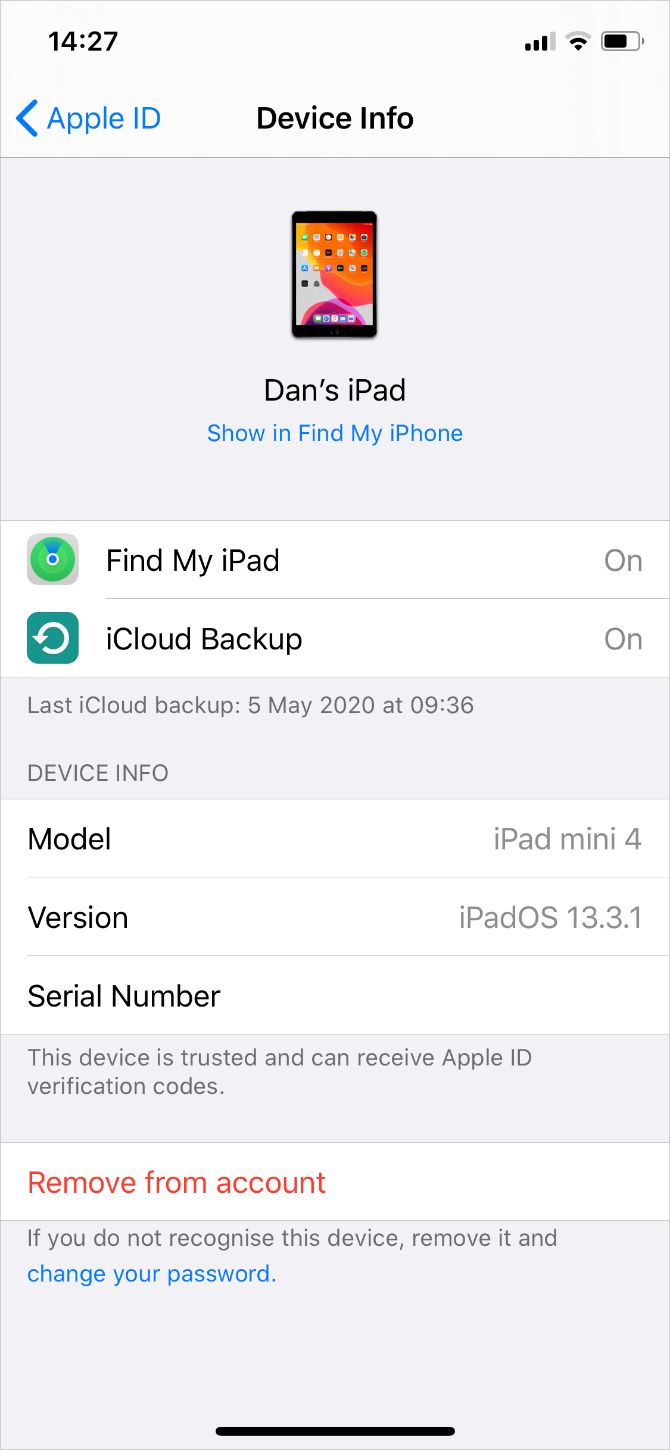
On an iPhone, iPad, or iPod touch, open the Settings app and tap your name at the top to view your Apple ID settings. Scroll down to see every device signed in to your account, then tap one to view more details about it, including the serial number.

On a Mac, open the System Preferences and click Apple ID. Every device using your Apple ID account appears in the sidebar; click on one to view details about it, including the serial number.

3. The Original Invoice or Receipt

When you buy an Apple product directly from Apple, you receive a purchase receipt with details about your new device, including the serial number. If you bought your device in an Apple Store, you may have a paper receipt. But if you bought it online, you should have an email receipt with your device’s serial number attached.

Search through your emails to find previous Apple receipts. The subject line could say:

  • Your Apple invoice
  • Your Apple Store billing document
  • Your receipt from Apple

Apple invoice email

After finding your attached Apple invoice, read the small print to find your serial number.

4. On the Original Packaging

If you still have the original box your Apple product came in, you should be able to find the serial number next to a barcode on the sticker. Check each side of the packaging to find this sticker. Make sure you read the serial number and not the UPC, which is next to a different barcode.

AirPods box showing serial number barcode

If you can’t find your serial number using the universal methods above, follow the device-specific instructions below.

How to Find Your iPhone, iPad, or iPod Serial Number

iPhone, iPod touch, and iPad Pro devices

If you can turn on and use your iPhone, iPad, or iPod touch, go to Settings > General > About to find the serial number listed alongside other information for your device.

If your device turns on, but you can’t open Settings—perhaps due to a cracked display—find your serial number by connecting to a computer instead. Use a Lightning-to-USB cable to connect your device to a computer running iTunes (or Finder on macOS Catalina and later).

Open iTunes or Finder, then select your device to view information about it. In iTunes, find your serial number on the Summary tab. In Finder, click the gray text beneath your device name at the top of the window to reveal your serial number.

Finally, if your iPhone, iPad, or iPod touch doesn’t power on at all, you may be able to find the serial number printed or engraved on the device itself. Check the back of your device, towards the bottom. Alternatively, eject the SIM tray (if your device uses one) and inspect that instead.

On an iPhone or cellular iPad, you might find the IMEI number but no serial number. The IMEI number is an equally unique string of numbers that you can use to identify your device instead of the serial number.

Older iPod Devices

You may struggle to find your serial number if you have an iPod Classic, iPod nano, or iPod shuffle. However, the serial number should be engraved somewhere on the device. Keep checking every surface to find it. On an iPod shuffle, it is printed beneath the clip.

How to Find Your MacBook, iMac, or Mac Pro Serial Number

MacBook, iMac, and Mac Pro computers

Whatever Mac you own, if it powers on, it’s easy to check the serial number from the Apple menu. Click the Apple icon in the top-left corner and select About This Mac. You can find important Mac information, including your serial number, in the window that appears.

If your Mac doesn’t power on, you should find the serial number printed on the bottom of the casing.

On an iMac, you may need to look at the bottom of the foot stand to find your serial number. And on older Mac Pro models, you can find the serial number on the back panel, beneath the video ports.

How to Find Your Apple Watch Serial Number

Apple Watch models

Open the Settings app on your Apple Watch and navigate to General > About to find the serial number.

If this isn’t possible, find the serial number using a connected iPhone instead. On the iPhone, open the Apple Watch app and go to the My Watch tab. Tap General > About to find the serial number for your connected Apple Watch.

If your Apple Watch doesn’t power on and isn’t connected to an iPhone, look for a serial number printed on the watch itself. Check around the edge of the sensor or inside the band slots after removing the watch strap.

How to Find Your AirPods or AirPods Pro Serial Number

AirPods and AirPods Pro

The easiest way to find the serial number for your AirPods or AirPods Pro is from the Settings app on a connected iPhone. With your AirPod case open, go to Settings > General > About on your connected iPhone. Then scroll down and select your AirPods to find the serial number for them.

If you can’t pair your AirPods with an iPhone, you should still be able to find the serial printed inside the lid of the charging case. The serial number is also printed in extremely small type on the bottom of each AirPod itself, unless you have first-generation AirPods.

How to Find Your Apple TV Serial Number

Apple TV 4K with Siri Remote

From your Apple TV home screen, go to Settings > General > About to find your serial number. If that isn’t possible, you can also find the serial number from Apple’s Home app on another Apple device.

Open the Home app from your iPhone, iPad, iPod touch, or Mac. Tap and hold (or double-click) on your Apple TV, then scroll down to reveal more details about it, including the serial number.

Finally, you can also find the serial number in reflective print on the bottom of the Apple TV itself. You may need to shine a flashlight to read the reflective serial number clearly.

Apple TV and Siri Remote

Your Apple TV remote or Siri Remote also has a unique serial number associated with it. Find this serial number from Settings > Remotes and Devices > Remote on your Apple TV.

How to Find Your Apple HomePod Serial Number

Black and White HomePod side by side

If your Apple HomePod is connected to your Apple Home network, open the Home app on an iPhone, iPad, iPod touch, or Mac. Tap-and-hold (or double-click) on your HomePod, then scroll down to find the serial number.

Alternatively, find your HomePod serial number printed on the bottom of the device.

Use the Serial Number to Check Your Warranty

Apple offers a generous one-year limited warranty from the purchase date of any product. After finding your serial number, use it to check when your Apple warranty expires. Be sure to get any repairs completed inside the warranty to avoid an expensive bill.

Read the full article: How to Find the Serial Number for Any Apple Device


Read Full Article

The Best Amazon Fire Tablet for Your Needs


amazon-fire-tablet

If you’re looking for an Android tablet, but don’t want to splash out too much money, Amazon’s Fire HD range is an excellent place to start.

However, what do you get when you buy one? And with so many models at different price points, which is the right one to choose?

Here’s our guide to the best Amazon Fire HD tablets.

What Is the Amazon Fire Tablet?

Kindle Fire tablets, now known as Fire HD tablets, are a range of highly affordable devices that combine the core tablet functionality with Amazon services, including Alexa.

Fire tablets run a heavily customized version of Android called Fire OS. Its interface brings all of Amazon’s content—books, videos, music, and so on—to the forefront. It also comes without any of the Google apps and services that you may use on other Android devices.

Amazon has replaced the most important of these with its own alternatives, including the web browser and maps app. In place of Google Assistant, you get Alexa, which many people prefer.

And instead of the Play Store, you get the Amazon Appstore. It’s reasonably well-stocked; major apps like Netflix, TikTok, and other notable brands are offered, plus plenty of indie titles. But it doesn’t have nearly the breadth of choice you get from Google. You can sideload the Play Store on a Fire tablet if you want to, though.

Fire tablets are great if you’re a heavy Amazon user, but you don’t have to be. You can use them as regular tablets, too. There’s a web browser, an email client, and you can check Facebook and Twitter. You can even play a few games, although these aren’t gaming devices.

When you buy a Fire HD, you can choose whether or not to have it include Special Offers—ads on the lock screen, in other words. They’re fairly inoffensive, but you can spend a little more to get an ad-free version.

The Newest Kindle Fire Tablet

Amazon Fire HD 8 Amazon Fire HD 8 Buy Now On Amazon $89.99

The newest Kindle Fire tablets are the Fire HD 8 and Fire HD 8 Plus. The former is a very nice upgrade to the hugely popular eight-inch model. It has a faster processor, more memory, slightly slimmer bezels, and USB-C connectivity. There’s a kid’s version, too. The Plus device adds even more RAM as well as wireless charging.

The range is fleshed out with the entry-level Fire 7, and the high-end Fire HD 10. Likewise, there are Kids Editions of those as well. You might be able to find some older models still on sale, but we wouldn’t recommend them. Fire tablets aren’t really designed to be future-proof, so the modest saving you’ll make on the price isn’t really worth the poor performance you’ll likely get.

Best Overall Fire Tablet: Fire HD 10

Amazon Fire HD 10 Amazon Fire HD 10 Buy Now On Amazon $149.99

Given the similarities in hardware specs across the Fire range, your idea of the best Fire tablet might be the one with your preferred screen size. Yet the Fire HD 10 is undoubtedly the top of the range model, and the closest to an iPad alternative, at a fraction of the price.

The device comes with a Full HD display and a pixel density of 226ppi. You’ll get an impressive 12 hours of use from a single charge. And, when it comes time to recharge, it charges via USB-C in under four hours.

There’s an octa-core processor—the fastest in the Fire HD range—backed with 2GB of RAM. You can add extra storage with microSD cards up to 512GB. The device is best for media consumption rather than productivity or creativity. If that’s your main use for a tablet, you can’t really go wrong with the Fire HD 10.

Best Fire Tablet for Portability: Fire HD 8

Amazon Fire HD 8 Amazon Fire HD 8 Buy Now On Amazon $89.99

Amazon’s two eight-inch tablets hit the sweet spot for size. The unit is bigger than your phone but still highly portable. If you want a tablet to put in your bag when heading out, you cannot look past them. Our pick is the new Amazon Fire HD 8—it’s the cheaper of the two, but has a considerable amount to offer.

It’s 30 percent faster than the previous generation and has 2GB of RAM. The bezels are a touch smaller, too, contributing to a sleeker, more modern design. You can select up to 64GB of storage, and expand to an additional 1TB via a microSD card. The battery promises 12 hours of use, and charges via a USB-C port. Only the 1280×800 resolution display is unchanged from the previous version.

If you’re happy to pay more, opt for the Amazon Fire HD 8 Plus. It’s a little extra, but this gets you 3GB of RAM—which should help make the tablet more future-proof—and there’s support for wireless charging. That said, you need to buy the charging dock bundle for this.

Best Value Fire Tablet: Fire 7

Fire 7 Fire 7 Buy Now On Amazon $49.99

The Fire 7 is the cheapest model in the range, and possibly most affordable Android tablet on the market. That’s the case when the tablet is sold at full price, but there are often deals which reduce the price further. Given the low price, you shouldn’t expect the highest specifications or greatest performance.

The Fire 7 has a lower resolution screen than the other models and is not designed for heavy use—push it too hard, and it will be laggy. However, as long as you don’t overload it with tasks, it can do a good job. The Fire 7 works well as an ereader, as well. It’s certainly an upgrade over an in-seat video screen on an airplane.

The tablet is also ideal for following recipes in the kitchen, especially as it comes with Alexa support, too. With up to seven hours of battery and support for memory cards up to 512MB, the Fire 7 is a great value entertainment device.

Best Fire Tablet for Kids: Fire HD 7 Kids Edition

Amazon Fire HD 7 Kids Edition Amazon Fire HD 7 Kids Edition Buy Now On Amazon $99.99

The Kids Editions of the Fire tablets are toughened versions of the main models with child-friendly software. Although they are slightly more expensive, you get additional benefits like a kid-proof case and a two-year guarantee. Fortunately, if the tablet breaks, Amazon will replace it for free. The Fire HD 7 Kids Edition is a good starting point for children.

Installing Netflix will keep them entertained on long car journeys, and the tablet can handle basic games and simple drawing apps. The device also includes a one-year subscription to the FreeTime service that gives you access to 20,000 apps, games, books, and educational content from a range of well-known brands. There’s also full parental controls, allowing you to limit screen time, for example.

Do More With Your Fire Tablet

Amazon’s Fire devices are some of the best value Android tablets you can buy today. Furthermore, there’s a Fire tablet for every use and requirement. Whatever your budget, you should be able to find a model that suits your needs.

Once you’ve bought your Fire HD tablet, it’s time to take advantage of the device’s full potential. So, be sure to take a look at our Amazon Fire Tablet tips to get started.

Read the full article: The Best Amazon Fire Tablet for Your Needs


Read Full Article