27 May 2020

How to Organize Your Amazon Kindle: 7 Tips and Tricks to Know


news-updates-kindle

Once you’ve downloaded a few dozen books to your Kindle, it becomes difficult to keep everything organized. Sorting through hundreds of titles to find what you’re looking for is no fun, which is why organizing your Kindle books is important.

By deleting, filtering, sorting, and using Collections, you can make it much easier to find the book you’re looking for. Here’s how to organize your Amazon Kindle through several simple steps.

1. Remove Kindle Books You Don’t Need

If you feel overwhelmed when you look at your Kindle, there’s a good chance that you need to get rid of some books. Your digital bookshelf can become packed over time thanks to books you’ve acquired through the many handy Kindle services. Since your digital books are stored in your Amazon account, you can always get them back after removing them.

On the homescreen, tap Your Library near the top-left to see a list of your books. Scroll through the list until you find a book you want to delete. You may want to tap the Sort button at the top-right, then choose List or Grid depending on your preference.

Tap and hold on the title or cover image, depending on your current view. You can also press the three-dot button that appears to the right of the book title in List view or at the bottom-right of the cover in Grid view.

From there, just hit Remove from Device to take the book out of your Kindle library. Note that it says “remove,” not “delete”. This is because you can restore the book later.

Kindle Remove From Device

Recovering Deleted Books

Even after you remove books from your Kindle, they’ll still show up under the All header in your library. To hide them, simply switch to the Downloaded tab. This will only show books that are on your device, making your library much easier to manage.

To download a book again in the future, just switch back to the All tab and tap a title to download it.

2. Sort Your Kindle Books

Once you’ve deleted a few books, it’s time to organize the rest of your Kindle library. The Kindle provides some sorting options that can make this a lot easier. For ease of use, we recommend using List view. Tap Sort at the top-right of the library and select List to show your titles in text form instead of showing their covers.

Kindle Grid List Views

Now, tap Sort again and choose one of these options to sort the books in your library. Recent will show you books in the order that you last opened them. Normally, this will show you the book that you were last reading at the top of the list. But if you tend to go back to flip through other books or look at highlights, the order will get messed up.

kindle sorting options

Title and Author are pretty self-explanatory: they both alphabetize by the chosen criteria. Collection is a bit different, though. You can put your books into Collections (the Kindle equivalent of folders), which we’ll discuss in a moment.

When you sort by Title, Author, or Recent, any book that’s in a Collection will still show up in the main library list. No matter how many Collections you have, those sorting methods will always show you every book on your Kindle.

Sorting by Collection, however, is different. Your Collections show up at the top of the list, and any books that aren’t part of a Collection show up below them. If you decide to use Collections to organize your books, this is definitely the best view.

3. Filter By Document Type

Also in your Library, you’ll see a Filter button at the top. This allows you to show only certain types types of content to further organize your Kindle.

Kindle Filter Options

The large list at the bottom lets you pick from the various document types: Books, Audible, Comics, Samples, Periodicals, Docs, and Collections. In case you weren’t aware, Periodicals holds magazines, newspapers, and similar. Docs holds any documents or websites you’ve sent to your Kindle, as well as your clippings.

You probably won’t need to use most of these, unless you have many different kinds of media on your Kindle.

After selecting one of these categories, you can use the Read and Unread filters to find books that you haven’t finished yet. And if you’re a Prime member, the Prime Reading section will show all the books you’ve downloaded as part of that program.

4. Take Advantage of Kindle Collections (Folders)

One of the best ways to keep your Kindle from getting overrun by books is to use Collections. Since they’re like folders, keeping your books organized in Collections makes it a lot easier to find what you’re looking for. To start, make a new Collection.

Tap the three-dot icon in the top-right corner under the clock to open the menu, then select Create New Collection at the bottom.

Kindle Create Collection

Type in a name for the Collection. You might make a Collection to hold the books you want to read next, titles by your favorite author, a certain genre, or some other criteria. Tap OK after entering a name to create it.

kindle new collection

After you create your Collection, your Kindle will prompt you to add books to it. Just check the boxes next to the books you want. This list sorts alphabetically by title, but if you’d prefer something different, you can use the Sort and Filter menus at the top to change the ordering. Hit Done at the bottom when you’re finished.

To add individual books to a Collection later, tap and hold on the title or cover, then select Add to Collection. Tap the box to the right of the Collection you’d like to add the book to (choosing multiple if needed) and hit Done when you’re finished. Since you can add one book to as many different Collections as you’d like, they can also function like tags.

kindle add collections

To get back to the multi-selection tool later, open the Collection from your library. From there, open the three-dot menu at the top-right and select Add/Remove Items. This menu also lets you rename the collection, remove it from your device, or delete it entirely.

Repeat the above steps to create as many Collections as you’d like. How you organize your Kindle library is up to you. Maybe you can categorize books by whether you’d like to read them again, if you want to share them, or similar.

5. Search Your Kindle Library

Even when your Kindle is highly organized, there are times when you can’t jump directly to what you’re looking for. In these cases, it’s faster to use the search bar at the top-right of your Kindle. Just start typing the book’s title or author, and you’ll see an instant list of results.

Items that show with a book icon are on your Kindle, while search terms with a shopping cart next to them will search the Kindle store for you. You can also select the Search Everywhere option at the bottom to see results from your library, the Kindle store, Goodreads, and other places.

Kindle Search

6. Utilize Reading Lists

Another handy organizational tool of your Kindle is the Reading Lists feature. While this won’t help you find a book that you bought years ago, it’s a good way to remind yourself of the books you want to read next. Tap Your Reading Lists at the top-right of the Kindle home page to access it.

Because of the link between Amazon and Goodreads, you’ll see both your Goodreads Want to Read list and Amazon wish list items directly on your Kindle. This page also shows any samples that you’ve downloaded to your Kindle. There’s a good chance that your reading list is also out of control, but that’s another story.

Kindle Reading List

7. Change Organization Preferences in Kindle Settings

While not extensive, the Settings menu on your Kindle lets you make a few changes to the homescreen layout. Tap Settings at the top, then All Settings to access the full menu. From there, go to Device Options > Advanced Options and select Home & Library.

Kindle Advanced Settings

Here, you can disable Home Screen View to hide the main page with your reading lists and recommendations. Disabling it means you’ll go right to the Library view instead.

The other option is Audible Content. This lets you choose between two options for displaying audiobooks on your Kindle. Show in Library and on Home will show audiobooks everywhere, just like regular books.

Change this to Show in Library Filter Only to hide them from view unless you select the Audible filter in your library, as mentioned above. They’ll also show normally if you downloaded an audiobook to your Kindle. This can help reduce clutter if you own a lot of audiobooks.

Keep Your Kindle Books Organized

Organizing your Kindle isn’t always easy, but it’s a worthwhile endeavor. Don’t let hundreds of books pile up on your device. With sorting, filtering, and Collections, you can turn an overwhelming library into a well-curated and easily searchable one.

Interested in doing more with your Kindle? Then check out our list of essential Amazon Kindle tips to get more out of your device. And if this isn’t enough management for you, consider trying the beloved Calibre ebook manager on your computer. We’ve looked at hidden Calibre features that make it extra powerful.

Read the full article: How to Organize Your Amazon Kindle: 7 Tips and Tricks to Know


Read Full Article

How to Make a Time-Lapse Video by Converting a Standard Video


time-lapse-video

Whether they’re a recording of something amazing or utterly mundane, time-lapse videos are always stunning. Watching the staccato motion and seeing several hours of footage compressed into a few seconds or minutes makes for compelling viewing.

Making a time-lapse video usually takes a lot time. You need a suitable camera, storage for the footage, a reliable stand or tripod, and good weather if you’re outside. Time-lapse videos can take a while to get right, and this might require several attempts.

However, you can use an app to create a time-lapse video from a standard video. And in this article we’ll explain how to do that…

Post Production Time-Lapse vs. True Time-Lapse

You basically have two choices when it comes to recording a time-lapse video.

  1. Spend time preparing and then record a time-lapse video as the events happen.
  2. Convert a standard video into a time-lapse movie.

But are there any differences in quality? It depends on what you’re using as a camera.

With a dedicated time-lapse camera (or one with a time-lapse mode) and the right lighting, the results should be good. Just make sure the delay between snaps is right for the subject!

Meanwhile, mobile devices used for recording time-lapse (or recording the footage to convert to time-lapse) might yield slightly inferior results. This might be due to a slightly unstable tripod or simply the device’s weight. Meanwhile, issues with auto-focus can affect the quality of the video.

To convert the footage you’ve recorded into a time-lapse video, you have two main options: desktop and mobile.

Not Just Time-Lapse: Hyperlapse Too!

It isn’t just time-lapse videos that you can produce in this manner. Hyperlapse, a similar technique that features small camera movements, is another option.

If you’re converting video that already features camera motion, the results are going to be more hyperlapse than time-lapse. In short, you have two output options, both of which will deliver striking results.

Just make sure that any video you have earmarked as a hyperlapse doesn’t feature too much camera movement. Any motion should be extremely slow, and smooth enough to be imperceptible in the finished video.

Hyperlapse is gaining in popularity, and there are more ways to create videos using this visual technique.

Convert Video to Time-Lapse on Your Desktop

Many desktop video editing suites have built-in tools that make converting a standard clip into a time-lapse movie very simple.

But if you’re looking for free software to create time-lapse videos, there’s no better option than VLC. This versatile media player (check out the best VLC features) is one of those cross-platform apps everyone should be using. It’s available for Windows, macOS, and Linux.

Download: VLC Media Player (Free)

Note that if you’re doing this on Windows 10, make sure you launch VLC Media Player with elevated privileges. Simply right-click the app icon and select Run as administrator and agree to the User Access Control notification.

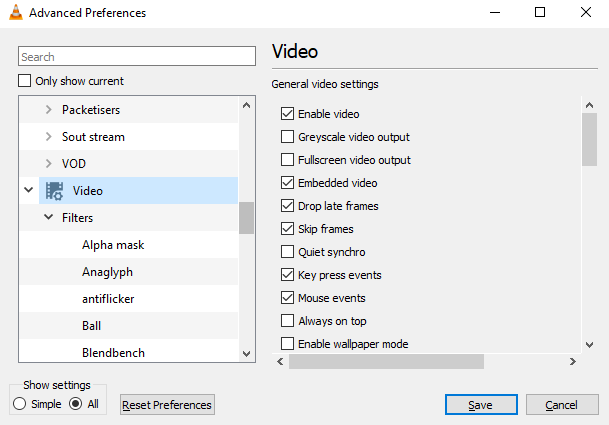
Next, open Tools > Preferences, and at the bottom of the screen, find the Show Settings radio buttons. Select All (#1 in the image below), then in the new view that appears, look for Video. You can use the search box at the top if you can’t find it.

Edit video preferences in VLC

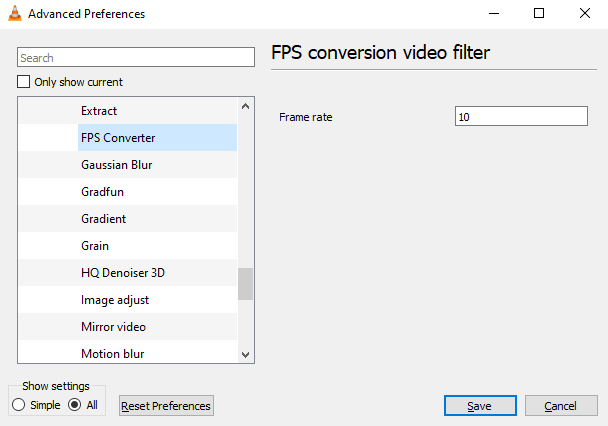
Expand Filters and select FPS Converter. In the right-hand pane, input the new Frame rate. At 30 or more frames per second in your original video, 10 FPS is a good option. Too high and the time-lapse video will look too smooth; too low and it will seem jerky. Experiment to get the best results.

Set a filter in VLC to create a hyperlapse

To finish, click Save. Then go to Media > Convert/Save, click Add, then browse for the video you wish to convert.

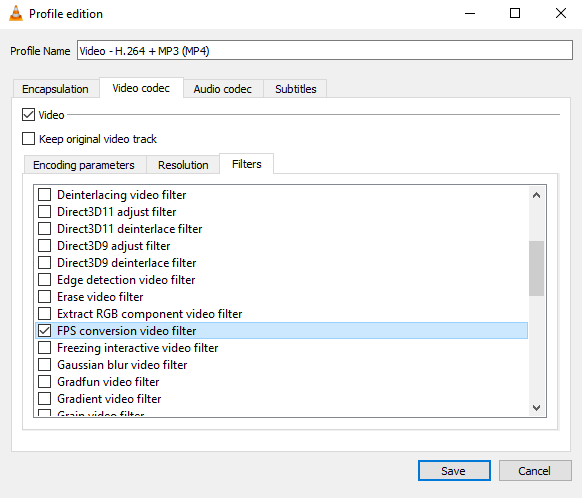
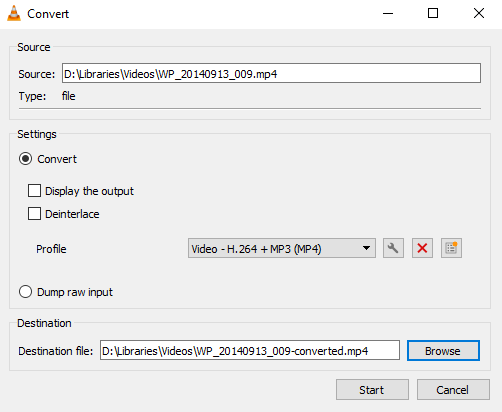
Click the arrow beside the Convert/Save button and choose Convert. In the Settings panel click the spanner icon, then Video codec > Filters and check FPS conversion video filter.

Select the filter in the VLC conversion screen

Click Save, then use the Destination file field to set a location to save the compiled time-lapse video. Name it, then click Start.

Select the destination of the VLC output file

A few moments later, you’ll see a compiled time-lapse movie, ready to view in any video player or share online.

Turn a Mobile Video Into a Time-Lapse Movie

So many time-lapse apps are available for iOS and Android. But what if you want to make a time-lapse movie from some footage you’ve already recorded with a standard video camera mode? The answer, of course, is a dedicated app, designed to convert the footage to time-lapse.

Make a Hyperlapse on Android

Probably the best mobile hyperlapse app is Microsoft Hyperlapse Mobile, capable of recording hyperlapse and converting existing videos.

Download: Microsoft Hyperlapse Mobile (Free)

Upon launch, you’ll see two options in this landscape-only app. Choose Import existing video and browse for a suitable video on your phone.

In the next screen, you’ll a preview of the video, with several options.

Tap the menu in the top-right corner to view the settings, where you’ll have the choice to Export videos at 1080p and Export to SD storage. These options are both disabled by default. Note that it isn’t possible to import video clips greater than 1080p resolution, so 2K and 4K videos are out.

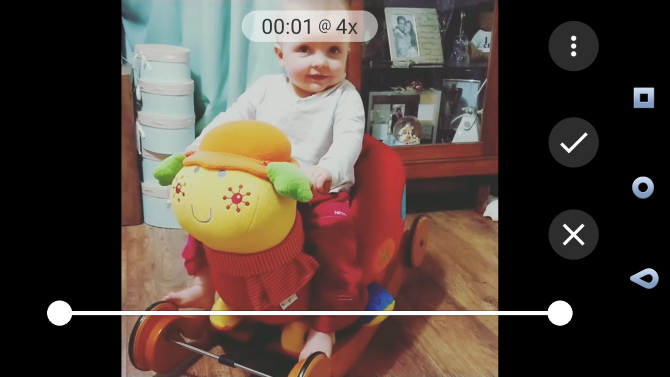
At the top of the screen, you’ll see information about the duration and speed of the video. At the bottom, meanwhile, look for the handles. These can be dragged to trim the length of the video down. Dragging these handles reduces the duration of the video.

Create a hyperlapse on Android

When you’re happy, click the check button, and wait while the video is imported. This may take a while depending on the length of the video. I’ve saved the results as a GIF to give you an idea how it might look.

Baby rocking hyperlapse

How to Create a Hyperlapse With iOS

On iPhone you can use the Time-Lapse photo mode in the camera app to create a hyperlapse. This video tutorial demonstrates how simple it is:

As long as you have a steady hand (or use one of the best iPhone gimbals) you should get great results.

Making a Time-Lapse Without Any Setup Is Easy!

It might be the lazy alternative to creating a genuine time-lapse, but if you want to make a time-lapse video as an afterthought, employing one of these methods is the answer. You could always head back to the location and shoot the same scenes with an app or dedicated camera, but converting the standard video into a time-lapse is quicker.

And with the tools we mentioned above, you can do it in just a few minutes. So why not share your work online? After all, time-lapse videos are one of the most popular types of YouTube video.

Read the full article: How to Make a Time-Lapse Video by Converting a Standard Video


Read Full Article

How to Upgrade or Switch Linux Distros Without Losing Data


linux-fedora-ubuntu

When you switch Linux distributions, the default course of action is to wipe everything on your computer. The same is true if you perform a clean install of an upgrade to avoid potential complications.

Turns out, it’s actually quite easy to perform clean installs or change Linux distros without losing data. Here’s what to do so that you’re all set up no matter your current situation.

How Does It Work?

What’s the magic that lets you keep all your personal data? Simple: separate partitions.

Whenever you switch Linux distros, you have to tell the installer what partition setup you would like to have on your hard drive. If Linux is the only operating system on the hard drive, you will most likely have one or two partitions. This includes the main partition, usually formatted as ext4, which includes the operating system and all of your data.

Optionally, you can also have an additional partition called the swap partition. This is a portion of your hard drive that’s used as RAM overflow space, as well as the location where RAM data is stored during hibernation.

But you have the freedom to create as many partitions as you like, and you can tell the installer which partitions should be used for which folders.

Creating a Separate Home Partition

Partition hard drive on Linux

If you’re tired of wiping data when you change Linux distros, you want to create an additional ext4-formatted partition. The first one should have “/” (the root folder) mounted to it, and the other partition should have “/home” mounted to it. All of your personal data is stored in the “/home” folder, so that means all of your personal data will be stored in the second partition.

Once you’re ready to switch Linux distros or perform an upgrade, you’re free to wipe out the first partition that contains the operating system and your installed applications. However, the second partition that has all of your personal files and preferences can remain untouched.

Next, when you perform the new Linux installation, you can tell the installer to reformat the first partition (to start from scratch), but leave the second partition alone and just mount it to “/home”. Then, all you need to do is make sure that you set up the same username and password as before, and everything should be back to the way it was.

Separating your partitions does not stop you from encrypting your drive, either.

The only thing you would still have to do is reinstall your applications, but you won’t have to reconfigure many of them because their settings were stored along with your other personal files.

Precautions to Take When Switching Linux Distros

One potential downside is that keeping prior settings while switching between distributions may cause incompatibilities. For example, although Fedora and Ubuntu both use GNOME as the default desktop backend, Ubuntu’s implementation is quite different, and settings from Fedora could get messy. Be aware.

Make sure that when you are giving the two partitions space, you give each of them enough room. If your first, root partition is very small, you won’t be able to install very many applications. If the second partition is too small then you won’t have much room to save your personal files. The partition sizes are hard limits.

Create Linux root partition

I’d suggest giving your first partition at least 15 or 20GB of space if you don’t plan on installing a lot of applications.

If you plan on installing many applications or games (which take up substantial amounts of space), then you may want to go with 50GB. Gamers should look at the games they’re interested in installing and add up how much space each one takes up.

If you find that your partition sizes weren’t appropriate for your usage, you can resize them by booting into a Live environment and running a partitioning tool or using the command line.

Already Have Linux Installed?

If you already have a Linux installation in place and have everything (including your Home folder) on the same partition, don’t worry. It only takes a few steps to achieve the setup you need. The steps are as follows:

  1. Download the Live environment ISO of your favorite Linux distribution, and burn it to a CD/DVD or write it to a USB drive.
  2. Boot into your newly-created media. Use a partitioning tool such as GParted to resize your ext4 partition to the size you want it to be.
  3. Use the same tool to create a new ext4 partition in the empty space created by resizing the first partition. Make note of what partition it is. It should look like /dev/sdXY, where X is a letter designating the drive and Y is a number designating the partition. An example is /dev/sda2.
  4. Mount both partitions, and copy over the contents of the home folder to the new partition. Make sure that you’re copying over all of the contents of the home folder, and not the home folder itself. Otherwise, when everything is done, all of your stuff will be in “/home/home/user”, which won’t work.
  5. Now open a terminal and run the command gksudo gedit to open the Gedit text editor. Now use the menus to open the file located at /etc/fstab in the first partition.
  6. Add the following line to the end of the file: /dev/sdXY /home ext4 errors=remount-ro 0 1. Again, make sure to replace /dev/sdXY with the actual designation for the partition.
  7. Save it, and restart. Make sure to remove the Live environment media so that you boot back into your regular installation.

Switch Linux Distros Without Losing Data

The difference won’t be obvious, but your personal data will now be on a separate partition that stays out of the way when switching distros or performing upgrades!

Separating partitions isn’t only for distro hoppers or to reduce hassle when upgrading to a new release. A separate partition can come to the rescue if you download updates that leave your PC in a state where it doesn’t boot. Simply reinstall a version of Linux on the root partition and you’re back up and running without having to back up and restore a bunch of files.

If you’re now feeling more emboldened to try out other versions of Linux or take a few risks, here’s our list of five bleeding-edge Linux distros. Just make sure to keep regular backups of your personal data, even if it is now on a separate partition.

Read the full article: How to Upgrade or Switch Linux Distros Without Losing Data


21 Essential Tips for First-Time Chromebook Users


new-chromebook-user-tips

So, you’ve considered the Chromebook’s upsides and downsides, and now you have a shiny new Chromebook. Great choice—it’s a versatile laptop option with a brilliant array of customization options.

However, Chromebooks have a learning curve, and feel different to, say, a MacBook, or Surface Laptop. You might also wonder what you can do with a Chromebook, or how to set it up.

Well, here are the best tips and tricks for new Chromebook owners.

1. Create Multiple User Profiles

Chromebooks make good use of Chrome’s User Profiles feature, allowing you to divide your machine into separate profile logins. Each profile maintains its own apps, settings, and controls. Are you the only user on your device? You should still use multiple profiles.

But Chromebook user profiles are crucial if you have kids. Google did away with supervised profiles, replacing them with the Google Family Link, which is very similar. Follow Christian’s tutorial on installing Google Family Link on Android to create safe accounts for your kids. The process is the same for a Chromebook.

2. Use Guest Mode for Guests

Even if you don’t use the Profiles feature above, you should definitely be aware of Guest Mode. Guest Mode lets you hand your device to someone else and rest assured that they’ll never be able to see your data (e.g., browsing history, downloads, bookmarks, etc.) or access your apps.

And when the guest is done, all traces of their activity are wiped from your device—no need for manual housekeeping. While this may sound similar to Incognito Mode in Chrome, be aware that Guest Mode and Incognito Mode aren’t the same!

3. Open Apps in Separate Windows

chromebook open app new window

Since all Chromebook apps are actually web apps in disguise, first-time users tend to be put off by the fact that apps always open in Chrome. Fortunately, it’s possible to force any installed app to open in a separate window.

Find the desired app in the App Launcher or the Taskbar, right-click on it, and select Open as window. It’s that simple! Now your device will feel like a real laptop, not just a glorified Chrome browser.

4. Organize Apps Into Folders

chromebook create app folder

As you use your device more and more, you’ll soon amass too many installed apps to wrap your head around. While the App Launcher makes it easy to launch any app with a quick search, maybe you prefer to tap or click. In that case, you should take advantage of App Folders.

Open the App Launcher and click on All Apps, then drag any app icon onto any other app icon to group them into a folder. Keep dragging as many icons as needed. To name the folder, click on it and change “Unnamed Folder” at the top to whatever you want.

5. Turn Websites Into Apps

chromebook set website to launch as app

Remember, Chromebook apps are basically just websites disguised as apps. While this does come with a few downsides, there’s one truly nifty benefit: you can turn any website into an app and run it in its own separate window.

Open Chrome, navigate to the website you want to use as an app and click the three-dot button at the top right. Go down to More tools, then select Create shortcut. Give the app a name, make sure you check Open as window, and then click Add.

6. Preview Files Before Opening

chromebook file details spacebar

One of the coolest things about Finder on macOS is that you can highlight most any file and press Spacebar to get a preview of that file without actually launching it in its associated app. Did you know that Chrome OS also has a similar preview feature?

Open the Files app, select any file without actually opening it, and press Spacebar. You’ll see an overlay with some file details (e.g., size, type, last modified time, etc.) and some information specific to the file type (e.g., ID3 tags for MP3s). Some types, like images and audio, will also have a preview.

7. Snap Windows to the Left and Right

If you have a Chromebook that supports a 1920×1080 resolution or higher, you probably don’t want to maximize your apps. For better productivity, you can make better use of your screen estate by keeping two windows open side by side.

An easy way to do this is drag windows to the left or right edge, and Chrome OS will automatically snap them to the side and fill up half the screen. Or you can select a window and press Alt + [ for a left snap or Alt + ] for a right snap.

8. Force Quit for Frozen Apps

chromebook chrome os task manager

You probably won’t run into frozen apps as often on Chrome OS as on Windows or even Mac. But if you do, all you need to do is open the Task Manager using the Search button + Escape keyboard shortcut.

Once that’s open, just find the frozen process, select it, and click End Process. The Task Manager is one of the most important Chrome OS features, so be sure you start using this crucial system feature.

9. Force Reboot for a Frozen System

In the rare case that something goes wrong at the system level, you may find that the Task Manager won’t open or isn’t able to unfreeze your device. If that happens, you can always use the last resort option: Hard Reboot.

Every Chromebook comes with a special set of media keys above the number key row. One of them is the Refresh key (resembling a circular arrow); another is the Power key (looks like a circle with a vertical line). Press Power + Refresh to reboot immediately.

Note that this will lose any unsaved data in open apps. Also note that this isn’t the same thing as a Powerwash, which is covered in more detail below.

10. Master the Built-In Search Key

One thing unique about Chromebook keyboards is the lack of a Windows key or Command key. Instead, Google opted to replace the Caps Lock key with a Search key, which opens the App Launcher when pressed.

This key is useful in three core ways:

  1. Quickly launch any app by typing its name. In this sense, it’s very similar to the Windows 10 Start Menu and Mac Spotlight.
  2. Quickly launch any website URL or search engine query.
  3. Activate a voice search by clicking the microphone button.

It may feel weird to use the Caps Lock key in this way, but it’s one of those things where going back is impossible once you get into the groove.

11. Rebind the Special Keys

chromebook special key settings

Chrome OS treats five keys as special, allowing you to rebind them if you wish: Search, Ctrl, Alt, Backspace, and Escape. You can rebind these to any of the other five, plus Caps Lock, Google Assistant, and Disabled. Hate the Search key? Revert it to Caps Lock here. Or turn it off altogether.

Click your profile icon at the bottom right, then click the gear icon to open Settings. Head to Device > Keyboard. Just change the key bindings with the drop-down menus. You can also turn the top-row media keys into function keys by enabling the checkbox.

12. Learn the System’s Keyboard Shortcuts

chromebook keyboard shortcut glossary

In addition to having a different keyboard layout, Chromebooks have different keyboard shortcuts for system-level actions. Fortunately, Google made it extremely easy to learn these new shortcuts, using another shortcut in the process. Hit CTRL + ALT + ? (yes, the question mark key), and you’ll bring up the Chromebook shortcut glossary.

Type in a letter to find the shortcut you want. You can search the glossary using the letter or key you want to find out the shortcut for, or which Chromebook shortcuts use a specific combination. It lists every possible Chromebook shortcut, starting with the most popular options.

That said, you can get a jump start with our overview of the most important Chromebook shortcuts.

13. Right-Click and Middle-Click on Touchpad

I hated my first three days on my Chromebook because the touchpad doesn’t come with any mouse buttons. This made web browsing a nightmare because I didn’t have access to right-clicking or middle-clicking. As it turns out, both of these actions are simpler than I thought.

To right-click, you just need to tap the touchpad with two simultaneous fingers. To middle-click, you just need to tap the touchpad with three simultaneous fingers. This tip alone will make your Chromebook experience a million times better.

14. Swipe Gestures for the Touchpad

chromebook three finger gesture show all screens

All modern Chromebooks come with a gesture-enabled touchpad and these gestures will change your life. While many gestures are supported, there are four in particular that every Chromebook newbie should know:

  1. Swipe horizontally with two fingers to go Forward and Back in Chrome.
  2. Swipe vertically with two fingers to scroll up and down.
  3. Swipe horizontally with three fingers to slide between open tabs in Chrome. This is even faster than using Ctrl + Tab.
  4. Swipe down with three fingers to open the Task Switcher, which spreads out all open apps in a bird’s eye view.

15. Quickly Free Up Disk Space

chromebook storage space options

All Chromebooks come with some form of SSD for data storage. While this is great news for speed and performance, there is one downside: many Chromebooks come with very small SSDs. On the one hand, this is great because it keeps the cost of a new Chromebook low. On the other hand, you can run out of storage space quickly.

Which is why disk space management is so important. Click on your profile icon at the bottom right, then click the gear icon to open Settings. Under the Device section, click Storage management. Here you can see what’s taking up space on your system and one-click delete when necessary.

On some Chromebooks, you can swap out the SSD for one with a larger capacity. Switching out the SSD can void your warranty, so make sure to check before making any hardware upgrades. If you’d prefer not to tinker with the hardware, check out the cheapest cloud storage providers instead.

16. Disable Sleep Mode

chromebook idle power options

For a long time, Chrome OS didn’t offer users an effective method for managing screen idle time and power management. Thankfully, that is no longer the case.

Head to Settings > Power, and you can select what your Chromebook should do on idle. For reference, your Chromebook will begin to idle after around 10-minutes. You can opt for Sleep, Turn off the display, or Keep the display on.

The latter option is what many users require, finding it frustrating to return to a sleeping Chromebook. There’s also the option to switch off Sleep when cover is closed, stopping your device sleeping each time you close the lid.

Some users may find their access to such settings unavailable due to school or enterprise administration settings. If that sounds like you, check out this Chrome extension that disables Sleep Mode. Not only that, but the Keep Awake extension also lets you pick between modes for screen-only sleep and screen-and-system sleep.

17. Take Easy Screenshots

If your Chromebook doesn’t have a Print Screen button, how are you supposed to capture an image of your screen? Simply press Ctrl + Switch Window key. (Switch Window is a special top-row key that looks like a rectangle with two vertical lines beside it.)

Saved screenshots appear in your Downloads folder, which you can access using the Files app. Note that you can also use Ctrl + Shift + Switch Window to limit your screenshot to a specific region of the screen.

18. Enable Optional Features With Flags

chromebook flags options

Open Chrome and type chrome://flags in the URL bar to access a bunch of optional Chrome OS features.

Note that these optional features may not be completely stable. At best, they may not function as intended. At worst, they can be buggy enough to cause data loss. Most of them are close to stable and extreme bugs are rare, but this risk is always present with these optional features.

If you are new to Chromebooks and Chrome OS in general, you should research what these options do before fiddling.

19. Experimental Features on Beta and Dev Channels

chromebook switch development channel

If you’re feeling adventurous, but you don’t want to mess with the optional flags above, consider switching to the Beta channel or Dev channel.

The Beta channel grants a low-risk sneak peek at upcoming features, approximately one month ahead of the Stable channel. The Dev channel grants a high-risk, bug-prone sneak peek at experimental features well ahead of the Stable channel. To switch to Beta or Dev channels:

  1. Click your profile icon at the bottom right.
  2. Click the gear icon to open Settings.
  3. At the bottom of the left panel, click About Chrome OS.
  4. Click Additional Details.
  5. Click the Change channel button.
  6. Pick either Beta or Dev channel.

If you want to minimize system crashes and potential for data loss, stick to the Stable channel. Switching from an experimental channel to the Stable channel will delete everything from your Chromebook, including accounts!

20. Factory Reset Using Powerwash

If you ever want to start over with a blank slate, plan on selling your Chromebook, or if you ever run into a catastrophic error that causes your system to crash all the time, then you may need to Powerwash your device.

Powerwash is Google’s term for a “factory reset.” It deletes all of the data on your Chromebook and returns to its factory state. Despite losing local data, your Google accounts and profiles won’t be affected, nor will any of your data synced to Google’s cloud.

To learn more, check out our post on reformatting your Chromebook.

21. Switch on Google Assistant

chromebook google assistant

You can use the Google Assistant on your Chromebook to show notifications, use “OK Google,” and display other useful information. Google Assistant can help new Chromebook users work their way around the new device. It displays handy tooltips relating to your current activity, plus other information.

To switch Google Assistant on, click your profile icon at the bottom right, then the gear icon to open Settings. Head to Search and Assistant > Google Assistant. 

Other Chromebook Tips You Might Like

As with all computers, Chromebooks do slow down over time due to wear and tear and accumulation of junk. Fortunately, there are steps you can take to speed up your Chromebook and reclaim performance. If you’re looking for a change of Chromebook-scene, check out the best Chromebooks for every type of user.

One last thing: even though I sing their praises and think they’re the best device for casual home use, Chromebooks aren’t perfect. If you want to try something different, here’s how you install Linux on your Chromebook.

Read the full article: 21 Essential Tips for First-Time Chromebook Users


How to Morph Faces Online and Create Face Merges With MorphThing


Browsing the web is a great way to find fun things to do. From games to joke sites, to Twitter accounts and subreddits, you can always discover something that is either really cool or will provoke a laugh. Face mashup tools will give you a mix of both.

If you’ve never tried out face morphing before, we’ve included a simple explanation of what it is below this. We’ve also put together a quick list of the best face merge websites that you can use for free.

What Is a Face Morph?

Morphthing Combine Two Faces Together With an Online Face Morpher

Face Morphing is the use of image manipulation programs to combine two separate images into a brand new image; usually, this image is of a face.

The earliest known version of a face mixer came from a practice known as “tabula scalata” that originated in the 1600s. It’s the process of constructing two images side-by-side over a bumpy or ridged surface. These images can then be viewed as a “picture” if you look at each of them from a specific angle.

In the current era, you can morph two faces together online for free via websites and apps. You can also try out a celebrity face morph through quick image generators. Additionally, there are also professional design programs out there that you can use to morph faces, including Adobe After Effects.

With that out of the way, let’s list off some of the websites where you can create your own face mash.

1. MorphThing

Morph Thing Morph Faces Online

MorphThing is an online face morpher. It lets you take any two face images, it can be celebrity photos or your own, then morphs these two different faces into one.

While you can register for an account to use this site, you can also visit the site and try out its tools without one.

Here are some other features that you should know about:

  • You can share your images with friends and family by forwarding them a link.
  • Additionally, you can embed your creations on other sites.
  • You can also check out the most popular morphs by scrolling down to Today’s Popular Morphs section.

Basically, try out MorphThing if you want to do a celebrity morph with a single click of a button. Please note, however, that this website is kind of old. It hasn’t been properly updated since 2015.

2. 3DThis

Face Merge Online 3DThis

3DThis is another face merger website that you can use to create mashups. While it’s not as easy to operate as MorphThing, it does give you some options.

When you open up the website, you can upload two images to mash together. Once uploaded, the website will resize and reposition these images so they line up more cleanly with one another. Additionally, you can choose to publish your face morph as well.

Some important things you should know about using this website include:

  • They do not “guarantee any confidentiality” to the images that you upload to the site.
  • Content can be submitted to the site as Public, Unlisted, or Private, but you can only upload private content if you have an account.
  • Public content appears once you’re done creating your face mash.
  • By using the service, 3DThis can also upload your face merge to its own social media accounts.

In essence, while this website can definitely help you create a cool effect, its rules are somewhat overreaching and they don’t do enough for privacy. As such, it’s not the top choice on our list.

3. FaceSwapOnline

Face Mashup FaceSwapOnline

Next on our list of mashups? Try FaceSwapOnline, a simple composite editor where you can make funny pictures through simple selections.

FaceSwapOnline is different from the other websites on this list, in that it’s not focused on animated morphs so much as it’s focused on swapping out one face for another. To use this website, just upload your own image, or try out some of the pre-generated content already on the site. Once your edits are complete, you can download your creation.

Some other things you should know about using this site:

  • You can only “post, modify, or distribute” content that you own the copyright to.
  • When you upload your pictures to FaceSwapOnline, you grant them the ability to use your images “royalty-free, perpetual, irrevocable,” as well as “worldwide,” as per the Terms of Service. Basically, they can do what they want with your images once you’ve uploaded them to the website.

So again, just be careful with these face mashup sites and how you use them. You should also be careful about what kind of pictures you upload, too.

Additionally, if you’re looking for other funny pictures to use online, check out this list of the best websites to find new memes.

4. Loonapix – Facer

Face Merge Loonapix Facer

Looking for a simple face merger website? Then you need to check out Loonapix’s “Facer” tool, which allows you to upload your face onto another person’s body using a “face in hole” template.

With Loonapix’s Facer, you can choose a template from a variety of different categories. You can then add your face by uploading a file. Once you’re done adding your picture to your creation, click Save Image. Choose from a variety of different options for what you want to do with your image, including saving the picture to your device or sharing that image with others.

Loonapix’s Terms of Service are less overreaching than some of the others on this list, so it’s a good in-between if you crave fine-tuned creation tools, but also want personal control over how you use your pictures.

Morph Things Online Using Apps and Websites

Now that you know where to face merge online, you can try out some of these websites yourself. While they won’t be able to give you the seamless results of a full-fledged design program, they should still be able to help you create a quick image manipulation for free.

If you prefer apps over websites, here is a list of the best face swap apps.

Read the full article: How to Morph Faces Online and Create Face Merges With MorphThing


Twitter adds a warning label fact-checking Trump’s false voting claims


On the heels of a furor over his tweets accusing MSNBC host Joe Scarborough of murder, Twitter has quietly begun to fact-check the president.

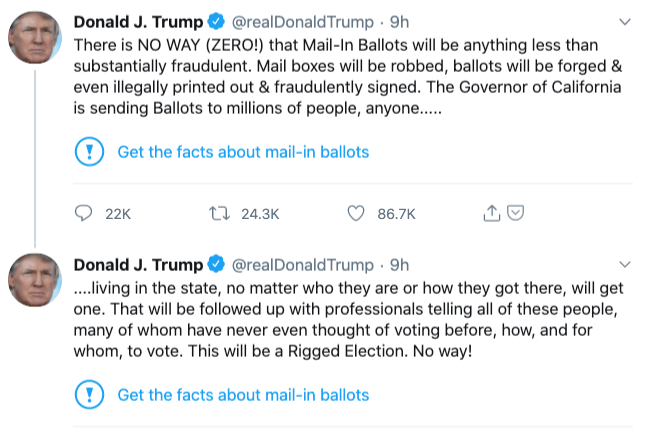
A new warning label encouraging Twitter users to “Get the facts about mail-in ballots” appeared on a series of tweets in which the president baselessly claimed ballots received through mail-in voting methods are “fraudulent.”

In a statement to TechCrunch, a Twitter spokesperson said the pair of tweets from the president “contain potentially misleading information about voting processes and have been labeled to provide additional context around mail-in ballots.”

“This decision is in line with the approach we shared earlier this month,” the spokesperson said, linking to the company’s recent blog post on its misinformation policies.

Clicking through the new prompt from Twitter brings users to a fact-checking page highlighting a CNN story debunking the president’s false claims. The page also offers a summary with bullet points providing useful context for the misleading tweets, including the fact that vote-by-mail is already widely in use around the country.

Trump has railed against vote-by-mail efforts in recent weeks, in spite of the consensus view by experts that voting through the mail is a safe process — so safe that it’s already widely used for absentee ballots and relied upon in five states as the primary method for voting.


Read Full Article

Evaluating Natural Language Generation with BLEURT


In the last few years, research in natural language generation (NLG) has made tremendous progress, with models now able to translate text, summarize articles, engage in conversation, and comment on pictures with unprecedented accuracy, using approaches with increasingly high levels of sophistication. Currently, there are two methods to evaluate these NLG systems: human evaluation and automatic metrics. With human evaluation, one runs a large-scale quality survey for each new version of a model using human annotators, but that approach can be prohibitively labor intensive. In contrast, one can use popular automatic metrics (e.g., BLEU), but these are oftentimes unreliable substitutes for human interpretation and judgement. The rapid progress of NLG and the drawbacks of existing evaluation methods calls for the development of novel ways to assess the quality and success of NLG systems.

In “BLEURT: Learning Robust Metrics for Text Generation” (presented during ACL 2020), we introduce a novel automatic metric that delivers ratings that are robust and reach an unprecedented level of quality, much closer to human annotation. BLEURT (Bilingual Evaluation Understudy with Representations from Transformers) builds upon recent advances in transfer learning to capture widespread linguistic phenomena, such as paraphrasing. The metric is available on Github.

Evaluating NLG Systems
In human evaluation, a piece of generated text is presented to annotators, who are tasked with assessing its quality with respect to its fluency and meaning. The text is typically shown side-by-side with a reference, authored by a human or mined from the Web.
An example questionnaire used for human evaluation in machine translation.
The advantage of this method is that it is accurate: people are still unrivaled when it comes to evaluating the quality of a piece of text. However, this method of evaluation can easily take days and involve dozens of people for just a few thousand examples, which disrupts the model development workflow.

In contrast, the idea behind automatic metrics is to provide a cheap, low-latency proxy for human-quality measurements. Automatic metrics often take two sentences as input, a candidate and a reference, and they return a score that indicates to what extent the former resembles the latter, typically using lexical overlap. A popular metric is BLEU, which counts the sequences of words in the candidate that also appear in the reference (the BLEU score is very similar to precision).

The advantages and weaknesses of automatic metrics are the opposite of those that come with human evaluation. Automatic metrics are convenient — they can be computed in real-time throughout the training process (e.g., for plotting with Tensorboard). However, they are often inaccurate due to their focus on surface-level similarities and they fail to capture the diversity of human language. Frequently, there are many perfectly valid sentences that can convey the same meaning. Overlap-based metrics that rely exclusively on lexical matches unfairly reward those that resemble the reference in their surface form, even if they do not accurately capture meaning, and penalize other paraphrases.
BLEU scores for three candidate sentences. Candidate 2 is semantically close to the reference, and yet its score is lower than Candidate 3.
Ideally, an evaluation method for NLG should combine the advantages of both human evaluation and automatic metrics — it should be relatively cheap to compute, but flexible enough to cope with linguistic diversity.

Introducing BLEURT
BLEURT is a novel, machine learning-based automatic metric that can capture non-trivial semantic similarities between sentences. It is trained on a public collection of ratings (the WMT Metrics Shared Task dataset) as well as additional ratings provided by the user.
Three candidate sentences rated by BLEURT. BLEURT captures that candidate 2 is similar to the reference, even though it contains more non-reference words than candidate 3.
Creating a metric based on machine learning poses a fundamental challenge: the metric should do well consistently on a wide range of tasks and domains, and over time. However, there is only a limited amount of training data. Indeed, public data is sparse — the WMT Metrics Task dataset, the largest collection of human ratings at the time of writing, contains ~260K human ratings covering the news domain only. This is too limited to train a metric suited for the evaluation of NLG systems of the future.

To address this problem, we employ transfer learning. First, we use the contextual word representations of BERT, a state-of-the-art unsupervised representation learning method for language understanding that has already been successfully incorporated into NLG metrics (e.g., YiSi or BERTscore).

Second, we introduce a novel pre-training scheme to increase BLEURT's robustness. Our experiments reveal that training a regression model directly over publicly available human ratings is a brittle approach, since we cannot control in what domain and across what time span the metric will be used. The accuracy is likely to drop in the presence of domain drift, i.e., when the text used comes from a different domain than the training sentence pairs. It may also drop when there is a quality drift, when the ratings to be predicted are higher than those used during training — a feature which would normally be good news because it indicates that ML research is making progress.

The success of BLEURT relies on “warming-up” the model using millions of synthetic sentence pairs before fine-tuning on human ratings. We generated training data by applying random perturbations to sentences from Wikipedia. Instead of collecting human ratings, we use a collection of metrics and models from the literature (including BLEU), which allows the number of training examples to be scaled up at very low cost.
BLEURT's data generation process combines random perturbations and scoring with pre-existing metrics and models.
Experiments reveal that pre-training significantly increases BLEURT's accuracy, especially when the test data is out-of-distribution.

We pre-train BLEURT twice, first with a language modelling objective (as explained in the original BERT paper), then with a collection of NLG evaluation objectives. We then fine-tune the model on the WMT Metrics dataset, on a set of ratings provided by the user, or a combination of both.The following figure illustrates BLEURT's training procedure end-to-end.

Results
We benchmark BLEURT against competing approaches and show that it offers superior performance, correlating well with human ratings on the WMT Metrics Shared Task (machine translation) and the WebNLG Challenge (data-to-text). For example, BLEURT is ~48% more accurate than BLEU on the WMT Metrics Shared Task of 2019. We also demonstrate that pre-training helps BLEURT cope with quality drift.
Correlation between different metrics and human ratings on the WMT'19 Metrics Shared Task.
Conclusion
As NLG models have gotten better over time, evaluation metrics have become an important bottleneck for the research in this field. There are good reasons why overlap-based metrics are so popular: they are simple, consistent, and they do not require any training data. In the use cases where multiple reference sentences are available for each candidate, they can be very accurate. While they play a critical part in our infrastructure, they are also very conservative, and only give an incomplete picture of NLG systems' performance. Our view is that ML engineers should enrich their evaluation toolkits with more flexible, semantic-level metrics.

BLEURT is our attempt to capture NLG quality beyond surface overlap. Thanks to BERT's representations and a novel pre-training scheme, our metric yields SOTA performance on two academic benchmarks, and we are currently investigating how it can improve Google products. Future research includes investigating multilinguality and multimodality.

Acknowledgements
This project was co-advised by Dipanjan Das. We thank Slav Petrov, Eunsol Choi, Nicholas FitzGerald, Jacob Devlin, Madhavan Kidambi, Ming-Wei Chang, and all the members of the Google Research Language team.

A COVID-19 "exit" strategy to end lockdown and reopen the economy | Uri Alon

A COVID-19 "exit" strategy to end lockdown and reopen the economy | Uri Alon

How can we return to work without spurring a second surge of coronavirus infection? Biologist Uri Alon shares a thought-provoking strategy: four days at work followed by 10 days of lockdown, a cycle that would exploit a weakness in the virus's biology and potentially cut its reproductive rate to a manageable level. Learn more about this approach -- which has already been adopted by both companies and countries -- and how it could be a key to reopening the economy responsibly. (This virtual conversation, hosted by head of TED Chris Anderson and science curator David Biello, was recorded on May 20, 2020.)

Click the above link to download the TED talk.

Twitter plans to expand its misinformation labels—but will they apply to Trump?


President Trump is again testing Twitter’s stomach for misinformation flowing from its most prominent users.

In a flurry of recent tweets, Trump floated conspiracy theories about the death of Lori Klausutis, an intern for former congressman Joe Scarborough who was found dead in his Florida office in 2001—a freak accident a medical examiner reported resulted from a fall stemming from an undiagnosed heart condition. Scarborough, a political commentator and host of MSNBC’s Morning Joe, is a prominent Trump critic and a frequent target for the president’s political ire.

The medical evaluation and lack of any evidence suggesting something nefarious in the former intern’s death has not been enough to discourage Trump from revisiting the topic frequently in recent days.

“When will they open a Cold Case on the Psycho Joe Scarborough matter in Florida. Did he get away with murder?” Trump tweeted in mid-May. A week later, Trump encouraged his followers to “Keep digging, use forensic geniuses!” on the long-closed case.

In a statement provided to TechCrunch, Twitter expressed that the company is “deeply sorry about the pain these statements, and the attention they are drawing, are causing the family.”

“We’ve been working to expand existing product features and policies so we can more effectively address things like this going forward, and we hope to have those changes in place shortly,” a Twitter spokesperson said.

When asked for clarity about what product and policy changes the company was referring to, Twitter pointed us to its blog post on the labels the company introduced to flag “synthetic and manipulated media” and more recently COVID-19 misinformation. The company indicated that it plans to expand the use of misinformation labels outside of those existing categories.

Twitter will not apply a label or warning to Trump’s recent wave of Scarborough conspiracy tweets, but the suggestion here is that future labels could be used to mitigate harm in situations like this one. Whether that means labeling unfounded accusations of criminality or labeling that kind of claim when made by the president of the United States remains to be seen.

In March, Twitter gave a video shared by White House social media director Dan Scavino and retweeted by Trump its “manipulated content” label—a rare action against the president’s account. The misleadingly edited video showed presumptive Democratic nominee Joe Biden calling to re-elect Trump.

According to the blog post Twitter pointed us to, the company previously said it will add new labels to “provide context around different types of unverified claims and rumors as needed.”

Even within existing categories—COVID-19 misinformation and manipulated media—Twitter has so far been reluctant to apply labels to high profiles accounts like that of the president, a frequent purveyor of online misinformation.

Twitter also recently introduced a system of warnings that hide a tweet, requiring the user to click through to view it. The tweets that are hidden behind warnings “[depend] on the propensity for harm and type of misleading information” they contain.

Trump’s renewed interest in promoting the baseless conspiracy theory prompted the young woman’s widower T.J. Klausutis to write a letter to Twitter CEO Jack Dorsey requesting that the president’s tweets be removed.

In the letter, Klausutis told Dorsey he views protecting his late wife’s memory as part of his marital obligation, even in her death. “My request is simple: Please delete these tweets,” Klausutis wrote.

“An ordinary user like me would be banished from the platform for such a tweet but I am only asking that these tweets be removed.”


Read Full Article

Sony’s ZV-1 compact camera zooms in on vloggers


Sony has taken aim at the suddenly enormous market of people who want to self-produce high-quality video with a minimum of setup. Its ZV-1 mutates the versatile RX100 series into a selfie video machine, and it could be the all-in-one solution many a vlogger has been searching for.

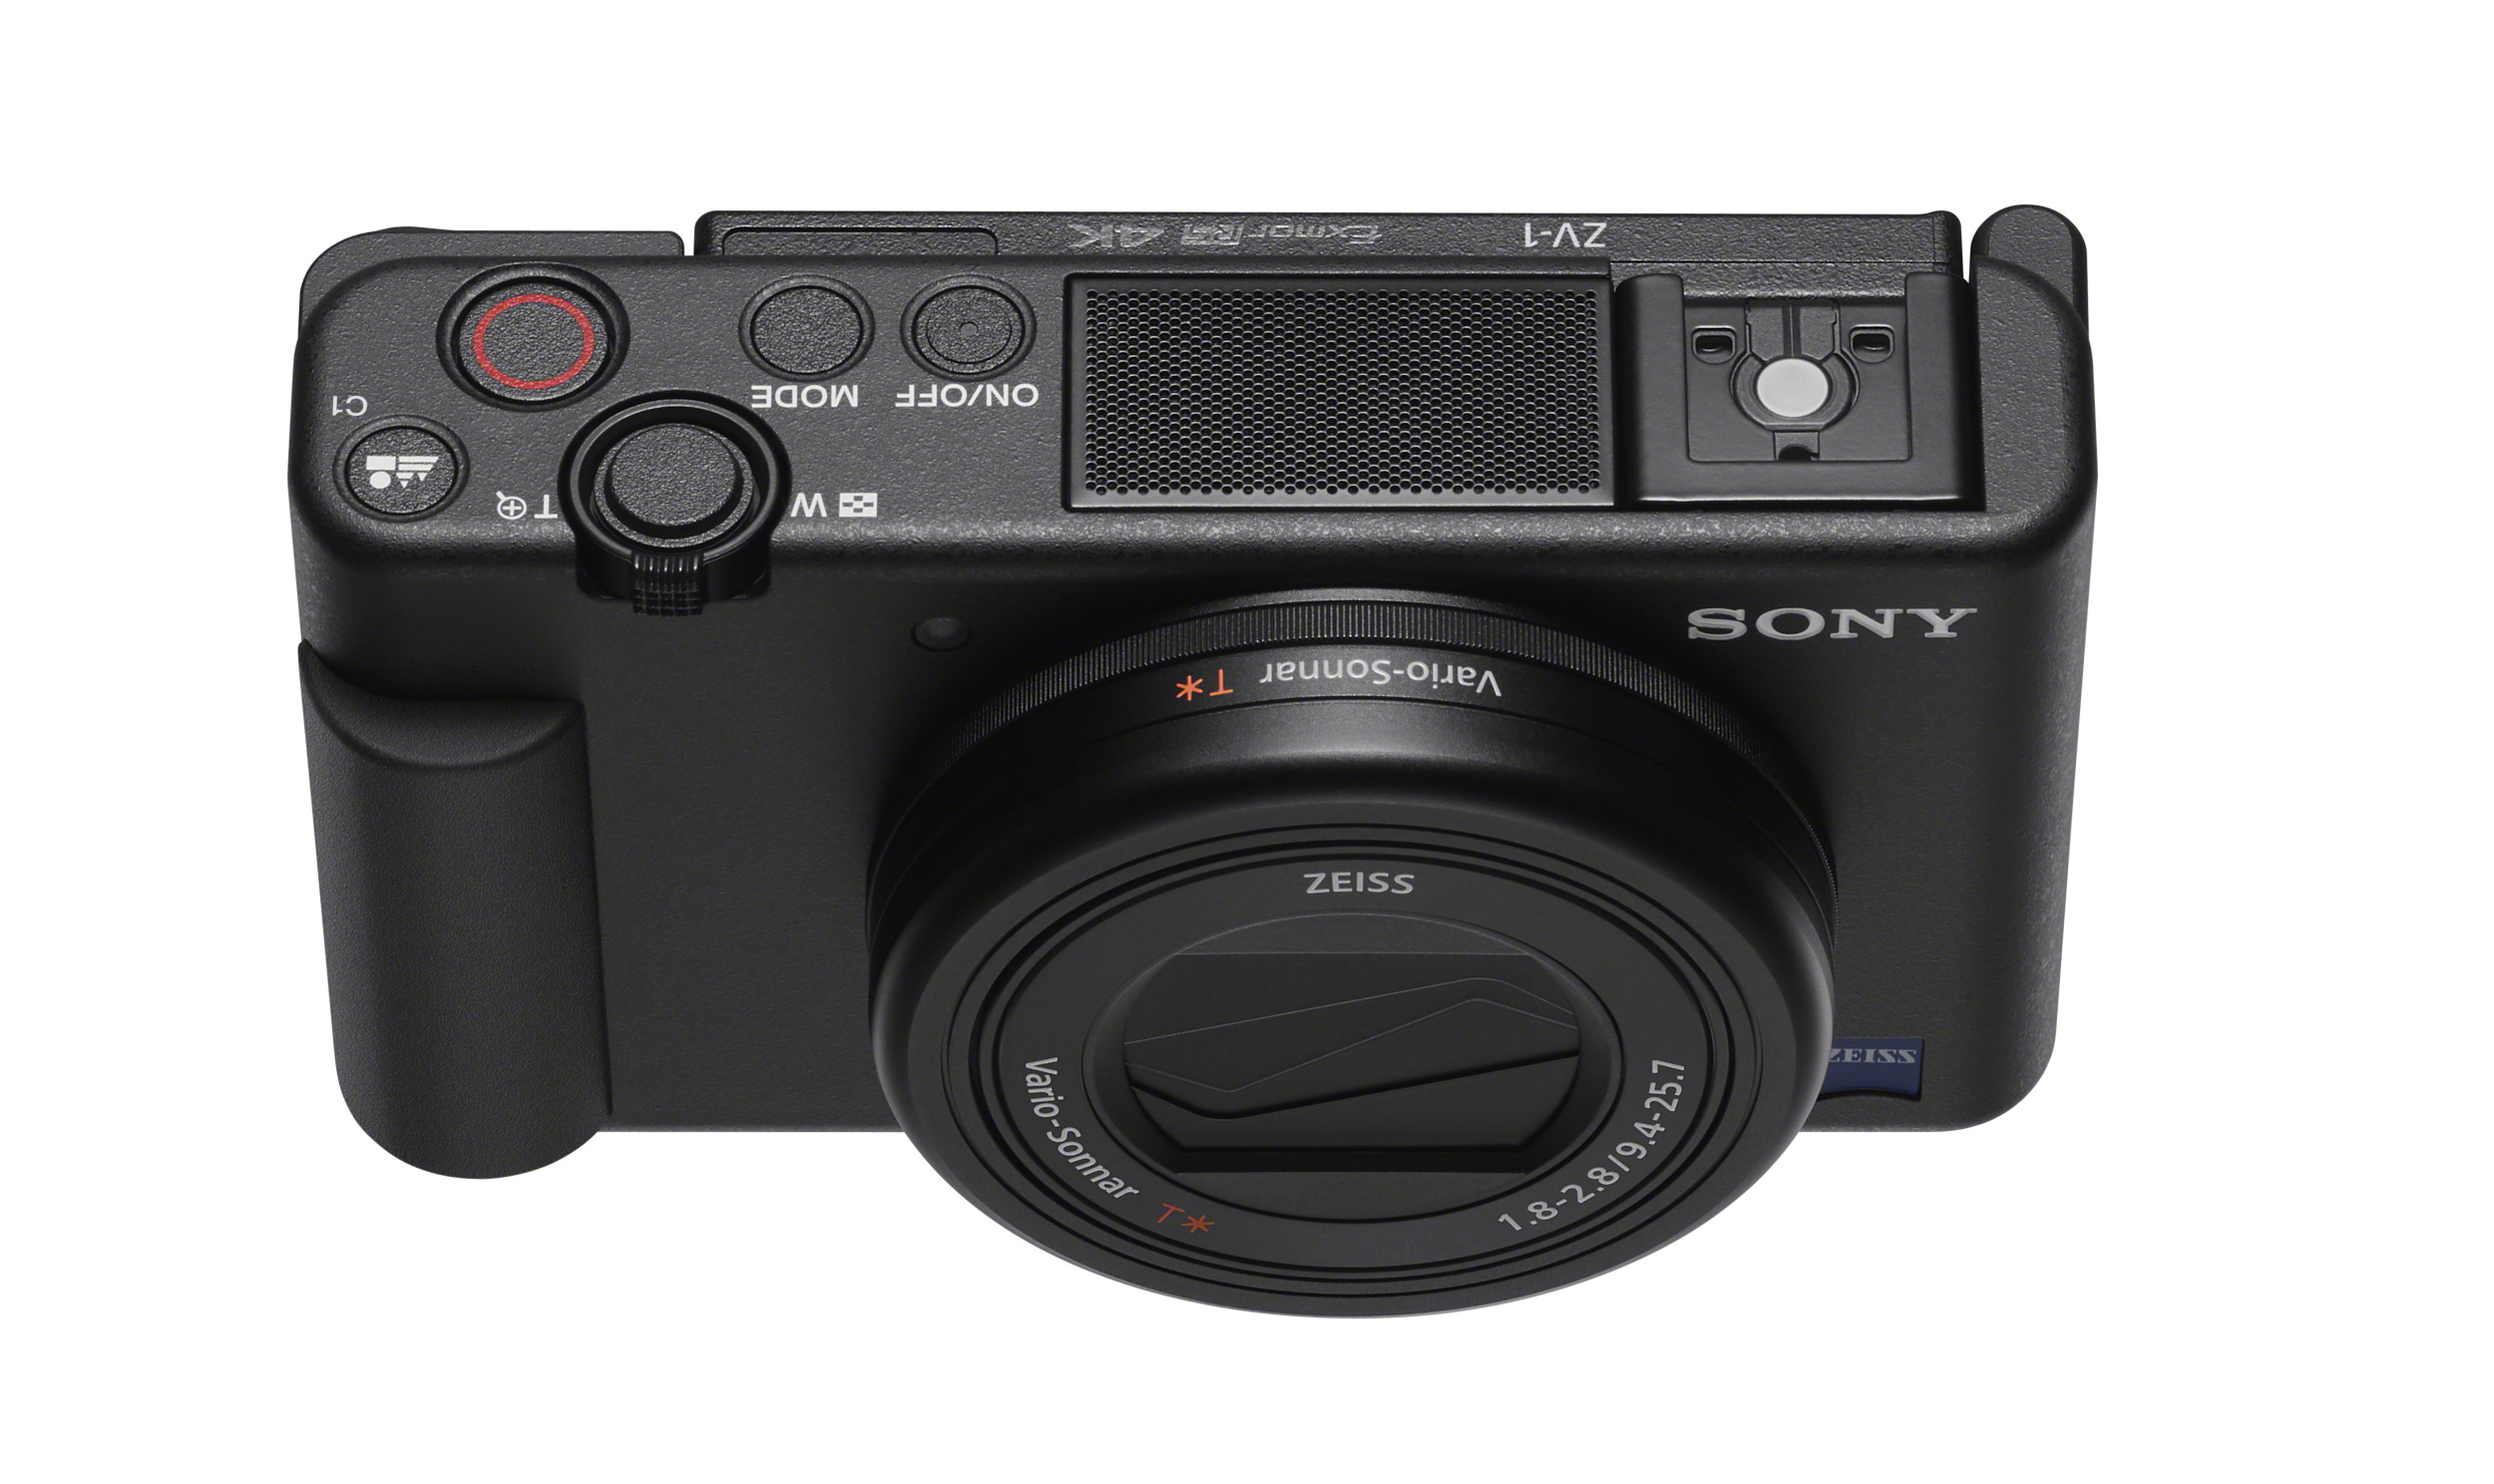
The new camera is very much based on the highly successful and acclaimed RX100, which over the years has grown in both price and capabilities but remains something the user is behind, rather than in front of. The ZV-1 rethinks the camera for people who need to work the other way round.

The 1″, 20-megapixel sensor and 24-70mm equivalent, F/1.8-2.8 lens are borrowed from the RX100, meaning image quality should be excellent (though vloggers may want a wider angle lens). But the camera has been customized with an eye to selfie-style operation.

That means the electronic viewfinder is gone, but there’s now a fully articulating touchscreen display. A powerful new microphone array takes up a large portion of the camera’s top plate, and the ZV-1 comes with a wind baffle or deadcat that attaches to the top hot shoe, giving the camera a flamboyant look.

Image Credits: Sony

A huge new dedicated record button is placed for perfect operation by a left hand holding the camera from the front, and the zoom dial should be thumbable from there as well. A new “background defocus mode” uses the widest possible aperture, naturally narrowing the depth of field with no need for all the AI rigmarole found on smartphones — and it’s smart enough to switch focus to the product a vlogger is being paid to promote when they hold it up close.

All told this could be a convincing works-out-of-the-box solution for people who may be juggling a panoply of hardware from multiple generations to get the same thing done. The proven RX100 image quality and reliability combined with ergonomic tweaks to make it more selfie-friendly might entice people thinking of putting together more complex setups.

At $800, or $750 if you order in the next month, it’s certainly more expensive than an entry-level setup but probably cheaper (and definitely easier) than getting a mirrorless, lens, mic, and other accessories you might need to match it.


Read Full Article