17 March 2020

5 Email-Cleaning Ways to Organize and Manage Your Inbox


clean-email

Is email taking up more time than it should? There are better ways to organize and tame your inbox so that you have more energy and space for other things.

Gmail is the world’s biggest email service today, and that’s why most of the methods and apps in this article focus on Gmail users. However, the tricks here can easily be applied in other email apps, and most tools have a how-to for that on their website.

1. You vs. Your Inbox (Web): 4 Strategies for Inbox Management

You vs. Your Inbox series talks about the best methods to organize your email

Everyone has their own cool trick to get control of their inbox. Forge magazine started an insightful series called You vs. Your Inbox to highlight some of the best strategies. Currently, there are four articles with different ideas about tackling inbox overload. Read them all, they offer different perspectives on dealing with email.

One article talks about how the secret is sending better emails. If you compose emails that make it clear what the response should be, there will be less confusion and fewer ambiguous messages sent back and forth. Another talks about how you should check email in sessions, and have a purpose assigned to each session.

The third email management system is about triaging your inbox with labels, making it easier to sort and filter the messages. And finally, one strategy talks about how it’s not important to have inbox zero, which has one of the best pieces of advice: “It’s important to remember that email itself isn’t work.”

2. Instaclean (Android, iOS): Find Senders and Subscriptions You Don’t Open
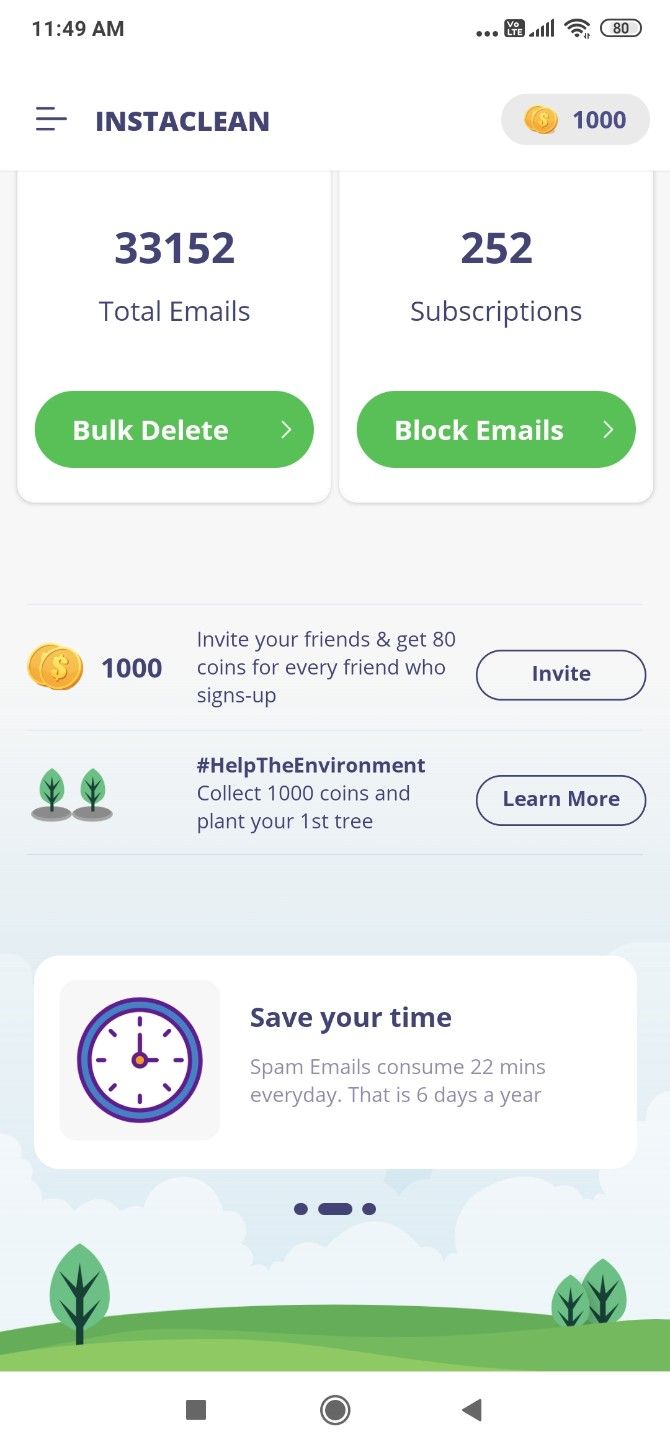
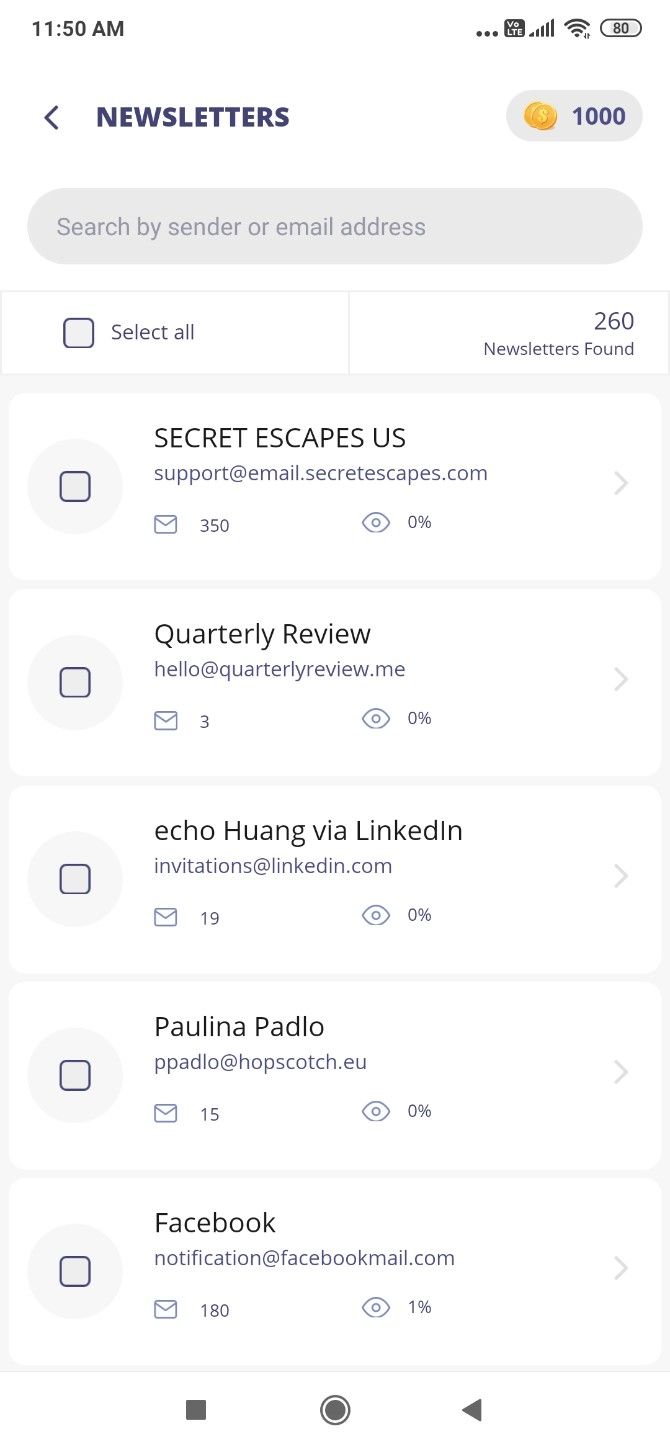
Instaclean is one of the best free apps to manage your inbox. It lets you delete and block unwanted newsletters. And it shows you senders who are clogging up your inbox when you don’t even read their messages.

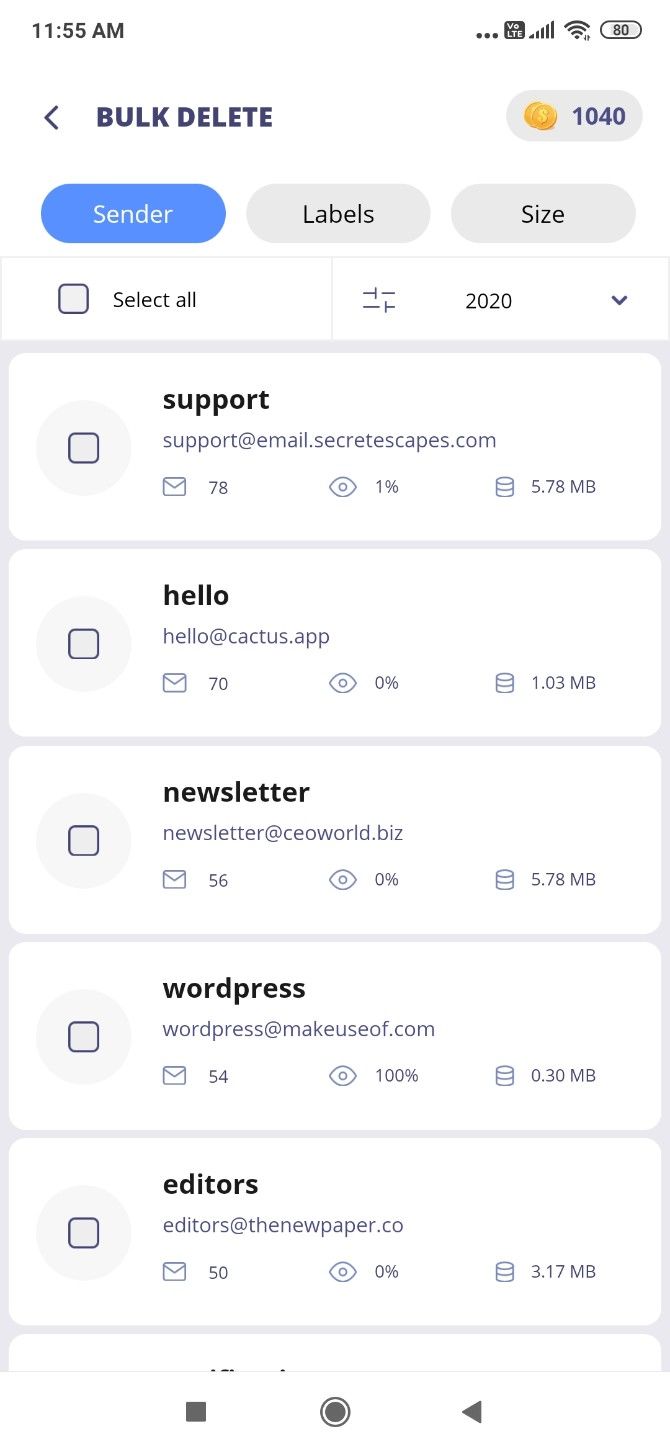
Bulk Delete sorts emails by sender, showing you how many of their messages are in your inbox and how many of them you have ever opened. If someone is sending you many emails and you open 0-1% of them, you might want to block that sender and delete all their messages still in your inbox. Emails can be sorted by sender or size.

The app also finds all the subscriptions you are getting emails from, which aren’t being sent to spam. In a few taps, you can block all such emails you no longer want to receive. It doesn’t delete all subscriptions, and you’ll have to do multiple passes. In a way, that’s good because you don’t want to accidentally remove something you like.

Each action (delete or block) rewards you with coins. Once you collect 1000 coins, you can use them for a good cause by asking Instaclean to plant a tree on your behalf. You can also earn coins by referring the app to friends.

Download: Instaclean for Android | iOS (Free)

3. Paced Email (Web): Get Frequent Emails as Batches and Summaries

Paced Email gives you an email alias to batch newsletters

Not every newsletter is unwanted, but it might be coming to you too often. Similarly, even if a colleague is trigger-happy with sending bulk emails on the office chain, you can’t ignore them. Paced Email lets you turn frequent messages into batches, so they land in your inbox when you want.

Register at the website to get your personal email alias, for example, john.doe@daily.paced.email. Then go to the newsletter, chain, or service that is mailing too often, and change your email address to this alias. Paced will then batch all emails from it and send it as a daily digest. If you want an email sooner, login to the website and trigger an immediate digest.

You also can also specify how often you want to receive emails from that service. By default, it’s daily as the email alias indicates, but you can change it to “weekly” or “monthly”. Paced will then send batches according to your preferences.

4. Slimbox (Web): Batch All Newsletters in Gmail

Slimbox finds newsletters in your inbox to turn them into a batch email

More than anything else, email newsletters are probably clogging up your inbox. Slimbox is an easy way to turn them into a single batched message, without having to unsubscribe or delete them.

There are a few reasons that make Slimbox better than the average app for batching. First, it’s verified by Google, so you can sign in to your Gmail or Google Apps inbox with the assurance that your data is safe. Second, Slimbox doesn’t make you change your email address in other services like Paced requires.

Once you’re logged in, the app will scan all your messages and prepare a list of frequent newsletters. You can choose to continue having them sent to your inbox or to put them into the daily Slimbox blast. Slimbox will send that email once a day (you can set your timezone), which hosts all the other emails you missed. It doesn’t affect your existing Gmail filters.

You can check your Slimbox at any time by signing into the site, change which senders go to the inbox or Slimbox, and so on. The service is free for a month to test it out, after which it costs $1 per month.

5. gfeed (Android, iOS): Scrolling Feed for a Faster Inbox

Try out gfeed and you’ll wonder why Gmail doesn’t have this option already. The app turns your inbox into a continuous scrolling feed of messages, like any social network. Images show up in preview, with the first few lines of the message below it.

To expand a message, tap the image, subject, or “more” link. There, you can reply to (or reply all) and forward that message through gfeed itself. This is good for basic text replies, but you’re mostly better off replying through the official Gmail app.

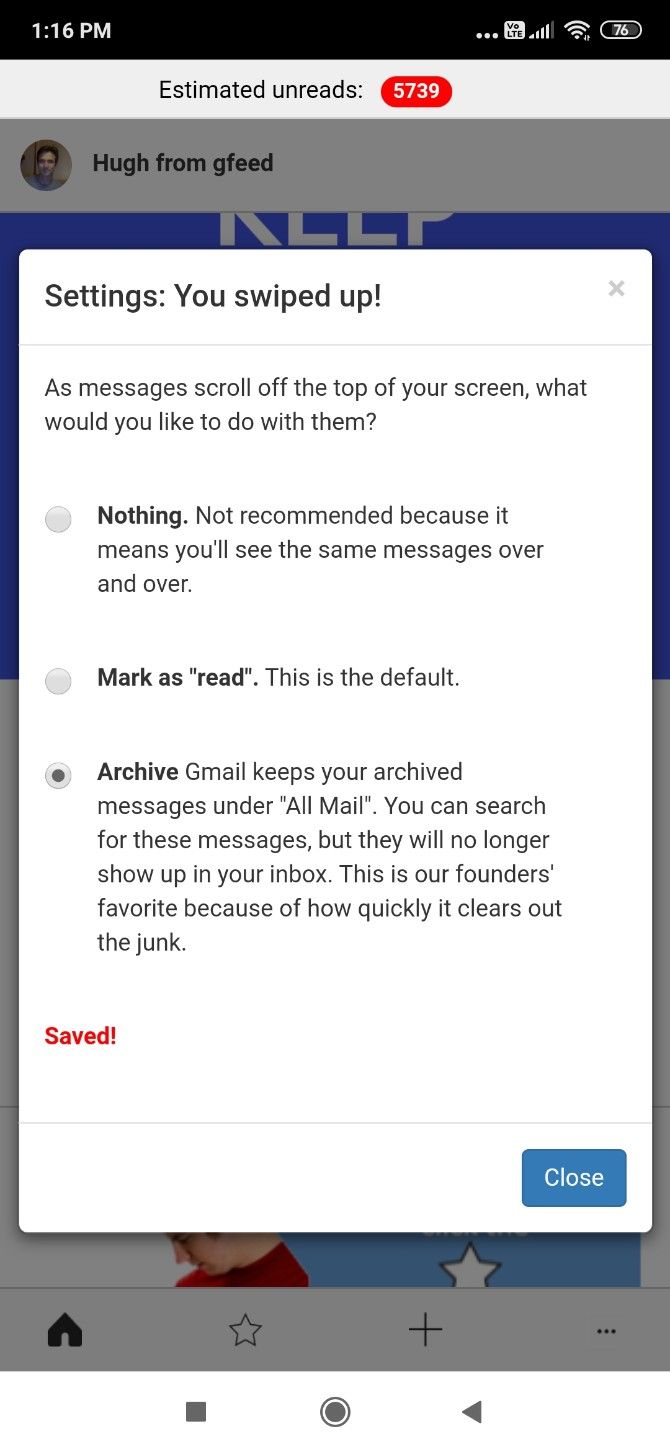
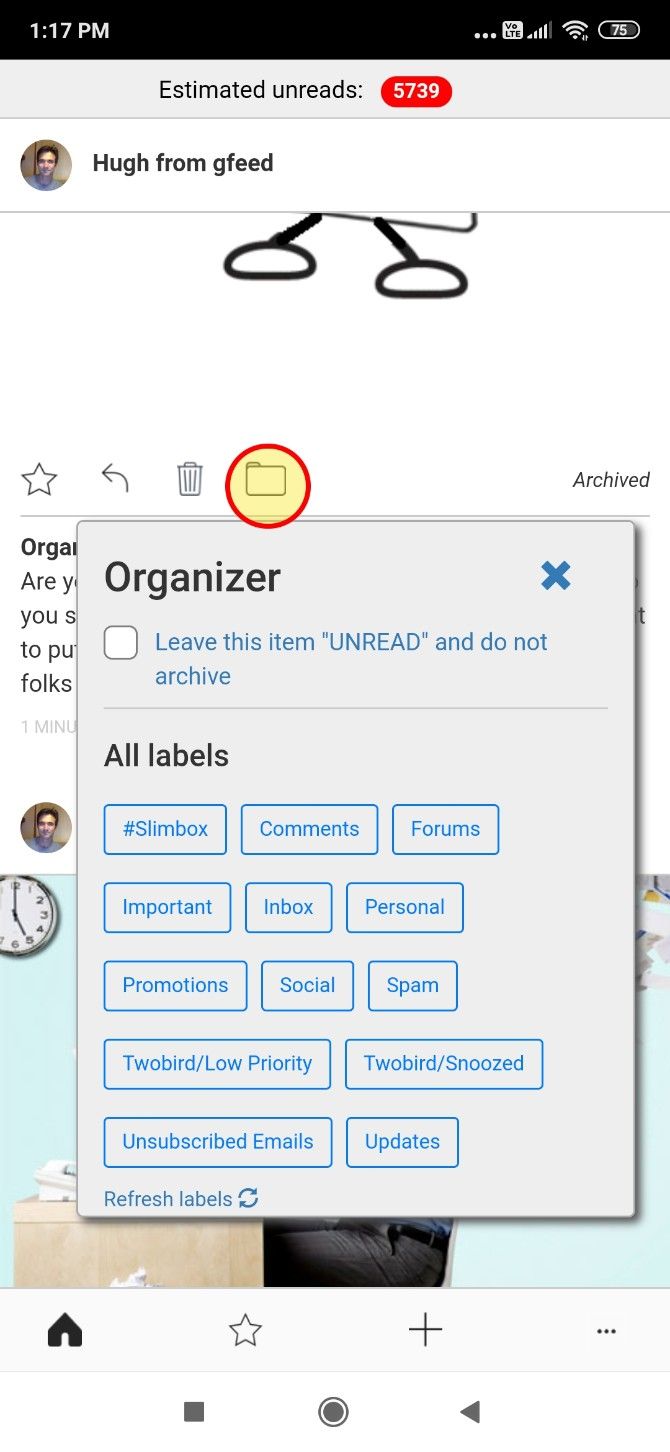
Every time you scroll past a message, gfeed will automatically mark it as read or archive it, depending on your settings. You can also star a message, or tag it with a label to add a filter. When you open Gmail, you can see those messages under that filter.

If you spend too much time going through your inbox, gfeed is among the best apps to speed up how you organize email.

Download: gfeed for Android | iOS (Free)

Archive Old Emails for Inbox Zero

Through one of these apps or a combination of multiple methods, that cluttered mess of emails should finally become much more manageable. Whether you’re aiming for inbox zero or a more organized inbox, don’t forget to check out the tools already available.

For example, the most overlooked feature is the “Archive” button in email apps. It’s an excellent way to free up your inbox while still keeping emails available for search later. Here’s how you can archive old mails and reach inbox zero.

Read the full article: 5 Email-Cleaning Ways to Organize and Manage Your Inbox


Read Full Article

The Best Online Tools To Know Everything About a Website


How do I contact the owner of a website? Where is a particular website hosted? What other websites are hosted on that same server? Is the site using WordPress or Gatsby? Which ad networks are they using to monetize a site? Is my site accessible from China?

Here are some of the most useful online tools that will help you know every single detail of any website.

Also see: The Essentials Tools for Programmers

  • just-ping.com — Use Just Ping to determine if a particular website is accessible from other countries. Just Ping has monitoring servers across the world including Turkey, Egypt, and China so if the ping results say 100% Packet Loss, most likely the site is inaccessible from that region.
  • who.is — If you like to know the contact address, email and phone number of the website owner, this free whois lookup service will help. This is a universal lookup service meaning it can simultaneously query the whois database of all popular domain registrars.
  • whoishostingthis.com — Enter the URL of any website and this online service will show you the name of the company where that website is hosted. This may come handy if you need the contact information of the web hosting provider for writing a DMCA Notice or if you are looking to switch web hosts.
  • chillingeffects.org — When there’s a copyright-related complaint against a website, a copy of that letter is archived in the Chilling Effects database. Anyone can query this public database to know about all the copyright infringement complaints against a particular website.
  • myip.ms — MyIP.ms offers a comprehensive report of any website or I.P. Address. You get to know about the hosting provider, the physical location of a website, the IP Address change history of a website and the DNS information. Netcraft also offers similar reports.
  • reversewhois.com — The reverse whois lookup will help you determine other websites of someone. You can search the whois database by the email address or name of the domain registrant.
  • builtwith.com — Use BuiltWith to know the technology stack of any website. It helps you figure out the mail service provider of a domain, the advertising partners, the tracking widgets that are installed on a website and whether the site is using any CDN like Amazon S3 or Google Cloud. See example.
  • ssllabs.com - The certificate diagnostics tool will verify your site’s SSL certificate and ensure that it is correctly installed, trusted and does not show errors to any of your site visitors.
  • semrush.com — If you wish to analyze your competitor’s website, this is the tool to go with. SEM Rush will help you figure what organic keywords are people using to find a website, what is the site’s traffic and which are the competing websites.
  • dnsmap.io — When you buy a new domain or switch from one host to another, the DNS records for the domain changes and it may take a while to propagate these changes worldwide. The tool checks the DNS records from various geographic locations and it can check your domain’s A, CNAME, TXT and MX records. whatsmydns.net is also a good alternative.
  • toolbox.googleapps.com — If email messages, including those sent via Mail Merge, from your domain are not reaching the recipient’s mailbox, use this Google tool to confirm that DMARC, DKIM and SPF records are properly configured for your domain.
  • browserstack.com - Check your website’s responsive design on multiple desktops, tables, iOS and Android phones running different versions of operating systems.
  • screenshot.guru - If a website is inaccessible, use Screenshot Guru, hosted on the Google Cloud, to confirm if the website is down or not.
  • thinkwithgoogle.com - A mobile speed tool developed by Google that will help you determine how fast your websites will load on mobile phones on 3G and 4G network. You can also compare your mobile speed score with other websites.
  • testmysite.io - A simple site testing tool from Netlify that will measure and rank your site’s loading time from different regions around the world.
  • developers.google.com — Find the Page Speed score of any website on both desktop and mobile devices. The higher this number, the better. The Google tool also offers suggestions on how the score can be improved.
  • httparchive.org — The HTTP Archive is a repository of all performance-related metrics for a website. It keeps a record of the size of pages, their average load time and the number of failed requests (missing resources) over time.
  • Website Monitor - Use this open-source Google Sheets based website monitoring tool to get alerts when your domain goes down or is inaccessible.
  • Flush DNS - Use this tool to flush the Google DNS cache for a domain. If you changed the DNS servers for your domain, by changing registrars or DNS hosting in the last few days, flush your main domain name first before you flush any subdomains. OpenDNS also has a web tool for refreshing the DNS cache.
  • DomainTools - The tool monitors one or more web domains and sends email alerts when the domain is expiring, the domain gets renewed, the nameservers change or when the registrant information is updated for the domain.

Also see: 101 Most Useful Websites


Facebook, Reddit, Google, LinkedIn, Microsoft, Twitter and YouTube issue joint statement on misinformation


In an unprecedented move to reassure customers and flag the potential for misinformation about COVID-19 on their platforms, all of the major social media companies and their parent corporations issued a joint statement on their efforts.

“We invite other companies to join us as we work to keep our communities healthy and safe,” the statement read.

Last week, U.S Chief Technology Officer Michael Michael Kratsios held a remote meeting with representatives from major tech companies on how to coordinate various efforts related to COVID-19, including fighting disnformation. The Washington Post and Politico reported that the White House asked Google, Facebook, Amazon, Microsoft, Apple, IBM, Cisco and Twitter for help.

The World Health Organization’s director-general said last month that disinformation is as dangerous as COVID-19. During an address at the Munich Security conference on Feb. 15, almost a month before the WHO officially declared COVID-19 a pandemic, Tedros Adhanom Ghebreyesus said “We’re not just fighting an epidemic; we’re fighting an infodemic. Fake news spreads faster and more easily than this virus, and is just as dangerous.”

But tech companies aren’t just battling the spread of questionable posts by the public. They also have to contend with misleading information in several of President Donald Trump’s public statements on COVID-19, including his tweets and Facebook posts.

TechCrunch has contacted each of the companies in the joint statement for more details, and will update this post as we hear back from them.

In response to an email, a LinkedIn spokesperson directed TechCrunch to a post published by the company on March 13, with links to information about finding trustworthy news sources and working remotely.

Facebook’s efforts to fight disinformation about COVID-19 have included information cards on Instagram and Facebook, that redirect to sources like the World Health Organization or local health authorities.


Read Full Article
TransferWise partners with Alipay for international money transfers


TransferWise, the London-headquartered international money transfer service most recently valued by investors at $3.5 billion, has partnered with China’s Aliplay for international transfers.

The launch enables TransferWise’s now 7 million-plus users to be able to send Chinese yuan from 17 currencies to users of Alipay, which serves more than 1.2 billion people worldwide including via its local e-wallet partners.

Promising “instant” money transfers — under 20 seconds, apparently — TransferWise users simply need the recipient’s name and Alipay ID to initiate a money transfer. The money will then be sent to the bank account linked to the recipient’s Alipay profile.

It could be a potentially smart bit of business by TransferWise, which has sometimes struggled to secure the kind of partnerships that can accelerate its customer base and increase transaction volume. According to a 2019 report, the fintech is citing, China is projected to be one of the top remittance recipient countries in the world, with £54bn expected to be sent back home by Chinese expats and migrants living abroad.

“The partnership is a major expansion for TransferWise as it reaches a new, additional market of people managing their money via the Alipay platform,” says the company.

With that said, Alipay is the second meaningful partnership that TransferWise has announced in the last few months. In November, it joined forces with GoCardless, the London fintech that lets customers pay via recurring bank payments (known as Direct Debits in the U.K.). GoCardless is used by more than 50,000 businesses worldwide, spanning multinational corporations to SMBs, and the partnership sees its own FX functionality powered by TransferWise.


Read Full Article
Windows 10 Now Powers 1 Billion Devices


Windows 10 now powers more than 1 billion devices worldwide. This includes PCs, laptops, tablets, Xbox One games consoles, and HoloLens smart glasses. And while it may have taken Microsoft longer to hit the 1 billion milestone than planned, it’s still an achievement.

How Windows Phone Failed Microsoft

Just before Microsoft launched Windows 10 in July 2015, the company declared that it was hoping to have Windows 10 installed on 1 billion devices “within two to three years after launch”. Unfortunately for Microsoft, that timeline came and went.

This failure was mostly driven by the demise of Windows Phone, as the original target was set when Windows Phone was still providing competition for Android and iOS. However, when Windows Phone failed, Microsoft had to rely on other devices instead.

Windows 10 Hits the Big Milestone

Now, five years on, Microsoft has hit the magic milestone. The company heralded the result on the Windows Blog, saying that “over one billion people have chosen Windows 10 across 200 countries resulting in more than one billion active Windows 10 devices”.

The reference to people is interesting, as Microsoft has previously always referred simply to devices. The statement suggests that the number of individual users and number of devices are both over 1 billion. Which is a cause for celebration for Microsoft.

In September 2019, Microsoft revealed that Windows 10 was installed on 900 million devices. So the number has jumped up by more than 100 million in under six months. Microsoft ended support for Windows 7 in January, which will have helped.

Upgrading From Windows 7 to Windows 10

The upshot is that “one in every seven people on the planet” now uses Windows 10. The company also heralds the fact that it’s “the only operating system at the heart of over 80,000 models and configurations of different laptops and 2-in-1s”.

With 1 billion people now using Windows 10, it’s probably time for everyone else to follow suit. And with Windows 7 reaching its end of life, it’s definitely time for you to upgrade. So here are the Windows 7 end of life alternatives open to you.

Read the full article: Windows 10 Now Powers 1 Billion Devices


Read Full Article
A Beginner’s Guide to Making Music With Audacity at Home


For many musicians, the cost of paying a professional sound engineer to produce a demo recording is too high. Therefore, many musicians are looking for alternatives.

A much more affordable option is to learn about production and recording techniques yourself. Then use free software, like Audacity, to record music on your own computer.

Audacity is a free piece of software that works on Mac, Windows, and Linux. If you’re a complete beginner, this article will explain how to use Audacity to make music.

Get Audacity for Windows, macOS, or Linux

Audacity banner from the official website

Before you can start making music, you need to download and install Audacity. Visit the official Audacity website below and follow the instructions to get the latest version for your operating system.

Download: Audacity for Windows | macOS | Linux

Prepare Your Recording Equipment

If you’re a complete beginner to making music, there’s a good chance you don’t have any recording equipment other than your computer and Audacity. That’s fine for now, but to make better recordings in the future you might want to research the best USB audio interfaces and microphones.

If you already have that equipment, make sure it’s working with your computer before you start trying to record any music in Audacity. You should also look into the best methods for recording your particular instruments, including microphone choice and placement.

How to Record Music in Audacity

In Audacity, recording someone’s voice or an instrument is as simple as selecting the correct microphone as an input, then clicking the Record button in the top-left corner.

Select the microphone you want to use (which might be your computer’s Built-in Microphone) from the dropdown menu next to the microphone icon. Select Mono or Stereo from the menu next to it as well—most microphones record in mono.

Audacity window highlighting input dropdown menu

Before you start recording music in Audacity, it’s a good idea to monitor the level of your microphone. That way you can turn it down to avoid distortion if the instrument you’re recording is too loud. Click the upper- or left-most sound meter in your Audacity window to start monitoring your input.

Now adjust the Recording Volume slider to make sure the instrument you’re recording doesn’t go into the red.

Audacity window with input monitoring highlighting input volume slider

When you’re ready, click the Record button to automatically create a new track and start recording audio. Click Stop or press Space when you want to stop recording.

Audacity window recording audio highlighting transport controls

Multi-Track Recording in Audacity

It’s possible to record multiple tracks at once in Audacity if you have an audio interface with multiple inputs. For most beginners, this isn’t the case, but you can still use Audacity to make music with multiple tracks by recording each track one by one.

If you’re recording a band, it’s a good idea to record all of them together to create a “scratch track.” Each musician can then play along with the scratch track as you record them individually. Make sure the person playing is using headphones so they can still hear the scratch track without the microphones picking it up.

To create new tracks, go to Tracks > Add New from the menu bar. Then use the Select button on each track to choose where you want your new recordings to go. You also need to turn on Transport > Transport Options > Overdub to make sure the scratch track keeps playing in the background while you record.

Audacity menu bar showing Overdub option

If a section of the recording is not quite right, click and drag to select it, then go to Edit > Remove Special > Split Delete to delete that section. Create another new track to record that part again.

Multi-track recording in Audacity

Make Music in Audacity Without Recording

A lot of people use Audacity to make music without actually recording anything. You can do this by importing other recordings, then editing and mixing them to create your own song. To do this, simply drag and drop an audio file into the Audacity window to import it.

Or you can use virtual instruments to create new music digitally. You get a couple of built-in instruments with Audacity you can use to do this straight away. Go to Generate > Pluck or Generate > Risset Drum from the menu bar to start using them.

Risset Drum virtual instrument in Audacity

How to Edit and Mix Your Song

After making music in Audacity, you usually need to edit and mix the tracks before they sound good together. You might need to remove the ambient noise or tighten up some timings. You probably also need to balance the volume of each track so you can hear every track clearly.

Edit Your Audio Recordings

Most of the editing you usually need to do consists of deleting or silencing sections you don’t need. We covered how to do this in the multi-track section above.

Sometimes you also need to adjust the timing of a recording. The simplest way to do this is to split the audio track into different sections and slide them into place.

Select a piece of audio, then go to Edit > Clip Boundaries > Split New to move that section of audio to its own track. Now select the Time Shift Tool (which looks like two arrows) from the top of Audacity and drag the clip to the right place in the timeline.

Editing music in Audacity showing Split New selection

Mix Your Tracks Together

On the left side of each track in Audacity, you should see two sliders. The top slider adjusts the volume of that track and the bottom slider adjusts the pan, which moves it from the left speaker to the right speaker.

Volume and Pan sliders on an Audacity track

Play around with the sliders on each of your tracks to create a balanced mix for your song. Learning how to mix music professionally is an entirely separate skill. For now, just focus on making everything easy to hear.

Add Music Production Effects in Audacity

To use effects in Audacity, highlight the section you want to add effects to, then click Effect from the menu bar and choose an effect. When you do so, a separate window opens with all the controls and parameters for that effect.

After you click OK, Audacity reprocesses the selected audio so that it permanently has the effect applied to it. For safety, you might want to create a backup of your tracks by going to Edit > Duplicate first, then Mute the duplicate track.

Duplicate tracks with one muted in Audacity

When you’re first learning how to make a song in Audacity, it’s tempting to use too many effects. Especially when there are so many available to you. But you’re better off sticking to the following options until you’re more comfortable using them well:

  • Amplify: Make sections of the recording louder or quieter as needed
  • Compressor: Apply compression to create an even volume throughout the track
  • Fade In / Fade Out: Smoothly transition from silence to music to avoid extra noise
  • Graphic EQ: Change the tone of each track so they create a full sound together
  • Noise Reduction: Get rid of background noise from your recording environment
  • Reverb: Create a virtual space for the instruments to make them sound more natural

Saving Your Music

Saving Audacity creates a project file with the individual audio tracks inside it. You can open this file again to keep working on your song, but it only opens in Audacity so you can’t add it to your music player yet.

To do that, you need to go to File > Export and choose the audio format you want to export your music in, such as MP3 or WAV. This creates a standard audio file that you can’t change anymore but you can add to your music library.

Export options from Audacity menu bar

Try Out Other Free Music Production Software

By now, you should have a pretty clear idea of how to use Audacity to make music. But Audacity isn’t the only option available to you. In fact, there is lots of other free music production software you can use instead.

You might even find some of them easier to use than Audacity.

If you aren’t sure where to start, take a look at our rundown of the best free music production software. All of the options on that list have countless tutorials online showing you how to start making music with them. So there’s no excuse not to give it a go.

Image Credit: Davizro Photography/Shutterstock

Read the full article: A Beginner’s Guide to Making Music With Audacity at Home


Read Full Article
How to Get a Windows XP Download Free From Microsoft, Legally


windows-xp-stays

Want a free Windows XP downloaded from Microsoft? It’s possible using a virtual machine. This article explains how.

Windows XP is old, and Microsoft no longer provides official support for the venerable operating system. But despite the lack of support, Windows XP is still running on 5 percent of all computers around the globe. Why are people still using Windows XP? Mostly due to work, research, or entertainment.

Finding a copy of Windows XP isn’t easy. Finding some hardware to run it on is just as difficult. That’s why the best option is to install Windows XP in a virtual machine so you can keep it on hand at all times. Here’s how you do it!

Is Windows XP Really Available for Free?

Microsoft knows that there are good reasons to jump back into Windows XP. That’s why they supply Windows XP Mode, a full version of XP that runs within Windows 7. However, most of us have long since moved on from Windows 7, making this compatibility fix… well, a little unhelpful.

Luckily for you and me, there’s a relatively easy way to take the Windows XP Mode download and load it up in any virtual machine of your choosing. Before we begin, you need a few things:

  1. Download and install the latest version of VirtualBox.
  2. Download and install a file archive tool.
  3. A copy of Windows XP Mode (see below).

Step 1: Download Windows XP Mode Virtual Hard Disk

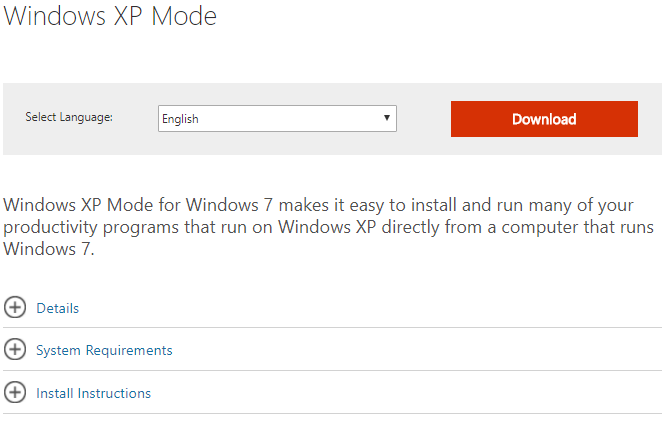
Head to the Microsoft Windows XP Mode download page. Select Download. On the next page, select WindowsXPMode_en-us.exe, then hit Next. The Windows XP Mode executable will now download.

windows xp mode download

When it completes, don’t install it yet!

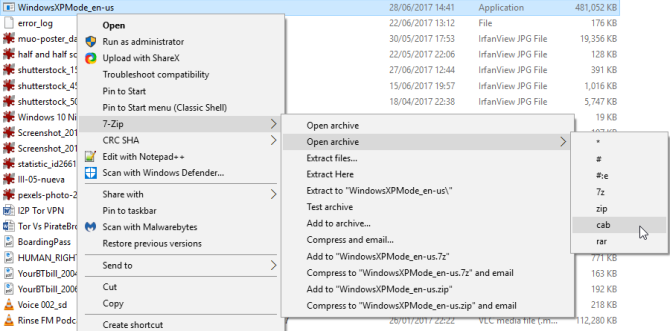
Instead, browse to the executable, then right-click and select 7-Zip > Open archive > cab from the context menu.

extract xp mode archive

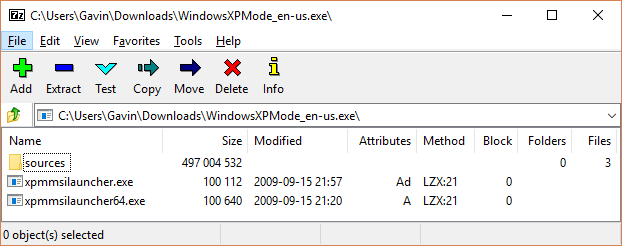
This immediately opens the executable in 7-Zip for you to have a poke around. There are three files:

xp mode sources

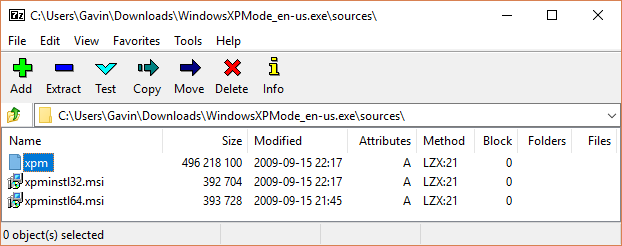
Open Sources to reveal another three files:

xp mode internal folders

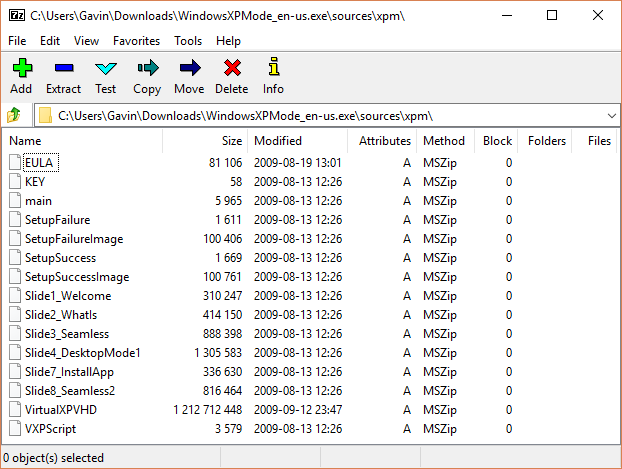
Double-click xpm. This is the XP Mode virtual hard drive folder. It should look the same as the image below:

xp mode virtual hard disk

These are the files you need to create the XP Mode virtual hard disk. Unfortunately, they’re Archive files and not executable files, meaning they’re currently Read-only.

You need to extract these files to a new folder.

Select Extract from the toolbar, then press the ellipsis icon next to the address bar. Browse to where you’d like to extract the files—your C: drive is fine—and select Make New Folder. I’ve called my folder “Windows XP Mode,” but the choice is yours. When you’re ready, press OK, then OK again to start the extraction process. This can take a minute or two.

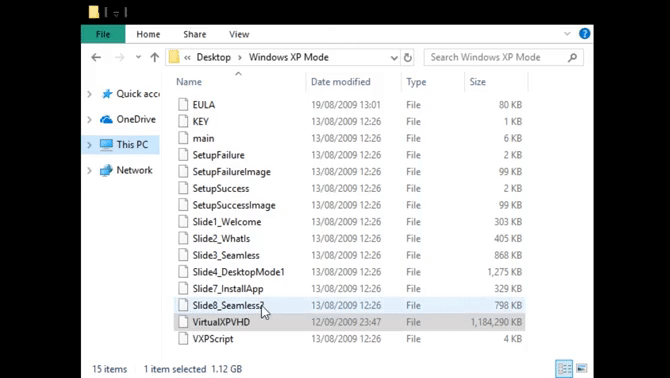
Head to the folder you created when the extraction process completes. You’ll see the same list of files. The difference is that you can now edit these files as you see fit.

Select the file named VirtualXPVHD. Press F2 to rename. Insert a period between the “P” and the “V,” and press Enter. The file should immediately change into a virtual hard disk, and the icon to boot:

xp mode virtual hard disk gif

Step 2: Install Windows XP Mode in a Virtual Machine

Before we completed the XP Mode virtual hard disk extraction, I asked you to download and install VirtualBox. VirtualBox is a free app that allows you to run operating systems in a window.

We’re going to install the Windows XP Mode virtual hard drive in VirtualBox.

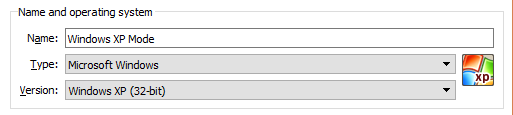
  1. Open VirtualBox. Select New. At bottom of the Create Virtual Machine window, select Expert Mode (if your window shows an option for Guided Mode, you’re already using Expert Mode). Now, give your virtual machine a suitable name. If you include “XP” in the virtual machine name, the Version will automatically change to reflect that. Even so, double-check the Version is Windows XP (32-bit).
    virtualbox select operating system
  2. Assign the virtual machine some memory. Memory is a shared resource, meaning both the host (your PC) and the guest (the virtual machine) use it concurrently. Luckily, Windows XP is old and doesn’t require buckets of RAM to run. I would advise assigning a minimum of 512 MB (but you won’t need more than 2048 MB).
    virtualbox select memory
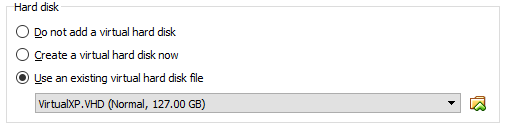
  3. Finally, we need to assign a hard disk—the virtual hard disk we extracted from the Windows XP Mode executable earlier. Under Hard disk, select Use an existing virtual hard disk file. Then, hit the folder with the green arrow. Browse to the folder we extracted our files to, select VirtualXP, then Open.
    virtualbox select hard disk

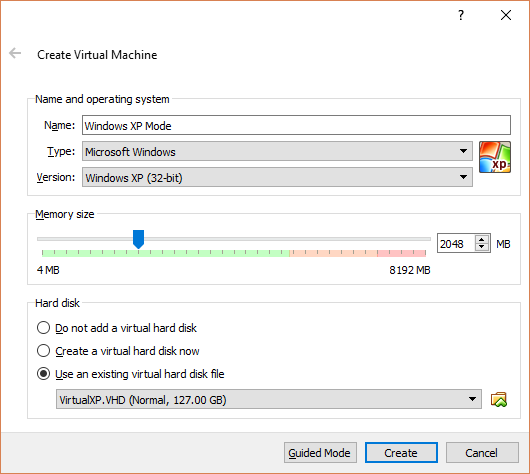
When you’re done, your new virtual machine setup should look like this:

virtualbox create virtual machine

Okay? Hit Create.

Step 3: Windows XP Mode Disk Settings

Before you boot up your shiny new Windows XP virtual machine, you need to tweak a few settings.

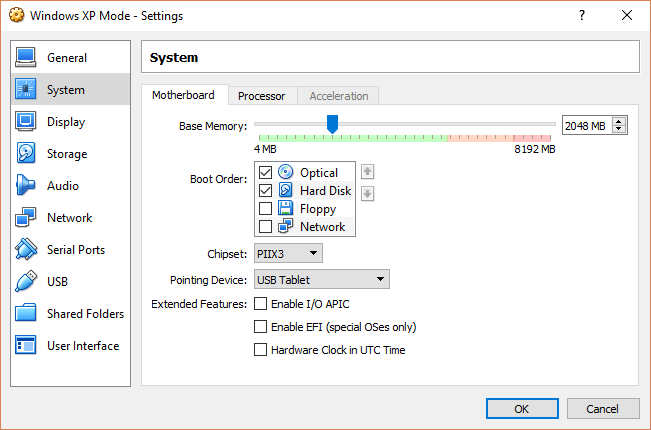
On the VirtualBox toolbar, press Settings. Head to System. Look at the Boot Order. Uncheck Floppy, and move it down the list. Promote Hard Disk to the top of the pile. Just like your host PC, the virtual machine has a specific boot order. You need the virtual hard disk at the top of the list, so it boots first:

xp mode boot settings

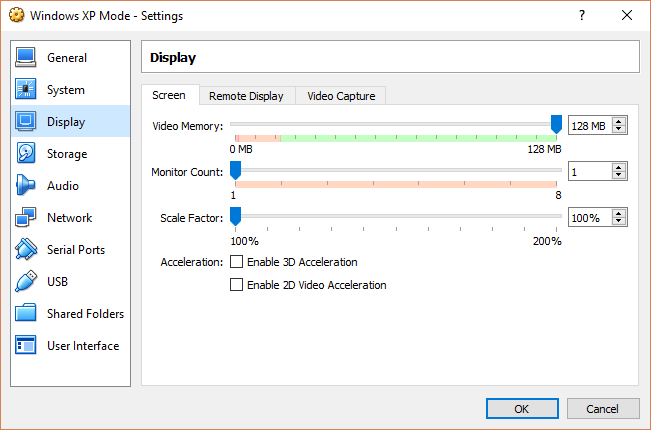
Under Display, increase Video Memory to 128 MB:

xp mode video memory

Windows XP Virtual Machine Network Settings

Next, check the Windows XP virtual machine network settings. Older versions of VirtualBox required a more manual approach to network configuration. The software is smarter these days (read: automated) and usually picks up your network settings without prompt.

For instance, my Windows XP Mode virtual machine works using the default configuration: using NAT, the VirtualBox-specific adapter, and ensuring Cable Connected is checked.

xp mode adapter settings

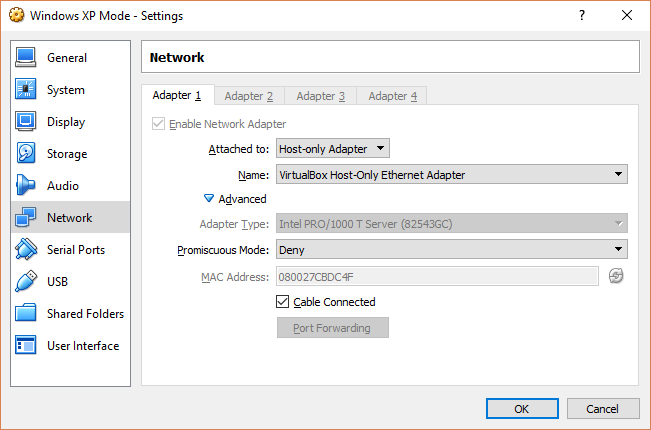
However, if it doesn’t work (and you’ll realize the good or bad news in a moment when you fire up the virtual machine), you can try an alternative configuration.

  1. Set Attached to: Host-only Adapter
  2. Set Name: VirtualBox Host-Only Ethernet Adapter
  3. Set Promiscuous Mode: Deny
  4. Check Cable connected

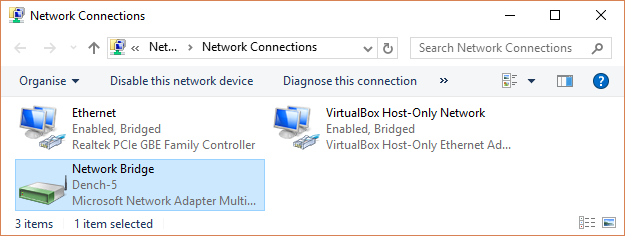
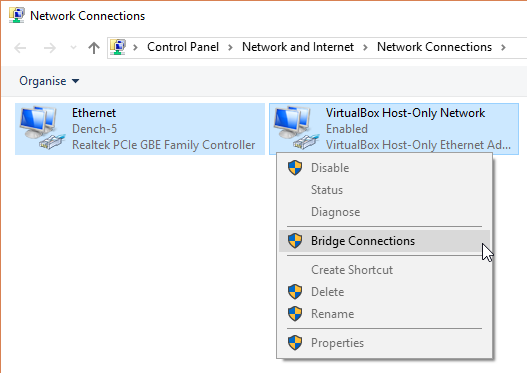
Using the Start Menu search bar, type “network,” and select the Network and Sharing Centre. In the left-hand column, select Change adapter settings. Hold CTRL and select both your Ethernet/wireless card and the VirtualBox Host-Only Network. Then, right-click and select Bridge Connection.

bridge network connection

“Combining” the adapters creates a network bridge, allowing the virtual machine to connect to a network even though it doesn’t have direct access to the router (or alternative switch):

network bridge

When you enter the virtual machine, you’ll have to update your network adapter settings:

  1. Head to Control Panel > Network and internet Connections > Network Connections.
  2. Then, right-click the Local Area Connection, and select Properties. Highlight Internet Protocol (TCP/IP), then select Properties.
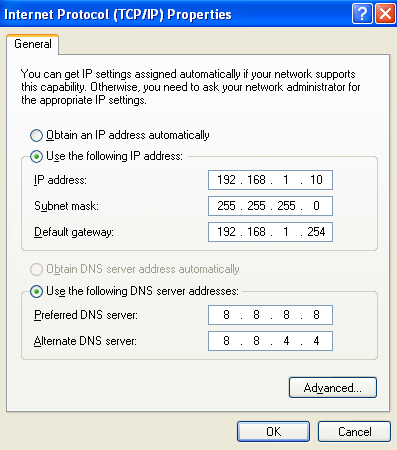
  3. Select Use the following IP address, and enter an available IP address for your home network. For instance, I will enter 192.168.1.10. Enter your Subnet mask and Default gateway.
  4. Unsure what they are? On your host machine, press Windows Key + R, then type CMD, and hit Enter. Now, type ipconfig /all. You’ll find the information you need listed under your Ethernet or wireless adapter name.
  5. Enter the same DNS server addresses as the host. I use Google DNS, so I’ll enter 8.8.8.8 and 8.8.4.4.
  6. Hit OK.

windows xp tcp/ip settings

Step 4: Run the Windows XP Virtual Machine

You extracted the virtual hard disk. You created a virtual machine, fiddled with the settings, and now you’re ready to hit the power switch.

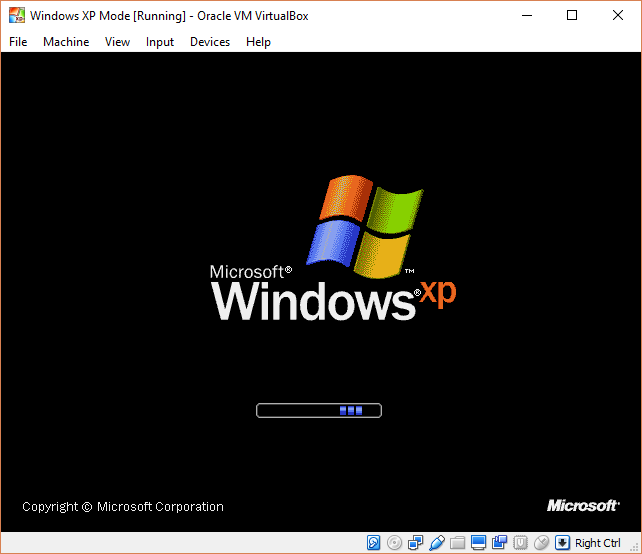
Highlight your Windows XP Mode virtual machine on the main VirtualBox window. Double-click it and wait for Windows XP to burst into life:

windows xp boot virtual machine

Looks like you made it!

There is a strong possibility that your mouse will not immediately work with the Windows XP Mode virtual machine. Navigate the operating system installation pages using the Tab key, arrow keys, Spacebar, and Enter key.

Complete the installation. You’ll arrive at a completely black screen. Don’t worry! Press Right Ctrl + R to restart the virtual machine.

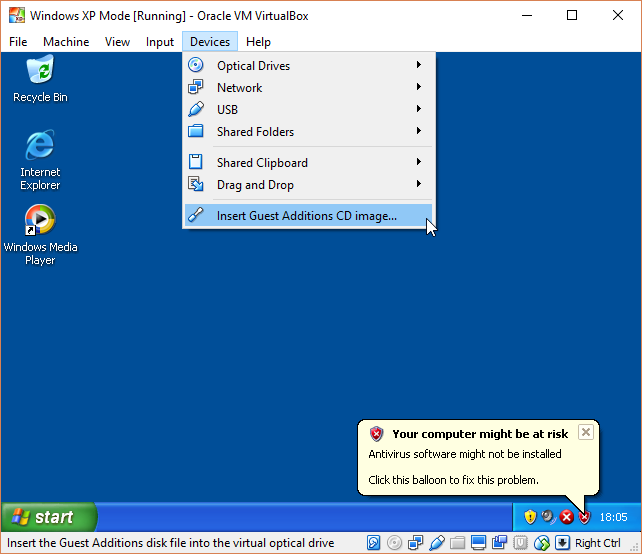
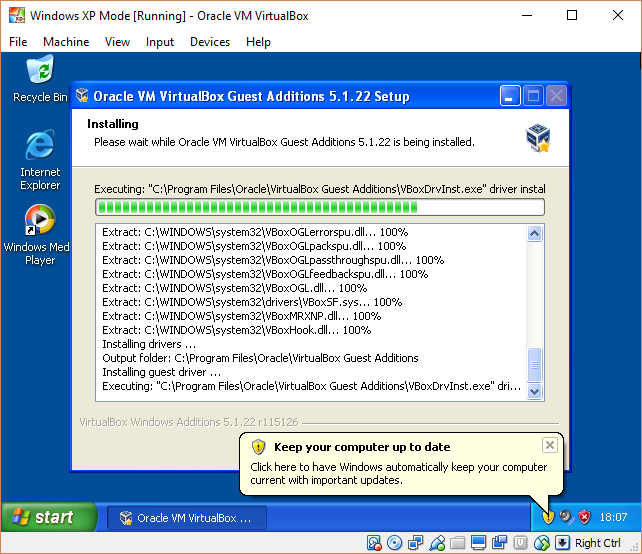
When it reboots, you can Cancel the New Hardware Installation and Microsoft Automatic Update wizards. Instead, head to Devices > Install Guest Additions CD Image. The VirtualBox Guest Additions CD Image adds some handy functionality to VirtualBox, including custom resolutions and mouse options. Use the default installation location and wait for the setup to complete:

xp mode guest additions

You might encounter warnings that you are attempting to install unsupported software and/or drivers. Select Continue Anyway. Once the Guest Additions installation completes, select Reboot now.

xp mode guest addition install

(If it fails to reboot, restart the virtual machine again.)

And there you have it. A working, fully-featured Windows XP installation to call your own.

What About Windows XP Product Keys?

The Windows XP Mode virtual machine has a temporary license that expires after 30 days.

If you have an old Windows XP license, dig it out and enter it to try to keep the virtual machine alive. I say “try” because the Windows XP activation servers are long offline, but you can try a phone activation.

If you are feeling devious, you could try the old Windows activation loop, whereby you reset the trial license back to its original 30-day counter. However, I haven’t tried that using the Windows XP Mode virtual machine, so you will have to conduct a private experiment.

But the easier solution is to create a snapshot of the Windows XP Mode virtual machine straight after installation. Then, when the license expires, you can revert to your fresh snapshot (but you’ll lose all the data on the virtual machine, so bear that in mind).

Without snapshots, you’ll have to keep reinstalling the Windows XP Mode virtual machine.

Windows XP Is Not Secure

Note that just because you have Windows XP working doesn’t mean you should use it! Windows XP is no longer suitable as a primary operating system because of the security risks. If you are still running Windows XP on your home computer or laptop, you should consider upgrading to a modern operating system. Here’s how you upgrade from Windows XP to Windows 10.

Read the full article: How to Get a Windows XP Download Free From Microsoft, Legally


Read Full Article
The 7 Best Windows 10 Sound Equalizers to Improve Your PC Audio


windows-10-sound-equalizers

If you’re an audiophile, a heavy gamer, or simply enjoy customizing the sound on Windows 10, you might be looking for a sound equalizer app.

An equalizer can adjust the loudness of specific audio frequencies—called bands—to suit both the listener’s preferences and the acoustics of the environment. For example, an equalizer will let you boost the bass when listening to dance music or increase the treble in a room that responds to low-frequency sounds.

But which is the best Windows 10 equalizer? Are there any free equalizers for Windows 10? Keep reading to learn more.

1. Equalizer APO

equaliser apo app windows 10

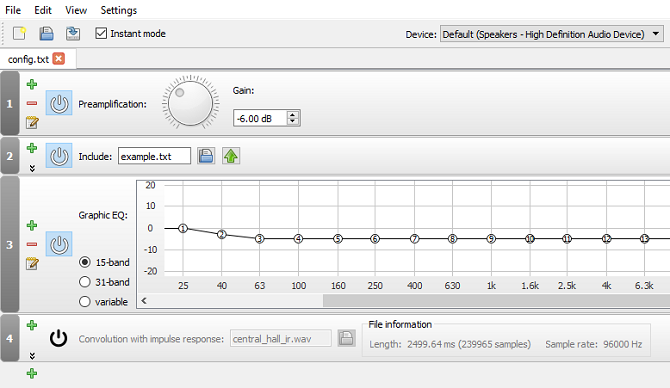
Our first recommendation is Equalizer APO. It’s the most powerful, customizable, and full-featured free sound equalizer that you’ll find. The app operates as an Audio Processing Object (APO), so if your audio uses APIs like ASIO or WASAPI, it will not work.

Equalizer APO’s best features include an unlimited number of filters, multi-channel use, support for 3D surround sound, and very low CPU usage. You can also create multiple profiles (perhaps for your external speakers and your headphones) and hop between them in a flash.

The big drawback is the lack of a graphical user interface (GUI). You need to edit the filters in a TXT file. Thankfully, several third-party GUIs are available. We recommend Peace Equalizer.

Download: Equalizer APO (Free)

2. Equalizer Pro

equaliser pro windows app

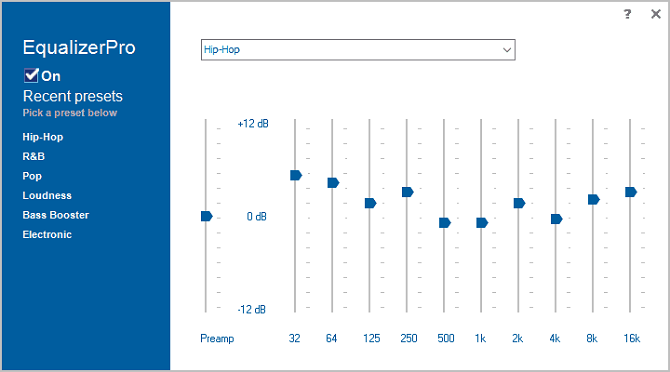
Equalizer Pro is another popular choice. It’s more user-friendly than Equalizer APO thanks to its clean and clutter-free interface.

The app offers a ten-band equalizer. That’s not as many as some of the other sound equalizers in this list and way behind professional music equipment which might provide 30 or more. However, it’s more than adequate for all but the most dedicated audiophiles.

Equalizer Pro comes with 20 presets, a system-wide bass boost feature, and the ability to save your own equalizer profiles. The app also offers a preamp volume control. It means you can adjust a single band to boost low tones with needing to tweak each band individually.

Equalizer Pro is not free. You can enjoy a seven-day trial, but thereafter you will need to pay $19.95 for the license.

Download: Equalizer Pro ($29.95, free trial available)

3. Viper4Windows

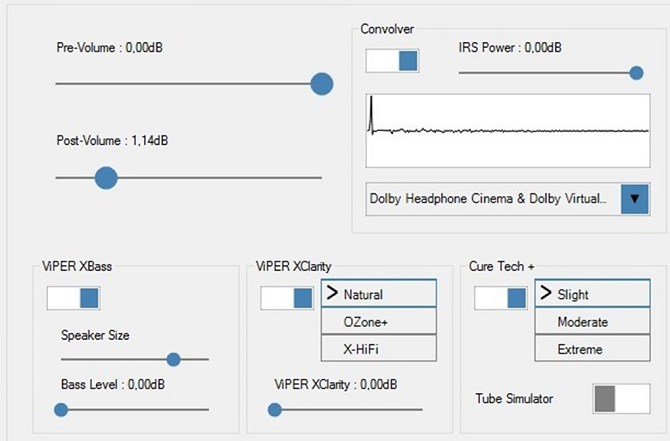
viper4windows windows 10 app

Viper4Windows is an open-source sound equalizer for Windows 10. It also works with Windows Vista, 7, and 8.1.

The equalizer offers an impressive 18 bands; it’s as many as you can hope to find on a consumer-level computer-based equalizer. The bands’ ranges run from -120dB to 13dB. As you’d expect, you can create your own profiles or use one of the many available presets.

Viper4Windows also offers some features beyond sound equalization. They include:

  • Room Size: You can set the size of the room you’re listening in, and Viper4Windows will adjust the surround sound settings accordingly.
  • Bass Boost: The app offers a customizable extra boost to the low-end sounds.
  • Distortion Control: You can choose from three presets or use the slider to tweak the control in decibels.
  • Reverberation Settings: Viper4Windows offers settings to control audio damping, density, bandwidth, decay, and more.

(Note: Make sure you set Viper4Windows to run in administrator mode. Right-click on the app’s file and go to Properties > Compatibility > Settings > Run this program as administrator. Doing so ensures the equalizer will still work if another app runs the software.)

Download: Viper4Windows (Free)

4. FXSound

The FXSound app is two tools in one. There’s the equalizer (and its associated effects) and the real-time audio processing feature.

Firstly, let’s look at the equalizer. It comes with 10 bands that go from 110Hz to 15KHz. There are also customizable sliders for fidelity (to reduce the muffled sound in compressed audio), ambiance (to add extra stereo depth), surround sound, dynamic boost (to increase the loudness with increasing the dynamic range), and bass boost. The preset profiles include Rap, Alternative Rock, Dialog Boost, Country, Techno, and countless more.

The real-time processing excels when you’re listening to audio on the web. internet audio is only 16-bit, but FXSound uses a 32-bit processor. The processor automatically adjusts the fidelity, ambiance, and surround sound of the audio, then re-dithers it into 16-bit. This allows the app to improve significantly on the theoretical limits of the web’s 16-bit output.

FXSound offers a seven-day free trial. The full app costs a one-off payment of $49.99.

Download: FX Sound ($39.99, free trial available)

5. Voicemeeter Banana

Voicemeeter Banana for Windows 10

If you do a lot of work with a microphone—perhaps because you’ve started your own podcast or upload a lot of videos to YouTube—you should try Voicemeeter Banana.

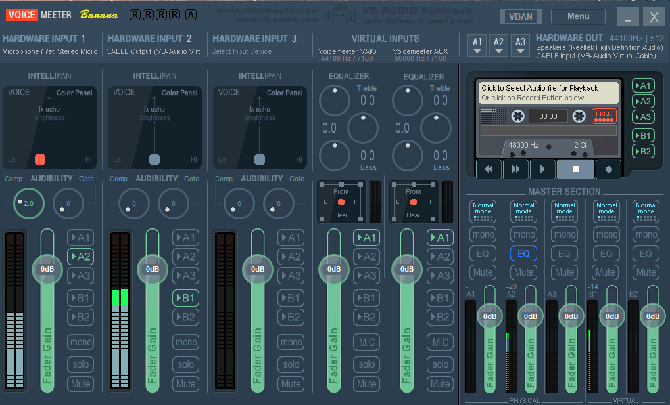
The app’s main feature is the advanced audio mixer. It lets you control your computer’s audio for any kind of streaming or recording.

From an equalizer perspective, the mixer lets you adjust audio input as well as output. Therefore, if you’re casting your screen via Twitch, speaking to the family on Skype, or recording a podcast with your friends, you can make up for any microphone deficiencies by making the sound crisper and less distorted. You can play with the equalizer settings in the app’s Master Section.

Voicemeeter Banana is donationware. You can pay what you like for the software, and you don’t have to pay anything at all.

Download: Voicemeeter Banana (Free)

6. Boom3D

boom3d app windows 10

Boom3D is an equalizer app for both Windows 10 and macOS.

The software is primarily designed for people who listen to their computer audio through headphones. It can convert all your audio output into 3D surround sound without any additional hardware or boosters.

It also boasts one of the most advanced equalizers out of all the apps on our list. The equalizer has 31 bands and dozens of presents, both of which combine to provide an immersive listening experience, regardless of the genre of audio you are playing.

Download: Boom3D ($39.99)

7. EQ Audio Equalizer

EQ Audio Equalizer chrome

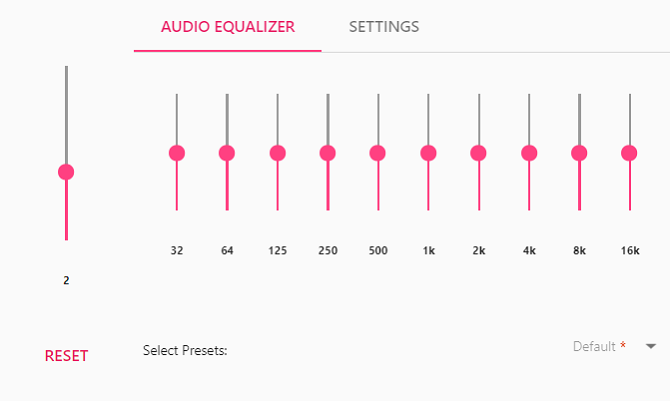
EQ Audio Equalizer is slightly different from the other Windows 10 sound equalizers we have covered. Rather than being an EXE file that you download and run on the Windows operating system, EQ Audio Equalizer is a Chrome app.

Being a Chrome app has both advantages and disadvantages. On the downside, it will only work with the audio that’s being produced from within the Chrome web browser; it cannot change the bands across your entire machine.

However, most people do the majority of their audio listening through Chrome on the desktop—whether that’s YouTube, Netflix, Spotify, or something else entirely. The extension will also work across all your devices that run Chrome and won’t eat through your system resources.

Download: EQ Audio Equalizer (Free)

Learn More About Sound on Windows 10

Using a sound equalizer in Windows 10 is just one part of the battle. There are lots of ways to tweak the operating system’s audio output to your liking.

For example, did you know it’s possible to set the sound output devices on a per-app basis? And remember, if anything ever goes wrong, we’ve got you covered. Just check out our article on how to fix audio issues on Windows 10.
Read the full article: The 7 Best Windows 10 Sound Equalizers to Improve Your PC Audio

Read Full Article