19 February 2020

How to Get Started With Windows 10 Sticky Notes: Tips and Tricks


sticky-notes-windows

Next time you need to take a quick note on your computer, forget the pen and paper. You can use the Windows 10 Sticky Notes app to jot down information easily.

Unlock the FREE "Ultimate Windows Keyboard Shortcuts" cheat sheet now!

This will sign you up to our newsletter

Enter your Email

Here’s how to use Sticky Notes in Windows 10 to record your thoughts for later use.

How to Get Sticky Notes on Windows 10

Sticky Notes is a built-in app for Windows 10 users. To launch it, click the Start button or press the Windows key to open the Start menu. There, type “sticky notes” and select the Sticky Notes entry that appears. This will open the program with one blank sticky note.

Windows 10 First Sticky Note

If you can’t find Sticky Notes on your computer, you can install the Microsoft Sticky Notes app free from the Microsoft Store.

Once it’s open, you may want to right-click the icon on your taskbar and select Pin to taskbar for easier access in the future.

Creating Desktop Sticky Notes in Windows 10

To create a new note using your newly pinned icon, right-click the Sticky Notes icon in your taskbar and select Add Note. You can also create a new note by clicking the Plus (+) icon at the top-left of any note. The keyboard shortcut Ctrl + N also works, as long as you have the Sticky Notes app in focus.

At the time of writing, the Sticky Notes app creates a separate window for each note you create. If you like to have a clean desktop, we recommend creating a separate virtual desktop for sticky notes.

To do this, press Win + Tab to open the Windows 10 Task View. At the top, click on the New desktop option.

Sticky Notes Move Desktop Windows 10

Now you can use the Ctrl + Win + Left/Right keyboard shortcut to easily switch between desktops. With your sticky notes on a second desktop, they won’t clutter up your primary workspace.

You can move existing notes by opening Task View, then dragging the Sticky Notes window(s) to the new desktop at the top.

Using Sticky Notes on Windows 10

While its simple interface may imply a barebones feature set, Sticky Notes actually has a few handy features to discover.

Formatting Sticky Notes and Keyboard Shortcuts

When not in focus, the menu bar on your note will collapse. Click a note to show a bar at the top with some options, plus formatting tools at the bottom. These include standard text options, such as bold and bullet points. You can also use the Images button to add a photo to your notes.

Instead of using the mouse, Sticky Notes offers several familiar keyboard shortcuts to access these options faster. Below are the basic text formatting shortcuts that Sticky Notes supports:

  • Bold: Ctrl + B
  • Underline: Ctrl + U
  • Italics: Ctrl + I
  • Strikethrough: Ctrl + T
  • Bullet: Ctrl + Shift + L

Windows 10 Sticky Note Formatting

Sticky Notes also supports other common Windows keyboard shortcuts for ease of use, like copy, paste, undo, and redo. Some of these include:

  • Ctrl + W to close the current note
  • Ctrl + D to delete the current note
  • Ctrl + H to open the Notes list

Sticky Note Movement and Customization

When the Sticky Notes app is in focus, you’ll also see a bar along the top with a few controls. You can click and drag on this to reposition your sticky notes. Stacking them, for example, will save space on your desktop.

Like most other app windows, you can click and drag from an edge to resize them.

Windows Sticky Note Sizing

Click the X at the top-right of a note to close it, which does not erase it. Select the three-dot options button, then click on the menu icon (three dots) to choose from several colors for your note. From this menu, you can also delete the note for good or access the Notes list, which we’ll cover shortly.

Windows 10 Sticky Notes Menu

If you have a touch-compatible interface, you can use your finger or stylus to write on Sticky Notes. Feel free to draw or sketch on your note using your touchscreen or tablet as you would on regular paper.
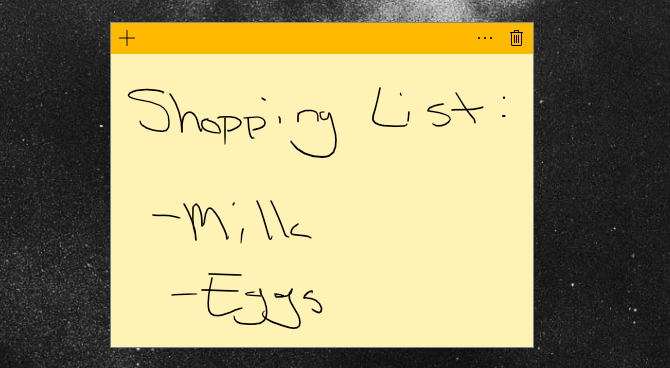
Windows 10 Handwritten sticky note

Using the Sticky Notes List

The final item on the Menu, which you can also access with the Ctrl + H shortcut, is the Sticky Notes list page. This is a hub for all your current Windows sticky notes, including ones you’ve closed.

Double-click one to open it, or right-click to delete a note you no longer need. You can also use the Search box at the top to scan the content of all your sticky notes.

Meanwhile, click the Settings gear at the top to open the few options that Sticky Notes offers. Choose Enable insights to turn on useful content recognition in Sticky Notes. You can also change your theme and disable the deletion prompt.

Windows 10 Sticky Note List Options

As the top, you can make sure you’re logged into your Microsoft account for syncing notes to other devices, which we’ll examine shortly.

Using Insights in Windows Sticky Notes

With insights enabled as mentioned above, you can enable enhanced functionality in your sticky notes. Let’s see how this works.

Note: In our testing, some of the insight features worked (phone numbers, addresses), while others didn’t (stock symbols, reminders, flights). We include a full explanation of them here, but keep in mind that these features may not work properly depending on your Cortana settings.

Integrate Sticky Notes and Reminders

Below is a simple reminder typed into a note with insights enabled:
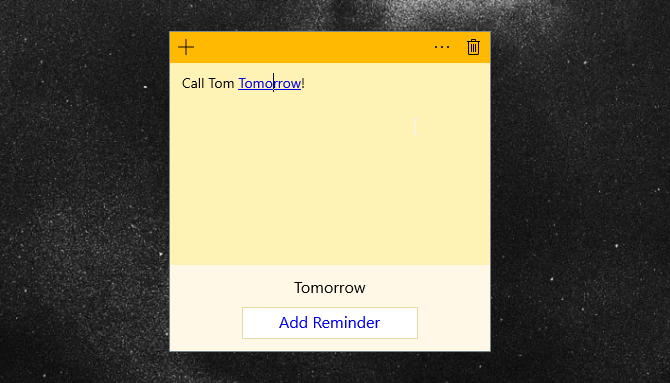
Windows 10 Insights reminder

When you type (or write) a date like this, it will become a link automatically. Click this link text to activate the insight; you’ll see a prompt to Add Reminder at the bottom of your note.

Hit this to set up your reminder with Cortana. Once you’ve entered the date and time, choose Remind and you’re all set.
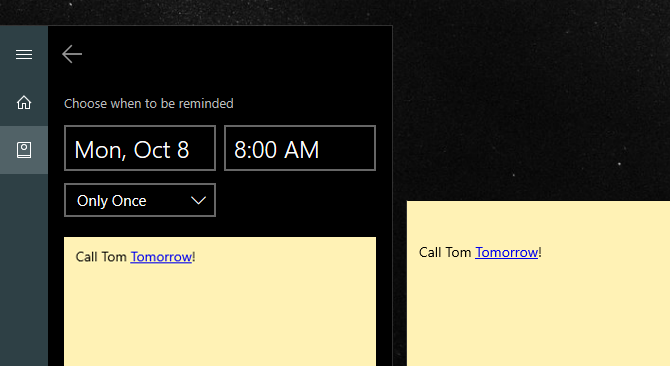
Cortana reminder from Sticky Note Windows 10

Other Sticky Notes Insights

Sticky Notes on Windows 10 offers other insights to access information directly from your notes. Here are several options:
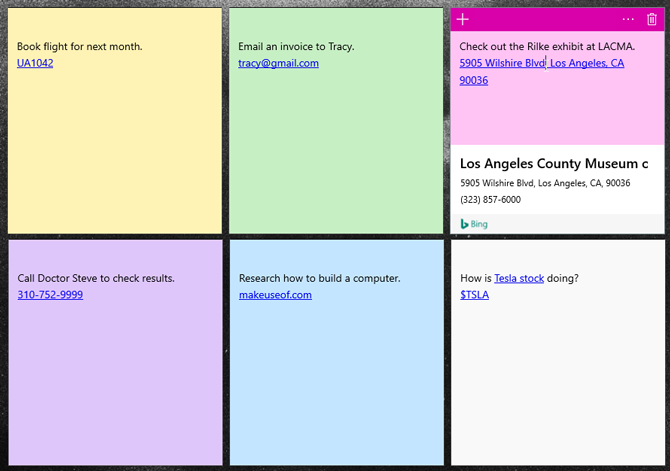
Windows 10 Sticky Notes Integrations

From top-left to bottom-right, these are:

  • Check flight numbers, such as an upcoming flight. They begin with two letters, followed by a sequence of numbers.
  • Send to an email address using your default email app.
  • View a location by pasting the address into your note. Click on the following prompt to get directions to the location in Maps.
  • Paste a phone number into your note to call the number from your desktop via Skype or other compatible apps.
  • Paste a link into your note to save it for later.
  • Enter stock symbols using the $STOCK format to check prices.

To view the available options for each of these, click the link text and then follow the prompt at the bottom of the note.
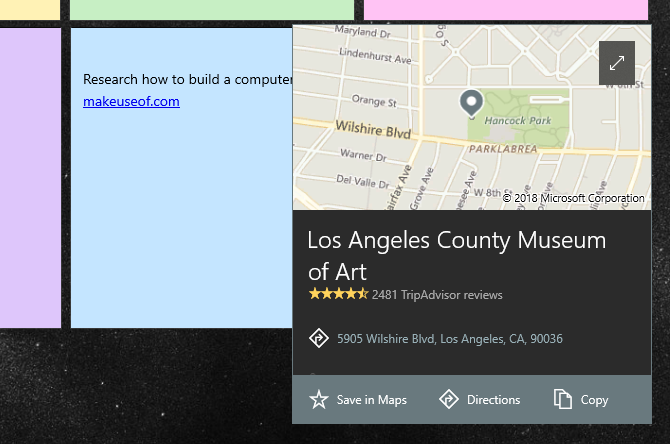
Windows 10 Sticky Notes Insight Prompt

Access Windows Sticky Notes on Mobile or Web

Need to work with your Windows sticky notes on other devices? Thanks to free mobile apps and a web interface, your sticky notes aren’t locked into Windows 10.

Head to the OneNote Sticky Notes page to access them online from any browser, even on a Mac or Linux system. Sign in with the same Microsoft account you use for Windows 10, and you’re all set.

Here you’ll find a simple interface that lets you read, edit, and create new notes. Any changes you make here will sync to Sticky Notes on Windows 10.

Windows Sticky Notes Web Interface

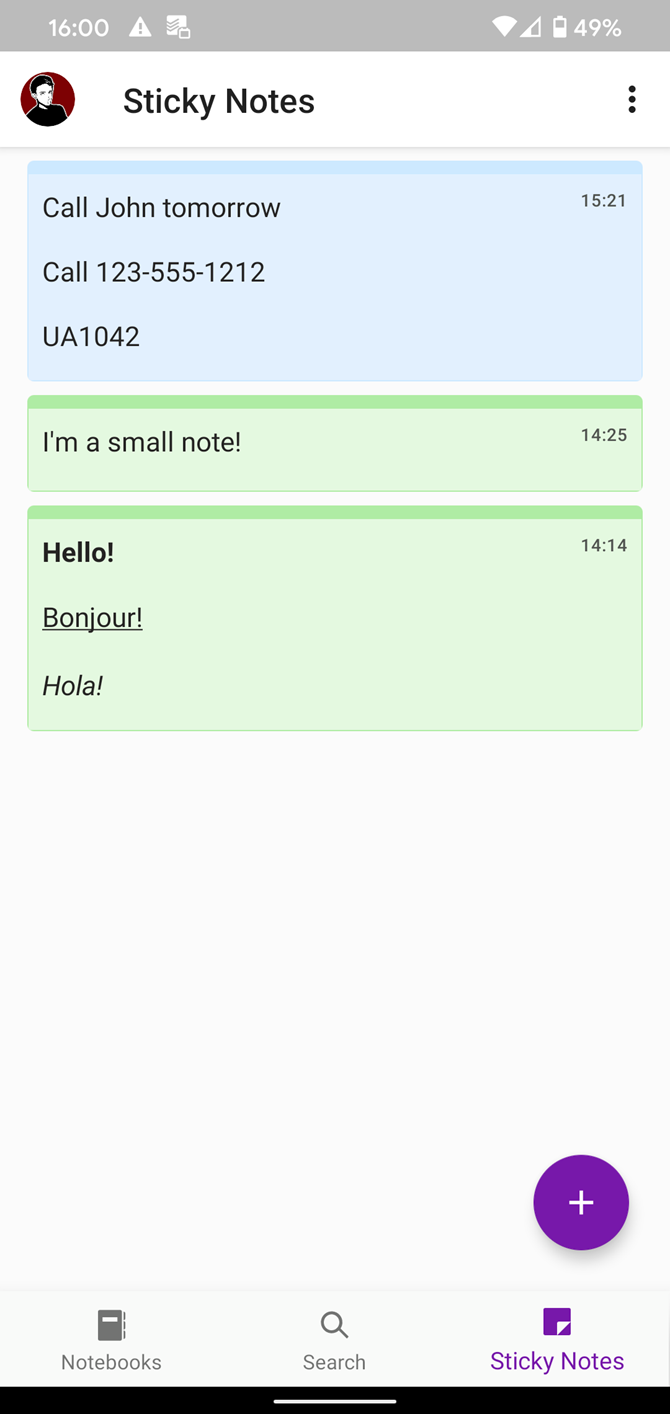
To access your notes on the go, you’ll need to install the free OneNote app for Android or iOS. Sign in with your Microsoft account, then tap the Sticky Notes tab to access your notes.

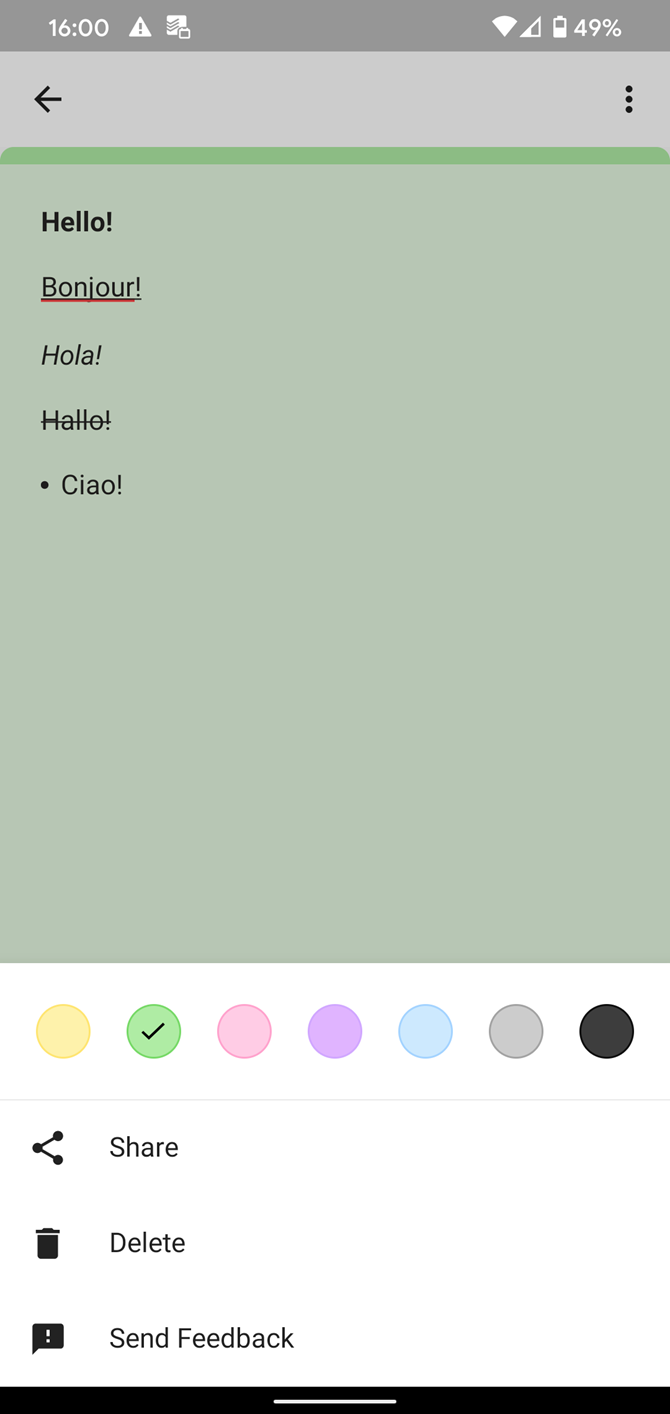
Just like the web and desktop, you can create new notes and make changes to existing ones. You’ll also notice the Camera icon at the bottom-left of a note, which lets you add images to them.
Transferring Sticky Notes to a New Computer

Using the above method, you can access your sticky notes on various devices. In case you want to move them manually or keep your own backup, you can copy and transfer the file they’re saved to.

First, head to the following directory:

 %LocalAppData%\Packages\Microsoft.MicrosoftStickyNotes_8wekyb3d8bbwe\LocalState

There, locate the file labeled plum.sqlite and copy it to a safe place. To move your notes to a new PC, place (or replace) this copied file into the same folder on that computer.
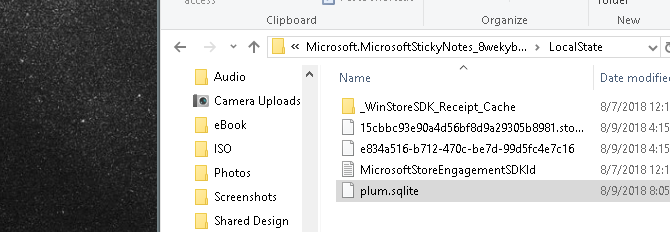
Windows 10 Sticky Notes storage file

If you want to create a duplicate copy of your sticky notes, simply duplicate the file and change its name. For example, you can copy and paste the plum.sqlite file and name it plum1.sqlite. Then if your notes disappear or become corrupted, just rename the backup file to plum.sqlite again to restore it.

Need Something More Advanced? Try OneNote!

You might not know about all the useful functionality hiding in Sticky Notes for Windows 10. While it’s not the most full-featured program, it’s great for jotting down a quick thought or important bit of information.

If you need a more robust note-taking experience, Microsoft OneNote is a great free option. Check out our full OneNote guide for an overview. If that doesn’t click, follow our checklist to finding the perfect note-taking app.

Read the full article: How to Get Started With Windows 10 Sticky Notes: Tips and Tricks


Read Full Article

1500+ Free Lightroom Presets for Any Occasion


lightroom-presets

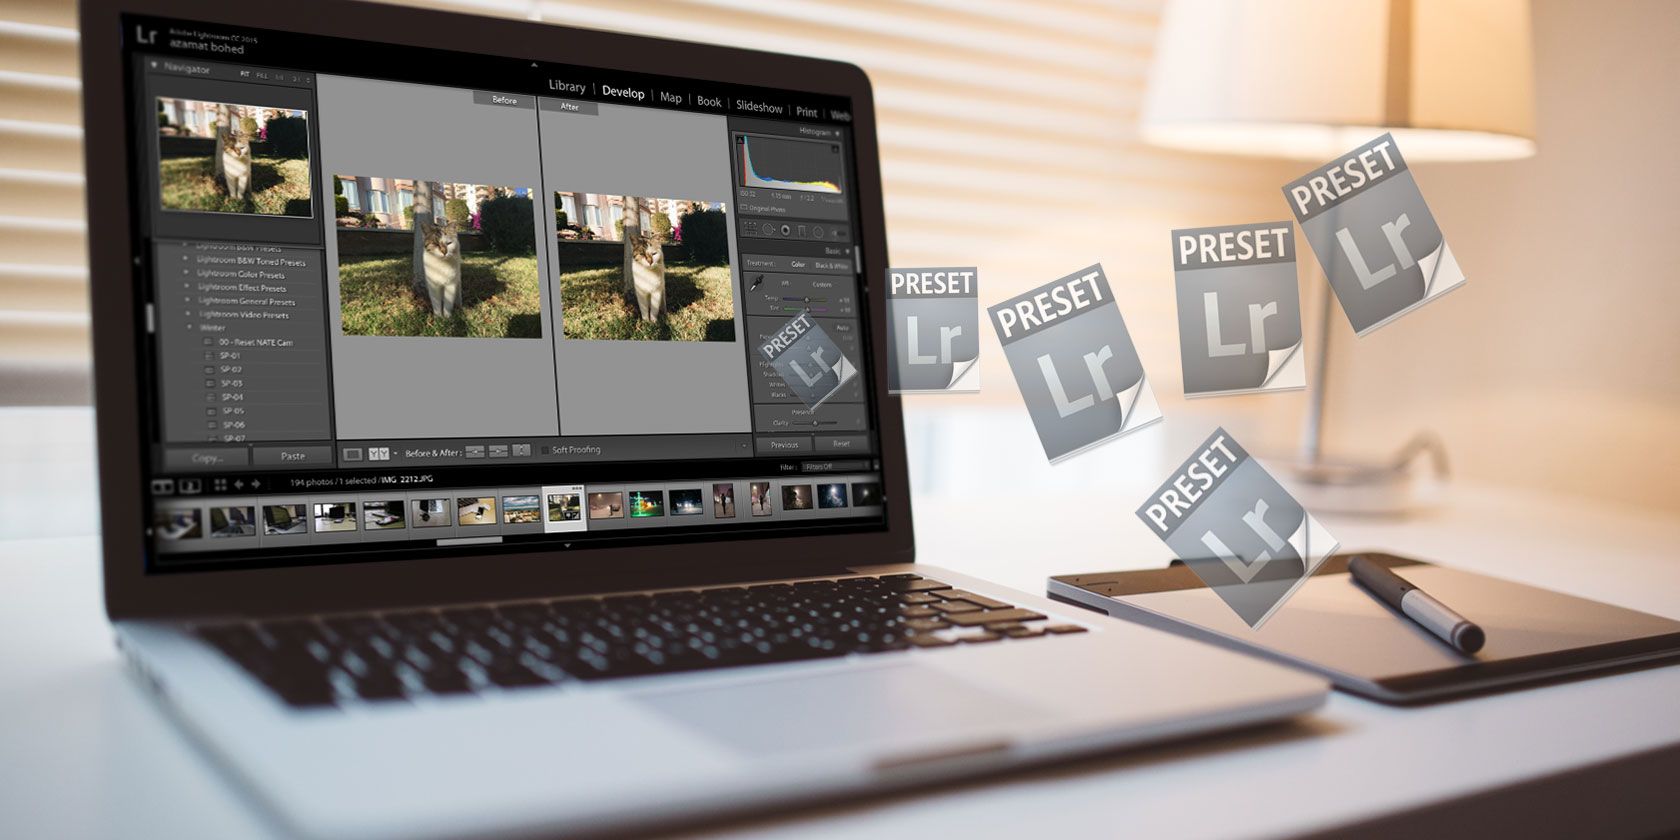
Adobe Lightroom is a fantastic program for processing your photos. It’s easy to use, but getting the exact look for your images takes both time and skill. Fortunately, there’s a shortcut in the form of Lightroom presets.

In this guide, we’ll explain what Lightroom presets are, how they can help you, and guide you towards the very best ones. And there are more than 1500 free Lightroom presets suitable for any occasion on offer here…

What Are Lightroom Presets?

Lightroom presets are saved collections of settings that you can re-use time and again with a single click. You can use them for the Export Settings, or to apply keywords to a group of images. But for most people presets mean develop presets.

A Lightroom develop preset is like a supercharged Instagram filter (how Instagram filters work). They transform your images with beautiful, distinct styles, giving you professional looking results with minimal effort.

lightroom presets

You can use presets for one-click processing, or as a starting point for creating your own look through further tweaks. They can also be used for basic, repetitive tasks, from applying lens corrections to removing haze from your photos.

Why Use Lightroom Presets?

Lightroom presets are mostly useful for three things:

  • Saving time editing your photos. Editing your favorite handful of shots is a fun creative exercise; coming back from vacation with several hundred photos to process isn’t quite so enjoyable. Presets enable you to cut through the tedium by applying a very high standard of processing very quickly.
  • Creating a consistent look across a collection of shots. Consistency in how you process your photos is important. It can help you develop a signature look, build your brand and get noticed. It also transforms a group of images shot at an event (wedding, party etc.) from a bunch of random snapshots to a proper collection.
  • Achieving a specific look. Everyone has seen photos and wondered, “How did they achieve that look?” Well, you can get almost any look with a free Lightroom preset. They are the shortcut to professional level photo editing.

Lightroom comes with a collection of its own free black and white presets, plus those for tweaking the colors, adding grain, or removing noise. With hundreds more available to download, you’ll always be able to find the style you’re after.

mastin presets pack

Not all presets are free. Companies like Mastin Labs create expensive Lightroom presets that faithfully recreate the look of different types of old film stock. Others design large bundles of premium presets for specific types of photography.

However, you don’t have to shell out for quality. Many sites offer a few free presets as a sampler for their paid options, and there are hundreds of additional presets created and shared for free by individual photographers.

Here’s our pick of the very best free Lightroom presets.

1. Nate Photographic

This site offers 10 Lightroom presets inspired by the filters in the popular mobile app VSCO Cam.

nate photographic presets

They all recall the matte look of vintage film stocks from the likes of Fuji and Kodak, complete with crushed blacks and added grain. There are presets for all occasions, from portraits to gritty street photography.

2. Photon Collective

The Quantum Collection is arguably the best set of free presets you can currently get. There are 16 styles—14 color, two monochrome—with six variations for each offering different levels of intensity. That’s 96 in total.

photon collective presets

Mostly film inspired again, the collection includes a lovely cyan/orange option for a modern cinematic look. They’re available under a pay-what-you-want system so you can grab them for free, although they’re definitely worth paying for.

3. Lonely Speck

From the same team behind the Quantum Collection, Film Speck One contains 102 presets, also available as a pay-what-you-want download.

lonely speck presets

Pretty much all styles are catered for, both modern and vintage. With so many to choose from it may take you a while to find the ones you really like, but there should be something here for everyone.

4. LookFilter

This set of 12 presets has racked up millions of downloads to date, and it’s easy to see why.

lookfilter lightroom presets

The colors are styled after film stock, like so many other presets. But with a few high contrast options, you can achieve a far punchier look than you’ll get with many similarly designed collections.

5. Shutter Pulse

By signing up with Shutter Pulse you get 20 free presets for Lightroom along with 20 Photoshop actions that will process your shots in the same way.

shutter pulse presets

The set ranges from a very vintage film look—complete with fake light leaks—to a very modern dramatic HDR style, and many points in between.

6. CreativeTacos

CreativeTacos has a massive collection of over 700 Lightroom presets for both desktop and mobile. Many share the bright and airy look so popular among Instagram influencers, but there are also some more technical tools, such as for retouching skin.

creative tacos free lightroom presets

The collection is a tad unwieldy to browse through. Persevere, though, and you’ll be sure to find the look you’re after.

7. Contrastly

Contrastly’s sampler of 25 free presets is a mixed bag of assorted styles, film sims, and tweaks.

contrastly presets

With such a random selection the quality also varies. Some are a tad overdone for our taste. Others, including the very nice Desaturated Cinematic – 7 (in action above), are a more-than-worthy addition to anyone’s preset library.

8. ON1

ON1 created one of the best alternatives to Lightroom in the form of ON1 Raw. But the company’s website also offers a collection of 60 presets that work with Lightroom.

on1 presets

They’re a varied bunch. Some are designed to be stacked with other presets, adding vignettes or softening skin etc. Others completely change the look of the image and includes a small set of movie inspired styles.

9. Rock Shutter

You can get a set of 15 presets influenced by various modern cinematic styles from Rock Shutter.

rock shutter presets

You need to pick the right shots to use them on. We found they worked really well on landscapes and cityscapes, though they are less effective on portraits.

10. Presetpro

With more than 120 presets to choose from, Presetpro has something suitable for almost every conceivable need.

Whether you shoot weddings or astrophotography, want to add some 1940s Hollywood glamor to your portraits, or need to recover detail from a cloudy sky, you’ll find the solution right here.

11. Lightroom Zen

There’s only a small number of free presets on Lightroom Zen, and you have to search through the Blog pages to find them. But it’s worth it, since the quality is good, and they tend to be designed for very specific purposes.

lightroom zen presets

If you’re shooting the night sky, for instance, or fireworks, or need to fix the skin tones in a portrait, then these presets will help make your images shine.

12. Fix the Photo

Fix the Photo offers over 500 presets with more than 10 million downloads between them. They cover every type of photography you can think of, from food and product photography to cityscapes and night shots.

fix the photo 500 free lightroom presets

There are over 100 more that you can use with Lightroom Mobile on your phone or tablet, along with a further 2000+ high quality (and pricey) premium presets.

13. Presets Galore

Offering 159 free presets across 12 collections, Presets Galore has something for all tastes.
presets galore

Whether you want a vintage film look, to produce classy black and white portraits, or to add punch and vivid color to your landscapes, you’ll find it here. And if that isn’t enough, the site has got hundreds of extra presets for Lightroom Mobile users, too.

14. Cole’s Classroom

With names like Bitchin’ Summer and Cole’s Bangin’ B&W, you might expect the 15 free presets from Cole’s Classroom to be a little wilder than they are.

cole's classroom presets

In fact, they’re classy and understated. They lend themselves to a wide range of shots, and never leave your images looking over-processed. The styles are mostly film-like, but there are some more contrasty and saturated options too.

15. Preset Love

Finally, another huge collection, totaling—at last count—313 presets. The quality can vary because most of them are submitted by the site’s users. The variety is unrivaled.

preset love

Naturally, most are designed to achieve a certain look. Arguably the best are those that help with the difficult parts of photo processing, such as fixing skin tones or sharpening.

How to Get Started With Lightroom Presets

It’s easy to install Lightroom presets, but the process is different depending on which version you have.

In Lightroom CC:

  1. Open the Presets section in the Edit panel
  2. Click Presets, then select Import Presets
  3. Find the presets on your desktop to complete installation

In Lightroom Classic CC:

  1. Open Lightroom’s Settings or Preferences and select the Presets tab
  2. Click Show Lightroom Presets Folder, then navigate your way to the Develop Presets subfolder
  3. Copy and paste your downloaded presets into this folder

You can use presets from two locations in Classic. In the Browse module, you can apply a preset from the Quick Develop panel on the right. For more controlled use, apply them from the Preset panel on the left of the Develop module.

quick develop

In Lightroom CC, just apply them through the Presets section of the Edit panel.

How to Make Your Own Lightroom Presets

Presets make Lightroom so much quicker and easier to use. Which means you can get great results with the least amount of know-how. However, what makes Lightroom presets even more useful is the ease with which you can make your own.

See our guide on how to create Lightroom presets for everything you need to know.

Read the full article: 1500+ Free Lightroom Presets for Any Occasion


Read Full Article

The 6 Best Meeting Scheduling Tools and Apps


meeting-scheduling-tools

Scheduling a meeting time with multiple people is a bit like herding cats. Everyone has different commitments that they need to keep, along with different time slots that they want to commit to. By the time you figure out when to meet, you may be so frustrated by everyone’s conflicting availability that you’ll have the urge to cancel.

While scheduling a meeting can feel near-impossible, having a scheduling app can make the process less painful. Here are the best meeting time planners that you can use.

How we ranked them: There are a lot of meeting schedulers out there. Because of this, we picked the options that scored the highest in the following three categories:

  • Integration: How easy is it to use the scheduling tool in combination with other apps?
  • Ease of use: How easy is it to use the app itself?
  • Features: How much can the app do?

Each category is scored from 1 to 5, with 1 being the lowest and 5 being the highest. Let’s explore these options now.

1. Google Calendar (Free)

Google Meeting Scheduler

Google Calendar is the first free scheduling app we’re including on this list. It scores high in all three of our categories: integration, ease of use, and features.

As part of a wider collection of tools, Calendar has an incredible ability to integrate with the rest of Google’s apps, including Gmail. It also offers a lot of flexibility when it comes to its features.

If you want to schedule a meeting, you need to create a Group Calendar within the app. To create one:

  1. Go to your Calendar app, then click on Other Calendars + > Create New Calendar.
  2. Once it’s created, click on the three dots next to the calendar’s name and click Settings and sharing.
  3. Choose a sharing option to share this calendar with your team.

Once you create a group Google Calendar, you can use it to:

  • Track everyone’s availability.
  • See who’s out of office.
  • Coordinate deadlines.

If you need an all-purpose meeting app that is easy to use, the Google Meeting scheduler is definitely the way to go.

Integration: 5
Ease of use: 4
Features: 3

Note: If you want to read more on this subject, here’s how to make another calendar in Google Calendar.

2. Rallly (Free)

Rallly Scheduling App

Next on the list? Rallly, an open-source scheduling tool. It’s completely free to use.

Simple and pared down compared to the other meeting apps on this list, Rallly allows you to create pages for new meetings or events. By sharing a link to that event, you and other recipients can discuss the details on the meeting page itself.

The big downside to Rallly is that you cannot create polls to vote on meeting time slots, so it’s not as flexible as some of the other free online scheduling tools.

Because of this, Rallly is better for small, casual groups of friends who are organizing one-off, simple get-togethers.

Integration: 2
Ease of use: 5
Features: 3

3. Assistant.to (Free)

Assistant.to Scheduling Assistant

Along with Google Calendar and Rallly, we wanted to recommend Assistant.to, which is another free scheduling app.

The idea behind Assistant.to? To integrate a scheduling assistant into your Gmail inbox.

When you compose an email in your inbox, Assistant.to pops up as a small, circular button in the bottom right-hand corner. After you click on that button, it will take you to a calendar scheduling app and attach the suggested time slots.

The major downside to this program? Assistant.to can only schedule a meeting between you and one other person. However, the app can also:

  • Automatically detect time zones.
  • Keep a record of when your most common meeting times are, to offer recommendations in the future.
  • Integrate with Google Hangouts, GoToMeeting, UberConference, and ReadyTalk.

Assistant.to is good for freelancers and business professionals looking to schedule one-on-one interviews. It is not good for teams at this time.

Integration: 4
Ease of use: 5
Features: 4

4. Doodle (Free, Subscription Available)

Doodle Poll Free

Doodle is another work schedule app we’re going to include on this list. Like Google Calendar, we’re including it because it scores high in all three of our categories.

Doodle has free and subscription options available. The free option is simple and is basically used for one-off events. To create a Doodle poll free of charge, just make a poll through the website, then send out the link.

For the subscription options, you can also try out Doodle’s free 14-day trial.

Doodle can also:

  • Auto-detect time zones.
  • Sync with Google Calendar and Office 365.
  • Send out proposed meeting times and have recipients vote on them.
  • Allow guests to indicate the dates they can make the meeting, along with the dates that they can make if there are no other options available.

If you sign up for a subscription to Doodle Premium, there are four different payment plans: Starter, Pro, Team, and Enterprise. Through the Doodle options Pro, Team, and Enterprise, you can also customize your Doodle app by adding your company logo or brand colors.

Doodle is the best schedule app out there if you want to set up a meeting. It’s also a relatively inexpensive option for business owners looking to take their team’s communication skills to the next level.

Integration: 5
Ease of use: 5
Features: 5

5. Calendly (Free, Subscription Available)

Calendly Meeting Scheduler

Calendly is another great option when it comes to doodle poll alternatives. Like Doodle, it has free and premium subscription options available.

When you’re setting up a schedule, Calendly will ask you for your time slot preferences. It’ll then calculate your availability from there. Through email, the recipient can pick a time to meet with you. Once a time has been decided it will be added to your calendar.

Calendly can also:

  • Integrate with Google Calendar, Office 365 or iCloud Calendar.
  • Set up buffers between meetings, to account for overtime.
  • Automatically figure out everyone’s availability by timezone.
  • Schedule one-on-one meetings.
  • Track the no-show rates to each meeting.

While Calendly can use used for one-on-one meetings, its true power comes from its ability to organize and monitor large-scale events.

Integration: 3
Ease of use: 3
Features: 5

6. YouCanBook.me (Subscription)

YouCanBook.me When to Meet

Lastly, we want to recommend the meeting scheduler app YouCanBook.me. It’s a paid subscription service that allows business professionals to book meetings with clients.

As YouCanBook.me is geared towards business-to-client relations, it’s not the best tool for in-house meetings. However, like the other options on this list, YouCanBook.me offers a ton of flexibility when it comes to its features.

You can:

  • Automatically detect time zones when scheduling a meeting.
  • Customize reminders for your meeting.
  • Display team member availability for your meeting.
  • Set prices for your bookings, if you are offering a paid consultation service.
  • Take payments for bookings through Stripe integration.

While YouCanBook.me is predominantly a subscription based service, you can explore the free trial prior to signing up.

YouCanBook.me is a good tool for businesses and independent contractors offering paid services to customers.

Integration: 3
Ease of use: 3
Features: 5

Use a Meeting Scheduler, Hassle-Free

Scheduling a meeting with multiple people has never been an easy task. With the help of these apps, however, you’ll be able to make the most of it.

Looking for other tips on team management? Here are some online project management tools for small teams.

Read the full article: The 6 Best Meeting Scheduling Tools and Apps


Read Full Article

How to Fix a Windows 10 Kernel Power Error in 5 Easy Steps


windows10-kernel-power-error

Does your Windows computer shut down without warning? Or does it crash every time you attempt to wake it from Sleep? Your computer might have a power supply fault that is causing it to crash without warning.

Unlock the FREE "Ultimate Windows Keyboard Shortcuts" cheat sheet now!

This will sign you up to our newsletter

Enter your Email

The issue, known as a Kernel-Power error, seemingly appears for no reason, yet is a critical system issue.

Here’s how you can fix Kernel-Power Event ID 41 and stop your computer from crashing.

What Is a Kernel-Power Critical Error?

The Kernel-Power critical error is a system error that causes your system to crash. The error can trigger under a range of circumstances, though all relate to a power issue.

However, the Kernel-Power issue doesn’t always indicate a power supply issue, rather an issue with your system hardware causing a power fault, and in turn, your system to crash.

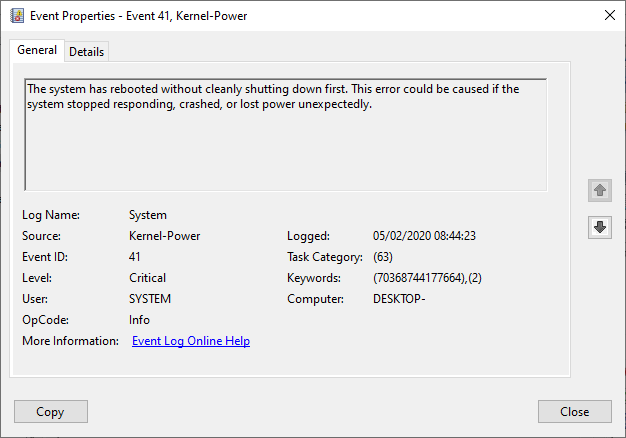
windows 10 kernel-power critical error event id 41

The Kernel-Power critical error associates with Event ID 41. Furthermore, Kernel-Power Event ID 41 is accompanied by the keywords (70368744177664),(2), which you can use to pinpoint your bug troubleshooting.

So, what causes Kernel-Power error 41?

While it is a common shutdown error code, there are several common causes, with easy fixes:

  1. Update Windows 10
  2. Disable Windows 10 fast startup
  3. Reseat your RAM and graphics card
  4. Run CHKDSK and SFC
  5. Test for a faulty PSU

Let’s take these fixes step by step and solve the Windows 10 Kernel-Power error.

1. Update Windows 10

Check if Windows 10 is up to date. Microsoft releases updates for Windows 10 frequently, fixing bugs and other issues. Your Kernel-Power critical error could stem from a bug that there is a fix ready for in an update.

Press Windows Key + I, type update in the search box, and select Check for updates. If there is an update waiting, download and install it, then restart your system.

2. Disable Windows 10 Fast Startup

Windows 10 fast startup is a hybrid sleep mode that enables your computer to boot extremely quickly. Windows 10 enables fast startup as a default setting during installation. If you enable fast startup, your computer doesn’t completely shut down.

It enters a middle ground that combines a full shutdown with hibernation mode, saving the last machine state to enable you to start working straight away.

However, unlike full hibernation mode, when you return to Windows 10, it is like starting the machine from scratch. There are no windows open, and your previous applications are not open, and so on.

windows 10 power settings disable fast startup

To disable Fast Startup, type power set in your Start Menu search bar, then select Choose a power plan.

Now, select Choose what the power buttons do, followed by Change settings that are currently unavailable.

Uncheck Turn on fast start-up and hit Save changes.

3. Reseat Your RAM and Graphics Card

Some users report their Kernel-Power 41 error resolving after reseating their RAM and graphics card (GPU).

You’ll need to get inside the case of your PC or laptop to reseat the hardware. Please be aware that this will void your manufacturer’s warranty in certain cases, so proceed with caution.

4. Run CHKDSK and SFC

CHKDSK is a Windows system tool you can use to verify your Windows 10 file system. You can add specific options to find and fix faults as the tool runs. Run it from the Command Prompt, and use the CHKDSK scan to find the problem and fix your machine.

  1. Type command prompt in your Start menu search bar, then right-click the best match and select Run as administrator. (Alternatively, press Windows key + X, then select Command Prompt (Admin) from the menu.)
  2. Next, type chkdsk /r and press Enter. The command will scan your system for errors and fix any issues along the way.

If CHKDSK doesn’t find any faults, you can run the Windows System File Check (SFC). System File Check is another Windows system tool you can use to check for missing or corrupt Windows system files.

In case you’re wondering, the difference between CHKDSK and SFC is the scope of the scan. CHKDSK scans your entire drive for errors, whereas SFC scans your Windows system files specifically.

However, before running the SFC command, it is best to check that it is completely functional.

DISM stands for Deployment Image Servicing and Management. DISM is an integrated Windows utility with a vast range of functions. In this case, the DISM Restorehealth command ensures that our next fix will work properly.

Work through the following steps.

  1. Type Command Prompt (Admin)in the Start menu search bar, then right-click and select Run as administrator to open an elevated Command Prompt.
  2. Type the following command and press Enter: DISM /online /cleanup-image /restorehealth
  3. Wait for the command to complete. The process can take up to 20 minutes, depending on your system health. The process seems stuck at certain times, but wait for it to complete.
  4. When the process completes, type sfc /scannow and press Enter.

5. Test for Faulty PSU With OCCT

Testing for hardware faults with your power supply unit isn’t easy unless you have the correct hardware to hand. You can check your PSU using a multimeter or a dedicated PSU testing tool.

The majority of software-based PSU checking tools cannot deliver an accurate reading on whether your PSU is working correctly.

That said, if you do want to attempt a PSU software test, I would suggest using OCCT, a free CPU/GPU/PSU stress testing tool. OCCT stress tests your CPU, GPU, and motherboard, and in the process can discover any faults with your power supply unit.

occt power supply stress test software

Open OCCT. Under Test Configuration, select Power. Select your graphics card, then set the resolution to 1920×1080. Save any work and close any other open programs on your system. When ready, hit the big red play icon in OCCT to begin the stress test.

The OCCT developer states that “Most errors are detected within the first 5 minutes. However, I recommend doing at least a 1-hour long test just to be sure.”

Once the test completes, OCCT produces a log that highlights any potential PSU errors (or with other hardware!).

Download: OCCT for Windows (Free)

Fixing Kernel-Power Critical Error 41

One of these five fixes will bring your Windows 10 computer back to full health. You might need to try a combination of fixes to stop the Kernel-Power critical error. For me, reseating my hardware and updating Windows 10 cured the issue.

Are you still experiencing random crashes? You need to check out these tips, tricks, and fixes to fix Windows blue screen errors.

Read the full article: How to Fix a Windows 10 Kernel Power Error in 5 Easy Steps


Read Full Article

How to Unblock a Number on an iPhone


unblock-number-iphone

In this guide, we explain everything you might want to know about unblocking numbers on your iPhone. That includes unblocking a contact so they can call or message you again, as well as unblocking a hidden number to find out who’s trying to reach you.

You might need to unblock a contact on your iPhone if you blocked someone by mistake. We’ve also shown how to unblock messages from someone without unblocking calls, in case you don’t want to speak over the phone.

In contrast, you probably want to unblock a number to reveal who keeps calling if their phone number or caller ID is blocked. Some people always hide their number from you, but if you unblock it, you’ll still know when it’s them.
How to Unblock Someone on Your iPhone

Every smartphone gives you the ability to block contacts you don’t want to talk to or hear from. When you block someone on your iPhone, they can’t call you, text you, FaceTime you, or email you. Your iPhone sends blocked contacts straight to voicemail without notifying you about missed calls or messages from them.

It’s a good idea to block numbers on your iPhone if you keep getting calls from spammers or telemarketers. But you could also use this function to remove toxic people from your life.

Sometimes, you might block the wrong person by mistake. When that happens, all you need to do is find the Blocked Contacts list on your iPhone and remove that person. After you do so, they’ll immediately be able to call, message, or email you again.

How to Find Blocked Numbers on Your iPhone

Your iPhone uses the same Blocked Contacts list for the Phone, Messages, FaceTime, and Mail apps. If you want to unblock someone on your iPhone, all you need to do is remove their details from this list.

It doesn’t matter if you have an older device like an iPhone 6 or a newer model—this is how you unblock numbers or contacts on any iPhone.

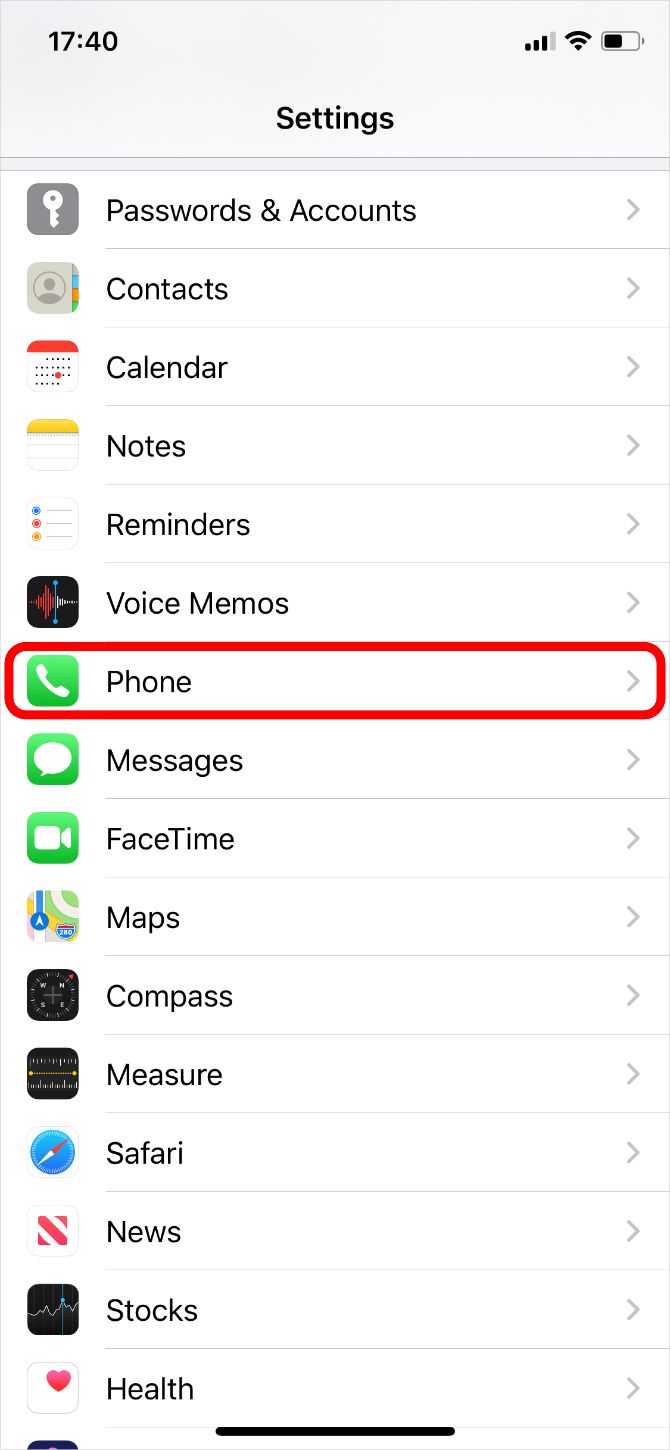
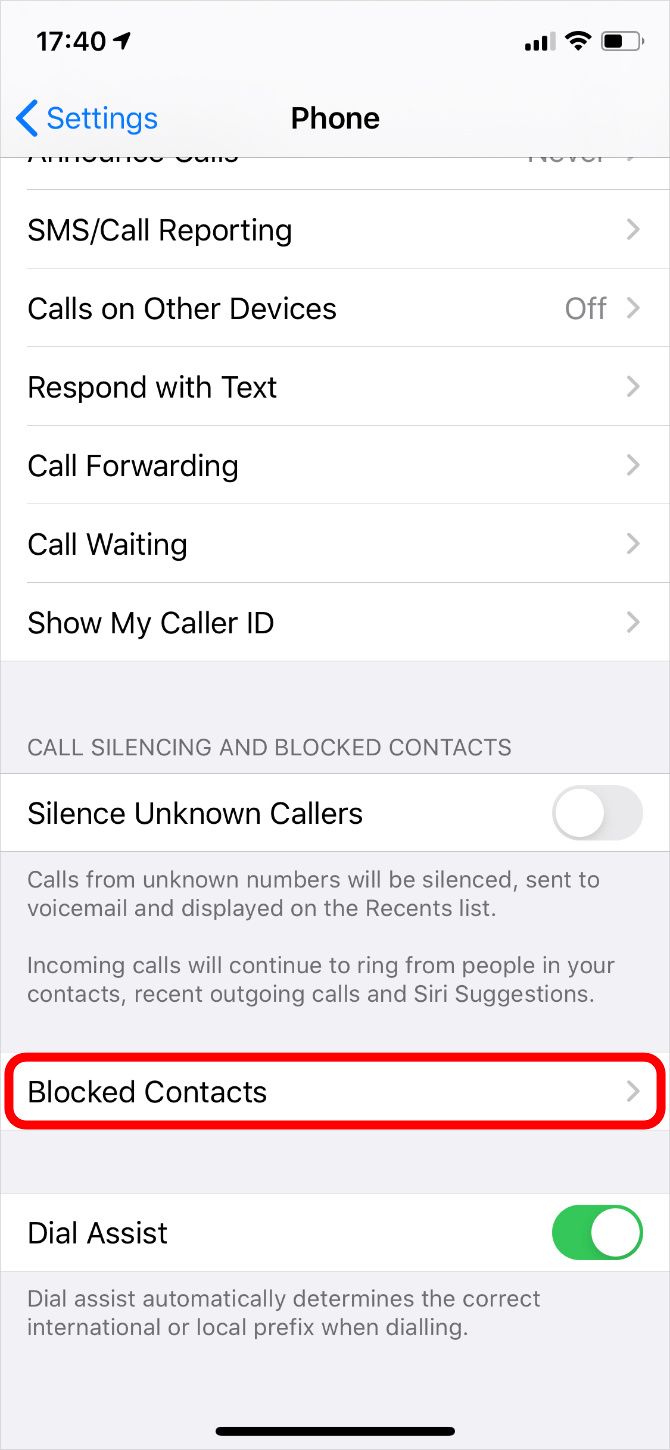
  1. Go to Settings > Phone > Blocked Contacts.
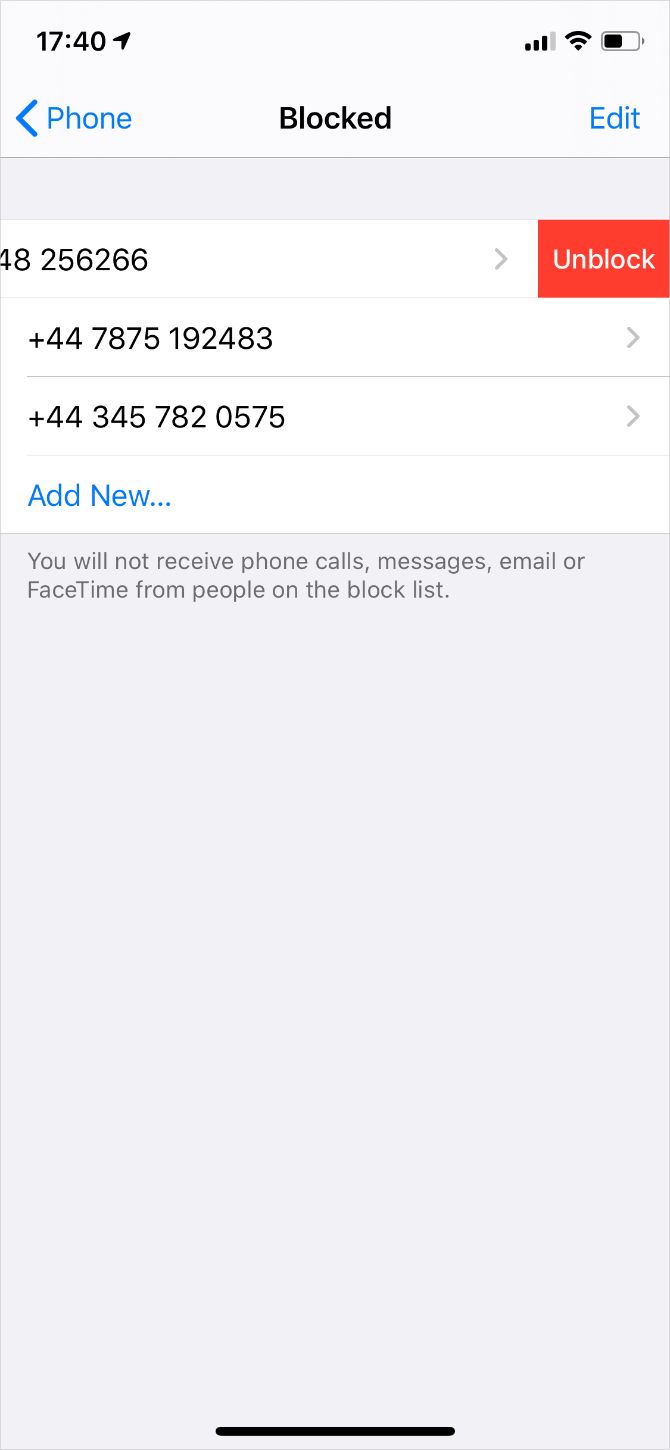
  2. Swipe left on a blocked contact to reveal an Unblock button.
    1. Alternatively, tap Edit, then hit the Minus (–) button next to a contact.
  3. Tap Unblock to remove that person from your Blocked Contacts list.

You might find that you still miss phone calls or messages, even if your Blocked Contacts list is empty. This usually happens because the people trying to reach you aren’t in your contacts list, which leads your iPhone to silence their calls and messages.

What to Do If Your iPhone Silences Unknown Callers

Spam calls are such a huge problem that Apple implemented a feature to automatically silence unknown callers on your iPhone. When this feature is turned on, your iPhone silences any calls from people who aren’t in the Contacts app.

That might lead you to think certain numbers are blocked, but all you need to do is turn this feature off in the Settings app:

  1. Go to Settings > Phone.
  2. Scroll down and turn off the option to Silence Unknown Callers.

Silence Unknown Callers option in iPhone Phone settings

If you turn this feature off, you should install one of the best caller identification apps so you know when it’s worth picking up the phone for an unknown caller.

What to Do If Your iPhone Filters Unknown Messages

Phone calls aren’t the only way spammers try to reach you; they might send you text messages as well. Luckily, Apple also added a feature to filter text messages from unknown senders into a different page in the Messages app.

These filtered messages don’t give you any notifications, which might explain why you keep missing messages on your iPhone. Disable this feature in the Settings app by performing the following:

  1. Go to Settings > Messages.
  2. Scroll down and turn off the option to Filter Unknown Senders.

Filter Unknown Senders option in iPhone Messages settings

How to Unblock Messages Without Unblocking Calls

It’s easier to deal with difficult people over text than it is to speak to them on the phone. For this reason, you might want to unblock text messages from a contact, without unblocking calls from them as well.

The only way to do this is by using a third-party app. That’s because your iPhone blocks all forms of communication at once, including both phone calls and texts.

Most third-party messaging apps act in the same way, except for Telegram.

Use Telegram to Block Phone Calls While Unblocking Messages

Download Telegram from the App Store and set up an account. You should ask your blocked contact to do the same, so they can message you using Telegram instead of regular text messages or iMessage.

After installing Telegram, change the in-app settings to block calls from that contact:

  1. Open Telegram on your iPhone and go to the Settings tab.
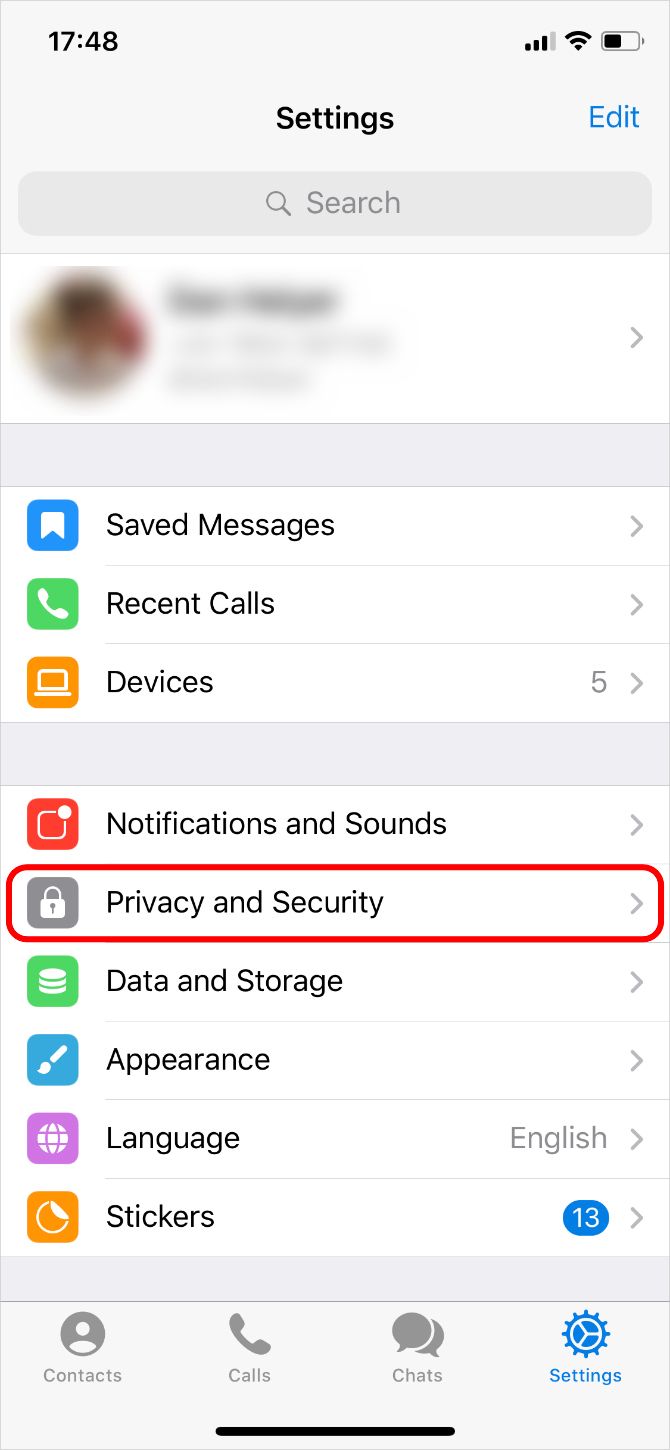
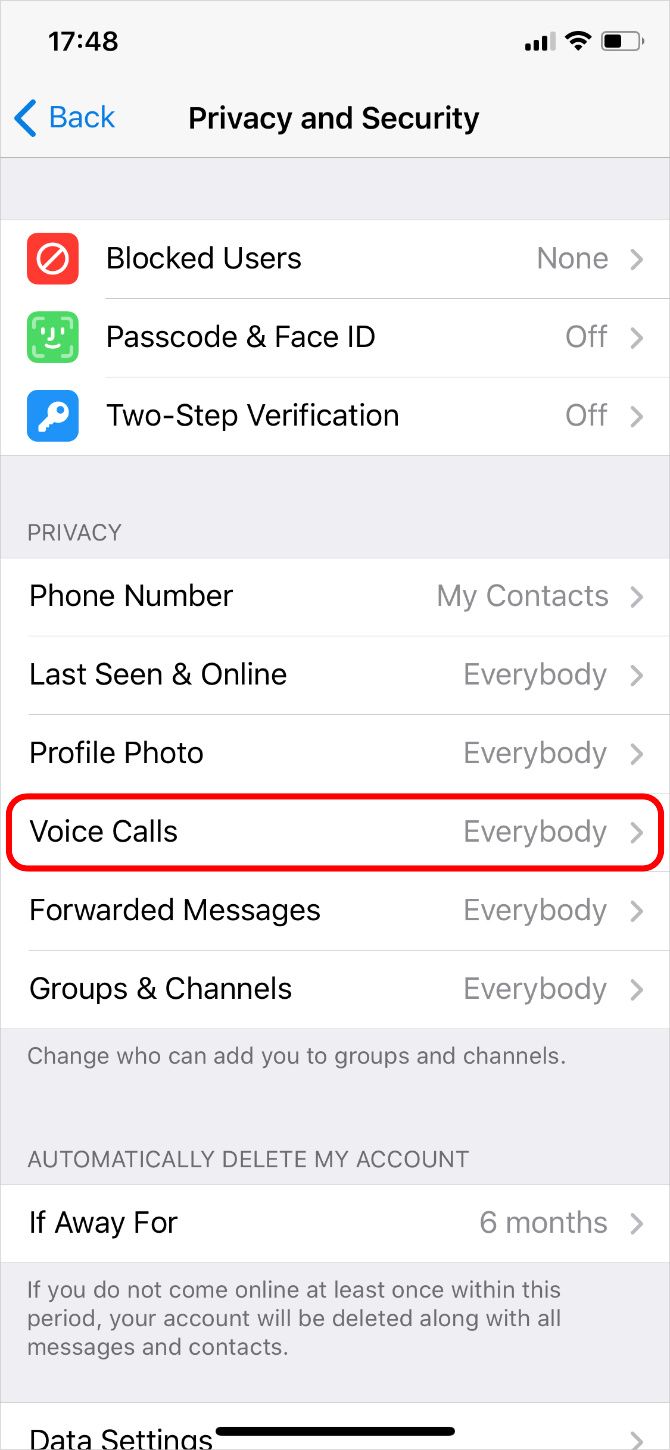
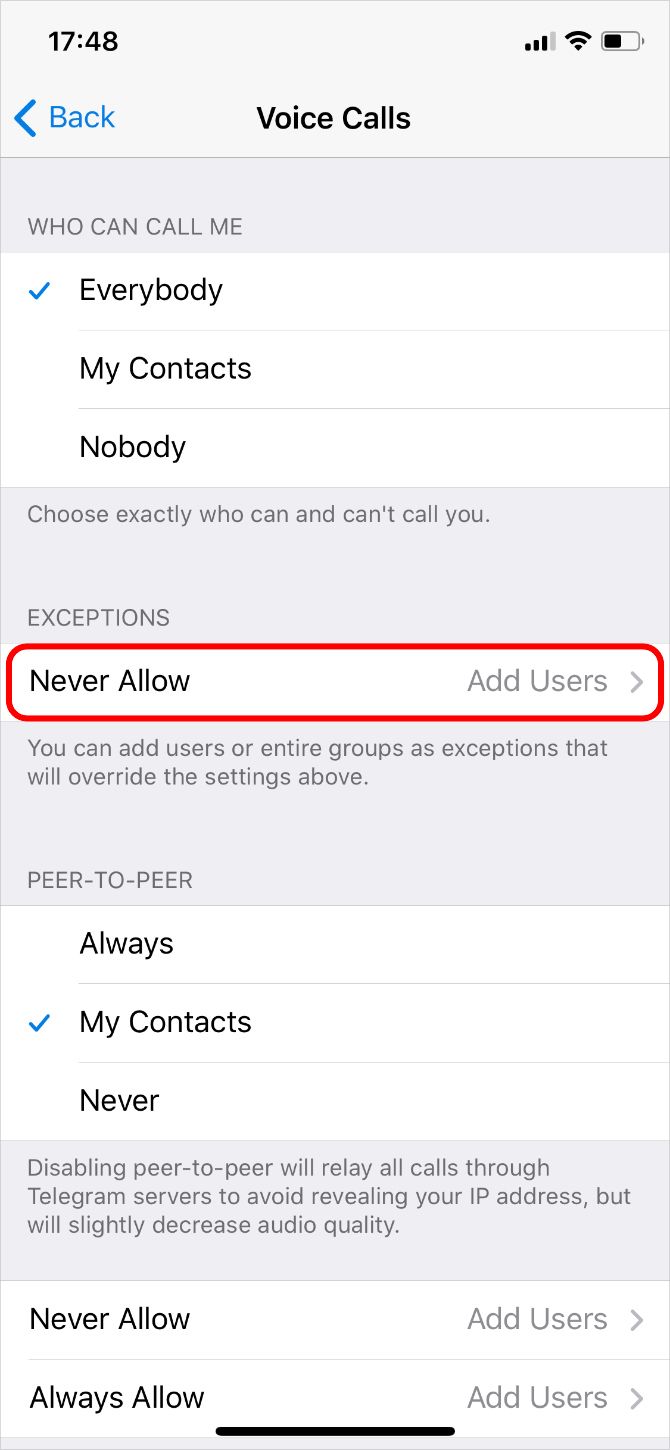
  2. Tap on Privacy and Security > Voice Calls.
  3. Under the Exceptions heading, tap Add Users and select the contact you want to block phone calls from, then choose Done.

That person can now message you using Telegram, but can’t call you. If you haven’t already, make sure you block them in your iPhone settings as well.

Download: Telegram for iOS (Free)

How to Unblock Hidden Callers on Your iPhone

You might receive a lot of phone calls from blocked numbers. When this happens, your iPhone usually says No Caller ID, Restricted, or Unknown on the screen without giving you a phone number or any contact details.

It’s never fun answering a blocked call, since you don’t know who might be on the other end of the line. To make matters worse, you can’t even block future phone calls from them, because you don’t know what number they’re calling from.

Unfortunately, there’s no way to unblock hidden numbers in your iPhone settings. However, your cell carrier may be able to see who’s calling you and block their future calls or messages for you. Give your cell carrier’s customer service line a call to see if they can help.

If that doesn’t work, there are a few third-party apps you can use instead to unblock hidden numbers. The most popular app for this is TrapCall.

Use TrapCall to Unblock Calls Hidden Numbers on Your iPhone

TrapCall is a premium app that reveals blocked numbers from incoming phone calls. You can use TrapCall to unblock numbers on any iPhone, from iPhone 6 to iPhone 11 and beyond. You can also use it to record your calls or automatically block known spammers.

Trapcall website homepage showing how to unblock unknown numbers

After downloading TrapCall from the App Store, you’ll need to sign up for a premium subscription or take advantage of its seven-day free trial.

Once you set up your account, all you need to do is decline incoming calls from blocked numbers by double-pressing the Sleep/Wake button on your iPhone. A moment later, your iPhone starts ringing again, but this time you should see a caller ID on the screen.

Two iPhones side-by-side with one saying No Caller ID and the other showing the phone number
Image Credit: TrapCall

Once you know who’s calling, you can choose to take the call or block that number. The caller won’t have any idea how you figured out it was them.

Download: TrapCall for iOS (Free trial, subscription required)

Find Out Exactly Who’s Calling You

Now you know how to unblock any number on your iPhone, but that doesn’t mean you always know who’s calling you. You won’t have most telemarketers or spammers in your Contacts app, which means you still won’t know it’s them until you pick up the phone.

That’s where identification apps like TrueCaller come in.

TrueCaller identifies people you don’t have saved in your iPhone, so you always know who’s calling. There are lots of other great functions inside TrueCaller as well, like recording calls or removing your number from public listings.

Read the full article: How to Unblock a Number on an iPhone


Read Full Article