13 April 2019

Disney Unveils Its Disney+ Streaming Service


Disney has finally unveiled Disney+, its long-awaited and much-anticipated streaming service. We now know when Disney+ will be launching, how much Disney+ will cost, and the names of the original movies and shows which will be exclusive to Disney+.

Disney Drip-Feeds Us Information About Disney+

In August 2017, Disney announced it was launching its own streaming service. At the time, details were thin on the ground. However, in November 2018, Disney revealed its streaming service would be called Disney+ and it would be launched sometime in 2019.

Now, Disney has officially unveiled Disney+, revealing the launch date, the price, and the shows which will be populating this streaming service. And if Disney can deliver on its promises, Disney+ could be a serious worry for the likes of Netflix.

How Much Will Disney+ Cost?

Disney+ will launch in the United States on November 12, 2019. It will cost $6.99/month or $69.99/year for those willing to commit to 12 months. This compares favorably to Netflix, which starts at $8.99/month for the Basic streaming plan.

Disney+ will boast movies and shows from Disney, Pixar, Marvel, Star Wars, and National Geographic. All of which will have their own sections in the app. Beyond that the user interface looks almost identical to Netflix’s UI, with rows of content.

What Content Will be Available on Disney+?

Streaming services live or die on content, and in that regard Disney+ is coming out swinging. Taking its cue from Netflix, there will be a host of original programming, with 25 original series and 10 original films, documentaries, and specials due within the first year.

Original programming includes The Falcon and The Winter Soldier and WandaVision from Marvel, Forky Asks a Question and Lamp Life from Pixar, The World According to Jeff Goldblum from National Geographic, and The Phineas and Ferb Movie from Disney.

As for older content, all 30 seasons of The Simpsons will be available from day one. And Disney will be adding “more than 7,500 television episodes and 500 films” including The Sound of Music, The Princess Bride, and Malcolm in the Middle within the first year.

What Devices Will Disney+ Support?

At launch, Disney+ will be available on a range of devices, including games consoles such as the PS4, media streamers such as Roku, and smart TVs. There will be support for up to 4K HDR video playback, and some content will be available to watch offline.

While it’s initially only going to be available in the U.S. Disney is planning to launch Disney+ worldwide within two years. To find out if and when Disney+ is launching in your area you can register for email updates at DisneyPlus.com.

In the meantime here’s some help choosing between Netflix, Hulu, and Amazon Prime.

Read the full article: Disney Unveils Its Disney+ Streaming Service


Read Full Article

10 Cool PowerPoint Templates to Make Your PPT Presentation Shine


cool-powerpoint-templates

When preparing for a presentation, you need all the help you can get to launch your slide deck into success. If you’re investing your time into content that will help drive your point to the audience, it helps to hand off the slide designs to the pros that can do it best.

Throughout this tutorial, we’re going to survey 10 of the best cool PowerPoint templates that can help you skip the work of designing a presentation from scratch. With PowerPoint templates, you open the source file, add your design specifics, and create your finished presentation in less time than ever before.

How to Use Templates to Design Your Presentation

First, let’s look at why templates are so useful in designing your presentation.

If you haven’t used PowerPoint templates to build out your presentation before, it might feel like a learning curve to take on. How do you use the pre-built slides in a template, and how can you customize PowerPoint templates to match your ideas?

As you download cool presentation templates, you’ll find that the included presentation formats already have slides designed for practically every purpose. It’s this collection of pre-built ideas that make using templates so helpful. You don’t have to design on a blank canvas to bring your presentation to life, thanks to templates.

Here’s how you can use PowerPoint templates to save you time when designing your next presentation:

  1. Start with a template, like one of the examples featured below.
  2. Choose the slides in the presentation deck that fit with your content goals, setting aside those slides for use in your presentation.
  3. Add your content specifics to those starter slides to customize the PowerPoint presentation to your needs.
  4. Save and export the finished PowerPoint presentation with your details built-in, ready to present to an audience.

If you want to save time and create PowerPoint presentations, the solution is clear: start with a cool PowerPoint template. Let’s see some of the best examples.

Top 10 Cool PowerPoint Templates

Here’s a list of 10 of our favorite great PowerPoint templates that you can use to design your next presentation and the reasons why you should choose them.

1. Iconic PowerPoint Template

1. Iconic PowerPoint Template

Iconic is a cool PowerPoint template that you can use to design your next presentation. It has all the elements that you’re likely to find in the top presentation templates, including easily scalable icons that can add graphic explanations to your presentation.

2. Believe: Multipurpose PowerPoint Presentation

Believe: Multipurpose PowerPoint Presentation

The best PPT templates feature the ability to re-use the designs over and over across multiple presentations. Believe embodies this idea beautifully thanks to over 200 unique slide designs and 10 color schemes that are easy to work with. Build out your presentation using this PowerPoint template.

3. The X Note: PowerPoint Template

3. The X Note: PowerPoint Template

The X Note always has a corner as one of the most popular PowerPoint templates thanks to its slick design options. It’s an awesome presentation template that you can use to build out a professional slide deck that would feel right at home in the boardroom.

4. Buxe Creative and Multipurpose Template

4. Buxe Creative and Multipurpose Template

One of the best ways to build an informative presentation is by mixing in infographics that explain ideas with graphics. Buxe really captures this principle using easy-to-customize infographic objects; it’s packed full of easy-to-customize infographics that make it one of the best PPT templates around.

5. Baldo PowerPoint

5. Baldo PowerPoint

Choosing an awesome PowerPoint presentation comes down to selecting slides that will stand out from the crowd. Your audience has likely seen the same built-in Microsoft templates too many times, so using a cool and colorful template like Baldo is an easy way to set your upcoming presentation apart from the crowd. It’s easy to customize thanks to the drag-and-drop format.

6. Social Media Trends: PowerPoint Template

6. Social Media Trends: PowerPoint Template

There’s truly an awesome PowerPoint template for every purpose, including this Social Media Trends option. Use this cool PowerPoint template to show off your social channel trends and how you can improve on key platforms.

7. Startup Plan PowerPoint Template

7. Startup Plan PowerPoint Template

Every startup needs a cool PowerPoint presentation to get off the ground, and this template could be the perfect way to do it. Pitching your idea to potential investors and employees is about putting your best foot forward, and this awesome template full of clean slides and clear ideas will help you showcase your startup.

8. Marketing Plan PowerPoint Template

8. Marketing Plan PowerPoint Template

No matter what type of app, product, or service you run, a marketing plan can help you capture your key ideas in how you’ll spread the word. Use an awesome PowerPoint template like this one to capture all your key marketing ideas in one place.

9. Hush PowerPoint Template

9. Hush PowerPoint Template

Hush is a flexible PowerPoint template that works for a wide variety of presentation purposes. More than 90 finely tuned slide designs are a breeze to update with your details to make your next PowerPoint presentation shine. Open the template, add your details, and present it with confidence knowing you have an eye-catching set of slide designs.

10. Project Proposal PowerPoint Template

10. Project Proposal PowerPoint Template

When you’re pitching your brand-new project, it helps to capture the idea in a PowerPoint presentation. This slide deck will help you do just that in less time than ever before, thanks to easy-to-customize starter slides.

All-You-Can Download PowerPoint Templates

Great PowerPoint presentations take on a variety of formats and styles. And if you want the most variety and options for building your next presentation, the best platform to source templates is Envato Elements.

If you checked out all 10 cool PowerPoint templates in this roundup, you may have noticed that they’re all sourced from Envato Elements. Even better, all the templates are included as a part of a flat-rate Elements subscription.

However, that’s not the only reason that you should try out an Elements membership if you regularly build PowerPoint presentations.

In fact, a subscription to Elements includes all the complementary assets that can really fill out your next PowerPoint presentation. Envato Elements offers stock photos and graphics that you can add to your presentation to set it apart from the PowerPoint presentations your audience is accustomed to seeing.

Don’t forget that these assets are a part of the all-you-can-download Envato Elements subscription package. A few key stock photos or added graphics can round out a presentation nicely, and the advantage of subscribing is that there’s no added cost to including these in your presentation whenever you see fit.

Go Design a PowerPoint Presentation Now

When it comes to designing awesome PowerPoint presentations, there’s nothing wrong with borrowing the hard work of others to skip ahead. Using a cool PPT template can help you avoid reinventing the wheel as you’re building your presentation.

No matter which template you choose, there are three key principles to keep in mind while designing a PowerPoint presentation with a pre-built template:

  1. Use only the relevant slides: Most of the PowerPoint templates in this roundup feature dozens of built-in slides. The key is to sample from and use only the slides that pertain to your final presentation, deleting the unused slides.
  2. Customize the built-in slides to your style: A PowerPoint template serves as a great starting point. But you don’t have to give up using a template to completely customize it to your style; add your branding, color scheme, and content to completely transform it for your purposes.
  3. Mix and match presentations: In the 10 slide deck examples featured, you might find cool slides that you want to use from a variety of pre-built templates. You can use individual slides from each of these and combine them to build a winning presentation by copying and pasting slides between decks.

Consider using any and all of the Envato Elements templates covered in this roundup as a starting point for your presentation. Try out one of the templates so that you spend less time designing in PowerPoint and more time prepping to deliver your presentation with an impact.

Read the full article: 10 Cool PowerPoint Templates to Make Your PPT Presentation Shine


Read Full Article

Will the Nvidia Jetson Nano Replace the Raspberry Pi?


nvidia-jetson-nano

It’s an exciting time for small factor computing. As if the Raspberry Pi wasn’t enough of an all purpose machine, more powerful boards capable of incredible feats keep appearing.

The Jetson Nano from Nvidia is a recent addition to the ranks of super powerful machine learning enabled boards. What makes it special? Should you buy one? What is the Nvidia Jetson Nano all about?

What Is the Nvidia Jetson Nano?

NVIDIA's Jetson Nano machine learning development board

The Jetson Nano is a Single Board Computer (SBC) around the size of a Raspberry Pi, and aimed at AI and machine learning. Seemingly a direct competitor to the Google Coral Dev board, it is the third in the Jetson family alongside the already available TX2 and AGX Xavier development boards.

Nvidia are leveraging their prowess for graphics processing power for these small computers, using parallel neural networks to process multiple videos and sensors simultaneously.

While all three Jetson boards aim to be accessible to all, the Nano is for both hobby and professional developers. The dev kit comprises two parts—a baseboard for connectivity, and a System On Module (SOM) for the actual processing units.

What Is System on Module?

The Jetson Nano System on Module

System on Module refers to any development board which has all system-critical parts in a removable module. The Nano features a 260-pin edge connector to attach it to a baseboard for development.

Once development is over, the SOM can be removed and added into an embedded system with custom inputs, and a new SOM connects to the baseboard for further development.

If all of this sounds a little familiar, it is!

This is the same setup as the Google Coral Dev board, which is a similar size, and also aimed at embedded machine learning for hobbyists and professionals alike!

What Are the Jetson Nano’s Specs?

Nvidia has packed a lot into the Jetson Nano:

SOM:

  • CPU: Quad-core ARM® Cortex-A57 MPCore processor
  • GPU: Nvidia Maxwell™ architecture with 128 Nvidia CUDA cores
  • RAM: 4 GB 64-bit LPDDR4
  • Storage: 16 GB eMMC 5.1 Flash
  • Video: 4k @ 30fps encoding, 4k @ 60fps decoding
  • Camera: 12 lanes (3×4 or 4×2) MIPI CSI-2 DPHY 1.1 (1.5 Gbps)
  • Connectivity: Gigabit Ethernet
  • Display: HDMI 2.0 or DP1.2 | eDP 1.4 | DSI (1 x2) 2 simultaneous
  • PCIE/USB: 1 x1/2/4 PCIE, 1x USB 3.0, 3x USB 2.0
  • I/O: 1x SDIO / 2x SPI / 6x I2C / 2x I2S / GPIOs
  • Dimensions: 69.6 mm x 45 mm

Baseboard:

  • USB: 4x USB 3.0, USB 2.0 Micro-B
  • Camera: 1x MIPI CSI-2 DPHY lanes (Raspberry Pi camera compatible)
  • LAN: Gigabit Ethernet, M.2 Key E
  • Storage: microSD slot
  • Display: HDMI 2.0 and eDP 1.4
  • Other I/O: GPIO, I2C, I2S, SPI, UART

What Can It Do?

It will come as a shock to nobody that Nvidia has produced a board suited well to visual tasks. Object recognition is a key focus here, and the Visionworks SDK has many potential applications in this field.

Rather than use a separate processing unit for machine learning tasks, the Jetson Nano uses a Maxwell GPU with 128 CUDA cores for the heavy lifting.

The Jetson Inference project features demos of a pre-trained neural network performing high-performance multiple object recognition in a variety of environments. Feature tracking, image stabilization, motion prediction, and multi-source simultaneous feed processing are all featured in the available demo packages.

Perhaps most impressive is the DeepStream technology featured in the above video. Running live analytics on eight simultaneous 1080p streams at 30fps on a small single board computer is incredible, and shows the potential power of the Nano’s hardware.

What Will It Be Used For?

Given its prowess for video analysis and small form factor, the Jetson Nano will almost certainly shine in robotics and autonomous vehicles. Many of the demos show these applications in action.

Given its power and size, it’ll also likely work in embedded systems which rely on facial and object recognition.

For Hobbyists like us? It seems to be a perfect blend of powerful machine learning possibilities in a factor familiar to anyone who has fiddled with a Raspberry Pi. While you can use machine learning frameworks like TensorFlow on a Raspberry Pi, the Jetson Nano is much more suited to the task.

What Else Can the Jetson Nano Do?

The Jetson Nano runs Ubuntu, though a specialized OS image is available from Nvidia featuring software specific to the platform. While the primary focus of the board is machine learning, this is Nvidia so you’d expect some graphical wizardry to be going on too.

You won’t be disappointed. Demos showing particle systems, real-time fractal rendering, and an array of visual effects would only until recently have been found on flagship desktop graphics cards.

Given that its video encoding is rated for 4k @ 30fps, and decoding at 60fps, it is safe to assume the Nano will be perfect for video applications too.

Jetson Nano vs. Coral Dev Board: Which Is Best?

It is tough to say which is the better board between the Google Coral Dev board and the Jetson Nano at this stage.

Google’s TensorFlow neural network is a dominant force in the field of machine learning. It would follow that Google’s own Edge TPU coprocessor might work better for applications of TensorFlow Lite.

On the other hand, Nvidia has already shown an impressive array of machine learning based demos for the Jetson Nano. This, alongside the impressive graphics the Nano is capable of make it a real competitor.

How Much Does Jetson Nano Cost?

Price is another aspect we haven’t covered yet. The Google Coral Dev board retails at $149.99 while the Jetson Nano is only $99. Unless the Coral Dev board can bring something unique to the table, hobbyists and small developers might find the extra $50 a hard stretch to justify.

There is currently no price for the SOM alone for either board, but I would imagine for most hobby developers this won’t be quite as important. From a commercial point of view, the performance/price contrast is going to be what makes the critical difference between the Jetson Nano and the Coral Dev board.

The Jetson Nano is available from Nvidia directly along with third party sellers.

Buy: Jetson Nano direct from Nvidia

Could It Replace My Raspberry Pi?

While the Google Coral Dev board is powerful, it doesn’t stack up to the Raspberry Pi in some ways. The Raspberry Pi is a great hobby computer for DIY electronics. It can also double as a desktop computer in a pinch.

Sure, the Coral Dev board is powerful, but their own documents advise against attaching a mouse and keyboard. The Coral’s custom OS is for SSH connections primarily. It is, however, likely capable of sustaining any variation of Linux. This puts it right back up there as a direct Pi competitor

There is a problem though. If you want a board for learning machine learning, but one that can also perform other daily tasks, why would you buy the Coral Dev Board?

The Jetson Nano supports a display port, and as previously mentioned has impressive video examples straight out of the box. The custom Ubuntu desktop will be familiar to many and the cheaper price point will make it an attractive prospect for many, even those uninterested in machine learning.

AI for Everyone

At this stage, it is hard to say which will be the better board. It’s also unknown which will be more accessible to home developers. I look forward to spending time with both the Coral Dev and Jetson Nano boards to get a definitive answer!

It’s an exciting time to be tinkering with SBCs! If you are new to it and want a place to start, get a Raspberry Pi and follow our ultimate getting started guide!

Read the full article: Will the Nvidia Jetson Nano Replace the Raspberry Pi?


Read Full Article

Soliom S60 Solar Outdoor Security Camera Review

The 7 Best Ergonomic Vertical Mice

How to Design the Perfect Cover Letter Using Canva


design-cover-letter

When you’re searching for a job there are few things more time-consuming than creating a cover letter. It’s crucial to craft a well-written cover letter that can stand out from the crowd.

But how do you make your cover letter look beautiful? How can you avoid the human resources slushpile? In this article we show you how to create the perfect cover letter using Canva.

Step 1: Where Should You Use a Cover Letter?

Create a Cover Letter With Canva Where You Should Use One

The first thing to keep in mind is that the job market is changing.

When you’re applying for a job online, large companies will usually have you fill out a form where your cover letter is limited to plain text.

Sometimes you’ll need to send your resume via email, and when you do it’s best to put your letter in the body of the email.

In both of these cases, a cover letter is not necessary. But when you drop off a resume in person or a company allows you to attach a PDF, that’s where a good design works well.

To create a cover letter using Canva, log into your account. Under “What would you like to design?” type in “cover letter”.

Pick the option Letterhead or Letter. For this tutorial I’m going to choose Letterhead.

Step 2: Find a Template Style

Create a Cover Letter With Canva Your Personal Workspace

Once you’re in your workspace you’ll see a blank page and a list of letterhead templates. If you’ve read our tutorial detailing how to find the perfect resume on Canva, you’ll be familiar with this step.

In that tutorial we created a resume for a woman who was applying to a modern baking company. Let’s say we want to create a cover letter that matches her resume.

To do this, click the Personal Letterhead option. In there you will find the templates best suited for this purpose.

Create a Cover Letter With Canva Personal Letterhead

Once there, start browsing.

The design we’ve picked looks nothing like the modern bakery resume, but it does have potential because of its line elements and simple layout. Let’s go with that.

There’s a lot of text on a cover letter, and some of it can be really small.

Right now I’m zoomed out to see my entire page, but what if that’s too small a size to work with?

To zoom in, click on the zoom tool in the bottom right-hand corner of your workspace. Choose the size that works for you.

Step 3: Change the Background

Create a Cover Letter With Canva Change Background Color

Next, we’re going to change the background color of the cover letter.

Make sure you have the entire document selected. Click on the color swatch icon in the top left-hand corner of your screen. Your swatches panel will pop up.

Choose your new color.

Step 4: Change the Color of Your Elements

Create a Cover Letter With Canva Change Element Color

After you change your background, we’ll need to fix the visual elements of this cover letter to make them match the resume.

The first element we’re going to tackle is the line at the top of the page. The line matches our overall design, but it’s the wrong color.

To change it, click on the element, then click your swatches panel.

For this line we’re going to pick a bright blue.

Create a Cover Letter With Canva Color Picker

That bright blue is pretty close to the color we want, but not exactly.

To fix this, click the + sign in the color swatch panel. This will bring up the color picker, where you can adjust the blue as needed.

Create a Cover Letter With Canva Add Color to New Element

Once you’ve decided, Canva will add the color to your panel.

After that, you can click on another element, then click on the color swatch. The new blue will be applied to it.

Step 5: Change Your Header Text

Create a Cover Letter With Canva Change Header Font

After you adjust the visual elements on your page, it’s time to fix the text.

As mentioned, there’s a lot of text, and the first thing we’re going to focus on is the “header”. It contains your name, address, and contact details.

Canva automatically puts placeholder text in each section, so you need to click on the title—in this case “James Morrison Elementary School”—and erase the words in the text box.

Next, type in your name. For this tutorial we’re going with “Jill Smith”.

Then, choose the same font that you used in the modern bakery resume, so both names match. Pick a size for the font and a color.

Click on the address section beneath your name. Erase the placeholder, and put your own address instead.

Step 6: Change Your Subheading Text

Create a Cover Letter With Canva Change Subheading Text

After you change your header you’ll need to change your subheading.

This is where you’ll address the letter to someone else, along with the reason you are sending it. It’s a good idea to include the job posting number and title for reference.

Make sure the text box is active so you can edit it. Erase the placeholder text, put in your own, then go to the top left-hand corner of your workspace.

Use the dropdown menus to change your font, size, and color.

Create a Cover Letter With Canva Change Title Case

In our modern bakery resume our subheadings were all-caps, but in this template the subheadings aren’t. How do you fix this without typing it all over again?

Simply click on the Uppercase icon at the top of your screen, seen here highlighted in red.

When you click on it Canva automatically changes the text to all-caps. To change it back, click on Uppercase again.

Step 7: Add a New Subheading

Create a Cover Letter With Canva Add a New Subheading

You’ve already got a subheading, but what if you want part of that subheading with one style and the rest of it with another? You’ll need another box.

Delete the text that you want in a different style from your first box. In this case, that text is “Job Posting # and Description”.

Next, click Text > Add a subheading on the left-hand side of your screen. Canva will add a subheading for you, but it will need some adjustment.

Create a Cover Letter With Canva Change Subheading Alignment

To align this text with the other subheading, click the Alignment button, seen here in red.

When you click on it, it will cycle through the different types of alignments—just keep clicking until you find the right one for your document.

Create a Cover Letter With Canva Change Subheading Size

Next, change your placeholder text to “Job Posting # and Description”.

Go to the top left-hand corner of your workspace and change the font, size, and color. Follow the same steps as before.

Step 8: Deleting a Text Box

Create a Cover Letter With Canva Delete Text Box

What if you want to delete a text box that isn’t required for your cover letter? Again, very easy.

Just click on the text box you want to get rid of, then go to the trash can icon in the top right-hand corner of your screen.

Clicking on it will delete the box.

Step 9: Grouping Elements

Create a Cover Letter With Canva Click and Drag to Group

We’ve talked about grouping elements in our tutorial detailing how to create a resume from scratch using Canva.

The short-and-easy version: grouping elements is useful if you need to keep them aligned and move them around the page.

Create a Cover Letter With Canva Group Elements

To group elements, click and drag over the individual items so the blue bounding box shows up.

Next, click Group in the top right-hand corner of your workspace. Voila. You’re finished.

Step 10: Add a Shape

Create a Cover Letter With Canva Add a Shape

We’re nearing the end of this tutorial, and as you’re doing your final checks you might decide that you want to add another shape for interest.

For this tutorial, let’s say we want to add a circle to the end of the line at the top of the page. There was a pattern like that in the modern bakery resume, and we want to mimic it.

To do this, click Elements > Shapes > Circle. Once you do, you’ll see a large circle pop up on your template.

Create a Cover Letter With Canva Change Shape Size

Click and drag the circle to the appropriate spot on your page. Resize it by clicking on one of the corners of the bounding box, to make it smaller.

To change its color, click on the color swatch icon in the top left-hand corner of your screen.

Step 11: Change Your Body Text

Create a Cover Letter With Canva Check Your Work so Far

Now that we’ve fixed the visual elements on the cover letter, it’s time to zoom out and take a look at it.

I personally think this design is pretty good. It matches the look and feel of the modern bakery resume, and it conveys a sense of approachability through its use of bright colors.

Create a Cover Letter With Canva Delete Body Text

All that’s left is to add the body text. This is where the “meat” of your cover letter will go—the part where you talk about yourself and what you do.

To write your body text, click and erase the placeholder, then begin typing.

Step 12: Give Your Cover Letter a Meaningful Name

Create a Cover Letter With Canva Give Your Document a Name

Now that your cover letter is complete, change the name of the template to something meaningful. This way you’ll be able to find it again under Home > Your Designs on Canva.

Job Hunts Don’t Last Forever

Cover letters are tough to write and just one part of the larger picture, but with Canva to help you can put your best foot forward and increase your chances of landing that job.

Are you looking for more direction on where to search for jobs? Then check out our list of job search engines you should try to help you make an informed decision.

Read the full article: How to Design the Perfect Cover Letter Using Canva


Read Full Article
HQ Trivia replaces Quiz Daddy Scott Rogowsky


Quiz Khalifa aka Host Malone aka Trap Trebek aka HQ Trivia’s Scott Rogowsky has been pushed out of the live mobile gaming startup. The two split due to disagreements about Rogowsky attempting to take a second full-time job hosting sports streaming service DAZN’s baseball show ChangeUp while moving to only hosting HQ on weekends, TMZ first reported. HQ wanted someone committed to their show.

Now HQ co-founder and CEO Rus Yusupov confirms to TechCrunch that Rogowsky will no longer host HQ Trivia. He tells me that the company ran a SurveyMonkey survey of its top players and they voted that former guest host Matt Richards rated higher than Rogowsky. Yusupov says HQ is excited to have Richards as its new prime time host. It’s also putting out offers to more celebrity guests to host for a few shows, a few weeks, or even a whole season of one of its time slots.

The departure could still shake HQ’s brand since Rogowsky had become the defacto face of the company. But he was also prone to talking a lot on the air and promoting himself, sometimes in ways that felt distracting from the game. Rogowsky has also been using HQ’s brand to further his standup comedy career, splashing its logo on advertising for his shows like this one below at a casino where “The centerpiece is a live trivia competition”, he told WPTV5.

TechCrunch had predicted that Rogowsky might depart if he wasn’t properly compensated with equity in HQ Trivia that would only vest and earn him money if he stuck around. The damage to HQ could worsen if he’s scooped up by Facebook, Snapchat, or another tech company to build out their own live video gaming shows.

HQ Trivia provided this statement on Rogowsky’s exit:

“We continue to build an incredible company at HQ Trivia, from drawing hundreds of thousands of players to the platform daily, to increasing the size of the prize, to attracting strong talent. We’ve come a long way since Scott Rogowsky’s first trivia game and we’re grateful for everything he’s done for the platform. This is a team that creates products for talent to really shine—we’re just getting started at HQ Trivia, and as he makes his next move, wanted to take a minute to thank him for being part of our journey.”

Yusupov tells me he’s excited about exploring new hosts, noting that Richards in a person of color who brings more diversity to HQ’s lineup. Richards is a standup comic who has appeared on CBS’ 2 Broke Girls, Nickelodeon’s School of Rock and was a voice-over host for game show Trivial Takedown on FUSE. Yusupov says the team feels jazzed about the new creative opportunities beyond Rogowsky, though the CEO says he appreciates all that its former host contributed.

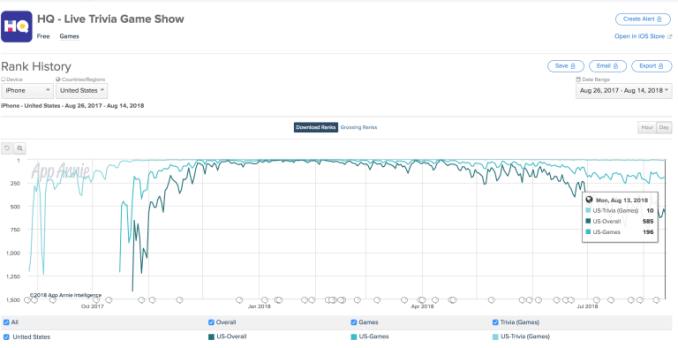
Richards will have the tall task of trying to revive HQ’s popularity. It climbed the app store charts to become the #3 top game and #6 overall app in January 2018, and peaked at 2.38 million concurrent players in March 2018. But it’s been on a steady decline since, falling to the #585 overall app in August, and it dropped out of the top #1500 last month according to App Annie.

Exhaustion with the game format, so many winners splitting jackpots to just a few dollars per victor, and laggy streams have all driven away players. The introduction of a new Wheel Of Fortune-style HQ Words game in August hasn’t stopped the decline. And the tragic death of HQ co-founder and former CEO Colin Kroll may have impeded efforts to turn things around. There’s a ton of pressure on the company after it raised $23 million, including a $15 million round at a $100 million valuation.

Even if HQ Trivia fades from the zeitgeist, it and Rogowsky will have inspired a new wave of innovation in what it means to play with our phones.


Read Full Article

This little translator gadget could be a traveling reporter’s best friend


If you’re lucky enough to get travel abroad, you know it’s getting easier and easier to use our phones and other gadgets to translate for us. So why not do so in a way that makes sense to you? This little gadget seeking funds on Kickstarter looks right up my alley, offering quick transcription and recording — plus music playback, like an iPod Shuffle with superpowers.

The ONE Mini is really not that complex of a device — a couple microphones and a wireless board in tasteful packaging — but that combination allows for a lot of useful stuff to happen both offline and with its companion app.

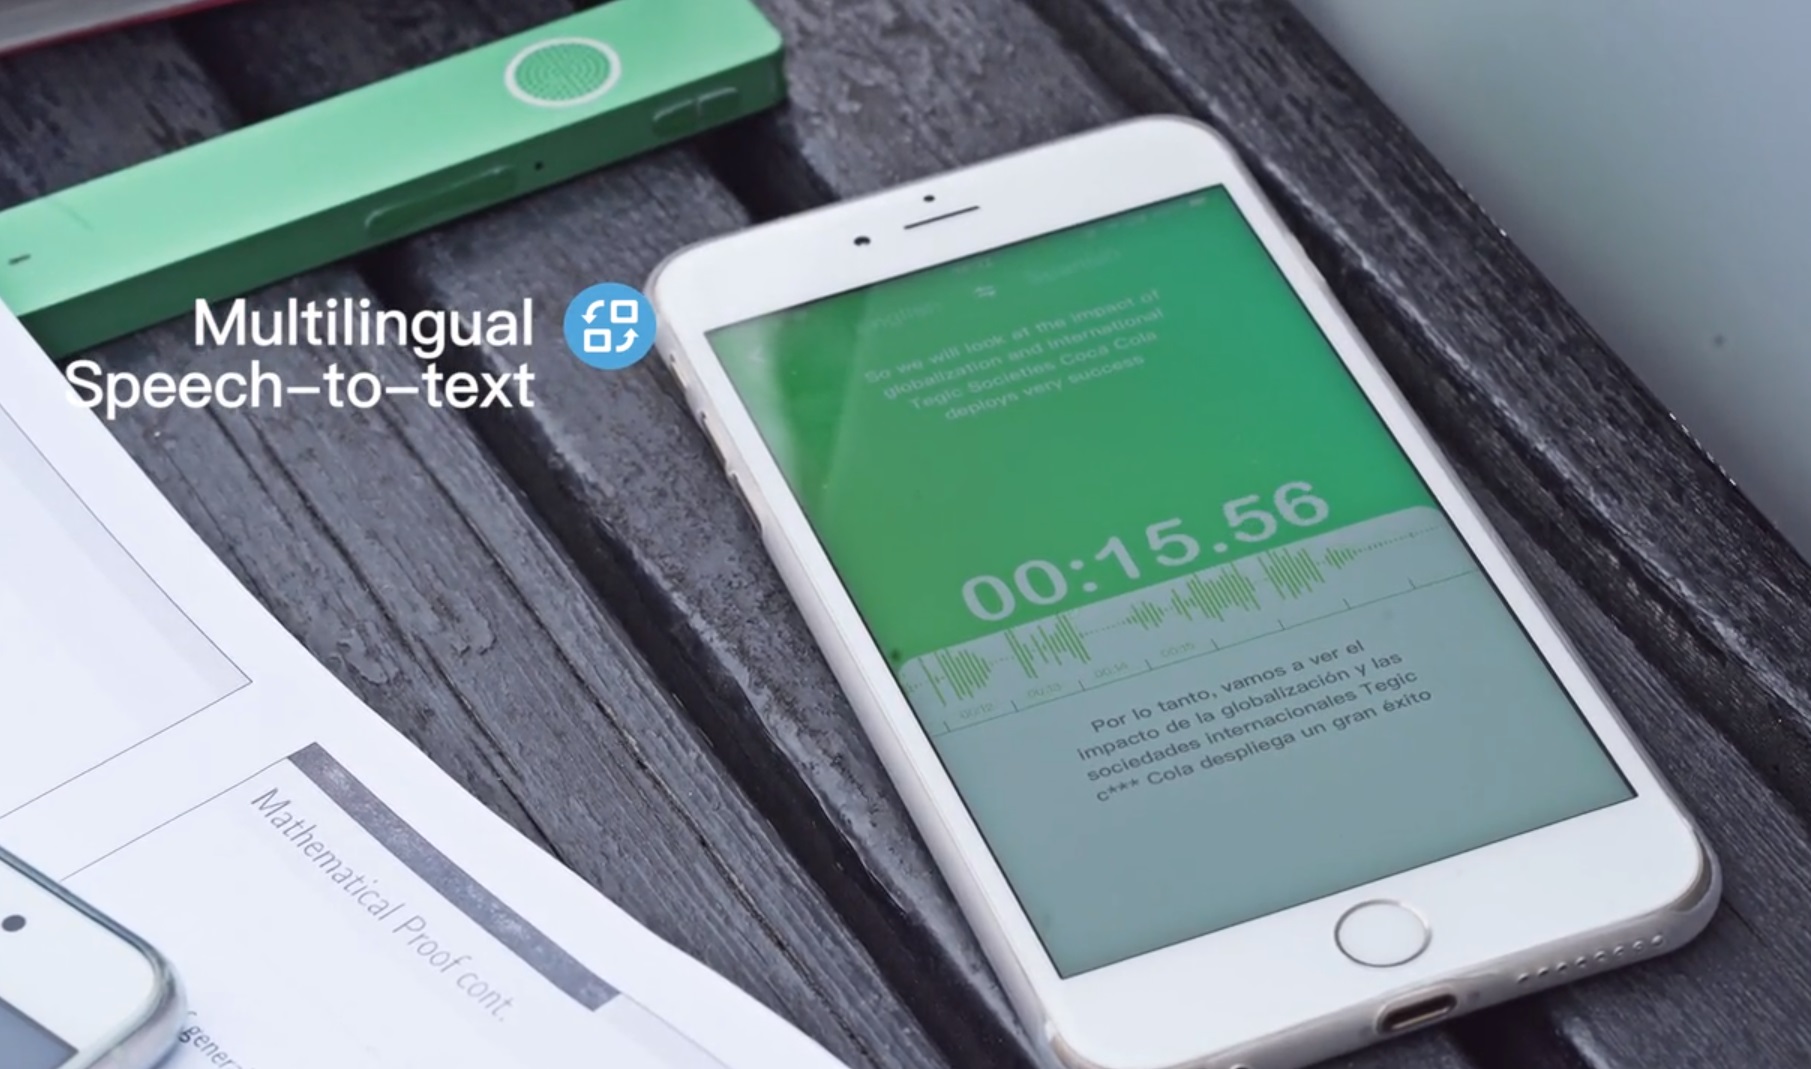
You activate the device, and it starts recording and both translating and transcribing the audio via a cloud service as it goes (or later, if you choose). That right there is already super useful for a reporter like me — although you can always put your phone on the table during an interview, this is more discreet and of course a short-turnaround translation is useful as well.

Recordings are kept on the phone (no on-board memory, alas) and there’s an option for a cloud service, but that probably won’t be necessary considering the compact size of these audio files. If you’re paranoid about security this probably isn’t your jam, but for everyday stuff it should be just fine.

If you want to translate a conversation with someone whose language you don’t speak, you pick two of the 12 built-in languages in the app and then either pass the gadget back and forth or let it sit between you while you talk. The transcript will show on the phone and the ONE Mini can bleat out the translation in its little robotic voice.

Right now translation online only works, but I asked and offline is in the plans for certain language pairs that have reliable two-way edge models, probably Mandarin-English and Korean-Japanese.

It has a headphone jack, too, which lets it act as a wireless playback device for the recordings or for your music, or to take calls using the nice onboard mics. It’s lightweight and has a little clip, so it’s probably better than connecting directly to your phone in many cases.

There’s also a 24/7 interpreter line that charges two bucks a minute that I probably wouldn’t use. I think I would feel weird about it. But in an emergency it could be pretty helpful to have a panic button that sends you directly to a person who speaks both the languages you’ve selected.

I have to say, normally I wouldn’t highlight a random crowdfunded gadget, but I happen to have met the creator of this one, Wells Tu, at one of our events and trust him and his team to actually deliver. The previous product he worked on was a pair of translating wireless earbuds that worked surprisingly well, so this isn’t their first time shipping a product in this category — that makes a lot of difference for a hardware startup. You can see it in action here:

He pointed out in an email to me that obviously wireless headphones are hot right now, but the translation functions aren’t good and battery life is short. This adds a lot of utility in a small package.

Right now you can score a ONE Mini for $79, which seems reasonable to me. They’ve already passed their goal and are planning on shipping in June, so it shouldn’t be a long wait.


Read Full Article