12 February 2019

Amazon looked to the past to build the future


Over the last 20 years, smart home gadgets have evolved from fantasy to commodity. Walk into Best Buy and there are dozens of products that take just a few minutes to set up. It’s wonderful. Even better, it’s easy. There are lights and locks and screens from big and small companies alike. And therein lies the problem. There isn’t a unified solution for everything and Amazon’s vertically integrated offering could be the solution for the consumer and retail giant alike.

Sure, most smart home gadgets work, but nothing works well together. The smart home has to be as easy as flipping a switch to control a lightbulb. Amazon’s purchase of the mesh WiFi startup, Eero, speaks to the problem. Assembling a smart home containing more than a couple of smart gadgets is hard. There are countless spots where something can go wrong, exposing a smart home as nothing more than a house of cards.

What’s best for the average consumer is also the best for Amazon. In order for the smart home to be easy and functional as possible, one company should control the experience from every entry point. This is Apple’s approach to smartphones and Apple has long offered the easiest, most secure smartphone experience.

In theory, Amazon will likely look to either bundle Eero routers with the purchase of Amazon Echos or build mesh networking into Echo products. Either way, Amazon is ensuring its Fire TV and Echo products can reliably access Amazon’s content services, which is where Amazon makes its money in the smart home.

As Devin explains in this wonderful article, mesh networking is the solution to the problem created by Amazon’s push into every room. Wifi is critical to a truly smart home, but there’s more to it. The smart home is complicated and it goes back over 20 years.

Before wireless networking was ubiquitous, hobbyists and luxury home builders turned to other solutions to add electronic features to homes. Some gadgets still use modern versions of these protocols. Services like Z-Wave and ZigBee allowed home security systems to wireless monitor entry points and control power to otherwise disconnected gadgets like coffee makers and lamps.

Later competing wireless protocols competed with Z-Wave and ZigBee. Insteon came out in the early 2000s and offered redundant networking through RF signals and power line networking. In 2014 Nest with the help of Samsung, Qualcomm, ARM, and others introduced Thread networking that offers modern network redundancy and improved security. And there’s more! There are gadgets powered by Bluetooth 5, Wi-Fi HaLow and line of sight IR signals.

This cluster of competing protocols makes it difficult to piece together a smart home that’s controlled by a unified device. So far, at this nascent stage of smart home gadgets, Amazon and Google have built a compelling case to use their products to control this bevy of devices.

Apple tried, and in some ways, succeeded. Its HomeKit framework put iOS devices as the central control point for the home. Want to turn on the lights? Click a button in iOS or more recently, tell a HomePod. It works as advertised, but Apple requires compatible devices to be certified, and therefore the market of compatible devices is smaller than what works with an Amazon Echo.

Meanwhile, Goole and Amazon stepped into the smart home with their arms wide, seemingly willing to work with any gadget.

It worked. Over the last two years, gadget makers took huge steps to ensure its products are compatible with Google Assistant and Amazon Alexa. Last month, at CES, this became a punchline when a toilet was announced that was compatible with Alexa.

Smart commodes be damned. All of these connected gadgets require their own setup process. Every connected light, thermostat and toilet demand the initial user be comfortable navigating several smartphone apps, knowing their network configuration and what to Google when something goes wrong — because things go wrong.

Amazon’s own Alexa app doesn’t help. The single app is loaded with several tentpole functions including voice calling, skill setup, remote operation and access to Alexa — it’s overwhelming and unwieldy once several Echos are configured under the same account.

Something has to change.

If the smart home is to reach new demographics, barriers have to be dropped and centralized control has to become paramount. A layman should be able to purchase a couple of voice control hubs, connected lights, and a thermostat and set them up through a single app even though the devices might use different networking methods.

Amazon has already taken a big step towards working with different smart home wireless protocols. In 2017 the company introduced the Echo Plus. This version of the Echo speaker included support for Zigbee (Philips Hue lights use Zigbee). Later, in 2018 the company upgraded the Echo Plus and included a temperature sensor and offline smart home networking so when the Internet goes down, the user can still control their connected products.

Amazon has a growing portfolio of smart home companies. Along with its own Echo products, Amazon owns Ring, a video doorbell company, Blink, a wireless video camera system, and recently purchased, Mr. Beams, an outdoor lighting company. Now, with Eero, it can offer buyers a WiFi solution by Amazon. The only thing missing is a unified experience between these devices.

In order for any company to win at the smart home, consumers need to fully trust this company and Amazon has so far only had several, relatively, minor incidents concerning the privacy of its users. A couple reports have surfaced reporting Amazon handing over voice data to the authorities. Other reports have taken issue with Amazon’s video doorbell company’s neighborhood watch system that could lead to profiling and discrimination.

Amazon can weather disparaging reports. Amazon cannot weather dysfunctional products unable to reach Amazon’s revenue-generating services.

Amazon is not alone in its quest for smart home domination. Google, Samsung, and Apple take this growing market seriously and will not let Amazon eat the whole pie. Consumer electronic giants will likely continue to scoop up smart home gadget companies that have traction with consumers. Look for companies like Arlo, ecobee, Belkin, Wyze Labs, sevenhugs and Brilliant to be acquired. These companies offer some of the best products in their respective fields and would compliment the companies currently owned by the big players as they look to offer consumers a the most complete experience.


Read Full Article

Hands-on with an Alpha build of Google Maps’ Augmented Reality mode

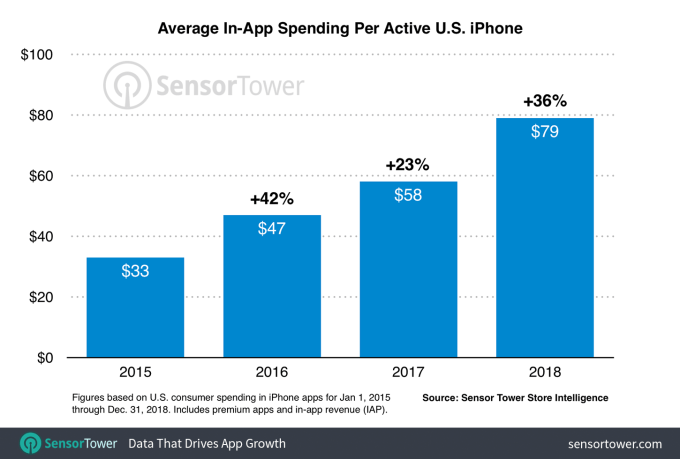
US iPhone users spent $79 last year, up 36% from 2017


Apple’s push to get developers to build subscription-based apps is now having a notable impact on App Store revenues. According to a new report from Sensor Tower due out later this week, revenue generated per U.S. iPhone grew 36 percent, from $58 in 2017 to $79 last year. As is typical, much of that increase can be attributed to mobile gaming, which accounted for more than half of this per-device average. However, more substantial growth took place in the categories outside of gaming — including those categories where subscription-based apps tend to rule the top charts, the firm found.

According to the report’s findings, per-device app spending in the U.S. grew more over the past year than it did in 2017.

From 2017 to 2018, iPhone users spent an average of $21 or more on in-app purchases and paid app downloads — a 36 percent increase compared with the 23 percent increase from 2016 to 2017, when revenue per device grew from $47 to $58.

However, 2018’s figure was slightly lower than the 42 percent increase in average per-device spending seen between 2015 and 2016, when revenue grew from $33 to $47, noted Sensor Tower.

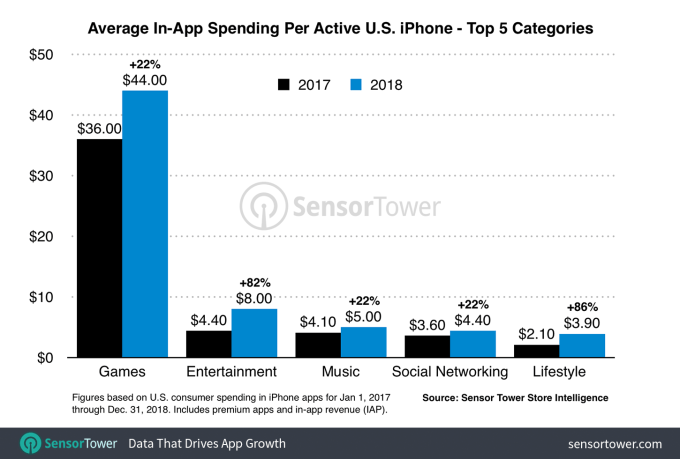
As usual, mobile gaming continued to play a large role in iPhone spending. In 2018, gaming accounted for nearly 56 percent of the average consumer spend — or $44 out of the total $79 spent per iPhone.

But what’s more interesting is how the non-gaming categories fared this past year.

Some categories — including those where subscription-based apps dominate the top charts — saw even higher year-over-year growth in 2018, the firm found.

For example, Entertainment apps grew their spend per device increase by 82 percent to $8 of the total in 2018. Lifestyle apps increased by 86 percent to reach $3.90, up from $2.10.

And though it didn’t make the top five, Health & Fitness apps also grew 75 percent year-over-year to account for an average of $2.70, up from $1.60 in 2017.

Other categories in the top five included Music and Social Networking apps, which both grew by 22 percent.

This data indicates that subscription apps are playing a significant role in helping drive iPhone consumer spending higher.

The news comes at a time when Apple has reported slowing iPhone sales, which is pushing the company to lean more on services to continue to boost its revenue. This includes not just App Store subscriptions, but also things like Apple Music, Apple Pay, iCloud, App Store Search ads, AppleCare and more.

As subscriptions become more popular, Apple will need to remain vigilant against those who would abuse the system.

For example, a number of sneaky subscription apps were found plaguing the App Store in recent weeks. They were duping users into paid memberships with tricky buttons, hidden text, instant trials that converted in days and the use of other misleading tactics.

Apple later cracked down by removing some of the apps, and updated its developer guidelines with stricter rules about how subscriptions should both look and operate.

A failure to properly police the App Store or set boundaries to prevent the overuse of subscriptions could end up turning users off from downloading new apps altogether — especially if users begin to think that every app is after a long-term financial commitment.

Developers will need to be clever to convert users and retain subscribers amid this shift away from paid apps to those that come with a monthly bill. App makers will need to properly market their subscription’s benefits, and even consider offering bundles to increase the value.

But in the near-term, the big takeaway for developers is that there is still good money to be made on the App Store, even if iPhone sales are slowing.


Read Full Article

Lenovo Watch X was riddled with security bugs, researcher says


Lenovo’s Watch X was widely panned as “absolutely terrible.” As it turns out, so was its security.

The low-end $50 smart watch was one of Lenovo’s cheapest smart watches. Available only for the China market, anyone who wants one has to buy one directly from the mainland. Lucky for Erez Yalon, head of security research at Checkmarx, an application security testing company, he was given one from a friend. But it didn’t take him long to find several vulnerabilities that allowed him to change user’s passwords, hijack accounts, and spoof phone calls.

Because the smart watch wasn’t using any encryption to send data from the app to the server, Yalon said he was able to see his registered email address and password sent in plain text, as well as data about how he was using the watch, like how many steps he was taking.

“The entire API was unencrypted,” said Yalon in an email to TechCrunch. “All data was transferred in plain-text.”

The API that helps power the watch was easily abused, he found, allowing him to reset anyone’s password simply by knowing a person’s username. That could’ve given him access to anyone’s account, he said.

Not only that, he found that the watch was sharing his precise geolocation with a server in China. Given the watch’s exclusivity to China, it might not be a red flag to natives. But Yalon said the watch had “already pinpointed my location” before he had even registered his account.

Yalon’s research wasn’t just limited to the leaky API. He found that the Bluetooth-enabled smart watch could also be manipulated from nearby, by sending crafted Bluetooth requests. Using a small script, he demonstrated how easy it was to spoof a phone call on the watch.

Using a similar malicious Bluetooth command, he could also set the alarm to go off — again and again. “The function allows adding multiple alarms, as often as every minute,” he said.

Lenovo didn’t have much to say about the vulnerabilities, besides confirming their existence.

“The Watch X was designed for the China market and is only available from Lenovo to limited sales channels in China,” said spokesperson Andrew Barron. “Our [security team] team has been working with the [original device manufacturer] that makes the watch to address the vulnerabilities identified by a researcher and all fixes are due to be completed this week.”

Yalon said that encrypting the traffic between the watch, the Android app, and its web server would prevent snooping and help reduce manipulation.

“Fixing the API permissions eliminates the ability of malicious users to send commands to the watch, spoof calls, and set alarms,” he said.


Read Full Article

LinkedIn debuts LinkedIn Live, a new live video broadcast service


LinkedIn — the social network for the working world with close to 600 million users globally — says that video is the fastest-growing format on its platform alongside original written work, shared news and other content. Now it’s taking its next step in the medium in earnest.

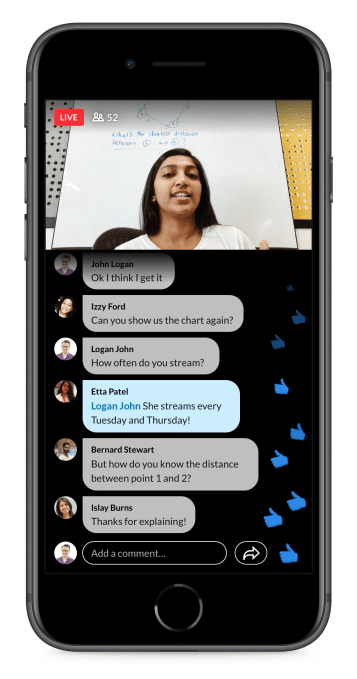
Today, the company is launching live video, giving people and organizations the ability to broadcast real-time video to select groups, or to the LinkedIn world at large.

Launching in beta first in the US, LinkedIn Live (as the product is called) will be invite-only. In coming weeks, LinkedIn will also post a contact form for others who want to get in on the action. It’s not clear when and if LinkedIn will make it possible for everyone to create LinkedIn Live videos, but if you consider how it developed its publishing features for written work, that will come later. too.

Initial live content that LinkedIn hopes to broadcast lines up with the kind of subject matter you might already see in LinkedIn’s news feed: the plan is to cover conferences, product announcements, Q&As and other events led by influencers and mentors, office hours from a big tech company, earnings calls, graduation and awards ceremonies, and more.
And to underscore how LinkedIn is keen to develop this — especially in its first phase — not as rough-and-ready user-generated content, but as streams of the kinds of videos that fit with its wider ethos, it has selected several third-party developers of live broadcasting streaming services that creators will work with to create and post more polished live video on LinkedIn.

These include Wirecast, Switcher Studio, Wowza Media Systems, Socialive, and Brandlive, “with more to come in the following weeks,” LinkedIn said.

There is another technical partner for LinkedIn’s live video effort, too: Microsoft, whose Azure Media Services, part of its cloud division, is providing encoding. Although Microsoft acquired LinkedIn in 2016, it’s mostly kept a distance in terms of knitting together product development between the two, so this is a notable exception. Skype, incidentally, is not part of this video effort.

Better late than never?

Compared to its competitors in the social networking sphere, LinkedIn has been a late bloomer when it comes to video.

Amid developments from competitors like Twitter and Facebook going back years to bring more engagement to its platforms with the use of moving pictures, the Microsoft-owned LinkedIn introduced its first native video features only in the summer of 2017.

But in the 17 months since launching video features, LinkedIn has seen a big boost in traffic and revenues from (non-live) video on its platform.

“Video is the fastest growing format on our platform right now, and the one most likely to get people talking,” said Pete Davies, the head of consumer products at LinkedIn. He and LinkedIn declined to give specific figures in terms of how many video creators or viewers there are, except to note that “millions” of LinkedIn members have used the feature.

Davies said that live video has been a big request — not least, I’d wager, because it is such a prominent part of how video is being used on other social platforms like YouTube, Facebook and Twitter, putting the functionality front of mind.

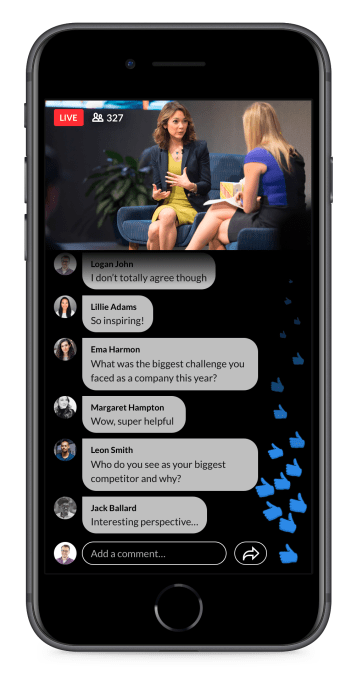
“Live has been the most requested feature,” he said. These other social platforms are serving as a template of sorts: as with these other platforms, users can “like” videos as they are being broadcast, with the likes floating along the screen. Viewers can ask questions or make suggestions in the comments in real-time. Hosts can moderate those comments in real-time, too, to remove harassing or other messages, Davies added.

There may be another reason beyond user requests for why LinkedIn is expanding video: it’s proving to be a strong engine for engagement and revenue growth at the company.

So far, the only monetization that LinkedIn has introduced around video is for video advertising. While Microsoft does not break out how much LinkedIn brings in in advertising revenues, much less video advertising, Microsoft reported in its last quarterly earnings that revenues at LinkedIn were up 29 percent with a reference to growing its ads business specifically: “with record levels of engagement highlighted by LinkedIn sessions growth of 30 percent.”

That it seems, is directly coming from its video products: LinkedIn tells me that video ads earn 30 percent more comments per impression than non-video ads and that LinkedIn members spend almost 3 times more time watching video ads compared to time spent with static Sponsored Content.

With LinkedIn looking at tapping into unique content with LinkedIn Live, there is a clear opportunity for the company to explore other ways of monetizing the content beyond ads. For example, it could charge viewers for unique experiences like conferences, or make certain Live events part of the company’s paid tier to lure in more premium subscribers. On the part of the broadcasters, it could potentially provide fee-based services to provide a platform to broadcast certain content like video-based earnings reports.

LinkedIn wouldn’t comment on future monetization plans and for now isn’t even putting in video ads into LinkedIn Live videos. “That will come down the road but for right now we are focused on awesome use cases,” said Peter Roybal, head of video product management, in an interview. “This could even be a way to try out some new ideas.”


Read Full Article

How to Really Block Time-Wasting Websites: 3 Tips That Work


websites-record-your-activity

When you’re trying to get some work done online, you might find the web too big and too fascinating a distraction to ignore. But you can sideline it with the help of tips and tools that block time-wasting digital content for you. Let’s explore them below.

1. Install a Blocker App or Extension

Before you can block your sources of distraction online, you need to pinpoint them. That’s where time management apps like FocusMe or RescueTime come in handy. They give you a detailed breakdown of your digital habits.

Each day, you learn how much time you have spent on which apps, websites, and activities. This data, in turn, helps you redirect your time and effort towards online activities that matter.

What about the activities that aren’t as important, but you have trouble giving up? How do you deal with them? Blocking trivial activities is the next step. Here, you’ll find quite a few browser-based solutions: services that block specific sites for as long as you need.

There’s StayFocusd, which lets you block websites in Chrome and even barricade specific in-page content such as videos.

If you’re a Firefox user, try the Leechblock extension instead. If you use Safari, install the Leechblock-inspired extension WasteNoTime. FocusMe and RescueTime also have a website-blocking feature.

The problem with solutions like these is that they’re too easy to bypass. All you need to do is open another browser or fire up a private browsing window and you’ve got full access to all your distracting sites again.

If you need to go further with the browsing restrictions, the apps we’ll look at next can take you there. They can block websites and apps across your computer. That means no access to incoming email via your system’s mail app or to Slack chats via the Slack desktop app.

App number one on our list here is Freedom. It’s one of the most popular cross-platform apps that let you block distracting websites and apps system-wide.

Cold Turkey is another great option. It also has a sister app called Cold Turkey Writer—a text editor you can’t escape until you have met your writing goal for a session.

Mac users can also go with SelfControl or 1Focus for system-wide site blocking.

Blacklist settings in Self Control app on macOS

If you’re a Linux user, you can edit the hosts file to block websites. Does that seem too extreme? Then it’s best to stick with a reliable and evergreen solution like RescueTime. If nothing else, you can repurpose the parental controls that you use to limit web access for your kids to clock a few serious work hours.

Again, system-wide solutions aren’t perfect. You could simply walk away from your computer and pick up your tablet, bypassing the block again. If that sounds like you, you need a more stringent solution. Router tweaks can help here, and we’ll explore them next.

By the way, would you rather get a gentle reminder than a wall when you’re about to visit a distracting website? In that case, install the Mindful Browsing extension for Chrome instead of the apps we have mentioned above.

2. Set Up Router Restrictions

Still distracted? Then it’s time to block addictive sites using your router. Here are two simple methods you can use to make this happen.

Method 1: Switch to OpenDNS

If you use a custom DNS to enable network-wide parental controls, why not use it to restrict your own usage of time-wasting websites? The free OpenDNS Home service is perfect for that.

With this service, you can configure which websites are and aren’t accessible on your home network. To use it, you’ll need to sign up for a user account first. After you do, change the DNS settings on your router to reflect the OpenDNS nameservers. If you’re unsure how to do this, check out the official step-by-step instructions for any router.

Once you’ve set everything up, log into OpenDNS and head to the settings page to block individual domains. Going forward, no one using your network—that includes you—can access these sites.

Method 2: Configure Your Router

Like the idea of blocking sites network-wide, but don’t want to sign up for an account or use OpenDNS? With most routers, you can block specific sites yourself, without the need for OpenDNS or any service like it.

Check your router’s documentation to see if this is possible; in most cases the instructions will be under a section called “Access Restrictions”. This will vary depending on who makes your router. If you can’t find the instructions in your router’s manual, google the device’s model number to find them online.

If you’ve installed the open source firmware DD-WRT on your router, you can block specific sites via the Access Restrictions menu. You’ll find the instructions to add select websites to a blacklist on the official Access Restrictions wiki page. Scroll down to the Filtering Services/URLs/Keywords section to spot them.

Sites you add to the blacklist will get blocked instantly for every device on your network. You can also configure the settings to block sites on specific days or for certain time periods.

3. Unplug Your Router

Are all the restrictions above not enough to tame your monkey mind? There’s always the nuclear option you can consider—total disconnection.

Unplug your router from the web to ramp up your productivity. It’s a crude method, sure, but it works. Unless you cave and plug your router back in or simply pick up your smartphone to access Facebook and co again.

You don’t have to lose access to work-related data and services when you disconnect. You’ll find plenty of productivity apps that work offline.

More Tips for Improving Your Focus

Of course, the ultimate way to avoid expected distractions is self-control. But, since we have limited amounts of it to spend on any given day, it seems best to save it for the most important decisions.

For dodging the distraction bullet when you’re working, you can outsource the task to one of the tools/methods we have discussed above.

These barriers are not one hundred percent foolproof, because you could always find a workaround to any system you set up yourself. But having them in place gives you just enough time to remind yourself why you installed these barriers to begin with—to keep your focus on your work.

Speaking of focus, did you know that you can boost it by controlling the noise around you?

Read the full article: How to Really Block Time-Wasting Websites: 3 Tips That Work


Read Full Article

How to Install and Customize Ringtones on Android Phones

iStock Provides All the Stock Images and Videos You Need at Great Value


istock-photography

iStock is the premium stock website by Getty Images. It offers royalty-free images and videos, flexible pricing, and a gigantic library to choose from. Let’s see how this stock media service works.

What You’ll Find

iStock groups images into two collections.

The Signature Collection represents the very best images on iStock, offering exceptional image quality coupled with increased resolutions (often greater than 40 megapixels). You won’t find Signature Collection images on any other stock website. A team of visual experts curates this collection of millions of unique assets.

The Essential Collection offers images at a lower price. Essential images are excellent quality and come in a variety of different industry-standard styles but at a more budget-friendly price.

iStock image credits

What It Costs

Any stock photo website worth using should be competitively priced. iStock offers you the flexibility to buy a single image using credits, or pay for a monthly or annual subscription bundle.

If you don’t have a huge need for imagery, purchasing per-image is an excellent option and allows you to buy only when you need. If you’re a high-volume user, then the subscriptions offer outstanding value for money, with multiple tiers available to suit any workflow.

iStock plans

Subscriptions work on a downloads per month basis; you’ll need credits to buy images outside of your subscription. (For example, if you want a Signature Collection image but have an Essentials subscription.)

You’ll also need to use credits and to purchase any video (which is not included in any subscriptions). Credits cost $11 each, but that price goes down when you buy in bulk. When purchasing video, you’ll be pleased to know that 4K video costs the same as HD.

Signature Collection images cost three credits, while Essential Collections images cost one credit each. If you’re happy with only using Essentials images, then the “essentials only” plan is less than half the price of the “access all images” plan.

The “access all images” plan starts at $70 a month, billed annually, and allows you to download ten images per month. Unused downloads roll over into the next month, as long as you continue to purchase the plan.

If you’d like to pay monthly, with the option to cancel any time, the price increases to $99 a month. Contrast this with the essentials-only plan, which starts at $29 a month for ten images (billed annually). This increases to $40 a month for a one-month rolling contract.

If you need more images, you can choose a different monthly image plan, maxing out at $333 per month annually (access all images), or $166 a month annually (essentials). You can always buy credits to supplement any image plan, which provides the flexibility to download additional images as and when required, without having to upgrade your plan.

Regardless of your payment plan, iStock never charges a higher price for a larger-resolution image. You pay for the image and gain access to the highest-resolution version available.

iStock Image Quality and Variety

iStock Puppy Image

Seeing images on websites isn’t always a true reflection of their quality. I purchased an image of a Dachshund puppy shown above, which is part of the Essentials collection. The full resolution of this image is 6000 x 3336 pixels (or 20 megapixels).

As a photographer myself, this image is perfect. After viewing it full-screen on my computer, I determined that it’s well worth the price. Every detail from lighting, composition, framing, color, and more are excellent. This is a high-quality photo taken by a skilled photographer, and it highlights the exceptional quality available from iStock’s impressive library.

One good photo, however, is useless without a varied library. Fortunately, iStock is one of the biggest names in stock photography, and it has an enormous collection of images to choose from. Over 200,000 artists contribute from all over the world and with nearly 80 million assets available, iStock’s premium assets are a class above other alternatives. The exclusively curated images found in the Premium Collection number more than 9 million assets.

iStock curated albums

If you’re not sure what to look for, iStock’s curated categories group photos into themes, trends, and topics. If that’s still not enough, you can refine image searches by date, color, popularity, orientation, license type, or upload date.

The Essentials Collection contains enough quality and variety of assets to complete any project on a wallet-friendly budget. Choose the Signature Collection and you’ll find exclusive images that are not available anywhere else.

iStock Makes It Easy

Getting started with iStock is very simple. You can begin browsing immediately, with no registration required.

Create an iStock Account

If you want to buy an image, the simple registration process only needs your name and email address. Signing up takes less than a minute; just click the Join button in the top-right.

Here you’ll need to provide an email address and password, then confirm your country. That’s all it takes and you’re ready to start.

Finding Images

Finding suitable images is equally as easy. The home page directs you to curated categories on specific themes, or you can use the search box to find images on almost any topic. Use the dropdown box on the search bar to change what you’re searching for, such as Illustrations or Video.

When searching, you can filter images by their collection. If you don’t want to pay for items in the Signature Collection, then you can only show Essential Collection images, for example.

iStock essential toggle

Once you’ve searched, you’ll notice the useful Refine menu on the left side of the screen. This lets you filter by image size, color, number of people, and more. If you can’t find what you’re looking for by text, iStock even lets you search with an image. Just click the camera icon at the right of the search bar.

Selecting an image will bring up extra information, including:

  • License terms
  • Other images in the series
  • Similar images
  • Price
  • Size, date, and other metadata

Purchasing an Image From iStock

Before you buy, if you’d like to make changes to the image, click the Edit this photo button. This lets you crop the image to certain preset sizes, add text, set a filter, or upload your own graphic. This lets you get a better look at how the image will look in your usage before you purchase.

iStock Editor

When you’re ready to buy, the large Download this image button gets the process started. The first time you do this, you’ll need to enter your billing and payment information. This is a painless process and one you don’t need to repeat for future purchases.

iStock download page

iStock accepts PayPal, which speeds up the process if you already have an account. Otherwise, you can pay with a credit or debit card. Once purchased, you gain immediate access to the image, in any size you want.

Once you’ve saved your payment details, subsequent purchases are even quicker.

Make iStock Your Go-to Image Service

If you’ve never used a stock photography service before, now is a good time to start using iStock!

In summary, iStock provides:

  1. Excellent value for money
  2. Flexibility to subscribe or pay for individual images
  3. High quality and a varied library
  4. Instant payment and download service
  5. Outstanding 4K video pricing for the same price as HD footage
  6. Simple registration process
  7. Tools and plugins to improve your productivity and workflow
  8. iStock editor, where you can edit images online

iStock clearly has a lot to offer. And with three free photos a week, it should be at the top of your list when looking for a stock photography service.

Read the full article: iStock Provides All the Stock Images and Videos You Need at Great Value


Read Full Article

6 Fun iPhone Party Games for Your Next Group Gathering

How 4K TV Resolution Compares to 8K, 2K, UHD, 1440p, and 1080p


tv-resolution-compare

If you’re shopping for a new TV, you’ll quickly encounter a bewildering maze of information. For someone who doesn’t spend all their time reading the latest news from the world of televisions, it can get confusing.

One of the most important things to consider is your new TV’s resolution. Should you buy 4K or one of the many alternatives? In this article, we explain how 4K resolution compares to 2K resolution, 8K resolution, and more.

What Is 8K Resolution?

Any display that is 8,000 pixels wide is called 8K. You will also see the format called 8K UHD, Full UHD, and FUHD.

8K displays are 7680×4320 pixels for a total of 33.2 megapixels. It has twice the linear resolution of 4K, four times that of 1080p, and six times that of 720p displays.

No consumer TVs offer 8K resolution, and that’s unlikely to change for a few years. Despite some concept designs at expos like CES, experts predict it will not arrive in TVs until 2023 at the earliest.

We are, however, slowly starting to see 8K video cameras creep into Hollywood Studios. 2017’s Guardians of the Galaxy Vol. 2 was the first movie to be shot using an 8K camera.

One of the only TV networks in the world with 8K potential is Japan’s public broadcaster NHK. It offers one 8K channel. The network plans to broadcast the 2020 Olympics in 8K.

A sub-version of 8K resolution is called 8K Fulldome. It has a resolution of 8192×8192 (67.1 megapixels) and is only seen in fulldome theaters (such as planetariums).

Note: If you have a high-end digital camera, it probably exceeds 8K—for photos. It could have more than 50 megapixels.

What Is 5K Resolution?

The most common 5K configuration is 5120×2880 pixels. That’s a 33.3 percent upgrade over 4K, meaning it shares the same relationship as 720p and 1080p.

It’s unlikely that we’ll ever see 5K become commonplace on consumer televisions. The tech world appears to have settled on 4K for the next few years before 8K is viable enough for a widespread rollout.

But 5K resolution displays undoubtedly have a role to play. The ability to natively display 4K content while leaving some of the screen free is perfect for video editors. They can work on 4K video while keeping menus and toolbars open; they will not be forced to downscale their previews.

What Is 4K Resolution?

Right now, if you’re in the market for a top-of-the-range TV, the chances are that you’ll end up with a 4K model. Experts predict that at least half of U.S. homes will have a 4K TV by 2020.

4K refers to any screen resolution with roughly 4,000 horizontal pixels; thus several iterations of 4K resolution exist. They are not all the same.

For example, 4K resolution in the world of cinema uses 4096×2160 pixels (8,847,360 total) with an aspect ratio of 256:135. It is called DCI 4K.

In TV sets, the most common 4K resolution is 3840×2160. It uses 8,294,400 pixels in total and has a 16:9 aspect ratio.

Officially, 4K resolution is called UHDTV1 or 4K UHDTV. As you may know, UHD resolution stands for Ultra-High Definition resolution. Ultra-High Definition and 4K resolution are interchangeable terms. You may also see 4K referred to as 2160p.

More services and devices are starting to offer 4K. They include Netflix, Xbox One (S and X), PlayStation 4 Pro, and Prime Video. All matches at the 2018 FIFA World Cup were broadcast in 4K. There are some great 4K videos on YouTube that you should check out.

What Is 2K Resolution?

2K resolution screens never really became a “thing.” Officially, 2K resolution is a cinema term and refers to 2048×1080 pixel displays. Most projectors in movie theaters provide 2K displays.

Sometimes, 1080p screens are described as 2K resolution. Almost all literature on the topic agrees that this is not correct. Over time, however, it could become of those situations whereby usage of term dictates its meaning, especially as 1080p slips further back into the history books.

What Is 1440p Resolution?

You won’t find any 1440p resolution TVs; no networks or studios have ever created content in the format, thus rendering it pointless. But that doesn’t mean it’s not a standard format in other devices.

There is more than one 1440p resolution. It includes 3120x1440p, 2960x1440p, 2880x1440p, 2560x1440p, and most recently, 5120x1440p.

You will find 1440p in lots of smartphones (including recent Samsung and LG models) and gaming monitors. According to Steam, slightly less than five percent of its users are gaming on a 1440p screen.

There is significant debate over whether 1080p or 1440p is better for gamers. The general consensus appears to be that if your hardware can handle it, a 1440p screen will offer notable improvements without worrying about 4K compatibility.

What Is 1080p Resolution?

Also known as Full HD (FHD), 1080p screens have a resolution of 1920×1080 pixels. The format has a ratio of 16:9 and offers 2.1 megapixels.

The “p” in 1080p stands for progressive scan. In simple terms, it means frames are drawn in sequence on the screen. The opposite is interlaced video in which odd and even lines are drawn alternately. It was common in analog TVs.

1080p resolution is half of 4K resolution. It has four times fewer pixels. The resolution is 33.3 percent higher than 720p displays.

Today, it’s tough to find a modern TV that doesn’t support 1080p input via HDMI cable. Most computer screens can also support the resolution. It has been available on Netflix since 2013.

Learn More About Televisions

The five screen resolutions we’ve discussed are the ones you are most likely to come across in your day-to-day lives.

Just be aware that the list is not exhaustive; there are so many variations that it is impossible to cover them all in one article. And remember, you can let us know about your experiences with the different resolutions in the comments section.

If you would like to learn more about televisions and displays, check out our discussion of whether you really need HDR and our list of the best 4K gaming monitors.

Read the full article: How 4K TV Resolution Compares to 8K, 2K, UHD, 1440p, and 1080p


Read Full Article

The 9 Best Apps and Sites for Reading Comic Books on Mac


comic-apps-mac

Reading comic books is an enjoyable experience for kids and adults alike. And thanks to technology, you don’t have to purchase physical comic books to get your fix. The internet is flooded with webcomics, and mobile devices offer an intuitive way to read comics without having to buy physical copies.

We recommend sticking to comic book reader apps, which are optimized for reading comic books much better than standard PDF readers. Here are our favorite apps and websites for reading comics on your Mac.

1. YACReader

YACReader Mac Comic Book Reader

YACReader is best known for its ability to organize and maintain a library of personal comics. It supports popular formats such as RER, ZIP, CBR, CBZ, TAR, PDF, 7Z, CB7, JPEG, GIF, PNG, and BMP. On the reading front, the app offers features like double-page mode, full-size view, fullscreen mode, custom page fitting, and the ability to change the background image.

We love the way YACReader keeps a tab on what you’re reading. The app organizes your collection, plus it maintains a tab on your reading status. Furthermore, the search function easily search your entire comic collection from within the app. Lastly, the image adjustments in the reading mode will help add colors to your old comic collection.

Download: YACReader (Free)

2. DrawnStrips Reader

Drawnstrips multi page layout menu

DrawnStrips is the only comic book reader app in this list that’s heavily optimized for Mac. This app offers Multi-Touch support (swipe, pinch, double-tap, etc.) and is Retina display friendly. Unlike other apps, DrawnStrips supports a true full-screen mode with no toggle bars or any other UI elements to distract you.

The app makes the navigation easy, featuring a row of thumbnails that represent pages of your comic book. Additionally, the Quick Look feature automatically generates icons that let you preview comics in Finder.

If you digitize older comics by scanning their pages and converting them into a suitable format, you’ll love the app’s features for this. Its Magic Enhancer lets you enhance the page by adjusting brightness, gamma, contrast, and sharpness.

While it isn’t free, investing a few bucks in DrawnStrips is worth it for comic book aficionados.

Download: DrawnStrips (Free trial, $4)

3. Comic CBR

CBR comic book reader chrome extension

Comic CBR is not exactly a full-fledged comic reader like the others. It’s a simple Chrome extension that allows you to read comic books in the browser. The user interface is minimalist and offers basic functions like the ability to chose View Mode and Page Direction.

All you need to do is upload or drop a file into your browser to open it. If you prefer, the extension also lets you upload CBR or CBZ files from your personal Google Drive account.

Download: Comic CBR (Free)

4. Astonishing Comic Reader

astonishing comic reader main menu

Astonishing Comic Reader is a simplistic Chrome extension option that supports multiple platforms. The web version lets you organize your comic collection and helps you discover new content. Astonishing Comic Book Reader also offers a Snapshot functionality that lets you take snapshots of comic books and share them with others.

Additionally, the cloud sync functionality (integrated with Google Drive) syncs your comic book library across all your devices.

Download: Astonishing Comic Reader (Free)

5. Simple Comic

Simple Comic Reader dual mode

Simple Comic reader excels in many ways. The app boasts a lightweight UI and supports all major file formats. Other highlights of the app include Thumbnail, Full-Screen, and Double Page modes. Plus, the Capture Tool lets you take a screenshot of the page and share it with your friends.

Performance is excellent. Simple Comic had us hooked with fast page renders and seamless menu transitions. Lastly, the thumbnail mode comes in handy when you want to navigate to a specific page or skip through multiple pages at once.

Download: Simple Comic

6. ComiXology

ComiXology Mac Comic Book Reader

ComiXology is like iTunes for comics; it’s one of the best ways to read comics online. The website lets you purchase individual comic books, or you can sign up for the ComiXology Unlimited plan. This grants access to thousands of comic books by paying a monthly subscription.

The best part is that ComiXology has a free section that offers 120 books at no cost. You can have a look at the free section first to help you decide whether or not you’d use the Unlimited plan. ComiXology offers a decent collection of comics spread across different categories, including lesser-known indie titles.

Visit: Comixology (Free, subscription available)

7. Marvel

Black Panther free marvel comic book reader

Marvel offers a subscription service called Marvel Unlimited. This lets you access more than 20,000 comics, including big names like Star Wars.

However, Marvel Unlimited doesn’t include every new comic, so you might still need to shell out if you want to read new releases right away. To help with this, Marvel Unlimited subscribers are treated to a 15 percent off digital comics.

Marvel also offers a free collection. This includes titles like the Black Panther series and Guardians of the Galaxy. However, the free offerings are sponsored, so you’ll have to put up with ads.

Visit: Marvel (Free, subscription available)

8. Sequential 2

Sequential 2 main page

Sequential is actually an image preview tool for Mac that conveniently doubles up as a comic reader. Though the app has not received any updates in a long time, it still works fine.

Sequential 2 offers a side panel with an image preview, and surprisingly, the app hasn’t lost its charm over time. The animation flow is fluid and there’s no lag whatsoever. You can double-click on any page to open the comic in full-screen mode. If you are on a lookout for a no-frills Mac-based comic book reader, then Sequential 2 will easily fit your bill.

Download: Sequential 2 (Free)

9. Tapas

tapas comic reader web user interface

Tapas is a South Korea-based webtoon syndicate that features comics, novels, and a special section for creators. The focus is mostly on original comic creators, so you might be disappointed not to find popular titles.

If you are a creator, Tapas lets you upload your comic strip. Check out our guide to making a web comic for the first time if you’re interested in this.

It also features forums to host discussions. And if you want to read comics on the move, Tapas has you covered with a free Android and iOS app.

Visit: Tapas (Free)
Download: Tapas for Android | iOS (Free, in-app purchases available)

Read Digital Comics Anywhere

We have more ways to consume our favorite comics than ever before. Of course, physical copies offer an unparalleled experience, but going digital is superior for convenience. Plus, digital comics can help you save money thanks to subscriptions and free offerings.

Can’t get enough comics? Have a look at the best graphic novels you can read free on Amazon.

Read the full article: The 9 Best Apps and Sites for Reading Comic Books on Mac


Read Full Article

How to Create a Group Email in Gmail


group-email-gmail

Look around. Groups are everywhere. That’s the way we roll in social apps like Facebook or WhatsApp. So why should the old and humble Gmail be any different? A group email in Gmail can save you the bother of picking out addresses one by one. But we need to talk about the other benefits of group emails too.

A group email is more than a simple list of email addresses. Let’s come to the benefits after we create our first email group in Gmail.

How to Create a Group Email in Gmail Quickly

Create an email group the instant you find that you are mailing the same bunch of people often. An email group is what it says on the tin—a bunch of email addresses that can share a common conversation. So open your Gmail inbox and follow the steps below.

1. Log into Google Contacts with your Gmail account.

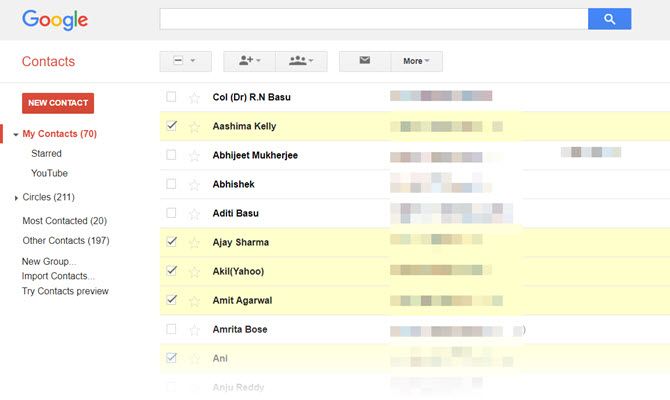
2. Select the contacts you want to group with a checkmark against their names and email addresses on the list. I have blurred the email IDs in the screenshot below.

Google Contacts

3. Click the Groups icon on the top (the icon with three stick heads) to show a dropdown menu.

Click the Google Groups Icon

4. In this drop-down menu, select an existing group or click Create new to place these contacts into their own unique list.

5. Enter a unique name for the new group in the New group dialog that pops up.

Name this email group.

6. Click OK to save the email group. The group now appears on the left side of the screen, under “My Contacts”. You can also spot a label with the group name against their names on the contacts list.

Use the Search Box to Create a Common Group

The Google Contacts search box is another quick way to create an emailing group. If you have most of the contact information organized in Google Contacts, then you can organize a group around any search criteria.

For instance, in the screenshot below, I used a keyword from the Notes field to find my friends who work in information technology.

Use search to create a Gmail Group quickly.

Then, it is just a matter of selecting the contacts and creating a new group or adding the members to an old one.

You can use any criteria to create a common list. For instance, a list of members from the same country, or with the same last name. This is why you should keep your Google Contacts clean and tidy.

How to Add Contacts to an Email Group

These specific email groups are one of the secrets to inbox organization. So keep adding new contacts to the right groups and you won’t have to do rummage through the list of addresses every time. You can add contacts to an email group from the master My Contacts list or from within a group with a couple of clicks.

Here’s how to do it from inside a group.

1. Select the group from the left sidebar.

2. Click the icon with a single stick head that says Add to “Group Name”.

Add Contacts to an Email Group

3. Type their name in the text box and pick the email address suggested by Gmail. Click Add. If they have multiple emails, Google picks the first one listed for the contact.

You can also add individual contacts to any groups from their contact cards. See the screen below:

Group Email from a Gmail Contact Card

How to Delete Contacts from an Email Group

You might have added a wrong contact, or you just want to shuffle a few members around. Remove a member from an email group by just de-selecting them. Here’s how in six steps.

Delete from Group

  1. Select and open the group from the left sidebar of Google Contacts.
  2. Select one or more contacts you want to remove with a checkmark against their names.
  3. Click the Groups button on top.
  4. Uncheck the checkbox for the group you want to remove them from.
  5. Click Apply from that drop-down menu.
  6. The contacts should immediately be removed from the list and Gmail displays a small notification at the top of the screen to confirm it. You can choose to undo it within a few seconds if you want.

Create a Distribution List in Gmail

Once a group is created it becomes your distribution list for any content. You can also email right from Google Contacts. But it’s more likely that you would want to use Gmail instead.

  1. Open Gmail.
  2. Click the Compose button
  3. In the To: text box, start typing the group name. Gmail will auto-suggest the group name for you to select.
  4. Choose the Group name and all the email IDs will get added to the To: field.

Send a Group Gmail

You can also include Gmail groups in the CC (Carbon Copy) and BCC (Blind Carbon Copy) fields as you would any other address. Use the BCC field if you want to mail a group of people who are unrelated to each other. The only address they will see is their own.

Gmail Contact Groups Vs. Google Groups

Gmail mailing list and Google Groups are two different things.

A Gmail contact group is for personal use while Google Groups are like online discussion forums. The group email in Gmail are managed through contacts and is owned by the creator.

You can create email based groups with Google Groups. They can be used by all members and anyone else who requests membership. One of the benefits is that you can join Google Groups without Gmail too. These can be a good collaborative space for like-minded teams. Google Groups allows you to create a collaborative inbox with a common shared email address, and the freedom to share a Google Calendar.

We are focusing on group emails from Gmail here, so I will point you to the right support page for Google Groups if you want to know more.

The Productivity Benefits of Email Groups

Gmail group emails are not only meant for teams. Like any other group, you can create them around any common interest. I would recommend that you should create custom contact groups for every purpose.

  • Want to coordinate a study group? Create a Gmail group.
  • Want to send a personalized newsletter? Make a distributed mailing list along with a newsletter template.
  • An event on the horizon? With these distribution lists, you don’t have to worry about forgetting anyone.
  • Manage multiple email accounts in Gmail? Use custom group emails to organize your sent mails.

Email groups as distribution lists are a common feature in Outlook. With some effort, you can make Gmail behave like a powerful desktop email client too. It’s an easy step to take and will help you become a power user of Gmail.

Read the full article: How to Create a Group Email in Gmail


Read Full Article

What Is Web Scraping? How to Collect Data From Websites

Gmail gets a useful right-click menu


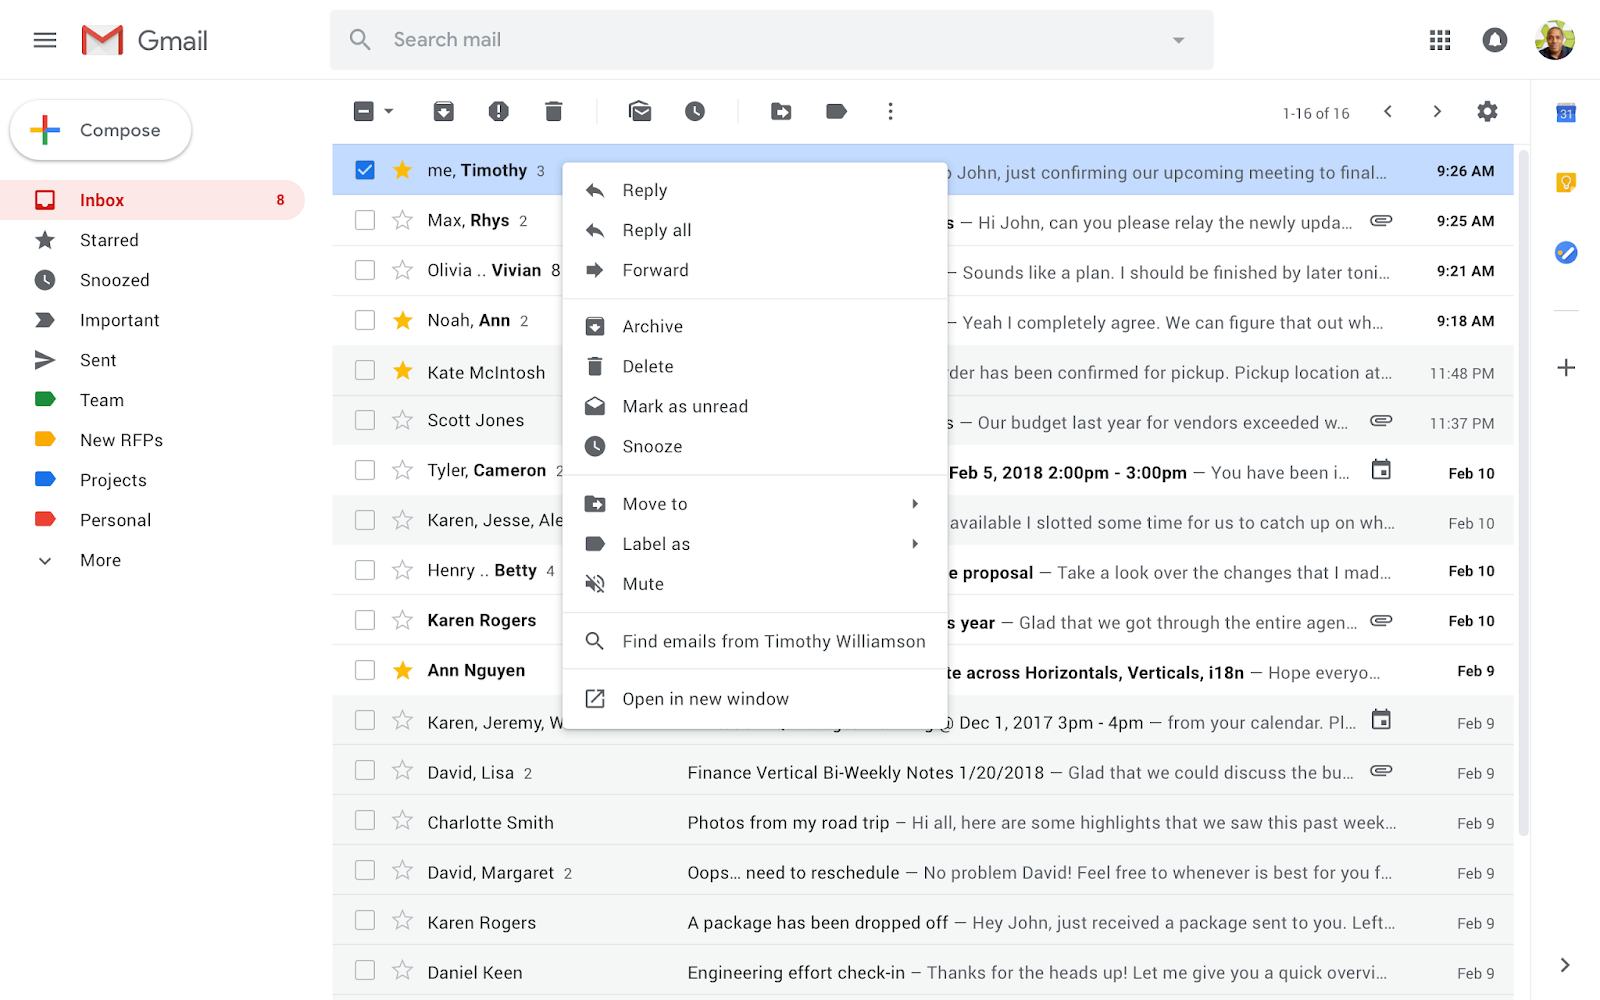
Google is giving Gmail a new right-click menu. And it’s about time. While you’ve long been able to right-click on any email in your inbox, your options were always limited. You could archive an email, mark it as read/unread and delete it, but that was about it. Now, as the company announced today, that’s changing and you’re about to get a fully-featured right-click menu that lets you do most of the things that Gmail’s top bar menu lets you do, plus a few extra features.

Soon, when you right-click on a message in your inbox view, you’ll see a long list of features with options to reply to messages and forward them, search for all emails from a sender or with the same subject, and open multiple emails in multiple windows at the same time. You’ll also be able to add labels to emails, mute conversations and use Gmail’s snooze feature, all from the same menu.

All of this is pretty straightforward stuff and none of it is especially groundbreaking, which makes you wonder why it took Google so long to implement this.

As usual, Google only tells us that it is rolling this feature out to G Suite users now (starting today for those on the rapid release schedule and on February 22 for those that follow the slower scheduled release cycle). But free users typically see these new features pop up somewhere around that same timeframe, too.


Read Full Article

Using Global Localization to Improve Navigation


One of the consistent challenges when navigating with Google Maps is figuring out the right direction to go: sure, the app tells you to go north - but many times you're left wondering, "Where exactly am I, and which way is north?" Over the years, we've attempted to improve the accuracy of the blue dot with tools like GPS and compass, but found that both have physical limitations that make solving this challenge difficult, especially in urban environments.

We're experimenting with a way to solve this problem using a technique we call global localization, which combines Visual Positioning Service (VPS), Street View, and machine learning to more accurately identify position and orientation. Using the smartphone camera as a sensor, this technology enables a more powerful and intuitive way to help people quickly determine which way to go.
Due to limitations with accuracy and orientation, guidance via GPS alone is limited in urban environments. Using VPS, Street View and machine learning, Global Localization can provide better context on where you are relative to where you're going.
In this post, we'll discuss some of the limitations of navigation in urban environments and how global localization can help overcome them.

Where GPS Falls Short
The process of identifying the position and orientation of a device relative to some reference point is referred to as localization. Various techniques approach localization in different ways. GPS relies on measuring the delay of radio signals from multiple dedicated satellites to determine a precise location. However, in dense urban environments like New York or San Francisco, it can be incredibly hard to pinpoint a geographic location due to low visibility to the sky and signals reflecting off of buildings. This can result in highly inaccurate placements on the map, meaning that your location could appear on the wrong side of the street, or even a few blocks away.
GPS signals bouncing off facades in an urban environment.
GPS has another technical shortcoming: it can only determine the location of the device, not the orientation. Sometimes, sensors in your mobile device can remedy the situation by measuring the magnetic and gravity field of the earth and the relative motion of the device in order to give rough estimates of your orientation. But these sensors are easily skewed by magnetic objects such as cars, pipes, buildings, and even electrical wires inside the phone, resulting in errors that can be inaccurate by up to 180 degrees.

A New Approach to Localization
To improve the precision position and orientation of the blue dot on the map, a new complementary technology is necessary. When walking down the street, you orient yourself by comparing what you see with what you expect to see. Global localization uses a combination of techniques that enable the camera on your mobile device to orient itself much as you would.

VPS determines the location of a device based on imagery rather than GPS signals. VPS first creates a map by taking a series of images which have a known location and analyzing them for key visual features, such as the outline of buildings or bridges, to create a large scale and fast searchable index of those visual features. To localize the device, VPS compares the features in imagery from the phone to those in the VPS index. However, the accuracy of localization through VPS is greatly affected by the quality of the both the imagery and the location associated with it. And that poses another question—where does one find an extensive source of high-quality global imagery?

Enter Street View
Over 10 years ago we launched Street View in Google Maps in order to help people explore the world more deeply. In that time, Street View has continued to expand its coverage of the world, empowering people to not only preview their route, but also step inside famous landmarks and museums, no matter where they are. To deliver global localization with VPS, we connected it with Street View data, making use of information gathered and tested from over 93 countries across the globe. This rich dataset provides trillions of strong reference points to apply triangulation, helping more accurately determine the position of a device and guide people towards their destination.
Features matched from multiple images.
Although this approach works well in theory, making it work well in practice is a challenge. The problem is that the imagery from the phone at the time of localization may differ from what the scene looked like when the Street View imagery was collected, perhaps months earlier. For example, trees have lots of rich detail, but change as the seasons change and even as the wind blows. To get a good match, we need to filter out temporary parts of the scene and focus on permanent structure that doesn't change over time. That's why a core ingredient in this new approach is applying machine learning to automatically decide which features to pay attention to, prioritizing features that are likely to be permanent parts of the scene and ignoring things like trees, dynamic light movement, and construction that are likely transient. This is just one of the many ways in which we use machine learning to improve accuracy.

Combining Global Localization with Augmented Reality
Global localization is an additional option that users can enable when they most need accuracy. And, this increased precision has enabled the possibility of a number of new experiences. One of the newest features we're testing is the ability to use ARCore, Google's platform for building augmented reality experiences, to overlay directions right on top of Google Maps when someone is in walking navigation mode. With this feature, a quick glance at your phone shows you exactly which direction you need to go.
Although early results are promising, there's significant work to be done. One outstanding challenge is making this technology work everywhere, in all types of conditions—think late at night, in a snowstorm, or in torrential downpour. To make sure we're building something that's truly useful, we're starting to test this feature with select Local Guides, a small group of Google Maps enthusiasts around the world who we know will offer us the feedback about how this approach can be most helpful.

Like other AI-driven camera experiences such as Google Lens (which uses the camera to let you search what you see), we believe the ability to overlay directions over the real world environment offers an exciting and useful way to use the technology that already exists in your pocket. We look forward to continuing to develop this technology, and the potential for smartphone cameras to add new types of valuable experiences.