29 August 2018

Forget Philips Ambilight: iHoment Retrofit TV Backlight Does The Job For $60


Our verdict of the MINGER iHoment LED TV Smart Lights:
Cost-effective, relatively easy to install and retrofit to any TV. iHoment is the perfect immersive addition to entertainment setup.
910

If you’re looking to set the mood in your entertainment areas, ambient lighting is one of the best ways of accomplishing this. There are a plethora of LED strips available online and at the high end we have systems like Philips Hue and the innovative Nano Leaf.

But ambient lighting can also be used to increase levels of immersion by syncing with what’s happening on your screen. Achieving this can prove to be challenging for a number of reasons. Has the MINGER iHoment kit solved these problems in a cost-effective and easy way? Let’s find out – and at the end of this review, you can enter our competition to win a kit for yourself!

Specifications

  • Small SKU size: 6.23ft of LEDs for 40″-55″ TVs
  • Large SKU size: 7.22ft of LEDs for 46″-60″ TVs
  • Connectivity: Bluetooth
  • App Support: iOS and Android
  • Video Source: Anything displayed on the TV

What is an Ambilight?

Ambilight is a trademark for the immersive lighting technology that Philips launched in 2004, with lighting on the rear of the TV that reflected on-screen content. To date, they’re the only manufacturers to build this technology into the TV itself. Unfortunately, the TVs aren’t sold in the US any more. Various attempts have been made to retrofit this functionality to other TVs, but have been unsuccessful due to cost, complexity, or limitations.

Our own ambilight DIY project required a Windows PC to playback the content and capture the image, but you can do the same with a Raspberry Pi and HDMI capture device for any input source:

For a ready-made kit, there’s LightBerry, but it costs upwards of $300.

iHoment have an innovative solution that keeps the cost and complexity low: it mounts a camera on top of your TV.

Getting Started

Packaged in the box are the LED strip, the controller, a camera, four electrostatic stickers and a tape measure.

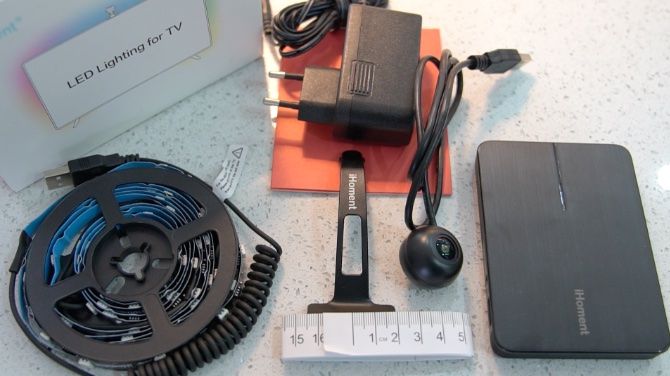
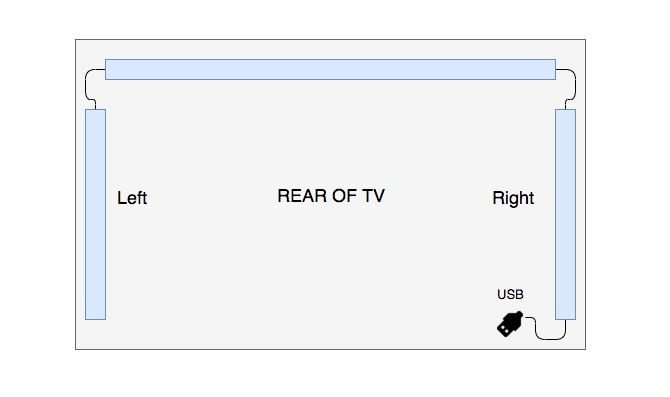
The LED strip is made up of three pieces. One vertical side with a USB connector, followed by the horizontal longer piece, and finally the last vertical piece. Each side is connected via a flexible cable making it easy when it comes to installation.

The first step would be to clean the back and top side of your TV and be sure to remove any dust that may have settled. Ideally, you want to place the TV face down on a soft towel, or if you’re extra lazy like me install it in place and get a friend to help out.

Installation

The orientation of how you install the strips is very important. If you’re looking at the rear side of the TV, ensure the vertical strip with the USB connector is going to be applied on the right-hand side. It may be a good idea to do a test fit without removing any adhesive tape to get an idea of where you’re going to be sticking the strips.

Once you’ve got the orientation correct, remove the adhesive tape from the middle piece and press down along the length of the strip. Do the same with the vertical side pieces and let’s move on to the camera.

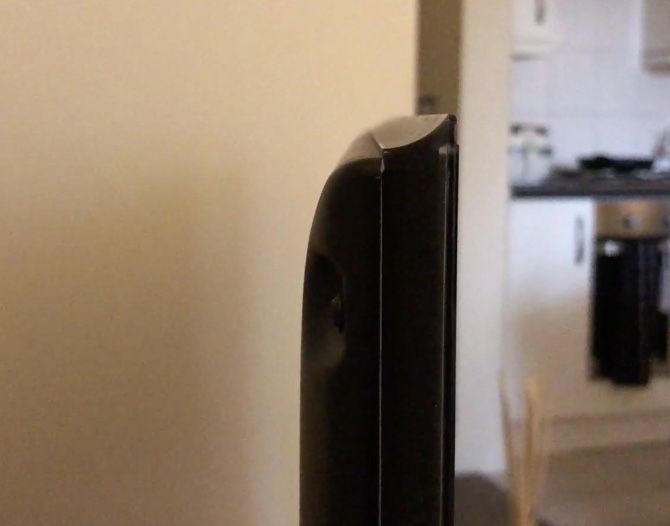
The camera is going to be installed on the top surface of your TV and needs to be parallel with the ground. Not all TVs are going to be completely flat on the top so you may need to fashion something out of Sugru or play dough in order to install the camera correctly. If your camera doesn’t seem to be parallel the mount can be bent easily to get the perfect fit.

The camera needs to be precisely in the center of your TV. Using the tape measure, and a whiteboard marker, mark the center of your TV on the bezel. You can also mark the camera mount to make lining up the camera and the bezel much easier. Remove the 3M adhesive tape and stick the camera to the top of your TV.

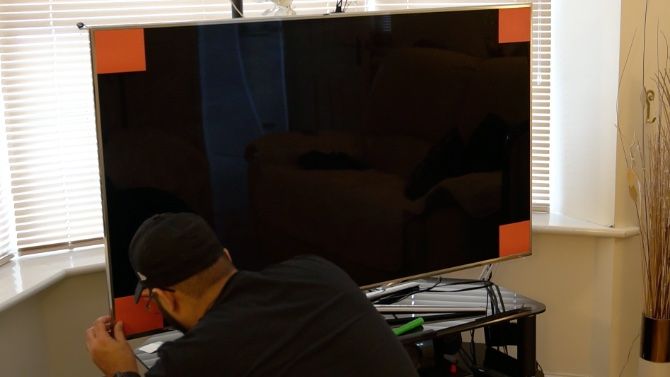
Finally, stick the four electrostatic stickers on the four corners of your TV. Fortunately, being electrostatic they are not going to leave any residue, which again is well thought out on iHoment’s part. Be sure to preserve these stickers in case you need to recalibrate the LED strips.

Calibration

If there are any red items in the periphery or line of sight of the camera, put them out of sight as it can interfere with the calibration. Ensure your TV is powered off and connect the camera and LED strip to the controller box. Finally, hook up the power (to the iHoment controller that is, not your TV). Quickly move away and make sure there’s at least a meter between yourself and the TV to make sure calibration happens correctly.

The LED strip will cycle through a few colors and when it stays solid white calibration is complete. If for any reason this is not the case you need to leave the stickers in place and re-run the calibration from within the app. I had to recalibrate one more time after initialization for the strip to work correctly. It also helps to keep the room lights switched on when calibrating the strips.

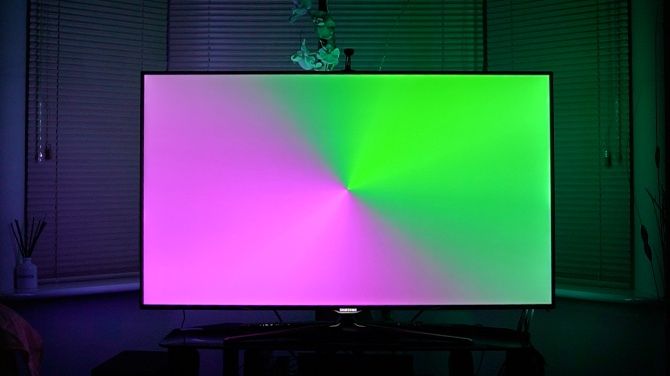
Power on your TV, and run a few quick tests to check if all your hard work has paid off. If you have access to YouTube you can search for “Ambilight Test” and have your TV cycle through a few colors and put the strip to the test.

Sit Back and Enjoy

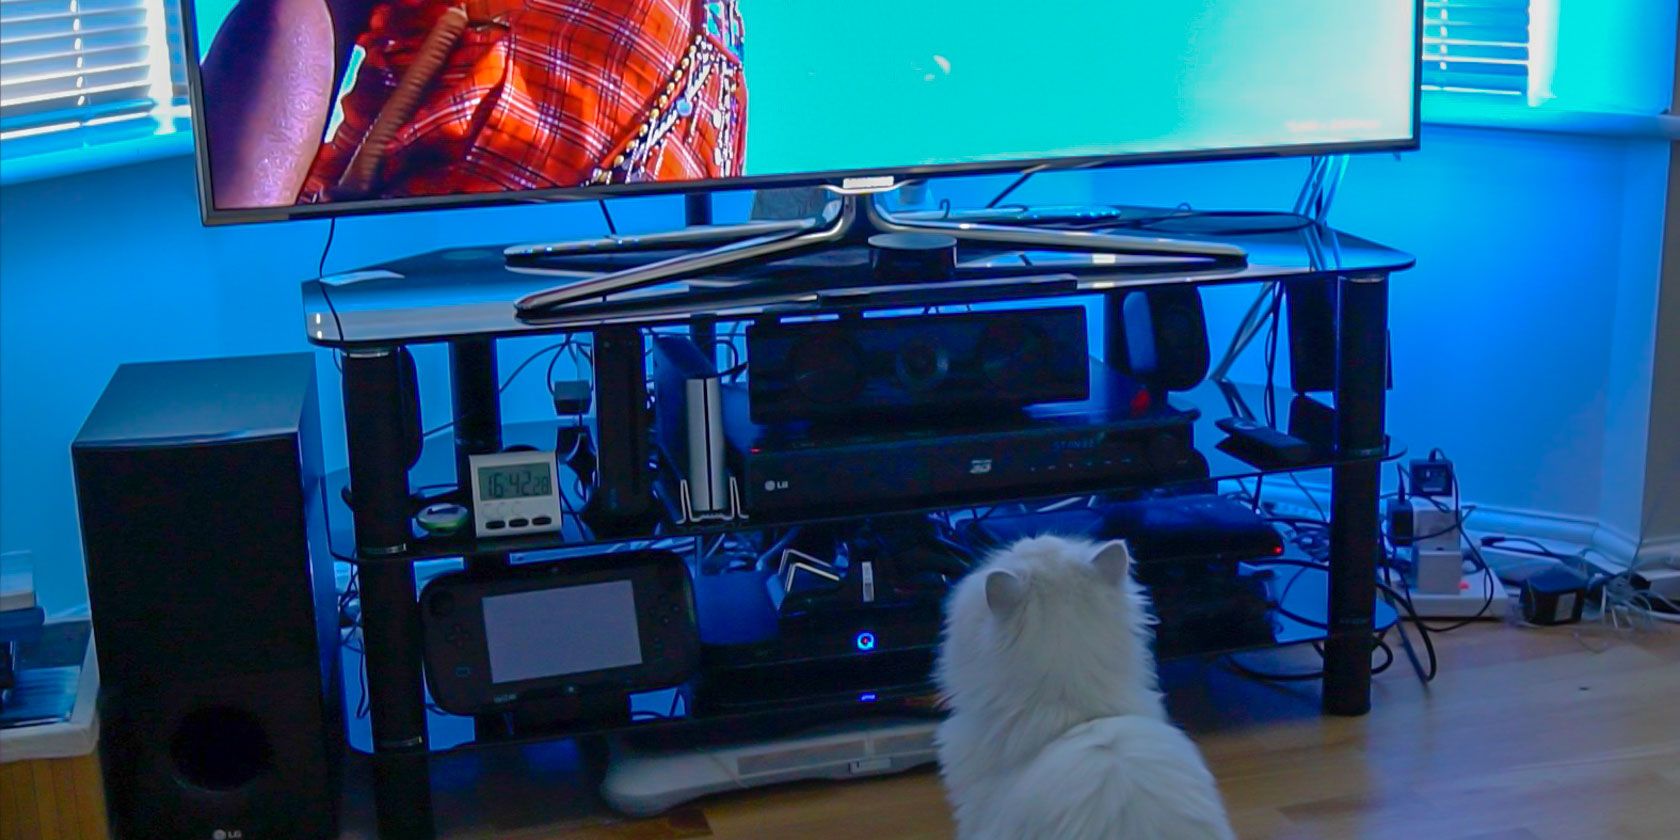
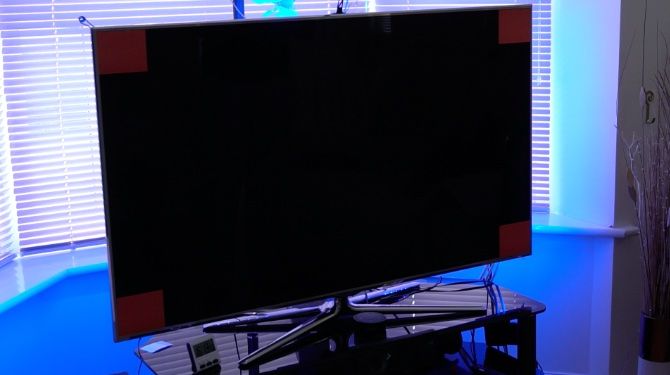
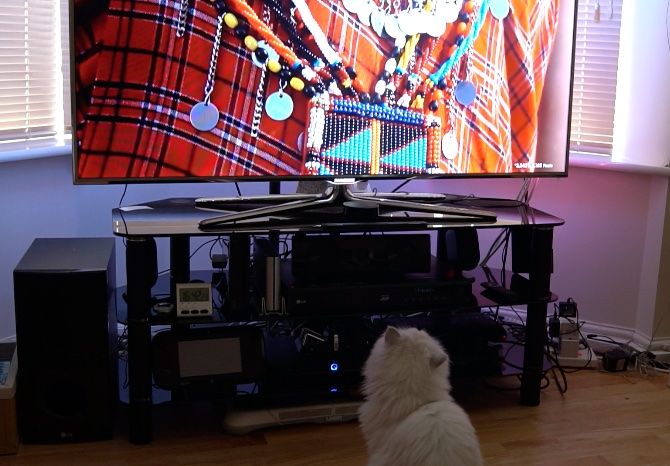
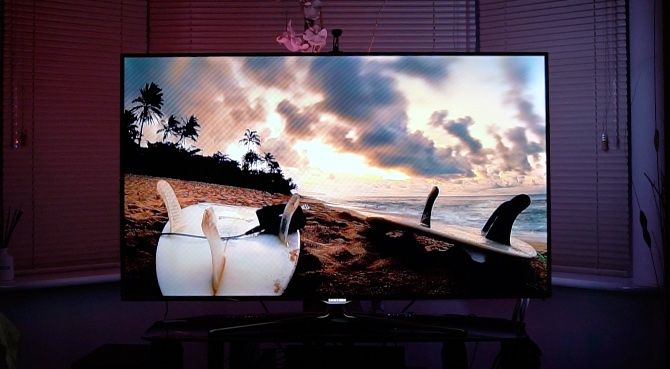
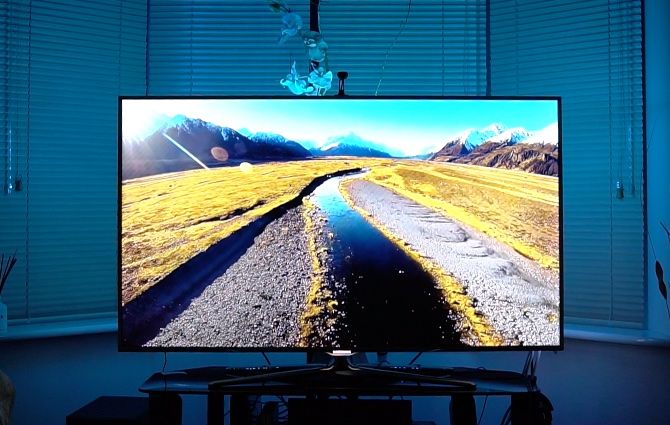
The result is absolutely stunning. Your TV which once was a simple animated picture frame is now a window into another dimension. It almost feels as if the TV is extending beyond its frame into the rest of the room. The iHoment doesn’t feel intrusive but rather adds to the ambiance complimenting every scene.

It’s quite difficult to translate over video or in pictures but it is something you just have to experience. When technology like this comes along some may not see it as necessary but there’s no disputing how impressive it is. But how does it compare with the likes of Philips Ambilight?

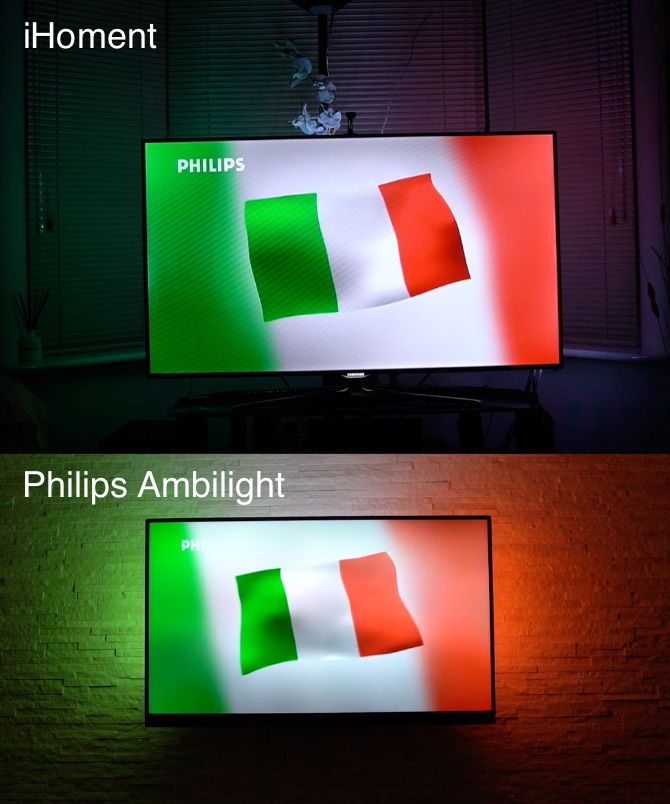
Inherently, this is an apples to oranges comparison as Ambilight have their LEDs baked into the TV. Relatively the Ambilight has a few more milliseconds of latency but it’s by no means sluggish. The colors on the Ambilight are also slightly more accurate for some of the colors but I doubt this will be very noticeable in regular usage.

The App

You can find the iHoment app on the App store or the Play store. Make sure your Bluetooth is switched on and fire up the app. Your mobile device will begin searching for the iHoment controller. When you initially pair, you can rename the device, in case you want to pair to multiple controllers.

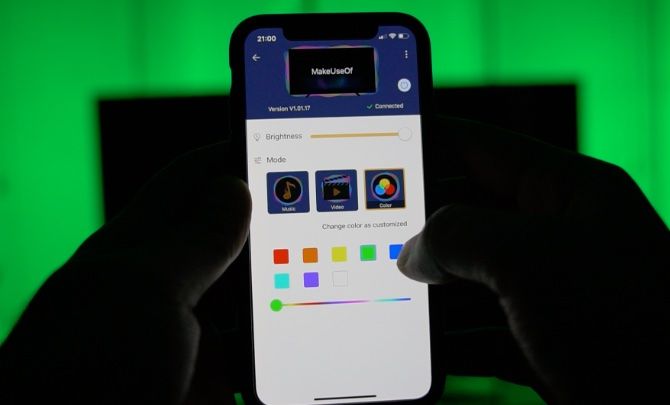
The app has essentially three modes; music, video, and color. Music activates a microphone in the controller box and the LEDs change based on sounds. Color, as you guessed allows you to statically set the color of the lights. The color picker does seem a little sparse, compared to a color wheel style picker similar to the Philips Hue.

Having an app to control the iHoment is brilliant. Many of the cheaper LED strips are paired with an infrared remote which is less convenient. Not to mention the app can be upgraded to include new features.

Predominantly you will leave the system in dynamic video mode which is where all the magic happens. The iHoment detects if your TV is on or off and switches both on and off with your TV. This is a great feature that means usage is generally a case of set and forget.

Do You Want an Ambilight For Your TV?

iHoment has put in a huge amount of effort with this device an it shows. The fact that you can retrofit it to almost any TV, isn’t dependant on HDMI, and is simple to install compared to a fully DIY solution, makes the iHoment the ultimate accessory to your entertainment system.

There are some areas where they could improve. Such as making the user manual a little easier to follow and the aforementioned color picker. It would also be nice if the transitions between static colors faded into each other. However, this can probably be added as a firmware update to the controller.

The iHoment has good color detection in my experience and exceeded expectations. If you’re looking to take your video or gaming experience into the next level, there just isn’t another system as cost-effective as the iHoment.

Enter the Competition!

iHoment Retrofit TV Backlight Kit

Read the full article: Forget Philips Ambilight: iHoment Retrofit TV Backlight Does The Job For $60


Read Full Article

Google’s Wear OS gets a new look


Wear OS, Google’s smartphone operating system that was once called Android Wear, is getting a new look today. Google says the overall idea here is to give you quicker access to information and more proactive help. In line with the Google Fit redesign, Wear OS now also provides you with the same kind of health coaching as the Android app.

In practice, this means you can now swipe through multiple notifications at once, for example. Previously, you had to go from one notifications card to the next, which sound minor but was indeed a bit of a hassle. Like before, you bring up the new notifications feed by swiping up. If you want to reply or take any other action, you tap the notification to bring up those options.

Wear OS is also getting a bit of a Google Now replacement. Simply swipe right and the Google Assistant will bring up the weather, your flight status, hotel notifications or other imminent events. Like in most other Assistant-driven interfaces, Google will also use this area to help you discover other Assistant features like setting timers (though I think everybody knows how to use the Assistant to set a time given that I’m sure that’s 90% of Assistant usage right there).

As for Google Fit, it doesn’t come as a surprise that Wear OS is adapting the same circle design with Hear Points and Move Minutes as the Android app. On a round Wear OS watch, that design actually looks quite well.

While this obviously isn’t a major break from previous versions, we’re definitely talking about quality-of-life improvements here that do make using Wear OS just that little bit easier.


Read Full Article

YouTube Now Tracks Your Time Spent Watching Videos


youtube-red

Like other tech companies, Google understands the need to help people use technology responsibly. So, in May 2018, as part of its ongoing Digital Wellness initiative, Google rolled out a feature which reminds viewers to take a break from YouTube.

Now, it has added another tool to its arsenal, and this one tracks the time you’ve spent watching YouTube videos today, yesterday, and over the last seven days. Which, given the rise of vloggers and streamers, might be longer than you think.

More Than the Occasional Cat Video

For many people, YouTube is more than just the occasional cat video shared on social media. Instead, it’s a treasure trove of interesting content that can consume hours of their lives. Perhaps too many hours, on occasion.

To help you find out whether you’re spending too long watching YouTube videos, and if so, do something to quell your addiction, YouTube has added a Time Watched profile to your account menu. This builds statistics based on your watch history.

This profile shows you how long you’ve been watching videos for today, yesterday, and over the past seven days. It also shows you your daily average to help you determine whether this is a true addiction or just an occasional lapse into being a couch potato.

While it’s useful to know this information, it’s only worthwhile finding out you’re spending too long watching YouTube videos if you then do something about it. Like closing the app and reading a book, for example. As unlikely as that is in this day and age.

Help Maintaining Your Digital Wellness

The Time Watched profile is just the latest in a line of tools YouTube has rolled out. The others are the aforementioned reminder to take a break, plus ways of managing notifications so that you don’t feel the need to check your phone every five minutes.

Google isn’t the only tech company taking your digital wellbeing seriously. Facebook recently rolled out new tools for Facebook and Instagram which not only show you how much you’re using the apps but also tries to help you curb your social media addiction.

Read the full article: YouTube Now Tracks Your Time Spent Watching Videos


Read Full Article

How to Install Brushes in Procreate


Hand-lettering is all the rage now, and if you’re interested in giving it a go, one of the most popular apps you’ll want to add to your arsenal is Procreate. And to get the most out of the app, you’ll probably want to install a few free or paid hand lettering brushes.

Installing brushes you’ve downloaded couldn’t be easier.

How to Install Brushes in Procreate

You can download the brushes on your computer and save them to the cloud (iCloud or Dropbox) or you can download them directly on your iPad.

If you download the files to your iPad as a ZIP file, you can unzip the files with a free app like FileExplorer: File Manager or iZip. No matter how you choose to download the brush, the installation process is the same:

  1. Open a new canvas and tap the paintbrush icon to open the Brushes panel.
  2. Select the folder where you want to install the brush. (You can create a new folder by tapping the + button at the top of the list of brush sets.)
  3. Tap the + button above the list of brushes to import a new brush.
  4. Tap Import in the dialog box that opens. 
  5. You’ll see the iPad’s File interface. Navigate to the folder containing your downloaded Procreate brushes.
  6. Tap the brush you want to install. The screen will go back to the Procreate canvas with the brush panel open. (At first the brush will be labeled as an untitled brush, but once you hit the back button to go back to the list of brushes, the name will appear.) 

To get you started, you can find some great free Procreate brushes courtesy of Missy Myer.

While Procreate is great for hand-lettering, it’s not the only way the popular iPad app can be used. It is one of the most powerful iPad art apps out there.

Image Credit: tomeversley/Depositphotos

Read the full article: How to Install Brushes in Procreate


Read Full Article

How to Ask Cortana About Any Image to Learn More About It


cortana-todo-tricks

Cortana could become your virtual assistant for life if you stay loyal to Microsoft. But to get the most out of it, you have to remember all its commands and features.

Some of its features work seamlessly with Microsoft Edge, and this particular one allows you to get help from Cortana when you need to find images.

How to Get Instant Image Results Using Cortana

Ask Cortana about an image

You already know that Cortana can be an invaluable tool if you are boosting your vocabulary with unfamiliar words. When browsing in Microsoft Edge, you can right-click on a word and select Ask Cortana from the menu.

A side panel displays the meaning, Wikipedia entry, and even images to cement your understanding. You can also ask Cortana if you want to know more about an image displayed in the browser.

  1. Right-click on an image.
  2. From the menu, select Ask Cortana about this picture (or “Bing Lookup” if Cortana is not enabled).
  3. The Instant Results are displayed on the right. You will see all the information Bing can pull on the image. For instance, you can check image dimensions and other sizes available, related images, and related searches etc. If the image is a product, it displays places to buy that product, and recipes are also displayed for food items.

The feature isn’t too different from Google’s “Search Google for image” in Chrome’s right-click menu. It is the same as Bing’s image search but just like Chrome’s image search in the context menu, this too can become a timesaver and part of your everyday browsing habits. But if you don’t like Bing, you can force Cortana to use Chrome and Google instead.

Read the full article: How to Ask Cortana About Any Image to Learn More About It


Read Full Article

How to Always Run Apps as Administrator on Windows


Running apps as an administrator in Windows gives them extra privileges. It lets them edit the registry, change system files, and access other folders that are usually restricted.

Sometimes, you need to run a program in administrator mode every time you use it. For example, my music management software needs to run in administrator mode so it can automatically organize my files in real-time.

If you have any apps you use every day that also require admin privileges, you will know how annoying it can be to continually right-click on the shortcut or EXE and select Run as Administrator.

Thankfully, there’s a way to make apps run in admin mode automatically. You’ll just need to agree to the popup UAC warning every time you launch them.

How to Always Run Apps as Administrator

To make apps open in administrator mode every time you open them, follow the step-by-step instructions below.

  1. Open the Start menu.
  2. In the All Apps list, scroll down and find the app you want to change.
  3. Right-click on the app’s name and go to More > Open file location.
  4. File Explorer will open. Again, right-click on the app’s name.
  5. Click on Properties and select the Shortcut tab.
  6. Select Advanced.
  7. Finally, mark the checkbox next to Run as administrator.
  8. Click on OK to save your changes.

Now your app will open in administrator mode every time you run it. If you want to remove automatic admin rights at any point in the future, re-follow the steps above and unmark the checkbox in Step 7.

For more information about administrator mode on Windows 10, check out our introductory guide to User Account Control.

Read the full article: How to Always Run Apps as Administrator on Windows


Read Full Article

3 Ways to Reduce the Size of a Microsoft Word Document


microsoft-word-auto-update

You probably don’t worry much about the size of Microsoft Word documents in most cases. Compared to games, videos, and other large files, they don’t take up much space at all.

But if you’re posting a Word document online, sharing it via email, or need to shave off every byte possible for some other reason, here are three quick ways to cut down how big your Word document is.

1. Save in DOCX Format

Word-Convert-to-DOCX

Starting with Word 2007, documents now save in DOCX format instead of DOC. The only reason to use DOC is if you need backwards compatibility with ancient word processing apps.

One of DOCX’s benefits is far smaller file sizes. A document that’s a few megabytes in DOC form would take up just a few hundred kilobytes as a DOCX.

When you save your Word documents, make sure to choose the DOCX format. If you’re already working with a DOC file, open the File tab in Word and select Convert on the Info tab. You’ll need to accept a prompt and provide a new file name.

2. Compress Images

Word-Compress-Images

Before you insert an image into a Word document, perform any edits in a separate image editor. If you edit inside Word, it will retain the original version and waste space.

You should also use the Insert > Picture menu to add an image from your computer in a space-friendly format, like JPG, instead of pasting it in. When you paste, Word adds the image as a PNG or BMP, which both take up a lot of space.

Finally, on the Save As menu, you can select Tools > Compress Pictures and select a Resolution for all of them. Depending on the document, you may be able to get away with lower-quality images to save more space.

3. Remove Font Embeds

Word-Embed-Fonts-Option

If you use a custom font in a document and someone who doesn’t have that font installed opens it, it won’t look right. To combat this, Word lets you embed fonts in your document so they work everywhere.

As you can imagine, this takes up more space. Head to File > Options and on the Save tab, make sure to uncheck Embed fonts in the file. If you must have fonts embedded for a particular file, you can check Do not embed common system fonts to leave out universal fonts like Arial.

For more tips, check out hidden features of Microsoft Word you must know.

Read the full article: 3 Ways to Reduce the Size of a Microsoft Word Document


Read Full Article

Google Can Now Turn Your Selfies Into Stickers


You can now create a set of stickers to suit all occasions using Gboard. The new feature, called Mini Stickers, turns you into an animated character, and all from a single selfie. No, this isn’t very original (Bitmoji, anyone?) but it is kinda cool.

Google Creates a Mini Version of You

Google’s new Mini Stickers use a combination of machine learning, neural networks, and illustrations by an artist to turn you into a cartoon character. Or avatar, or emoji, or whatever else you want to call it. And all from nothing more than a selfie.

Mini Stickers create a virtual you based on your visual characteristics. Which means your skin tone, face shape, hairstyle, eye color, and more besides. And if you’re not happy with Google’s interpretation of you then you can even customize it.

How to Use Google’s Mini Stickers

All you need to do is open Gboard for Android or Gboard for iOS, and tap the Emoji button. Then, select the Stickers icon, and then tap on the Mini icon. Finally, hit the Create button, take a selfie, and watch Google work its magic.

At this point you can accept Google’s creation or customize your Mini. You’ll then have a selection of stickers to use, with both a “Bold” and “Sweet” flavor of you to choose from. And you can send them to everyone you know for no apparent reason.

Mini Stickers First Appeared on Allo

This feature has been ported across from Google Allo, where it was dubbed Selfie Stickers. While Google Allo isn’t disappearing, Google has paused development on the messaging app. Which is why its best features are being introduced to other Google apps.

If you’re intrigued by Allo you should read our beginner’s guide to Allo and Duo. And if you’re using Gboard, you should see why we described it as the best iPhone keyboard yet or discover things you didn’t know Gboard for Android could do.

Read the full article: Google Can Now Turn Your Selfies Into Stickers


Read Full Article

How to Get Verified on Instagram

Facebook has removed all cross-posted tweets


Facebook users are complaining the company has removed the cross-posted Tweets they had published to their profiles as Facebook updates. The posts’ removal took place following the recent API change that prevented Twitter users from continuing to automatically publish their Tweets to Facebook. According to the affected parties, both the Facebook posts themselves, as well as the conversation around those posts that had taken place directly on Facebook, are now gone. Reached for comment, Facebook says it’s aware of the issue and is looking into it.

TechCrunch was alerted to the problem by a reader who couldn’t find any information about the issue in Facebook’s Help Center. We’ve since confirmed the issue ourselves with several affected parties and confirmed it with Facebook.

Given the real-time nature of social media – and how difficult it is to pull up old posts – it’s possible that many of the impacted Facebook users have yet to realize their old posts have been removed.

In fact, we only found a handful of public complaints about the deletions, so far.

For example:

Above: selected complaints from Twitter about the data loss

Above: a comment on TechCrunch following our post on the API changes 

Some of those who were impacted were very light Facebook users and had heavily relied on the cross-posting to keep their Facebook accounts active. As a result of the mass removals, their Facebook profiles are now fairly empty.

TechCrunch editor Matthew Panzarino is one of those here who was impacted. He points out that the ability to share tweets to Facebook was a useful way to reach people who weren’t on Twitter in order to continue a discussion with a different audience.

“I’ve had tweet cross-posting turned on for years, from the early days of it even existing. This just removed thousands of posts from my Facebook silently, with no warning,” Matthew told me. “Even though the posts didn’t originate on Facebook, I often had ongoing conversations about the posts once my Facebook friends (and audience) saw them. Many of them would never see them on Twitter either because they don’t follow me or they don’t use it,” he said.

“It’s wild to have all of that context just vanish,” he added.

As you may recall, Facebook earlier this month made a change to its API platform to prevent third-party apps from publishing posts to Facebook as the logged-in user. The change was a part of Facebook’s larger overhaul and lockdown of its API platform in the wake of the Cambridge Analytica scandal, where as many as 87 million Facebook users had their data improperly harvested and shared.

Since then, Facebook has been trying to plug up the holes in its platform to prevent further data misuse. One of the changes it made was to stop third-parties from being able to post to Facebook as the logged-in user.

For existing apps, like Twitter, that permission was revoked on August 1, 2018.

Above: Twitter’s cross-posting feature, on the day it was disabled by the Facebook API change

Before the API changes, Twitter users were able to visit the “Apps” section from Twitter on the web, then authenticate with Facebook to have their tweets cross-posted to Facebook’s social network. One enabled, the tweets would appear on the user’s page as a Facebook post they had published, and their friends could then like and comment on the post as any other.

In theory, the API changes should only have prevented Twitter users from continuing to cross-post their tweets to Facebook automatically. It shouldn’t have also deleted the existing posts from Facebook users’ profiles and business users’ Facebook Pages.

This is a breach of trust from a company that’s in the process of trying to repair a broken trust with its users across a number of fronts, including data misuse. Regardless of whatever new policy is in effect around apps and how they can post to Facebook, no one would have ever expected that Facebook would actually remove their old posts without warning.

We’re hoping that the problem is a bug that Facebook can resolve, and not something that will result in permanent data loss.

Facebook tells us while it doesn’t have further information about the problem at this time, it should have more to share tonight or tomorrow about what’s being done.


Read Full Article

You can now apply to get a verified badge on Instagram — here’s how


Instagram is at last quenching the thirst of its thirsty, thirsty unverified users.

The company just introduced a trio of new features designed to make Instagram a generally safer and more authentic place to hang out (third-party 2FA — enable it!) and for the first time the platform now offers users a straightforward way to request verification.

On Instagram, blue check marks are fairly rare, even among pretty big brands and public figures. Getting verified on the platform has long been the stuff of legend — no one quite knows what goes on behind the scenes but knowing a guy doesn’t hurt. Remarkably, there’s even a super sketchy black market where people charge thousands of bucks to hook you up with verified status (or more likely to just rip you off). The whole thing has always been kind of mysterious, with little blue checks quietly sprinkled around in no discernible pattern.

It looks like those days are over. While it’s too early to tell if Instagram will be handing out more verified badges to users, they’ve at least made the process much more transparent. Now, any user can request to be verified with a few steps. As a note: In our testing, the option to request verification is live now in iOS but hasn’t yet popped up in the updated Android app.

If you’re curious if you might qualify to begin with, here’s how Instagram framed the new verification system in its latest announcement:

“… The blue verified badge is an important way for you to know that the account you are interacting with is the authentic presence of a notable public figure, celebrity, global brand or entity. Today we are enabling a new way for accounts that reach large audiences and meet our criteria to request verification through a form within the Instagram app.”

Does that sound like you? Here’s what you need to do.

1) Request Verification

From your profile, navigate to the Settings menu and then find an option to “Request Verification.”2) Show your stuff

Provide the relevant documents. Instagram accepts government-issued IDs (driver’s license, passport or other national ID cards). In lieu of that, you can submit official documents like a utility bill, tax filing, or article of incorporation. These documents won’t be public on your profile.

If your official documentation isn’t a match for your legal name, you might be out of luck. We’ve asked Instagram to clarify if these documents need to match your account information exactly or if they just need them on file for reference.

3) Wait and wonder

Wait while Instagram reviews your request. Instagram says that you’ll receive a notification letting you know if you’ve been approved or rejected, so look out for that. If you are rejected you can reapply after 30 days.

Tips and requirements

Before you apply, it’s worth reading over what Instagram requires for a verified account. According to its hub on verified badges, Instagram will evaluate your account for “authenticity, uniqueness, completeness and notability” — the criteria it must meet in addition to abiding by the platform’s terms of service.

What do those things mean? Instagram defines an authentic account as one that “represent[s] a real person, registered business or entity.”

When Instagram demands an account be “unique” what it really means is that it intends to only approve one account per business or individual except in cases of “language-specific accounts.” Instagram reminds users that it “[doesn’t] verify general interest accounts (example: @puppymemes).”

To make sure your account is complete, it must be public, with a profile photo, bio and one post minimum. Importantly, Instagram stipulates that your account “can’t contain ‘add me’ links to other social media services,” so prune anything like that.

The last criterion is the toughest. Instagram requires that your account be “notable.” You might think know that your account is [100 emoji], but unless you are a “well-known, highly searched for person, brand or entity” you probably won’t make the cut. Instagram explains further that it reviews accounts “featured in multiple news sources” and paid content doesn’t count. While Instagram’s process is way more transparent now, this bit does leave some room for interpretation.

Even with the new request form, keep in mind that most users won’t make the cut. Historically, it’s kind of unpredictable. Popular users who seem like a no-brainer for a verified account sometimes don’t have verified status, while others with a far less substantial public profile do. Even here at TC, some of us (like @panzer with his assiduous sneaker content) sport a little blue check while others don’t. We don’t know if there is more rhyme or reason to verification now, but at least the process is public and available for everyone.


Read Full Article

How the New Google Tasks Helps You Manage Your To-Do List


new-google-tasks

Google has cleaned up their legacy tool Google Tasks and introduced a fresh look. The goal of Google Tasks historically has been to keep you organized with your to-dos. Adding tasks and managing lists are easy with this new task management app.

While it doesn’t rival the feature-rich Todoist, the minimalism of Google Tasks is being praised for its basic abilities.

What’s New With Google Tasks?

The first Google Tasks experience launched back in 2009 and had a positive release.

The tool has always been simple. Allowing you to add tasks, notes and create new lists for all your projects. The basic approach of Google Tasks brought in many eyes, with even the likes of YouTuber MKBHD using it as their daily driver.

Google Tasks - How to Get Started

Since the days of the old Google Tasks, Google has stepped things up. Eight years on, they’ve created something quite interesting.

The goal of the classic Google Tasks was to help organize tasks when inside your Gmail account. You could access the task list from the inbox and stay on top of your to-dos. The design was never award-winning. But Google never put their full attention on upgrading this.

But what’s changed in the app?

Google Tasks hasn’t changed too much in terms of features. The ability to create lists and manage tasks is very much the same. But in the last 2-3 years, the design began to feel very out of date. However, the new Gmail redesign brought about a change and the new Google Tasks look much more streamlined to manage your daily to-dos.

Tasks by Google - Get Started

With the new Google Tasks, simplicity is the key.

The main motivation for people moving to Tasks is this very reason. With a busy 21st-century routine and so many task managers to choose from. Google Tasks scratches an itch. With the lack of complexity, combined with the Google-feel and close links of to-dos with Gmail and Google Calendar, many people have transitioned to Tasks.

The bad news is that Google Tasks launched without a standalone web application. The only way to access Tasks is via the new Gmail dashboard. Failing that, you can enjoy the full download on iOS and Android. The shame is that there’s no sign of a web app for managing your tasks.

Create Your First Task List in Google Tasks

To create your first list, view your lists and select “Create a new list”.

New lists are fundamental to organizing tasks into various projects. Creating a list per project is a good way to keep everything plotted out. Many Google Tasks users keep things simple, with a list of personal activities and a list for work errands.

Create a new Task List - Google Tasks

Once you have a new list created, managing tasks is easy.

To add tasks to the list, select “Add a task” and type in what’s up next. If you’re in a rush, Tasks will allow you to add multiple tasks and by hitting enter, they will be added to the list.

Add a New Task - Google Tasks

Once you’ve added a task, you can add a few context points. You can add details, a due date, and even sub-tasks to help you break down the task actions. The information is easy to add and from here you can move the task to another list.

Adding Detail to a Task - Google Tasks

This is ideal if your goal is to add the location of the event or even a few errands of the task itself. Links and other such information will work in the “details” section too. Inside Google Tasks, you cannot create a recurring reminder. However, Google should add this in time allowing you to set repeat or routine to-dos.

Viewing Your List - Google Tasks

Once you’re happy, you can return to the list view and see your tasks including sub-tasks. This is the extent of the Google Tasks application through the Gmail web dashboard. The iOS and Android experience are almost identical, just in the vertical format for your smartphones.

Adding Emails to Google Tasks - Google Tasks

Add a new email as a t0-do. The magic with having Tasks right next to your Gmail dashboard is when you want to add a new email as a task.

From Gmail, you can drag new emails into the task list. This will create them as a to-do, with the title of the email as your task name. On all emails, there will be a button titled “Add as Task” to help manually do this, drag free. Inside of your task list, you’ll see a button that links directly back to the email thread. Perfect for email-lovers.

Manage Your Task Lists in Google Tasks

Inside of the menu-bar in Google Tasks is a sorting function. The “Sort By” section helps you to streamline your view, so it is perfect for organizing your next task. You can take two approaches:

My Order allows you to see your tasks in order of which they are placed in. At any time, you can re-arrange tasks by dragging and dropping them.

Date uses due dates for the sorting and this can be useful for those with deadlines.

Tasks remembers how you organize these so you can always return to the My Order view to see your arranged list.

Delete all Completed Tasks - Google Tasks

Finally, as you complete to-dos inside of Tasks, you’ll start to leave a trail of completed items. You can delete all of these by hitting the Delete all completed tasks inside of the settings button on each list.

Learn the keyboard shortcuts. You can view the keyboard shortcuts inside the three-dot menu bar. But it can be used only on the web Gmail dashboard.

  • You can use Space to complete or un-complete items.
  • Use Shift + Enter to enter task details and indent or unindent tasks by using the bracket keys, Command + [ or Command + ].
  • To add new tasks use Enter or Command + Enter for sub-tasks.
  • Use Command + Z to undo and the last action will be reversed.

For those lovers of managing Gmail and Google Tasks keyboard shortcuts can save a lot of time.

How Does Google Tasks Compare?

The new Google Tasks introduced a new way for Google-app lovers to manage their tasks. Combine all your Tasks with Google Keep and Google Calendar, and your productivity might thank you for it. But how does Tasks compare with the big task managers?

First off, Tasks isn’t aiming to compete with the front runners like Todoist and OmniFocus That’s the thing! Google Tasks has one real main competitor: Microsoft To-Do.

If you don’t have a task manager yet, it’s very much worth exploring Google Tasks on iOS or Android, but there are plenty of alternatives to try out too. If Google Tasks isn’t your cup of tea, we recommend either TickTick or Remember the Milk.

Read the full article: How the New Google Tasks Helps You Manage Your To-Do List


Read Full Article

How to Set Up Your Bluehost Webmail Email Account


setup-bluehost-email

Bluehost is one of the world’s leading web hosting providers. With its wide range of plans, the company is an excellent choice regardless of the type of site you own. WordPress even recommends Bluehost as one of the best providers for running self-hosted WordPress content.

Like all web hosting providers, Bluehost offers its users personalized email addresses. Keep reading, and we’ll explain how to create your email address, how to access Bluehost webmail, and how to add your Bluehost email to Gmail.

How to Create an Email Account on Bluehost

The number of email addresses you can create depends on the hosting plan you’ve chosen. The entry-level Basic shared hosting plan lets you create five addresses, while the Starter cloud hosting plan offers 100 addresses. All Bluehost’s other plans allow you to create an unlimited number of email accounts.

When you’re ready to create your account, head to Bluehost.com and log into your account using the button in the top left-hand corner.

Once your account portal has loaded, locate the blue ribbon at the top of the page and click on Hosting. Then, in the sub-menu directly beneath the blue ribbon, click on Email. On your screen, you should now see all the tools you need to create and manage your email addresses.

To create a new email address, select Email Accounts on the menu in the left-hand panel and click Create an Email Account in the main window.

Create an Email Account Bluehost

Choose the prefix you want to use with your new address (the part before the @). Remember, you can also use periods (.) and underscores (_).

If you have multiple Bluehost domains, you also need to use the dropdown menu select the domain to which you want to connect your new email address.

Further down the page, you need to create a password. You can either use a password of your own choosing or ask Bluehost to generate one for you automatically.

Finally, at the bottom of the page, Bluehost asks you to determine the mailbox size and to select your preferred webmail client.

It’s generally advisable to select an unlimited mailbox size. You can leave the default Bluehost webmail client blank. It’s not essential to pick one at this stage; we’ll talk more about the options shortly.

When you’re happy, click on Create to finish the process.

How to Access Bluehost Webmail

Now it’s time to start using your email address. There are two easy ways to access Bluehost webmail and one slightly more complicated method.

The easiest way to access Bluehost webmail is to head to login.bluehost.com/hosting/webmail and enter your credentials.

You can also access your webmail via your main Bluehost portal by going to Hosting > Email > [Email address] > View Inbox.

Lastly, if you have the technical wherewithal, you can create your own email sub-domain and redirect it to the webmail client.

Choosing the Right Webmail Client

Bluehost offers three individual webmail clients: Roundcube, Horde, and SquirrelMail. They are the same three clients you will see on most mainstream web hosting providers. Bluehost will ask you to choose one of the three when you log into your webmail for the first time.

Each of the three clients has different strengths and weaknesses.

Horde is the most full-featured of the three. In addition to an address book (which all three clients offer), Horde also includes a calendar, task list, event reminders, news feed, and notes page. It also provides a spellchecker and mail filters.

At the other end of the scale, SquirrelMail is the most basic client. There are no productivity tools beyond the address book, there’s no way to filter your mail, and the interface only offers a two-pane view.

Roundcube strikes a middle ground. System administrators can use plugins to add extra productivity tools, the client supports drag-and-drop emails, and there’s a three-pane view with a spellchecker.

Roundcube Webmail Interface

Click on one of the client’s logos to make your selection. If you change your mind later, you can alter your webmail client in Hosting > Email > Email Accounts > [Email Address] > Webmail Client.

Use a Third-Party Client With Bluehost Webmail

If you don’t want to use Bluehost’s own webmail interface, you can try using third-party webmail clients instead.

The most popular third-party webmail client is Gmail, but services such as Outlook, Yahoo, and GMX will also work.

To add Bluehost your Gmail portal, you first need to decide whether to use the IMAP or POP3 protocol. Bluehost webmail supports both. Generally, IMAP is the preferred option; it will leave a copy of your email on Bluehost’s servers and lets you access your messages on multiple devices.

To add your Bluehost email address to Gmail, log into your Gmail account and navigate to Gear icon > Settings.

Next, click on the Accounts and Import tab and go to Check email from other accounts > Add an email account.

Add Bluehost mail to Gmail

A new window will open that will guide you through the setup process. Start by entering your email address and clicking Next.

Gmail will prompt you to add your server details. Here’s the information you’ll need:

Secure SSL/TLS Settings

  • Username: Your email address
  • Password: Your password
  • Incoming Server: mail.example.com (replace example.com with your own domain)
  • Incoming Port: 993 (IMAP) or 995 (POP3)
  • Outgoing Server: mail.example.com (replace example.com with your own domain)
  • Outgoing Port: 465 (SMTP)
  • Authentication: Your password

Standard Settings

  • Username: Your email address
  • Password: Your password
  • Incoming Server: mail.example.com (replace example.com with your own domain)
  • Incoming Port: 143 (IMAP) or 110 (POP3)
  • Outgoing Server: mail.example.com (replace example.com with your own domain)
  • Outgoing Port: 26 (SMTP)
  • Authentication: Your password

Warning: Using the SSL/TLS settings encrypts your messages and ensures no one other than the intended recipient can read them. It is not advisable to use the standard settings; however, sometimes a network’s configuration makes it unavoidable.

The server details will be the same regardless of which third-party webmail client you use, but the setup process will be slightly different.

For more information, check out our guide to combining multiple email accounts into a single inbox.

A More Professional Email Address

Using Bluehost webmail lets you create a personalized and professional email addresses. Your personal brand or small business will instantly gain more credibility from having its own domain rather than using @gmail or @outlook.

Remember, you can even create a personal email without needing to build a website.

Sign up with Bluehost using our special discounted rate for MakeUseOf readers and create your email address today!

Read the full article: How to Set Up Your Bluehost Webmail Email Account


Read Full Article