30 March 2013

How To Add A Photo Slideshow To YouTube


Creating a photo slideshow is about the wow-factor. It is also about convenience. The viewer can enjoy the smooth transition of one photo to another like the actual thread of events. Slideshows are part and parcel of photo displays – you can create one at the touch of button on any self-respecting image tool like IrfanView or Picasa. Bakari showed you how to put together a travel slideshow in iPhoto. But do you know something that’s even more convenient – turning a photo slideshow into a video.


A couple of years back, I showed you how to how to convert a PowerPoint 2010 presentation into a video with one click. Since then videos have become only easier to compile, combine, and compose. YouTube crossed over to 1 billion users just a few days ago and despite the presence of very good alternatives like Vimeo, it is the de-facto home for online videos. So, it makes sense to upload your first photo slideshow on YouTube.


Only the question remains – how do you add and share a photo slideshow on YouTube?


The Easy Way – Take YouTube’s Help


YouTube has made it really easy to upload media and create a video from within YouTube itself. Log into YouTube with your Google credentials and then follow the uncomplicated steps below to create your first photo slideshow on YouTube.


1. On your YouTube page, hit the Upload button that’s next to the search bar on top. If you are lost, here’s the Upload page to jump straight to from here.


2. Click on the Create button for Photo slideshow.


3. Select the photos for your YouTube slideshow. Google automatically gives you the first option to bring in your saved photos from Google+ or Picasa Web albums. (As of March this year, the Picasa URL redirects to Google+ as Google+ is in all probability centralizing photo sharing).


4. But no; if you want to upload photos instead from your desktop you can. Click on Upload Photos and drag ‘n drop your selected photos from your computer.


Once all photos are uploaded and in the timeline, you can drag the around and re-arrange their sequence.


5. After all photos are re-arranged in the right sequence for your photo-story, hit the next button to go to the business end of the YouTube slideshow creator. The screen you see will be something like this:


The slideshow creator is self-explanatory. You can set the slide duration, slide effect, and transitions. YouTube also gives you a choice of 150,000 tracks for a background score if you want to add some musical pizzazz to your video. If not, go with the No Audio option. YouTube does not allow you to upload your own audio files.


6. You can also go into the Advanced Editor and really fine-tune your video by controlling transitions, applying Instagram-styled effects, add text…and a whole lot of other controls which you should experiment with for a great looking photo slideshow. The screenshot below gives you an idea of the Advanced Editor and a small cross-section of the image effects you can apply.


Do regard this note from YouTube – Advertisements may be displayed on videos that use content available through the YouTube Video Editor. In this case, it is the music track which I have added.


7. You can also change the Privacy from Info & Settings. You have the choice of taking it Public, keeping it Unlisted, or going Private and sharing it with only a few people. The Info & Settings page also allows you to add a title and a description.


YouTube takes some time to process the video before it is displayed in your profile. You can go back and again edit the slideshow if you wish.


Here’s the YouTube Help page which will give you the nitty-gritty on the various features of the video editor.


Create A Video Slideshow On Windows Movie Maker


Windows dropped the Live from the title and just called it Movie Maker (Version 12). If you don’t have it on your Windows 7 and 8 systems, you can download or update it from Microsoft. It might be basic for serious video editing work, but if you want to put together a photo slideshow in the form of a video, it gives you enough bells and whistles for the job. With a bunch of pictures, in ten minutes or less, you can have your own ‘home movie’.


1. The interface has a preview pane on the left and the content pane on the right. You can click on Add videos and photos to bring in your photos into the content pane. You can drag the photos around to arrange them. The Content pane also works like a timeline. You can also add a title slide that will be like an introduction – Click Title on the Home tab. Also, clicking the playhead on the Preview pane gives you an idea of how your video plays out. Windows Movie Maker also gives you complete control if you want to embellish the slides with custom text. All system fonts, colors, and font sizes are available.


2. Click on Edit under Video Tools and change the duration of the displays.


4. Add animations and/or effects from the Animations and Visual Effects tabs respectively. You can apply them collectively or individually to each picture in your slideshow.


For instance, you can make the slides more interesting by making them pan up or pan down. The number of effects you have to play around with is more than what you get on YouTube’s own video editor (more than 60 transitions).


You can also take advantage of the Movie Maker AutoMovie themes, which automatically build in fun visual effects and transitions.


5. Windows Movie Maker also lets you upload your music or source it from royalty free music sites featured on the Add Music menu.


6. When it’s time to publish your photo slideshow, you can save it to your desktop or choose among SkyDrive, Facebook, YouTube, Vimeo, and Flickr. You can publish directly to YouTube by picking a resolution. Log-in with your Windows Live ID and then publish the photo slideshow by logging in with your Google ID.


Windows Movie Maker gives you more ways to ‘creatively’ enhance your photos than YouTube’s own video editor. I like the options it gives me – I can save it to my desktop, publish it just to carry around on my smartphone, or push it upwards to YouTube.


These two are the simplest ways to create a photo slideshow and upload to YouTube. I think you must have got the ease with which you can create a few memory bytes on YouTube and share it with friends and family. I use YouTube to send across video greeting cards made out of old photos. It certainly beats the sameness of e-card sites and gives a personal spin to your thoughts.


What uses can you put photo slideshows to? Do you have any other tool for the job…a web application perhaps? But are they really better than these two easily available and free resources? Tell us in the comments.


The post How To Add A Photo Slideshow To YouTube appeared first on MakeUseOf.


How To Add A Photo Slideshow To YouTube


Creating a photo slideshow is about the wow-factor. It is also about convenience. The viewer can enjoy the smooth transition of one photo to another like the actual thread of events. Slideshows are part and parcel of photo displays – you can create one at the touch of button on any self-respecting image tool like IrfanView or Picasa. Bakari showed you how to put together a travel slideshow in iPhoto. But do you know something that’s even more convenient – turning a photo slideshow into a video.


A couple of years back, I showed you how to how to convert a PowerPoint 2010 presentation into a video with one click. Since then videos have become only easier to compile, combine, and compose. YouTube crossed over to 1 billion users just a few days ago and despite the presence of very good alternatives like Vimeo, it is the de-facto home for online videos. So, it makes sense to upload your first photo slideshow on YouTube.


Only the question remains – how do you add and share a photo slideshow on YouTube?


The Easy Way – Take YouTube’s Help


YouTube has made it really easy to upload media and create a video from within YouTube itself. Log into YouTube with your Google credentials and then follow the uncomplicated steps below to create your first photo slideshow on YouTube.


1. On your YouTube page, hit the Upload button that’s next to the search bar on top. If you are lost, here’s the Upload page to jump straight to from here.


2. Click on the Create button for Photo slideshow.


3. Select the photos for your YouTube slideshow. Google automatically gives you the first option to bring in your saved photos from Google+ or Picasa Web albums. (As of March this year, the Picasa URL redirects to Google+ as Google+ is in all probability centralizing photo sharing).


4. But no; if you want to upload photos instead from your desktop you can. Click on Upload Photos and drag ‘n drop your selected photos from your computer.


Once all photos are uploaded and in the timeline, you can drag the around and re-arrange their sequence.


5. After all photos are re-arranged in the right sequence for your photo-story, hit the next button to go to the business end of the YouTube slideshow creator. The screen you see will be something like this:


The slideshow creator is self-explanatory. You can set the slide duration, slide effect, and transitions. YouTube also gives you a choice of 150,000 tracks for a background score if you want to add some musical pizzazz to your video. If not, go with the No Audio option. YouTube does not allow you to upload your own audio files.


6. You can also go into the Advanced Editor and really fine-tune your video by controlling transitions, applying Instagram-styled effects, add text…and a whole lot of other controls which you should experiment with for a great looking photo slideshow. The screenshot below gives you an idea of the Advanced Editor and a small cross-section of the image effects you can apply.


Do regard this note from YouTube – Advertisements may be displayed on videos that use content available through the YouTube Video Editor. In this case, it is the music track which I have added.


7. You can also change the Privacy from Info & Settings. You have the choice of taking it Public, keeping it Unlisted, or going Private and sharing it with only a few people. The Info & Settings page also allows you to add a title and a description.


YouTube takes some time to process the video before it is displayed in your profile. You can go back and again edit the slideshow if you wish.


Here’s the YouTube Help page which will give you the nitty-gritty on the various features of the video editor.


Create A Video Slideshow On Windows Movie Maker


Windows dropped the Live from the title and just called it Movie Maker (Version 12). If you don’t have it on your Windows 7 and 8 systems, you can download or update it from Microsoft. It might be basic for serious video editing work, but if you want to put together a photo slideshow in the form of a video, it gives you enough bells and whistles for the job. With a bunch of pictures, in ten minutes or less, you can have your own ‘home movie’.


1. The interface has a preview pane on the left and the content pane on the right. You can click on Add videos and photos to bring in your photos into the content pane. You can drag the photos around to arrange them. The Content pane also works like a timeline. You can also add a title slide that will be like an introduction – Click Title on the Home tab. Also, clicking the playhead on the Preview pane gives you an idea of how your video plays out. Windows Movie Maker also gives you complete control if you want to embellish the slides with custom text. All system fonts, colors, and font sizes are available.


2. Click on Edit under Video Tools and change the duration of the displays.


4. Add animations and/or effects from the Animations and Visual Effects tabs respectively. You can apply them collectively or individually to each picture in your slideshow.


For instance, you can make the slides more interesting by making them pan up or pan down. The number of effects you have to play around with is more than what you get on YouTube’s own video editor (more than 60 transitions).


You can also take advantage of the Movie Maker AutoMovie themes, which automatically build in fun visual effects and transitions.


5. Windows Movie Maker also lets you upload your music or source it from royalty free music sites featured on the Add Music menu.


6. When it’s time to publish your photo slideshow, you can save it to your desktop or choose among SkyDrive, Facebook, YouTube, Vimeo, and Flickr. You can publish directly to YouTube by picking a resolution. Log-in with your Windows Live ID and then publish the photo slideshow by logging in with your Google ID.


Windows Movie Maker gives you more ways to ‘creatively’ enhance your photos than YouTube’s own video editor. I like the options it gives me – I can save it to my desktop, publish it just to carry around on my smartphone, or push it upwards to YouTube.


These two are the simplest ways to create a photo slideshow and upload to YouTube. I think you must have got the ease with which you can create a few memory bytes on YouTube and share it with friends and family. I use YouTube to send across video greeting cards made out of old photos. It certainly beats the sameness of e-card sites and gives a personal spin to your thoughts.


What uses can you put photo slideshows to? Do you have any other tool for the job…a web application perhaps? But are they really better than these two easily available and free resources? Tell us in the comments.


The post How To Add A Photo Slideshow To YouTube appeared first on MakeUseOf.


29 March 2013

Attach Images in the New Gmail Compose Interface


Gmail's new compose interface has many useful features, but there are also some annoyances.


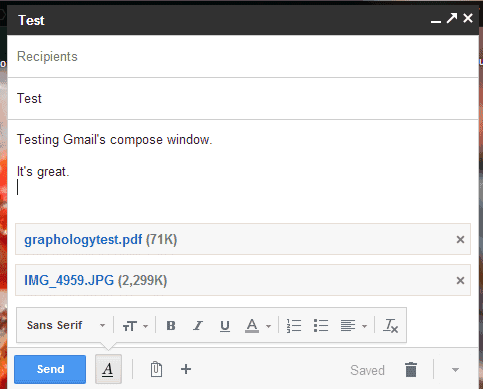
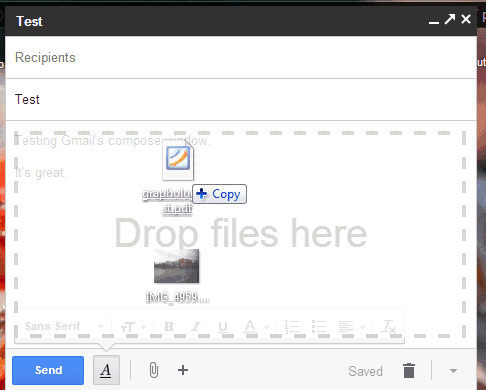
The old interface had two ways to upload images using drag and drop: as attachments or as inline images. The new interface only lets you place images inside the message when you drag and drop them. There are many reasons why you might find this feature annoying: it's more difficult to compose a message after adding a bunch of images, the images could be distracting, Gmail no longer adds cool options like "download all attachments", "view" or "download" when you open the message, some mail clients block inline images.


Fortunately, you can use the "attach files" paperclip button to add image attachments. The "insert photos" button will embed the images. If you still want to drag and drop a photo, you can drag the photo you want to attach and some other random file (for example, a PDF file or another image) and remove the random file. It's a workaround that forces Gmail to treat images like regular files. When you drag and drop multiple images, they're added as attachments.


For now, you can "temporarily switch to the old compose" interface by clicking the arrow button at the bottom of the compose box and selecting the corresponding option, but the new interface is here to stay, while the old one will be retired in the near future. The new UI for composing messages is now the default for all Gmail users.


How To Deal With Telephone Spam


The greatest aspect of the telephone? The fact that you can speak to anyone at a moment’s notice, even if they’re halfway across the world. Sit back and think about that for a second because it’s amazing. But there’s also a drawback: spammers can constantly attempt to reach you with texts and calls and you may feel helpless against the endless barrage.


Fortunately for us all, there are actually a few measures we can take to protect ourselves against phone spammers and telemarketers. Some of these measures are more serious than others (e.g., inflicting financial fines against the perpetrators) and others are just for our own sanity and peace of mind. Check them out and use the ones that work best for you.


Forward to 7726 (SPAM)


If you’re suffering from text spam, this solution might help you out (and others as well). Text spam can come from a lot of sources, though usually the spammers get your number from online contact forms and public profiles. If you truly want to stop all future text spam, don’t ever give your number away. Ever.


But when you do receive text spam, forward it to 7726 (the keypad combo for the word SPAM). Your wireless carrier will send you a reply asking you for the phone number that sourced the text. Text them back and your carrier will block that number from sending out any more unsolicited spam.


I’m not sure how many mobile carriers utilize this service, but it definitely works for Verizon and AT&T. If you want to make sure that your carrier has something similar, search Google for your carrier’s name and the phrase “text spam.” This works in the US, but your mileage may vary in other countries.


Report to a Phone Spam Service


Text spam may not be your biggest problem; what about phone call spam? Most phone call spam arrives in the form of telemarketers, and they usually call when you’re about to sit down for a hearty meal of dinner. Other forms of phone spam can occur all throughout the day and they’re all equally annoying. How can you hit them where it hurts?


If you live in the US, the Federal Communications Commission (FCC) has a form that you can fill out. It’s the 1088G complaint form and I’ve heard that it’s quite effective on a personal level. It’s not even inconvenient since you can just fill out the 1088G form online, never having to leave the comfort of your desk chair.


If you live outside the US, you may be able to find a similar complaint service to report spam callers. In the UK, for example, you could try complaining to the ICO.


Register for DoNotCall


If you want to be more proactive about not receiving spam calls, there are services that will place you on a “do not call me” list. Conveniently, the service is called DoNotCall by the FCC. Register your number and you’ll stop receiving calls after a month. If you do receive a call after a month, you can report the number to the FCC and the spammer will suffer some serious fines.


If you’ve been badgered to sign up for a “do not call” listing, then there’s a good chance it was a fake service that actually farmed your phone number. Here’s a notice by the official DoNotCall service:


Scammers have been making phone calls claiming to represent the National Do Not Call Registry. The calls claim to provide an opportunity to sign up for the Registry. These calls are not coming from the Registry or the Federal Trade Commission, and you should not respond to these calls.


Of course, the DoNotCall registry is only for the US. If you live outside the US, you may be able to find a similar spam-call-blocker service to keep yourself protected from unsolicited calls. In the UK, you might try Ofcom’s TPS service. For other countries, you’ll need to do some Google searching of your own.


Create a SPAM Contact


If you don’t want to mess with call registries and complaints, you could go the passive route by creating a SPAM contact on your phone. With this SPAM contact, you just pick up calls as normal when they come in. If the caller happens to be spam, then you add that number under the SPAM contact.


Now, every time a previous spammer calls you again, you’ll see it come up as SPAM and you can ignore it. You can even set a custom ringtone for the SPAM contact as 30 seconds of silence and you won’t even be bothered when they call. Of course, with this method, you’ll have to deal with a spammer before you can block them AND it only works if your phone allows multiple phone numbers per contact.


Conclusion


And now you have four methods of dealing with telephone spam under different circumstances. Be wary that even when you take measures against spam callers, they’re always trying to engineer new ways to spam their messages to innocent phone owners… just like with email spam. But if you follow the suggestions above, you can at least reduce their impact on your life for now.


Have any other ideas and suggestions for dealing with phone spammers? Please share them with us in the comments!


Image Credits: Stop Spam Via Shutterstock, Texting Via Shutterstock, Frustrated Caller Via Shutterstock, Spam Contact Via Shutterstock


The post How To Deal With Telephone Spam appeared first on MakeUseOf.


Minesweeper: Restoring The Classic Windows Games In Windows 8


minesweeper windowsBring the default games in Windows 8 back to the desktop. If Metro-style, full screen apps aren’t what you want when you play Solitaire, Minesweeper or Free Cell, you’re probably disappointed with Windows 8-only fullscreen versions of these games are offered in Microsoft’s latest operating system.


So these games, which have more or less been the same since Windows 3.1, are not included by default in Windows 8– and the versions you can get all run in the Metro user interface. Sure, they offer new features – the new Minesweeper, for example, offers daily challenges and an adventure mode – but some purists prefer their simple, desktop-based classics. If that includes you, keep reading.


I’ve shown you how to replace the terrible Windows 7 games with the classic XP ones, and this tutorial is similar to that one, except I’ll outline how to grab the games both from an existing Windows XP install and a Windows XP CD. I assume most people don’t have access to a working version of XP anymore.


Let’s get to work…so we can distract ourselves.


From An XP Install


minesweeper windows


If you have access to a computer with Windows XP installed (or a VirtualBox install of Windows XP) the process will be easy for you. Fire up XP and open Windows Explorer, then head to “C:\Windows\System32″. Do not change any files in this folder: you’ll break things. We’re just here to copy some files. They’re called:


  • cards.dll

  • freecell.exe

  • mshearts.exe

  • sol.exe

  • spider.exe

  • winmine.exe


minesweeper for windows 8

Copy – do not move – these files to a single folder, which you can transfer them to your Windows 8 computer however you like. USB, emailing yourself – it doesn’t matter.


These games will all work fine in Windows 8, so feel free to put this folder wherever you like on your Windows 8 computer. You can even right-click one of the games and pin it to the taskbar:


minesweeper for windows 8


Enjoy, and remember: MakeUseOf is not liable for any productivity losses directly resulting from these games. Use responsibly.


From an XP Install Disk


Of course, you probably do not have a computer with Windows XP handy. It’s possible to grab the old games from a Windows XP CD, but it’s a little more complicated – and involves the command line.


Don’t panic: it’s not as hard as it sounds. Let’s do this together now.


Insert your Windows XP CD into your Windows 8 computer, then open Windows Explorer. Open the “i386″ folder – we’re going to find some files here. They’re similar to the files above, but named in all caps and ending with an underscore instead of the last letter. The files are:


  • CARDS.DL_

  • FREECELL.EX_

  • MSHEARTS.EX_

  • SOL.EX_

  • SPIDER.EX_

  • WINMINE.EX_


You can quickly find any of these files by searching.


minesweeper for windows 8


Copy these files to a folder on your desktop – in this tutorial I’ll call it “oldgames”. Once you’ve got them all open the Command Prompt – you can find it by clicking the Search charm and typing “Command”.


minesweeper windows 8


To begin, type:


cd Desktop\oldgames


Then hit “Enter”. This will bring the Command Prompt to your oldgames folder. Now we need to extract the games. Let’s start with CARDS.DL_.


expand CARDS.DL_ cards.dll


minesweeper windows 8


To explain: the word “expand” tells the prompt what you want to do: expand a file. The word “CARDS.DL_” tells the prompt which file you want to expand. The last word, “cards.dll”, tells the prompt what you want the expanded file to be called. Shortcut: hit the “Tab” button after typing the first few letters of an existing file – the prompt will figure out which file you want.


The above command cannot create an .EXE file, so we’re going to need to cheat for the rest of the files. Let’s start with Freecell:


expand FREECELL.EX_ freecell


This command will create a file called “freecell”. Simply rename that file by right-clicking it, then add “.exe” to the end – “freecell.exe”. Assuming you’ve already extracted cards.dll you’ll have a working version of the game:


minesweeper windows 8


Repeat the process for the other games – once you’re done, feel free to delete all the files that end with an underscore (that is, this: ” _” ). You now have a folder full of your favorites:


Right-click any of these files and click “Pin to Taskbar” if you want quick access to them. They’ll be at the bottom of the screen every time you’re in desktop mode.


Conclusion


So you’ve now got your favorite old games from Windows XP working in Windows 8. I’m not sure why Microsoft doesn’t offer these on their site somewhere – it would have saved me some time in writing this, and you some time in finding the files.


minesweeper windows


I suppose they want fans of the games to get used to Metro – to learn how to use it. Microsoft has a history of using games to teach people user interface principles: Solitaire was initially included in Windows to teach people how to click and drag, for example. So these games are once again playing the role of teacher.


Maybe you don’t want to learn, however – maybe you like the way things worked before. At least it’s possible to do things your way with some tweaking: you can use Classic Shell to add a start menu to the Windows 8 desktop or add Aero effects to Windows 8 with free tools. Check out all of our Windows 8 articles for more tips like that.


What else are you doing to make Windows 8 comfortable? Let me know in the comments below, or simply share your top scores in Minesweeper.


The post Minesweeper: Restoring The Classic Windows Games In Windows 8 appeared first on MakeUseOf.


Context-Sensitive Spell Checking in Google Chrome


Chrome is the first browser that has a smart spell-checking feature powered by a web service. Originally, Chrome only relied on a local dictionary. Then Chrome's team started to add suggestions from a Google service to the contextual menu and improve the list of suggestions from the local dictionary.


Chrome 26 dramatically improves spell checking by bringing the Google Docs and Google Search spell checker to the browser. "We're now rolling out support for grammar, homonym and context-sensitive spell checking in English, powered by the same technologies used by Google search. Support for additional languages is on the way," informs Google. Right now, this feature is not available in Chrome for Mac, but it will be added soon.


The enhanced spell-checker is opt-in, so it's not enabled by default. You need to right-click a text field, go to "Spell-checker options" and make sure that "Ask Google for suggestions" is enabled. It's a privacy-sensitive feature, since everything you type is sent to Google's servers.


Context-sensitive spell checking, first available in Google Wave, is incredibly useful. Sometimes you can make mistakes and write "fund a place" instead of "find a place" or "took a brake" instead of "took a break". A regular spell-checking software can't detect these errors because "fund" and "brake" are words from the dictionary. Google uses the language models built for Google Translate to find the words that don't belong in a certain context and highlights them. Right-click the underlined words and click Google's suggestions.


Even if you enable online spell-checking, Chrome will still use the local dictionary feature. The spelling errors that have a red underline come from the dictionary, while errors with a green underline are detected by the web service.