19 February 2013

So, You Think You Can’t Write? Let’s Get You Back On Track


writer tipsStumped? Lost for words? Are you often in the position of being unable to get yourself to write anything, even though the deadline is fast approaching? Yeah, writer’s block sucks – and it happens to all of us. Most writers, after suffering a few days where it got really bad, make plans to get around the problem as best as possible. Now is your time to do the same.


There are lots of great ideas anyone can try, regardless of your writing needs. It doesn’t matter if you’re a student writing essays, a casual writer doing NaNoWriMo, or a professional author writing a new novel. In this list of writing tips there are bound to be a couple of ideas which will make a huge difference to the way you approach your writing. So, read on!


1. Get Comfortable


If you’re fussing around trying to avoid back-ache and eye strain, you’re not writing. Set up your desktop or laptop so that you’re actually comfortable, then every future attempt to write will only be thwarted by you not knowing what to write.


writer tips


2. Stop Procrastinating & Write


Sometimes, you just need to open up a blank page and get writing. It doesn’t matter what the subject is, really. Once you’ve written a few pages, you’ll be ready to get stuck into the important stuff. So, get yourself a random writing prompt and see how quickly you can get a few words out:


3. Ensure Your Desktop is Distraction-Free


Get rid of email notifications, turn off anything that beeps or pops up, ensure your digital writing space is clear and uncluttered, and make sure your real-world environment is clean, quiet and peaceful too. Serenity brings creativity with it & many writers swear by ensuring they have a neat and peaceful place to write, both digitally and physically.


writer tips tricks


4. Dictate When Possible


If you find your typing speed slows you down, or that getting free time with your hands ready for typing isn’t likely, you might be better off using some dictation software. This is great if you’re out and about with a tablet often.


5. Read & Listen To Creative Inspiration


If you get a daily dose of inspiration and advice on creating characters and other writing devices, you’ll be perpetually coming up with great ideas you can use. This is the state you want to be in! It’s better to forget a handful of half-formed ideas than to never have them in the first place. So, subscribe to creative podcasts, read blogs on writing, install brainstorming software, use free web tools, and take time to immerse yourself in decent literature. Every bit helps.


Here’s some recommendations from MakeUseOf staff:


6. Make Notes Of Any Great Ideas


It doesn’t matter what you use: Evernote, OneNote, RememberTheMilk or a spreadsheet. What matters is that whenever you have a great idea for an article, story, character or plot you jot it down somewhere where you can refer to it when you need some inspiration later. Nothing is better than realising that you already came up with the ideas and all you need to do now is write. Dictating your notes is also a great idea if you’re pressed for time.


writer tips


7. Keep Synced Backups


Nothing is more annoying than wanting to work on a particular piece you are writing, only to find that you don’t have a current version with you. Oh wait, yes there is – losing your work altogether. To avoid this issue, and to protect your writing from digital or real-world disasters, keep organised backups of your writing that are synced between your devices. MakeUseOf staff recommend numerous ways to do great backups, but here’s a few dedicated to writing backups:


What are your best tips for getting your writing back on track? How do you overcome procrastination? Where do you get your inspiration? Let us know in the comments!


Image Credit: Shutterstock, Shutterstock, Shutterstock, Shutterstock


The post So, You Think You Can’t Write? Let’s Get You Back On Track appeared first on MakeUseOf.


How To Open Folder Options In Windows 8


CLICK HERE TO SEE FULL POST


In Windows 8, Microsoft has introduced Ribbon in Windows Explorer. Because of this, the new file explorer or Windows Explorer looks drastically different from previous versions of Windows. The new Ribbon Explorer helps quickly access various files and folders options. Many advanced settings are located under Folder Options in Windows. Options such as show drive [...]

18 February 2013

Everything You Need To Know About Windows 8 Swipe Gestures On A Laptop


windows 8 gesturesWith the introduction of Windows 8, a lot of brand-new touch-friendly features have been added to make the operating system enjoyable to use on touch-enabled devices. However, for typical laptops which only have touchpads for their input, it may be a bit confusing as to how to move your mouse in order to achieve the same results. Therefore, with some tips and drivers in hand, here is how you can easily take advantage of Windows 8′s new Modern UI goodies.


Synaptics Drivers


Before we begin, it’s important to note that Windows 8 does support some touchpad gestures as well, in addition to simply pushing your mouse pointer to certain areas of your screen. There’s nothing you need to do if you bought your computer with Windows 8 already installed, but if you upgraded to Windows 8 yourself, you may need to go to Synaptic’s website and download their latest drivers to enable gesture support.


Charms Bar


windows 8 gestures

The Charms bar is what appears on the right side of your screen to access application and system settings, the start button, and a few other items. Touch-screen users can reach it by swiping to the left from the right edge of the screen. However, touchpad users have three options – either push your mouse pointer into the top right or bottom right corner and then move it to the center of the right edge, put your finger on the right edge of your touchpad and swipe inward, or hit Win + C on your keyboard.


App Switcher


Accessing the app switcher is very similar to how the Charms bar is accessed, except on the opposite side. Therefore, touchscreen users can swipe to the right from the left edge of their screen. Touchpad users can push their mouse pointer into the top left or bottom left corners and then move to the center of the left edge, put your finger on the left edge of your touchpad and swipe inward, or hit Win + Tab on your keyboard. One thing to note – all desktop applications are grouped together into the “Desktop” app, so switching between those desktop applications can still be achieved with the trusty Alt + Tab keyboard combination.


App Bar


windows 8 gesture control

If you would like to access the App bar of a native Windows 8 app, you have slightly different options. Touch-screen users can simply swipe down from the top edge of their screen, and touchpad users can do the same thing by swiping down from the top edge of their touchpad. You can also right-click anywhere on an app, or hit the Win + Z key combination.


Horizontal Scrolling


Horizontal scrolling is another feature in Windows 8 which can be easily accessed. Both touch-screen and touchpad users can do horizontal scrolling by swiping two fingers to either the left or right. If you are using a mouse, you can horizontally scroll by scrolling the wheel up or down. The reasoning why scrolling the wheel up or down corresponds into horizontal scrolling is because the start screen as well as all Windows 8 apps expand horizontally rather than vertically.


Zooming And Rotation


You can also zoom in and out as well as rotate. Zooming in and out can be achieved by placing two fingers on the touchpad and then spreading them out or putting them together. You can also use the Ctrl and + keyboard combination to zoom in, or the Ctrl and – keyboard combination to zoom out. Rotation can be accomplished by using two fingers and then turning them to mimic rotating a circle. Rotation doesn’t have a keyboard shortcut, however.


Turning Them Off


windows 8 gestures

While it’s cool to have these gestures to get easier access to Windows 8′s UI, it may get in the way of your productive habits if you tend to swipe around on your touchpad in much the same way as the gestures defined by Windows 8. If you need to turn them off, there’s a way to change entries in the registry which control whether the gestures are enabled or disabled. To do this, open up Notepad and copy and paste the following code into it:


Windows Registry Editor Version 5.00

[HKEY_CURRENT_USER\Software\Synaptics\SynTPEnh\ZoneConfig\TouchPadPS2\Right Edge Pull]

"ActionType"=dword:00000000

[HKEY_CURRENT_USER\Software\Synaptics\SynTPEnh\ZoneConfig\TouchPadPS2\Left Edge Pull]

"ActionType"=dword:00000000

[HKEY_CURRENT_USER\Software\Synaptics\SynTPEnh\ZoneConfig\TouchPadPS2\Right Edge Pull Extended Zone]

"ActionType"=dword:00000000

[HKEY_CURRENT_USER\Software\Synaptics\SynTPEnh\ZoneConfig\TouchPadPS2\Top Edge Pull]

"ActionType"=dword:00000000


Then save that file somewhere on your computer as “gestures.reg”. Just make sure to choose “All file types” in the Save As dialog and then typing out the whole filename, including the file extension. Then find the file you just saved and run it, clicking on Yes for all warnings that pop up. After it completes, you’ll need to restart your computer to load the new settings.


You can also enable them again if you previously disabled them using the same trick. However, you’ll need to paste this code into your gestures.reg instead:


Windows Registry Editor Version 5.00

[HKEY_CURRENT_USER\Software\Synaptics\SynTPEnh\ZoneConfig\TouchPadPS2\Right Edge Pull]

"ActionType"=dword:00000002

[HKEY_CURRENT_USER\Software\Synaptics\SynTPEnh\ZoneConfig\TouchPadPS2\Left Edge Pull]

"ActionType"=dword:00000002

[HKEY_CURRENT_USER\Software\Synaptics\SynTPEnh\ZoneConfig\TouchPadPS2\Right Edge Pull Extended Zone]

"ActionType"=dword:00000002

[HKEY_CURRENT_USER\Software\Synaptics\SynTPEnh\ZoneConfig\TouchPadPS2\Top Edge Pull]

"ActionType"=dword:00000002


Conclusion


Hopefully you can make better use of your new Windows 8 system now that you know about these tips for using the operating system with a touchpad. While I still think that the OS is better suited for actual touch-screens, it’s still easy to remain productive with just a typical laptop touchpad. And if these wordy instructions didn’t click in your mind, maybe this video will help you a bit. Also, if you have any other Windows 8 issues, check out this article, or if you’re just getting started with the new operating system, check out our guide on Windows 8!


What do you use with your Windows 8 system, a touchpad, touchscreen, or both? How do you feel about any of these input options? Let us know in the comments!


The post Everything You Need To Know About Windows 8 Swipe Gestures On A Laptop appeared first on MakeUseOf.


Chromebooks and Battery Life


There's something wrong about the latest Chromebooks: battery life. Cr-48, Google's prototype hardware, had a 63Wh battery that provided more than 8 hours per charge. Samsung's first Chromebook had a similar battery that provided "up to 8.5 hours of continuous use".


For some reason, a few months after introducing the Series 5 Chromebook, Samsung switched to a different battery: 41Wh and only 6.5 hours of use. The updated Series 5 Chromebook, which uses a Celeron processor, has a battery with a larger capacity: 51Wh, but the same battery life. Samsung's latest Chromebook, which uses a Cortex A15 chip, has a 30Wh battery and the same battery life because the ARM chip is more efficient.


What about the latest offerings from Acer, Lenovo and HP?


- Acer C7: 37Wh, 2.5Ah, 3.5 hours battery life

- HP Pavilion: 35Wh, 2.55Ah, 4.25 hours battery life

- Lenovo X131e: 6.5 hours battery life.


It's not clear why the latest Chromebooks no longer have a great battery life, but the new batteries are obviously cheaper and lighter. Google's Chromebook features page no longer mentions the word "battery", even if this was one of the main selling points for the first Chromebooks.


Google Docs Templates, Still Available


Google has recently updated the "Create" menu from Google Drive and removed the templates option from the menu. You can still find it if you visit this page.


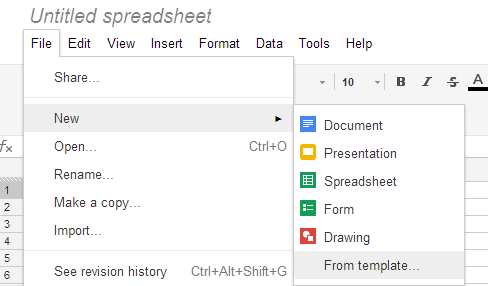
Another workaround is to create a document, spreadsheet, form, drawing or presentation, click the "File" menu, select "New" and then "From template".


Maybe Google finds a way to integrate the templates section with the Google Drive apps, so that it doesn't open in a new tab.


17 February 2013

Complete Windows 8 Guide


Windows 8 proved that its better than its predecessors windows 7 ,XP and Vista.In this article we will list out all the Tutorials and How to Guides related to Windows 8 Operating System.


Downloading Windows 8:


Microsoft first released the preview editions of windows 8 then finally released the Professional Edition on August 1st 2012.Since its release it has got a great hype.


Installation:


You can install windows 8 on your computer in different ways based on your need and convenience.


  • Install Windows 8 on virtual box to test its features.

  • You can mount ISO image of downloaded windows 8 edition and format your PC with usual bootable CD method.

  • In case if you dont want to go ahead with Bootable CD method then you can also install windows 8 via usb/pendrive.

  • You can also run Windows 8 in parallel to the existing OS on your PC.All you have to do is to format your PC using the same traditional bootable method but here you have to choose a different hard drive i.e Other than C Drive which is already loaded with the existing Operating system.So you have to choose drive other than C while formatting your personal computer.


Windows 8 Activation and Keys:


Almost all the editions of windows 8 comes with trial period.Windows 8 pro edition comes with a 90 days trial.


Windows 8 Customization:


Windows 8 itself is a very colourful and attractive operating system.It also offers many features to customize windows 8 based upon your interest.


Windows 8 Video Tutorials:


Final Words:


Here we have listed all the basic guides to get started with Windows 8.If you want any more guides let us know in your comments we will update the article with what you want.


Hokrain Is The Coolest Audio Player That You’ve Never Heard Of [Windows]


audio playerEvery month or so, I’ll come across a piece of software hidden in the depths of the internet that really hits me as a surprise. How are some of these applications so unpopular?


I’ve preached on my loyalty to Winamp Lite in a previous article. It’s old and many would consider it to even be deprecated, but it’s always done the job for me. When I’m listening to music downloaded to a local drive, I don’t need Spotify or iTunes in charge of my music. However, for the past week, I’ve slowly started to fall in love with a new, free, and portable alternative to Winamp Lite that seems to incorporate the same elements of simplicity while also offering some really awesome extra functionality. Let me tell you about Hokrain!


Download Hokrain


First worth mentioning is the website that Hokrain calls home. Though I’ll echo and help explain much of it in this article, Hokrain’s website is one of the best examples of a one-pager that I’ve ever seen. All of the information that you’d be interested in, including a direct link to download the application, exists on a single page.


audio player


It saves you from wasting time and makes you want to download and give it a try. It’s one click away and you know everything that it has to offer, so why not?


Hokrain is completely portable and can be run from a flash drive. Hokrain runs perfectly on any version of Windows, from 98 onward. It’ll cost your disk 600 KB of space and I’ve yet to see it go over about 7 MB in RAM usage. Compared to one of the applications I mentioned earlier, Spotify or iTunes, the difference in resource intensity is extremely significant.


Out of the box, Hokrain’s interface is very simple and clean.


free audio player


One quick glance and you’re able to see practically everything you need to begin listening to your music. Hokrain supports the following formats:


  • MP3

  • MP2

  • MP1

  • MPA

  • OGG

  • WAV

  • AIFF

  • MO3

  • IT

  • XM

  • S3M

  • MTM

  • MOD

  • UMX

  • AAC

  • AC3

  • APE

  • MAC

  • CDA

  • FLAC

  • MIDI

  • MID

  • RMI

  • KAR

  • MPC

  • MP+

  • MPP

  • TTA

  • WMA

  • WV


Navigate to a folder, double-click a track, and it will immediately begin playing.


free audio player


Let’s break down a few of the more interesting parts of the audio player’s interface:


  • Hokrain has a nice CPU usage monitor that shows just how much processing power it is consuming while playing. It’s near the top-right of the interface, and just 0.42% in the above screenshot.

  • Hokrain’s volume slider is very large, running all the way up the right side of the interface. Unlike many audio players, it’s vertical rather than horizontal. Being so large, it really allows you to easily set an exact volume percentage, if you’re into round numbers like me.

  • There is also a quality spectrum that lets you visualize the current track’s visual quality.

  • Below the spectrum, you’re able to graphically seek your track. Some audio players have a simple slider that lets you seek through the track, but a graphical seeker really lets you pinpoint a particular part of a song at just a glance. No more hearing around and wasting time to get to the part of a song that you want.


The application’s settings are filled with goodies. Hokrain comes stocked with six different themes that you can choose from. Here is the Windows XP theme:

free audio player


The General tab offers a lot of information and lets you set more than just your theme. There is an OSD (on-screen display) every time you change tracks to notify you of what is currently being played. It can be turned on or off. You are then able to toy with shell integration options, your tray icon, and a few other small tweaks.


cool audio player


Another great thing about Hokrain lies within the two Hot Keys tabs.


cool audio player


If you’re using a media player, you need to use hotkeys. It’s just that simple. Hokrain supports a ridiculous amount of hotkeys that let you control playing, stopping, pausing, muting, seeking, and plenty more. I’d argue that there are possibly even too many hotkeys!


The coolest part of the settings is something that I’d consider to be a “quality of life” feature, one that isn’t exactly necessary but it’s really nice to have: Scrobbler.


audio player


If you’re not big on Last.fm, Hokrain lets you keep local records on what tracks you play, how long you’ve listened to them, and how many times you’ve played them. You can sort these records to make out what your favorite songs are. It’s just an example of Hokrain thinking outside the box and doing more than the average audio player.


Hokrain is an audio player that I’m happy I’ve found. Even if you’re pleased with your current audio player, it’s a piece of software really worth appreciating. Give it a try and see if you like it. Let me know what you think in the comments!


The post Hokrain Is The Coolest Audio Player That You’ve Never Heard Of [Windows] appeared first on MakeUseOf.


Will Windows 8 Run On My PC? Here’s How to Tell


will windows 8 work on my pcIt’s been about three months since Microsoft released Windows 8, and people have had lots of time to hear about what’s new and decide whether they wish to upgrade. If you have decided to commit to the upgrade, you need to be sure that your system is capable of handling the new software, or else burn a useless hole in your wallet.


Now that the time frame for cheaper Windows 8 upgrades is over, it’s highly important to be certain that such an upgrade will go as smoothly as possible. Therefore, to help you out, here are some tips on determining whether your system can handle the upgrade, and what you can do to improve performance once you’re running Windows 8.


The Requirements


will windows 8 work on my pc

Every piece of software has listed hardware requirements that your system must meet in order to run such software. Windows 8 is no different, but its requirements aren’t as high as past Windows releases. The requirements for Windows 8 include:


  • 1 GHz processor

  • 1 GB of RAM for 32-bit systems, or 2 GB of RAM for 64-bit systems

  • 16 GB of free space for 32-bit systems, or 20 GB of free space for 64-bit systems

  • A graphics card capable of DirectX 9 graphics with WDDM driver


Of course, in order to get the best experience possible, there are a few recommendations that are listed. However, Windows 8 should run just fine if you don’t have any of these:


  • A tablet or monitor that supports multi-touch

  • To access the Windows Store and download and run apps, you need an active Internet connection and a screen resolution of 1024 x 768

  • To “snap” apps, you need a screen resolution of 1366 x 768.


If you do not meet all of the listed requirements, I would suggest looking at upgrading your system’s hardware, if possible. If not, you’ll probably need to look at getting a new system if you are still wanting to run Windows 8. If you do meet the requirements, however, you should run the Windows 8 Upgrade Assistant. This utility will do some extra work to check not only your system’s basic hardware, but also the compatibility of all attached hardware, such as webcams, printers, joysticks, and other peripherals. If the upgrade assistant gives you the green light, you should be in good position to perform an upgrade.


Performing the Upgrade


Once you have the upgrade media (whether it’s a physical disc or the upgrade assistant which will download the upgrade for you after charging you the fee), it’s fairly painless to complete the procedure. The setup wizard asks a minimal amount of questions, and you can even perform a “clean install” upgrade directly from your old Windows, without having to reboot into the installer. Of course, once the upgrade completes, you’ll need to restart in order to do some final cleaning up and launch into the new operating system.


Turn Off Visual Effects


will windows 8 work on my computer

Congratulations, you’re now running Windows 8! If, after the upgrade, your system feels sluggish, you can change a few settings to increase performance. A fair amount of the resources and CPU cycles needed by Windows come from the graphical interface on which you do your work, so it’s a good idea to turn off any fancy graphical effects that aren’t really necessary to stay productive.


To turn these all off to up your system’s performance, begin by opening the Control Panel. You can do this by going into the Start screen by hitting the Start button on your keyboard, and then typing “control panel.” Hitting enter will open the application. From here, click on System and Security –> System –> Advanced system settings. The new window that appears should already be in the Advanced tab. Click on the Settings button under the Performance section at the top of the window. A new Performance Options window should appear which is on the Visual Effects tab. To turn off all the graphical effects, choose the “Adjust for best performance” option. This should help reduce some strain on your CPU, GPU, and RAM.


Increase the Paging File


will windows 8 work on my computer

Another performance trick is to adjust the size of the paging file on your computer. The paging file is a file on your hard drive that is responsible for holding any data that won’t fit into the RAM. In other words, it’s a space on your hard drive that is used as overflow for whenever your RAM is completely used. Conceptually, it is similar to the swap partition for Linux operating systems.


In the same Performance Options window, switch from the Visual Effects tab over to the Advanced tab. Then click on the Change button in the Virtual Memory section at the bottom of the window. Then, in the new window, turn off “automatically manage paging file size for all drives,” and then choosing Custom Size. The size that you put in is really up to you, so it mostly depends on how much RAM is already installed on the system and how much free space you have on your hard drive. As people who would need to do this trick typically have about 1 GB of RAM, I would suggest setting it to at least 2048 MB. Both fields should hold the same number, so that the space is always reserved for the paging file. When you’re done, hit the Set button before closing out of all your opened windows.


Clean Out Your Hard Drive


will windows 8 work on my pc

Last but not least, it’ll also help to clean up some space on your hard drive after performing the upgrade. To open the disk cleaning utility, launch an instance of Windows Explorer by clicking on the folder icon in the taskbar in desktop mode. Then, click on your C: drive from the list in the left panel, and then click on Manage from the ribbon menu. Finally, click on Cleanup to launch the utility. Let it scan through all your files to see what can be removed, and when it opens up the results, click on the “Clean up system files” button to really search through everything. Provided that you have backed up or moved out any files that you may have wanted to keep from your old Windows installation, the disk cleaning utility will clean up all traces of the upgrade, typically reclaiming around 20GB or more.


Conclusion


You also shouldn’t have to worry about defragmenting your hard drive anymore, as Windows 8 does it routinely by default. With these tips on whether an upgrade is feasible, and how to improve performance on systems that barely meet the requirements, you should be on your way to a decent Windows 8 experience based on the hardware that you have. Plus, there are a few more things you can change to make your Windows 8 experience even more enjoyable.


Are you upgrading to Windows 8? What other tips could you offer? Let us know in the comments!


The post Will Windows 8 Run On My PC? Here’s How to Tell appeared first on MakeUseOf.


16 February 2013

A First Look At Discourse, A Next-Generation System For Forums


Discourse

Forums are an important part of the Internet, but they’re also one of its most dated ones. I mean, when have you last used a forum and were wowed by how simple and fun it was? Alternative discussion systems like Stack Overflow. Quora, and even Reddit were all developed as ways to surface high-quality content that escaped the traditional drawbacks of forums.


And yet, the forum is alive and well, embodied in XDA developers (just one of the seven best forums for learning about Android, for example). That’s because, well, forums are needed. But do they really have to be so cumbersome? Certainly not, says Discourse, a cutting-edge project from Jeff Atwood, one of Stack Overflow’s founders. Let’s break Discourse down a bit, to see what it offers.


It’s a Work in Progress


error


That screenshot shows an error I got on Discourse this morning. That’s not to say the service is bad, but just that it isn’t ready yet: Atwood and his team feel things have progressed far enough to share them with the world, but that doesn’t mean it’s a complete working product. There’s no definitive feature list, the demo they have online now resets every 24 hours, and you will see the random error popping up here and there. But it’s more than impressive enough to look at.


Topic Listing


Rather than use a large hierarchy of forums and sub-forums, Discourse uses categories that feel a bit like tags:


Tags


Much like Stack Overflow, there are just a limited subset of categories you can pick from when authoring a new post:


categories


Initially, the overview page mixes content from all different categories, but can be quickly filtered down to just a single category:


View topics


You can see who’s participating in each discussion at a glance; this view only shows up to five participants, even if a discussion has many more.


Single Topic View


Discourse is a forum, and just like every forum, it has a topic view:


topic view


At first blush, it seems similar to many other forums. An original post, followed by a reply (or 150,000, if you’re on XDA Developers). But what’s that bar under the original post? Let’s take a closer look:


Topic bar


This info bar appears only under the first post in a thread, displaying the thread’s vital statistics at a glance: This thread was created three days ago and last updated two days ago (it seems like not all posts are removed with every reset of the demo site). The other stats are just as easy to follow, and the avatars at the end show you who’s participating.


Authoring a Topic


Topic reply


Both replying and authoring a new topic happens in a bar that floats at the bottom of the screen. You can either write using BBCode or Markdown. The right side of the pane renders your text as you type, making it easy to spot any formatting errors without having to click a Preview button.


On the top-right corner of the bar, there’s a little down-arrow letting you minimize the toolbar. You can click it mid-post, and this is what happens:


minimize


Discourse saves your draft in the background, server-side. This means you can log off, go to a different computer, log back on, and continue writing right where you left off. But even if you don’t switch machines, being able to minimize the post and having it just a click away is a great way to browse other topic for reference. It makes it easier to carefully author replies, because you don’t need another browser tab to work with existing posts.


User View


Just like many other forum systems, Discourse offers a user profile page:


User Profile


The Discourse page, however, is a far cry from any other forum user page I’ve seen before. The sidebar lets you slice and dice that user’s activity, and you can click into every post they made, see what they liked, and so on. Note the “Trust Level” entry at bottom-left: Just like Stack Overflow (and the other StackExchange websites), Discourse has a self-policing system built into it. Looking through Discourse’s “meta” forum (a forum containing discussions about the platform) did not reveal much additional information about the feature, but I did dredge up a thread on automating trust that mentions a ratio between “flags” and posts as a way to detect bad users (i.e., if you don’t post very much, but a great many of your posts are flagged as bad content, you probably deserve a low trust level).


Unlike Stack Overflow, where the user’s point rank is very prominently displayed, in Discourse it has been abstracted into a “trust level” and squeezed into a tiny corner of the user’s profile. That feels like a conscious design choice: Forums are often more “democratic” than dedicated Q&A sites like StackExchange.


Not an End, But a Beginning


I love Stack Overflow, and Discourse currently gives an indication of being just as disruptive, exciting, and fresh. What you don’t see in the screenshots is how fluid and airy the system feels: Interactions are smooth even at this early stage, and the UI really does feel re-imagined. I, for one, hope to see Discourse become a powerhouse platform in the world of Internet forums. Did you try it out? What did you think?


The post A First Look At Discourse, A Next-Generation System For Forums appeared first on MakeUseOf.


Get Tweeting On Windows Phone With Multiple Account Support!


Although the platform supports social networking integration, there is still a need for full apps of services such as Facebook, LinkedIn and Twitter on Windows Phone.


A quick look at the Windows Phone apps + games service (where you can find Twitter) will reveal an endless list of Twitter related apps for the device – which is strange as Twitter functions (such as Tweeting and retweeting) can be found in the People Hub!


So, why do so many Twitter apps exist, and why would you choose the official Twitter app as your preferred choice?


The answers are interesting…


Why Does Windows Phone Need a Twitter App?


When you boot up a Windows Phone and head to the People Hub, you will see a list of your contacts, their telephone numbers and email addresses. If you add a social networking account to your phone, you will also see what these people are up to on services such as Facebook and LinkedIn.


Twitter can also be added, but like Facebook and LinkedIn, integration is limited.


That is to say that although you can see what people are posting, you cannot necessarily fully engage with the service in the way you might with a dedicated app. For instance, the People Hub doesn’t support Twitter lists.


As a result, there is an official Twitter app for Windows Phone. There are also many third party apps all trying to improve on the original, with varying degrees of success.


Twitter App Features


The Windows Phone Twitter app has various features and functions that make it an attractive choice. Although it could be argued that there are better alternatives available, it remains the best of the free to use, ad-free Twitter apps.


Providing support for multiple Twitter accounts, hashtags, photo uploads, insertion of usernames from your friends (enabling you to direct messages @ them) the app also provides location-aware support (which can be disabled) and directs notifications to the Start screen when you’re mentioned or your posts are retweeted. Search is also available, as is access to custom lists.


There are also two themes available, dark and light, but sadly there is not a live tile feature which would display the number of retweets, for instance (a feature available with other Twitter apps).


Tweeting, Retweeting and Configuring


The most important thing about this Twitter app, however, is that it is easy to use.


To make a new Tweet, all you need to do is tap the Compose button, and enter your thoughts using the keyboard, complete with autocorrect options. It is from this screen that you can add photos, either from your library of images or from either of your Windows Phone’s cameras. Direct messages can also be sent using the Message button, although note that as per Twitter’s rules, these can only be directed to someone that you are following and who is also following you.


You can view your own profile with this app, and while doing so you will notice that there is an Edit profile option in the ellipses menu. Editing options allow a new profile picture, display name, description, location and website to be added.


Good App or Bad App?


A check of the rating for this app on the Windows Phone app store will reveal an app with around 3 stars out of 5. I’m not totally sure what the individual users that have left a low rating have found wrong with the official Twitter apps as the problems described are not anything I’ve ever come across on either a Windows Phone 7 or a Windows Phone 8 handset.


Speed issues affect all Twitter apps (usually due to capacity problems), and as this official version offers multiple account support (rare among even some of the paid third party apps) there really is no reason not to recommend this free application.


Conclusion


The official Windows Phone Twitter app is published by Twitter (some “official” apps are released by Microsoft) so there is plenty of reason to expect a solid, slick and full-featured app.


While Twitter search is present, this app can unfortunately be slow at times, although that is often due to issues with the Twitter service itself. Most frustrating, perhaps, is the “gap in time” created between uses of the app. This effectively means that when you’re not using, and your Twitter activity continues elsewhere (perhaps on your PC), the app doesn’t display anything when it is relaunched apart from what it is happening on Twitter at that very moment.


This can prove very frustrating.


However, given the support for multiple accounts, camera and images, lists and direct messages, this is a very good Twitter app that is free to use but could do with some behind-the-scenes improvements to keep it relevant.


The post Get Tweeting On Windows Phone With Multiple Account Support! appeared first on MakeUseOf.


Yummly Lets You Share Recipes Just By Saying “Yum”


Fans of online recipe sites may have heard of Yummly before as it’s been around for a while. But recently it’s had one hell of a spruce-up and added a whole lot of new social features and other updates to the site. Browsing Yummly has never looked better and sharing recipes is now as easy as pressing “Yum”.


Yummly launched back in 2010 and is currently one of the fastest-growing food sites on the net. Their main aim is to bring in recipes from all over the web, making the recipes easy for you to search and find your favorites. Now that they’ve added their new social features, they are well and truly ready to become the Pinterest of the food world. Now is the time for you to test out the upgrade and see for yourself!


Yummly’s Re-Vamp


Yummly has always been very useful as a search engine and easy on the eyes, however the recent overhaul has made it look fabulous. The recipes are bright and appealing, and each recipe is shown with images of similar recipes alongside it. So if another one catches your eye, you can jump directly to that recipe instead.


As well as bigger photos, Yummly has added new recipe sources, improved the search functions so that it’s smoother and faster, and added taste profiles to give better recommendations to you. The rating of each recipe is now more accurate, incorporating Yummly user ratings and other social feedback alongside the reputation of the source site generally.


Yummly Search


Yummly have made recipe search as easy as possible, ensuring all food requirements are taken into consideration. It doesn’t matter if you’re vegetarian, gluten intolerant, hate spinach or just trying to cut back on calories; Yummly lets you filter your results to find just what you’re after. As well as foods you love or hate, you can also filter by holiday celebrations, cuisine, diet, courses, the source site of the recipe, cooking techniques, tastes (e.g. salty, bitter, sweet), nutrition, brands of ingredients or how recently the recipe was added.


When you’re viewing the recipe, you can see the full list of ingredients, links to the original recipe, nutritional information, taste ratings, tags and more. It’s very easy to see if this is something you’re going to enjoy and whether you have all the ingredients on hand.


Social Sharing On Yummly


It’s really easy to share and keep track of the recipes you love using Yummly. Log into Yummly using Facebook or Google credentials and you are ready to go. Logging in will also allow you to save your diet and allergy preferences, plus a few links to social networks like Facebook, Twitter and Pinterest. You can also choose in settings whether to share your Yummly activities with Facebook or not.


If you have chosen to share your activities with Facebook, share your favorite recipes with Facebook by simply clicking “Yum” on anything you like. Yummly will also keep track of all your “Yum’s” for later. You can also comment on recipes and share those comments with Facebook. Regular social sharing buttons are there too, so you can quickly Tweet, Like, Pin, Stumble or email the recipe.


The “Yum’s” also act as a popularity indicator for the recipe. You can quickly see that a recipe with over 200 “Yum’s” is worth checking out in more detail.


Yummly Remembers What You Like


As long as you are logged in, Yummly can filter every search you do according to your taste preferences, which you can save in your settings. These settings are also easy to override if you change your mind and want to look for something else.


Need More Recipes?


Let’s face it, all cooks need more recipes. The fact that the internet has many great recipe websites doesn’t mean we’re ever going to stick with just one. You can also get your daily dose of food porn from: Epicurious; Foodily; Punchfork; Gojee; great YouTube cooking channels; sites that inspire you to start baking; a number of great vegetarian recipe sites; some old favorite recipe sites; recipe sites with tasty visuals; great sites for holiday recipes.


What do you think of Yummly’s new social features? Will you be sharing your favorite recipes on Facebook?


The post Yummly Lets You Share Recipes Just By Saying “Yum” appeared first on MakeUseOf.