29 February 2020

The Essential SQL Commands Cheat Sheet for Beginners


MacBook with code displayed on screen

Structured Query Language (SQL) is the tool of choice for manipulating databases. This language lets you manipulate data like no other, and it costs nothing to start using!

If you’re new to SQL commands or need a reminder of some parts of this powerful tool at your disposal, then our SQL commands cheat sheet below is exactly what you need. Scroll down to see the awesomeness it contains, or download the PDF for future use. (The PDF contains examples for the given commands.)

FREE DOWNLOAD: This cheat sheet is available as a downloadable PDF from our distribution partner, TradePub. You will have to complete a short form to access it for the first time only. Download The Essential SQL Commands Cheat Sheet.

The Essential SQL Commands Cheat Sheet

Command Action
Query Commands
SELECT Basic query building block to retrieve data.
SELECT * Using * with SELECT returns all columns.
SELECT column Specify exact columns with their name.
SELECT table.column Reference a column from a specific table.
FROM Specify where to find data.
AS Temporarily alias a table name or column to a new name.
WHERE Filter results with a condition.
AND Use multiple conditions with a WHERE clause. Results must match all conditions.
OR Use multiple conditions with a WHERE clause. Results only need to match one condition.
ORDER BY Order the results by a column. The database chooses how to order.
ORDER BY column ASC Order the results by a column in ascending order.
ORDER BY column DESC Order the results by a column in descending order.
LIMIT Restrict the number of results returned.
OFFSET Skip the first OFFSET number of rows. Often used with LIMIT.
SUBQUERY Run a query to retrieve data for another query.
Aggregate Functions¹
COUNT Count the number of rows that match the query.
MAX Return the highest value in a numeric column.
MIN Return the lowest value in a numeric column.
SUM Sum the values of a numeric column.
AVG Calculate the average value for a numeric column.
HAVING Used with aggregate functions instead of the WHERE clause.
GROUP BY Used to refine an aggregate result.
Operators
LIKE Case-sensitive search for a pattern with a wildcard operator (%).
ILIKE Case-insensitive search for a pattern with a wildcard operator (%).
BETWEEN Search for a value between two values. Works with dates or numbers.
> Search for values greater than a condition.
>= Search for values greater or equal to a condition.
< Search for values less than a condition.
<= Search for values less than or equal to a condition.
= Search for values matching a condition exactly.
<> Search for values not equal to a condition.
UNION Combine two unique queries (with the same columns) into one result.
UNION ALL Combine two queries (with the same columns) into one result. Duplicates allowed.
IN Shorthand for WHERE. Specifies multiple OR conditions.
NOT IN Shorthand for WHERE. Specifies multiple OR conditions (inverted) or not equal to.
IS NULL Check for empty values.
IS NOT NULL Check for no empty values.
INTERSECT Return results which match two queries.
MINUS Return results in one query which are not in another query.¹
Joins
ON Used to specify the column to compare and match results.
USING Shorthand for ON, used when the column name is the same in both tables.
LEFT OUTER JOIN All the results from the left table, with only the matching results from the right table.
LEFT OUTER JOIN (WITH NULL) (With null) All the results from the left table but not in the right table.
INNER JOIN All the results that match in both the left and right tables.
FULL OUTER JOIN All the results from both the left and right tables.
FULL OUTER JOIN (WITH NULL) (With null) all the results from both the left and right tables excluding results in both tables.
RIGHT OUTER JOIN All the results from the right table, with only the matching results from the left table.
RIGHT OUTER JOIN (WITH NULL) (With null) All the results from the right table but not in the left table.
Creating and Editing Tables
CREATE TABLE Create a new table.
NULL Allow empty values for this field.
NOT NULL Don't allow empty values for this field.
DEFAULT A value to populate the field with if one is not supplied.
AS Create a new table based on the structure of an existing table. The new table will contain the data from the old table.
ALTER TABLE (ADD COLUMN) Add a new column to an existing table.
ALTER TABLE (DROP COLUMN) Remove a column from an existing table.
ALTER TABLE (ALTER COLUMN) Change the datatype of an existing column.
ALTER TABLE (RENAME COLUMN) Rename an existing column.
ALTER TABLE (RENAME TABLE) Rename an existing table.
ALTER TABLE (MODIFY NULL) Allow null values for a column.
ALTER TABLE (MODIFY NOT NULL) Prevent null values for a column.
DROP TABLE Delete a table and all its data.
TRUNCATE TABLE Delete all the data in a table, but not the table itself.
Constraints
PRIMARY KEY A value that uniquely identifies a record in a table. A combination of NOT NULL and UNIQUE.
FOREIGN KEY References a unique value in another table. Often a primary key in the other table.
UNIQUE Enforce unique values for this column per table.
CHECK Ensure values meet a specific condition.
INDEX (CREATE) Optimise tables and greatly speed up queries by adding an index to a column.
INDEX (CREATE UNIQUE) Create an index that does not allow duplicate values.
INDEX (DROP) Remove an index.
Creating and Editing Data
INSERT (SINGLE VALUE) Add a new record to a table.
INSERT (MULTIPLE VALUES) Add several new records to a table.
INSERT (SELECT) Add records to a table, but get the values from an existing table.
UPDATE (ALL) Modify all existing records in a table.
UPDATE (WHERE) Modify existing records in a table which match a condition.
DELETE (ALL) Remove all records from a table.
DELETE (WHERE) Remove records from a table which match a condition.
Creating and Editing Triggers¹
CREATE TRIGGER Create a trigger.
CREATE TRIGGER (OR MODIFY) Create a trigger, or update an existing trigger if one is found with the same name.
WHEN (BEFORE) Run the trigger before the event happens.
WHEN (AFTER) Run the trigger after the event happens.
EVENT (INSERT) Run the trigger before or after an insert happens.
EVENT (UPDATE) Run the trigger before or after an update happens.
EVENT (DELETE) Run the trigger before or after a delete happens.
ON Which table to target with this trigger.
TRIGGER_TYPE (FOR EACH ROW) Execute the trigger for every row changed.
TRIGGER_TYPE (FOR EACH STATEMENT) Execute the trigger once per SQL statement, regardless of how many rows are altered.
EXECUTE Keyword to indicate the end of the main trigger definition.
DROP TRIGGER Delete a trigger.
Creating and Editing Views
CREATE VIEW Create a new view.
AS Define where to retrieve the data for a view.
WITH CASCADED CHECK OPTION Ensure any data modified through a view meets the rules defined by the rule. Apply this to any other views.
WITH LOCAL CHECK OPTION Ensure any data modified through a view meets the rules defined by the rule. Ignore this for any other views.
CREATE RECURSIVE VIEW Create a recursive view (one that refers to a recursive common table expression).
CREATE TEMPORARY VIEW Create a view that exists for the current session only.
DROP VIEW Delete a view.
Common Table Expressions (CTEs)¹
WITH Create a new common table expression.
AS Specify the data to use in the CTE.
, (COMMA) Chain multiple CTEs.
¹Database engine implementations and support often vary.

SQL: The Most Powerful Language Around?

Keep in mind that SQL dialects vary between database engines. It’s a bit like the difference between HD DVD and Blu-ray (or VHS and Betamax). SQL is similar between databases, but the occasional complex command may not work exactly the same across all implementations. Most of the SQL commands in this cheat sheet will work across any database. The complex commands where database support varies are noted as such.

Once you know SQL, you can apply it to a variety of uses. Whether you’re dealing with a management system, programming project, or basic reporting, SQL unlocks the raw power contained in a database. Don’t forget to read our basic programmer’s guide to SQL, for an in-depth look at how to use these commands.

Read the full article: The Essential SQL Commands Cheat Sheet for Beginners


Read Full Article

Multiverse virtual worlds will be healthier for society than our current social networks


The basis of the classic James Bond film “Tomorrow Never Dies” is an evil media mogul who instigates war between the U.K. and China because it will be great for TV ratings. There’s been a wake-up call recently that our most popular social networks have been indirectly designed to divide populations into enemy camps and reward sensational content, but without the personal responsibility of Bond’s nemesis because they’re algorithmically driven.

(This is part five of a seven-part series about virtual worlds.)

The rise of “multiverse” virtual words as the next social frontier offers hope to one of the biggest crises facing democratic societies right now. Because the dominant social media platforms (in Western countries at least) monetize through advertising, these platforms reward sensational content that results in the most clicks and shares. Oversimplified, exaggerated claims intended to shock users scrolling past are best practices for individuals, media brands and marketing departments alike, and social platforms intentionally steer users toward more extreme content in order to captivate them for longer.

Our impending cultural shift to socializing equally as often through virtual worlds could help rescue us from this constant conflict of interest between what we recognize as healthy interactions with others and how these social apps incentivize us to behave.

Virtual worlds can have advertisements within them, but the dominant monetization strategies in MMOs are upfront purchase of games and in-game transactions. Any virtual world that gains enough adoption to compete as a social hub for mainstream society will need to be free-to-play and will earn more money through in-world transactions than from ads.


Read Full Article

This Week in Apps: Coronavirus impacts app stores, Facebook sues mobile SDK maker, Apple kicks out a cloud gaming app


Welcome back to This Week in Apps, the Extra Crunch series that recaps the latest OS news, the applications they support and the money that flows through it all.

The app industry is as hot as ever, with a record 204 billion downloads in 2019 and $120 billion in consumer spending in 2019, according to App Annie’s recently released “State of Mobile” annual report. People are now spending 3 hours and 40 minutes per day using apps, rivaling TV. Apps aren’t just a way to pass idle hours — they’re a big business. In 2019, mobile-first companies had a combined $544 billion valuation, 6.5x higher than those without a mobile focus.

In this Extra Crunch series, we help you keep up with the latest news from the world of apps, delivered on a weekly basis.

This week, we’ll look at the coronavirus outbreak’s impact on the App Store, China’s demand for App Store removals — and soon-to-be-removals, it seems. We’re also talking about Facebook’s lawsuit over a data-grabbing SDK, Tinder’s new video series, the TSA ban on TikTok, Instagram’s explanation for its lack of an iPad app and how Democratic presidential primary candidates are performing on mobile and social, among other things.

Headlines

Coronavirus concerns send Chinese ride-hailing apps crashing, games surging

5 Best Puzzle Sites for Logic Riddles and Lateral Thinking Brain Teasers


puzzle-sites

Much like your body, your mind too needs a regular workout to remain fighting fit. These websites are full of free puzzles, riddles, and brain-teasers to activate those brain cells.

Many studies have shown that having a sharper brain in later life is linked to regularly solving word and number puzzles. Meanwhile, coming up with solutions to riddles and brain-teasers will develop your lateral thinking skills.

But more than anything else, puzzles are a fun and entertaining way to give your mind a little bit of exercise for free.

1. Puzzle Prime (Web): Large Variety and Collection of Brain Teasers

Puzzle Prime hosts a large variety and collection of puzzles and riddles

Puzzle Prime is choc-a-bloc with all types of puzzles and brain teasers. The website also hosts a forum for puzzle-related discussions as well as a fun activity center with webcomics, jokes, and other entertainment. But the brain teasers are the main attraction.

The website hosts puzzles across categories like insights, riddles, deduction, practical, math, detective, chess, lateral, and science. You can also choose a difficulty level (which is useful if you’re showing the website to kids) or go through all the puzzles in that section. Then just click again to reveal the solution so that you aren’t stuck for ages.

There’s a separate section for Casual Puzzles, which include mazes, rebuses, hidden object puzzles, and movie conundrums. All of these are printable activities for children, but I have to admit, they’re fun for grown-ups too.

If you fancy yourself to be a great detective like Sherlock Holmes, try Puzzle Crime. This is an interactive story with a new clue to solve at each level, as you embark on a journey to figure out a whodunnit. It’s a fun activity for both adults and kids.

2. Puzzle Choice (Web): Classic Printable Puzzles

Find classic puzzles and riddles that you can print out for free at Puzzle Choice

You don’t always want to solve puzzles online. If you want to print them out as activities for children (or as a party or trip activity for adults), Puzzle Choice has some of the best classic brain teasers available for free.

There are nine categories to print from, namely crossword, word search, sudoku, logic puzzles, brainteasers, number, wordplay, quizzes, and kids’ games. None of the categories have a huge collection, but the variety of printables is large enough to keep anyone occupied and entertained for a few days.

Each of these printable puzzles also has an online version that you can play in your browser. Puzzle Choice also has a separate category for Online Games, which includes a few arcade video games along with other puzzles. The website isn’t mobile-friendly though, so I would advise playing these on a laptop or desktop.

Puzzle Choice is great for also getting a bunch of printable crossword puzzles and a daily new one. But if that’s what you want, there are better options in our list of the best crossword puzzle apps and sites.

3. Matchstick Puzzles (Web): Logic and Lateral Thinking Classics

Matchstick Puzzles has 92 different riddles for logic and lateral thinking based on classic match stick riddles

One of the classic forms of brain teasers is to use match sticks to set a difficult problem that requires either logic or lateral thinking. In case you’ve never seen one before, it usually takes the form of matchsticks placed in a certain shape, and you have to move or remove some to meet the objective.

Matchstick Puzzles is a large collection of these problems, including both famous problems as well as original ones. There are currently 92 different riddles, each showing the arrangement of the sticks and asking a question. Click the post to find a deeper description, and then you can click again to reveal the solution.

It’s best to attack these with your own box of matchsticks. Place your sticks on a table as indicated in the puzzle and try it out. It makes a great activity for children, but some of them are difficult for adults too.

4. Puzzling Stack Exchange (Web): Forum for Daily Puzzles

Stack Exchange's Puzzling community is a forum for puzzlers with some of the toughest riddles and brain teasers

Question-answer platform Stack Exchange hosts a dedicated forum called Puzzling. Puzzlers ask questions, answer tough riddles, and even try to come up with solutions for unanswered mysteries. It’s an amazing community for anyone interested in puzzles.

The website posts new questions every day. The questions are diverse, hitting basic logic, math, and wordplay, along with advanced topics like mathematics, programming, design, science, and much more. The presentation is interesting too, letting commenters hide their answers to avoid spoilers. Mouse over any comment to reveal the solution offered.

You can browse the website without registering, but you will need a free Stack Exchange account to comment or ask questions. As always, there is an “Unanswered” section for questions that haven’t yet been resolved. Think you can solve a riddle or puzzle that has stumped hundreds of other users?

5. Gpuzzles (Web): Interview Puzzles by Google, Apple, and Others

Find interview riddles and puzzles from top tech startups at Gpuzzles

Tech startups and other modern companies are famous for asking tough puzzles in interviews when hiring a new candidate. Many of these questions have gone viral as a way to test your intelligence. Genius Puzzles, or Gpuzzles, collects these interview puzzles in one place, along with a collection of other riddles and brain teasers.

The interview puzzles are organized by company names, which include Google, Apple, Microsoft, Amazon, Flipkart, Samsung, Yahoo, Adobe, Oracle, and Intel. Each of the questions has an answer as well, but you can also dive into the comments to see alternative solutions and lateral thinking by others.

Apart from interview questions, Gpuzzles hosts a variety of puzzles and riddles, as well as a cool collection of inexplicable illusions. The Daily Challenge is a fresh puzzle every day. The answer is revealed the next day, giving you the time to come up with a solution and perhaps discuss it in the comments.

More Puzzle Zones Are Out There

If these five haven’t already quenched your appetite for brain food, then don’t worry, we have more websites for you to check out. You’ll get printable puzzles, YouTube videos of logic questions, and even a classic puzzle-based video game at these puzzle places for brain twisters and logic riddles.

Read the full article: 5 Best Puzzle Sites for Logic Riddles and Lateral Thinking Brain Teasers


Read Full Article

How to Install The Sims 4 Mods and the Best Mods to Try


The Sims 4 is still one of the best simulation games available, even years after its release. You can also buy The Sims 4 expansion packs to expand the game. However, these cost money.

Thankfully, you can expand The Sims 4 for free using mods and custom content. So, in this article we show you how to install The Sims 4 mods and list the best The Sims 4 mods to try.

What Are The Sims 4 Mods and Custom Content?

In terms of The Sims 4, mods and custom content (CC) are not the same thing.

Mods (sometimes called script mods) means modifications. These change or add to the functionality of the game, like changing how Sims behave or adding a new career.

Custom content (or CC) is things like furniture, hair styles, or textures—stuff that you can use when designing a Sim or a house.

You can also download lots. These are houses or places. They don’t necessarily use custom content, but instead save you having to build something from scratch.

How to Download and Install The Sims 4 Mods and CC

Most downloadable content for The Sims 4 comes in compressed file types like ZIP or RAR. Windows can handle ZIP files by default, but you will need a free program like WinRAR for anything else. Here are the best tools to open RAR files.

You need to move all mods and custom content into a specific folder. Press Windows key + R to open Run and input the following:

\Users\%username%\Documents\Electronic Arts\The Sims 4

You should see a Mods folder here. If you don’t, click New folder to create it.

The Sims 4 Mods and Tray folders

Extract the contents of your download into this Mods folder. You can store things within subfolders, but don’t go deeper than one level (a new sub-folder for each mod is the simplest approach).

The only exception is for house lots. These files have extensions like .blueprint, .bpi, and .trayitem. They don’t go in the Mods folder. Instead, go to the top The Sims 4 folder and place them in the Tray folder.

To uninstall anything, close the game and simply remove the associated files.

How to Enable Mods and CC in The Sims 4

To enable mods and CC in The Sims 4, first launch the game.

Click the menu button (three horizontal dots) in the top-right of the screen. Then, click Game Options > Other.

The Sims 4 game options

Here, tick Enable Custom Content and Mods and Script Mods Allowed.

To finish, click Apply Changes. You will need to restart the game for the changes to take effect.

A Mods panel will then open when you launch the game, listing which mods are enabled. If you don’t want to see this, untick Show At Startup.

You don’t need to do this for any lots you download. To find these, click the gallery icon (photo album) in the top-right and click My Library. If your lots use custom content, ensure that Include Custom Content is ticked on the left.

How to Update Mods and CC in The Sims 4

Mods and CC are usually disabled after The Sims 4 updates. This is because there’s a risk that a mod isn’t compatible with the latest version of the game. Follow the instructions above to enable them again.

Unlike the game itself, mods don’t automatically update. When a mod breaks then you will need to check where you got it from to see if there’s a new version. If there is, download it, and replace the original files. If there isn’t, remove the files until there’s an update.

The Best The Sims 4 Mods to Try

There are lots of great places to download The Sims 4 mods and CC from. These include Mod The Sims, The Sims Resource, and Sims Catalog.

Here are some of the best The Sims 4 mods from these sites and beyond.

1. MC Command Center

MC Command Center does so much, we’d be here all day describing it. Essentially, it lets you control every aspect of your Sims—and even grants minor control to usually non-playable characters. For many, this mod includes what the base game should have. You can ban clothes, control pregnancies, remove homeless ghosts, and more.

2. Meaningful Stories

The Sims 4 Meaningful Stories mod

This mod redesigns the mood and emotions system of The Sims 4. In the base game, your Sims will be joyful because of a nice lamp one minute, then angry from a faulty shower the next. This mod makes your Sims’ lives more meaningful (and challenging), with emotions that reflect real life—a first kiss creates true happiness, while a depressive rut can last for days.

3. Have Some Personality Please!

One of the big differences between The Sims 3 and The Sims 4 was the switch towards more emotion-driven gameplay.

This mod makes your Sims personality more natural. No longer will they chat to each other about random things. Instead, they will act based on shared traits, moods, and relationships. The mod also includes more interactions with pets.

4. Slice of Life

The Sims 4 Slice of Life mod

As the name of this mod suggests, it aims to bring The Sims 4 closer to reality. It does this by adding a range of emotions, the ability to get drunk, the chance to get acne, the menstrual cycle, colds and flu, and memories. And that’s not everything! You’ll wonder how you played the game without this mod.

5. Don’t Wash Dishes Where You Angry Poop

This mod isn’t as radical as some of the others listed here, but it fixes an incredibly annoying behavior that Sims in the game possess. Now you can set which sinks your Sims can or can’t wash up in. No longer will they pick up their finished dish from the table and then head to the bathroom to wash it in that sink. Rejoice!

Get More From The Sims 4 With Expansion Packs

There are lots of free The Sims 4 mods available, but they don’t usually offer the same game-changing depth that the official expansion packs do.

While the expansion packs do cost money, they add new features like pets or weather, plus objects, clothes, hairstyles, and more.

If you’re struggling to decide which The Sims 4 expansion packs to buy, check out our guide to all of The Sims 4 expansion packs.

Read the full article: How to Install The Sims 4 Mods and the Best Mods to Try


Read Full Article

Apple Family Sharing Explained: What You Need to Know and How to Use It


setup-family-sharing

Apple’s Family Sharing is a way to make your apps, movies, subscriptions, and more available to all the people in your family. You can also use it to control the screen time or content restrictions for your children’s devices. What’s more, it can even let you keep an eye on the location of all your loved ones.

We’ve written this guide to explain everything you need to know about setting up and using Apple’s Family Sharing service. Let’s take a look at how it works.

What Is Family Sharing?

Family Sharing lets you connect up to six different Apple ID accounts together. These accounts form your Family Sharing group, which you can use to save money by sharing various Apple purchases and services, including:

  • Apps, movies, TV shows, songs, and books
  • Apple Music family plan subscriptions
  • Apple Arcade, Apple News+, and Apple TV channel subscriptions
  • iCloud storage

Since everybody has their own account, you don’t need to share your password with other people. You can also access content in your Family Sharing group from any device you use with your Apple ID: iPhone, iPad, Mac, Apple TV, or even a Windows PC.

Music, Movies, Books, and Apps on iPhone shared with Family Sharing
Image Credit: Apple

Alongside shared purchases and services, Family Sharing automatically creates a shared reminders list, shared calendar, and shared photo album for you all to use. With permission, you can even use Family sharing to see the location of everyone in your group, as well as all their Apple devices.

Finally, with Family Sharing, parents or guardians can manage the Screen Time or Content & Privacy Restrictions for any children under 18 in the group. With Ask to Buy turned on, they can also approve or deny App Store and iTunes purchases their kids want to make.

You Can’t Share Everything

Unfortunately, not everything is available to share with Family Sharing. Before purchasing an app, scroll down to the Information section in the App Store to check that it supports Family Sharing.

Notably, you also can’t share in-app purchases or subscriptions for non-Apple services.

App Store showing Family Sharing support in Information section

How to Set Up Family Sharing

Whoever creates the Family Sharing group becomes the Family Organizer. This person chooses who is and isn’t allowed in the group, and also chooses which services or purchases you share with Family Sharing.

If the Family Organizer chooses to share App Store and iTunes purchases, they must also agree to pay for new purchases that anyone in the Family Sharing group makes.

It’s easy to set up Family Sharing from an iPhone or Mac, provided it’s running at least iOS 8 or OS X Yosemite, respectively.

Set Up Family Sharing on an iPhone, iPad, or iPod touch

  1. Go to Settings and tap [Your Name] at the top of the screen. If you don’t see your name, choose to Sign in to your [device] using your Apple ID account.
  2. Tap Set Up Family Sharing, then choose Get Started and choose the first feature you want to use with Family Sharing. You may need to add a payment method to your Apple ID account if you don’t already have one.
  3. Follow the onscreen prompts to complete the setup and Invite Family Members, which you can do using iMessage or by asking them to sign in on your device.
  4. After creating your group, the Family Sharing settings appear beneath your name. You can also tap Add Family Member to add more people to your family.

Set Up Family Sharing on a Mac

  1. Open the Apple menu and go to System Preferences > Family Sharing.
  2. You should see instructions to Set up Family Sharing; click Next and follow the onscreen prompts to complete the setup. You may need to add a payment method to your Apple ID account if you don’t already have one.
  3. Once the setup is complete, click Add Family Member and enter the name, email address, or Game Center nickname of the first family member you want to add.
  4. Use the sidebar in System Preferences to edit the various Family Sharing settings. Go to Family to add more people to your Family Sharing group.

Mac Family Sharing System Preferences

Set Up a Child’s Account in Family Sharing

Children under 13 cannot create their own Apple ID accounts. However, with Family Sharing, the Family Organizer can create a child’s account for them. Apple limits the apps and media based on your child’s age and automatically turns on Ask to Buy. This means they can’t download or purchase anything without permission, even if it’s free.

To create a child’s account, open the Family Sharing settings on your device and follow the prompts to add a new family member. Select the option to Create a Child Account. Then create an iCloud email address, a password, and security answers for your child.

Family Members with Add Family Member option in iPhone Family Sharing settings

As a Family Organizer or parent/guardian in the Family Sharing group, you can remotely approve or deny App Store and iTunes purchases, track your child’s Screen Time, or edit the Content & Privacy Restrictions for your child’s device.

Apple’s Family Sharing Features Explained

After creating your Family Sharing group, you will see a lot of different features and services you can choose to use with it. This many options can seem a little overwhelming at first, so we’ve explained each Family Sharing feature below.

Family Sharing Shared Features settings on iPhone

Purchase Sharing

If you want to share apps, movies, TV shows, songs, and books in your Family Sharing group, you need to turn on Purchase Sharing. When doing this, the Family Organizer must agree to pay for any future purchases people in your Family Sharing group make.

Family members get to keep their purchases after leaving the Family Sharing group, even if the Family Organizer paid for that purchase originally.

To view another person’s purchases, open the App Store or iTunes Store app and go to the Purchases page. You should see each of your family members’ names; tap one to view or download their purchases.

Family Purchases in App Store on iPhone

Purchase Sharing lets your family access everything you’ve ever bought or downloaded, even if you did so before joining the Family Sharing group. If you want to hide a particular purchase from your family, swipe on that purchase and choose to Hide it.

iCloud Storage

Apple gives everybody 5GB of free storage to use with their Apple ID account. Each family member can decide to expand their storage for a small monthly fee, or you can choose to share a single storage plan across your Family Sharing group.

iCloud storage showing Family Usage amount

To share iCloud storage with Family Sharing, you either need the 200GB or the 2TB plan. When a family member chooses to share iCloud storage, Apple doesn’t add their free 5GB to the shared plan.

Location Sharing

With Location Sharing turned on in Family Sharing, you can use the Find My app on your iPhone, iPad, or Mac to check where your other family members are. You can also use Find My to locate your family members’ missing Apple devices.

Each family member can choose whether they want to share their location from the Family Sharing settings on their device.

Find My app showing family member locations with stars next to them

You should be careful with this setting. When Location Sharing is turned on, anyone in your Family Sharing group can use the Find My app to mark your devices as lost or remotely erase them.

Screen Time

Turn on Screen Time to monitor any children in your Family Sharing group under the age of 18. You can choose to set App Limits, Communication Limits, Downtime, and Content & Privacy Restrictions on your children’s devices.

Screen Time setting options for child's Family Sharing account

Family Sharing also gives you regular usage reports so you can keep an eye on how much your children use their devices.

Apple Music, TV Channels, Apple Arcade, and Apple News+

Apple now offers a lot of different subscription services. And except for Apple Music (which requires a family plan), you can share any of these subscriptions with your Family Sharing group at no extra cost.

For example, if you subscribe to Apple Arcade, everyone else in your Family Sharing group can also access Apple Arcade games without needing to sign up for their own subscription.

To share Apple Music, you need to pay a little bit more to get a Family Sharing plan. It still works out cheaper than paying individually, though.

Apple subscriptions services settings in Family Sharing on iPhone

Apple Isn’t the Only Company to Offer Family Sharing

Plenty of other companies offer sharing services similar to Apple’s setup. Now that we’ve explained how to use Apple’s Family Sharing service, it’s worth taking a moment to learn what’s on offer elsewhere as well.

That way, you can be certain you’re getting the best service for your particular needs. For instance, if you use more Google apps than Apple ones, you might have a lot more to gain from setting up a Google Play Family Sharing group instead. Don’t forget that many streaming services have family plans, too.

Read the full article: Apple Family Sharing Explained: What You Need to Know and How to Use It


Read Full Article

How to See the Exact Time Your WhatsApp Message Was Read


whatsapp-new-features

It’s simple to find out if your WhatsApp message was read thanks to the checkmarks alongside every message. However, did you know you can also check the time on WhatsApp messages to see when the other person saw them?

In this article, we’ll show you how to check the WhatsApp seen time for your messages.

How to View Message Seen Time on WhatsApp

To see what time your WhatsApp message was read, first, open WhatsApp on your phone. Find the message that you’re interested in, then long-press on it.

When you do this, you’ll see some new icons appear along the top bar. Tap the three-dot Menu button, then choose Info. This will display the Delivered and Read times for your message. Of course, Delivered is when your message arrived on their device, while Read indicates when the recipient actually opened it.

You can do this in both one-on-one chats and group messages. In group chats, you can see the delivered and read times for each individual. Tap their name in the list for full details. However, note that you can’t get message read times for other people’s messages.

If the person hasn’t read your message yet, you’ll see a dash under the Read field. However, you might run into a case where the WhatsApp message info says “read” but has no time. In this case, the other person has probably turned off WhatsApp read receipts. Which is one of the ways to use WhatsApp while maintaining your privacy.

Turning off read receipts prevents WhatsApp from showing when you’ve seen messages. This is why there’s no time, even though the message says “read.”

You can turn off read receipts yourself by going to Settings > Account > Privacy and disabling the Read Receipts slider. Doing this also prevents you from seeing read receipts from others. Keep in mind, however, that read receipts are always on for group chats.

View Message Read Time on WhatsApp Web

You can follow a similar process using WhatsApp Web to see what time someone read your WhatsApp message. Simply open the relevant chat and mouse over the message you’re interested in. Click the small arrow that appears in the top-right corner, then choose Message info.

WhatsApp Message Info Web

You’ll then see a similar screen showing you the Delivered and Read times for your message. Unlike the mobile app, you can only see Read times in group chats, not the Delivered times. And remember, if the message says “read” but has no timestamp, the other person probably has read receipts turned off.

WhatsApp Read Times Give You More Information

While you probably don’t care about this info all the time, knowing exactly when someone read your WhatsApp message can be useful. You might want to make sure they arrived at a destination safely, for example.

And if there’s no time displayed, make sure your own read receipts are enabled to make this work in the future.

For more help with WhatsApp, take a look at our list of essential WhatsApp tips and tricks you should know.

Read the full article: How to See the Exact Time Your WhatsApp Message Was Read


Read Full Article

The Basic Parts of a Computer and How to Upgrade Them


pc-parts

You know how to use a computer, but how familiar are you with what’s inside?

As complicated as the inner workings of computers may seem, they’re only made up of a few key pieces. But what are they? What are the different parts of a PC?

We’re going to show you how to identify your computer’s parts by name.

What Are the Basic Parts of a Computer?

A PC consists of several discrete components that are designed to work together. With a desktop computer, these components can be relatively easily replaced—less so on a laptop. This is due to the dimensions of portable computers, their power and cooling requirements, and a lack of standardization.

Fortunately, this isn’t a problem with desktop PCs. Designed to last longer, desktop computers can be customized and upgraded by replacing any or all components.

But what are these components called? Most computers ship with seven different parts:

  • Motherboard (also known as the “mainboard”)
  • Memory (RAM)
  • Processor (CPU)
  • Power Supply Unit (PSU)
  • Storage device (e.g. the hard drive)
  • Removable storage (optical drive, or even USB)
  • Cooling fans

You’ll also find PCs with two additional, optional components:

  • Graphic card (also known as a GPU or video card)
  • Sound card (usually integrated, discrete cards are available for specialist use)

These parts are not necessary in most cases as the motherboard can replicate their purpose. However, discrete, dedicated cards offer improved processing and performance.

Understanding the Parts of a PC

Below we’re going to look at each of these parts in more detail and where they’re situated. You’ll also get an idea about how to upgrade them. This will give you the information you need to replace the parts yourself.

Note that we’re only looking at the basics of computer parts. This is not as a comprehensive description of your PC’s interior. When buying new parts, you need to be aware of component compatibility. Our guide to buying PC parts with PC Part Picker will explain this further.

IMPORTANT: Before opening your PC and handling any PC parts, power the computer down and unplug it from the mains. You should also learn about anti-static precautions to safeguard your equipment.

Motherboard

Mini ITX motherboard

Your motherboard (also known as the mainboard) is where all the components plug into.

It has slots for the CPU, RAM, storage devices, and video and sound cards. If you are a beginner, we wouldn’t advise you to upgrade your motherboard yourself. It requires full compatibility with not just the other components, but also the PC case.

However, the other components covered here require you to unplug things from the motherboard.

Random Access Memory (RAM)

RAM installed on a PC motherboard

RAM is temporary (or short-term) memory and concerned with overall system performance and speed. RAM modules are of long sticks that plug directly into your motherboard. The computer’s guidebook or motherboard manual will tell you how much the maximum amount of RAM supported by your system.

Upgrading RAM depends on how many slots you have and the maximum size each slot supports. Some computers require that you have the same amount of RAM in each slot. Check the PC’s manual to confirm this.

Swapping RAM is straightforward: unclip the catches at either (sometimes one) end of the slots, and pull the RAM out. Thanks to a notch, replacement modules will only fit one way. Line the new module up with the notch, and press firmly into the slot until the catches lock it in place. Check they’re secure and you’re done.

Central Processing Unit (CPU)

This PC part is the CPU

If a computer was a human, the CPU would be the brain. It is the single most important part of a computer. The CPU processes data, calculations, and controls most of the other components.

CPUs sit on the motherboard in a dedicated socket. It is important to know that these sockets are often specific to particular generations of CPU. They’re also specific to CPU manufacturers (AMD or Intel).

Once secured on the motherboard, a CPU is cooled with a cooling unit, usually a heatsink and fan. However, other PC cooling solutions are available.

Like the motherboard, it is unwise to upgrade your CPU yourself if you are a beginner. In most cases, upgrading your CPU will require a new motherboard, along with a heat sink and perhaps other components.

Find out more in our guide to how a CPU works.

Power Supply Unit (PSU)

A PC power supply unit (PSU)

Providing power to the PC is the PSU, usually found at the back of the PC case. A look at the back of your computer will show you where the power cable is attached. There is usually an on-off switch on this, in addition to the power switch on the front of the computer.

PSUs power the motherboard and CPU via dedicated cables. SATA power cables power everything else in the computer. PSUs are rated by the amount of power they supply (e.g. 600 watts).

It is important that your computer is powered properly. If it isn’t, components will not work correctly, and the system will soon fail.

To upgrade your PSU, first research the specifications of the video card and CPU. You also want to make sure you get the proper connectors for your system. The PSU can be replaced by first disconnecting all internal cables. Follow this by removing the screws that secure it to the PC case.

Fixed Storage Device (Hard Drive or SSD)

Connect your old HDD to your PC

Data is retained on your PC in a storage device. For decades a hard disk drive (HDD) has served this purpose, but PCs increasingly rely on other devices. These are usually Solid State Storage (SSD) devices, compact 2.5-inch devices that look just like HDDs.

HDDs and SSDs are found at the front of the PC’s case and connected to the motherboard via SATA cables. Drives required two cables: one for power, one for data. Older disk drives rely on wider ribbon cables, known as PATA, with an IDE connector for data. They’re powered by Molex plugs.

If a HDD or SSD dies or you plan to upgrade to a larger capacity storage device, they can be easily swapped out. Just make the necessary backup precautions, before you unplug the device and remove the securing screws/clips. The SSD or HDD can then be replaced.

Removable Storage: DVD-ROM or Blu-ray

DVD drive
Image Credit: William Hook/Wikimedia

Increasingly uncommon on laptop computers, desktops still seem to ship with an optical drive. This is known as removable storage, typically a DVD-ROM or Blu-ray drive, with read and write capabilities.

Upgrading an optical drive is simple. Unplug the cables, unscrew, or unlock the drive from its housing, the push it out the front of the case.

A USB stick or SD card, both based on flash RAM, are also removable storage. PCs frequently ship with a card reader and USB ports on the front. Replacing a card reader is simple—again by unplugging and pushing through from the back to pull it out.

Cooling Fans

CPU cooling fan

An oft-overlooked PC part is the cooling fan. At least two are required: one for the CPU, and another for the case.

The purpose of the CPU fan is to keep the CPU cool. Because it gets hot inside a computer, motherboard fans draw cool air in; additional fans draw the heated air out.

In most cases there should be a fan on the back of the case, another on the side or the front. Many cases come with fans built in, but these are usually low grade. Superior fans can be installed, designed to replace or complement the existing cooling solution.

Cooling fans are usually powered by a cable from the PSU and are secured to the case with screws. Many fans ship with built-in LEDs to pimp your PC case.

Graphics Card (GPU)

A PC graphics card (aka video card or GPU)

Also known as a video card, the graphics card or GPU (Graphic Processing Unit) links your computer to a display. While older PCs employed a VGA port, current computers use HDMI to connect to HD displays.

In most cases the video out port is connected to an integrated graphics card on the motherboard. However, this isn’t always the case.

Modern games require better graphics cards. As such, gamers, video editors, graphic designers, and other specialists employ dedicated graphics cards. GPUs slot into a dedicated PCI-Express (PCIe) slot on the PC’s motherboard. This overrides the motherboard’s GPU.

Graphics cards are prone to compatibility issues such as size specifications, slot placement, motherboard type, processor speed, and power intake. However, upgrading is as simple as removing the securing screw and clip, unplugging the GPU and slotting the replacement in its place.

Sound Card

A PC sound card

On the back of your PC you will typically find three to five small circular ports. These are usually colored. In some cases, you might also find them on the front of your PC.

These are the audio ports, connected to your computer’s sound card. Like the video card, a sound card is usually integrated into the motherboard. However, for specialist use such as gaming and audio development or recording purposes, a dedicated sound card might be used.

Sound cards offer various audio improvements, such as advanced audio processing and Dolby 7.1 surround sound. Like the GPU, the sound card slots into a PCIe slot on the motherboard (a different slot to the GPU, however).

A new sound card has minimal compatibility issues.

Now You Know the Different Parts of a Computer

By now you should know the names of the various PC parts in your computer. You should also be able to recognize them too, as well as have an idea as to how they can be replaced.

Congratulations! You’re on the road to understanding how to service your own computer and save money. It might even lead to you building your own one day.

But this article is not about how to build a computer. If you’re ready to do that, consult our guide on how to build a PC.

Read the full article: The Basic Parts of a Computer and How to Upgrade Them


Read Full Article

The 5 Best Bullet Journal Apps for Effortless Bullet Journaling


bullet-journal-apps

You can use any note-taking app to create a digital Bullet Journal. But you have a lot less work to do if you start with an app that has the right ingredients for keeping a Bullet Journal.

Not sure where to find such bullet journal apps? Start with the ones listed below. We have chosen them because they bring a few key benefits. These apps:

  • Make rapid logging painless
  • Have ready-made icons for legends (task, event, note) or at least include tagging, labeling, and color-coding options
  • Give you a quick way to search through your journal entries

Now, on to those bullet journal app recommendations.

1. Trello

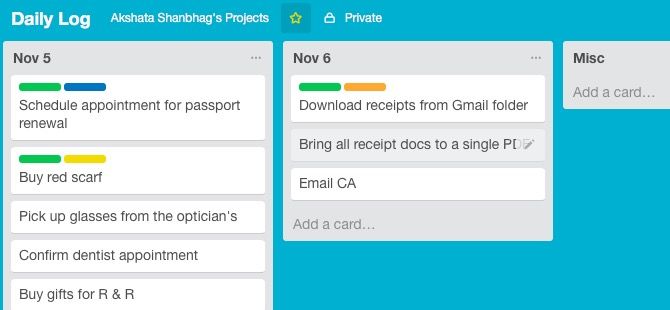
trello-bj-daily-log

Trello’s cross-platform availability and its automation capabilities are a big plus if you want to set up an electronic bullet journal. You can automate Trello to create boards (for modules) and cards (for dates) on a schedule.

You don’t need the Index module and page numbers, because the powerful search functions in Trello make it easy to quickly find what you need.

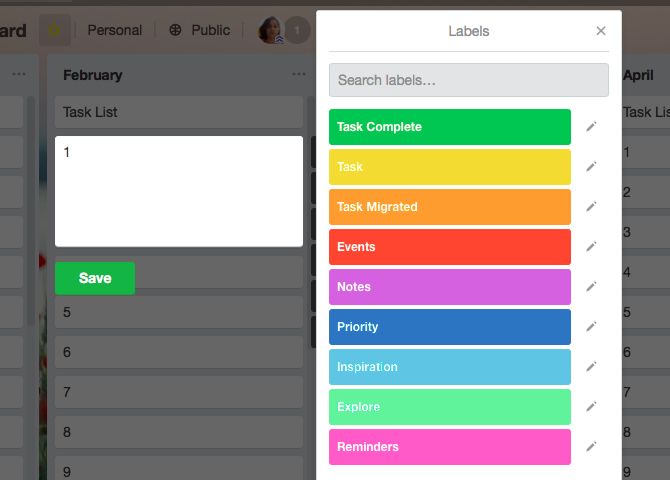
Want a bird’s eye view of your tasks for the month? You can get one if you assign due dates to cards and then switch to the monthly view of the Calendar PowerUp, one of the best Trello Power-Ups to add to your workflow. Color-coded labels can work as bullets and signifiers to add context to your journal entries.

trello-bujo-bullets-and-signifiers

Does this switch from paper to Trello sound complex? It’s not, actually, as you’ll see in our step-by-step guide to create a Bullet Journal in Trello. The guide shows you how to bring every aspect of your paper journal to Trello. It also gives you a sample Monthly Log board that you can clone and add to your Trello account.

Trello is not the only popular note-taking app that can take your journal from analog to digital. You can also use Evernote for bullet journaling. If you’re a Mac user, you could use Reminders, Calendar, or Notes as a Bullet Journal. These macOS journal apps can work, too.

Download: Trello (Free, Premium plans available)

2. NotePlan

NotePlan comes with a calendar, Markdown notes, and to-do lists. The Calendar view lets you see the big picture like the Monthly Log in your paper journal does.

When you want to zoom in on your entries for a particular day, switch to the Notes view. Here, you can use a mix of tasks, lists, reminders, events, and general notes to plan your days and reflect on them.

Thanks to color-coded to-dos, @tags and #tags, linked notes, and linked dates, it’s easy to jump to the right entries in your journal anytime. You’ve got Dropbox and iCloud sync, too, so you can keep your bullet journal ready to go on all your Apple devices.

On the whole, NotePlan doubles up as the perfect bullet journal and many of the app’s users use it as such.

Download: NotePlan for macOS ($30, trial version available)| iOS ($15)

3. Taskade

Taskade Bullet Journal template

It’s handy that you can use Taskade as a guest before signing up for it. The app lets you add checklists, outlines, and notes to your bullet journal. You also get various bullet formats to choose from, which makes it easy to match them up with the bullets and signifiers in your journal.

The app has basic formatting options and emoji as well. For scheduling your plans, Taskade gives you Due Date and Add To Calendar options. The latter feature lets you connect with Google Calendar and Yahoo Calendar.

Attachments, templates, comments, tags, search—Taskade has got it all. It’s a versatile app that lends itself to all kinds of note-taking. We recommend starting off with Taskade’s Bullet Journal template to save time setting up your journal.

Download: Taskade (Free, $7/month premium plan available)

4. The Bullet Journal Companion

You need to use the Bullet Journal companion app along with, and not instead of, your analog bullet journal. That makes this simple mobile app from the makers of Bullet Journal the odd one out on this list. But it’s the perfect solution if you’re not ready to let go of your paper journal completely in favor of a digital one.

The companion app prompts you to reflect on your plans and notes with reminders twice a day. (You can tweak the times of these reminders to suit yourself.) It also has a Library section that lets you search your old bullet journals.

If you’re away from your notebook, you can use the app for logging and then migrate the entries to your notebook during your reflection time. You have a 72-hour window to move your entries from the app.

The Bullet Journal Companion includes a set of guides that cover every aspect of bullet journaling. It’s sure to appeal to Bullet Journal beginners and veterans alike. If you like the community aspect of Bullet Journal, you’ll appreciate the compilation of posts from the official blog in the app.

Download: The Bullet Journal Companion for iOS ($5), Android ($5)

5. Dynalist

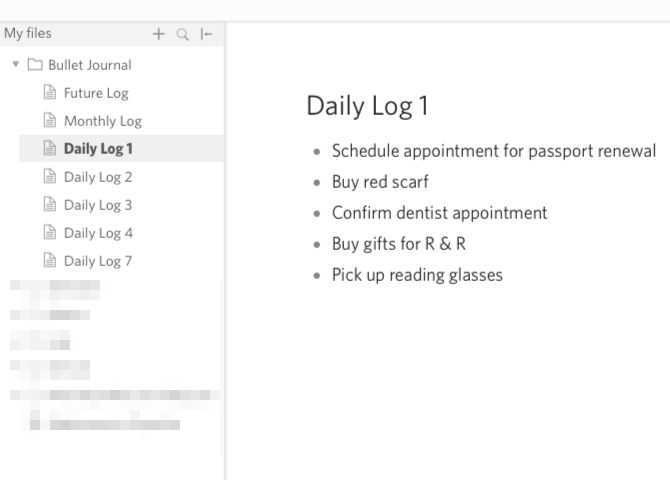
dynalist

Dynalist is one of the best and most popular bullet-based to-do list apps. It comes with Markdown support, tags, due dates, and internal links, among other features.

The app’s tree structure is great for handling your Daily Logs. For bullets and signifiers, you can use either regular keyboard characters or suitable emoticons. Since Dynalist lets you bookmark items, you get to keep your most important modules easily accessible at all times.

Dynalist’s demo version gives you a detailed overview of how the app works. It’s the perfect testing ground to figure out if the app can work as your bullet journal.

Download: Dynalist (Free, $10/month premium version available)

More Apps for an Online Bullet Journal

We have lined up a few extra options for you to work with, just in case the apps we have listed above don’t appeal to you:

  • Day One: If you don’t mind paying for a subscription or doing without the premium features
  • TheBrain: To combine the power of the Bullet Journal with the flexibility of mindmaps
  • OneNote: If you love all apps Microsoft
  • GoodNotes: For bullet journaling with a stylus

A Bullet Journal Is What You Make of It

If you need a reliable system for fast note-taking, a Bullet Journal is up to the job. It gives you a good framework to begin with, but is not so inflexible that you can’t customize it.

For those of you who want to keep your bullet journal online, we have shown you apps that can make the switch easy for you. You might also want to consider these mobile note-taking apps to create bullet journal spreads.

If it’s inspiration you’re looking for, try these places to gather ideas for your Bullet Journal. And if you need a refresher in this note-taking method from time to time, keep our Bullet Journal cheat sheet handy!

Read the full article: The 5 Best Bullet Journal Apps for Effortless Bullet Journaling


Read Full Article